
How do I create a scale drawing in Word?
Using the Drawing Grid
- Make sure the Drawing toolbar is displayed.
- Click on the Draw tool on the toolbar. …
- Select the Grid option from the Draw menu. …
- Use the controls in the dialog box to set the specifics of the grid.
Is there a drawing ruler in Word?
Sorry that ruler does not exist in Word. The only option seems to be to press Shift when drawing a line . .. Power to the Developer! In Word, you can add a paragraph border, if that helps.
How do you draw measurements in Word?
Click on Tools ->Options->General tab->Measurement Units drop-down menu toward the bottom of the «Options» dialog box. You can choose from «Inches,» «Centimeters,» «Millimeters,» «Points» or «Picas from the Measurement Units» drop-down menu. Click on the office buttonfile->word options->advanced->display section.
How do you draw an object to scale?
1:3712:03How To Make A Scale Drawing — A Tutorial — YouTubeYouTubeStart of suggested clipEnd of suggested clipWhat is scale. If you want to draw a picture half size of the original object that would mean that 6MoreWhat is scale. If you want to draw a picture half size of the original object that would mean that 6 inches on the drawing. Would equal 1 foot on the real object.
Can you draw to scale in paint?
If you want to draw something to scale, some form of structured drawing package would be your best bet. Everything from SketchUp to AutoCAD would qualify. I use Visio for all my layouts, but that’s 2D, no isometric or 3D. However it does do measurements, comes with a bazillion shapes, and scales nicely.
How do I draw different shapes in Word?
On the Format tab, in the Insert Shapes group, click a shape, and then click somewhere in the document. Change a shape. Click the shape you want to change. On the Format tab, in the Insert Shapes group, click Edit Shape, point to Change Shape, and then choose a different shape.
Where is clear formatting in Word?
Select the text that you want to return to its default formatting. On the Home tab, in the Font group, click Clear All Formatting. On the Home tab, in the Font group, click Clear All Formatting. On the Message tab, in the Basic Text group, click Clear All Formatting.
What is full size scale?
1 : identical to an original in proportion and size full-scale drawing. 2a : involving full use of available resources a full-scale biography full-scale war.
Is it possible to scale a Word document?
You realize that your Word document detailing new company policies will fit in a smaller-sized sheet and doesn’t need to take up a letter-size memo. The good news is that you don’t have to reformat your Word document — you can simply print to scale. Here’s how:
How to make a drawing in Microsoft Word?
How to Draw in Microsoft Word 1 Using Microsoft Word Drawing Tools. There are two sets of drawing tools available to Microsoft Word users. … 2 Inserting Shapes into Microsoft Word. … 3 Creating Freehand Drawings in Word. … 4 Creating a Drawing Canvas in Word. … 5 Designing Microsoft Word Documents. …
How do you make a scaled drawing in Photoshop?
Select the entities that belong in the scaled drawing. Context-click the selection and select Make Group from the submenu that appears. Context-click the new group, choose Scale, and then select a scale from the submenu that appears, as shown in the following figure.
How do you resize drawing in Microsoft Word?
A drawing canvas groups your drawing into a single object which can then be moved, resized, or copied elsewhere. To do this, press the Drawing Canvas button in the Insert section of the Draw tab.
Show the rulers
Go to View and select Ruler.
If the vertical ruler doesn’t show, make sure you’re in Print Layout view. If it still doesn’t show, you might need to turn the ruler on. Go to Word > Preferences > View (under Authoring and Proofing Tools). Then, in the View dialog box, select the Vertical ruler box.
Therefore, What is the formula for magnification?
To calculate magnification, use the following formula: magnification = the height of the image ÷ by the height of the object. Plug your data into the formula and solve. If your answer is greater than 1, that means the image is magnified. If your answer is between 0 and 1, the image is smaller than the object.
As well, What is a scale bar? A linear scale, also called a bar scale, scale bar, graphic scale, or graphical scale, is a means of visually showing the scale of a map, nautical chart, engineering drawing, or architectural drawing. A scale bar is common element of map layouts.
Furthermore, How do you scale in Word? To change the scale of a Word document without adjusting its formatting, open the “File” menu, click “Print” and open the zoom option, which by default reads “1 Page Per Sheet.” Choose “Scale to Paper Size” and pick a new size.
How do you show scale in Word?
Show the Ruler in Word: Instructions
- To show the ruler in Word and also hide it, click the “View” tab in the Ribbon.
- Then check or uncheck the “Ruler” checkbox in the “Show” button group to turn the display of the ruler on and off, if available for your currently selected document view.
How can you calculate the magnification of a microscope?
It’s very easy to figure out the magnification of your microscope. Simply multiply the magnification of the eyepiece by the magnification of the objective lens. The magnification of both microscope eyepieces and objectives is almost always engraved on the barrel (objective) or top (eyepiece).
How do you calculate angular magnification?
Answer. The angular magnification is equal to the ratio fo/fe. Thus we have M = (10 m)/(0.1 m) = 100. The larger the focal length of the primary mirror, the greater will be the angular magnification of the telescope.
What is microscope magnification?
Magnification is the ability of a microscope to produce an image of an object at a scale larger (or even smaller) than its actual size. Magnification serves a useful purpose only when it is possible to see more details of an object in the image than when observing the object with the unaided eye.
What is bar scale with example?
The bar scale is represented like this: Each piece or segment of the bar represents a given distance, as labelled underneath. To use the bar scale, you need to measure how long one segment of the bar is on your ruler.
What is a scale bar and why is it needed?
Scale bars, or bar scales, are small graphics that indicate the proportions of a map to the original geographic area and help users measure distances on maps. While scale can be indicated as a ratio or in words (i.e. 1:10, or “One inch to ten miles”), scale bars allow users to measure distances in maps directly.
Click Layout Tools tab > Scale Bar. Select a scale bar style from the list. To use a custom style, click Load Custom Scale Bar and navigate to the drawing containing the scale bar block. Select a viewport for the scale bar.
What is text scaling?
1. Font scaling is an alternate term used to describe a scalable font or vector font. 2. Font scaling is a printer feature that allows the font to be scaled by the printer instead of in the document program.
What is a Ruler bar?
What Is Ruler Bar Used For. In Microsoft Word or Ms world document, the ruler bar is used as a measuring tool for. adjusting indents, the tabsand the width of margins for a document. This tool is also found in some software programs that helps the user to align text, graphics, tables and other elements on a page.
What is status bar in Word?
The status bar gives you important information about where you are in a document and which features are currently enabled. The left side of the status bar shows the location of the insertion point, specifying the page and section numbers, the current and total page count and the line number and column number.
What is the total magnification at 4x 10x and 40x?
Grades 1-8 typically will buy a monocular compound microscope with 3 objective lenses: 4x, 10x, 40x for maximum total magnification of 400x.
What is the total magnification of 40x?
| Magnification | Total Magnification | |
|---|---|---|
|
Scanning |
4x |
40x |
| Low Power | 10x | 100x |
| High Power | 40x | 400x |
| Oil Immersion | 100x | 1000x |
1 août 2021
What is the difference between 4x 10x and 40x on a microscope?
For example, optical (light) microscopes are usually equipped with four objectives: 4x and 10x are low power objectives; 40x and 100õ are powerful ones.
What is the difference between angular magnification and magnification?
The linear magnification ML is the more commonly used term for “magnification”, the ratio of the linear dimension of the image over that of the object. The angular mag MA is the ratio of the angle formed by the the bundle of rays converging on a point in the image to the angle that left the object.
How do you find the angular magnification of a simple microscope?
-The angular magnification of a simple microscope when the image is at a near point is given by, m=1+Df where D is the least distance of distinct vision and f is the focal length of the lens. -The power of the lens is given by, P=1f where f is the focal length of the lens.
What is the angular magnification of a telescope?
Angular magnification is the negative of the focal length of the objective lens divided by focal length of the eyepiece of the telescope. So, that’s negative 100 centimeters divided by two and a half centimeters, which is negative 40. That’s the angular magnification.
- Reference 1
- Reference 2
- Reference 3
- Reference 4
- Reference 5
Table of Contents
- 1 How do I draw a line to scale in Word?
- 2 How do you draw a rectangle to scale?
- 3 What does a scale of 1 750 mean?
- 4 What is a 1/4 scale?
- 5 How many 16 of an inch are in 1 inch?
- 6 Which model is bigger 1 48 or 1 72?
- 7 How big is a perfect grade Gundam?
- 8 How many inches is 1 48 scale?
How do I draw a line to scale in Word?
Using the Drawing Grid
- Make sure the Drawing toolbar is displayed.
- Click on the Draw tool on the toolbar.
- Select the Grid option from the Draw menu.
- Use the controls in the dialog box to set the specifics of the grid.
- If you are using Word 2000 or Word 2002, make sure the Display Gridlines On Screen check box is selected.
- Click on OK.
How do you draw a rectangle to scale?
Rectangle Sketch Tool
- Go to Markup > Sketch > Rectangle Sketch to Scale.
- Click on the PDF to place the first point.
- Enter the length of the rectangle and press TAB.
- Enter the width of the rectangle and press TAB.
- Enter the rotation of the rectangle and press ENTER.
How do I draw in 1 50 scale?
You could also say, 1 unit in the drawing is equal to 100 units in real life. So, if we were drawing a table that measured 100cm wide by 200cm long at a scale of 1:50, you would draw the table 2cm wide by 4cm long on your piece of paper. This is worked out by dividing the real life size (100cm) by 50 (1:50 scale).
What does a scale of 1 750 mean?
Architectural Models 1:750 Scale (1.33mm represents 1 metre) This is an ideal scale for creating masterplan models of wider development zones or even whole cities such as the Cardiff City model shown below.
What is a 1/4 scale?
A 1/4″ scale means that each 1/4″ (inch) on the plan counts for 1′ (feet) of actual physical length. To scale a blueprint in imperial units to actual feet. multiply the measurement on the drawing (in inches decimal equivalent) with the denominator.
What size is 1/4 scale in inches?
The 1/4 inch = 1 foot scale is the most common in the U.S. and is also referred to as 1/48 size because there are 48 units of 1/4 inch in 12 inches. Shown below are two different U.S. customary scales. The 1/4 inch scale on the left indicates that for every 0.25 inches measured there is 1 foot of real distance.
How many 16 of an inch are in 1 inch?
In this case, there are 16 units of smaller quantity (1/16 inch) in one unit of the larger quantity.
Which model is bigger 1 48 or 1 72?
A good rule of thumb is the greater the detail, the more complex the build. 1/48, being larger than 1/72, usually is also able to show smaller details.
What size is 1 87 scale?
HO or H0 is a rail transport modelling scale using a 1:87 scale (3.5 mm to 1 foot). It is the most popular scale of model railway in the world.
How big is a perfect grade Gundam?
around 30 cm tall
How many inches is 1 48 scale?
At this scale, 1/4 inch represents 1 foot. It is similar in size to 1:50 scale and 1:43 scale, which are popular for diecast vehicles.
To change the scale of a Word document without adjusting its formatting, open the “File” menu, click “Print” and open the zoom option, which by default reads “1 Page Per Sheet.” Choose “Scale to Paper Size” and pick a new size.
Contents
- 1 How do you scale a document to size?
- 2 How do I scale a Word document to legal size?
- 3 Where do I find page scaling in Word?
- 4 How do I resize a text box in Word?
- 5 How do you insert a scale bar in Word?
- 6 How do you insert a sliding scale in Word?
- 7 How do you make a Likert scale?
- 8 How do you make a bar scale?
- 9 How do you use the word scale?
- 10 What is an example of a Likert scale?
- 11 What is a slider scale?
- 12 How do you use a Likert scale?
- 13 How do you calculate Likert scale data?
- 14 Is Likert scale nominal or ordinal?
- 15 Is Likert scale a statistical tool?
- 16 How do you find the magnification of a scale bar?
- 17 How is a bar scale used?
- 18 What’s a bar scale?
- 19 What is scale data examples?
- 20 What is scale example?
How do you scale a document to size?
Scaling Your Output
- Load the document you want to print.
- Press Ctrl+P. Word displays the Print dialog box.
- Use the Scale to Paper Size drop-down list (lower-right corner) to specify the paper on which your document will be printed.
- Specify any other printing options, as desired.
- Click on OK to print your document.
How do I scale a Word document to legal size?
How to scale the document to the legal paper size?
- Firstly, open and navigate to the Layout tab (Office 360, and MS Office 2019)
- On the layout tab, in the Page Setup group, click “Size” to expand its drop-down menu.
- On the drop-down menu select legal (size 8.5 x 14 in centimeters 21.59 cm x 35.56 cm).
Where do I find page scaling in Word?
This feature works the same in all modern versions of Microsoft Word: 2010, 2013, and 2016. On the Print page in Backstage view, under Settings , select the fifth drop-down that by default says Letter . Then select a scaling option.
How do I resize a text box in Word?
Resizing a Text Box
- Click once on the information within the text box.
- Use the mouse to point to one of the handles.
- Drag the handle to resize the text box.
- Release the mouse button when the text box is the size you want.
How do you insert a scale bar in Word?
Show the rulers
- Go to View and select Ruler.
- If the vertical ruler doesn’t show, make sure you’re in Print Layout view. If it still doesn’t show, you might need to turn the ruler on. Go to Word > Preferences > View (under Authoring and Proofing Tools). Then, in the View dialog box, select the Vertical ruler box.
How do you insert a sliding scale in Word?
In the View preferences, click the box for In the Ribbon Show > Developer Tab. Now click on the Developer tab, click on the Scroll Box control and drag across a worksheet to add your slider control.
How do you make a Likert scale?
How to Create a Likert Scale Survey
- Determine what the Likert Scale should measure. What is it you want to find out?
- Create your list of indicator statements.
- Decide on the response scale you want to use.
- Test and test again.
How do you make a bar scale?
Use the Block Editor to create the scale bar block.
- Type BE at the command line to open the Block Editor.
- Specify a name for the scale bar block.
- Use the pline command to draw the horizontal line for the scale bar.
- Add vertical lines for each division.
- Add any other desired decorations or divisions.
How do you use the word scale?
- [S] [T] Stand on the scales. ( CK)
- [S] [T] I weighed myself on the bathroom scales. ( CK)
- [S] [T] Step on the scale. ( J_S)
- [S] [T] Please scale the fish. (
- [S] [T] The fish has shiny scales. (
- [S] [T] Please put it on the scale. (
- [S] [T] Put the meat on the scales. (
- [S] [T] What’s the scale of this map?
What is an example of a Likert scale?
Likert scale questions usually have five, seven, or nine points, with five and seven points, used more frequently. For example, typical multiple-choice options include strongly agree, agree, no opinion, disagree, and strongly disagree as to the Likert item.
What is a slider scale?
Slider scale questions let respondents rate an answer option on a numerical scale by dragging a slider.Slider rating scales allow researchers to produce question and answer styles that incorporate a more extensive range of answers and enable animation and interactivity.
How do you use a Likert scale?
5 extra tips on how to use Likert scales
- Keep it labeled. Numbered scales that only use numbers instead of words as response options may give survey respondents trouble, since they might not know which end of the range is positive or negative.
- Keep it odd.
- Keep it continuous.
- Keep it inclusive.
- Keep it logical.
How do you calculate Likert scale data?
To determine the minimum and the maximum length of the 5-point Likert type scale, the range is calculated by (5 − 1 = 4) then divided by five as it is the greatest value of the scale (4 ÷ 5 = 0.80). Afterwards, number one which is the least value in the scale was added in order to identify the maximum of this cell.
Is Likert scale nominal or ordinal?
The Likert scale is widely used in social work research, and is commonly constructed with four to seven points. It is usually treated as an interval scale, but strictly speaking it is an ordinal scale, where arithmetic operations cannot be conducted.
Is Likert scale a statistical tool?
Are Likert scales ordinal or interval scales? Individual Likert-type questions are generally considered ordinal data, because the items have clear rank order, but don’t have an even distribution. Overall Likert scale scores are sometimes treated as interval data.
How do you find the magnification of a scale bar?
Magnification can be calculated using a scale bar.
Scale bar
- Measure the scale bar image (beside drawing) in mm.
- Convert to µm (multiply by 1000).
- Magnification = scale bar image divided by actual scale bar length (written on the scale bar).
How is a bar scale used?
To use the bar scale, you need to measure how long one segment of the bar is on your ruler.So, if 1 cm on the bar represents 10 m on ground, and the distance you measure on the map is 3 cm ( 3 cm ÷ 1 cm length of segment = 3 segments) then the real distance on the ground is 3 × 10 m = 30 m.
What’s a bar scale?
Scale bars, or bar scales, are small graphics that indicate the proportions of a map to the original geographic area and help users measure distances on maps.
What is scale data examples?
This level of data measurement allows the researcher to compare both the differences and the relative magnitude of numbers. Some examples of ratio scales include length, weight, time, etc. With respect to market research, the common ratio scale examples are price, number of customers, competitors, etc.
What is scale example?
Scale is defined as a system or series of marks used for measuring or registering. An example of scale is what someone would use to figure out the length of something. An example of scale is what someone would use to find out how much they weigh. noun. 13.
Here’s how: Open the document containing the announcement. Press [Ctrl]P. In the Zoom section, click the Scale To Paper Size drop-down arrow. Scroll to and select the desired sheet size. Enter how many copies you want and then click OK.
How do you scale a document to size?
Scaling Your Output Load the document you want to print. Press Ctrl+P. Word displays the Print dialog box. Use the Scale to Paper Size drop-down list (lower-right corner) to specify the paper on which your document will be printed. Specify any other printing options, as desired. Click on OK to print your document.
How do you scale to fit on one page in Word?
Press Ctrl+A to select all the text in your document. Click Home > Shrink Font one or more times. As you click Shrink Font, Word decreases the size of every font in your document.
Where is Print scaling on word?
This feature works the same in all modern versions of Microsoft Word: 2010, 2013, and 2016. On the Print page in Backstage view, under Settings , select the fifth drop-down that by default says Letter . Then select a scaling option.
How do you insert a scale bar in Word?
Show the rulers Go to View and select Ruler. If the vertical ruler doesn’t show, make sure you’re in Print Layout view. If it still doesn’t show, you might need to turn the ruler on. Go to Word > Preferences > View (under Authoring and Proofing Tools). Then, in the View dialog box, select the Vertical ruler box.
How do you set a printer to scale?
To access Scaling Options: In the Printer Properties window, select Printing Options. Click on the Paper, and then select Other Size > Advanced Paper Size > Scaling Options. Select an option: No Scaling: This option does not change the size of the printed image. Click OK.
How do I resize a text box in Word?
Resizing a Text Box Click once on the information within the text box. Use the mouse to point to one of the handles. Drag the handle to resize the text box. Release the mouse button when the text box is the size you want.
What is insertion point in Word?
The insertion point is the blinking vertical line in your document. It indicates where you can enter text on the page. You can use the insertion point in a variety of ways. Blank document: When a new blank document opens, the insertion point will appear in the top-left corner of the page.
Where is the Tabs dialog box in Word?
In the lower-right corner of the Paragraph group, click the dialog box launcher. The Paragraph dialog box appears. Tabs are, after all, a paragraph-level format. Click the Tabs button.
How do I change Print scaling?
In the worksheet, click File > Print. Under Settings, click Custom Scaling > Custom Scaling Options. Click Page and in the Adjust to box, choose a percentage by which you want to increase or decrease the font size. Review your changes in Print Preview and—if you want a different font size—repeat the steps.
How do I fix my printer scale?
How to Remove Scaling on a Printer Launch the program you want to print from, such as Microsoft Word or Internet Explorer. Click the “File” menu and select the “Print Preview” option. Use the “Scale” or “Zoom” box or slider to adjust the scaling to 100 percent. Click the “Print” button to start printing the document.
How do I Print to scale in Windows 10?
If you open the photo in Windows Photo Viewer (instead of the Windows 10 Photo app), you can scale within the printer properties. File>Print>Options>Printer Properties>Effects>scale as needed.
How do you change the size of a text box?
To resize a shape, text box, or WordArt, under Drawing Tools, on the Format tab, in the Size group, enter the measurements that you want into the Height and Width boxes.
How do you find the magnification of a scale bar?
Magnification can be calculated using a scale bar.Scale bar Measure the scale bar image (beside drawing) in mm. Convert to µm (multiply by 1000). Magnification = scale bar image divided by actual scale bar length (written on the scale bar).
How is a bar scale used?
To use the bar scale, you need to measure how long one segment of the bar is on your ruler. So, if 1 cm on the bar represents 10 m on ground, and the distance you measure on the map is 3 cm ( 3 cm ÷ 1 cm length of segment = 3 segments) then the real distance on the ground is 3 × 10 m = 30 m.
What is the main difference between Save and Save As option?
The main difference between Save and Save As is that Save helps to update the lastly preserved file with the latest content while Save As helps to store a new file or to store an existing file to a new location with the same name or a different name.
How do you cut selected text in Word?
Keyboard shortcuts Copy: Ctrl+C. Cut: Ctrl+X. Paste: Ctrl+V.
Which file format best preserves formatting and allows editing when a Word document is transferred?
Portable Document Format (PDF), a PostScript-based electronic file format that was developed by Adobe Systems. It preserves document formatting and enables file sharing. Files that use the PDF file format can be saved and opened by using Word 2019, Word 2016, and Word 2013.
What’s a dialog box on Microsoft Word?
A: A dialog box is a small window that a program pops open to request input from the user. For example, in Word if you click on the Save icon and the document hasn’t already been named, Word will pop open a dialog box that prompts you to name the file and tell the program where to save it.
What is Layout tab?
The Layout tab provides access to page display and layout options. These include page orientation and AutoFit, which is a feature that limits the width of columns in a report to be no wider than the largest value in each column. The Layout tab is available in Report, Chart, and Document mode.
Scale Drawing In Word

Word Error Rate Versus Size Of Vocabulary Log Scale For Each Of
![]()
Scale Factors Worksheet Scale Factor Word Problems Worksheet Find

Melia S Blog Proportional Reasoning Review Scale Drawing Word

Melia S Blog Proportional Reasoning Review Scale Drawing Word

Scale Drawing Word Problem Easy Peasy All In One Homeschool
Proportions And Scale Drawings Textbook Pages Ppt Download

Scale Justice Word Cloud Concept On Stock Image Colourbox

Ixl Scale Drawings Word Problems 7th Grade Math

Scale Drawing Word Problems Do We Get A Grade For This

Being Inventive Base View Scale In Title Block

Ticket Template Lovely Event Word Door Prize Drawing Airplane

Engineering Drawing Template Word Orthographic Projection Chemical

Fillable Online Scale Drawings Of Geometric Figures Matching
Interpreting A Scale Drawing Video Khan Academy

What Does Scale Mean Math Filmntheatre Club

Solving A Scale Drawing Word Problem Video Khan Academy

Similar Triangles Word Problems Worksheet Math Trigonometry Word
How To Make A Timeline In Microsoft Word Free Template

Drawings Eng 205 Ce Me Mece Mse Ppt Video Online Download

Proportions And Scale Drawings Ck 12 Foundation
Scale Drawings Practice Geometry Khan Academy

Melia S Blog Proportional Reasoning Review Scale Drawing Word

Grade Ratio Activities Lovely Scale Drawings Worksheet Math

Copy Paste A Drawing From Autocad To Word Preserving The Scale

Melia S Blog Proportional Reasoning Review Scale Drawing Word

Drafting Paper Template E Large Graph Grid Word Drawing Paper
Scale Word Problems Youtube
Proportions Math Puzzle Similar Figures Scale Drawings Maps
How To Accurately Draw A Project Scale Three View Drawings Ppt

Scale Drawing Scavenger Hunt 7th Grade Math Activities Geometry

Scale Drawing Worksheets
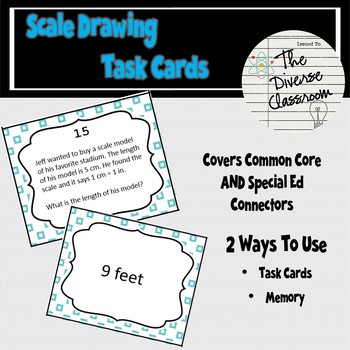
Scale Drawing Task Cards By The Diverse Classroom Tpt

Course 2 Word Problem Book

Scale Drawings Worksheet 7th Grade Math Worksheets Percentages Myscr
Cn Scale Drawing Lesson Notebook
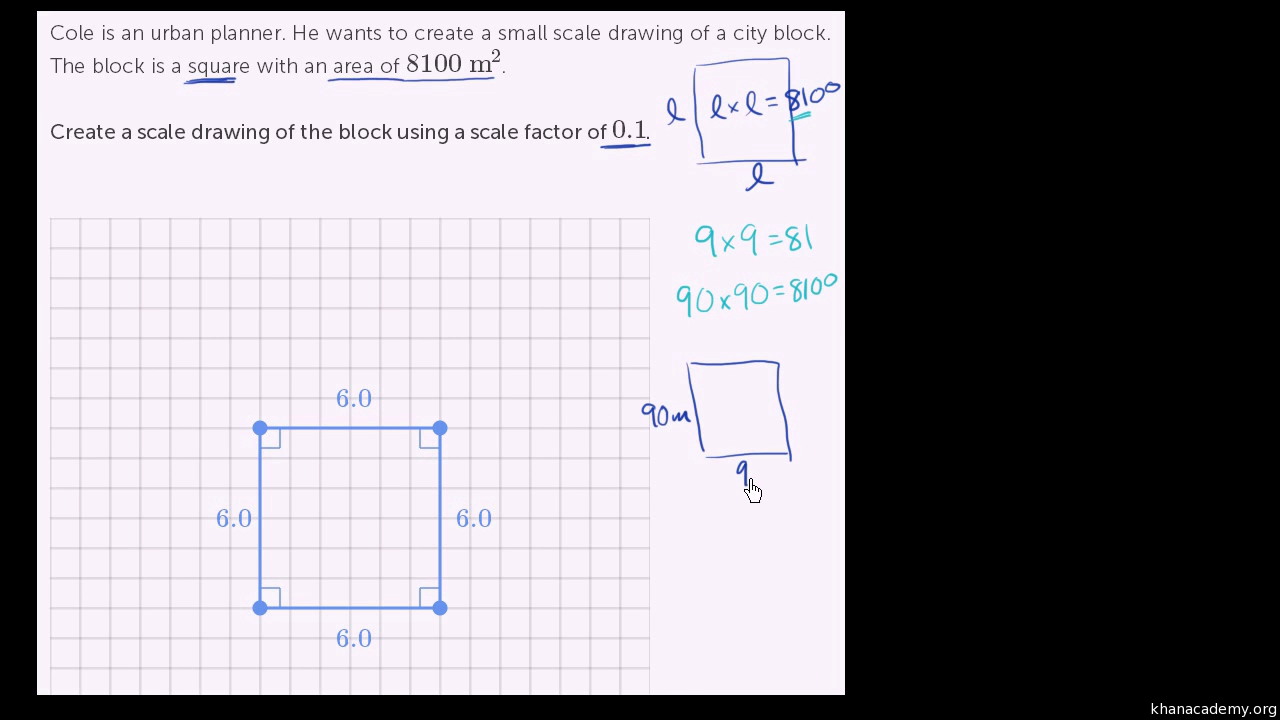
Making A Scale Drawing Video Geometry Khan Academy

Scale Drawing Scavenger Hunt Ccs 7 G A 1 Teacher Twins On Tpt
HOW TO SCALE A DRAWING: 12 STEPS (WITH PICTURES) — WIKIHOW
Web Feb 16, 2022 Choose a ratio for your scaled drawing. Common ratios include 1:10, 1:100, 2:1, and 4:1. When the first number is smaller than …
From wikihow.com
Views 258.8K
HOW TO DRAW TO SCALE | MAKING A SCALED DRAWING EXPLAINED
Web Aug 26, 2020 Drawing to scale lets you create an accurate plan in proportion to the real thing for house plans, floor plans, room layouts, landscape designs, and lots of engineering drawings. Learn more:…
From youtube.com
Author SmartDraw
Views 36.5K
CREATING A SCALED DRAWING | SKETCHUP HELP
Web To begin with a scaled drawing group, follow these steps: Select Window > Scaled Drawing. In the Scaled Drawing panel that appears, click Make Scaled Drawing. Choose a scale. (Optional) From the Length drop …
From help.sketchup.com
SHOW THE RULER — MICROSOFT SUPPORT
Web Go to View and select Ruler. To show the vertical ruler Go to File > Options > Advanced. Select the Show vertical ruler in Print Layout view under Display. Need more help? Want more options? Discover Community …
From support.microsoft.com
HOW TO CREATE A SCALE OF 1 TO 10 IN MICROSOFT WORD
USING THE DRAWING GRID (MICROSOFT WORD) — TIPS
Web Jan 28, 2023 Click on the Draw tool on the toolbar. Word displays the Draw menu. Select the Grid option from the Draw menu. If you are using Word 97, the Snap to Grid dialog box is displayed. If you are using …
From word.tips.net
HOW TO DRAW CIRCLES IN WORD: 12 STEPS (WITH PICTURES) — WIKIHOW
Web Jul 15, 2020 5. Click and drag while pressing ⇧ Shift on your keyboard to draw the circle on your document. After you select a circle theme and click and drag your mouse over …
From wikihow.com
Views 14K
HOW TO DRAW A FLOOR PLAN TO SCALE: MEASURING & SKETCHING
Web Mar 7, 2023 Convert your measurements to a smaller scale using a scale ruler or graph paper. For example, your scale could be ¼” = 1’ (¼ in. = 1 ft.) Draw the room’s walls and …
From wikihow.com
ANYWAY TO DRAWING A DIAGRAM ON GRAPH PAPER AND TO SCALE?
Web Jan 31, 2017 If you’re just wanting to display the drawing grid, then you can certainly do that. The Gridlines check box is on the View tab. The grid interval can be changed at …
From answers.microsoft.com
CHANGE THE SIZE OF A PICTURE, SHAPE, TEXT BOX, OR WORDART …
From support.microsoft.com
WHERE PEOPLE ARE DRAWN TO SCALE? — CROSSWORD PUZZLE CLUE
Web Clue: Where people are drawn to scale? Where people are drawn to scale? is a crossword puzzle clue that we have spotted 1 time. There are related clues (shown below). …
From crosswordtracker.com
VIDEO: DRAW SHAPES — MICROSOFT SUPPORT
Web Select Insert > Shapes. Select the shape you want to add. Click and drag to draw it. Tips: To create a perfect square or circle, press and hold the Shift key while you drag. To …
From support.microsoft.com
SOMETHING DRAWN TO SCALE CROSSWORD CLUE ANSWERS, CROSSWORD …
Web Nov 6, 2021 Last updated: November 6 2021. This crossword clue Something drawn to scale was discovered last seen in the November 6 2021 at the NewsDay Crossword. …
From crosswordeg.com
HOW TO DRAW IN MICROSOFT WORD IN 6 STEPS (WITH TIPS)
Web Feb 3, 2023 To use the drawing feature, open the draw tab in the Word document. The draw tab is at the top of the page, between the insert and layout tabs. When you open it, …
From indeed.com
CHANGE THE SIZE OF A PICTURE, SHAPE, TEXT BOX, OR WORDART …
Web Select the dialog box launcher in the Size group. Clear the Lock aspect ratio check box. Resize to an exact proportion Select the picture, shape, WordArt, or other object to …
From support.microsoft.com
VIDEO: CHANGE THE DRAWING SCALE — MICROSOFT SUPPORT
Web Go to the page that you want to change the drawing scale on, and select Design. In the Page Setup group, select the More arrow. Tip: Each page in a drawing can have a …
From support.microsoft.com
HOW TO AUTOMATICALLY RESIZE A TABLE IN MICROSOFT WORD
Web Dec 29, 2021 Select the table in your document. You can do this by placing your cursor over the table and clicking the table handle (four-sided arrow) on the top …
From howtogeek.com
ADD A DRAWING TO A DOCUMENT — MICROSOFT SUPPORT
Web Click in your document where you want to create the drawing. On the Insert tab, in the Illustrations group, click Shapes. You can do any of the following on the Format tab, …
From support.microsoft.com
HOW TO DRAW A CUSTOM TABLE IN MICROSOFT WORD — HOW-TO GEEK
Web Jan 6, 2022 To draw your table, go to the Insert tab and click the Table drop-down arrow. Select “Draw Table.”. You’ll see your cursor change to a pencil icon. Drag to draw the …
From howtogeek.com
33 WORDS AND PHRASES FOR SCALE DRAWING — POWER THESAURUS
Web Another way to say Scale Drawing? Synonyms for Scale Drawing (other words and phrases for Scale Drawing). Log in. Synonyms for Scale drawing. 33 other terms for …
From powerthesaurus.org
CREATE A FLOOR PLAN — MICROSOFT SUPPORT
Web Insert a CAD floor plan. On the Insert tab, in the Illustrations group, click CAD Drawing. In the Insert AutoCAD Drawing dialog box, select the CAD file you want and click Open. To …
From support.microsoft.com
SCALE DRAWING GIFS — GET THE BEST GIF ON GIPHY
Web Explore and share the best Scale Drawing GIFs and most popular animated GIFs here on GIPHY. Find Funny GIFs, Cute GIFs, Reaction GIFs and more.
From giphy.com
CREATING SCALE DRAWINGS IN MS WORD 2010 — MICROSOFT …
Web May 29, 2014 In Word 2003 I found a very convenient way of achieving this, by embedding a MS Word Drawing Object. This allowed me to edit the drawing in a separate instance of Word at a 1:1 scale, while the view of the drawing in the main document could be …
From answers.microsoft.com

Word allows you to do much more than simply insert or place graphics. For our fourth lesson in this series, we will focus on the graphic design functions in Word such as pictures, SmartArt, screenshots, and other items that can be found on the “Insert” tab.
These functions really breathe life into your drab black and white text documents. With a simple picture or chart, you can turn your term paper from meh to yeah! Luckily, there’s a whole range of ways you can add images to better illustrate (no pun intended) your point.
We’ll wrap the lesson by changing gears a bit and discussing how to use more than one language in Word 2013.
Images and Multimedia
You don’t have to think of Word as simply a word processing program. It has requisite tools for doing some pretty nifty page layout. While it’s not a feature-complete or robust as a professional page layout program such as Adobe InDesign. You can still get very professional looking results if you know what’s in your toolbox and how to use it.

Pictures and Online Pictures
Both “Pictures” and “Online Pictures” accomplish the same goal. The only difference is that “Pictures” means you can insert pictures locally, while “Online Pictures” allows you to insert images from an internet-based source such as clip art from Office.com, Bing, or OneDrive (formerly SkyDrive).
You can also insert pictures from your Facebook profile or Flickr although you could always just save the pictures you want to insert to your computer and then insert them from there if you don’t want to connect Office to these profiles.
Picture Tools
As always, when you want to edit a picture or any element place in a Word document, you can click on it and the appropriate tab will appear on the Ribbon.
With pictures, that tab is “Picture Tools.” Here we see you can make all kinds of corrections to the picture on-the-fly. For example, you can correct brightness and contrast, the color, add a border.
Where you position and how you wrap text will also play a large role in formatting your documents.
Here we see those controls. In our documents, we don’t worry so much about word wrapping or positioning because Word isn’t the final step toward publishing online. However, if you’re going to produce something WYSIWYG (What You See is What You Get), such as for a PDF or print publication, then these things will definitely matter.
Also, there are a couple ways you make changes to your pictures inline, such as resizing, rotating, and moving them. In the following image, you see these controls, many of which you will likely be familiar with.
When you click on an image in your document, you get a box on each corner, which will let you resize a picture. At the top, in the middle, is a circular arrow, grab this to freely rotate your picture. To move the image, hover the mouse over the image until the pointer is the four arrows, you can then click and drag the image anywhere you like.
Finally, if you click on the little “Layout Options” button, you can change your text wrapping without going to the Ribbon.
Clicking on “See more…” at the bottom of the “Layout Options” opens the full-blown “Layout” dialog.
Note, the size tab both on the Ribbon the “Layout” dialog allows you to specifically resize, rotate, and scale your pictures, rather than relying wholly on winging it:
We’d like to spend the whole day talking about formatting images in Word, but as you can see, there’s a ton of options at your disposal. Let’s move on now to other objects you can insert into your documents, starting with “Shapes.”
Shapes
Microsoft Word 2013 comes with an array of built-in shapes, which you can use to create callouts, boxes, stars, and other shapes.
When you choose a shape, you simply draw it on a blank space on the page. It doesn’t matter if you get it perfect or just the way you want it because you can adjust it to your heart’s content once it is placed in your document.
Note in the screenshot, the previously mentioned little “handles” you can use to resize and rotate your shapes.
At the bottom of the “Shapes” menu, there’s an option to create a “new drawing canvas.” This will open, what is essentially a text box for shapes. With this drawing canvas, you can create drawings using these shapes allowing you to create things like diagrams and flowcharts.
SmartArt and WordArt
SmartArt and WordArt tend to have some overlap, particularly if you create something using WordArt and then customize any of the text within it. Of course, you can use one or the other and never the twain shall meet, but we’re going to talk about them in the same section because one often leads to the other.
Think of SmartArt as premade drawing canvases that you can insert into your document and then customize as you like. Simply pick an arrangement, such as a list, process, or cycle.
As you can see, we created a graphic based on a “Continuous Block Process.” When we click on the text boxes, we can edit what is inside. There are also the usual grab handles needed to resize the image, and the “Layout Options” allowing you to wrap text to your preference.
If you use SmartArt, note that the Ribbon changes to reflect this. The “SmartArt Tools” features two tabs: “Design” and “Format.” Let’s cover each one and its features.
The right half of the “Format” tab allows you to pick from a number of “SmartArt Styles” and you can also “Change Colors.”
If you look at our previous example, you can see we applied an embossed, shiny effect and changed the colors of our text boxes and arrow.
On the left half of the “Design” tab, you can “Create Graphic” so you can add shapes, bullets, text, and move things around.
The “Layouts” section lets you change how your graphic looks on the fly. Simply hover over any of the built-in options to see how it would look utilizing a different layout. Changes to the layout are not applied unless you first click on a style.
The right side of the “Format” tab is used for affecting changes to text. These include “WordArt Styles” and other effects suchs as fill and outline. Beyond that, you can arrange multiple layers by sending them forward and backward.
The “Layout” dialog pops out if you select the little arrow in the bottom-right corner of the “size” section or you can choose more options from any of the drop-down menus including “Position”, “Align”, and “Rotate.”
On the left side of the “Format” tab you can select any of your shapes and change them to another, and also make them larger or smaller.
If you click on “Shape Styles” you will be able to choose from a selection of pre-defined shapes and colors.
Shift right just slightly and you will find controls to alter the fill. Choose from various “Theme Colors” or select your own. You an also use pictures, gradients, and textures for even more fill options.
If you want to refine the outline around your shape(s), you can choose any color, weight, or dashes.
Finally, “Shape Effects” has quite a few options for enhancing your shapes, many of which will give them a cool 3D effect that you can adjust by clicking 3D Options at the bottom of the of the menu.
Format Text Effects
Let’s take a closer look at this because it contains a pretty sizable amount of features. We’ll cover the basics so that you’re more aware of them. The pane titled, “Format Text Effects,” slides out from the right edge.
As with any other panes in Word 2013, it can be detached, which you can then stick out of the way to save screen area, or keep it nearby so it is handy. Regardless, this dialog box will allow you to quickly work with text, so you don’t have to repeatedly keep going to the ribbon to change things. Note also that the dialog is split into functions, “Text Fill and Outline” and “Text Effects.” “Text Fill and Outline” is simple enough to figure out, and is used to enhance how text appears.
Say, for instance, we want to write How-To Geek School and enhance it so that it is size 48 pt., blue with a black 1 pt. outline. We simply select the text we want, increase to the size to 48, then in the “Format Text Effects” dialog, we can change the color (we can also do this in the “Font” section of the “Home” tab. Then under “Text Outline” we choose “Solid line” and choose block and 1 pt. for the outline width.
That looks pretty good, but we really want it to pop, let’s add some more text effects, such as a shadow, a reflection, and we’ll add a bit of a 3d bezel to round the lettering out.
The result is a bit more striking and while it’s not likely to make it into any final designs, it does give you an idea of what you can do with WordArt.
Chart
Who doesn’t like charts? Charts are a great way to visually display data sets and Word 2013 comes jam packed with a large assortment of Charts to choose from, including columns, pie, bar charts and much, much more. Check out the screenshot for an idea of just how many options there are:
When you choose a style, you’ll get a spreadsheet, which will allow you to enter the data points on your x and y axes. As you enter data, the chart will change.
Manipulating and formatting charts is easy. Whenever you click on a chart in your document, you’ll get the “Chart Tools,” which, as you might have guessed, is the Ribbon tab devoted solely to charts.
Using the “Design” tab, if you don’t like the colors or style of your chart, you can instantly apply changes to it without having to generate a new one.
If you decide you don’t think the layout works for this particular type of data, change it using “Quick Layout” or add another element such as another axis, chart title, gridlines, and more.
On the right side of the “Design” tab you will find essential tools for altering your data and you can also go back and completely change the type of chart you’re using.
So, if you think a pie chart would work better, you can change to that. Note however, some data points, such as “breakfast,” “lunch,” and “dinner” aren’t represented on this chart.
The “Chart Tools” also give you a “Format” tab so you can dress things up a bit by adding shapes and then being able to change the style, fill, and outline.
Turning to the right side of the “Format” tab, you are given options for adding and changing WordArt, arranging elements, and adjusting the size of your chart (which you can also do with the grab handles).
It’s easy also to affect changes inline too. When you click on a chart in your document, formatting controls appear along the upper-right corner. From top-to-bottom, you get “Layout options” so you can set your text wrapping. You can change chart elements with the plus (+) symbol, so if you want to change chart titles, add gridlines, and stuff like that.
The paintbrush icon is for setting a style and color them, and finally, the sieve icon is for “Chart Filters,” so you can edit data points and names on your chart.
Screenshot
The “Screenshot” feature will allow you to take a screen clip, which is automatically pasted in you document.
When you use the screenshot function, it will let you choose between any currently open windows, or you can select “Screen Clipping,” which will minimize Word allowing you to take a selection or full shot of your desktop. So for example, if you want to simply insert a shot of your desktop and its icons, you would first need to minimize everything you have open.
There’s a myriad of ways you can take and add screenshots, so we’re not going to dwell on it. Just note this feature, if you’re unfamiliar with adding screenshots, and you want an easy way to do it in Word.
Online Video
You can insert “Online Video” such as Bing, YouTube, or video embed code into your document.
When you embed a video, it will appear as if it is a regular picture, complete with grab handles and text wrap controls.
Further, you can adjust how the emedded video thumbnail appears (as a picture) using the “Picture Tools” so you can make adjustments to the color, add a border, correct the contrast and brightness, and more.
So you see, we simply applied a “picture style” and add a purple border. This is only a fraction of the stuff you can do, so if you to add some really nice looking effects and create a nice looking document that really pops, you should take your time to familiarize yourself with everything.
On the other hand, if you don’t like your changes and you want to go back to the default, simply click “Reset Picture” and it will revert to normal.
Other Text Features
Here are few more text features that you might want to be aware of though you will probably rarely use them.
Text Box
Text boxes are like their own little islands in Word. What we mean is, when you add a “Text Box” to your documents, it is immune to changes you make to the rest of the document. It is like a document within a document.
This is useful if you want to present something “as is” in your work, be able to make overarching changes to the document’s formatting, but have something you’ve pasted remain unchanged.
For the most part, text boxes are something of a bane to an editor’s existence because they don’t play nice with styles (Lesson 5). You may find them extremely convenient and that’s perfectly fine, but if you want something that conforms to your document’s style and formatting, but still place it in a box or have a border around it, then we recommend simply adding a border, which we covered in Lesson 2 – Shading and Borders.
Drop Cap
Drop caps are simply that one letter at the beginning of a chapter or book that is larger than the rest:
You can either make your drop cap “Dropped” (the text below it shifts underneath it) or “In Margin.” Check out the “Drop Cap” options for more power over how your drop caps behave.
Using More than One Language
If you want to produce content in a language other than the one that comes with Word by default, you will likely need to purchase it. Open the Word “Options” and click on “Language.”
Pick the language you want to add from the dropdown list and then click the “Add” button. When you add a language, you will need to enable it, which means that you will have to turn it on in the “Control Panel.”
From here, you can write in the language, but Word won’t display in it, in other words, menus and help systems will still appear in the default language. To get the full multilingual experience, you may need to purchase a language pack from Microsoft.
To see what languages are available for purchase, and how much, click on “Not installed” and you will be whisked to the Microsoft Office website.
If you want to add proofing tools, such as spellcheck, grammar check, and/or screen tooltips, then you may be able to simply download them for free.
While it’s doubtful you’ll be using Word in full multilingual mode, it’s nice to know how you can affect those changes. Moreover, most languages are freely available to use system-wide so actually creating a document in another language is well within your reach, for free.
Coming up Next…
So that concludes this section. We know it’s been a lot to absorb but you’ll see that after a while, this stuff is a cinch!
Once you get the hang of one skill, the rest is pretty similar and comes easier. By now you should have more than enough knowledge to create awesome documents with lists, tables, pictures, video, and anything you need to create a true multimedia publication!
Don’t forget though, if you’ve missed anything in this series you can always go back and read our introduction in Lesson 1, all that stuff on paragraphs and lists in Lesson 2, and all-important tables and other formatting options in Lesson 3.
In our final lesson, Lesson 5, we will cover styles, templates, and themes. It doesn’t sound like much, but they can be a fantastic way to not only save tons of time and create consistently formatted documents, but quickly apply themes that will instantly affect the entire appearance of your documents, as well as create templates that you can later use over and over again!
READ NEXT
- › How to Adjust and Change Discord Fonts
- › The New NVIDIA GeForce RTX 4070 Is Like an RTX 3080 for $599
- › This New Google TV Streaming Device Costs Just $20
- › Google Chrome Is Getting Faster
- › HoloLens Now Has Windows 11 and Incredible 3D Ink Features
- › BLUETTI Slashed Hundreds off Its Best Power Stations for Easter Sale