
Are you struggling to get your message across? When your Microsoft Word project contains information, try presenting it in the form of a Word table. Learn how to make tables in Word quickly with a template.


A table is a kind of chart that organizes and presents data in rows and columns. It makes information easier to grasp, understand, and analyze at a glance, compared to explaining the same data through plain text.
Microsoft Word gives you various ways to insert or create a table. And you’ve got granular control over the formatting, layout, and appearance of Microsoft Word tables. Table charts are useful in different types of Word projects, whether for personal, educational, or business use.
This article will show you how to make a table in Word using a template. Then edit and format it to change its appearance.
(Note: The screenshots and instructions that follow are made using Microsoft Word for Mac version 16.4. If you’re using a different version of Word, then the interface and steps may be different.)
How to Make & Edit MS Word Tables (Video)
In this video, you’ll learn how to quickly make tables in Mircosoft Word. Find out how to start with a premium template. Quickly customize it to make an attractive, professional MS Word table you can use and reuse.
To learn even more about MS Word tables and about templates than can be used for tables, study the step-by-step tutorial below:
How to Make Basic Tables in Word
Let’s start by learning how to make a basic table in Microsoft Word:
1. Insert a Table
You can create a basic Microsoft Word table in one of two ways:
Method 1. The Insert Tab
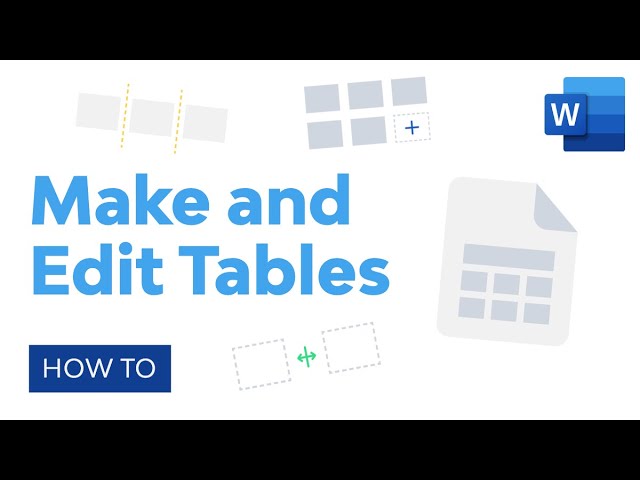
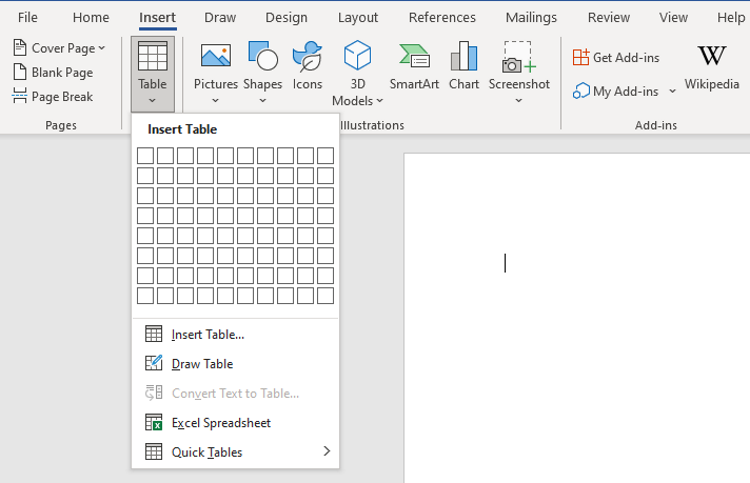
Click on the Insert tab, then click the Table button on the ribbon.


The Insert Table panel appears. Drag the cursor over the squares to specify the number of columns and rows you want to create. Click to apply.


Method 2. The Insert Menu
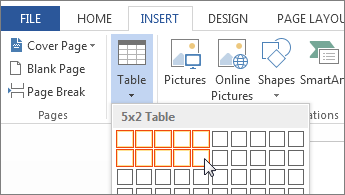
Go to Insert > Table….


The Insert Table panel opens. Specify the number of columns and rows you need. (You can always add or remove columns and rows later.)


Also select the Autofit Behavior you want the table to have. You’ve got several options:
- Initial column width. The default setting is Auto, which divides the entire width of your page window across the number of columns in the table. Or, you can specify a different column width.
- AutoFit to contents. Resizes the column width based on the width of the content inside the column.
- AutoFit to window. Distributes the columns equally across the entire width of the page window.
- Set as default for new tables. Check this option if you want the settings to be applied globally to all new tables you create.
When you’re happy with the options you’ve selected, click OK.


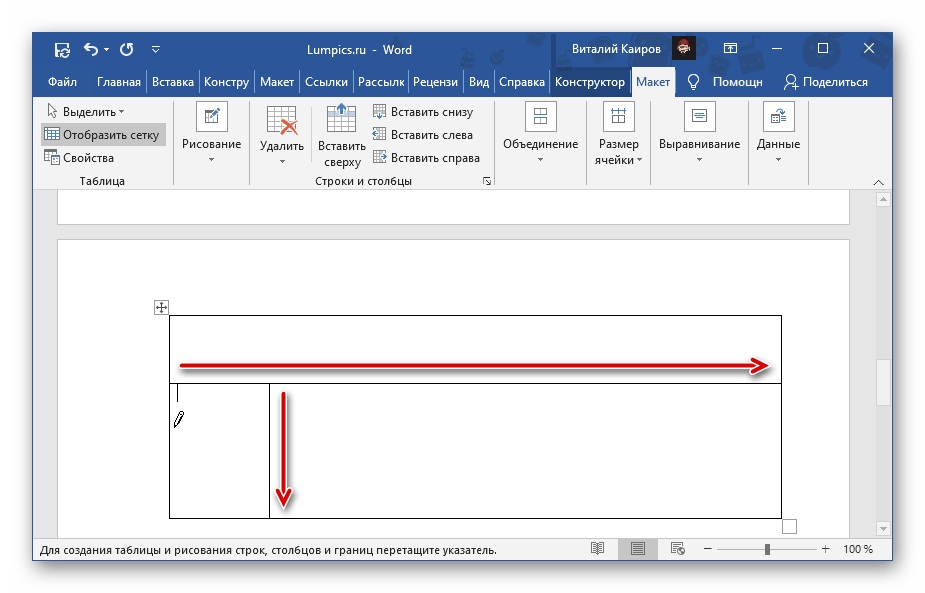
2. Draw a Table
Or, you can draw a table in MS Word. This is a useful feature if you want to create an irregular or more complicated table with columns and/or rows of varying widths.
To draw a table, click Insert > Table > Draw Table.


With your mouse or trackpad, click and drag the cursor to start drawing your table. You can begin by drawing the outermost boundary of the table first.


Then, click and drag the cursor to create columns and rows inside the table. When you’re done, click anywhere outside the table.


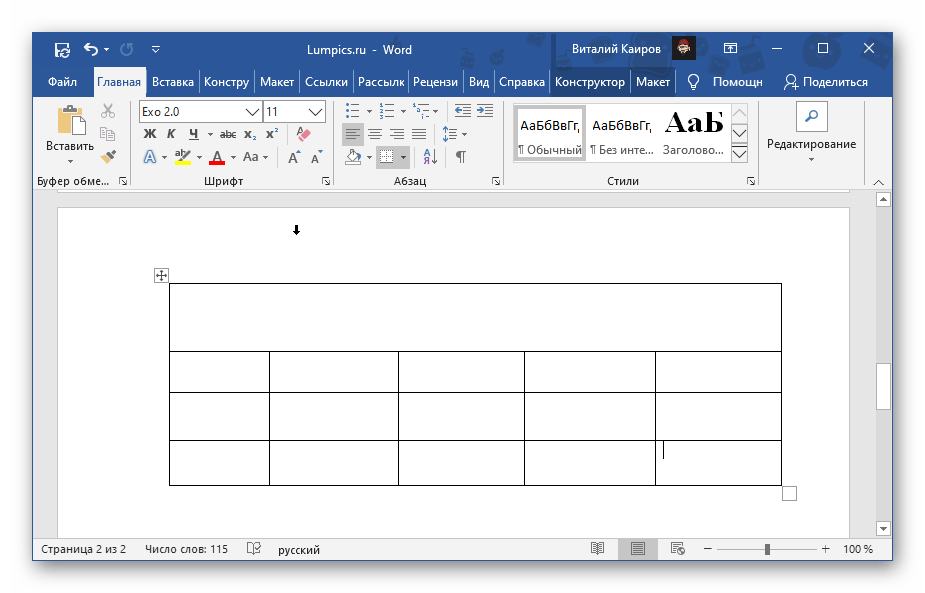
Here’s an example of an “irregular” table you can draw using this feature.


If you make a mistake, click Layout > Eraser to erase a line from the table.


Click and drag the eraser along the line you wish to erase. The line that’ll be erased appears as a thick, red line. Release the mouse or trackpad to erase.


Click outside the table when you’re done.
3. Convert Text to Tables and Vice Versa
Another way to create a table is by converting text into a table. This means you can take non-tabular data from a CSV or plain TXT file and convert them into a table.
First, copy and paste the non-tabular data into your Word document.


With the text selected, go to Insert > Table > Convert Text to Table….


The Convert Text to Table panel opens. Specify the settings you wish to use. Click OK.


The text is then converted into a table.


You can also do the opposite, which is to convert a table into text.
Select the cells or entire table you want to convert. Next, click on the Layout tab then click the Convert Table to Text icon.


The Convert Table to Text panel opens. This is where you’ll decide how you want to separate text that’s currently in different columns. When you’ve made a selection, click OK.


For this example, I chose to separate text with commas. This is what the converted table looks like.


4. Advanced: How to Insert a Table from Excel
If you’ve already created a table in Excel, you can embed it into your Word document.
Open the Excel file. Click and drag the mouse to select the table.


Go back to your Word document. Go to Edit > Paste Special ….


In the Paste Special panel, select Microsoft Excel Binary Worksheet Object, then click OK.


This embeds the Excel table into Word. It’s still an Excel table, which means you can’t edit or format the table in MS Word. You’ve got to do so in Excel.


Double-click anywhere in the table to launch the source file in Excel. When you make any changes to the table in Excel, the table embedded in your Word project automatically updates to reflect those changes.
Now you know how to make a table in MS Word using various options.
How to Edit Tables
At any time after creating your table, you can edit and customize it to look the way you want it to. Here are some steps for editing tables in Microsoft Word:
1. Add a Column or Row
To add a row or column, click inside a table cell. Right-click on the mouse, then click Insert.


Select one of the following:
- Columns to the Left. Adds a column to the left of the current column
- Columns to the Right. Adds a column to the right of the current column
- Rows Above. Adds a row above the current row
- Rows Below. Adds a row below the current row
- Cells … Inserts a cell and shifts the rest of the cells either to the right or down from where the cursor is
- Table … Inserts a table inside the current cell
Or, with the cursor in one of the cells, you can click on the Layout tab.


Then choose of the following buttons on the ribbon:
- Insert Above. Inserts a row above the current cell
- Insert Below. Inserts a row below the current cell
- Insert Columns to the Left. Inserts a column to the left of the current cell
- Insert Columns to the Right. Inserts a column to the right of the current cell
Finally, you can add a new row when you’ve reached the last cell in the last row of your table. Simply press tab and a new row appears.
2. Delete a Column or Row
To delete a cell, column, row, or table, click on the Layout tab > Delete.


Select one of the options that appear:
- Delete Cells …
- Delete Columns
- Delete Rows
- Delete Table
You can use the same steps to edit a table you’ve drawn. Or, you can use the Layout tab to add or delete rows and columns.


Merge Cells
Sometimes you may want to merge cells to present information more clearly. To merge cells, click and drag the cursor to select the cells you wish to merge.


On the Layout tab, click on the Merge Cells button.


Or, after selecting the cells to be merged, right-click on your mouse, then click Merge Cells.


Now the cells have been merged into one.


Split Cells
After merging cells, you can always split them again into separate cells.
Place the cursor in the merged cell, then click Layout > Split Cells.


Or, right-click on your mouse, then click Split Cells….


Either way, the Split Cells panel pops up. Specify the number of columns and rows you want to split the cell into. Click OK.


Split Table
You may decide that it makes more sense to split up a table into two separate tables. Microsoft Word lets you do that easily, too.
In this example, I want to split the table right above the Accessories cell. And so, I’ll place the cursor in that cell. Next, click on the Layout tab, then click the Split Table button.


Now, we’ve got two separate tables.


Table Formatting
When you first create a table, it looks plain and boring. But Microsoft Word has many features so you can format tables to look exactly the way you want them. Here are some common ways to format tables:
1. Table Styles
The easiest way to format a table is by using one of the pre-formatted table styles. Put the cursor in any cell in the table. Click on the Table Design tab. Next, click on the arrow to expand the Table Styles group.


Click on a style you want to use and it’s applied immediately.


You can change any style you’ve selected. Again, click on Table Design, expand the Table Style group, then click Modify Style.


The Modify Style panel opens. Make the selections you want, then click OK.


2. Use Your Own Formatting
The Table Design tab gives you control over the appearance of every aspect of your table. Click on the Table Design tab and any of the appropriate buttons on the ribbon.


Resize a Table
You can also resize your table. Click on any cell to select the table, then click and drag one of the corners to resize it.


Or, you can use the Layout tab to resize individual cells, specific rows or columns, or the entire table. Select the columns or rows you wish to resize. Specify the height and/or width you wish to apply.


You can also adjust column width by hand by using the Table Ruler. Click inside a column you want to change. Then, drag the sliders in the Table Ruler to set to desired width.


Text Wrapping
If you want text to flow around the table, you can do so by changing its text wrapping.
Click in any cell to select the table. Click Table > Table Properties….


In the Table Properties panel and under Text Wrapping, click Around > OK.


Now the text flows around the table.


Take note that the Table Properties panel allows you to format other qualities of the table, including:
- Size
- Alignment
- Positioning
- Borders and Shading
On the other tabs, you can change:
- Column, Row, and Cell Size
- Allow row to break across pages
- Repeat as header row at the top of each page
- Cell Vertical Alignment
- Alt Text (Title and Description) — more information about the table, to help people with vision or cognitive impairment who may not see the table
Find Great Styles for Microsoft Word
You don’t have to start from scratch to create an impressive and effective Word document — even if you don’t have design skills. You can find great styles by using a template for Word.


One great source for great Microsoft Word templates and professional graphics is Envato Elements. For one low monthly subscription, you get unlimited downloads of templates, graphics, fonts, and other creative tools you need for your project. It’s a terrific option if you create plenty of materials.
For single projects, GraphicRiver is an outstanding source for templates for Word. This marketplace gives you access to thousands of creative elements on a pay-per-use basis.
Learn More
Microsoft Word has many robust features to help you realize the vision you’ve got for your document. But with power comes complexity. That’s why it’s a good idea to learn how to use Microsoft Word.
These articles will help you get started:
Visualize Your Data with Microsoft Word Tables
Make your information clearer and easier to understand by learning how to make a table in Microsoft Word. Tables organize data into rows and columns, which makes them easier to grasp at a glance. Follow the steps in this article to create, format, and customize tables in Word.
You can also use a premium Word template to get a premium design created by designers. Get Word templates from Envato Elements, if you want unlimited downloads of templates, graphics, and other creative tools you need — all for one flat monthly fee.
Or, get premium templates for Word from GraphicRiver if you prefer to pay for each use of an item. Both sources give you access to thousands of design elements created by professionals, so you can save time, energy, and effort while creating an outstanding Word document.
Did you find this post useful?

Marketing & Communications Professional and Lifelong Learner/Canada
Lexi Rodrigo is a marketing and communications professional, copywriter, and course creator who helps remarkable brands and people get seen, heard, and known. Writing for the web since 2008, she has over 100+ blog posts published on Envato Tuts, Acadium, Mirasee, Vero, Copyblogger, FreelanceFolder, Business2Community, and others.
Lexi has supported multimillion-dollar companies and nonprofits in various marketing and communication roles. She has driven results like tripling the organic search traffic of a blog in three months and generating over $65 million in revenues, donations, and sponsorships.
She has a Bachelor of Arts degree in communications. She is also the co-author of «Blog Post Ideas: 21 Proven Ways to Create Compelling Content and Kiss Writer’s Block Goodbye.» When she’s not reading or writing, Lexi bakes bread, grows food, and takes long walks.

Try it!
In Word, you can insert a table, convert text to a table, and even draw a table.
Insert a table
To quickly insert a table:
-
Select Insert > Table and move the cursor over the grid until you highlight the number of columns and rows you want.

For larger tables, or to customize the table:
-
Select Insert > Table > Insert Table.
-
Select the number of columns and rows, AutoFit behavior, and then select OK.
Tip: Check Remember dimensions for new tables if you want all new tables to look like this.

Convert text to a table
-
Separate the text you want to convert to a table with paragraphs, commas, tabs, or a special character. Then select the text.
-
Select Insert > Table, and then select Convert Text to Table.
-
Select the table size, AutoFit behavior, and how you separated the text: paragraphs, commas, tabs, or a special character.
-
Select OK.

Draw a table
-
Select Insert > Table > Draw Table.
-
Draw a rectangle to make the table’s borders. Then draw lines for columns and rows inside the rectangle.
Select a style
-
Click anywhere in the table to select the table.
-
On the Table Tools > Design tab, select a style.

Want more?
Insert or draw a table
Convert text to a table or a table to text
Discover more Word training at LinkedIn Learning
Need more help?
Want more options?
Explore subscription benefits, browse training courses, learn how to secure your device, and more.
Communities help you ask and answer questions, give feedback, and hear from experts with rich knowledge.
To draw a table in your Word document, follow these steps:
- Click the Insert tab.
- Click the Table icon.
- Click Draw Table.
- Move the mouse pointer where you want to draw your table, hold down the left mouse button, and drag the mouse to draw your table.
Contents
- 1 How do you draw rows and columns in Word?
- 2 Can tables in Word be drawn freehand?
- 3 How do I insert a table into a table in Word?
- 4 How do I draw a column in Word?
- 5 How do I use drawing tools in Word?
- 6 Does Word have a drawing tool?
- 7 What is draw table in Microsoft Word?
- 8 Where is table Tools in Word?
- 9 How do you draw a table inside a table?
- 10 How do you customize a table in Word?
- 11 How many ways can you insert table in Word?
- 12 How do you add a column to a table?
- 13 What is column in MS Word?
- 14 How will you insert a column in a table?
- 15 Where can you find the Draw Table tool button?
- 16 How do you draw a freehand in Word?
- 17 Where is the draw option in Word?
- 18 How do you draw in docs?
- 19 How do I insert a pen in Word?
- 20 Where is the Drawing toolbar in Word 2013?
How do you draw rows and columns in Word?
Word
- Click where you want to add a row, and then click the Table Layout tab.
- Under Rows & Columns, click Above or Below. Tips: You can also use the Draw tool to draw a row in a selected table. On the Tables tab, under Draw Borders, click Draw, and then draw a line through a row.
Can tables in Word be drawn freehand?
Yes, you can freehand draw whatever you want
Microsoft Word contains a variety of shapes that can be used alone or in combination to create stunning graphics.
How do I insert a table into a table in Word?
Adding a table in Word
- In Word, place the mouse cursor where you want to add the table.
- Click the Insert tab in the Ribbon.
- Click the Table button and select how many cells, rows, and columns you want the table to display. You can also click Insert Table and enter the number of columns and rows for the inserted table.
How do I draw a column in Word?
On the Page Layout tab, click Columns, then click the layout you want.
- To apply columns to only part of your document, with your cursor, select the text that you want to format.
- On the Page Layout tab, click Columns, then click More Columns.
- Click Selected text from the Apply to box.
How do I use drawing tools in Word?
Click in your document where you want to create the drawing. On the Insert tab, in the Illustrations group, click Shapes.
Add a drawing to a document
- Insert a shape.
- Change a shape.
- Add text to a shape.
- Group selected shapes.
- Draw in the document.
- Adjust the size of the shapes.
Does Word have a drawing tool?
You can draw freely in Microsoft Word using the “Draw” feature whether you have Word for Mac or Windows. You can also insert customizable shapes into your document, or draw using the “Scribble” feature. The process of drawing in Word varies based on which version of Word and device you’re using.
What is draw table in Microsoft Word?
Microsoft Word’s Draw Table feature allows you to create perfectly formatted tables in your document. Here’s how to use it! If you use Microsoft Word, chances are that you’re familiar with tables. Tables allow you to present information in an easy-to-digest format—in rows and columns.
Where is table Tools in Word?
When working within a table, the Table Tools tab appears in the Ribbon, and includes the Design and Layout tabs. You can easily sort data in a table in either ascending or descending order.
How do you draw a table inside a table?
Click inside any cell in the larger table. Once again, use the “Insert” tab to create a table. For example, click on cell 1, go to “Insert,” “Table” and then create a 2-by-2 table. This 2-by-2 is now nested inside of the 3-by-3.
How do you customize a table in Word?
Choosing a table style in Word 2019
- Move the cursor inside the table you want to modify.
- Click the Design tab under the Table Tools tab.
- In the Table Style Options group, select or clear check boxes, such as the Header Row or Last Column check box.
- In the Table Styles group, click the More button.
- Click a table style.
How many ways can you insert table in Word?
Explanation: Microsoft now provides five different methods for creating tables: the Graphic Grid, Insert Table, Draw Table, insert a new or existing Excel Spreadsheet table, and Quick Tables, plus an option for converting existing text into a table. To start, open a blank Word document from the Home/New page.
How do you add a column to a table?
To insert a column, pick any cell in the table and right-click. Point to Insert, and pick Table Rows Above to insert a new row, or Table Columns to the Left to insert a new column.
What is column in MS Word?
Essential to formatting many documents, columns help break up the layout of a page full of text. You can set columns just about any way you like with the ability to specify the number, size, and borders. The following articles explain how to do that and more with columns in a Word document.
How will you insert a column in a table?
Add a column to the left or right
- Click in a cell to the left or right of where you want to add a column.
- Under Table Tools, on the Layout tab, do one of the following: To add a column to the left of the cell, click Insert Left in the Rows and Columns group.
Where can you find the Draw Table tool button?
Explanation : Draw Table tool button is found in Tables and Formatting toolbar in Word 2003 and earlier versions. Draw Table tool button is found in Insert > Table > Draw Table in Word 2007 and higher versions .
How do you draw a freehand in Word?
Draw a freeform shape
Click anywhere in the document, and then drag to draw. To draw a straight segment with the Freeform tool, click one location, move your pointer to a different location, and then click again; to draw a curved segment, keep your mouse button pressed as you drag to draw.
Where is the draw option in Word?
The Draw tab is normally found on the Ribbon.
Adding the Draw tab to the Ribbon
- Right-click the Ribbon and select Customize the Ribbon.
- Check the box next to Draw, then click OK.
- The Draw tab will now be available in the Ribbon.
How do you draw in docs?
What to Know
- Open a document in Google Docs. Place the cursor where you want the drawing to appear.
- Select Insert > Drawing. Choose New to open the Drawing window.
- Choose a drawing type from the Actions menu. Options include word art, shapes, arrows, callouts, and equations.
How do I insert a pen in Word?
Click on File tab and select Options from the menu Page 2 3. Select All Tabs under Choose Commands from: 4. Select Pens under the Ink Tools and click the Add button to add the Pens tab as a main tab on the ribbon.
Where is the Drawing toolbar in Word 2013?
Click Insert. Click the Shapes button, then click the Scribble icon in the Lines section. Click and hold down the mouse button, then move the mouse cursor to draw. Click the Format tab under Drawing Tools to make any changes to your drawing.

Одним из возможных вариантов создания таблиц в редакторе Майкрософт Ворд является их самостоятельное рисование. Рассмотрим, как пользоваться данной функцией.
- Перейдите во вкладку «Вставка», нажмите на кнопку «Таблица» и выберите пункт «Нарисовать таблицу».
- Сразу же после этого указатель курсора сменится на карандаш, с помощью которого и осуществляется самостоятельное рисование таблицы.

Для начала начертите прямоугольник, обозначив таким образом внешние границы.
Далее начните проводить горизонтальные и вертикальные линии,
добавляя нужное количество строк и столбцов.
Примечание: Размер любой части таблицы всегда можно изменить, поэтому не стоит пытаться сразу сделать все идеально ровно. К тому же, линии имеют привязку к сетке, а потому строки и/или столбцы могут быть изначально симметричными. И, наоборот, если требуется, чтобы они были разного размера, сделать это тоже не составит труда.
Если вы что-то нарисовали неправильно, воспользуйтесь инструментом «Ластик», доступным во вкладке «Макет» («Работа с таблицами»).
Просто проведите ним вдоль ненужной границы.
Читайте также: Как убрать границы в таблице Ворд
- Закончив с рисованием, нажмите клавишу «Esc».


Дальнейшие действия с самостоятельно нарисованной таблицей ничем не отличаются от таковых в случае с ее шаблонным аналогом. Наверняка может потребоваться изменить размеры, выровнять ширину и/или высоту ячеек в столбцах и строках, заполнить данными и, вполне вероятно, выровнять и оформить их. Сделать все это помогут отдельные инструкции на нашем сайте.
Подробнее:
Работа с таблицами в Microsoft Word
Форматирование таблиц в Ворде
Выравнивание таблиц и текста в Word

Еще статьи по данной теме:
Помогла ли Вам статья?
Microsoft Word’s Draw Table feature allows you to create perfectly formatted tables in your document. Here’s how to use it!

If you use Microsoft Word, chances are that you’re familiar with tables. Tables allow you to present information in an easy-to-digest format—in rows and columns. This can be useful when preparing reports, listing features, or displaying data in Word.
Perhaps you know how to add tables in Word using the popular Insert Table function, among others. But have you ever tried to draw your own custom tables?
In this article, you’ll learn how to use the draw table feature in Microsoft Word to quickly draw tables, plus how to customize the tables that you draw.
What Is Draw Table in Microsoft Word?
Just as the name implies, the Draw Table feature in Word allows you to draw and design your own tables by hand using your mouse and a pen tool.
Draw Table is one of the five methods of creating tables in Word. Others include Insert Table, Convert Text to Table, Insert Excel Spreadsheet, and Quick Tables.
Draw Table allows you to customize your tables in far more ways. For instance, you can place a table exactly where you want it and manage its proportions quickly if you draw it.
If, on the other hand, you use the Insert Table option, your table will expand to fit the page. You’ll then need to start adjusting its proportions using the table formatting tool.
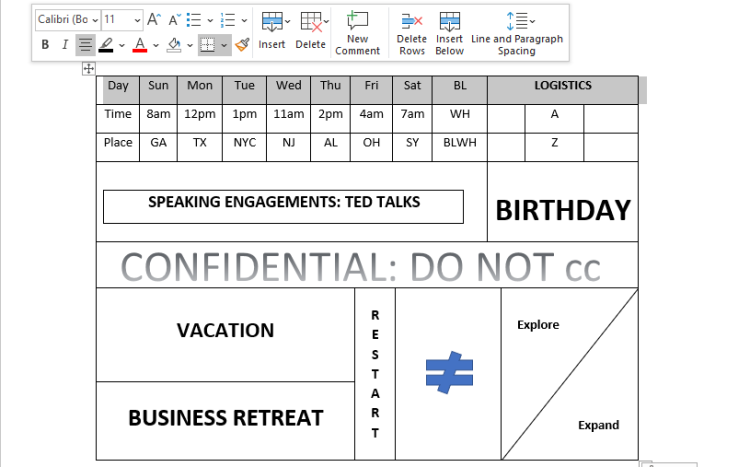
What’s more, with Draw Table, you can draw diagonal lines and cells within cells. Below is an example of what’s possible with Draw Table.
The Draw Table feature is currently not available in the Microsoft Word mobile app, but here’s how to use it in Microsoft Office 365.
How to Use the Draw Table Feature in Microsoft Word
Here’s how to draw a simple 10×5 table in Microsoft Word using the Draw Table feature.
- Launch the Microsoft Word desktop app on your PC and open the document in which you want to insert a table.
- Click the Insert tab in the ribbon area and select Table from the menu options.
- Scroll down and click Draw Table. This will activate the pen tool with which you’ll draw your table.

- Now, click your mouse and drag across and down one inch to create a single cell outline for your table.
- Use your pen to draw a vertical line that divides this cell into two equal parts to create a 2×1 table.

- Click outside the table to deactivate the pen tool. Now, place your mouse pointer at the midpoint and click on the + button. This will add more columns to your right. Do this until you have a 10×1 table.

- Place your pointer at the upper-left tip of the table to reveal the same + button from earlier. Click on it until you have four additional rows.

- You’ve now created a 10×5 table using the Draw Table feature. Notice that the cells are of the same proportions.


And just like other tables, you can equally format and customize this table to your liking.
Basic Formatting and Customizations for Drawn Tables
You can format and customize the tables you’ve drawn with Draw Table in several ways. Here are some of the basics.
1. Insert Rows, Columns, and Cells
If you begin by drawing a 2×1 table, you can expand it to any size of your choice by clicking the + button around the edges or using the Insert function. Simply select the table, right-click inside it, scroll down and select Insert.

By using this method, you can insert columns to the left and right, rows above and below, as well as cells.
2. Distribute Rows and Columns Evenly
If you drew your own table by hand, there’s a good chance that some cells will be disproportionate. To fix this, select the table and right-click inside it. Select Distribute Rows Evenly or Distribute Columns Evenly.
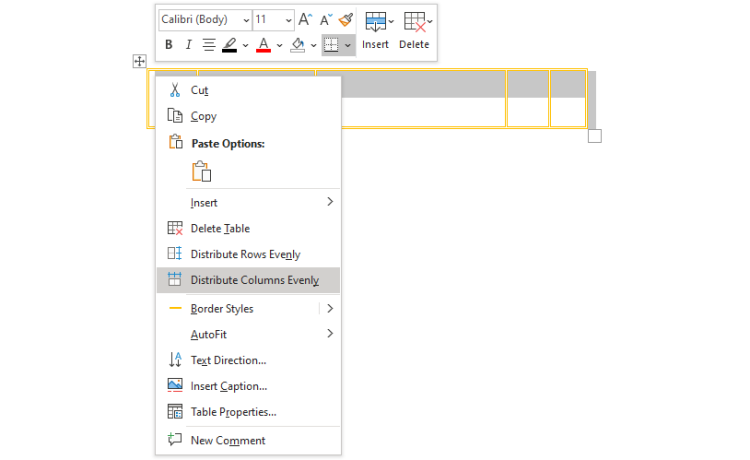
This will make all the cells of your table of equal sizes. You can still grab the pen tool if you want to add any odd-shaped cells.
3. Restrict Editing
If you’ve put in some hard work into creating your tables, you wouldn’t want that to go to waste. You can limit other authors from making certain changes to your tables during a review.
To do so, select the table or portion of it for which you want to restrict editing. Now, click on Review, then click Restrict Editing to your right-hand side.

In the Restrict Editing pane, set your preferences and click on Yes, Start Enforcing Protection.
4. Watermark Your Table
Watermarking your table is another way of branding it and preventing unauthorized copying and distribution. If your table contains sensitive information, then you should definitely add a watermark.
Place your cursor at the spot where the watermark should be, then click on Insert > WordArt. Select your preferred style and enter watermark text in the Your text here box.

Drag and drop the box wherever you wish within the table.
5. Color-Code Your Table
You can color-code your table to highlight certain key information. This is great for easy reference when working with large tables containing lots of data.
To color a single cell, place your mouse pointer in the cell and click once the black pointer arrow appears. Click on the Shading tool and pick a color to apply to your selection.
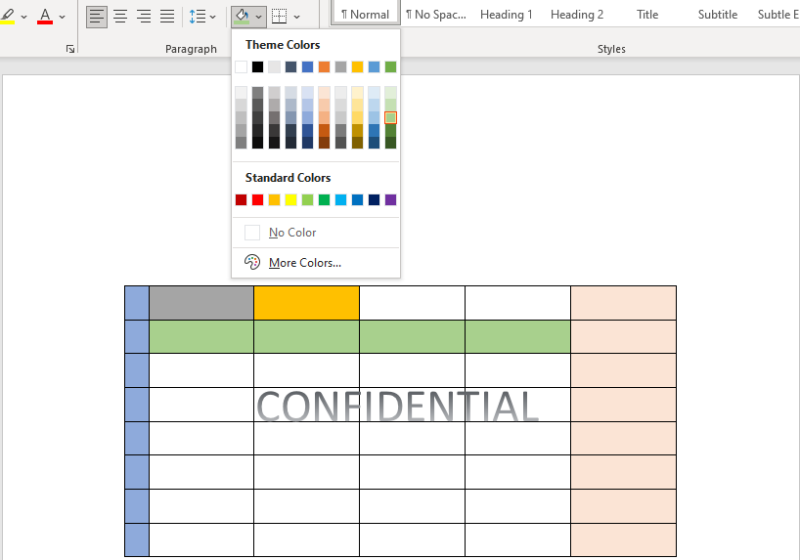
You can also apply a single color to an entire row or column by highlighting the row or column. This also makes your table visually appealing. With Draw Table, the sky is the limit. You can cut, copy, paste, delete, distribute, autofit, direct text, insert caption, and even add comments.
You can also access the Table Properties from where you can make additional changes to the table, rows, columns, cells, and alt text.
Tabulate Your Microsoft Word Documents With More Flexibility
DIY or not, drawing your own tables by hand gives you a certain level of control and input over the way your tables look and feel. You can create just about any kind of table you can imagine in Microsoft Word and customize it accordingly using Draw Table. So, go ahead and be creative.
You can also use Draw Table in combination with other methods of adding tables in Microsoft Word for greater variety and customization. If you use tables a lot in your line of work, this can help you to up your tables game.