
Word for Microsoft 365 Word 2021 Word 2019 Word 2016 Word 2013 Word 2010 Word Starter 2010 More…Less
You can easily insert a special character, fraction, or other symbol in your Word documents.
The most important thing to understand when inserting symbols, fractions, special characters, or international characters is that the font you use is critical. Not all fonts have the same characters in them. For example, the Elephant font has no fraction characters in it, while Verdana does. As a result it’s important to use the right font to find the symbol or character you want.
These marks are static symbols. If you’re looking for an interactive check box that you can click on to check or uncheck, see Make a checklist in Word.
Symbol such as currency (¥), music (♫), or check marks (✔)
-
Place your cursor in the file at the spot where you want to insert the symbol.
-
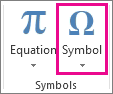
Go to Insert > Symbol.

-
Pick a symbol, or choose More Symbols.
-
Scroll up or down to find the symbol you want to insert.
Different font sets often have different symbols in them and the most commonly used symbols are in the Segoe UI Symbol font set. Use the Font selector above the symbol list to pick the font you want to browse through.
-
When you find the symbol you want, double-click it. The symbol will be inserted in your file.
-
Select Close.
Tip: If you want to make your symbol larger or smaller, select it and use the Font Size setting.
If you’re going to insert the same symbol often, consider setting up AutoCorrect to insert it for you. You can find more info about that here: Insert a check mark or other symbol using AutoCorrect.
-
Click or tap where you want to insert the special character.
-
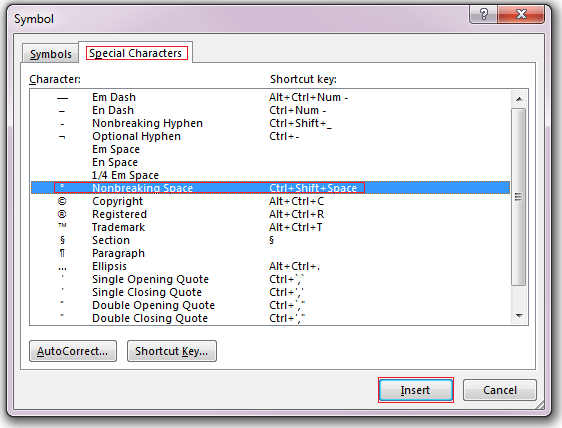
Go to Insert > Symbol > More Symbols.
-
Go to Special Characters.
-
Double-click the character that you want to insert.
Tip: Many of the special characters have shortcut keys associated with them. If you want to insert that special character again in the future, just press the shortcut key. ALT+CTRL+C inserts the Copyright symbol (©), for example.
-
Select Close.
Some fractions (1/4, 1/2, and 3/4) automatically switch to a fraction character (¼, ½, ¾) when you type them. But others do not (1/3, 2/3, 1/5, etc.) so if you want to insert those as symbols you’ll need to use the insert symbol process.
-
Click or tapwhere you want to insert the fraction.
-
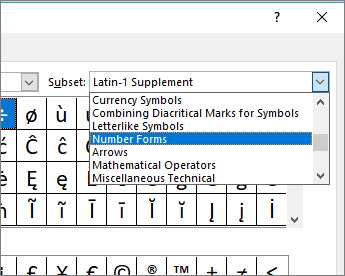
Go to Insert > Symbol > More Symbols.
-
In the Subset dropdown, choose Number Forms.
Note: Not all fonts have a number forms subset. If you don’t see the number forms subset available for your font you will have to use a different font, such as Calibri, to insert the fraction character.
-
Double-click the fraction that you want to insert.
-
Select Close.
Only a handful of common fractions have a symbol that you can substitute. For more unusual fractions, such as 8/9, you can approximate the symbol by setting the numerator as superscript and the denominator as subscript. For more information see Insert subscript or superscript text.
If you plan to type in other languages often you should consider switching your keyboard layout to that language. You can find more information about that at Enable or change a keyboard layout language.
For one-off characters there are almost always keyboard shortcuts in Office to do that. For example:
-
CTRL+SHIFT+ALT+? inserts a ¿
-
CTRL+SHIFT+~ followed immediately by «a» will insert ã.
-
CTRL+SHIFT+: followed immediately by «u» will insert ü.
For more info on international characters see: Keyboard shortcuts for international characters.
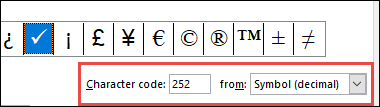
You can also use the character code of the symbol as a keyboard shortcut. Symbols and special characters are either inserted using ASCII or Unicode codes. You can tell which is which when you look up the code for the character.
-
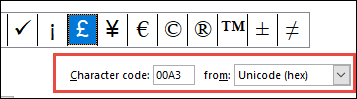
Go to Insert >Symbol > More Symbols.
-
Scroll up or down the list to find the symbol you want. You might have to change the font or the subset to locate it.
Tip: The Segoe UI Symbol font has a very large collection of Unicode symbols to choose from.
-
Towards the bottom right you’ll see boxes for Character code and a from:. The character code is what you’ll enter to insert this symbol from the keyboard and the from: tells you what kind of character it is. If from: says «Unicode (hex)» it’s a Unicode character. If from: says «Symbol (Decimal)» then it’s an ASCII character.
Unicode
ASCII
ASCII and Unicode information and character tables
For more info about using ASCII or Unicode characters, see Insert ASCII or Unicode character codes.
Insert a check mark
For info on inserting a check mark, see Insert a check mark.
Need more help?
Want more options?
Explore subscription benefits, browse training courses, learn how to secure your device, and more.
Communities help you ask and answer questions, give feedback, and hear from experts with rich knowledge.
Place your cursor in the file at the spot where you want to insert the symbol. Go to Insert > Symbol. Pick a symbol, or choose More Symbols. Scroll up or down to find the symbol you want to insert.
How do I put love in Word?
Expressing Deep Love in Words
- I cherish you.
- I want a lifetime with you.
- I adore you.
- I am better because of you.
- I need you by my side.
- I cannot stop thinking about you.
- My love for you is unconditional and eternal.
- All of the good in my life is because of you.
Can I draw on word?
You can draw freely in Microsoft Word using the “Draw” feature whether you have Word for Mac or Windows. You can also insert customizable shapes into your document, or draw using the “Scribble” feature. The process of drawing in Word varies based on which version of Word and device you’re using.
Why can’t I draw on word?
Write, draw, or highlight text In Word, you must be in Print layout to draw with ink. If the Draw tab is grayed out so that you can’t select a pen, go the View tab and select Print Layout. Tap again to open the menu of Thickness and Color options for the pen.
How to draw a heart with a picture?
How to Draw a Heart – Drawing a Heart Icon 1 Start the outline sketch with two consecutive circles. 2 Add a downward triangle on the outline sketch. 3 Begin drawing the actual line on the left cheek of the heart. 4 Draw the right cheek. 5 Erase the outline sketches. 6 (more items)
How do you put a heart on a keyboard?
Windows: Press and hold the Alt key, then press 3 on the numeric keypad on the right side of your keyboard. This will insert the heart symbol (♥). Alt+3 is an example of a Windows Alt code, which is an easy way to enter hundreds of special characters in Windows.
How do you make the heart symbol in Microsoft Word?
From the ribbon, select ‘Insert’ => ‘Symbol” => ‘More Symbols” then go to ‘Webdings’ (Third line of symbols) or Yu Gothic (a good distance scrolling down or 2665, Alt+X). Get the Backup Bible eBook Complete Edition – now available.
How do you start drawing in Microsoft Word?
To start, press the Draw tab on the ribbon bar. This will display the pen drawing tool options for you to use. Three drawing options are available under the Tools section. Press Draw with Touch to begin drawing with one of the pen tools, Eraser to switch to the eraser tool or Select to select your drawings as objects to move, copy, or delete them.
How do you type a heart in Windows?
This wikiHow teaches you how to type a heart (♥) symbol in Windows applications. Click on the location where you want to insert the heart. Press 3 on the numeric keypad. A heart (♥) symbol will appear where you placed the cursor. Click on the location where you want to insert the heart.
From the ribbon, select ‘Insert’ => ‘Symbol” => ‘More Symbols” then go to ‘Webdings’ (Third line of symbols) or Yu Gothic (a good distance scrolling down or 2665, Alt+X). Get the Backup Bible eBook Complete Edition – now available.
Where is the heart on the keyboard?
Windows: Press and hold the Alt key, then press 3 on the numeric keypad on the right side of your keyboard. This will insert the heart symbol (♥).
![]()
Download Article
![]()
Download Article
This wikiHow teaches you how to create your own symbols and use them in Microsoft Word. Creating and installing symbols is different than inserting pre-installed symbols into your document. You can create and install symbols on Windows by using a hidden program called «Private Character Editor», while Mac users can create and install their own font with customized symbols by using the Calligraphr template. Keep in mind that any custom symbols you make will not display on any platform that doesn’t have your symbols installed as well.
-
1
Open Start
. Click the Windows logo in the bottom-left corner of the screen.
-
2
Type in eudcedit. This is the code you’ll need to locate Private Character Editor since the program doesn’t have a built-in shortcut.
Advertisement
-
3
Click eudcedit. It’s at the top of the menu. This will open the Private Character Editor program.
-
4
Select a space for your symbol. Click one of the grid squares in the window.
- Your selected space will correspond to Character Map later (for example, if you pick the upper-left corner box, the symbol will be in that box when you open Character Map later).
-
5
Click OK. It’s at the bottom of the window. Doing so confirms your space and opens the symbol editor window.
-
6
Draw your symbol. Click and drag your mouse around the window to draw. This part is largely up to you, though keep in mind that the bottom of the window represents the bottom of a text line; if you create a symbol that starts above the bottom of the window, it will be higher than the rest of the text in the line.[1]
- You can select different drawing tools in the left-hand side of the window to change the drawing style.
- If you make a mistake, you can undo it by pressing Ctrl+Z, or by using the eraser tool in the bottom-left side of the window.
- You can use an existing symbol as your base by clicking Edit, clicking Copy Character…, selecting a character, and clicking OK.
-
7
Save your symbol. Click the Edit menu item in the upper-left side of the window, then click Save Character. The symbol is now installed on your system.
-
8
Open Character Map. Click Start
, type in character map, and click Character Map at the top of the Start menu.
- The Character Map program keeps track of all available symbols on your system.
-
9
Click the «Font» drop-down box. It’s at the top of the Character Map window. A drop-down menu of different font names will appear.
-
10
Click All Fonts (Private Characters). This option is near the top of the drop-down menu. Doing so will display a list of your created symbols.
- You may have to scroll up to see this option.
-
11
Insert your symbol into a Microsoft Word document. If you want to place the symbol in a Word document, click the symbol to select it, click Select, click Copy, and then open the Microsoft Word document and paste in the symbol by pressing Ctrl+V.
- Your symbol may not be large enough or bold enough to be easily visible in Word. You can change that by selecting the symbol and raising the font size to the appropriate level.


Advertisement
-
1
Download the Calligraphr template. Calligraphr is a free service which allows you to create your own font. In order to download the font creation form, you’ll need to create an account on Calligraphr’s website.
- Follow How to Create a Font for more detailed steps on how to create an account, log in, and download a template.
-
2
Select the template file. Open the template file’s download folder, then click the template file to select it.
-
3
Click File. It’s at the top of the screen. A drop-down menu will appear.
-
4
Select Open With. You’ll see this near the top of the File window. Selecting it prompts a pop-out menu.
-
5
Click Preview. It’s in the pop-out menu. Doing so opens the Calligraphr template in your Mac’s Preview program.
-
6
Click the «Markup»
icon. This option is at the top of the Preview window.
- On some versions of macOS, the «Markup» icon resembles a bag instead.
-
7
Click the «Draw»
icon. It’s in the Markup toolbar. This will allow you to draw by clicking and dragging your mouse.
-
8
Draw your symbol on top of a letter. Whatever you draw on top of a letter (e.g., A) is what will be typed when you press that letter’s key.
- You can repeat this process for multiple symbols in order to bind them to letters (e.g., A-Z).
- Keep in mind that capital letters and lower-case letters have their own distinct bindings.
-
9
Save your template. Press ⌘ Command+S to do so. This will save the changes you’ve made to the Preview template, which will allow you to create your own font by uploading the template back to Calligraphr and then downloading the resulting font file.
-
10
Upload your template. Go back to https://www.calligraphr.com/en/ in your computer’s web browser, then do the following:
- Click START APP
- Click MY FONTS
- Click Upload Template
- Click Choose File
- Select your template file, then click Open
- Click UPLOAD TEMPLATE
-
11
Scroll down and click ADD CHARACTERS TO YOUR FONT. It’s near the bottom of the page. A window will open.
-
12
Create your font file. Click Build Font at the top of the page, enter a name for your font, and click BUILD.
- The name that you select for your font is the name that will display for the font when you select it in Microsoft Word.
-
13
Download and install your font. Click the font file that ends in .ttf to download it onto your Mac, then double-click the font file and click Install at the bottom of the window.
-
14
Insert your symbol into Microsoft Word. If you want to type your symbol into Word, open a Word document, then select your custom font on the Home tab and type the symbol’s corresponding letter. You should see the symbol appear.
- You’ll have to switch to another font in order to type actual letters.


Advertisement
Add New Question
-
Question
How do I convert scanned PDF documents into Word?

Use an online PDF-to-Word converter.
Ask a Question
200 characters left
Include your email address to get a message when this question is answered.
Submit
Advertisement
-
If you have a Microsoft Office 365 subscription on a Windows computer, you can insert Windows icons into your document by clicking the Insert tab, clicking Icons in the «Illustrations» section of the toolbar, and selecting an icon. This will not work on the Mac version of Word.[2]
Thanks for submitting a tip for review!
Advertisement
-
Since custom symbols are only available for Word documents on your computer, other people will not be able to view your symbols if you share the document with them. You can get around this limitation by printing the document or saving it as a PDF.
Advertisement
About This Article
Thanks to all authors for creating a page that has been read 281,747 times.
Is this article up to date?
Have you ever been bothered by inserting a mathematical symbol in Word? After all, the current keyboard has been designed with very few common symbols. As for larger than or equal to symbol, approximately equal to symbol, not equal to symbol, etc., you can only insert them through other approaches. Here I’d like to share 5 simple tips:
Method 1: Symbol Button
1. Go to Insert tab and click Symbol button, click More Symbols in the drop-down list.

2. The Symbol dialog box will be displayed, go to Symbols tab and select Symbol in the box of Font. Scroll up and down to choose the mathematical symbol you want, then just simply click Insert at bottom right.

Method 2: Right-click Menu
1. Click anywhere in Word document and right-click the mouse. Select Insert Symbol in the menu.

2. The Symbol dialog box will pop out as well. Select Symbol as the Font in Symbols tab. Scroll up and down to choose the mathematical symbol you want, and simply tap Insert button to add it to your document.

Method 3: Ink Equation
1. Go to Insert tab and click Equation in Symbols group.

2. Select Ink Equation in the drop-down list.

3. Then the handwriting board will show. Just drag your mouse to draw the symbol. The graph will be auto identified as the most similar mathematical symbol in the textbox above.
If it’s not correct, click the Erase button and select the error part to clear it. If you want to reenter the mathematical symbol, click Clear button then everything in the handwriting board will be deleted. Then just simply click Insert at bottom right.

Method 4: Keyboard Shortcuts
Some specific mathematical symbols have corresponding keyboard shortcuts. To insert them, you can enter a corresponding code and then press [Alt+X].
For example, if you want to insert a less than or equal to symbol, just enter 2264 in the document and press [Alt+X], it will be converted into the ≤ immediately.

Here’s a list of commonly used mathematical symbols and corresponding codes. You can have a try or just copy them directly.
| Name | Symbol | Corresponding Code |
| Less than symbol | < | 003C |
| Less than or equal to symbol | ≤ | 2264 |
| Larger than symbol | > | 003E |
| Larger than or equal to symbol | ≥ | 2265 |
| Plus-minus symbol | ± | 00B1 |
| Approximately equal to symbol | ≈ | 2248 |
| Not equal to symbol | ≠ | 2260 |
| All equal to symbol | ≌ | 224C |
| Summation symbol | ∑ | 2211 |
| Integral symbol | ∫ | 222B |
Method 5: Object Button
1. Go to Insert tab and click Object button, select Object in the drop-down menu.

2. In Create New tab of the popping out Object dialog box, choose Microsoft Equation 3.0 as the Object type, then tap OK button at the bottom right.

3. The Equation dialog box will appear in the document. Click the icon of mathematical symbols on the top-left corner and choose the symbol you want to insert in the list. It will be added to your document immediately.

Note: Among all these approaches, Method 1, Method 3 and Method 5 can also be applied to Microsoft Excel. You can have a try following above steps.
Copyright Statement: Regarding all of the posts by this website, any copy or use shall get the written permission or authorization from Myofficetricks.
Microsoft Word symbols cannot be easily typed in using the keyboard.
However,
the need to include these characters in documents is increasingly common these
days.
Even when writing in English, foreign names of places and people may require some of these special characters.
Scientific writings also include mathematical symbols and Greek letters.
Text may also include characters like the degree symbol and copyright symbol.
There
are character codes you can use to enter a symbol in Word. However, most people
don’t have the time to memorize these character codes.
So, in this guide today, you’ll learn how to insert any symbol in Word either using the mouse pointer or a keyboard shortcut.
NOTE: There are several methods you can use to type symbols in Word. For me, the method I use to type symbols depends on how many and how frequently I need to type them. Keep reading to choose the best method for you
Without
further ado, below are the ways to type symbols in word
1st Method: Using Insert Symbols
This
method involves using the symbols dialog box located in the symbols area at the
right border of the insert tab.
Below are steps to insert symbols in MS Word using Insert Symbols.
NOTE: in the steps below, I’ll illustrate how to insert symbols in MS Word by inserting the greater than or equal to symbol. You can use the same steps to insert any symbol of your choice.

- STEP 1: Click to position the insertion point at where you want to insert the symbol. In this example, we will place the symbol between X and 10 as you can see in the above picture.
- STEP 2: Go to the Insert tab, in the Symbols group and click Symbol, then More Symbols.

NOTE: If the symbol you want to insert is found in the symbols gallery as shown in the picture above, click it to insert it into your document. Any symbol you use will move to the first position in the gallery. Thus, the symbol gallery box gives you access to the 20 most recently used symbols. However, if you can’t find the symbol you are looking for in the symbol gallery, click on More Symbols to display all the symbols.
- STEP 3: Select your desired font from the Font drop down. You can leave it as default (Normal text). You don’t have to explore every font in the list. However, it is worth looking at Wingdings or Symbol if you want a fancy symbol.

- Step 4: Scroll down or up until you find the required symbol, then
click to select it. You can also click the desired symbol in the Recently used
symbols. - Step 5: Click Insert to insert the selected symbol then click
to close the dialog. Alternatively, double-click on the desired symbol to
insert it into your document, then close the dialog.
As soon as you click insert or double-click the symbol, Word will insert it into your document.
2nd
Method: Using the keyboard to insert symbols in Word.
Not all the symbols in Word can be found on the keyboard.
However, all the symbols can be typed using the keyboard.
Typing symbols that are not found on the keyboard can be very tedious. In fact, it is not even necessary in Word because using the first method above is much easier and simple to compare with.
However, it is still useful to know as it becomes handy to obtain certain characters or symbols in software that has no access to Insert Symbol like in Microsoft Word.
Let’s use the following exercise for example:
- Turn on your Num Lock.
- Whilst holding down the [Alt] key, type [065]
on the numeric keypad (on the right). - Then release the [Alt] key. The letter A should
appear. - To type the letter B, repeat steps 2 and 3. But this
time type [Alt 066] on the numeric keypad. - [Alt 067] should give you C, and [Alt 068] should give
you D, and so on.
This
exercise isn’t really necessary because one can easily type in any letter
directly with the keyboard.
However, not all characters and symbols are on the keyboard. Hence let’s try out the following:
- Hold down the [Alt] and type [0176] for a degree sign (°)
- Type [Alt 0189] and [Alt 0190] for fractions (½ and ¾)
- Also try [Alt 0181] for µ
But
how do you remember the number for each symbol?
It’s
almost impossible to remember. It’s not even necessary.
Instead, you should make a note of the symbols or characters you use very often.
In the next section, you’ll learn how to get the shortcut to any symbol into your Word document.
How to find the keyboard shortcut for symbols in word
You
can use the Symbol dialog box to find the character code (or keyboard shortcut)
for any symbol or character.
This way you can insert symbols by typing them on your keyboard instead of using the Symbol dialog box.
Here’s how to learn the keyboard shortcut code for a particular symbol or character in Word:
- Open the Symbols dialog box.
To
display the Symbols dialog box, go to the Insert tab, in the
Symbols group and click Symbol, then More Symbols.
- Select the symbol you want to take note of, then look near
the bottom of the dialog for the symbol name as well as its code. - To insert any symbol using its character code, press down the
[Alt] key, type the code, then release the [Alt] key.
If you are lucky, you’ll see another shortcut key aside from the character code which is much easier to type than the code.
See
screenshot below:

Assigning
shortcut keys to symbols
In
Microsoft word, you are not limited to the default hotkeys.
You can assign any keyboard shortcut key to any command or symbol to fit your needs.
As
mentioned, each and every character or symbol in Microsoft Word has a character
code that you can use on the keyboard.
Aside from these character codes, Word still gives you the space to assign a shortcut key to any symbol.
Below
are the steps to do so:
- Open the Symbols dialog box.
To
display the Symbols dialog, navigate to the Insert tab, in the
Symbols group and click Symbol, then More Symbols. The Symbols
dialog box should display.
- Click to select the symbol to which you want to assign a shortcut.
- At the bottom area of the dialog, click Shortcut Key… The Customize Keyboard dialog box appears.

- Under Specify keyboard sequence, in the Press new shortcut key field, type the keyboard shortcut you want to assign for the symbol.
If the shortcut key you assign is already assigned for a command, Word will tell you that hey dude, the shortcut key you are assigning to this symbol is already taken by another command. If you ignore and continue to assign, Word will not stop you. However, this shortcut will not work again for the command it was previously assigned to. It will now work for this symbol.

- Click Assign to assign the shortcut.
NOTE: There is another box labeled Current keys. These are the current hotkeys assigned to the selected symbol. You can take note of these hotkeys without assigning another one for the same symbol.
Typing
any symbol in Word doesn’t have to be difficult as you can see.
If you don’t understand anything explained here, let me know in the comments section below for more clarification.
Thank you very much for reading this article.