
On a touch-enabled device, draw with your finger, a digital pen, or a mouse.
Available inking features depend on the type of device you’re using and which version of Office you’re using.
Please start by choosing your version of Office:

|
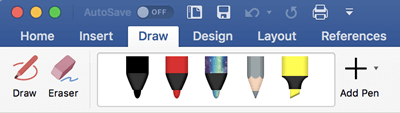
If your device is touch-enabled, the Draw tab is turned on automatically. Otherwise, turn it on by selecting File > Options > Customize Ribbon > Draw. |
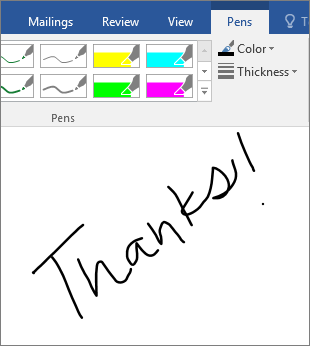
Write, draw, or highlight text
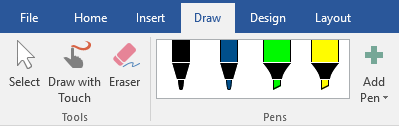
The new pen set is customizable and portable. You define the pens you want to have, and they are then available in Word, Excel, and PowerPoint.
-
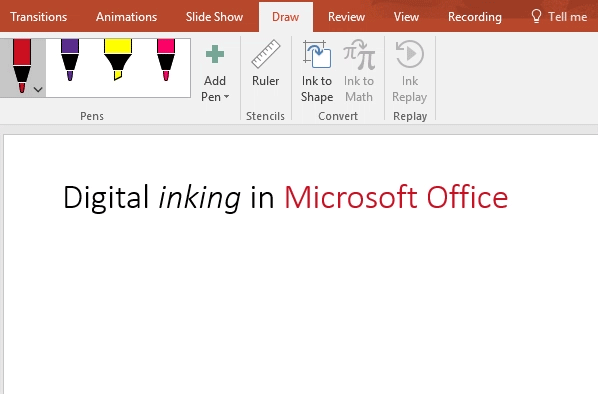
On the Draw tab of the Ribbon, tap a pen to select it.

In Word, you must be in Print layout to draw with ink. If the Draw tab is grayed out so that you can’t select a pen, go the View tab and select Print Layout.
In Outlook, first tap the body of the message and insert a drawing canvas
; then you can select a pen to draw with. -
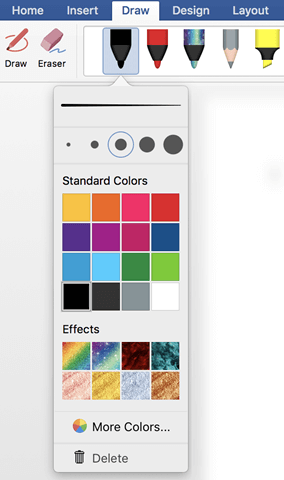
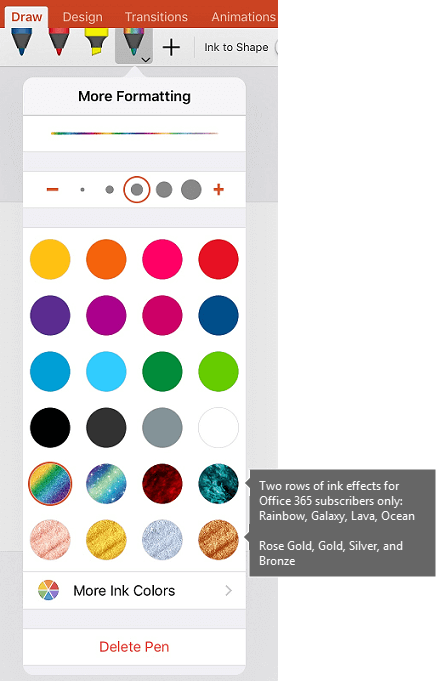
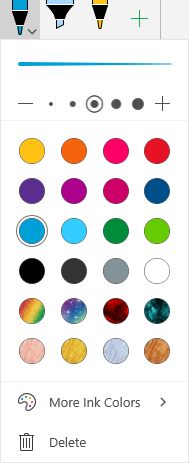
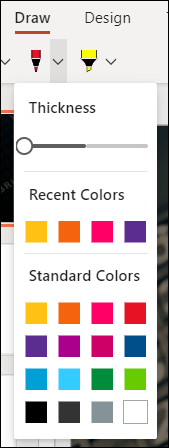
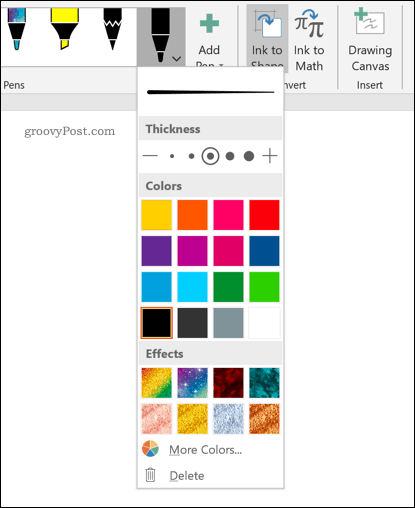
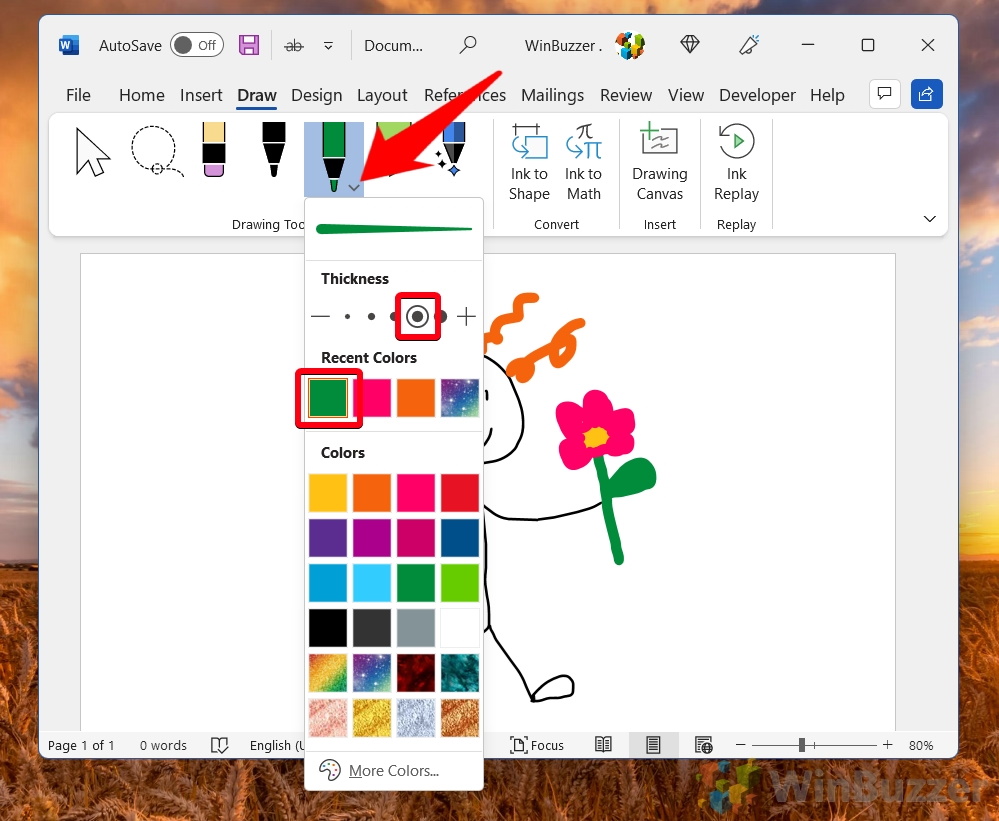
Tap again to open the menu of Thickness and Color options for the pen. Select your preferred size and color.
-
There are five pen thickness settings ranging from .25 mm to 3.5 mm. Select a thickness or use the plus or minus sign to make your pen thicker or thinner.
-
Sixteen solid colors are available on the menu, with more available when you tap More Colors.
-
Eight effects are also available: Rainbow, Galaxy, Lava, Ocean, Rose Gold, Gold, Silver, and Bronze.
-
-
A Pencil texture is also available:
When you draw with the Pencil texture while using a supported digital stylus, you can tilt the stylus to get a «shading» effect, just like you would get with a real pencil.
-
On the touch screen, begin writing or drawing.
Once you have drawn an ink shape, it behaves like any shape that you are used to working with in Office. You can select the shape, then you can move or copy it, change its color, pivot its position, and so on.
-
To stop inking and select your annotations, press the Esc key.
 ; then you can select a pen to draw with.
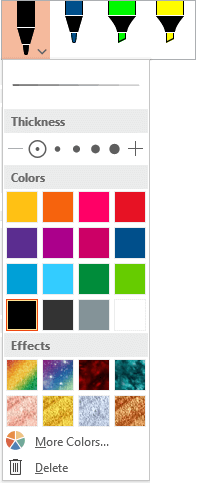
Convert ink to text or shapes
Word or Excel: See Convert ink to shapes in Office
PowerPoint: See Convert ink to text or shapes in PowerPoint for Microsoft 365.
More features
Select a heading below to open it and see the detailed instructions.
-
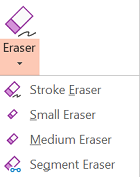
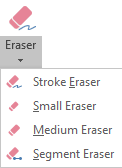
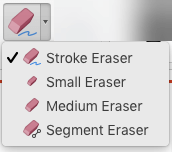
Under Draw > Tools, tap the Eraser.
(In PowerPoint for Microsoft 365, you can choose from different sizes of erasers. Word has three eraser options. Tap the down arrow on the Eraser button to pick the eraser that you want.)
-
With your pen or finger, drag the eraser over the ink you want to remove.
With the Segment Eraser in PowerPoint, you can simply tap a segment of ink or drag across it to remove it (rather than having to thoroughly wipe away the entire segment). Dragging across segments is an easy way to erase several at once.
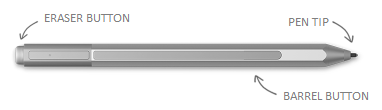
Some active pens, such as the Surface pen, have an eraser that you can also use to erase digital ink.
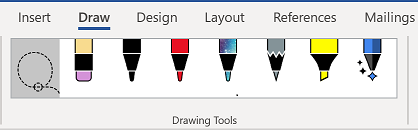
All apps include a Draw tool on the Draw tab of the Ribbon for switching between inking mode and selection mode.
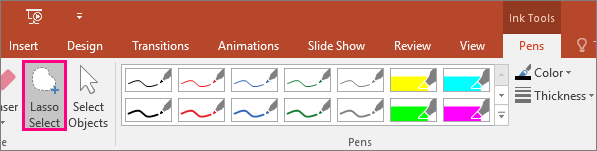
There is also an ink selection tool, Lasso Select,  or
or  for specifically for selecting objects drawn with ink. It’s most useful when you have a mixture of standard and ink objects and you only want to select an ink object.
Applies only to Word, PowerPoint, and Excel:
To select part of a drawing or words written in ink, use the Lasso Select tool. (This tool can’t select non-ink objects—that is, shapes, pictures, etc.)
-
Under Draw > Tools on the Ribbon, tap Lasso Select
or . -
With your pen or finger, drag to draw a circle around the part of the drawing or word that you want to select. A faded, dashed selection region appears around it, and when you’re done, the portion you lassoed is selected. Then you can manipulate that object as you wish: move it, change its color, and so on.

In both Excel and PowerPoint, with a digital pen, you can select an area without even tapping the selection tool on the ribbon. Use the supported digital pen button to Lasso Select ink without visiting the ribbon. Then you can use the pen to move, resize, or rotate the ink object.
-
On the File menu, select Options, and then select Advanced.
-
In the Pen section, select the box next to Use pen to select and interact with content by default.
This setting only applies to the app in which you make it, so, for example, you can have automatic inking turned on in Visio and turned off in Word.

|
If your device is touch-enabled, the Draw tab is turned on automatically. Otherwise, turn it on by selecting File > Options > Customize Ribbon > Draw. |
Write, draw, or highlight text
The new pen set is customizable and portable. You define the pens you want to have, and they are then available in Word, Excel, and PowerPoint.
-
On the Draw tab of the Ribbon, tap a pen to select it.
In Word, you must be in Print layout to draw with ink. If the Draw tab is grayed out so that you can’t select a pen, go the View tab and select Print Layout.
-
Tap again to open the menu of Thickness and Color options for the pen. Select your preferred size and color.
-
There are five pen thickness settings ranging from .25 mm to 3.5 mm. Select a thickness or use the plus or minus sign to make your pen thicker or thinner.
-
Sixteen solid colors are available on the menu, with more available when you tap More Colors.
-
-
A Pencil texture is also available:
When you draw with the Pencil texture while using a supported digital stylus, you can tilt the stylus to get a «shading» effect, just like you would get with a real pencil.
-
On the touch screen, begin writing or drawing.
Once you have drawn an ink shape, it behaves like any shape that you are used to working with in Office. You can select the shape, then you can move or copy it, change its color, pivot its position, and so on.
-
To stop inking and select your annotations, either to modify or move them, pick Select
on the Draw tab.
Convert ink to text or shapes
See Convert ink to text or shapes in PowerPoint for Microsoft 365.
More features
Select a heading below to open it and see the detailed instructions.
-
Under Draw > Tools, tap the Eraser.
(In PowerPoint for Microsoft 365, you can choose from four erasers. Tap the down arrow on the Eraser button to pick the eraser that you want.)
-
With your pen or finger, drag the eraser over the ink you want to remove.
With the Segment Eraser in PowerPoint, you can simply tap a segment of ink or drag across it to remove it (rather than having to thoroughly wipe away the entire segment). Dragging across segments is an easy way to erase several at once.
Some active pens, such as the Surface pen, have an eraser that you can also use to erase digital ink.
When you’ve been drawing with ink, you can use Stop Inking  on the Draw tab to change the mouse pointer back to a standard selection tool
  . The selection tool can select digital ink drawings and any other kind of objects.
PowerPoint and Excel also have an ink selection tool, Lasso Select,  specifically for selecting objects drawn with ink. It’s most useful when you have a mixture of standard and ink objects and you only want to select an ink object.
Applies only to PowerPoint and Excel:
To select part of a drawing or words written in ink, use the Lasso Select tool. (This tool can’t select non-ink objects—that is, shapes, pictures, etc.)
-
Under Draw > Tools on the Ribbon, tap Lasso Select
. -
With your pen or finger, drag to draw a circle around the part of the drawing or word that you want to select. A faded, dashed selection region appears around it, and when you’re done, the portion you lassoed is selected. Then you can manipulate that object as you wish: move it, change its color, and so on.
In both Excel and PowerPoint, with a digital pen, you can select an area without even tapping the selection tool on the ribbon. Use the supported digital pen button to Lasso Select ink without visiting the ribbon. Then you can use the pen to move, resize, or rotate the ink object.
-
Select File > Options > Advanced.
-
In the Pen section, select the box next to Use pen to select and interact with content by default.
This setting only applies to the app in which you make it. So, for example, you can have automatic inking turned on in Visio and turned off in Word.
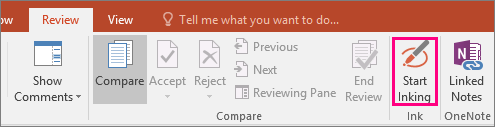
Find the drawing tools
Go to the Review tab and select Start Inking to display the Ink Tools and Pens tab.
Write or draw
-
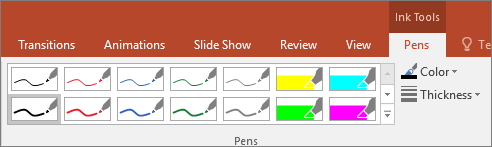
Under Ink Tools >Pens choose Pen.
-
To change the ink color and stroke width, point to the color and width (0.35mm — 0.5mm) you want.
-
On the touch screen, begin writing or drawing.
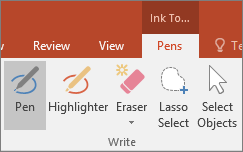
Highlight text
-
Under Ink Tools, on the Pens tab, click Highlighter, and then pick a highlight color.
-
Point and drag your pen or finger over the text that you want to highlight.
You can highlight text in Excel, Word, and Outlook, but PowerPoint doesn’t support highlighting text.

Delete whole written words or ink drawings
-
Under Ink Tools, on the Pens tab, click the arrow below Eraser, and then pick an eraser size.
-
With your pen or finger, select the word or ink drawing that you want to erase.

Drawing in OneNote
If you’re using OneNote and want to draw, see these other articles:
 OneNote for Windows 10: Write notes and draw in OneNote
 OneNote: Draw and sketch notes on a page
Extra features in PowerPoint
Select parts of an ink drawing or written words (PowerPoint only)
To select part of a drawing or some written words, use the Lasso tool. (You cannot use the Lasso tool to select non-ink objects (shapes, pictures, etc.).
-
Under Ink Tools, on the Pens tab, click Lasso Select.
-
With your pen or finger, drag to draw a circle around the part of the drawing or word that you want to select. A faded, dashed selection region appears around it, and when you’re done, the portion you lassoed will be selected.
Delete parts of an ink drawing or parts of written words (PowerPoint only)
-
Under Ink Tools, on the Pens tab, click the arrow below Eraser, and then pick an eraser size.
-
With your pen or finger, select parts of the ink drawing or text that you want to erase.
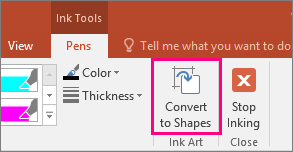
Convert ink drawings to shapes (PowerPoint only)
You can convert ink drawings on a touch screen into common shapes.
-
Under Ink Tools > Pens, select Convert to Shapes.
-
With a pen or your finger, draw a shape on the slide, and PowerPoint automatically converts your drawing to the shape that looks most like it.
To stop converting shapes, click Convert to Shapes again.
Which shapes can PowerPoint convert?
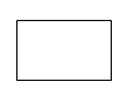
When you create an ink drawing, PowerPoint can convert it to the shape that is most like it.
|
Ink drawing |
Corresponding shape |
|---|---|
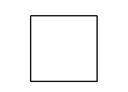
|
Rectangle
|
Rectangle
|
|
Square
|
Rectangle with all sides equal
|
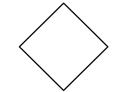
|
Diamond
|
Diamond
|
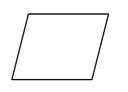
|
Parallelogram
|
Parallelogram
|
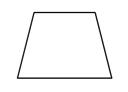
|
Trapezoid
|
Trapezoid
|
|
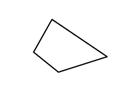
Irregular quadrilateral
|
Closed freeform shape with four sides
|
|
Regular pentagon
|
Pentagon with all sides equal
|
|
Regular hexagon
|
Hexagon with all sides equal
|
|
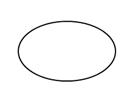
Ellipse
|
Ellipse
|
|
Circle
|
Ellipse with shape height and width equal
|
|
Single-headed arrow
|
Arrow
|
|
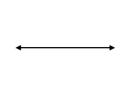
Double-headed arrow
|
Double arrow
|
|
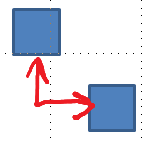
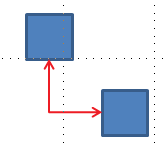
Arrows connecting two shapes
|
Arrow connectors
|
|
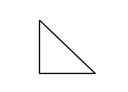
Right triangle
|
Triangle with right angle
|
|
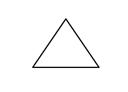
Equilateral triangle
|
Triangle with all sides equal
|
|
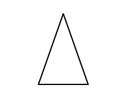
Isosceles triangle
|
Triangle with two equal sides
|
|
Irregular triangle
|
Closed freeform with three sides. |


For more information about using Office with Windows touch devices, see the following:
-
Office Touch Guide
-
Read documents in Word
Write, draw, or highlight text
 On the Mac, these features are only available in Microsoft 365 and Office 2019 for Mac.
-
On the Draw tab of the Ribbon, tap a pen to select it.
-
Tap again to open the menu of Thickness and Color options for the pen. Select your preferred size and color.
-
There are five pen thickness settings ranging from .25 mm to 3.5 mm. Select a thickness to make your pen thicker or thinner.
-
Sixteen solid colors are available on the menu, with more available when you tap More Colors.
-
Eight effects are also available: Rainbow, Galaxy, Lava, Ocean, Rose Gold, Gold, Silver, and Bronze.
-
-
A Pencil texture is also available:
When you draw with the Pencil texture while using a supported digital stylus, you can tilt the stylus to get a «shading» effect, just like you would get with a real pencil.
-
Once you have drawn an ink shape, it behaves like any shape that you are used to working with in Office. You can select the shape, then you can move or copy it, change its color, pivot its position, and so on.
-
To stop inking and select your annotations, press the Esc key.
Touch drawing with a trackpad
Rather than drawing ink with your mouse, you can draw on a trackpad with your finger. See Use your trackpad for «touch» drawing for more information.
Erase ink
-
Under Draw > Tools, tap the Eraser.
(In PowerPoint for Microsoft 365 for Mac, you can choose from different sizes of erasers. Word has three eraser options (version 16.28 or newer). Tap the down arrow on the Eraser button to pick the eraser that you want.)
-
With your mouse, pen, or finger, drag the eraser over the ink you want to remove.
Additional procedures
Select a heading below to open it and see the detailed instructions.
PowerPoint and Excel also have an ink selection tool, Lasso Select, specifically for selecting objects drawn with ink. It’s most useful when you have a mixture of standard and ink objects and you only want to select an ink object.
Applies only to PowerPoint and Excel:
To select part of a drawing or words written in ink, use the Lasso Select tool. (This tool can’t select non-ink objects—that is, shapes, pictures, etc.)
-
Under Draw > Tools on the Ribbon, tap Lasso Select
. -
With your mouse, pen, or finger, drag to draw a circle around the part of the drawing or word that you want to select. A faded, dashed selection region appears around it, and when you’re done, the portion you lassoed is selected. Then you can manipulate that object as you wish: move it, change its color, and so on.
-
On the PowerPoint, Word, or Excel menu, select Preferences > Authoring and Proofing Tools > General.
-
In the Pen section, clear the box next to Use pen to select and interact with content by default.
This setting only applies to the current app. So, for example, you can have automatic inking turned on in Excel and turned off in Word.
Basic inking tools
Word for iOS, Excel for iOS, and PowerPoint for iOS all come with basic inking options on the Draw tab: a selection tool, a draw-with-touch tool, a stroke eraser, pens, multiple ink colors, and ink thickness options:

 If you’re working in OneNote on your iPad, see Handwrite, draw, and sketch.
Draw or write
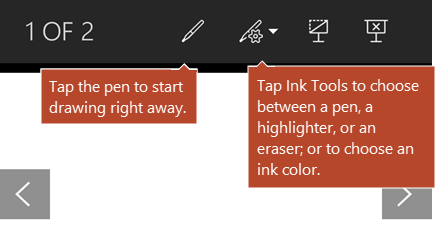
By default, Draw with Mouse or Touch (or «Inking mode») is turned on when you are using a mobile device. Just tap the Draw tab, select a pen  , and you can begin drawing ink on a slide.
To change the settings on a pen:
-
Tap again to open the menu of thickness and color options for the pen. Select your preferred size and color:
-
There are five pen thickness settings ranging from .25 mm to 3.5 mm. Select a thickness or use the plus or minus sign to make your pen thicker or thinner.
-
Sixteen solid colors are available on the menu, with more available when you tap More Ink Colors.
-
(For Microsoft 365 subscribers only) Eight effects are also available: Rainbow, Galaxy, Lava, Ocean, Rose Gold, Gold, Silver, and Bronze.
A Pencil texture is now available:
The Apple Pencil is sensitive to pressure, which allows you to vary line thickness. It’s also sensitive to tilt, which allows you to create shading, as you can with a tilted lead pencil.
-
-
On the touch screen, begin writing or drawing.
Once you have drawn an ink shape, it behaves like any shape that you are used to working with in Office. You can select the shape, then you can move or copy it, change its color, pivot its position, and so on.
-
To stop inking and select your annotations, either to modify or move them, turn off Draw with Touch on the Draw tab. Turning off this feature also keeps you from making accidental ink marks when your hand touches the screen.

Watch a video overview of the inking features in iPhone and iPad:

2:47
Select
On an iOS device, Inking mode is turned on when you have selected a pen or highlighter on the Draw tab. Otherwise, you are in Select mode, and you can tap to select an object.
(If you’re using an Apple Pencil on an iPad Pro device, you can make Select mode the default by going to app settings.)
PowerPoint and Excel have an ink selection tool, Lasso Select,  specifically for selecting objects drawn with ink. It’s most useful when you have a mixture of standard and ink objects on a slide and you only want to select an ink object.
To select part of a drawing or words written in ink in PowerPoint or Excel, use the Lasso Select tool:
-
On the Draw tab on the Ribbon, tap Lasso Select
. -
With your pen or finger, drag to encircle the ink that you want to select.
A faded, dashed selection region appears as you drag, and when you’re done, the portion you’ve lassoed is selected. Then you can manipulate that object as you wish: move it, copy it, delete it, and so on.
Erase
-
On the Draw tab, tap the Eraser.
Word has three erasers to choose from—a stroke eraser, a small eraser, or a medium eraser. Tap the down arrow on the Eraser button to pick the eraser that you want.
PowerPoint has those three erasers plus one more: With the Segment Eraser, you can simply tap a segment of ink or drag across it to remove it (rather than having to thoroughly wipe away the entire segment). Dragging across segments is an easy way to erase several at once.
-
Drag the eraser over the ink you want to remove.
Switch tools with the new Apple Pencil
Office for iOS supports the 2nd-generation Apple Pencil and its double-tap gesture. By default, the double-tap gesture switches from the current tool to the eraser, but the System settings on your device allow you to choose a different behavior for this gesture. This feature is available to Microsoft 365 subscribers in Word, Excel, and PowerPoint on iPad version 2.22.19020201 and later.
Turn off automatic inking
-
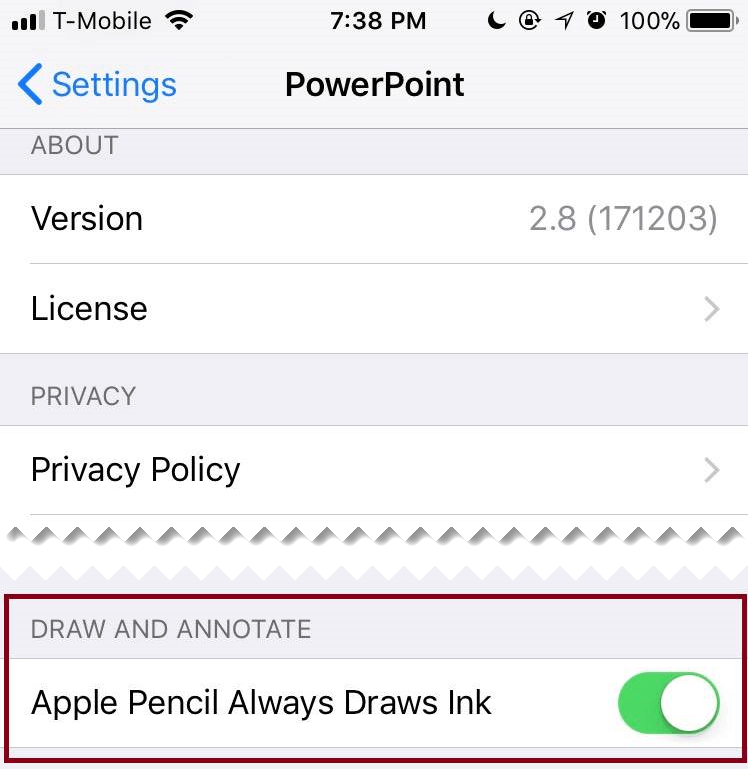
Open the Settings app from the home screen of your iOS device.
-
Scroll through the list of apps at the bottom of the Settings page to find your Microsoft 365 app, and tap to open its Settings.
-
In the app settings on the right side, at the bottom under Draw and Annotate, toggle Apple Pencil Always Draws Ink.
For more information, see Turn off automatic inking on iOS.
Convert ink drawings to standard shapes in PowerPoint
In PowerPoint, you can convert ink drawings on a touch screen into common shapes:
-
Ensure that Draw with Mouse or Touch
is turned on. -
Tap Ink to Shapes
-
With a pen or your finger, draw a shape on the slide. When you finish drawing, PowerPoint automatically converts your drawing to the shape that looks most like it.
To stop converting shapes, tap Ink to Shapes again.
 is turned on.
Basic inking tools
Word for Android, Excel for Android, and PowerPoint for Android all come with basic inking options on the Draw tab: a selection tool, a draw-with-touch tool, a stroke eraser, pens, ink colors and a color wheel, and ink thickness options:

Draw or write
By default, Draw with Mouse or Touch (or «Inking mode») is turned on when you are using a mobile device. Just tap the Draw tab, select a pen  , and you can begin drawing ink on a slide.
Select
On an Android device, Inking mode is turned on when you have selected a pen or highlighter on the Draw tab. Otherwise, you are in Select mode, and you can tap to select an object.
PowerPoint and Excel have an ink selection tool, Lasso Select, specifically for selecting ink drawings. It’s most useful when you have a mixture of standard and ink objects and you only want to select an ink object.
To select part of a drawing or words written in ink in PowerPoint or Excel, use the Lasso Select tool.
-
On the Draw tab on the Ribbon, tap Lasso Select
. -
With your pen or finger, drag to encircle the ink that you want to select.
A faded, dashed selection region appears as you drag, and when you’re done, the portion you’ve lassoed is selected. Then you can manipulate that object as you wish: move it, copy it, delete it, and so on.
Erase
-
On the Draw tab, tap the Eraser.
(In PowerPoint, you can choose from three erasers—a stroke eraser, or a small or medium eraser. Tap the down arrow on the Eraser button to pick the eraser that you want.)
-
Drag the eraser over the ink you want to remove.
Some active pens, such as the Surface pen, have an eraser that you can also use to erase digital ink without having to select an eraser from the Ribbon.
Convert ink drawings to standard shapes in PowerPoint
In PowerPoint, you can convert ink drawings on a touch screen into common shapes:
-
Ensure that Draw with Mouse or Touch
is turned on. -
Tap Ink to Shapes
-
With a pen or your finger, draw a shape on the slide. When you finish drawing, PowerPoint automatically converts your drawing to the shape that looks most like it.
To stop converting shapes, tap Ink to Shapes again.
Annotate with ink while showing a presentation
In PowerPoint, you can add ink markings to a slide while you are presenting:
Basic inking tools
Word Mobile, Excel Mobile, and PowerPoint Mobile all come with basic inking options on the Draw tab: a selection tool, a draw-with-touch tool, a stroke eraser, pens, multiple ink colors, and ink thickness options:

If you’re working in OneNote for Windows 10, see Write notes and draw in OneNote for Windows 10.
Draw or write
By default, Draw with Touch (or «Inking mode») is turned on when you are using a mobile device. Just tap the Draw tab, select a pen  , and you can begin drawing ink on a slide.
The Draw tab in Word Mobile, Excel Mobile, and PowerPoint Mobile for Windows 10 is similar to the desktop versions of each app. Before you can use the drawing features, be sure to update to the latest version of Windows 10. To do this, select the Windows button in the lower-left corner of your screen, and select Settings > Update & security > Windows Update. Click Check for updates to get the latest updates.
To change the settings on a pen:
-
Tap again to open the menu of thickness and color options for the pen. Select your preferred size and color:
-
There are five pen thickness settings ranging from .25 mm to 3.5 mm. Select a thickness or use the plus or minus sign to make your pen thicker or thinner.
-
Sixteen solid colors are available on the menu, with more available when you tap More Ink Colors.
-
Eight effects are also available: Rainbow, Galaxy, Lava, Ocean, Rose Gold, Gold, Silver, and Bronze.
-
-
On the touch screen, begin writing or drawing.
Once you have drawn an ink shape, it behaves like any shape that you are used to working with in Office. You can select the shape, then you can move or copy it, change its color, pivot its position, and so on.
-
To stop inking and select your annotations, either to modify or move them, turn off Draw with Touch on the Draw tab. Turning off this feature also keeps you from making accidental ink marks when your hand touches the screen.
Select
Inking mode is turned on when you have selected a pen or highlighter on the Draw tab. Otherwise, you are in Select mode, and you can tap to select an object.
PowerPoint Mobile and Excel Mobile also have an ink selection tool, Lasso Select, , specifically for selecting objects drawn with ink. It’s most useful when you have a mixture of standard and ink objects and you only want to select an ink object.
To select part of a drawing or words written in ink in PowerPoint or Excel:
-
On the Draw tab on the Ribbon, tap Lasso Select
. -
With your pen or finger, drag to encircle the ink that you want to select.
A faded, dashed selection region appears as you drag, and when you’re done, the portion you’ve lassoed is selected. Then you can manipulate that object as you wish: move it, copy it, delete it, and so on.
Erase
-
On the Draw tab, tap the Eraser.
(In PowerPoint, you can choose from three erasers—a stroke eraser, or a small or medium eraser. Tap the down arrow on the Eraser button to pick the eraser that you want.)
-
Drag the eraser over the ink you want to remove.
Convert ink drawings to standard shapes in PowerPoint
In PowerPoint, you can convert ink drawings on a touch screen into common shapes:
-
Ensure that Draw with Mouse or Touch
is turned on. -
Tap Ink to Shapes
-
With a pen or your finger, draw a shape on the slide. When you finish drawing, PowerPoint automatically converts your drawing to the shape that looks most like it.
To stop converting shapes, tap Ink to Shapes again.
Open the Draw tab on Windows 10 Mobile phones
Here’s how to see the Draw tab in Word, Excel, and PowerPoint on Windows 10 Mobile phones.
-
Select the More button
in the lower-right corner of the screen. -
Pick the Draw tab.
 in the lower-right corner of the screen.
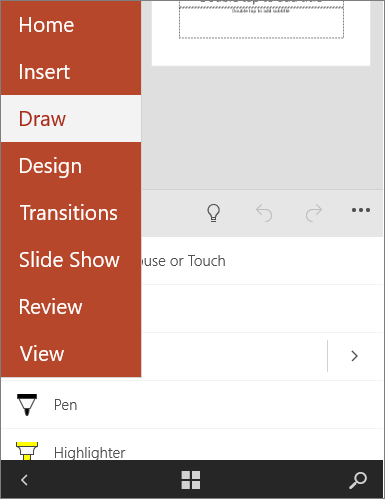
Write, draw, or highlight text in PowerPoint
-
On the Draw tab of the ribbon tap a pen to select it.
-
If you want to customize the pen tap the drop arrow next to the pen on the ribbon and select the thickness, and color, you want.
The Draw menu lets you have two separate pens available, plus a highlighter.
Stop inking
After you’ve drawn what you want, you can stop inking and return to selection mode by pressing the Esc key.
Erase ink
Select the eraser from the pens gallery on the Draw tab, then swipe your cursor across the ink you want to erase. This is a stroke eraser, which means it will erase entire ink strokes at a time.
See Also
Languages supported for ink-to-text conversion
Turn off automatic inking on Windows or iOS

While Microsoft Word isn’t the best drawing tool, you can create basic drawings or scribbles in Word directly. Here’s how.
Microsoft Word isn’t essential software for graphics designers, and for a good reason. It’s true—Microsoft Word isn’t best suited for drawing, but it does have some built-in drawing tools you can use, should you need to.
For simple drawings, you can draw in Word directly using shapes, lines, or pen tools. If you want to draw in Microsoft Word, here’s what you’ll need to do.
These instructions have been designed with Microsoft Office 2019 in mind. Note that Microsoft 365 (formerly O365) is the Office suite with 1 TB of OneDrive per user. While the steps may work for older versions of Word, there may be some variations or missing features.
Using Microsoft Word Drawing Tools
There are two sets of drawing tools available to Microsoft Word users. If you want to draw basic, block-like images, you can insert shapes or lines into your Word document and group them together. You might want to do this if you’re creating a diagram or flow chart, for instance.
Alternatively, you can turn Word into your own personal canvas using pen drawing tools. If you have a touchscreen device or a graphics tablet, you can create freehand drawings.
To insert shapes, you’ll need to press the Insert tab on the ribbon bar. For freehand drawings, press the Draw tab instead.

Inserting Shapes into Microsoft Word
If you’re not confident of your freehand drawing ability, or you want to create diagrams in Word, you can insert shapes.
There are hundreds of pre-set shapes available. You can draw typical shapes like squares or circles or insert arrows, stars, speech bubbles, and more. To insert a shape, press the Insert tab on the ribbon bar, then press the Shapes button.
This will list the various shape options in a drop-down menu for you to choose from.

Press on one of the pre-set shapes or line options to select it—your cursor will change at this point.
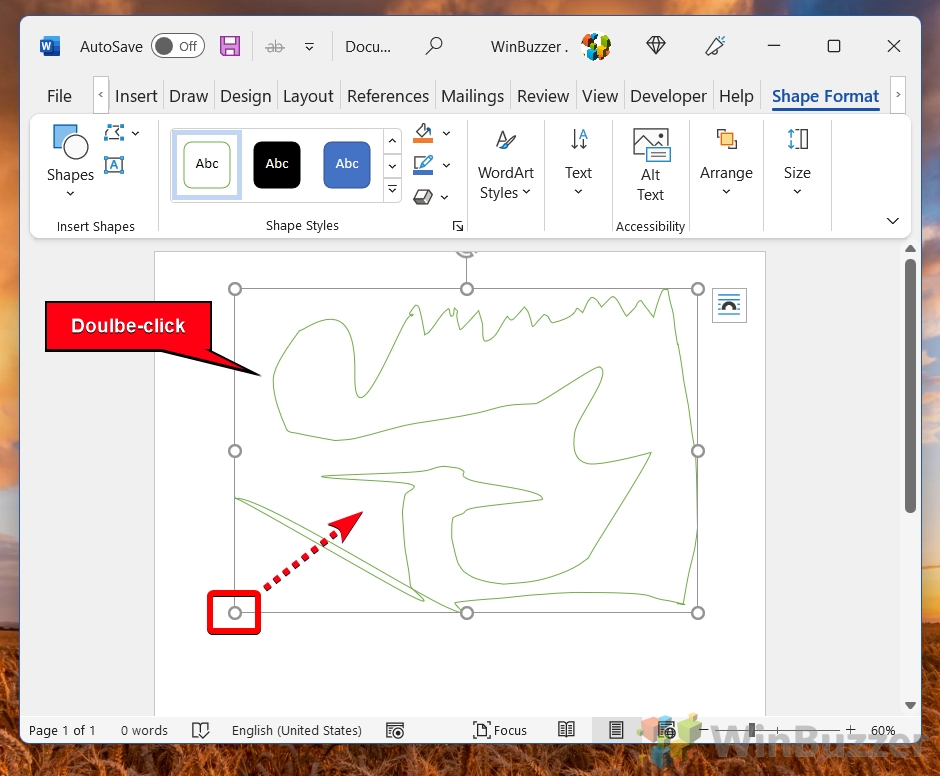
Once this happens, draw onto your Word document directly to insert the shape or line you selected. This allows you to select the appropriate size for your shape.
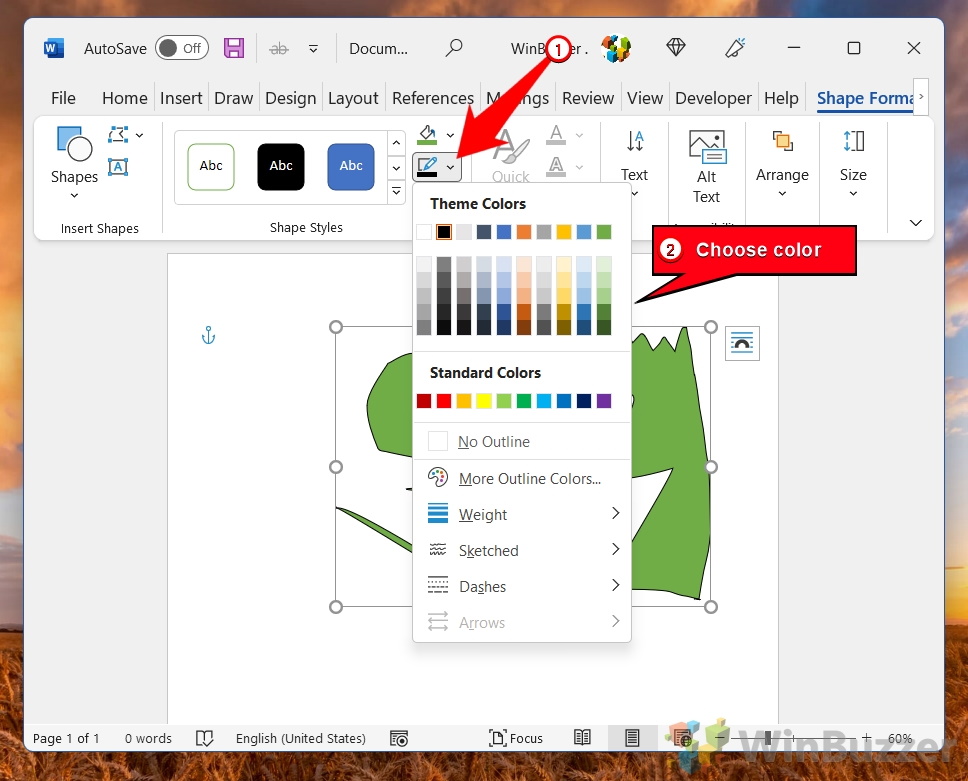
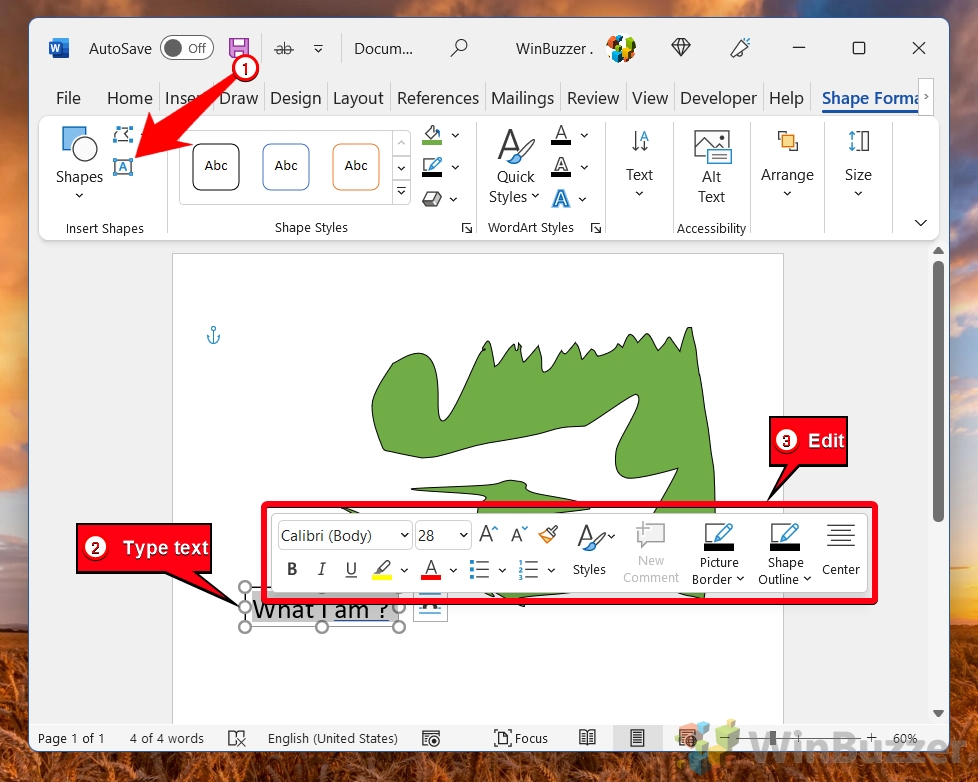
With the shape inserted and selected, Word will switch to the Format tab on the ribbon bar. From here, you can format your shape.

For instance, add text to your shape and begin typing with the shape selected–the text will be inserted inside the shape.

You can also change the color and style of your shape, as well as the position and alignment of any inserted text, using the options listed in the Format tab.

Creating Freehand Drawings in Word
If you want to create more original Word drawings, you can use various pen drawing tools to draw onto a Word document. You can do this using a mouse or trackpad, or more precisely, using a touchscreen device or graphics tablet.
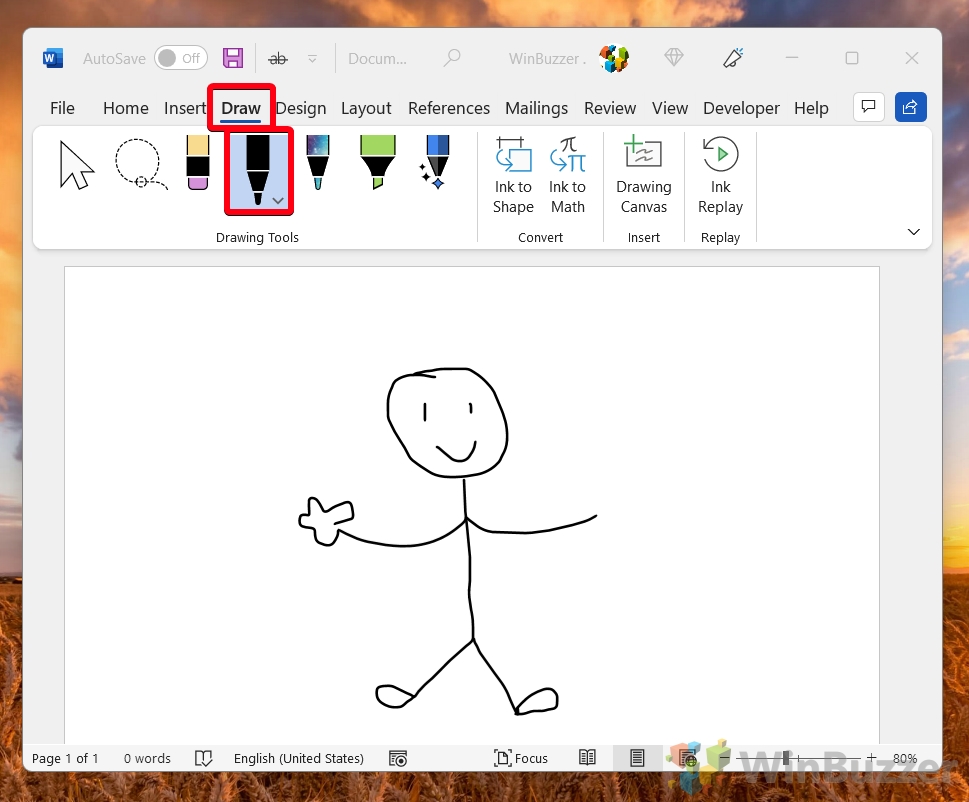
To start, press the Draw tab on the ribbon bar. This will display the pen drawing tool options for you to use.

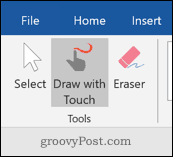
Three drawing options are available under the Tools section. Press Draw with Touch to begin drawing with one of the pen tools, Eraser to switch to the eraser tool, or Select to select your drawings as objects to move, copy, or delete them.
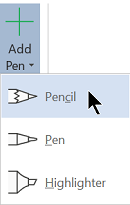
A list of available pens to draw with is shown under the Pens category. There are three drawing pens available—Pencil, Pen, and Highlighter.
As you’d expect, using the Pencil tool inserts a finer, less precise drawing line to your document. The Pen tool is the opposite—lines are clearer, thicker, and more defined. The Highlighter tool can be used for emphasis, adding color to your drawings.
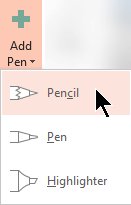
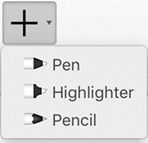
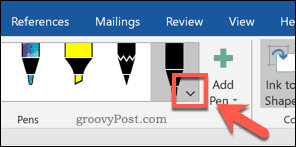
Several pre-set colors and designs are available already in the Pens category—select one of these to begin drawing. Alternatively, you can create your own by pressing the Add Pen button and selecting one of the tools listed in the drop-down menu.

This will add a new pen design to the Pens category, with a settings drop-down menu. From here, you can set the thickness and color of the pen tool, with a preview of the pen design at the top.
You can edit these in the future by hovering over a pen design and press the arrow icon in the bottom-left corner.
With your drawing pen tool selected and configured, you can begin drawing onto your Word document directly.
Creating a Drawing Canvas in Word
Word allows you to draw onto a Word document without constraints. If you’d prefer to draw onto a much smaller area of your Word document, however, you can insert a drawing canvas.
A drawing canvas groups your drawing into a single object which can then be moved, resized, or copied elsewhere. To do this, press the Drawing Canvas button in the Insert section of the Draw tab.

This will insert the canvas into your Word document. You will only be able to draw inside the canvas object’s borders– anything drawn outside of this will be ignored.

Designing Microsoft Word Documents
While it hasn’t been designed with drawing in mind, you can still use shapes, lines, and freehand pen drawings to create simplistic images in Microsoft Word. You can use shapes to create a flow chart or diagram or use free-hand drawings to show your artistic drawing skills.
You can insert and edit images in Microsoft Word too, but don’t forget Word’s main purpose. If you’re designing new documents, you may prefer to use building blocks to help you create them more quickly.
![]()
Click in your document where you want to create the drawing. On the Insert tab, in the Illustrations group, click Shapes.
Add a drawing to a document
- Insert a shape.
- Change a shape.
- Add text to a shape.
- Group selected shapes.
- Draw in the document.
- Adjust the size of the shapes.
Contents
- 1 How do you draw on a Word document?
- 2 Can I draw on Google Docs?
- 3 How do I draw a pen in Word?
- 4 How do I draw freehand in Word?
- 5 How can I draw on a PDF?
- 6 Where is drawing tool in Word?
- 7 How do you use pen on Google Docs?
- 8 How do you write on screen?
- 9 Which tool helps you draw freehand?
- 10 What is meant by free hand drawing?
- 11 Does scribble work with Microsoft Word?
- 12 How do you put markers on a PDF?
- 13 How do I draw on a PDF without Adobe?
- 14 How do you draw in Powerpoint?
- 15 Can I handwrite in Google Docs?
- 16 Where is the Scribble tool?
- 17 How do you use Apple pencil on Google Docs?
- 18 Is there a pen tool in Google Slides?
- 19 How do you paint on Google Docs?
- 20 How do you write on docs?
How do you draw on a Word document?
How to draw in Word
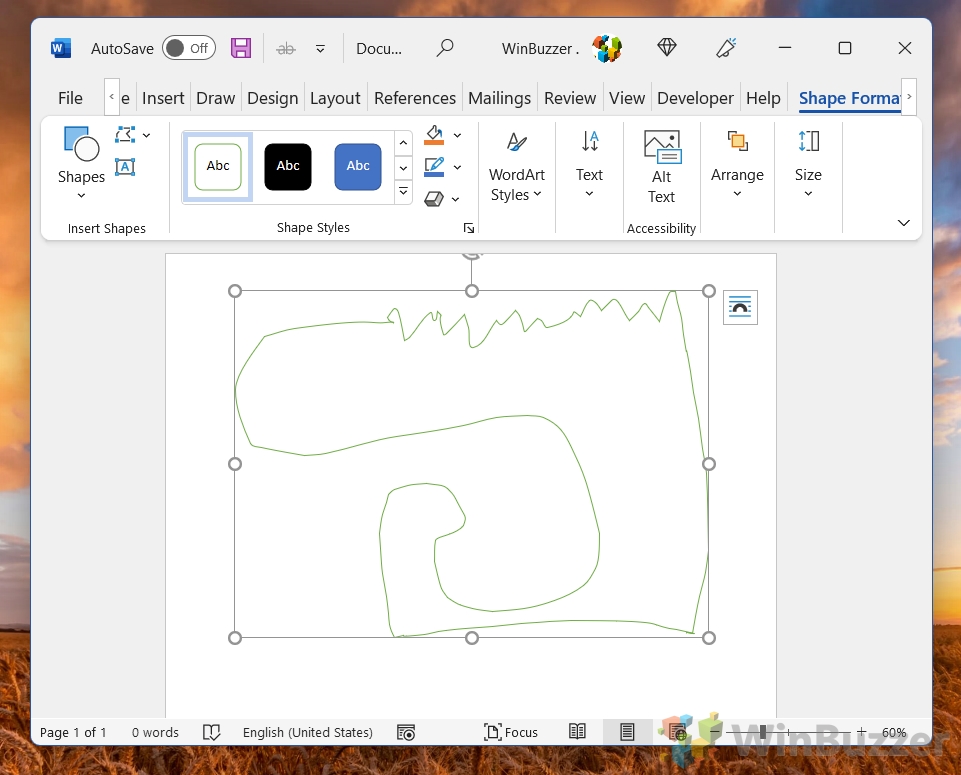
- Click the ‘Shapes’ button and select ‘Scribble’ Open up your Microsoft Word document.
- Hold down your mouse to draw. Click and hold down your mouse to draw.
- Release the mouse. As soon as you release your mouse, the drawing will be finished.
- Edit your drawing. Double-click your drawing.
Can I draw on Google Docs?
You can draw in Google Docs by using the built-in Drawing tool. The Drawing tool allows you to create and manipulate lines, shapes, colors, text, and more to add an artistic touch to your documents.
How do I draw a pen in Word?
On the Draw tab of the Ribbon, tap a pen to select it. In Word, you must be in Print layout to draw with ink. If the Draw tab is grayed out so that you can’t select a pen, go the View tab and select Print Layout. ; then you can select a pen to draw with.
How do I draw freehand in Word?
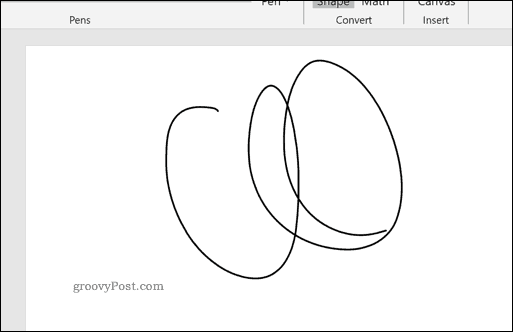
Draw a freeform shape
Click anywhere in the document, and then drag to draw. To draw a straight segment with the Freeform tool, click one location, move your pointer to a different location, and then click again; to draw a curved segment, keep your mouse button pressed as you drag to draw.
How can I draw on a PDF?
Add a line, arrow, or shape
- Choose Tools > Comment.
- Draw in the PDF:
- To edit or resize the markup, select it and drag one of the handles to make your adjustments.
- To add a pop-up note to the markup, select the Hand tool, and double-click the markup.
- (Optional) Click the close button in the pop-up note.
Where is drawing tool in Word?
Click View > Toolbars > Drawing. The Drawing toolbar is displayed or hidden. The Drawing toolbar contains a collection of icon buttons that allows the user to draw shapes and images in the document.
How do you use pen on Google Docs?
Use a stylus with your virtual keyboard
Open any text box or app that you can type in, like Docs or Gmail. Tap into the text box. The handwriting pad should appear. If you don’t see Handwrite: At the top of the virtual keyboard, tap the Right arrow , then Handwrite .
How do you write on screen?
How could I write on computer screen?
- In the Screen Draw Tools Pane, click Pen. tool.
- Drag the pointer to write on computer screen.
Which tool helps you draw freehand?
Explanation: pencil tool is used to draw free hand drawing in computer.
What is meant by free hand drawing?
A freehand drawing is drawn without using instruments such as a ruler or a pair of compasses.freehand sketches. Freehand is also an adverb.
Does scribble work with Microsoft Word?
Turn handwriting into text with Scribble
In a document, tap Apple Pencil in the body of a word-processing document where you want to write. Or tap in a text box, shape, or in a table cell in a word-processing or page layout document. Tap the Scribble tool in the toolbar at the bottom of the screen, then start writing.
How do you put markers on a PDF?
Using Pen/Marker
Choose Tool Pen to enable the pen. The pen writes on your document like a typical felt-tip pen. To use the marker, select Tool Marker from the menu. The marker works like a typical highlighter – it does not obscure the text, and it is therefore well-suited for emphasizing certain portions.
How do I draw on a PDF without Adobe?
How to draw on a PDF online for free
- First, go to our PDF Editor and upload your PDF.
- Choose the ‘Freehand tool’ via the top toolbar or by pressing ‘F. ‘
- Pick one of the 27 available colors, the thickness, and the opacity of the drawing tool.
- Draw as you please, and download your PDF when you are done.
How do you draw in Powerpoint?
Turn on the pen and draw in Slide Show
- On the Slide Show tab, click either From Beginning or From Current Slide to start your slide show.
- When you reach the slide where you want to draw something, simply put your digital pen to the screen, and then draw.
Can I handwrite in Google Docs?
Gmail and Google Docs Now Support Handwriting Input.
Where is the Scribble tool?
The Scribble Tool is located in the top toolbar in both the Review and Create Modes. There are several line widths, colors, and styles to choose from so you can stylize your notes as you see fit.
How do you use Apple pencil on Google Docs?
Click Insert -> Drawing then choose the scribble option. So possible on a Mac and iPad Pro with Pen. Good to know!
Is there a pen tool in Google Slides?
Annotate Google Slides
Next is the pen tool. When you select it, you’ll notice different color pen choices show up. Pick a color you want, and you can use it to draw directly on your slides.You can also backfill text box with color to make it stand out and use the pen to to annotate what you just typed as well.
How do you paint on Google Docs?
Fire up your browser, head to Google Docs, and open a document. Highlight the text you want to copy the format of, and then click on the “Paint Format” icon in the toolbar. After it’s enabled, your cursor turns into a paint roller to show you the format was copied.
How do you write on docs?
Using Handwriting Input in Google Docs
With a document open, choose the More menu item to find it. The same handwriting window will appear for Google Docs as it did for Gmail above. Write out the words and then choose an auto-populated word or phrase to enter it.

Contents
- 1 How to Draw in Word with the Shapes Tool
- 2 How to Draw on a Word Document with the Microsoft Word Drawing Tool
- 3 Extra: How to Draw on Google Docs
- 4 Extra: How to Annotate Screenshots with Snip and Sketch
The instances where you’d want to draw in Word in a professional environment are slim, but that doesn’t mean you shouldn’t do it.
Drawings can add some extra flavor to your documents while remaining suitable for certain audiences. We’re going to show you how to draw on Word documents using two tools: the freehand tool and the shapes tool.
Drawings in Word
The Shapes tool lets you create illustrations using a variety of preset shapes or its line tool. It’s best suited for those using a keyboard and mouse, as it allows you to get passable drawings without having a steady hand.
Freehand drawing in Word is primarily designed for those with touchscreens or tablets. It forgoes shapes for a series of more traditional pens and markers. You can choose whichever of these suits you and follow along below:
Drawing with the shapes tool doesn’t produce the best results, but it’ll definitely do in a pinch. You can even use the freeform: scribble tool to draw any shape you want. Here’s how to use it:
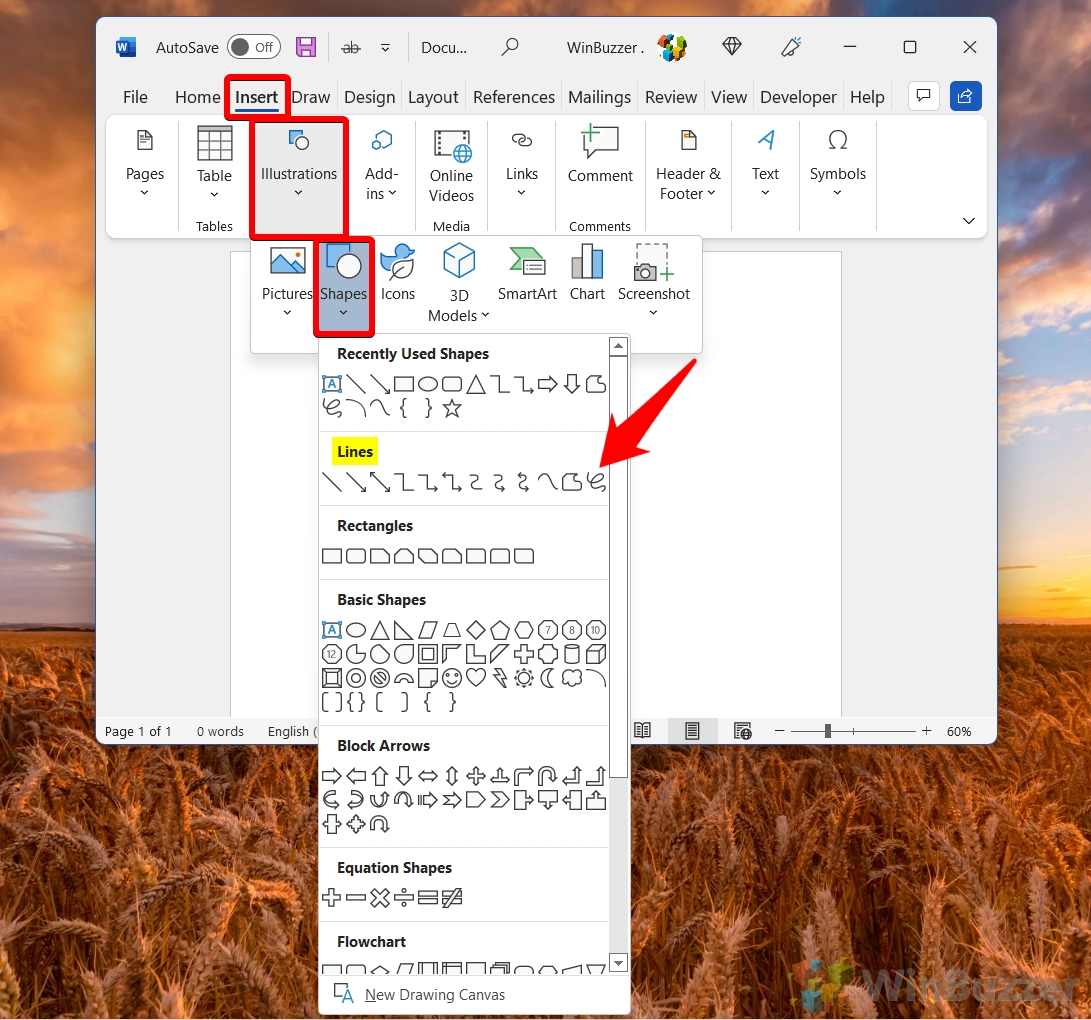
- Open the “Insert” tab of your ribbon and click “Illustrations > Shapes > Freeform: scribble”

- Click and drag on your canvas to draw

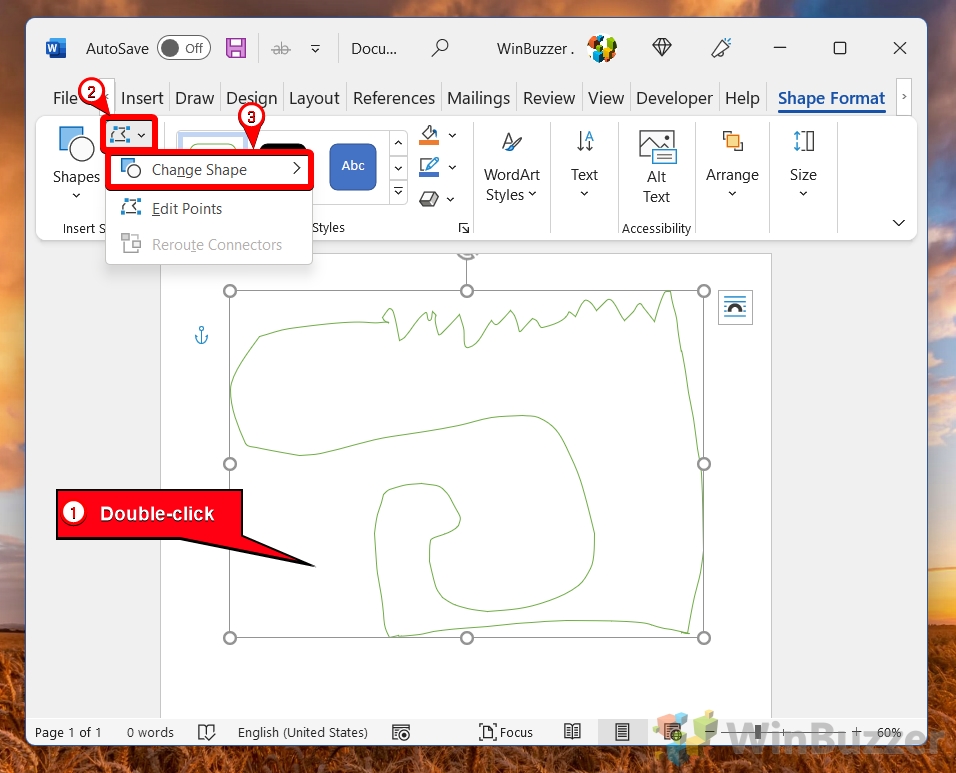
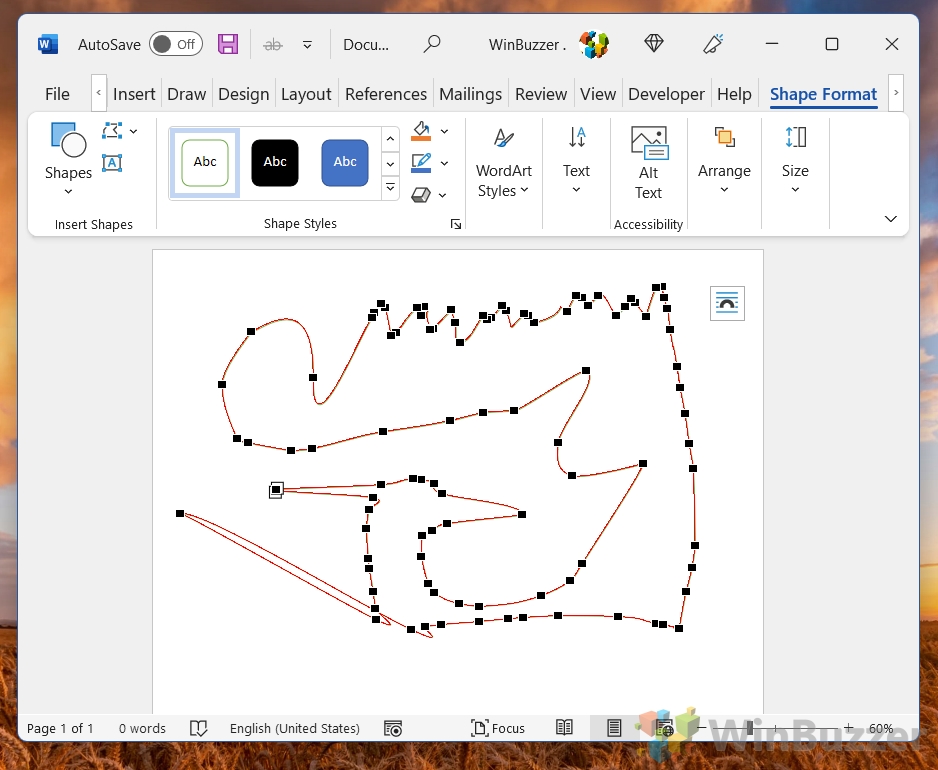
- Modify your drawing by double-clicking it and pressing “Edit points icon > Change shape”

- Move the points around to edit your drawing
Click away when you’re done to apply the changes.

- Double-click the shape and drag a corner or other anchor point to resize it
Step description

- With the shape selected, press the paint bucket and choose a color to fill it in

- Click the pencil icon to choose a stroke color

- Click the “A” in a box on the left to add text and use the pop-up menu to adjust its formatting

- Click the “WordArt Styles” link in the ribbon and add gradients, shadows, and textures
Once you’re done, you can right-click it and press “Save as Picture…” to save it as a shareable image file.


How to Draw on a Word Document with the Microsoft Word Drawing Tool
The Microsoft Word drawing tool uses the Microsoft Ink engine for a very competent drawing and annotation experience. It supports advanced features like pressure sensitivity and allows you to choose between a variety of pen/pencil textures for your brush. Here’s how you use it:
- Open the “Draw” tab of the ribbon and click on the pen tool
Click and drag with your cursor, finger, or tablet pen to draw.

- Add some color via the colored pen icon
Technically, you can change the color of the regular pen, but having a separate tool helps you to quickly switch between different colors and thicknesses.
- Press the down arrow on the colored pen to modify color and thickness

- Press one of the images to use it as a pen texture

- Use the highlighter pen for a square brush

- Press the eraser icon and use it to clean up your image
You can just click and drag over lines with this tool to remove them.

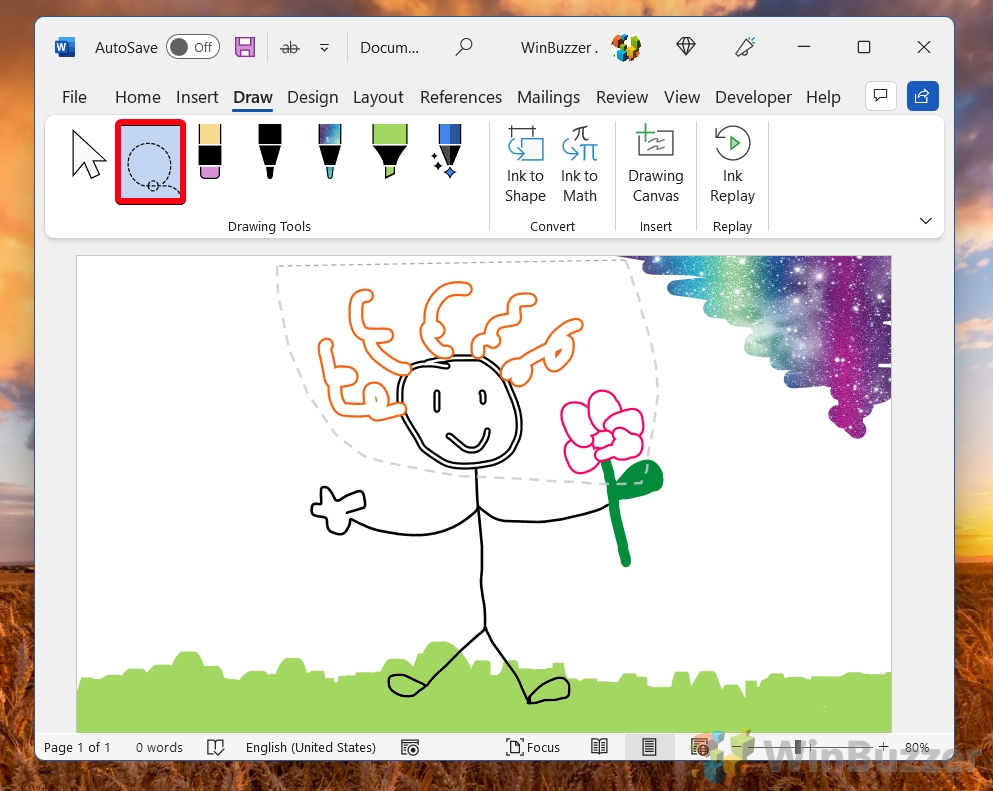
- Select shapes by clicking the lasso tool and dragging around them

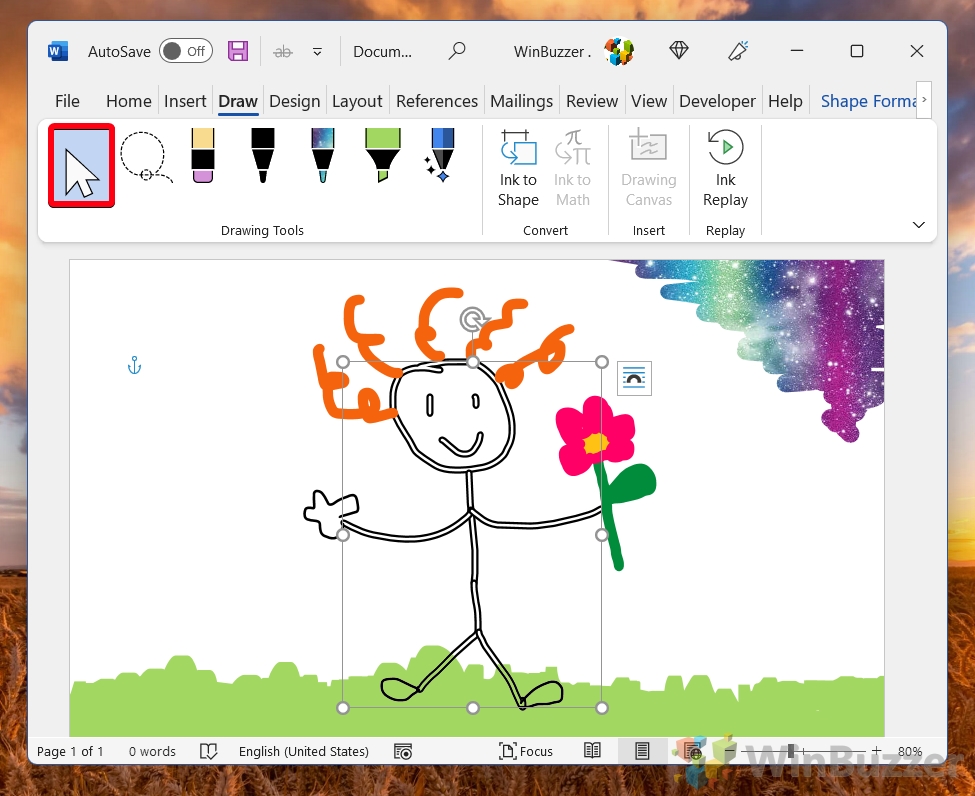
- Click and drag with the cursor tool to move your lines

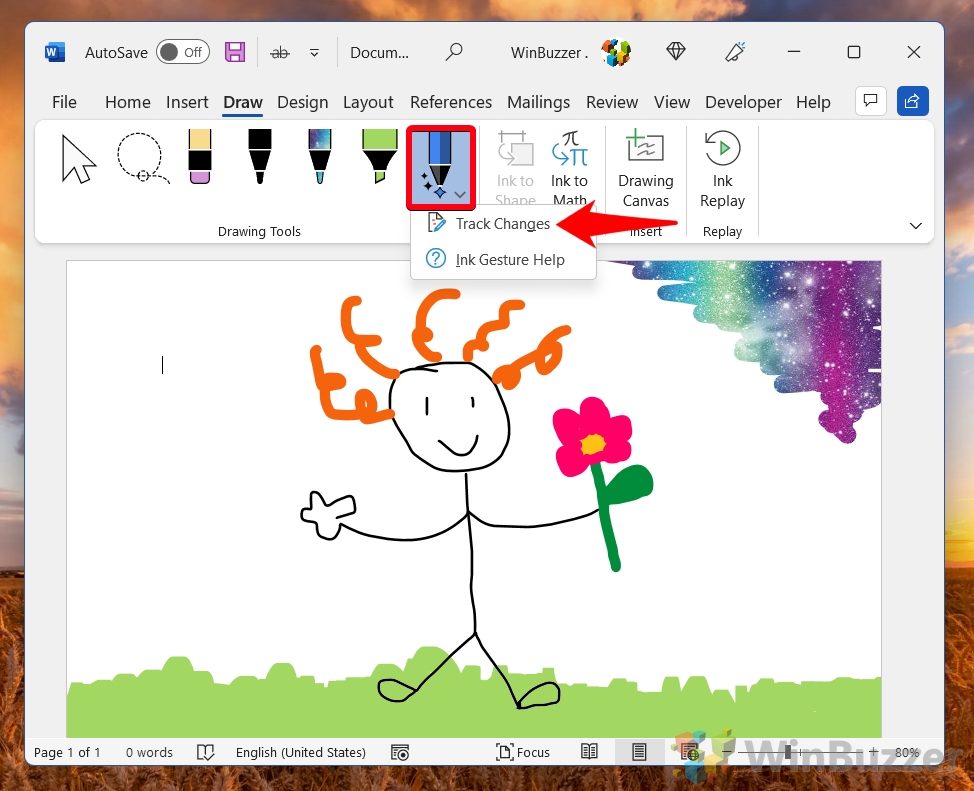
- Click on the action pen and choose “Track Changes”

- Annotate on text with typical editing marks to modify it

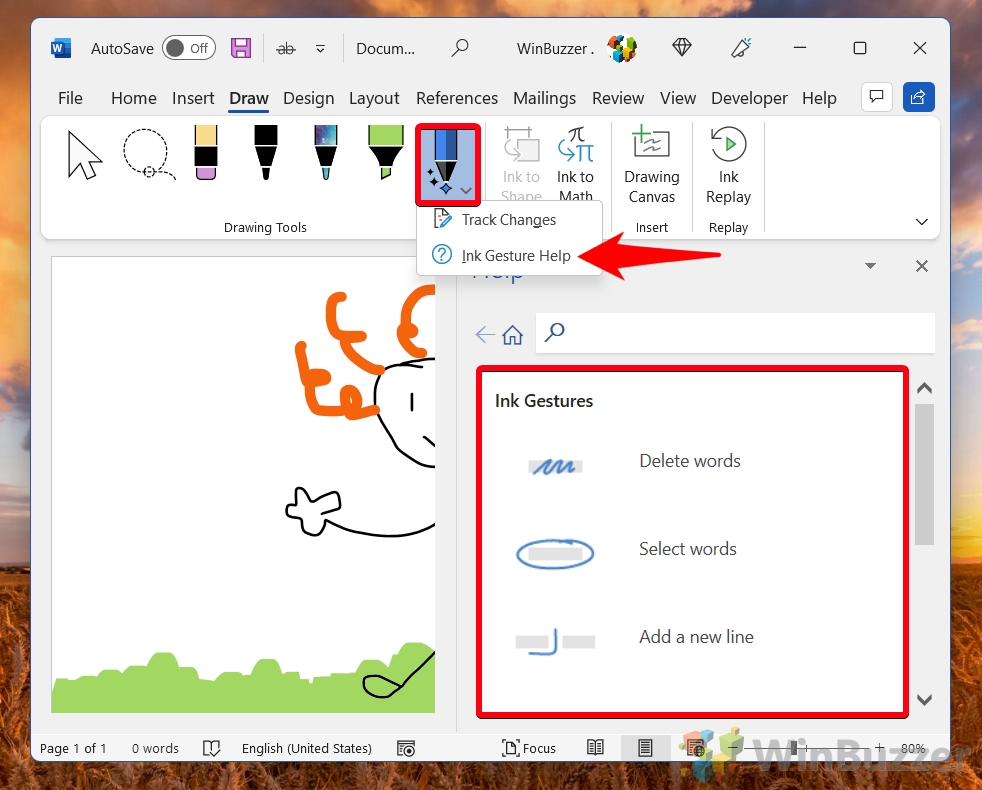
- For editing mark tips, click the action pen and press “Ink Gesture Help”


If you prefer to use Google’s text editing tools, drawing gets a bit less intuitive, but it’s still entirely possible. Here’s our existing guide on how to draw on Google Docs.

Extra: How to Annotate Screenshots with Snip and Sketch
You can also take a screenshot and annotate on it directly using Microsoft’s Snip and Sketch tool. Here’s our tutorial on the matter.

Microsoft Word mainly works with text, but sometimes you need some art to make your report or article pop. Adding pictures, shapes, charts, and so on is easy, but what about drawing it by hand?
Word’s pen tools are just what you need to mark or draw on your text. Here’s what each can do and how it can benefit your project.
Also known as ink tools, they’re in the Draw tab and are meant for more delicate work than throwing on SmartArt or 3D models. Basically, you can mark and enhance your document with your pen tools faster than with a keyboard.
Quite artistic tasks, like making a custom cover page in Word, can really benefit from these tools. When designing a book, for example, you can specify exactly where artwork should go. You could even have the author sign it straight onto the screen.
As Microsoft itself explains, your pens are especially useful when working on a tablet or smartphone—any touchscreen, really. With your finger, stylus, or mouse, you can sketch shapes and mind maps, show how to draw symbols, mark homework, and even insert math.
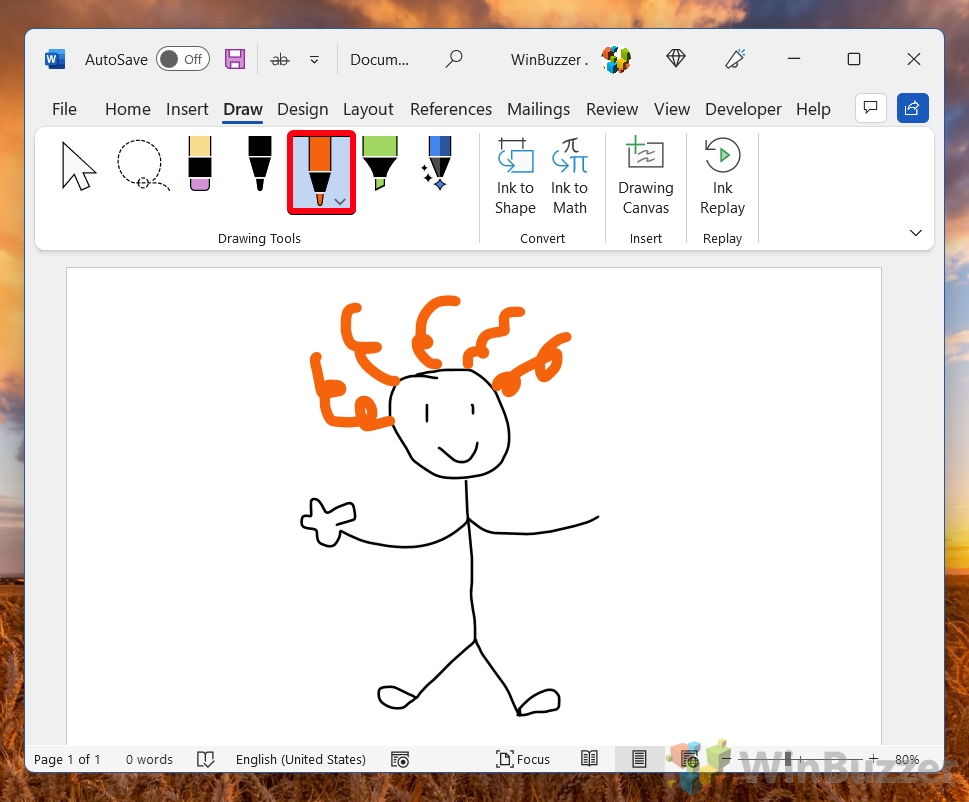
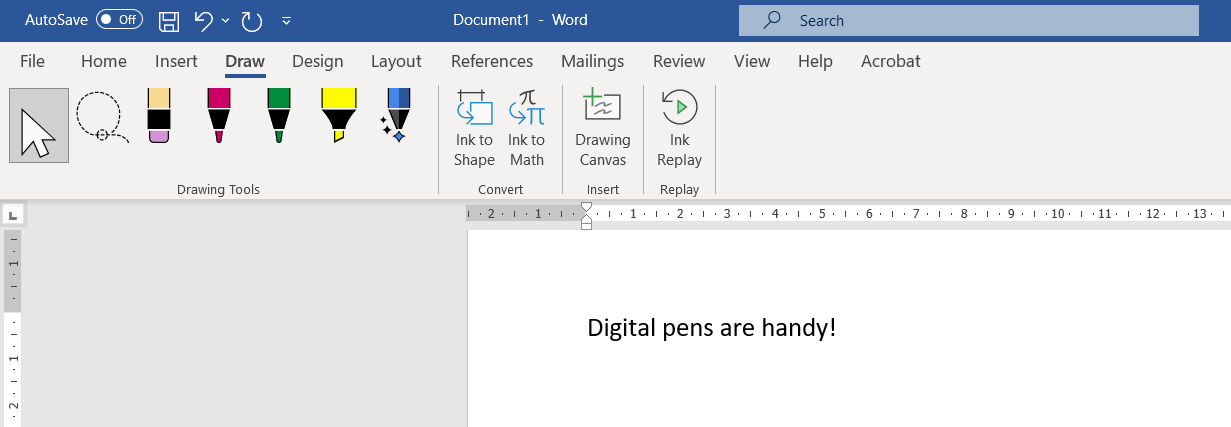
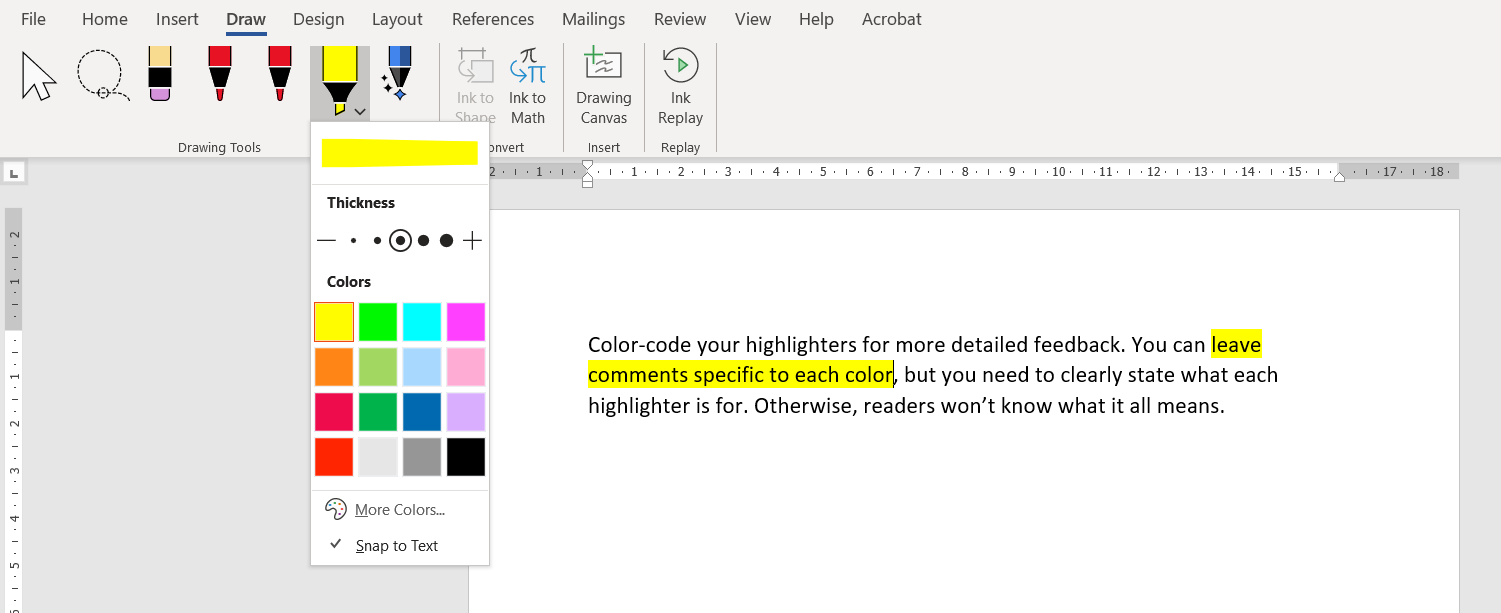
1. Normal Pen, Highlighter, and Eraser
You have access to an eraser and two pens that you can set to different colors and thicknesses. This is great for color-coding, for example. You can easily switch between them as you work.
There’s also a Highlighter tool you can customize in the same way. If you want your markings to be precise, you can activate the Snap to Text setting. Then, every highlight will be nice and straight.
2. Action Pen for Marking With Gestures
If you can’t use Microsoft Word’s normal reviewing tools, or they just don’t cut it for you, try out your Action Pen. It lets you edit your document by marking it in certain ways, a method that may feel even more natural with a stylus.
To begin with, when you click on the Action Pen icon, it gives you the option to activate Track Changes and a guide on the different gestures.
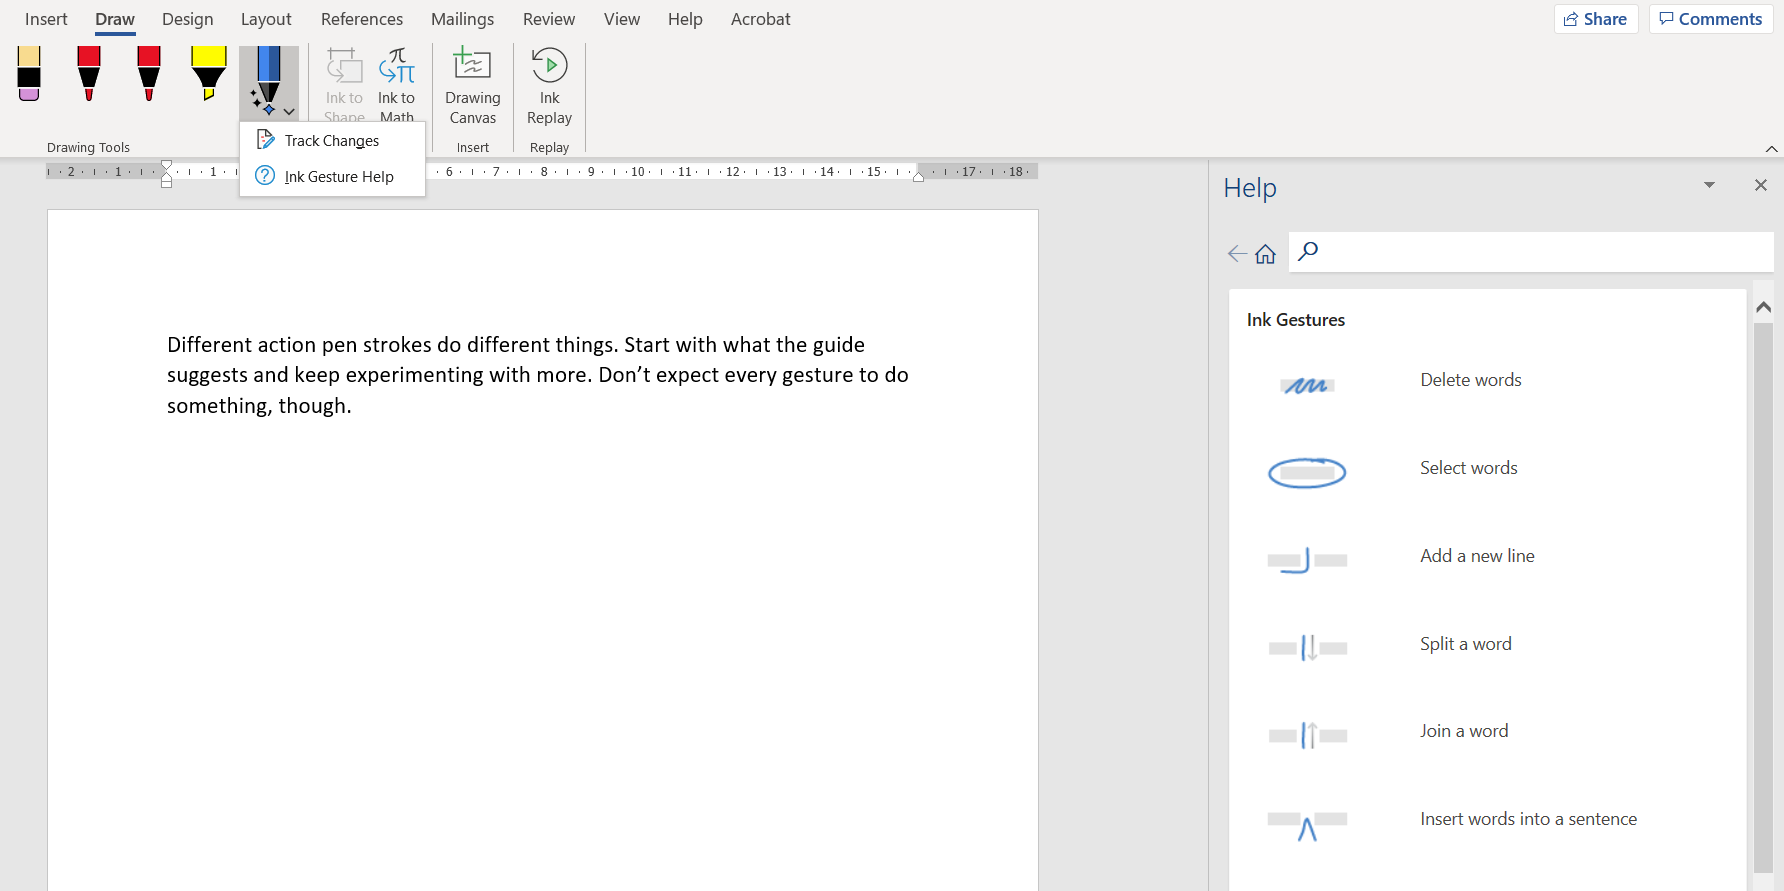
For example, you can delete or add words and symbols. You can start a new line and select text to modify it. This and more are possible with the simplest marks in the right places.
As a result, editing is easier and faster. Following simple design rules for professional Word documents doesn’t need to take forever.
3. Ink to Shape Adds Simple Forms
When you select a pen, the Ink to Shape icon becomes available. This lets you draw the shape you want—square, circle, triangle—and automatically transform it into a more presentable version.
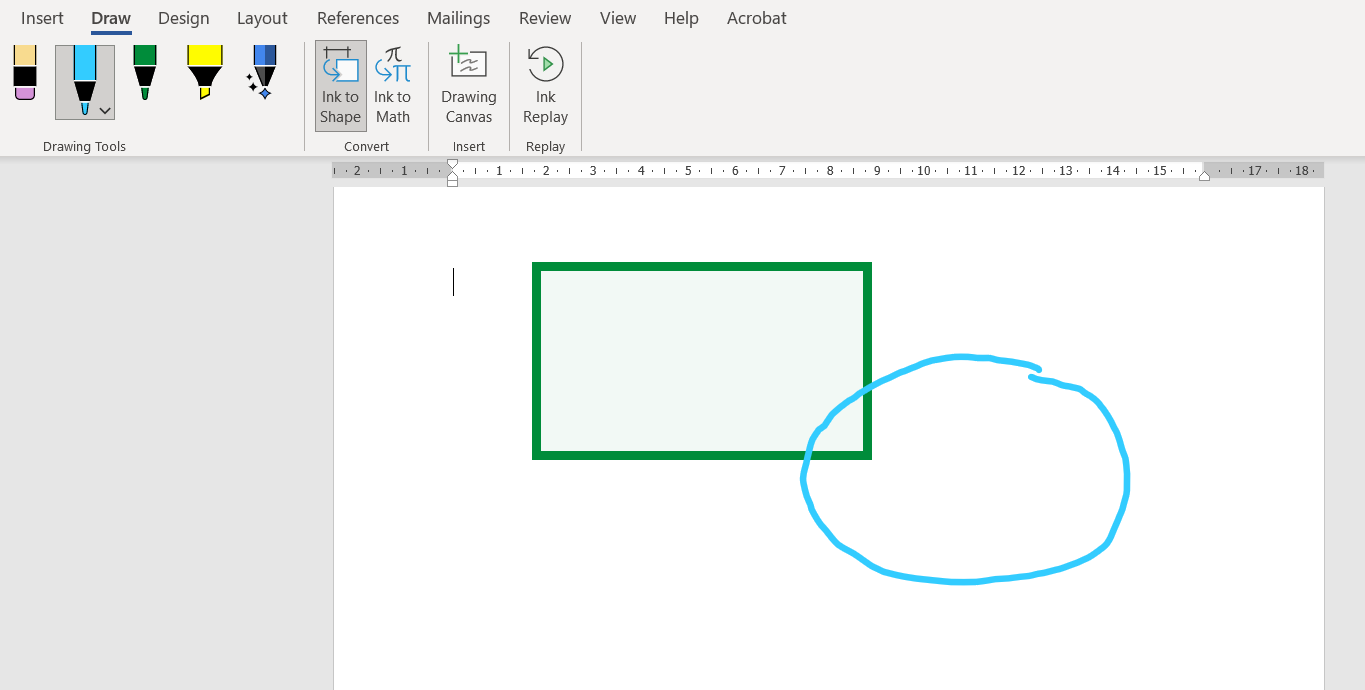
You can then move, resize, and align the shape with the selection pointer. To remove the shape, simply select it and press Backspace or Delete.
4. Ink to Math Adds Equations
Here’s a more impressive function of your pen tools. Click on the Ink to Math icon, which is always active. A small window will pop up called Math Input Control.
With your mouse or finger, draw shapes to create a mathematical expression. At the same time, Word shows you a preview of what the expression will look like with your shapes turned into digital numbers and symbols.
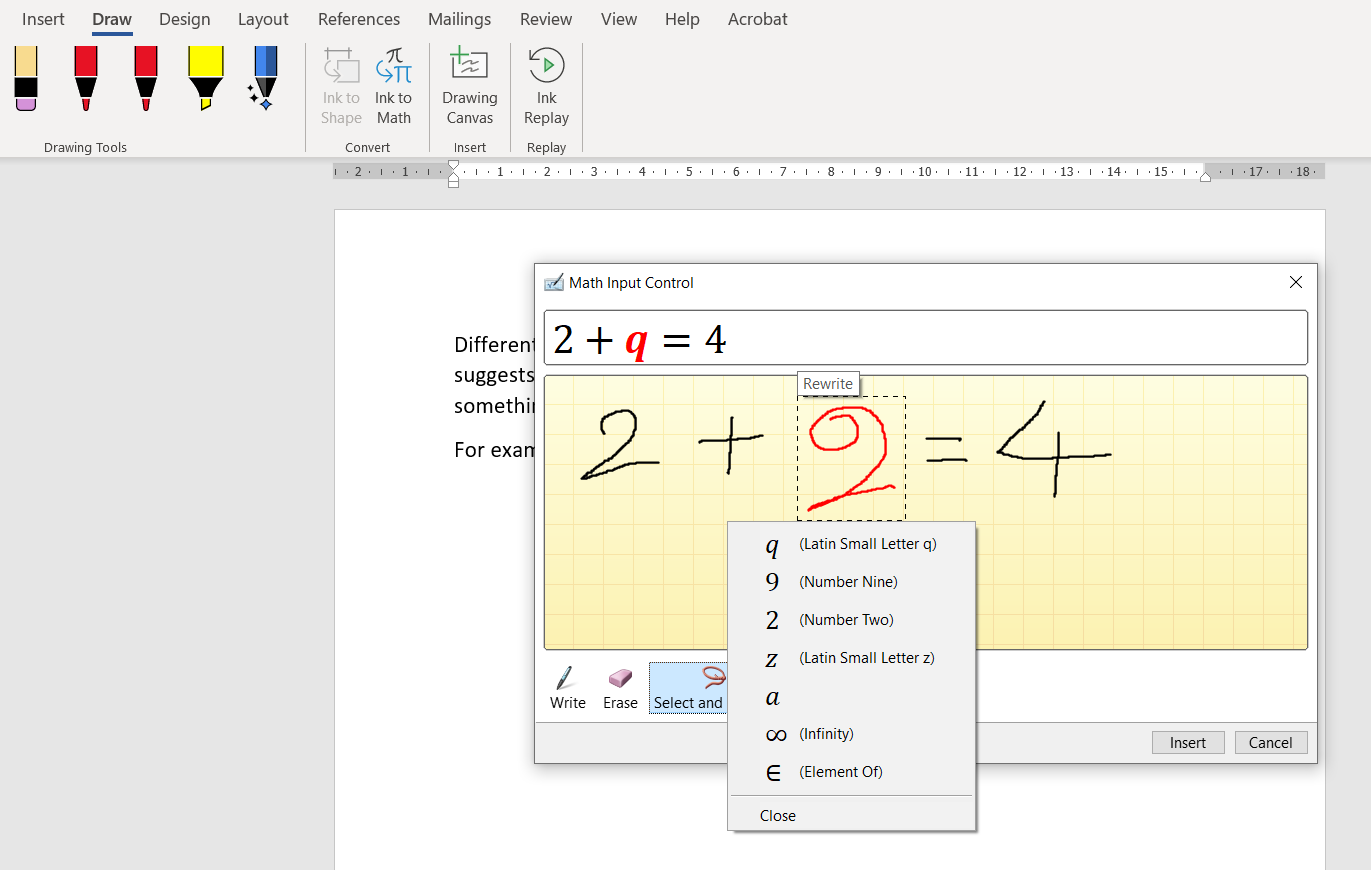
If the program misreads a shape, you can either erase and redo it or select it and choose from alternatives that resemble what you drew.
When you’re done, click Insert. Word will add the expression to the document as a separate object. Not only can you move it, but you can open up a whole load of other equation tools. This is perfect for scientific projects.
5. Drawing Canvas Lets You Control Your Artistic Space
Making good use of your space in Microsoft Word is important, especially when you want visuals as well as text. Just like learning how to use both landscape and portrait orientations right, you should get to know how to choose the best places for your art.
Thanks to your pen tools, you can set the boundaries of your drawing space to not mark the surrounding elements. To do this, click on Drawing Canvas, which will automatically insert an empty box wherever your cursor was.
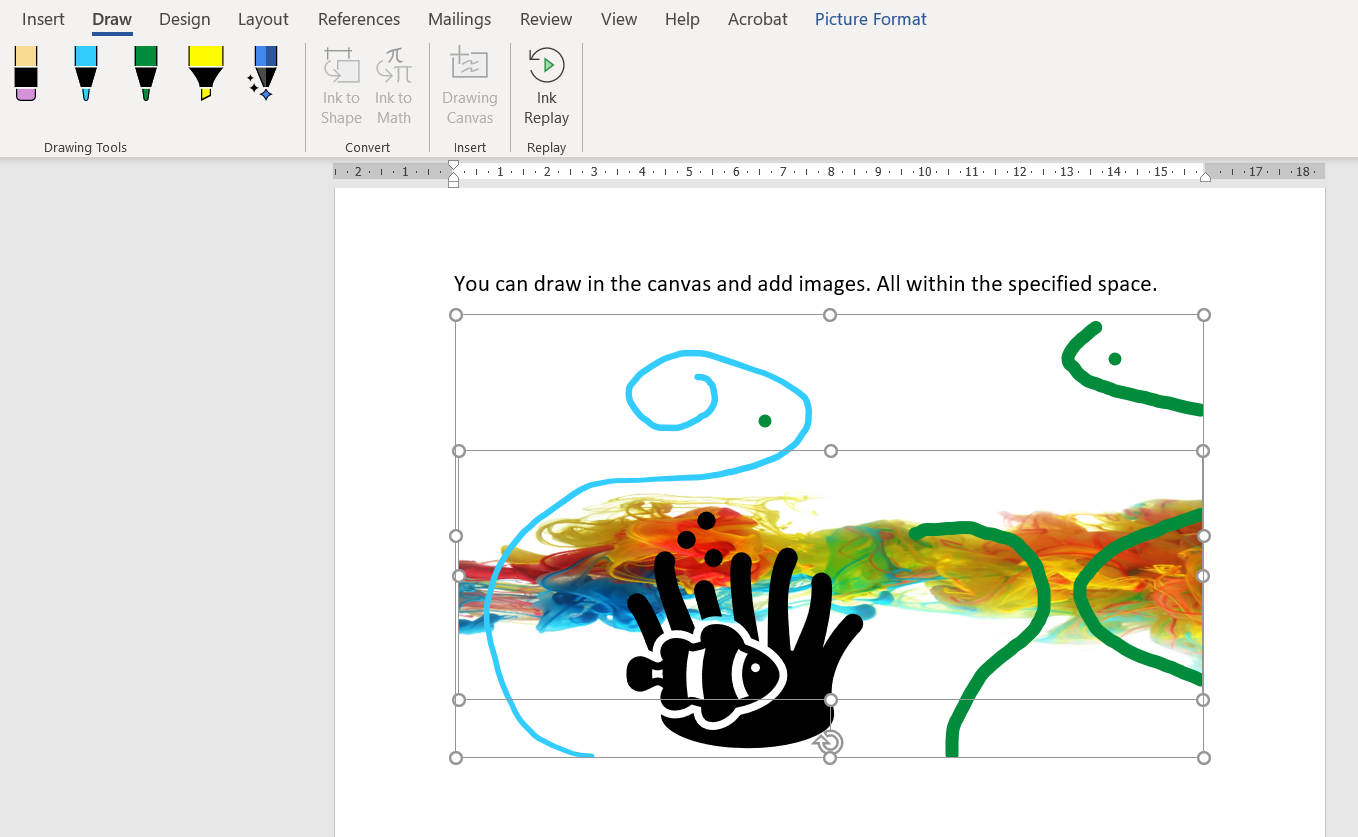
You can customize the box and add any imagery you want—it will keep almost everything within its borders. Even if you draw something that spills into the rest of the document, the canvas will keep what’s inside it and erase everything else.
This is great for when you need art in a specific place in a document. Or when collaborating, you can set canvases and ask team members to use them, so you don’t worry about them affecting the rest of the document.
6. Ink Replay Demonstrates Your Drawing Actions
Another interesting pen tool to keep in mind is Ink Replay. If you click the icon after drawing something, Word will rerun your actions as a quick animation. You can also rewind and forward it, bit by bit.

That’s all the feature does so far, but it can come in handy when teaching an online art class, for example. Students can replay what you did and follow your actions.
7. Selection Tools Let You Control Your Drawings
Finally, you have two selection tools: a pointer and a lasso. The first option is good for interacting with a single object or different elements within a document. The second is mainly for activating ink strokes, but not within a canvas.
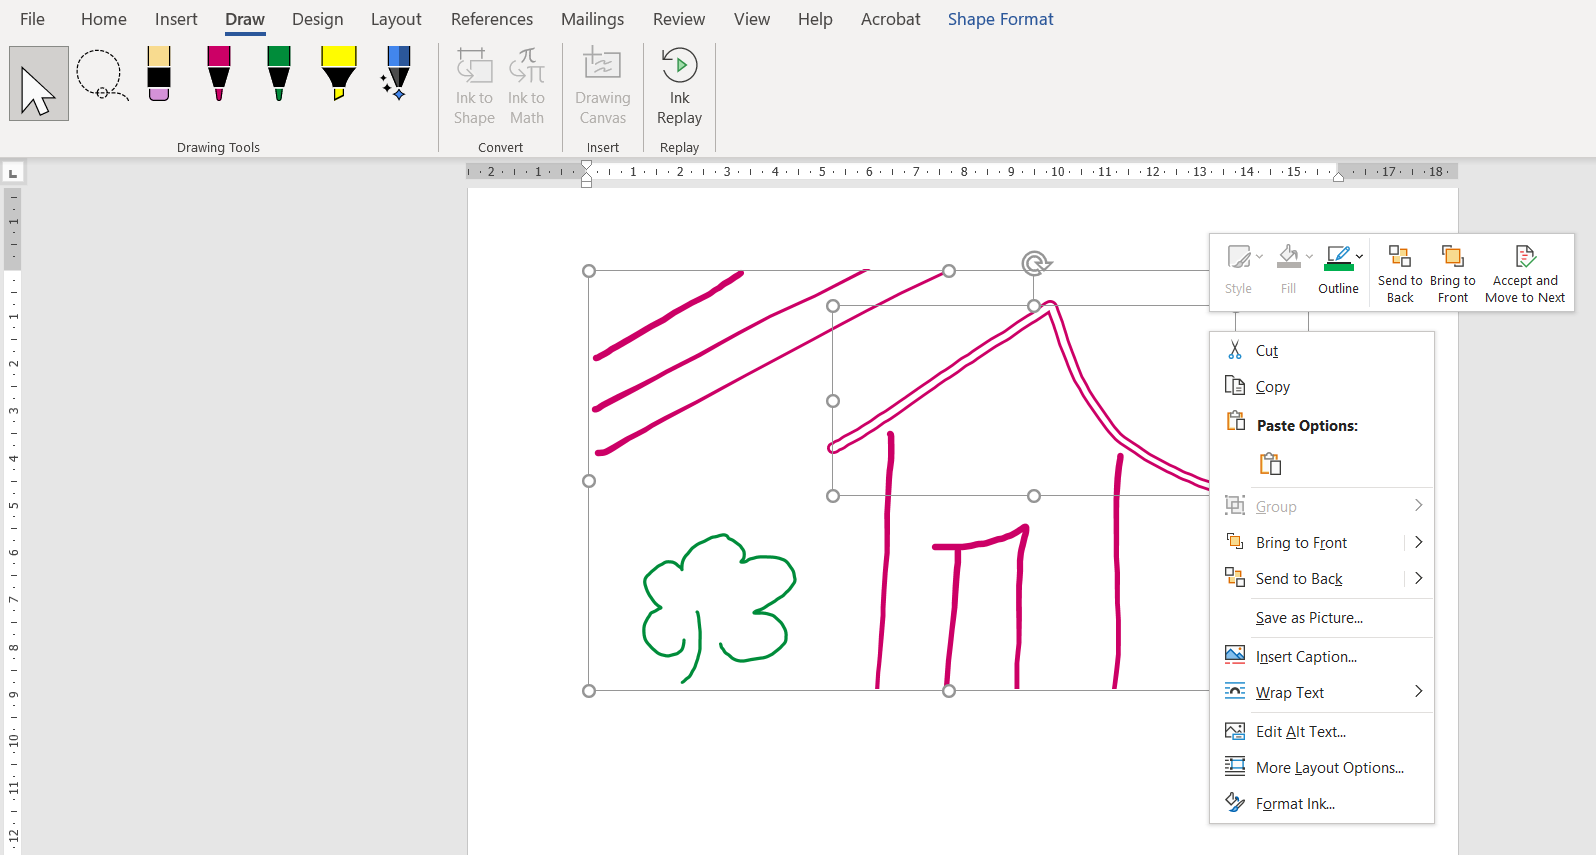
When drawings are selected, you can then adjust them. Resize or move them to a better position. Change their color or thickness. Do what you need to give your document the look you want, combining all its elements productively.
Master Microsoft Word and Really Personalize Your Documents
The pen and ink tools are refreshing additions to Word’s features. If you like to embellish your writing with sketches or work on the go with mobile devices, they can make your word processing life much easier and fun.
The beauty of Microsoft Word is that it offers so many ways to make your documents your own. Your header alone can be the most eye-catching part of your report, combining text with all kinds of visuals. Get to know every tool, and impress readers with your creations.