
Word for Microsoft 365 Word 2021 Word 2019 Word 2016 Word 2013 Word 2010 Word 2007 More…Less
These are the basic types of graphics that you can use to enhance your Word documents: drawing objects, SmartArt, charts, pictures, and clip art. Drawings refer to a drawing object or a group of drawing objects.
Drawing objects include shapes, diagrams, flowcharts, curves, lines, and WordArt. These objects are part of your Word document. You can change and enhance these objects with colors, patterns, borders, and other effects.
Note: It is no longer necessary to insert a drawing canvas to work with drawing objects in Word. However, you may still use a drawing canvas as an organizational aid when working with several drawing objects, or if you want to add connectors between shapes. To insert a drawing canvas, on the Insert tab, click Shapes, and then click New Drawing Canvas.
What do you want to do?
-
Add a drawing to a document
-
Delete all or part of a drawing
Add a drawing to a document
-
Click in your document where you want to create the drawing.
-
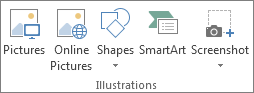
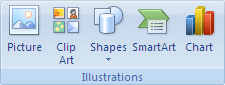
On the Insert tab, in the Illustrations group, click Shapes.

-
You can do any of the following on the Format tab, which appears after you insert a drawing shape:
-
Insert a shape. On the Format tab, in the Insert Shapes group, click a shape, and then click somewhere in the document.
-
Change a shape. Click the shape you want to change. On the Format tab, in the Insert Shapes group, click Edit Shape, point to Change Shape, and then choose a different shape.
-
Add text to a shape. Click the shape you where you want text, and then type.
-
Group selected shapes. Select several shapes at a time by pressing CTRL on your keyboard and clicking each shape you want to include in the group. On the Format tab in the Arrange group, click Group so that all of the shapes will be treated like a single object.
-
Draw in the document. On the Format tab, in the Insert Shapes group, expand the shapes options by clicking the arrow. Under Lines click Freeform or Scribble.
Tip: To stop drawing with the Freeform or Scribble lines, double-click.
-
Adjust the size of the shapes. Select the shape or shapes you want to resize. On the Format tab, in the Size group, click the arrows or type new dimensions in the Height and Width boxes.
-
Apply a style to a shape. In the Shape Styles group, rest your pointer over a style to see what your shape will look like when you apply that style. Click the style to apply it. Or, click Shape Fill or Shape Outline and select the options that you want.
Note: If you want to apply a color and gradient that aren’t available in the Shape Styles group, select the color first, and then apply the gradient.
-
Add flow charts with connectors. Before you create a flow chart, add a drawing canvas by clicking the Insert tab, clicking Shapes in the Illustrations group, and then clicking New Drawing Canvas. On the Format tab, in the Insert Shapes group, click a Flow chart shape. Under Lines, choose a connector line such as the Curved Arrow Connector.
-
Use shadow and three-dimensional (3-D) effects to add interest to the shapes in your drawing. On the Format tab, in the Shape Styles group, click Shape Effects, and choose an effect.
-
Align the objects on the canvas. To align the objects, press and hold CTRL while you select the objects that you want to align. On the Format tab, in the Arrange group, click Align to choose from an assortment of alignment commands.
-

Delete all or part of a drawing
-
Select the drawing object that you want to delete.
-
Press DELETE.
See also
Add shapes
Draw a curve or circle shape
Insert pictures
Crop a picture
Add clip art to your file
What do you want to do?
-
Add a drawing to a document
-
Delete all or part of a drawing
Add a drawing to a document
-
Click in your document where you want to create the drawing.
-
On the Insert tab, in the Illustrations group, click Shapes.
-
When you find the shape you want to insert, double-click to insert it automatically, or click and drag to draw it in your document.
You can do any of the following on the Format tab, which appears after you insert a drawing shape:
-
Insert a shape. On the Format tab, in the Insert Shapes group, click a shape, and then click somewhere in the document.
-
Change a shape. Click the shape you want to change. On the Format tab, in the Shape Styles group, click Change Shape, and then choose a different shape.
-
Add text to a shape. Right-click the shape, click Add Text, and then type.
-
Group selected shapes. Select several shapes at a time by pressing CTRL on your keyboard and clicking each shape you want to include in the group. On the Format tab in the Arrange group, click Group so that all of the shapes will be treated like a single object.
-
Draw in the document. On the Format tab, in the Insert Shapes group, expand the shapes options by clicking the arrow. Under Lines click Freeform or Scribble.
-
Adjust the size of the shapes. Select the shape or shapes you want to resize. On the Format tab, in the Size group, click the arrows or type new dimensions in the Shape Height and Shape Width boxes.
-
Apply a style to a shape. In the Shape Styles group, rest your pointer over a style to see what your shape will look like when you apply that style. Click the style to apply it. Or, click Shape Fill or Shape Outline and select the options that you want.
Note: If you want to apply a color and gradient that aren’t available in the Shape Styles group, select the color first, and then apply the gradient.
-
Add flow charts with connectors. Before you create a flow chart, add a drawing canvas by clicking the Insert tab, clicking Shapes in the Illustrations group, and then clicking New Drawing Canvas. On the Format tab, in the Insert Shapes group, click a Flow chart shape. Under Lines, choose a connector line such as the Curved Arrow Connector.
-
Use shadow and three-dimensional (3-D) effects to add interest to the shapes in your drawing. On the Format tab, choose an option in either the Shadow Effects or the 3-D Effects group.
-
Align the objects on the canvas. To align the objects, press and hold CTRL while you select the objects that you want to align. On the Format tab, in the Arrange group, click Align to choose from an assortment of alignment commands.
-

Delete all or part of a drawing
-
Select the drawing object that you want to delete.
-
Press DELETE.
See also
Draw a curve or circle shape
Insert pictures
Crop a picture
Add clip art to your file
Need more help?
 Please Note:
This article is written for users of the following Microsoft Word versions: 97, 2000, 2002, and 2003. If you are using a later version (Word 2007 or later), this tip may not work for you. For a version of this tip written specifically for later versions of Word, click here: Creating a Drawing Object.
![]()
Written by Allen Wyatt (last updated December 27, 2019)
This tip applies to Word 97, 2000, 2002, and 2003
Word allows you to create drawing objects in your document. These objects (such as an oval, rectangle, line, or AutoShape) are positioned on what is termed the «drawing layer,» which is separate and distinct from the text that appears in a document. You generally create such objects by using the tools on the Drawing toolbar. (Display the Drawing toolbar by clicking your mouse on the Drawing tool on the Standard toolbar.)
Notice that on the left side of the Drawing toolbar are several tools used to create basic shapes. The line, arrow, rectangle, and oval tools are easily identifiable. In addition, the AutoShapes tool displays a menu of more than 125 different symbols, banners, and callouts.
You can follow these steps to place a drawing object in your document:
- Click on the tool that represents the type of object you want to create or select the object from the AutoShape tool. Once a tool is selected, the mouse pointer changes to crosshairs, or a plus sign.
- Click within your document at one corner of where you want the shape to appear.
- Drag the mouse to the opposite corner for the object.
- When you release the mouse button, the object appears in the document and you can manipulate it as desired.
WordTips is your source for cost-effective Microsoft Word training.
(Microsoft Word is the most popular word processing software in the world.)
This tip (1318) applies to Microsoft Word 97, 2000, 2002, and 2003. You can find a version of this tip for the ribbon interface of Word (Word 2007 and later) here: Creating a Drawing Object.
Author Bio
With more than 50 non-fiction books and numerous magazine articles to his credit, Allen Wyatt is an internationally recognized author. He is president of Sharon Parq Associates, a computer and publishing services company. Learn more about Allen…
MORE FROM ALLEN
Avoid Using the Normal Style
The basis of almost all styles in Word is the Normal style. Here’s a good reason why you shouldn’t use it.
Discover More
Stopping a Conditional Formatting Rule from Breaking into Smaller Ranges
When you paste information into a row that is conditionally formatted, you may end up messing up the rules applied to …
Discover More
Choosing a Power Management Plan
Windows maintains a number of power management plans that define how long the various components of your system sit idle …
Discover More
More WordTips (menu)
Placing Many Graphics in a Document
Word documents can contain more than just text. You can even create documents that contain almost no text at all. This …
Discover More
Clip Art Sizing Difficulties
A discussion of problems a reader was having resizing clip art in Word.
Discover More
Keeping Callouts Positioned
Using graphics to add callouts to your graphics is a common occurrence in Word. Here’s how to stop all those graphics …
Discover More
![]()
Download Article
![]()
Download Article
In Microsoft Word, you can do a lot more than simple word processing—you can create charts and graphs, add media, and draw and format shapes. These quick, easy steps will show you how to draw a 3D shape or add 3D effects to existing shapes. Before beginning, make sure you have updated to the latest version of Microsoft Word.
-
1
Select Insert > Shape. You’ll find the “Insert” menu at the top of the screen.
- Mac users will see a menu of shapes appear on the right side of the screen.
- PC users will see a drop down menu of shapes.
-
2
Select a 3D shape. As you scroll through the available shapes, you’ll see a small selection of pre-formatted 3D objects, including a cube, a cylinder (“can”), and a bevel. Click on your desired shape to select it.
Advertisement
-
3
Draw your 3D shape. Click anywhere on your document and your shape will appear in previously determined measurements, usually equalling or close to 1”x1”.
- You can also click and drag to draw your shape in the desired dimensions.
-
4
Modify your shape. You can modify your shape by clicking on it to reveal resize boxes. Click and drag any of these to resize your object and also change the direction it’s facing.


Advertisement
-
1
Select Insert > Shape. You’ll find the “Insert” menu at the top of the screen.
- Mac users will see a menu of shapes appear on the right side of the screen.
- PC users will see a drop down menu of shapes.
-
2
Draw a 2D object. Click on a 2D object that you’d like to convert to three dimensions. Click on your document and your shape will appear.
-
3
Open the format menu. Right click (for Mac users, Ctrl + click) the shape and select “Format Shape”.
-
4
Rotate your object in three dimensions. Select “3-D Rotation” and use the rotation buttons to turn your shape along the X, Y, and Z axes. Play with the rotation until your shape is facing the desired direction.
- You need to rotate the shape along the X or Y axis to see the depth you are about to add.
-
5
Add depth to your object. Still in your “Format Shape” menu, select 3-D Format > Depth and Surface. Increase the “Depth” value to your desired depth and watch your 2D shape become 3D.
- You can experiment with the depth amount and the X, Y, and Z angles until you are satisfied with the look of your 3D object.
- The 3-D Format > Bevel menu allows you to add more 3D effects to the top and bottom of your object.
-
6
Click “Ok” when you are finished.


Advertisement
-
1
Add a Text Box or WordArt. Select Insert > Text Box or Insert > WordArt. You’ll find the “Insert” menu at the top of the screen. Draw your box and type your desired text in the box.
-
2
Add 3D effects to the box. Right click (for Mac users, Ctrl + click) your WordArt or Text Box and choose “Format Shape” from the drop down menu. Under «3-D Rotation», change the X and/or Y axis numbers; under «3-D Format», increase the value of the depth.
- You can experiment with the depth amount and the X, Y, and Z angles until you are satisfied with the look of your 3D object.
- To better see the 3D effects you’ve added to the object, change the fill color in the «Format Shape» menu.
-
3
Add 3D effects to the letters. Right click (for Mac users, Ctrl + click) your WordArt or Text Box and select “Format Text Effects” from the drop down menu. Under «3-D Rotation», change the X and/or Y axis numbers; under «3-D Format», increase the value of the depth.
- To better see the 3D effects you’ve added to the object, change the fill color in the «Format Text Effects» menu.


Advertisement
Add New Question
-
Question
Can I divide the cube into 12 x 12 text boxes in each part?

You have to click the insert button and click INSERT CHART. Then you have to choose the 12 by 12 cube, and you’re done!
Ask a Question
200 characters left
Include your email address to get a message when this question is answered.
Submit
Advertisement
-
If you haven’t made 3D objects before, it is best to start with a simple shape.
-
You can experiment with coloring and shading in Format Shape > Fill and Format Shape > 3-D Format > Depth and Surface.
Thanks for submitting a tip for review!
Advertisement
About This Article
Thanks to all authors for creating a page that has been read 200,037 times.
Is this article up to date?
Click in your document where you want to create the drawing. On the Insert tab, in the Illustrations group, click Shapes.
Add a drawing to a document
- Insert a shape.
- Change a shape.
- Add text to a shape.
- Group selected shapes.
- Draw in the document.
- Adjust the size of the shapes.
Contents
- 1 How do I get the drawing toolbar in Word?
- 2 Does Word have drawing tools?
- 3 How do you turn on Draw in Word?
- 4 Where is the drawing toolbar in Microsoft Word 2010?
- 5 Where is drawing toolbar in open office?
- 6 How do I draw diagrams in Word?
- 7 How do I use Apple pencil in Word?
- 8 How do you draw in docs?
- 9 How do you draw a freehand in Word?
- 10 How do I turn off drawing tools in Word?
- 11 What is illustration in MS Word?
- 12 Where is the Drawing toolbar in Word 2013?
- 13 Can you draw in open office?
- 14 How do you draw on Open Office?
- 15 Where is the Drawing toolbar in Word 2007?
- 16 How do you draw a diagram on the computer?
- 17 What is the use of drawing canvas in a Word document?
- 18 How do I label a diagram in Word?
- 19 How do I use pencil in Word?
- 20 Can you use scribble on Word?
How do I get the drawing toolbar in Word?
Click View > Toolbars > Drawing. The Drawing toolbar is displayed or hidden. The Drawing toolbar contains a collection of icon buttons that allows the user to draw shapes and images in the document. Provides a number of features for drawing.
Does Word have drawing tools?
You can draw freely in Microsoft Word using the “Draw” feature whether you have Word for Mac or Windows. You can also insert customizable shapes into your document, or draw using the “Scribble” feature. The process of drawing in Word varies based on which version of Word and device you’re using.
How do you turn on Draw in Word?
If your device is touch-enabled, the Draw tab is turned on automatically. Otherwise, turn it on by selecting File > Options > Customize Ribbon > Draw.
Where is the drawing toolbar in Microsoft Word 2010?
In Word 2010, there are no toolbars; they have been replaced with ribbons at the top of the screen. Note: If you do not see the Drawing Tools tab, make sure that you have inserted/selected a shape, line, or drawing object. You may have to double-click the object.
Where is drawing toolbar in open office?
To begin using the drawing tools, select View > Toolbars > Drawing. The drawing toolbar appears at the bottom of the screen. You can tear off this toolbar and move it to a convenient place on the window.
How do I draw diagrams in Word?
Click in your document where you want to create the drawing. On the Insert tab, in the Illustrations group, click Shapes.
Add a drawing to a document
- Insert a shape.
- Change a shape.
- Add text to a shape.
- Group selected shapes.
- Draw in the document.
- Adjust the size of the shapes.
How do I use Apple pencil in Word?
In a document, tap Apple Pencil in the body of a word-processing document where you want to write. Or tap in a text box, shape, or in a table cell in a word-processing or page layout document. Tap the Scribble tool in the toolbar at the bottom of the screen, then start writing.
How do you draw in docs?
What to Know
- Open a document in Google Docs. Place the cursor where you want the drawing to appear.
- Select Insert > Drawing. Choose New to open the Drawing window.
- Choose a drawing type from the Actions menu. Options include word art, shapes, arrows, callouts, and equations.
How do you draw a freehand in Word?
Draw a freeform shape
Click anywhere in the document, and then drag to draw. To draw a straight segment with the Freeform tool, click one location, move your pointer to a different location, and then click again; to draw a curved segment, keep your mouse button pressed as you drag to draw.
How do I turn off drawing tools in Word?
To turn off the drawing canvas, do the following:
- From the Tools menu, choose Options.
- Click the General tab.
- Uncheck Automatically Create Drawing Canvas When Inserting AutoShapes in the General Options section.
- Click OK.
What is illustration in MS Word?
Illustrations Quick Reference
The Microsoft Illustrations group allows you to insert pictures, shapes, smart art, and charts into your document. These options will enhance the layout and appearance of your documents. Drawing Tools and Picture Tools tabs only appear when a graphic image is selected.
Where is the Drawing toolbar in Word 2013?
Click Insert. Click the Shapes button, then click the Scribble icon in the Lines section. Click and hold down the mouse button, then move the mouse cursor to draw. Click the Format tab under Drawing Tools to make any changes to your drawing.
Can you draw in open office?
You can use Writer’s drawing tools to create graphics, such as simple diagrams using rectangles, circles, lines, text, and other objects.You can use the drawing tools to place drawing objects directly on a page in your document, or you can insert the drawing objects into a frame.
How do you draw on Open Office?
To use a drawing tool:
- Click in the document where you want the drawing to be anchored.
- Select the tool from the Drawing toolbar.
- Move the cross-hair pointer to the place in the document where you want the graphic to appear and then click-and-drag to create the drawing object.
Where is the Drawing toolbar in Word 2007?
Accessing the Drawing Toolbar
From the View menu, select Toolbars » Drawing. The Drawing toolbar appears.
How do you draw a diagram on the computer?
8 Online Tools to Draw Diagrams and Flowcharts
- Lucidchart. Lucidchart allows you to create diagrams and flowcharts without installing any software easily.
- Draw.io. Draw.io is a completely free online tool for creating diagrams of all types.
- Cacoo.
- Gliffy.
- Sketchboard.
- Creately.
- DrawAnywhere.
- Google Drawings.
What is the use of drawing canvas in a Word document?
A drawing canvas is an object, a bounding box to contain graphics. Use it to provide a background or shading behind AutoShapes and images, group graphics, or to create a wider area for a text wrap. Because the drawing canvas is mostly obsolete, you have to turn it on in Word’s options.
How do I label a diagram in Word?
On the References tab, in the Captions group, click Insert Caption. In the Label list, select the label that best describes the object, such as a figure or equation. If the list doesn’t provide the label you want, click New Label, type the new label in the Label box, and then click OK.
How do I use pencil in Word?
Start Microsoft Word and click “File” and “Open” if you want to add handwriting to an existing document. Choose your file and press “Enter” or click “Open” to open it. Select “Insert” from the top menu bar and choose “Shape.” Choose the “Scribble” tool to change the cursor to a pencil with which you can draw.
Can you use scribble on Word?
Turn handwriting into text with Scribble
In a document, tap Apple Pencil in the body of a word-processing document where you want to write. Or tap in a text box, shape or in a table cell in a word-processing or page layout document. Tap the Scribble tool in the toolbar at the bottom of the screen, then start writing.
Содержание
- Включение вкладки «Рисование»
- Средства рисования
- Инструменты
- Перья
- Преобразовать
- Воспроизведение
- Рисование с помощью фигур
- Добавление области для рисования
- Инструменты для рисования
- Вставка фигур
- Стили фигур
- Стили WordArt
- Текст
- Упорядочить
- Размер
- Вопросы и ответы
MS Word — это, в первую очередь, текстовый редактор, однако, рисовать в этой программе тоже можно. Таких возможностей и удобства в работе, как в специализированных программах, изначально предназначенных для рисования и работы с графикой, ждать от Ворда, конечно, не стоит. Тем не менее, для решения базовых задач стандартного набора инструментов будет достаточно.
Урок: Как нарисовать линию в Word
Прежде, чем рассмотреть то, как сделать рисунок в Ворде, следует отметить, что рисовать в данной программе можно двумя разными методами. Первый — вручную, подобно тому, как это происходит в Paint, правда, немного проще. Второй метод — рисование по шаблонам, то есть, с использованием шаблонных фигур. Обилия карандашей и кистей, цветовых палитр, маркеров и прочих инструментов в детище Майкрософт вы не найдете, но создать простой рисунок здесь все же вполне возможно.
Включение вкладки «Рисование»
В Microsoft Word есть набор средств для рисования, которые подобны таковым в стандартном Paint, интегрированном в Windows. Примечательно, что о существовании этих инструментов многие пользователи даже не догадываются. Все дело в том, что вкладка с ними по умолчанию не отображается на панели быстрого доступа программы. Следовательно, прежде, чем приступить к рисованию в Ворде, нам с вами предстоит эту вкладку отобразить.
1. Откройте меню «Файл» и перейдите в раздел «Параметры».
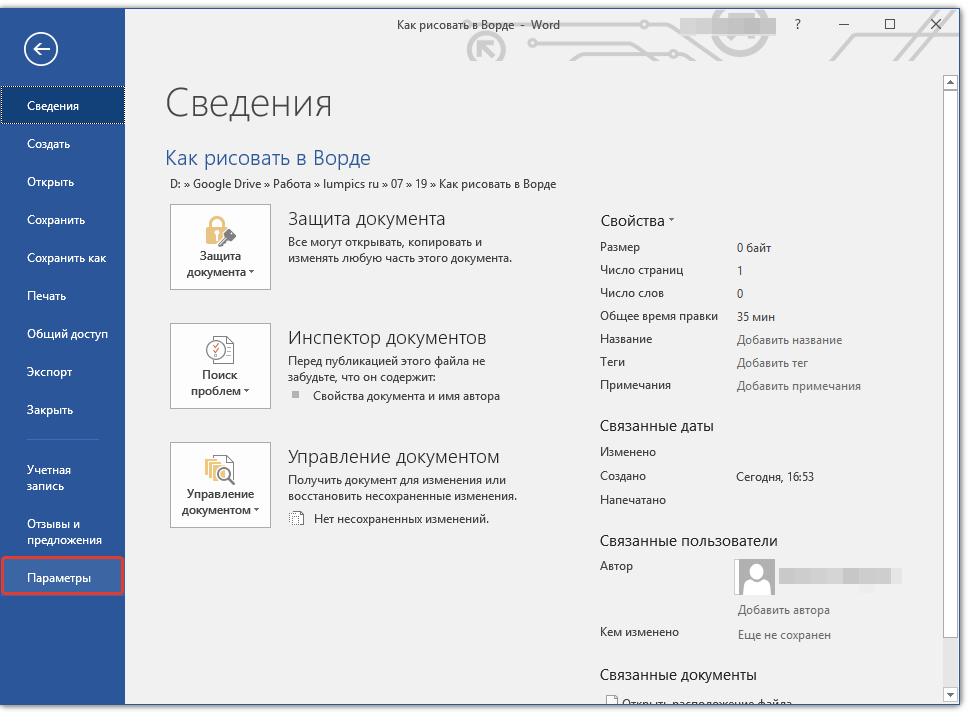
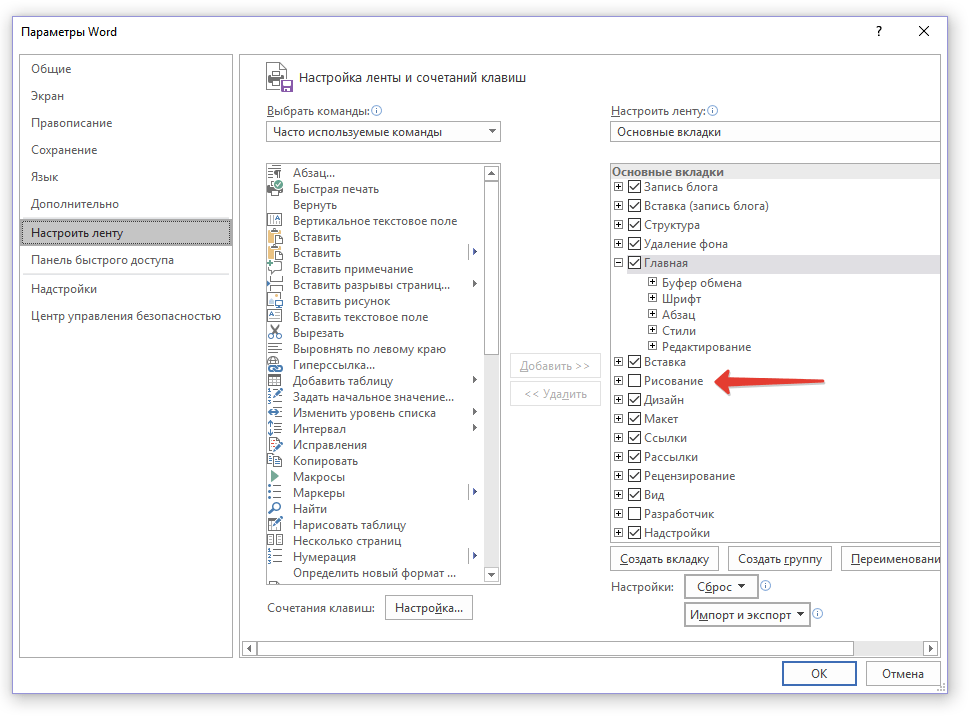
2. В открывшемся окне выберите пункт «Настроить ленту».
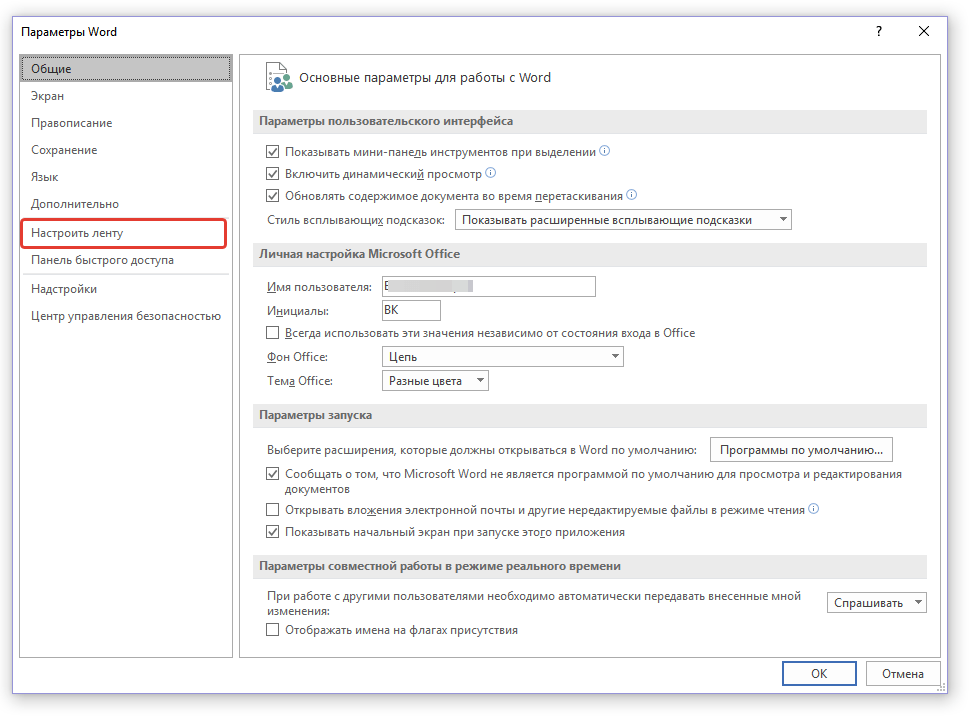
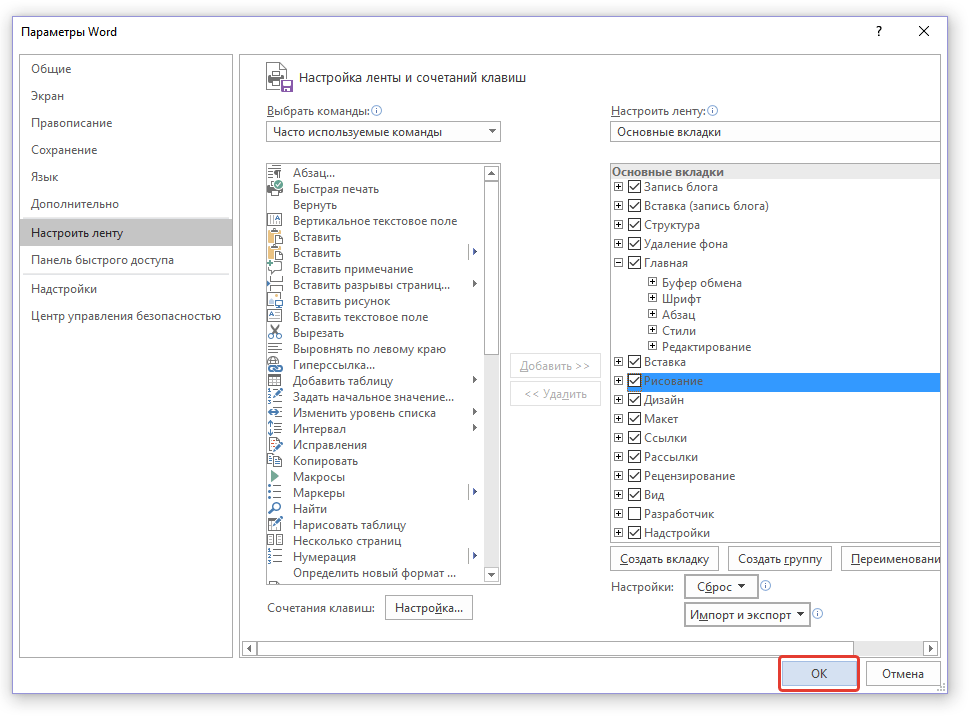
3. В разделе «Основные вкладки» установите галочку напротив пункта «Рисование».
4. Нажмите «ОК», чтобы внесенные вами изменения вступили в силу.
После закрытия окна «Параметры» на панели быстрого доступа в программе Microsoft Word появится вкладка «Рисование». Все инструменты и возможности этой вкладки мы рассмотрим ниже.
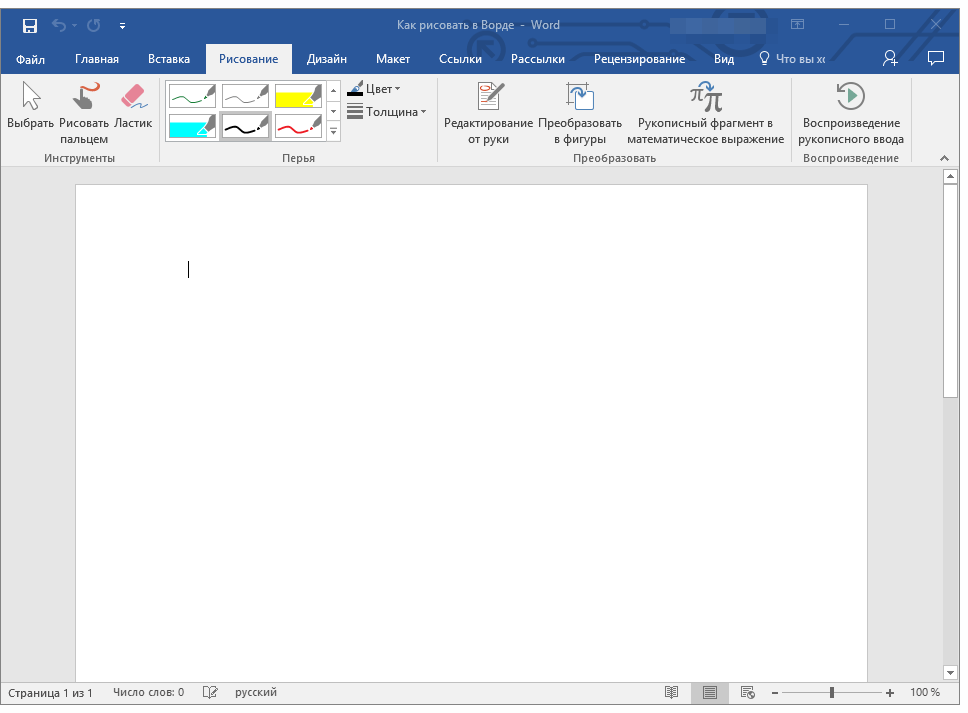

Средства рисования
Во вкладке «Рисование» в Ворде, вы можете видеть все те инструменты, с помощью которых можно рисовать в этой программе. Давайте подробно рассмотрим каждый из них.
Инструменты
В этой группе расположились три инструмента, без которых рисование попросту невозможно.
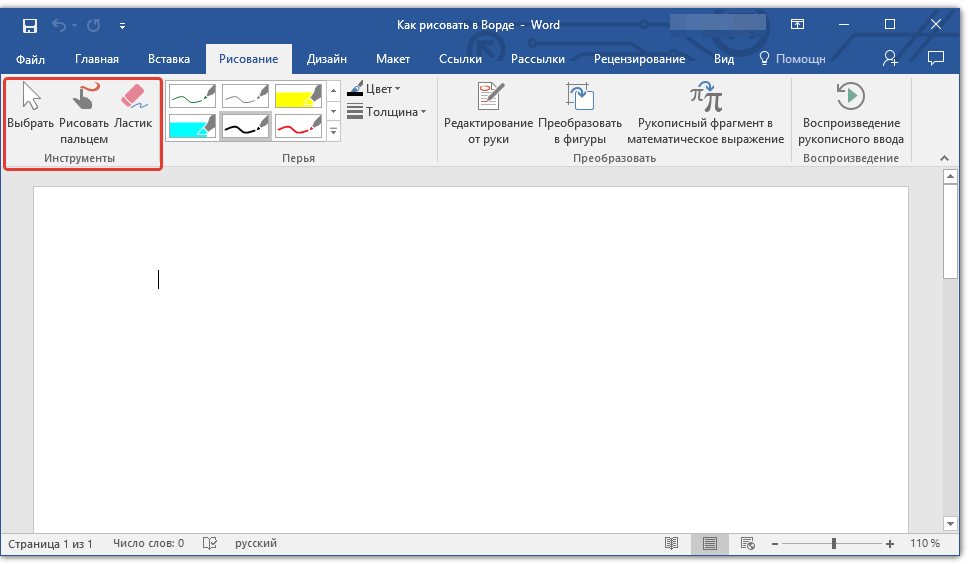
Выбрать: позволяет указать на уже нарисованный объект, расположенный на странице документа.
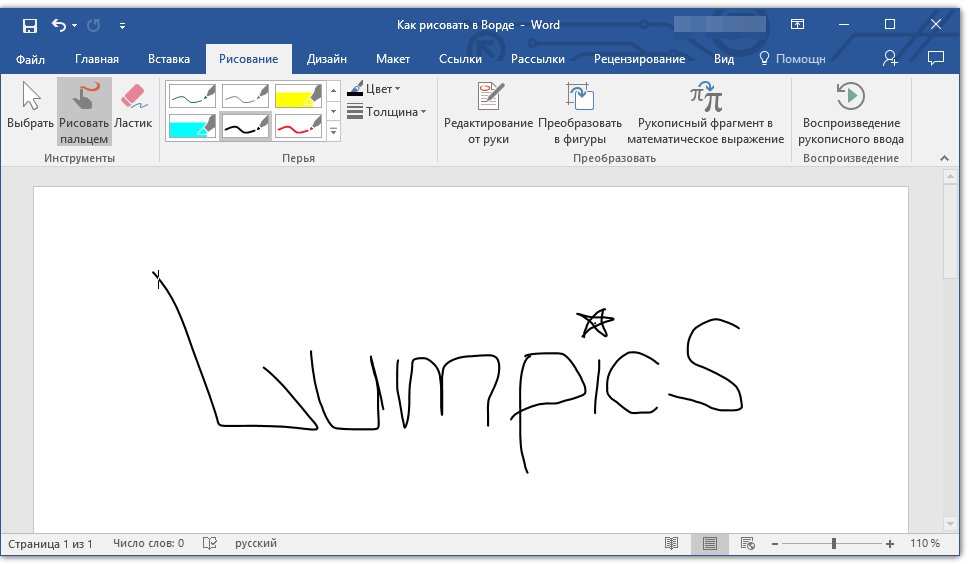
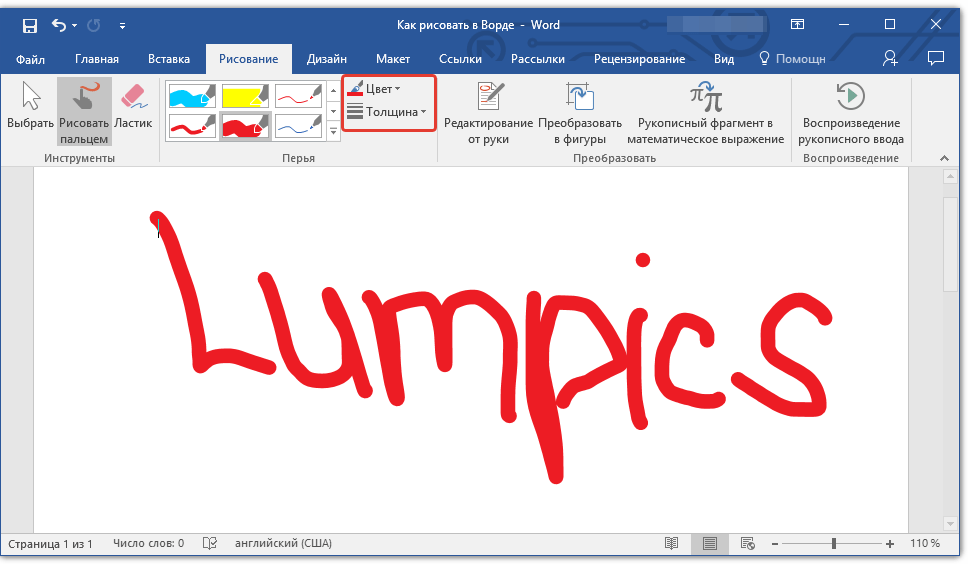
Рисовать пальцем: предназначен, в первую очередь, для сенсорных экранов, но может использоваться и на обычных. В таком случае вместо пальца будет использоваться указатель курсора — все как в Paint и других подобных программах.
Примечание: Если вам необходимо изменить цвет кисти, которой вы рисуете, сделать это можно в соседней группе инструментов — «Перья», нажав на кнопку «Цвет».
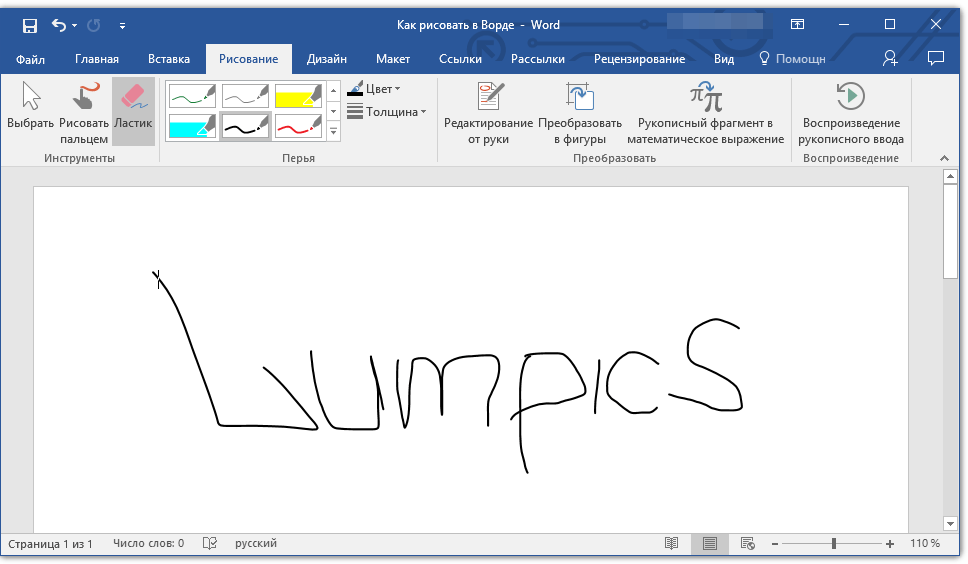
Ластик: этот инструмент позволяет стереть (удалить) объект или его часть.
Перья
В этой группе вы можете выбрать одно из множества доступных перьев, которые отличаются, в первую очередь, по типу линии. Нажав на кнопку «Больше», расположенную в правом нижнем углу окна со стилями, вы сможете увидеть предпросмотр каждого доступного пера.
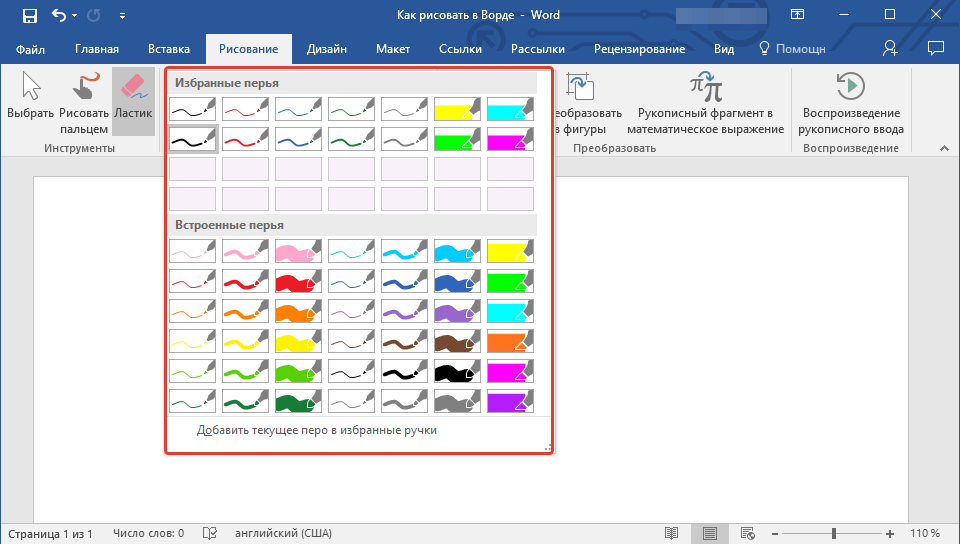
Рядом с окном стилей расположены инструменты «Цвет» и «Толщина», позволяющие выбрать цвет и толщину пера, соответственно.
Преобразовать
Инструменты, расположенные в этой группе, предназначены не совсем для рисования, а то и вовсе не для этих целей.

Редактирование от руки: позволяет выполнять редактирование документов с помощью пера. Используя этот инструмент, можно вручную обводить фрагменты текста, подчеркивать слова и фразы, указывать на ошибки, рисовать указательные стрелки и т.д.
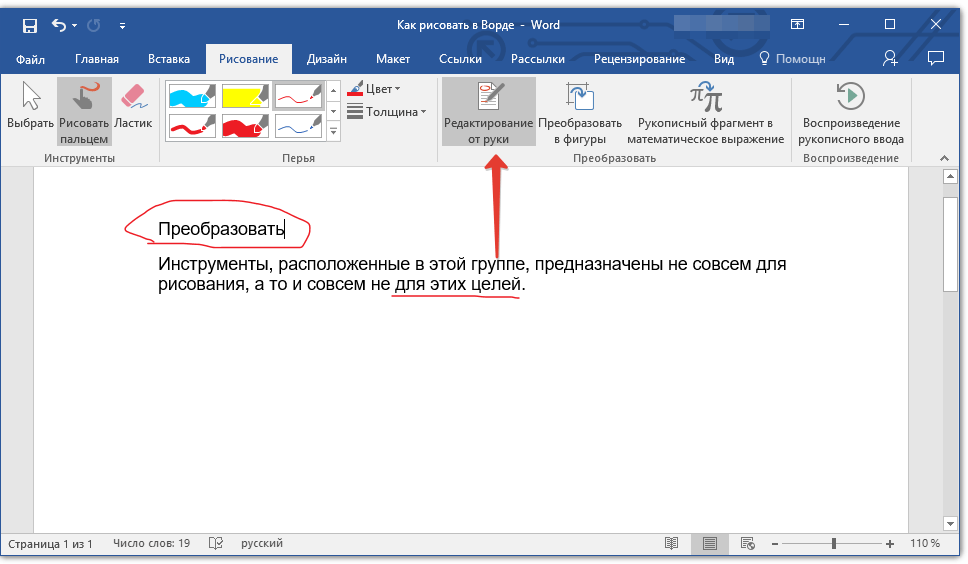
Урок: Рецензирование текста в Word
Преобразовать в фигуры: сделав набросок какой-либо фигуры, вы можете преобразовать ее из рисунка в объект, который можно будет перемещать по странице, можно будет изменять его размер и выполнять все те манипуляции, которые применимы для других рисованых фигур.
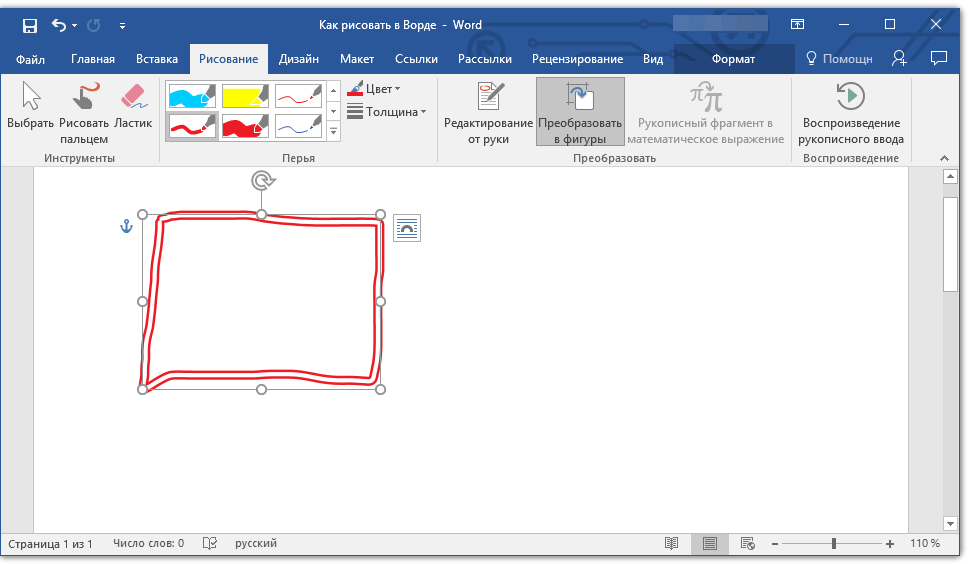
Для преобразования наброска в фигуру (объект) необходимо просто указать на нарисованный элемент, воспользовавшись инструментом «Выбрать», а затем нажать кнопку «Преобразовать в фигуры».
Урок: Как сгруппировать фигуры в Ворде
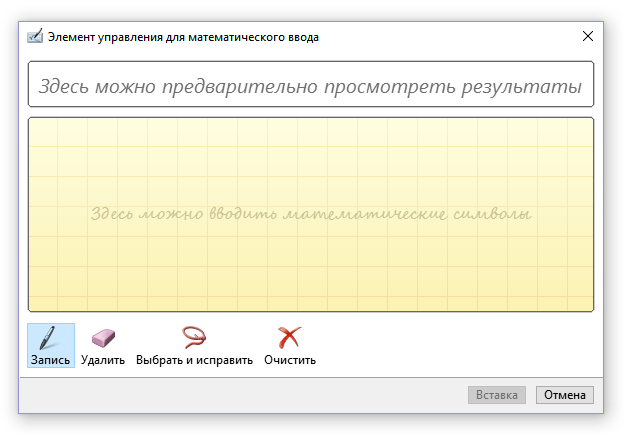
Рукописный фрагмент в математическом выражении: мы уже писали о том, как добавлять математические формулы и уравнения в Word. С помощью данного инструмента группы «Преобразовать» вы можете вписать в эту формулу символ или знак, которого нет в стандартном наборе программы.
Урок: Вставка уравнений в Ворде
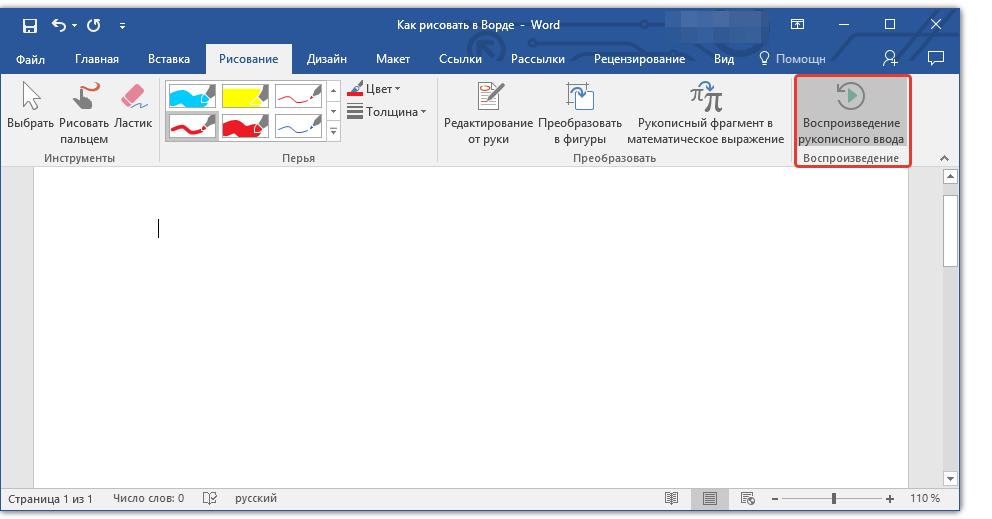
Воспроизведение
Нарисовав или написав что-то с помощью пера, вы можете включить визуальное воспроизведение этого процесса. Все, что для этого требуется, нажать кнопку «Воспроизведение рукописного ввода», расположенную в группе «Воспроизведение» на панели быстрого доступа.
Собственно, на этом можно было бы и закончить, так как мы с вами рассмотрели все инструменты и возможности вкладки «Рисование» программы Microsoft Word. Вот только рисовать в этом редакторе можно не только от руки, но и по шаблонам, то есть, используя для этого готовые фигуры и объекты.
С одной стороны такой подход может оказаться ограниченным в плане возможностей, с другой стороны — он предоставляет куда более широкий выбор средств для редактирования и оформления создаваемых рисунков. Более подробно о том, как в Ворде рисовать фигуры и рисовать с помощью фигур, читайте ниже.
Рисование с помощью фигур
Создать рисунок произвольной формы, со скруглениями, пестрыми цветами с плавными переходами, оттенками и прочими деталями этим методом практически невозможно. Правда, зачастую столь серьезный подход и не требуется. Проще говоря, не выдвигайте к Word высокие требования — это не графический редактор.
Урок: Как в Ворде нарисовать стрелку
Добавление области для рисования
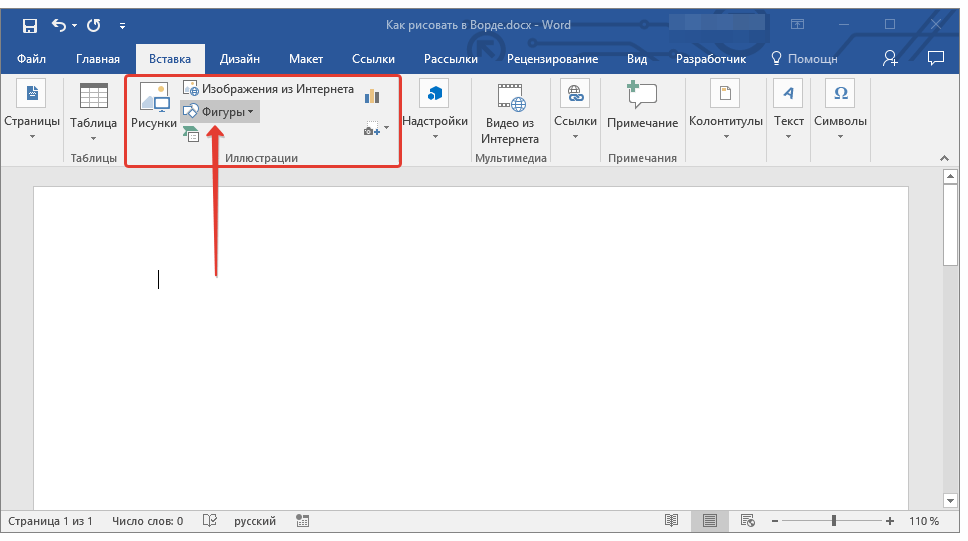
1. Откройте документ, в котором нужно сделать рисунок, и перейдите во вкладку «Вставка».
2. В группе иллюстрации нажмите на кнопку «Фигуры».
3. В выпадающем меню с доступными фигурами выберите последний пункт: «Новое полотно».
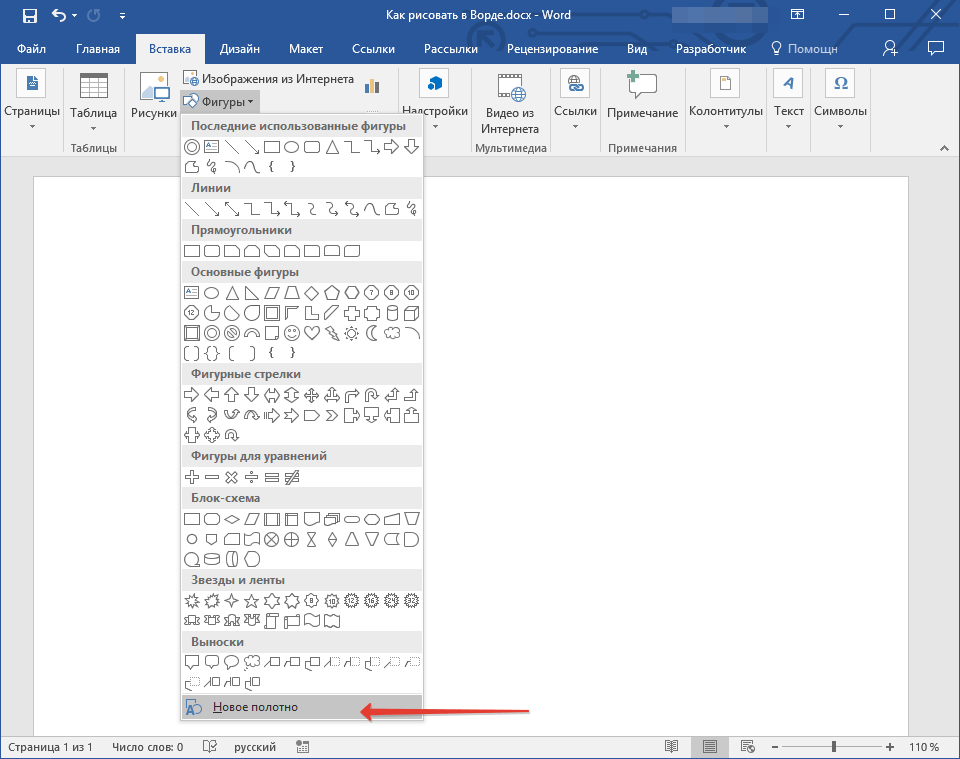
4. На странице появится прямоугольная область, в которой и можно начать рисовать.
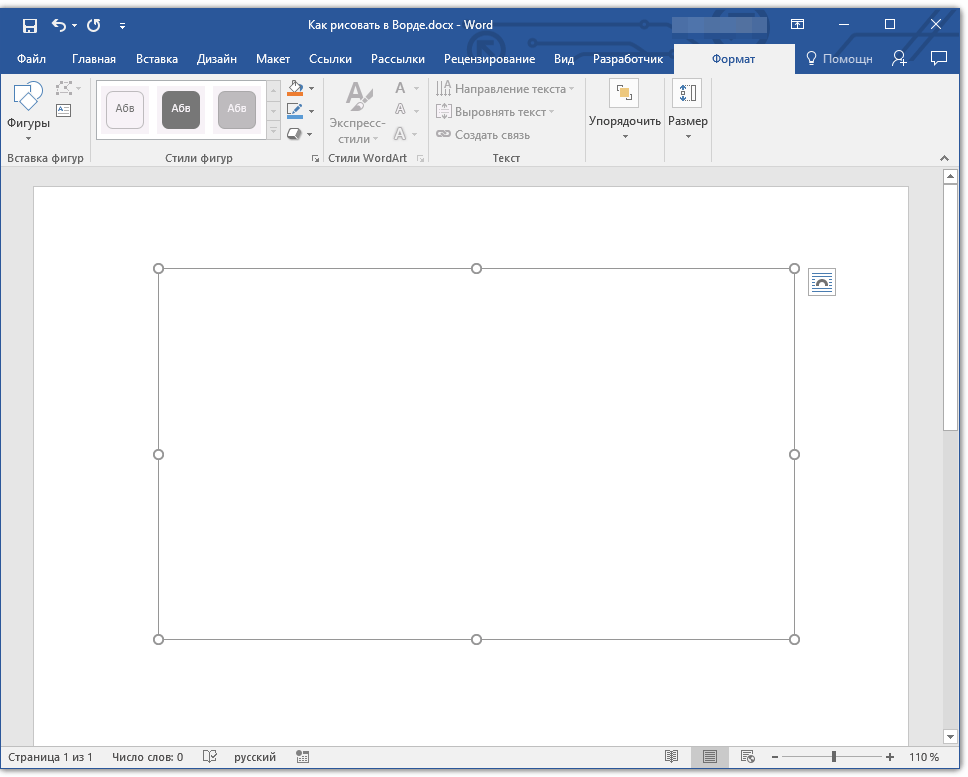
Если это необходимо, измените размеры поля для рисования. Для этого потяните в нужном направлении за один из маркеров, расположенных на его границе.
Инструменты для рисования
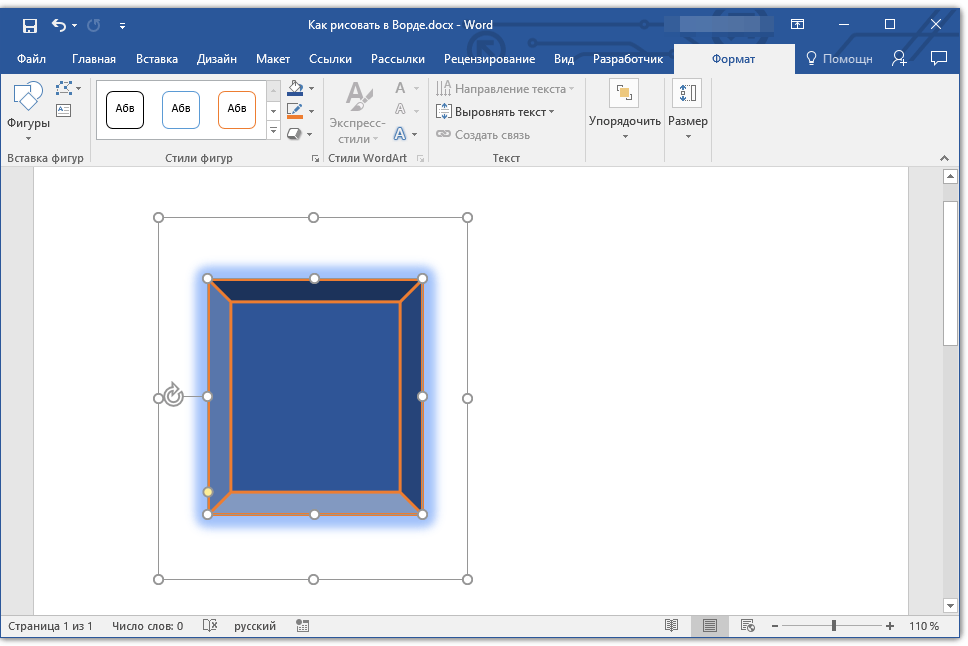
Сразу после добавления нового полотна на страницу, в документе откроется вкладка «Формат», в которой и будут находиться основные инструменты для рисования. Рассмотрим детально каждую из групп, представленных на панели быстрого доступа.

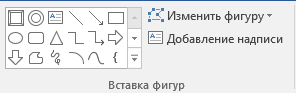
Вставка фигур
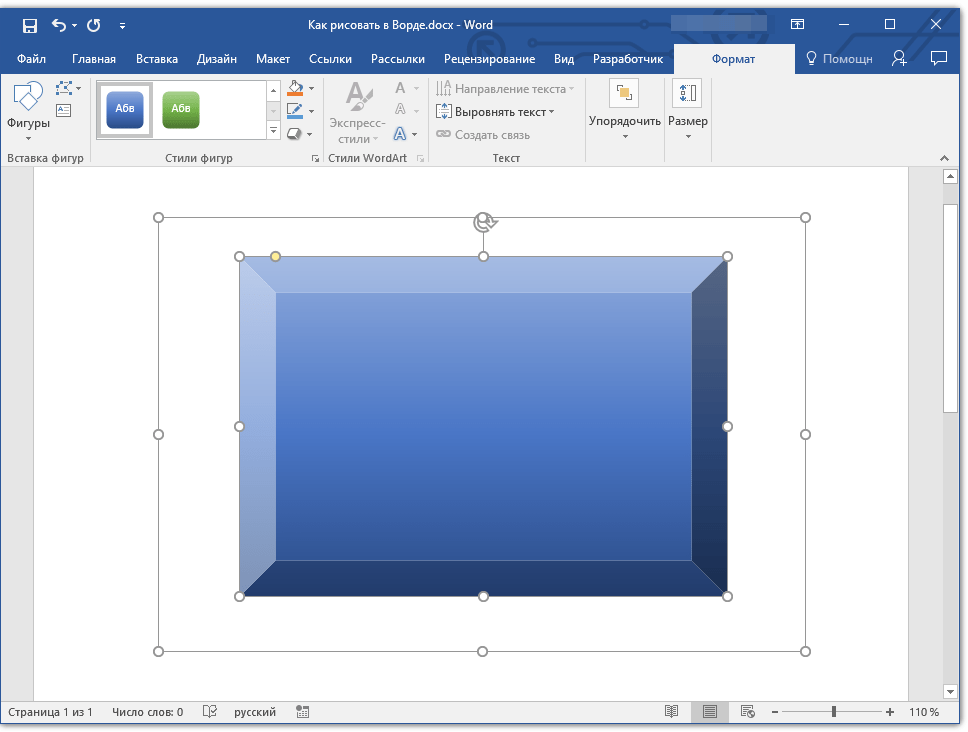
«Фигуры» — нажав на эту кнопку, вы увидите большой перечень фигур, которые можно добавить на страницу. Все они разделены по тематическим группам, название каждой из которых говорит само за себя. Здесь вы найдете:
- Линии;
- Прямоугольники;
- Основные фигуры;
- Фигурные стрелки;
- Фигуры для уравнений;
- Блок-схемы;
- Звезды;
- Выноски.
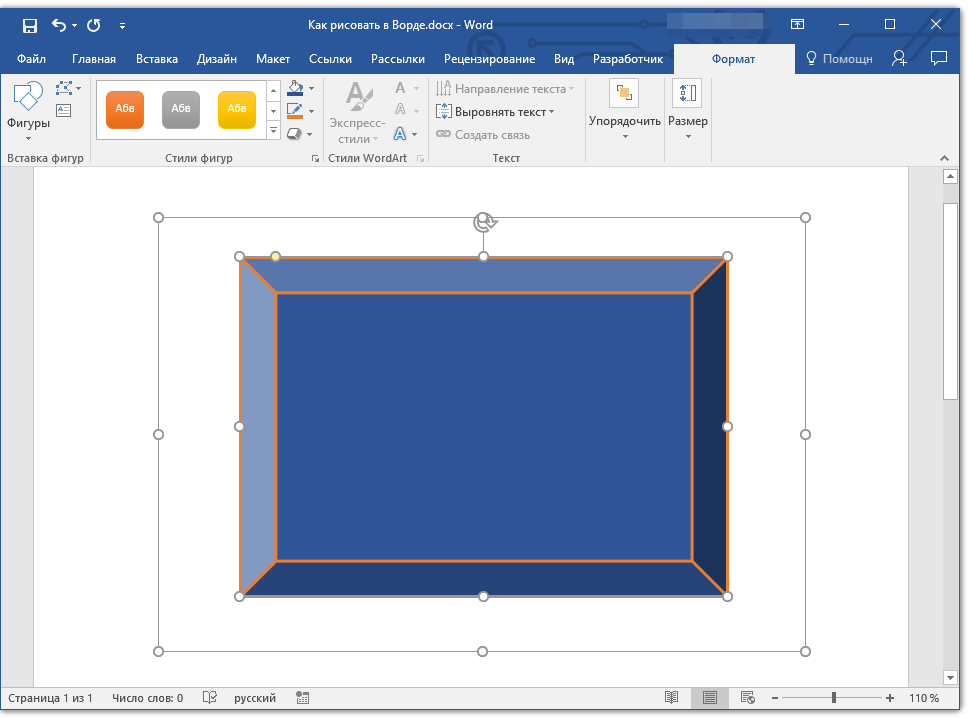
Выберите подходящий тип фигуры и нарисуйте ее, задав левым кликом мышки точку начала. Не отпуская кнопку, укажите конечную точку фигуры (если это прямая) или область, которую она должна занимать. После этого отпустите левую кнопку мышки.
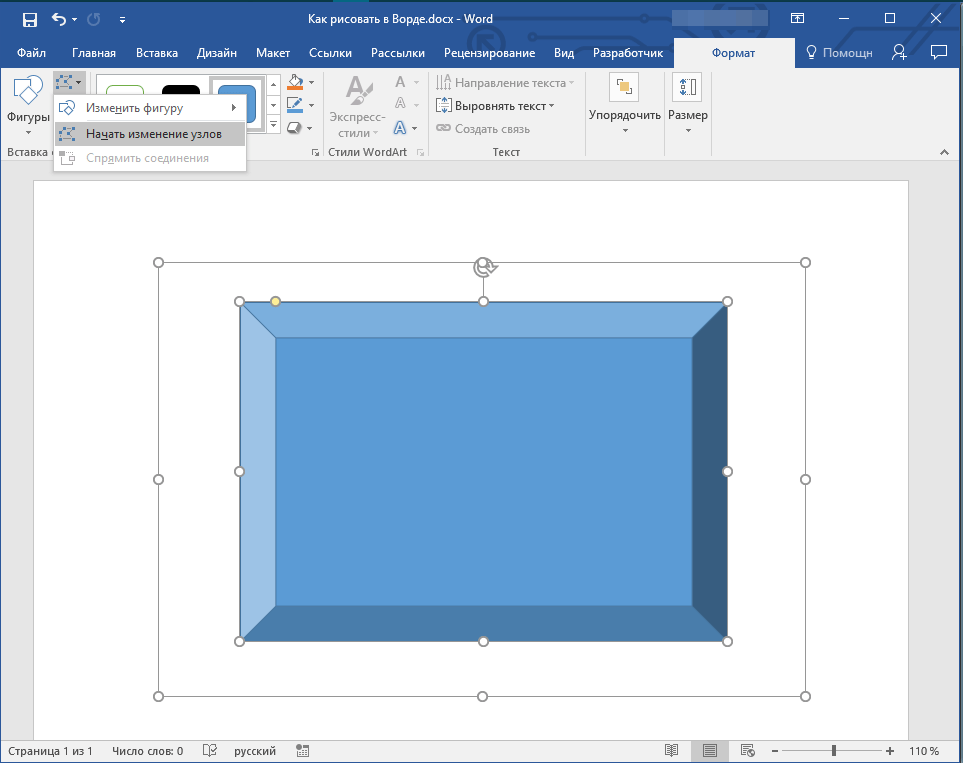
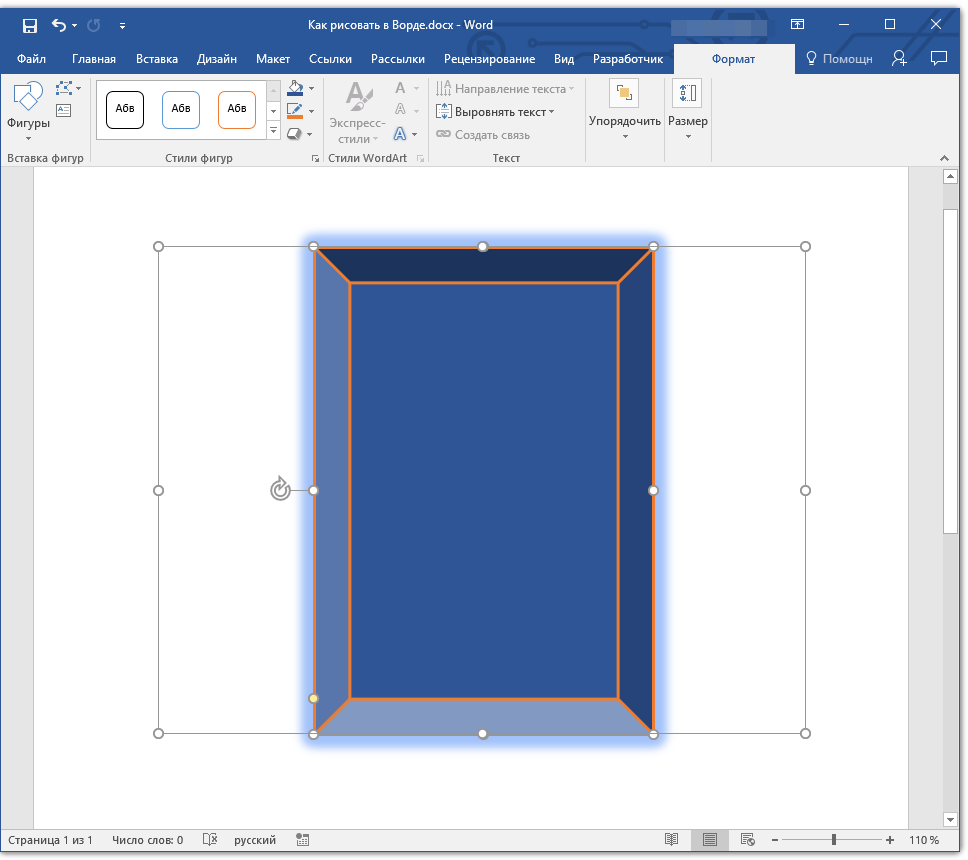
«Изменить фигуру» — выбрав первый пункт в меню этой кнопки, вы можете, в буквальном смысле, изменить фигуру, то есть, вместо одной нарисовать другую. Второй пункт в меню этой кнопки — «Начать изменение узлов». Выбрав его, вы можете изменить узлы, то есть, точки привязки конкретных мест фигуры (в нашем примере это внешние и внутренние углы прямоугольника.
«Добавить надпись» — эта кнопка позволяет добавить текстовое поле и вписать в него текст. Поле добавляется в указанном вами месте, однако, при необходимости его можно свободно перемещать по странице. Рекомендуем предварительно сделать поле и его грани прозрачными. Более подробно о том, как работать с текстовым полем и что можно сделать с его помощью, вы можете прочесть в нашей статье.
Урок: Как в Word перевернуть текст
Стили фигур
С помощью инструментов данной группы вы можете изменить внешний вид нарисованной фигуры, ее стиль, текстуру.

Выбрав подходящий вариант, вы можете изменить цвет контура фигуры и цвет заливки.
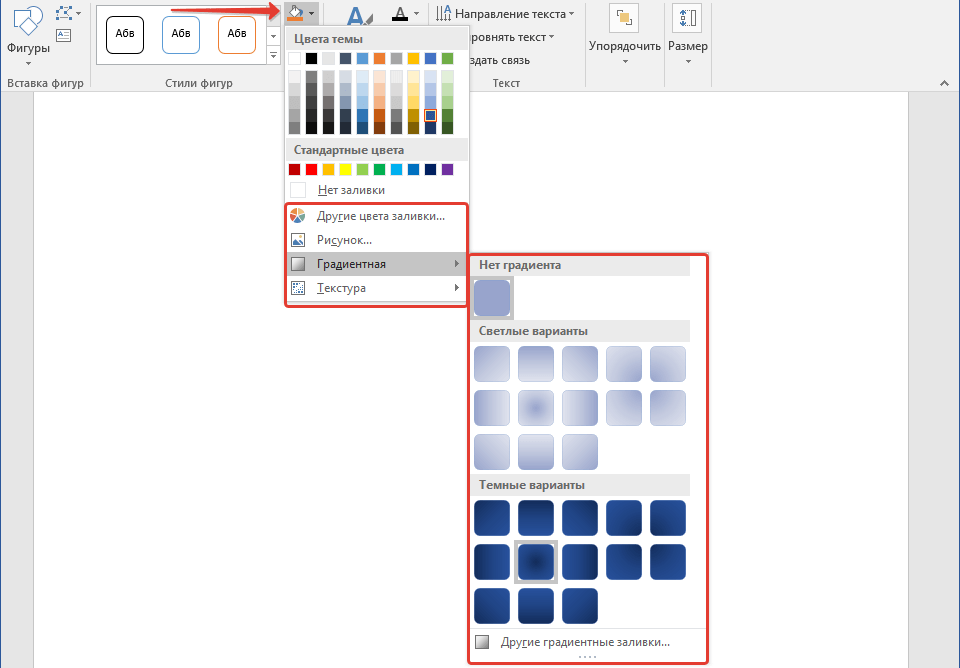
Для этого выберите подходящие цвета в выпадающем меню кнопок «Заливка фигуры» и «Контур фигуры», которые расположены справа от окна с шаблонными стилями фигур.
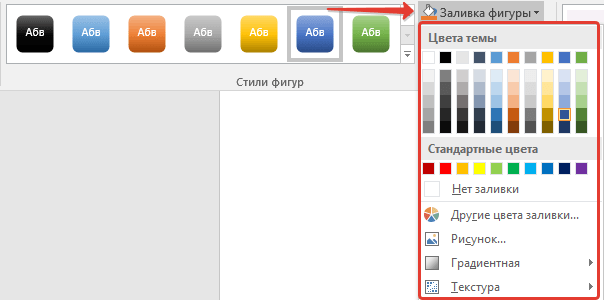
Примечание: Если стандартные цвета вас не устраивают, вы можете изменить их с помощью параметра «Другие цвета». Также, в качестве цвета заливки можно выбрать градиент или текстуру. В меню кнопки «Цвет контура» можно регулировать толщину линии.
«Эффекты фигуры» — это инструмент, с помощью которого можно еще больше изменить внешний вид фигуры, выбрав один из предложенных эффектов. В числе таковых:
- Тень;
- Отражение;
- Подсветка;
- Сглаживание;
- Рельеф;
- Поворот.
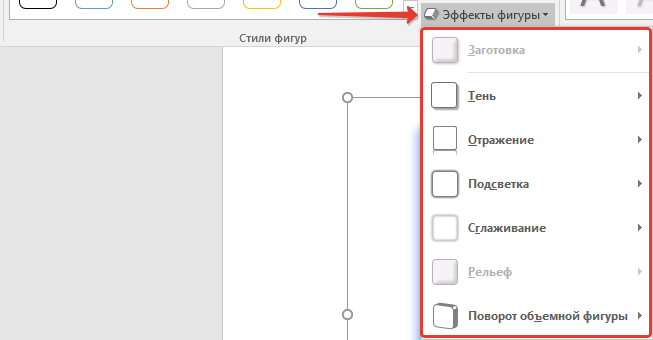
Примечание: Параметр «Поворот» доступен только для объемных фигур, некоторые эффекты из вышеперечисленных разделов тоже доступны только для фигур определенного типа.
Стили WordArt
Эффекты из данного раздела применяются исключительно к тексту, добавленнуму с помощью кнопки «Добавление надписи», расположенной в группе «Вставка фигуры».
Текст
Аналогично стилям WordArt, эффекты применяются исключительно к тексту.
Упорядочить
Инструменты этой группы предназначены для изменения положения фигуры, ее выравнивания, поворота и других подобных манипуляций.
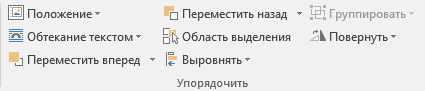
Поворот фигуры выполняется точно так же, как и поворот рисунка — на шаблонное, строго заданное или произвольное значение. То есть, можно выбрать стандартный угол поворота, указать свой или просто повернуть фигуру, потянув за круговую стрелку, расположенную непосредственно над ней.
Урок: Как в Ворд повернуть рисунок
Кроме того, с помощью данного раздела можно наложить одну фигуру на другую, подобно тому, как это можно сделать с рисунками.
Урок: Как в Word наложить одну картинку на другую
В этом же разделе можно сделать обтекание фигуры текстом или сгруппировать две и более фигур.
Уроки по работе с Ворд:
Как сгруппировать фигуры
Обтекание картинки текстом
Примечание: Инструменты группы «Упорядочить» в случае работы с фигурами абсолютно идентичны таковыми при работе с рисунками, с их помощью можно выполнять ровно такие же манипуляции.
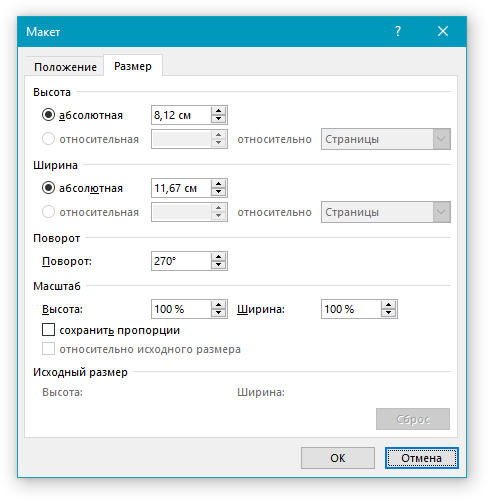
Размер
Возможность единого инструмента данной группы всего одна — изменение размера фигуры и поля, в котором она находиться. Здесь можно задать точное значение ширины и высоты в сантиметрах или изменить его пошагово с помощью стрелок.
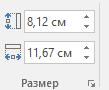
Кроме того, размер поля, как и размер фигуры, можно менять вручную, используя для этого маркеры, расположенные по контуру их границ.
Урок: Как обрезать рисунок в Word
Примечание: Для выхода из режима рисования нажмите клавишу «ESC» или же кликните левой кнопкой мышки в пустом месте документа. Чтобы вернуться к редактированию и открыть вкладку «Формат», дважды кликните по рисунку/фигуре.
Вот, собственно, и все, из этой статьи вы узнали, как рисовать в Ворде. Не забывайте о том, что данная программа является в первую очередь текстовым редактором, поэтому не стоит возлагать на нее слишком серьезных задач. Используйте для таких целей профильный софт — графические редакторы.