
Is your friend coming to visit but don’t know where you live? You can send your friend a cleverly drawn map to make locating your home easier.
You can easily draw a map of your locality in MS Word. You can create it using basic shapes.
We will show you how in simple, step-by-step instructions.
Let’s begin!
Step #1: Open a Word document
Open a new Word document.
Step #2: Insert a basic shape
Click on the Insert tab in the top menu bar to change the ribbon.

In the section Illustrations, click on the Shapes icon.

This will open a window with various shapes.
Pick a shape like a parallelogram from Basic Shapes.

Click on the document where you want the shape to appear.
The chosen shape will now appear in the document.

Step #3: Add more shapes
Add more shapes like line, oval, and text box.

The chosen shapes will appear in the document.

Step #4: Modify the shapes
Click on the shape you want to change.
Drag the handles on the shape to change it. (Handles are the small circles on the corners as well as the circular arrow at the top, shown in red below.)

Copy the changed shape and arrange them the way you want for the map.

Right-click inside the shape to open a menu.
Click on the Fill icon.

This will open the Theme Colors dialog box.
Pick the color you want to appear inside the shape.

Step #5: Modify the text box
Click inside the text box.
Type in the necessary text.
Modify the shape to fit the text by making use of the handles.

Step #6: Remove the text box boundary
Right-click on the text box boundary – a different menu will appear than if you click inside the text box.
Click on the Outline icon.

This will open the Theme Colors dialog box.
Tick the box next to No Outline.

Step #7: Make more copies of the text box
Depending on your map, copy the text box as many times as necessary.
Change the text as required.
Rotate the text if necessary. To do this, you will click on the circle handle at the top of the text box, and move your mouse pointer left.
Step #8: Complete your map
Arrange all the shapes to match the basic layout of your map.

Conclusion
We have shown you a simple method to draw maps in MS Word.
Use this method to make different types of maps.
How to Make a Concept Map in Word
- Step 1 – Open Word.
- Step 2 – Draw the Map.
- Step 3 – Edit and Customize.
- Step 4 – Save File.
- Step 1 – Launch EdrawMind.
- Step 2 – Select Radial Map.
- Step 3 – Insert Topics and Sub-Topics.
- Step 4 – Revisions and Edits.
Contents
- 1 How do you make a map on Microsoft Word?
- 2 How do I create a grid map in Word?
- 3 How do I create a custom map?
- 4 How can I create a map?
- 5 Can you get squared paper on Word?
- 6 What is Navigation Pane in MS Word?
- 7 How do you make square boxes in Word?
- 8 What is the best free mapping software?
- 9 How do I create a map of my neighborhood?
- 10 How do I make a treasure map?
- 11 How do you make a dot grid on Microsoft Word?
- 12 How do you make a grid paper on pages?
- 13 How do you insert a chart page in Word?
- 14 How do I add a style to the navigation pane in Word?
- 15 Where is the navigation pane in Windows?
- 16 How do you make 4 boxes in Word?
- 17 What is the easiest mapping software to use?
- 18 Which software is used for mapping?
- 19 How can I create a map with multiple locations for free?
- 20 How do you make a map on the computer?
How do you make a map on Microsoft Word?
How to Draw a Map on Word
- Open Microsoft Word.
- Draw the first line of the map – choose the longest route.
- Repeat the “Scribble” process for the rest of the lines on the map.
- Click the “Text Box” button on the “Insert” tab’s ribbon.
How do I create a grid map in Word?
Using the Drawing Grid
- Display the Page Layout tab (or the Layout tab if you are using Word 2016 or a later version) of the ribbon.
- Within the Arrange group, click the Align drop-down list.
- Choose Grid Settings.
- Use the controls in the dialog box to set the specifics of the grid.
How do I create a custom map?
Open Google Maps and click the menu button in the top left corner. Click Your Places > Maps > Create Map. Name your map and enter in a description. Add markers for your desired locations.
How to Make a Map
- Choose a map template. Choose a map that fits your purpose.
- Label important locations and areas. Use text and graphics (such as push pins, arrows, and other symbols) to label the map with key information.
- Add a compass.
- Include a legend.
Can you get squared paper on Word?
Go to Ribbon > Design tab. Then, click the Page Color button and choose Fill Effects from the dropdown. Click the Pattern tab to display the design choices available to you. For example, to make a typical graph paper in Word, you can choose the Small grid or Large grid pattern.
What is Navigation Pane in MS Word?
The Navigation pane in Word lets you quickly search or navigate through your document. To show the Navigation pane in Word, click the “View” tab in the Ribbon. For all document views other than “Read Mode,” then check the “Navigation Pane” checkbox in the “Show” button group.
How do you make square boxes in Word?
On the Insert tab, click Shapes. Click the shape you want, click anywhere in the workspace, and then drag to place the shape. To create a perfect square or circle (or constrain the dimensions of other shapes), press and hold Shift while you drag.
What is the best free mapping software?
But these 13 reign supreme for free mapping software.
- QGIS 3. When QGIS releases a new version, it’s kinda a big deal.
- QGIS 2 (Quantum GIS)
- gVSIG.
- GRASS GIS.
- ILWIS.
- SAGA GIS.
- GeoDa.
- Whitebox GAT.
How do I create a map of my neighborhood?
How to Create a Map of Your Neighborhood
- 1 Go to Google Maps. Go to Google Maps. Then enter your address in the search engine. A map of where you live should pop up.
- 2 Zoom and pan the map to get to the area. Zoom and pan the map to get to the area you want to cover in your map. Hit print, and then cancel the print.
How do I make a treasure map?
How to make a treasure map!
- Mix the tea bags and coffee into a bowl of warm water.
- Once dry, your paper will look old and dirty – perfect for a pirate map!
- Time to design your map!
- Pain the map’s edges and flick it with specks of the tea mixture.
- Write a letter on each piece of paper and put them at the map locations.
How do you make a dot grid on Microsoft Word?
Click Design > Page Color in the ribbon, and then select “Fill Effects” in the drop-down menu. Click “Pattern” to see the various patterns you can apply as a background for your document. To create the dot grid effect, select either “Dotted Grid” or “Large Grid” in the second row.
How do you make a grid paper on pages?
Creating Grids in Pages
- Click to add a Grid Unit, which will create a new Grid consisting of two columns:
- Click the Plus Icon to add a new Unit to a particular column:
- Using the Grid settings, enter your chosen Gutter Width.
- You’re done – hit Save changes and get sharing!
How do you insert a chart page in Word?
Add a chart to your document in Word
- Click Insert > Chart.
- Click the chart type and then double-click the chart you want.
- In the spreadsheet that appears, replace the default data with your own information.
- When you’ve finished, close the spreadsheet.
- If you want, use the Layout Options button.
How do I add a style to the navigation pane in Word?
Figure 1.
- Display the Home tab of the ribbon.
- Click the small icon at the bottom-right of the Styles group.
- At the bottom of the Styles task pane there are three small tool buttons.
- Make sure the Style Based On drop-down list is set to (no style).
Where is the navigation pane in Windows?
The Navigation Pane offers shortcuts to places you visit most frequently. Found along the left edge of every folder, the Navigation Pane contains several main sections: Quick Access, OneDrive, and This PC. (On PCs connected through a network, you’ll also see entries for Network and Homegroup.)
How do you make 4 boxes in Word?
Split page to 4 quarters with a table
- Place the cursor at left-top of the page, then click Insert > Table, select 2×2 Table.
- The table has been inserted, then drag right-corner of the table to resize it as you need.
- Insert texts into the columns and rows separately.
What is the easiest mapping software to use?
Top 10 Free GIS Software in 2021
- BatchGeo.
- Esri ArcGIS.
- Surfer.
- Maptitude.
- MapInfo Pro.
- Scribble Maps.
- Geopointe.
- Global Mapper.
Which software is used for mapping?
A Geographic Information System (GIS Software) is designed to store, retrieve, manage, display, and analyze all types of geographic and spatial data. GIS software lets you produce maps and other graphic displays of geographic information for analysis and presentation.
How can I create a map with multiple locations for free?
How to Pin Point Multiple Locations on Google Maps
- Make sure you’re signed in – you can do so by clicking the Login button in the top-right corner.
- In the top left corner, next to the search box, click the menu icon to expand the menu.
- Click “Your Places”, “Maps” and then click “Create Map” to edit your map.
How do you make a map on the computer?
Draw a line or shape
- On your computer, sign in to My Maps.
- Open or create a map.
- Click Draw a line.
- Select a layer and click where to start drawing.
- Click each corner or bend of your line or shape.
- When you’re finished drawing, double-click or complete the shape.
- Give your line or shape a name.
Как нарисовать карту на Word — Вокруг-Дом — 2021
Table of Contents:
Microsoft Word может быть идеальным выбором программного обеспечения для ввода направлений или описаний нового места, но несколько скрытые инструменты рисования программы также дают вам возможность предложить наглядную иллюстрацию. Рисование карт в Word может быть громоздкой и не совсем сложной задачей, но все инструменты, необходимые для создания линий и слов карты, присутствуют. Соберите свой собственный образ поиска сокровищ и начните работу в новом направлении.
Нарисуйте направления, используя Microsoft Word.
Шаг 1
Откройте Microsoft Word. Нажмите вкладку «Вставить». Нажмите кнопку «Фигуры». Нажмите на инструмент «Scribble» в разделе «Линии»; инструмент выглядит как волнистая линия. Курсор изменится на знак плюс со значком карандаша.
Шаг 2
Нарисуйте первую линию карты — выберите самый длинный маршрут. Word окружает линию рамкой и открывает вкладку «Инструменты рисования». Нажмите кнопку «Форма контура» и выберите новый цвет для линии, например, обозначение основных магистралей синим цветом и проселочных дорог черным.
Шаг 3
Повторите процесс «Scribble» для остальных линий на карте. Чтобы нарисовать прямые линии, нажмите и удерживайте клавишу «Shift» при использовании инструмента «Scribble». Измените цвета линий карты по желанию.
Шаг 4
Нажмите кнопку «Текстовое поле» на ленте вкладки «Вставить». Выберите «Простое текстовое поле». Как только Word добавит его в рабочую область, щелкните внутри текстового поля и введите название города, ориентира, улицы или другой заметки на карте. Нажмите на границу текстового поля. Нажмите кнопку «Заполнить текстовое поле» на ленте и нажмите «Не заполнять». Нажмите кнопку «Структура текстового поля» на ленте и выберите «Нет структуры». Перетащите текстовое поле на место на карте.
Шаг 5
Щелкните правой кнопкой мыши текстовое поле и выберите «Копировать». Щелкните правой кнопкой мыши в любом месте карты и выберите «Вставить». Щелкните внутри текстового поля, выделите слово (слова) и введите текст поверх них для нового текста карты. Перетащите текстовое поле на место.
Шаг 6
Добавьте на карту дополнительные функции, такие как звезда «Вы находитесь», щелкнув вкладку «Вставка», нажав кнопку «Фигуры», выбрав фигуру и нарисовав ее на карте.
Шаг 7
Придайте карте фоновый цвет, например желтый или синий, перейдя на вкладку «Макет страницы». Нажмите кнопку «Цвет страницы». Нажмите на один из маленьких квадратов для цвета страницы — выберите тот, который контрастирует с цветами линий карты вместо того же цвета, чтобы линии не исчезали на фоне. Это необязательно.
Шаг 8
Нажмите на вкладку «Файл». Нажмите «Сохранить как». Дайте файлу карты название и нажмите кнопку «Сохранить».
Как в Word нарисовать схему со стрелками

Word является, пожалуй, самой популярной программой Microsoft. Он идеально справляется с созданием и редактированием текстовых файлов, к тому же может предложить инструменты для грамотного и корректного отображения текста. Сегодня мы поговорим о том, как в Ворде нарисовать схему со стрелками.

Создание простого элемента
Нарисовать схему со стрелками в Ворде 2007, 2003 и прочих версиях довольно просто. Вы можете выбрать прямоугольник, круг, квадрат и прочие производные. Алгоритм действий будет следующий:
- переходите в раздел «Вставка»;
- в появившемся списке инструментов ищите «Фигуры», там можно выбрать один из шаблонов;

- делаете левый клик мышкой по выбранному шаблону, жмете на область в тексте, где должен он стоять;

- при необходимости форматируете его, регулируя толщину границ, цвет фона и остальные параметры;
- если необходимо скруглить углы, следует на объекте навести курсор на желтый круг сверху в левой стороне и выполнить необходимые настройки;
- для перемещения наводите курсор на одну из границ и ждете появления четырехсторонней стрелочки, располагаете элемент в заданном месте.
Если необходимо создать одинаковые макеты, не обязательно все время использовать вставку и выполнять все действия, описанные выше. Просто копируете и вставляете их комбинациями Clrl + С и Ctrl + V .

Для выравнивания используется поочередное выделение нажатой кнопкой Shift. После чего следует зайти в раздел «Формат» и найти «Выровнять» в подразделе «Упорядочить». Будет открыт список, в котором вы легко выравниваете фигуры, к примеру, по верхнему краю.
Как в Ворде нарисовать блок-схему со стрелками
Иногда возникает необходимость в создании такого схематичного объекта. Для этого сначала переходите по такому пути:
Перемещаете в него ранее созданные макеты и соединяете их стрелочками:
- добавляете элемент в полотно указанным выше способом;

- после выделения появляются кружки верху и снизу. Когда вы ими управляете, стрелочка прикрепляется снизу и сверху другого.

Получается, что во время перемещения созданных схематичных объектов, все указатели, прикрепленные к ним, передвигаются тоже. Так можно не только создавать новые шаблоны, но и редактировать их отображение.

Если понадобилось добавить текстовый контент в блок, просто делаете его выделение правой кнопкой мышки, выбираете в открывшемся меню «Добавить текст ».
Майкрософт Word постоянно увеличивает перечень своих специнструментов и возможностей, а также делает их использование более простым и комфортным. Так что теперь вы знаете, как в Ворде нарисовать схему со стрелками, и при необходимости легко справитесь с этой задачей. Очень удобно, что в редакторе есть свои заготовки, которые часто выручают.
Как сделать схему в Ворде
Работая в документе Ворд с текстом, Вам могут попадаться картинки, диаграммы, рисунки. Вставляя различные объекты в текст, он становится более наглядным, и тот, кто его читает, лучше воспринимает информацию.
В данной статье мы рассмотрим два способа, с помощью которых можно создать схему в текстовом редакторе MS Word – это рисунок SmartArt и вставка обычных Фигур. Показывать я буду в Ворде 2010, но данные скриншоты так же подойдут, если у Вас установлен Ворд 2007, 2013 или 2016.
На сайте уже есть статьи: как добавить рисунок в Ворд, и как сделать график в Ворде. Перейдя по ссылкам, Вы сможете их прочесть и сделать свой документ интересным и более информативным.
Как рисовать схемы с помощью SmartArt
Схема в текстовый редактор добавляется вставкой в документ рисунока SmartArt. Для этого перейдите на вкладку «Вставка» и в группе «Иллюстрации» нажмите на кнопку «SmartArt» .

Появится вот такое окно. В нем нужно выбрать подходящий рисунок. Слева кликните по разделу, в примере «Иерархия» , и выберите один из предложенных рисунков. Справа область предпросмотра, посмотрите, как она выглядит, и для чего больше подойдет.

Теперь приступим к размещению блоков. Удалить ненужные можно, выделив его мышкой и нажав кнопку «Delete» . Уберите, таким образом, все лишние прямоугольники.

Дальше необходимо добавить блоки. Выделите тот, под которым нужно вставить дополнительные, и на вкладке «Работа с рисунками SmartArt» – «Конструктор» нажмите на кнопку «Добавить фигуру» , в списке кликните по пункту «Добавить фигуру ниже» .
После этого снова выделите верхний прямоугольник и добавьте еще один ниже. Здесь же Вы можете выбрать добавление нужного объекта выше выбранного блока, перед ним, или за ним.

После того, как Вы сделаете предыдущий пункт, нужно напечатать текст. Выделите область схемы и на вкладке «Работа с рисунками SmartArt» – «Конструктор» нажмите на кнопку «Область текста» . Или же на левой границе нажмите на кнопку с двумя маленькими стрелочками.

Откроется сбоку небольшое окошко. В нем нужно ввести текст для каждого из блоков. Здесь маркерами обозначены уровни, а кликнув напротив маркера можно посмотреть, куда будет вписан текст.
Напишите напротив каждого маркера, какой текст должен быть в каком объекте.

Когда все заполните окно для добавления текста можно закрыть, нажав в нем на крестик.

Теперь можно поработать над внешним видом самой схемы. Для этого выделите ее и перейдите на вкладку «Работа с рисунками SmartArt» – «Конструктор» . В группе «Стили SmartArt» можете выбрать любой другой стиль.

Также можно «Изменить цвета» схемы, кликнув по соответствующей кнопке.

Если Вам не сильно подошел выбранный вид, можете изменить его в соответствующей группе. Наведите курсор на любой из предложенных макетов, чтобы посмотреть, как будет выглядеть Ваша схема. Если этот макет подойдет больше, кликните по нему, чтобы выбрать.

Перейдя на вкладку «Работа с рисунками SmartArt» – «Формат» можно изменить любую фигуру или текст. Например, выделим фигуру, нажмем «Изменить фигуру» и кликнем по любой другой из предложенного списка. Для каждой можно изменить заливку, контур или добавить эффект.
Точно так же и для текста, выделите его и можно применить один из готовых стилей, изменить заливку, контур или добавить эффект.

В итоге, у меня получилась вот такая схема.

Как нарисовать схему со стрелками, используя Фигуры
Делать схемы в Ворде можно и другим способом, не используя готовых шаблонов, а создать ее с помощью вставки в документ подходящих фигур.
Для этого откройте вкладку «Вставка» нажмите на кнопку «Фигуры» и кликните по нужной из списка, это может быть овал, прямоугольник, ромб и другое.

После этого курсор поменяет вид с палочки на плюсик. Нарисуйте с его помощью фигуру в нужном месте документа. Затем у Вас появится вкладка «Средства рисования» – «Формат» . На ней снова кликните по кнопочке «Фигуры» и нажмите по нужной в списке. Добавьте их все таким образом.
Если Вы нарисовали объект на листе и его нужно немного переместить, то сделать это можно мышкой, захватив за его границу. Или же выделите его, зажмите клавишу «Ctrl» и перемещайте с помощью стрелок на клавиатуре.

Дальше давайте соединим блоки прямыми линиями или стрелками. Выделите один из них, чтобы открылась вкладка «Средства рисования» – «Формат» . Затем нажмите «Фигуры» и из выпадающего списка кликните, например, по стрелке. Нарисуйте стрелку, чтобы она указывала непосредственно на сам блок. Соединить несколько стрелок можно с помощью прямой линии.
Подробнее прочесть, как сделать стрелки в Ворде, можно в статье, перейдя по ссылке.
Чтобы нарисовать ровную горизонтальную или вертикальную линию, рисуя стрелку, нажмите и удерживайте клавишу «Shift» .

Используя прямую и стрелку, у меня получилось нарисовать вот такую схему.

Теперь давайте изменим внешний вид стрелок. Выделяйте их по очереди, и для каждой можно выбрать один из готовых стилей, или нажмите «Контур фигуры» и сами выберите цвет, толщину стрелки и прочее.

Нажав «Эффекты фигур» можно добавить один из предложенных эффектов. Я выбрала тень.

Прорисовав и изменив вид всех стрелок, переходим к тексту. Выделяем один прямоугольник и на вкладке «Средства рисования» – «Формат» нажимаем на кнопку «Нарисовать надпись» . Появится плюсик вместо курсора. Нарисуйте им прямоугольник для надписи в нужном блоке.

Дальше напечатайте текст. Добавьте, таким образом, текст во всю схему.

Как видите, прямоугольник для надписи залит белым и у него есть контур. Давайте это уберем. Кликайте по нему и на вкладке «Средства рисования» – «Формат» выбирайте «Заливка фигуры» – «Нет заливки» .

То же самое повторяем и для контура: «Контур фигуры» – «Нет контура» . Сделайте так для всех блоков с текстом.

Следующий шаг – это форматирование написанного текста. Выделите текст и на вкладке «Главная» выберите шрифт, размер, цвет и поставьте его по центру.

Итак, мы изменили вид стрелок и текст в схеме, осталось поработать с блоками. Выделите любой из них мышкой, кликнув по нему – откроется вкладка «Средства рисования» – «Формат» . В группе «Стили фигур» нажмите на тот, который Вам понравится. Или используя кнопки «Заливка» , «Контур» и «Эффекты» сделайте любой вид, который подходит больше.

Если нарисовав схему, Вы заметили, что нужно поменять один из блоков, например, прямоугольник на ромб, тогда не нужно его удалять и рисовать ромб, можно просто заменить. Выделите прямоугольник, для примера, перейдите на вкладку «Средства рисования» – «Формат» и нажмите по кнопке, на которой изображена линия с маркерами. Выберите в открывшемся списке «Изменить фигуру» и укажите, какую вставить.

Вот такая схема со стрелками получилась у меня. Скачать все, что было нарисовано во время написания данной статьи, можно с Яндекс.Диска, перейдя по ссылке: https://yadi.sk/i/61H5Cdak3KALtz.
Чтобы переместить созданную в документе схему немного в стороны или уменьшить/увеличить всю сразу, а не по одной фигуре, нужно сгруппировать все нарисованные объекты. Как сгруппировать фигуры в Ворде, прочтите, перейдя по ссылке.

На этом буду заканчивать. Попробуйте пошагово сделать все, как описано в статье, и у Вас обязательно получится.

For those who lack this information, we assure you that it is possible to find out the owner of a bank account number, so when you need to carry out a process that requires this information, you can do it without wasting time :-). This of course, if you have the data to enter the website of the … READ MORE

Sometimes we ask ourselves questions like; who could not know where he lives? Identity, citizenship and nationalist sentiment are values that are normally developed in the first years of life. It is at that moment when we think of those people who still do not identify their locality and it is when we observe situations such as change of… READ MORE

God is the supreme being for any religion, in the case of Catholics, making a pact with God is a kind of commitment, in the Bible it is known as «chaining together», this referring to marriage or the earthly union of two beings . To make a pact with God it is necessary to have faith… READ MORE

There are many types of instructions: short, long, for children, for employees, printed on paper, digital and many more! But they all have one thing in common and that is to educate the user or reader. The importance of the instructions lies in the fact that these are the ones that explain to us in a clear and simple way how to do some … READ MORE

When it comes to the education of people in general, the way in which knowledge is imparted must be as dynamic, participatory and understandable as possible so that the knowledge fits better in our heads; This is where, in this digital age, virtual tools like Kahoot come into play, which … READ MORE

The concept of triptych comes from art, especially Flemish art during the XNUMXth and XNUMXth centuries, which consisted of a painting that was divided into panels, generally three different scenes of the same theme, which when closed revealed a fourth work; its name comes from the Greek triptychos (tri Y … READ MORE

Many people consider it important and spend their time thinking about what the opinion of others will be in relation to how attractive they may be, and there are even scientific studies related to this subject given how common it has become. It is believed that there are ways to know if you are handsome, … READ MORE

Hydraulics is an area of physics that studies the mechanical properties of fluids, these properties will depend on the relationship between the mass and the force applied to the fluids, as well as their viscosity, allowing them to move heavy loads and in the case of hydraulic arms this technology … READ MORE

Gold from the beginning was considered one of the most expensive minerals, that is why it is important to know the quality and how real our gold is, there are several ways to check it such as lemon, vinegar, among others, and here we will show you some of them. those shapes. How to Know if it is Gold with Paste of … READ MORE

Cheating on exams is as old as the art of studying and it may be that at some point in our lives we cannot learn the content of a subject no matter how hard we try or we have a lot of content to study and little time to memorize it and it comes to your mind asks how… READ MORE

Since the beginning of civilization, information has been essential, whether written, visual or contextual. Because communication has always been essential to be able to make the empire grow and be maintained for many more years without being involved in an abrupt fall. There are different ways to transmit information, for… READ MORE

Chatroulette is a free portal that is very popular among its users because it allows you to meet new people mainly through video chats, although you can also do it with voice or text chat. One of its attractions is the number of people who connect daily to the website: more than 1,5 million, which… READ MORE

Having a hickey anywhere on the body is indicative that we have spent a passionate night with our partner or rather, a reminder that we are loved and desired; however, it may be the case that we want to exhibit one of them to make a joke or fulfill some penance, so … READ MORE

What’s more fun than a hat? It is a versatile accessory, it can be a formal piece at one time and something fun and informal at another, that is why if we are going to show you how to make a crazy hat in just 10 minutes, with different materials, themes and shapes to please the most small and more… READ MORE

The kite, parrot or kite, is a traditional game in many Latin American countries, it is a fun game, and it can also be done as a craft at home, here we will teach you how to make a kite, with the help of parents and children. kids. Here we will explain in detail everything you need to know… READ MORE

The plumes are an implement that is part of the cultures of ancient tribes, to be used in different religious ceremonies. Without a doubt, due to its brightness and colors, it is a decorative element that has attracted the attention of everyone. How to Make a Plume? Making a plume is not complicated, you just need… READ MORE

The activity schedules are quite effective graphic resources to track the progress of an investigation or a project; The term comes from the Greek «chronos» which refers to time and «gram» which translates as written message. There are several types and the idea is that through the realization of … READ MORE

When you have a partner it is normal to want to know where they are, in many cases this can be a bit overwhelming for one of the parties, but many times it can even save the life of the person in the event of an accident. There are countless people who return from work to high … READ MORE

A layout is synonymous with design, plan, layout and refers to the distribution of different elements within a space; They are very common when carrying out projects to create structures such as buildings or different objects; One of its main characteristics is that they go beyond resignations, since you find them in 2D and 3D. … READ MORE

There are many reasons why we can ask ourselves how to know the date of birth of a person? Either to surprise him on his birthday, because it is a requirement for a procedure or an investigation, among other causes. The truth is that this time I am going to give you ideas to discover… READ MORE

Within the writing, a conclusion is a text that is placed at the end of the writing with the purpose of exposing the most outstanding points of the object of study, at the same time, providing conclusive data to give closure to the idea pursued by the writing. The aspects that a conclusion must have is to contribute… READ MORE

Many people usually know some relatives, usually the closest ones but very few really know where their family or their bloodline comes from, that is why if you want to organize this important information, I will tell you how to make a tree genealogical. In the movies you can see various… READ MORE

Calculating the age of a person is not a complicated task at all, but if you are not very clear on how it is carried out, do not worry, in this section everything you need to know will be explained to you to understand how to know the age of a person? Many may ask the question… READ MORE

Cantoya balloons have a special symbolism for people and are generally released with wishes or messages to heaven, it is believed that their origin comes from Asian culture, although in Mexico they are called cantoya balloons in honor of Joaquín de la Cantolla and Rico, pioneer builder of hot air balloons. Their … READ MORE

Tabloids are newspapers with a smaller format than traditional ones, initially used for sensational news, referring to celebrities, crimes, political issues, among others; In fact, this is the reason that its size is smaller, making it accessible in size, price, as well as being eye-catching and full of illustrations. If you’re … READ MORE

For children, having wooden carts has always been an adventure, they are synonymous with traditions and times of yore, nowadays it is not very common for children to play with them, however, they are still a good option for those who still have their inner child and want to build them from scratch. Either … READ MORE

In any company or institution, the credentials or badges are part of the identification of the staff and with it the internal organization of the company. That is why, if you do not have this identification system, we will tell you how to make a badge or credential in Word and in other programs within the computer, as well as, … READ MORE

For all those who love crafts, we bring you several super simple ways to make a big head, since we know that there are many people who can feel motivated to make these beautiful figures that are ideal for popular festivities. We have in this article different modalities to carry out this task, such as a … READ MORE

Making an international call can seem like a very cumbersome procedure, especially because we get scared with how long that phone number can look on the screen, however, in this article you will know in the easiest way possible How to make a call to the United States from Peru . In addition, you will know how to dial a foreign number from … READ MORE

A file is a virtual or real information organization system, this information is ordered and classified according to a certain criterion, in order to preserve it and facilitate access to it when required. There are many ways to make files, if you need any, we will show you how to make a file… READ MORE

Making a hat at any time of the year can be a fun and very creative task, take advantage of the little ones in the house to share this new initiative with them, keep the little ones busy and create the best EVA rubber hats. Eva rubber is a super easy material to use, it sticks … READ MORE

A pinwheel is a decorative piece, made up of blades that move downwind and are widely used for gardens or as a special detail for a person. They are also called pinwheels, pinwheels, renglets or reguiletes, they are made from numerous materials and are usually of many colors. Next, you… READ MORE

The transport pass is a solution in terms of payments for the public transport service, for which, in the Spanish nation, it is normal for people to have a transport pass for periods of time, however, they can lose how much its validity is due to the long time to which they are scheduled, if this is … READ MORE

Wallapop is here to stay, this app since 2013 has become one of the favorite sites for lovers of second-hand pieces, whether to buy or sell; using it is very simple and one of its most distinctive features is that you can locate the products by zones. Your system of… READ MORE

Whether it is because you want to change your eating habits and eat in a more conscious and healthy way, or because you want to lose several extra pounds, Herbalife Nutrition products were created for these purposes, with the recognized endorsement of the scientific and medical community. . In this article you will know for sure some questions… READ MORE

Pellet burners are devices that allow the use of biofuel pellets to generate fire or heat in an economical and ecological way. Currently, they are widely used and popularized in the world, being implemented in open fireplaces, cauldrons, wood stoves, among others. If you want to join this ecological alternative, we will show you how to make a burner… READ MORE

Cement is generally thought of as a material used for undecorated completed works or those that are in the process of being built. The image that comes to mind for many people is rustic and without good finishes, but that is not always the case. Cement can be used quite… READ MORE

The pilota valenciana is the traditional game of this community, to practice it it is necessary to have adequate protection in this case that of the gloves, if you want to practice this sport and you do not know how to make your own pilota valenciana gloves, you have come to the right place in This article will teach you how to do it step… READ MORE

Kartings are small carts that are used for racing or quietly transporting around neighborhoods. They can be purchased or made at home, the latter being the most exciting and fun to make. If you are interested in creating a homemade karting, here are 4 incredible ways to do this type … READ MORE

Nothing better than watching and enjoying a good movie or a captivating series as a family, even more so when you don’t have to pay anything to access this multimedia content from the internet; These qualities are brought together by a website that has been afloat for 12 years, it is Cuevana 3. This platform … READ MORE

When we are at home and we get creative, we want to greatly improve the facade of the home, or failing that, kill time doing things that are not difficult and can save us a lot of money, that is, occupy our free time, here we will show you how to make a gate of wood. Materials to Use to Make a Gate of … READ MORE

There are currently many applications and also web pages that make it easier for us to edit any multimedia content that we have prepared, either for the presentation of a project or to upload it to a video platform, such as YouTube. One of those software that brings together many advantages and attractive features is Filmora, … READ MORE

Building a closet on your own is not as complex as many of us have imagined, in addition to saving a lot of money, you also raise your knowledge in construction and do a different activity, here we will show you step by step how to make a closet, in an easy way and without spend a lot of money. How to make a closet? Can you do … READ MORE

It may be that you got carried away by a moment of unbridled passion with your partner and a short time later you realized that you have an obvious mark on your neck; Now you feel a little embarrassed and you don’t want anyone to see it, but… How to remove a hickey? Calm down! Here you will discover how to achieve it… READ MORE

A prism is a geometric figure, specifically a polyhedron that is made up of two parallel faces called «base» and a number of lateral faces called «parallelograms», the number of parallelograms of a prism is determined by the geometric shape of its base, if is a triangle will have three faces, with a pentagon it will have five. They can have … READ MORE

Since the beginning of civilization, sharing information has been fundamental, for example in ancient times they used crows or pigeons to transport messages from one place to another and with different types of marks on the paper to identify how urgent the writing was. The way of transporting information was advancing until … READ MORE

The American visa is a privilege granted by the US Government to citizens of other countries so that they can enter it legally, usually as a tourist, however, there are also visas for those who wish to study, work and even migrate and to obtain it you must qualify within their … READ MORE

Making or building a new room inside the house helps us to improve the appearance of the spaces, it distracts us a bit and in turn allows us to stay busy for a long time, so here we will show you how to make a room out of wood. A new room or wooden room at home … READ MORE
How to make a concept map in Word from PC / Mac
make a concept map on Word from your PC o Mac, you must first start the famous word processor on your computer and then use the geometric shapes and connectors that can be called up from the menu Inserisci. Let’s see in detail how to proceed.
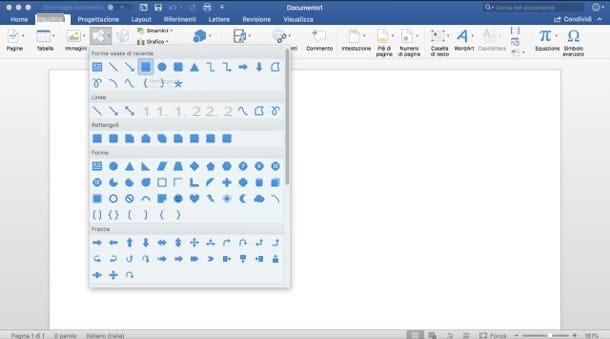
After starting Word, presses on the tab Inserisci located at the top, presses the button Form (the icon depicting the circle, square and rhombus located at the top), select the shape you want to use to make the central knot (eg. Rectangle) and draw it on the sheet: then hold down the left mouse button, move the cursor to make the drawing and release it when you have finished creating the desired shape.
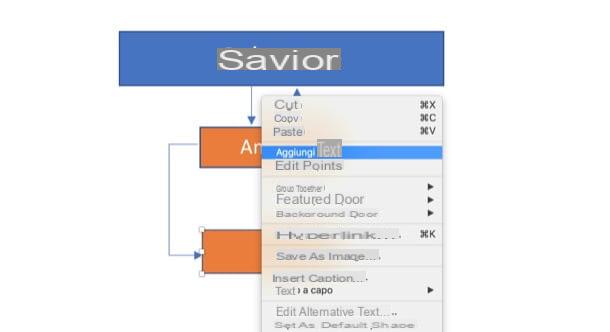
To add some text inside the central node you drew, right click on the shape inserted in the sheet, select the item Add text from the context menu and write the word or phrase (if you want, you can also format the text using the tools on the tab Home).
After making the central node of the map, add the connectors through which to connect it to the other nodes on the map. Press, therefore, on the board Inserisci (if necessary), click the button Form and use one of the connectors in the section Tiers (Eg. Connector 5) to connect the central node to the secondary ones that you are going to draw following the procedure I indicated in the previous lines. To change the appearance of a node, then left click on it and use i squares and shot that appear on it to change its size and curvature.
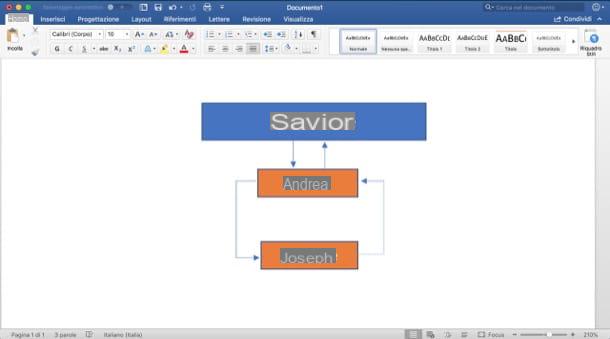
To complete the concept map, all you have to do is repeat what I have shown you so far: draw a new node using one of the shapes made available in Word and connect it through the connectors and lines available in the program. To add text to the nodes, then, you have to right click on them, select the item Add text from the context menu, enter the desired word or phrase and that’s it.
If you want, you can also change the appearance of the shapes you used to create your concept map: select one of them, press the button Shape format that appears in the toolbar at the top and changes the color and appearance of the selected shape using the options and buttons available. As soon as you are satisfied with your work, save it by selecting the item Save with name … from the menu Fillet.
Alternatively, if you want, you can save the concept map as a template and reuse it to create new documents by selecting setting the option Word template (* .dotx) in the drop-down menu Save eat or, if you are using a Mac, by selecting the item Save as template from the menu Fillet.
How to make a concept map in Word from smartphones and tablets
want make a concept map on Word directly from the smartphone or from tablet? To proceed, you must first install on your Android device (also on alternative stores) iOS / iPadOS the official Word app which, as you may already know, can be used for free on devices with a display of dimensions equal to or less than 10.1 « (for larger devices, on the other hand, a subscription is required Microsoft 365).
Once the Word app has been installed and started on your smartphone / tablet, log into your Microsoft account and decide whether to start creating a new document by pressing the button New or whether to modify an existing one by tapping the button apri and then selecting the file from the device memory or from one of the supported cloud storage services.
Once you have chosen whether to modify an existing document or whether to create one from scratch, you have to make another choice: draw the concept map using the geometric shapes of Word or draw it by hand using the touch screen technology of mobile devices to your advantage. Let’s see how to proceed in both cases.
make the concept map using geometric shapes, do the following.
- Yes smartphone — tap on the tab Home placed at the bottom left, presses on the card Inserisci from the menu that opens, press on the item Form located at the bottom, select the shape you want to use to draw the main node of the map and resize and move the shape inserted in the sheet using the shot and squares placed on its perimeter. Then presses the Insert button appeared below, select the connector you want to insert in the map by choosing one of those in the section Tiers e usa i shot and squares places on the connector to resize it. To add text inside the shapes inserted in the sheet, tap on one of them and select the item Add text from the menu that opens. Now all you have to do is repeat the operations I indicated to you to finish the map and that’s it.
- Yes tablet — presses on the voice Inserisci, fai tap sul pulsating Form (the icon with the square and circle located at the top), select the shape to use to make the central node of the map and then resize it using the shot and squares placed on its perimeter. Then press the button Inserisci located at the top left, select the connector you want to use to join the central node to the secondary ones and repeat these operations for all the nodes and connectors that you will need to complete the job. To insert text inside a node, then, tap on one of the added shapes, press on the item Add text from the menu that opens and type the text you want to insert.
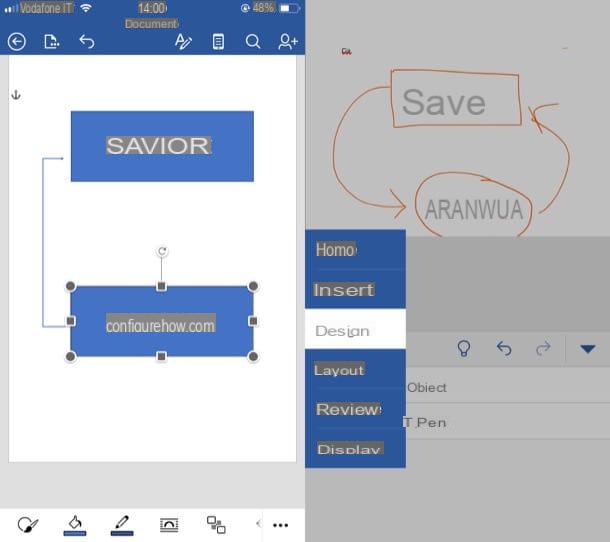
drawing the concept map “by hand” using touch screen technology, do the following.
- Yes smartphone — tap on the tab Home placed at the bottom left, presses on the card Design from the menu that opens, press on the item Start Inking, select the pen you want to use and draw the concept map.
- Yes tablet — presses on the card Design located in the top menu, check that the switch is next to the wording Finger drawing is moved up ON, choose the pen you want to use and draw the concept map. Easier than that ?!
As soon as you have completed your work, save it by pressing on the item Save o Export from the menu Fillet (l’icona del sheet located at the top left).
How to make a concept map in Word