
Using the Drawing Grid
- Display the Page Layout tab (or the Layout tab if you are using Word 2016 or a later version) of the ribbon.
- Within the Arrange group, click the Align drop-down list.
- Choose Grid Settings.
- Use the controls in the dialog box to set the specifics of the grid.
Contents
- 1 How do you put a grid on Microsoft Word?
- 2 How do you make a grid?
- 3 How do you make a dot grid on Microsoft Word?
- 4 How do I make a print grid in Word?
- 5 What does grid paper look like?
- 6 Is grid and graph paper the same?
- 7 How do I create a Web grid?
- 8 How do you get grid papers on pages?
- 9 How do I make Word look like a journal?
- 10 What are grid lines?
- 11 Where is ruler in Microsoft Word?
- 12 Can you print grid paper?
- 13 What is dot grid paper used for?
- 14 Is quad paper the same as graph paper?
- 15 Is engineering paper the same as graph paper?
- 16 How many squares are in a 12×12?
- 17 How are grid and Web the same?
- 18 What is grid layout design?
How do you put a grid on Microsoft Word?
Click the Page Layout tab. Click the Align dropdown in the Arrange group. Check View Gridlines. To disable gridlines, uncheck View Gridlines.
In Word 2003, enable gridlines as follows:
- On the Drawing toolbar, click Draw.
- Click Grid.
- Check Display Gridlines.
How do you make a grid?
To draw the grid:
To draw this grid, put your ruler at the top of the paper, and make a small mark at every inch. Place the ruler at the bottom of the paper and do the same thing. Then use the ruler to make a straight line connecting each dot at the bottom with its partner at the top.
How do you make a dot grid on Microsoft Word?
Click Design > Page Color in the ribbon, and then select “Fill Effects” in the drop-down menu. Click “Pattern” to see the various patterns you can apply as a background for your document. To create the dot grid effect, select either “Dotted Grid” or “Large Grid” in the second row.
How do I make a print grid in Word?
On the Design tab, click the Page Setup Dialog Box Launcher. You can also open the Page Setup dialog box by right-clicking the page tab and then clicking Page Setup. On the Print Setup tab, under Print, select the Gridlines check box. Click OK.
What does grid paper look like?
Grid paper is simply a page covered with a continuous square grid. It is often called “quadrille paper” or “quad paper.” The squares usually have a specific size such as 1/2 inch, 1/4 inch or 1/8 inch – which gives the paper a name such as “1/2 Inch Grid Paper.” No axes are drawn on grid paper.
Is grid and graph paper the same?
Graph paper, coordinate paper, grid paper, or squared paper is writing paper that is printed with fine lines making up a regular grid. The lines are often used as guides for plotting graphs of functions or experimental data and drawing curves.
How do I create a Web grid?
Just highlight your artboard and underneath the Grid section check the box for grid, choose Layout. From there you can customize your grid however you like. You can adjust how many columns, the gutter width, the column width, and even choose if you want this to be your default grid for future web design projects.
How do you get grid papers on pages?
Creating Grids in Pages
- Click to add a Grid Unit, which will create a new Grid consisting of two columns:
- Click the Plus Icon to add a new Unit to a particular column:
- Using the Grid settings, enter your chosen Gutter Width.
- You’re done – hit Save changes and get sharing!
How do I make Word look like a journal?
How to Create Note or Journal Lines in Microsoft Word
- Click on the Page Layout tab in Word.
- Click on the little drop down arrow to the right of the words “Page Setup” along the bottom of the menu.
- Write down your book’s width found under Page Size.
- Write down both of your inner margins.
- Write down the Gutter margin.
What are grid lines?
Definition of grid line
: any of a series of numbered horizontal and perpendicular lines that divide a map into squares to form a grid by means of which any point may be located by a system of rectangular coordinates.
Where is ruler in Microsoft Word?
Show the rulers
Go to View and select Ruler. If the vertical ruler doesn’t show, make sure you’re in Print Layout view. If it still doesn’t show, you might need to turn the ruler on. Go to Word > Preferences > View (under Authoring and Proofing Tools).
Can you print grid paper?
If you need a sheet of graph paper, you can print it from Excel. If you tried to print now Excel would tell you that there is nothing to print and excel does not print gridlines, by default.
What is dot grid paper used for?
A dotted notebook is a great way to keep track of plans by drawing calendars that work for you. Whether that’s daily, weekly, monthly, or all three, it’s up to you. Thanks to the dots, it’s easy to draw neat lines and separate the page where you want, so you can create the size and format of planner you need.
Is quad paper the same as graph paper?
Quad paper is just another form or variation of graph paper. It’s a square grid pad. On the other hand, there are many types of graph paper which don’t have square grids.
Is engineering paper the same as graph paper?
The difference between graph paper and engineering paper is that engineering paper is blank (but see through) on one side, so you can still draw straight lines but also write clearly without having to worry about writing dark enough for it to be legible over the graph lines.
How many squares are in a 12×12?
You will multiply the 12 foot width by the 12 foot length to find the square footage of your room which is 144 square feet.
How are grid and Web the same?
In web design, grid systems are invisible structures that collect all the elements within a web page together.a structure (usually two-dimensional) made up of a series of intersecting straight (vertical,horizontal, and angular) or curved guide lines used to structure content.
What is grid layout design?
In design, a grid is a system for organizing layout. The layouts could be for print (like a book, magazine, or poster), or for screen (like a webpage, app, or other user interface). There are a lot of different types of grid, and they all serve different purposes.
Microsoft Word is not limited to text-based documents alone. It is also possible to set up a grid in Word. You may want a grid paper for a complex mathematical chart. Grid papers are also great for bulleted journals for personal planning. The best thing is, you do not need complicated training for creating grids.
5 ways of making grids in Word using simple, easy stepwise instructions:
- Using Grid Lines
- Using Fill Effects
- Using Lines
- Using Rectangles
- Using Tables
Let us begin.
Method #1: Grid using Grid Lines
This method uses the grid line feature of Word.
Step #1: Open a Word Document
Open a Word document.
Navigate to the page where you want the grid.
Step #2: Modify the Layout
Click on the Layout tab in the top menu bar to change the ribbon.

In the section Arrange, click on the Align tab.

In the drop-down menu that opens, click on View Gridlines.

Your Word page will show a grid.

Step #3: Change the Grid Size
Click on the Layout tab in the top menu bar to change the ribbon.

In the section Arrange, click on the Align tab.

In the drop-down menu that opens, click on Grid Settings….

Under Show grid in the dialog box that opens, click and select Display gridlines on screen.
Click and select Vertical every:, and enter a suitable number.
For Horizontal every:, enter a suitable number.
Click on the OK tab to close the dialog box.

Your Word page will show a grid with the above changes.

Method #2: Grid using Fill Effects
This method uses the page fill effects feature of Word.
Step #1: Open a Word Document
Open a Word document.
Navigate to the page where you want the grid.
Step #2: Modify the Page Design
Click on the Design tab in the top menu bar to change the ribbon.

Step #3: Change the Background Color of the Page
In the section Page Background, click on the Page Color icon.

In the drop-down menu that opens, click on Fill Effects….

This opens the Fill Effects dialog box.
- Click on the Pattern tab.
- Select a suitable grid.
- Change the Foreground: and Background: colors suitably.
- Click on the OK tab to close the dialog box.

Your Word page will show the grid you have chosen.

Note: you cannot change the grid size to your choice.
Method #3: Grid using Lines
This method uses simple shapes (lines) to create the grid.
Step #1: Open a Word Document
Open a Word document.
Navigate to the page where you want the grid.
Step #2: Open a Drawing Canvas
Click on the Insert tab in the top menu bar to change the ribbon.

In the section Illustrations, click on the Shapes icon.

In the drop-down menu that opens, click on the New Drawing Canvas icon at the bottom.

A drawing canvas box will appear on the page.
Drag the handles of the box to match the page width.

Step #3: Insert a Line
Click on the Insert tab in the top menu bar to change the ribbon.

In the section Illustrations, click on the Shapes icon.

In the drop-down menu that opens, click on the Line icon under Lines.

- The cursor will change to a cross.
- Position the cross where you want to start the line in the drawing canvas.
- Press the Shift button on your keyboard.
- Press the left mouse button and drag the cross to draw a horizontal line.
- Release the Shift button and the mouse button.

Step #4: Make Copies of the Line
- Select the line.
- Press CTRL+D on your keyboard.
- This will create a copy of the line.
- Repeat CTRL+D to make more copies.

Step #5: Align the Lines
Click on the Home tab in the top menu bar to change the ribbon.

In the section Editing, click on the Select icon.

In the drop-down menu that opens, click on the Select Objects icon.

Click and drag the mouse to select all the lines.

Click on the Layout tab in the top menu bar to change the ribbon.

In the section Arrange, click on the Align tab.

In the drop-down menu that opens, click on Align Left.

All the lines will align to the left of the page.

Step #6: Group the Lines
In the section Arrange, click on the Group icon.

In the drop-down menu, click on the Group icon.

This groups the lines.

Step #7: Copy the Group
Press CTRL+D to make a copy of the group of lines.

Step #8: Make the Grid
In the section Arrange, click on the Rotate icon.

In the drop-down menu, click on the Rotate Right 90° icon.

This rotates the new group of lines.

Step #9: Align the Lines
Select one group.
Move it on top of the other group.
Use the handles to resize the groups to fit each other.

Step #10: Remove the Drawing Canvas
- Select the grid.
- Press CTRL+C to copy the grid to clipboard.
- Delete the grid.
- Delete the drawing canvas.
- Press CTRL+V to paste the grid on the page.

Method #4: Grid Using Rectangles
This method uses simple shapes (rectangles) to create the grid.
Step #1: Open a Word Document
Open a Word document.
Navigate to the page where you want the grid.
Step #2: Open a Drawing Canvas
Click on the Insert tab in the top menu bar to change the ribbon.

In the section Illustrations, click on the Shapes icon.

In the drop-down menu that opens, click on the New Drawing Canvas icon at the bottom.

A drawing canvas box will appear on the page.
Drag the handles of the box to match the page width.

Step #3: Insert a Rectangle
Click on the Insert tab in the top menu bar to change the ribbon.

In the section Illustrations, click on the Shapes icon.

In the drop-down menu that opens, click on the Rectangle icon under Rectangles.

The cursor will change to a cross.
Position the cross where you want to start the rectangle inside the drawing canvas.
Drag the mouse diagonally to form a square.

The ribbon will change to Shape Format.
![]()
In section Shape Styles, click on the Shape Fill icon.

In the drop-down menu, click on the No Fill icon.

The rectangle will now be devoid of any fill color.

Position the cursor on the border of the square.
Press CTRL+D on your keyboard.
A copy of the square will appear.
Drag the copy below the original square.

Step #4: Make Copies
Repeat for as many rows as you want.

Step #5: Align the Rectangles
Click on the Home tab in the top menu bar to change the ribbon.

In the section Editing, click on the Select icon.

In the drop-down menu that opens, click on Select Objects.

Click and drag the mouse to select all the rectangles.

Click on the Layout tab in the top menu bar to change the ribbon.

In the section Arrange, click on the Align tab.

In the drop-down menu that opens, click on Align Left.

All the rectangles will align to the left of the page.

Step #6: Group the Rectangles into a Grid
In the section Arrange, click on the Group icon.

In the drop-down menu, click on the Group icon.

This groups the rectangles.
Step #7: Copy the Group
- Press CTRL+D to make a copy of the group of rectangles.
- Drag the copy to align on the right of the original rectangles.
- Repeat until you have the desired number of columns.

Step #8: Remove the Drawing Canvas
- Select the grid.
- Press CTRL+C to copy the grid to the clipboard.
- Delete the grid.
- Delete the drawing canvas.
- Press CTRL+V to paste the grid in the page.

Method #5: Grid using Tables
This method uses tables to create the grid.
Step #1: Open a Word Document
Open a Word document.
Navigate to the page where you want the grid.
Step #2: Insert a Table
Click on the Insert tab in the top menu bar to change the ribbon.

In the section Tables, click on the Table icon.

The Insert Table dialog box will open.
Select the number of rows and columns according to the grid you want.

A table will appear on the page.
Click on the icon on the top left to select the entire table.

Step #3: Adjust the Grid
Click on the Layout tab in the top menu bar to change the ribbon.

In the section Cell Size, enter the same figures for Height: and Width:.

A grid appears on the page.

Conclusion
We have shown you five methods of making grids in Word. Use the method that best suits your requirement.
В Microsoft Word можно добавлять и изменять рисунки, иллюстрации, фигуры и прочие графические элементы. Все их можно редактировать с помощью большого набора встроенных инструментов, а для более точной работы в программе предусмотрена возможность добавления специальной сетки.
Эта сетка является вспомогательным средством, она не выводится на печать и помогает более детально производить ряд манипуляций над добавленными элементами. Именно о том, как добавить и настроить эту сетку в Ворде и пойдет речь ниже.
Добавление сетки стандартных размеров
1. Откройте документ, в котором нужно добавить сетку.

2. Перейдите во вкладку “Вид” и в группе “Показать” установите галочку напротив пункта “Сетка”.
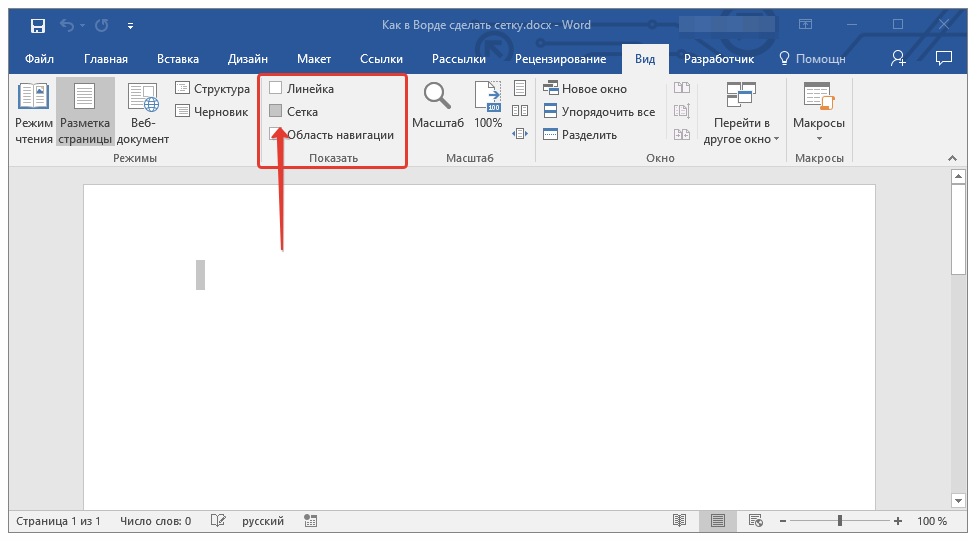
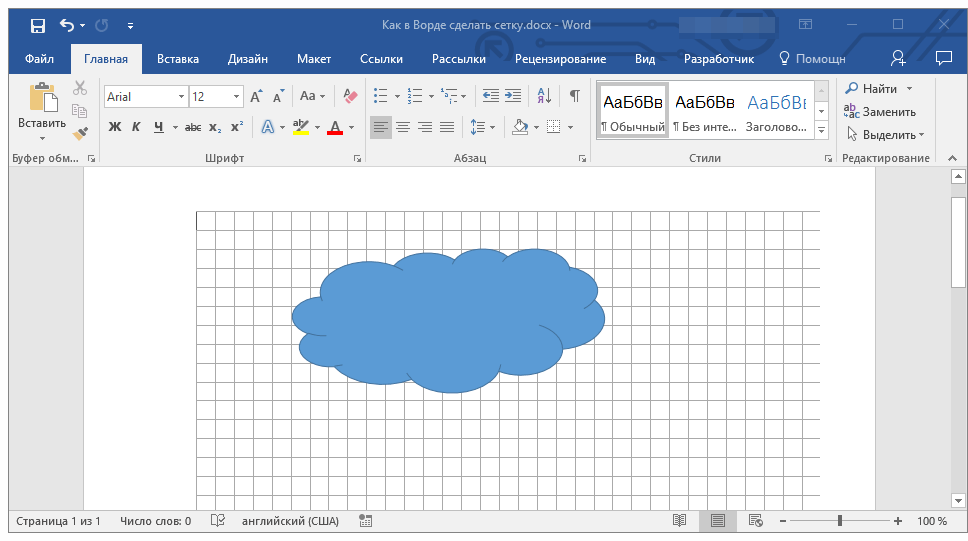
3. Сетка стандартных размеров будет добавлена на страницу.
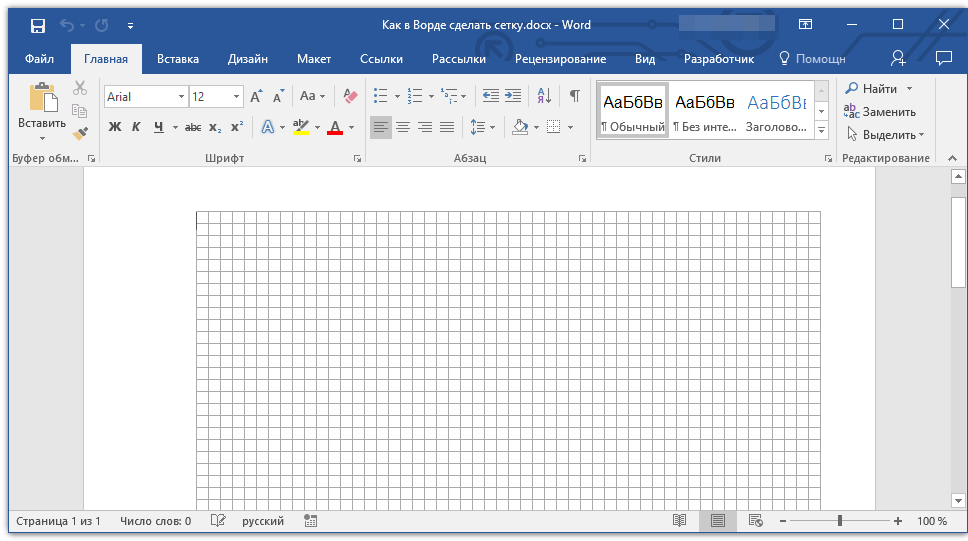
Примечание: Добавленная сетка не выходит за пределы полей, как и текст на странице. Для изменения размеров сетки, точнее, области, которую она занимает на странице, необходимо изменить размеры полей.
Урок: Изменение полей в Word
Изменение стандартных размеров сетки
Изменить стандартные размеры сетки, точнее, клеток в ней, можно только в том случае, если на странице уже имеется какой-нибудь элемент, например, рисунок или фигура.
Урок: Как в Ворде сгруппировать фигуры
1. Кликните по добавленному объекту дважды, чтобы открылась вкладка “Формат”.
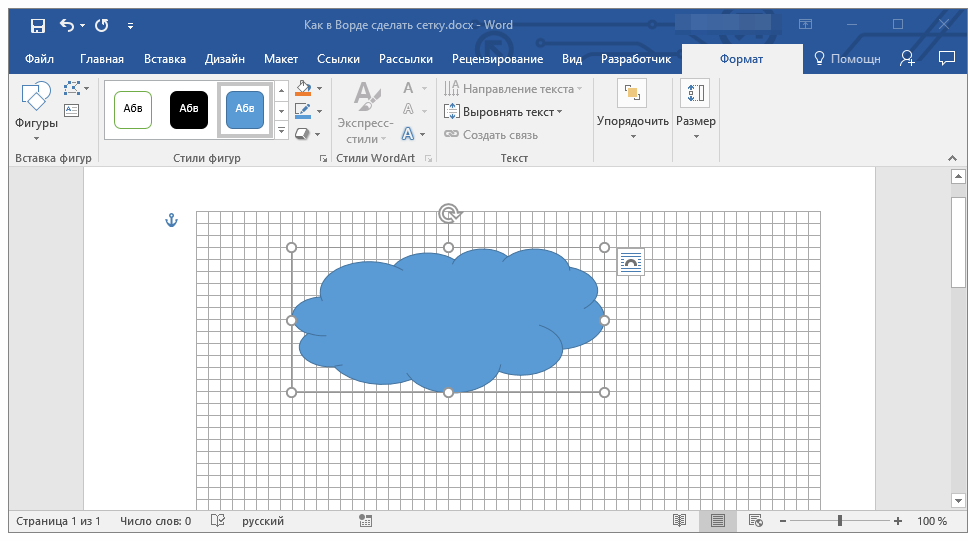

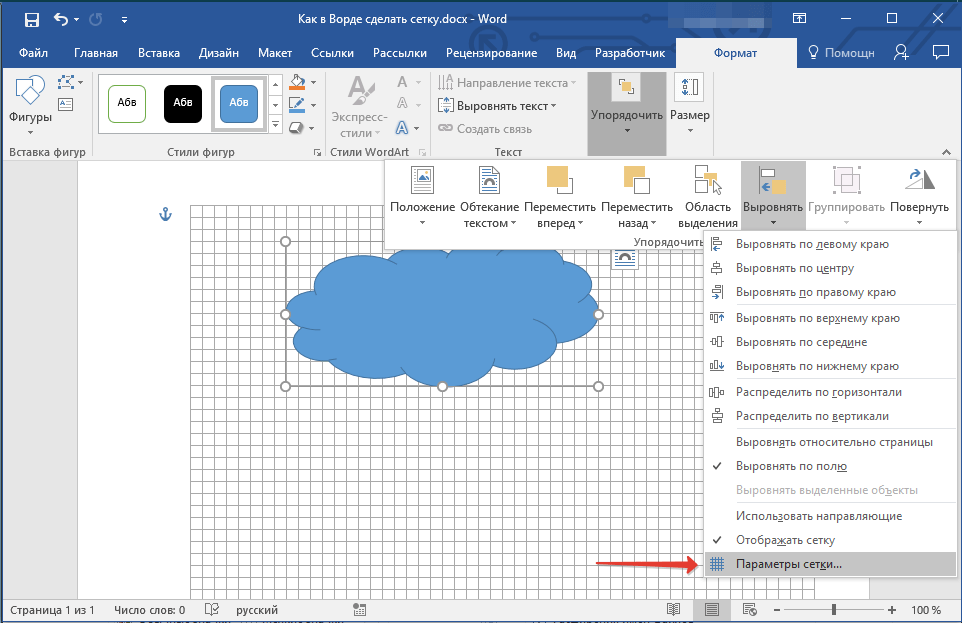
2. В группе “Упорядочить” нажмите кнопку “Выровнять”.
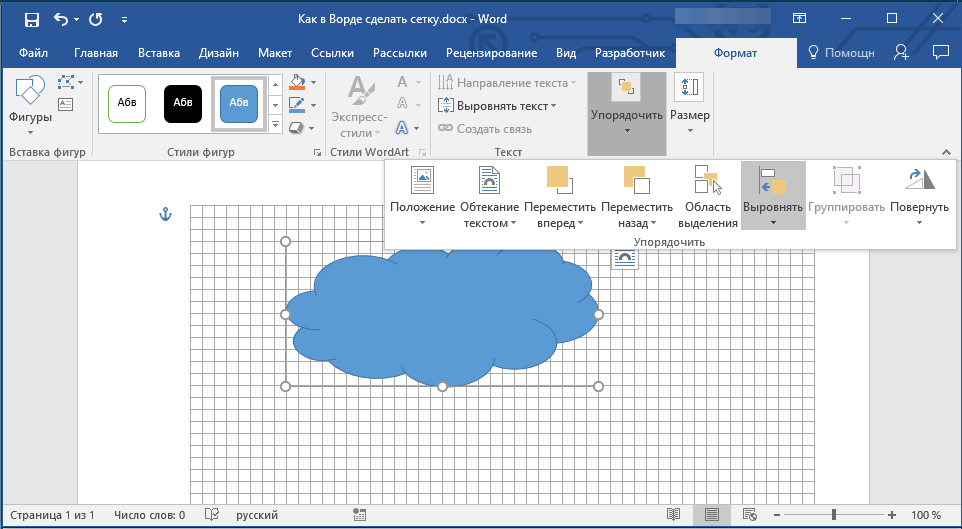
3. В выпадающем меню кнопки выберите последний пункт “Параметры сетки”.
4. Внесите необходимые изменения в открывшемся диалоговом окне, задав размеры сетки по вертикали и горизонтали в разделе “Шаг сетки”.
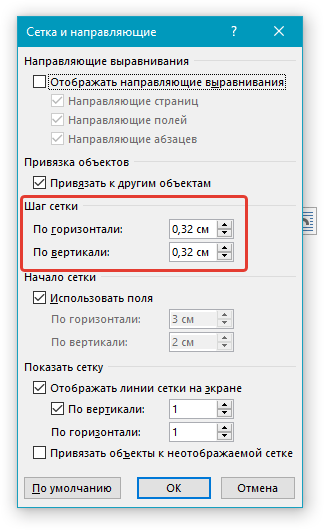
5. Нажмите “ОК” для принятия изменения и закрытия диалогового окна.
6. Стандартные размеры сетки будут изменены.
Урок: Как в Word убрать сетку
Вот, собственно, и все, теперь вы знаете, как сделать сетку в Ворде и как изменить ее стандартные размеры. Теперь работа с графическими файлами, фигурами и прочими элементами будет протекать значительно проще и удобнее.
Еще статьи по данной теме:
Помогла ли Вам статья?
Excel for Microsoft 365 Word for Microsoft 365 PowerPoint for Microsoft 365 PowerPoint 2021 PowerPoint 2019 Excel 2016 Word 2016 PowerPoint 2016 Excel 2016 for Mac Word 2016 for Mac Excel 2013 Word 2013 PowerPoint 2013 Excel 2010 Word 2010 PowerPoint 2010 Excel 2007 Word 2007 PowerPoint 2007 More…Less
Gridlines help give you visual cues when you’re formatting in Office. You can align shapes and other objects in your PowerPoint slides and Word documents, and distinguish between cell boundaries in and sections of your spreadsheets and workbooks in Excel.
Note: This article doesn’t apply to PowerPoint for the web or Word for the web.

In Word and PowerPoint, gridlines are for visual reference only and cannot be printed. If you want to print gridlines in Excel, see Print gridlines in a worksheet.
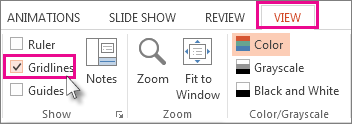
To show the gridlines, in Excel, PowerPoint, or Word, click the View tab, and then check the Gridlines box.
To hide the gridlines, clear the Gridlines check box.
More about tools that help you align and place text and objects:
-
Snap charts, pictures, and objects to a grid to align them in Word
-
Work with gridlines and use snap-to-grid in PowerPoint
-
Turn the snap to grid and snap to object options on or off in Excel
-
Print gridlines in a worksheet
-
Show or hide the ruler in PowerPoint
-
Show or hide rulers in Word
Need more help?
Microsoft Office
Grids consist of a network of lines that work as graphic cues while formatting your document in Microsoft Office. If you need to set up a grid in Microsoft Word, you can either use grid templates with endless customization features or make a grid out of Word’s free built-in gridlines feature.

Download the Free How to Set Up a Grid in Microsoft Word Article in PDF
![]() Download
Download
Table of Content
- Build a Grid in Microsoft Word Template – Step-by-Step Instructions
- Grid Templates & Examples
- Assumption Grid Template
- A5 Grid Note Taking Template
- Grid and Matrix Graphic Organizer Template
- Geometric Grid Vector Template
- Clothing Grid Catalog Template
- FAQs
Build a Grid in Microsoft Word Template – Step-by-Step Instructions
Microsoft Word is no stranger to the word-processing program department and this application is where you can make professional documents as well as create grids or print gridlines. Without further ado, here are the steps to incorporate a grid framework into your Word documents:
-
Step 1: Look for a Grid in Microsoft Word Template (Option 1)

Visit Template.net and check out the whole assembly of grid templates from the landing page. Be sure to select any grid template that is in Microsoft Word format so that you can add the template to Word after.
-
Step 2: Search for a Grid in Microsoft Word Template (Option 2)

Save time in reaching the specific grid template in Word you need by utilizing Template.net’s search box, which is found at the top of the page. Just type “grid” from there and you’ll have a bunch of suggestions to select from quickly.
-
Step 3: Choose a Grid Template to Edit
After viewing the collection of grid templates, click on the certain template that catches your attention. You’ll be able to view the grid template’s table,drawing, pattern, or square coordinate clearly as well as see the file format options in downloading the template. -
Step 4: Download the Template in MS Word Format
Since the goal all along is to make grids in Word, download the template by clicking “Word” as it suggests that the file you’re about to download is in Microsoft Word format. Then, press “Free Download” from the window pop-up until the file is downloaded to your computer swiftly.
-
Step 5: Open Microsoft Word and Enable Editing
Open the downloaded file in MS Word and the document is likely locked for protective view by default. Hence, press “Enable Editing” at the top of the page so that you can customize the file further.
-
Step 6: Change the Title and Characters
Make the most out of editing the grid template in Word by changing the grid’s title, adding blue or pink background colors, incorporating Minecraft pixel art, resembling a blank graph paper, inserting a simple logo design, adding dot grid table lines, or inserting a numbered perspective per cell. You can also design the document with a label template, use transparent drawing grids to make it look like you are to remove gridlines, or any other aesthetic you like; thus, you have a fully-formed grid in your Word doc.
-
Step 7: Set Up a Grid in Microsoft Word Manually

In case you want to make a grid in Microsoft Word from scratch, you just have to open MS Word on your computer and press “Blank Document” to make a new doc. Blank documents make it easier to set up a grid from scratch. -
Step 8: Access Layout and Align

On the upper menu bar, select “Layout” until you can find the “Align” button on the right side of your screen. Click “Align” so that you’d see a drop-down menu.
-
Step 9: View Gridlines Shortly

You’d show table gridlines immediately by clicking “View Gridlines” from the drop-down menu. The “View Gridlines” option would automatically show gridlines on your Word document, meaning there are loads of squares or cells on the document.
-
Step 10: Alter the Grid Settings

Below “View Gridlines,” there is an option called “Grid Settings” where you can access a lot of customizable features for your grid. Click it so that you can change the horizontal spacing, vertical spacing, object snapping, and other edits for the gridlines.


Grid Templates & Examples
Grids are reliable graphic guidelines to be conscious of the lines, shapes, boundaries, and spacing of your Word sheet through visible cells. Don’t forget to take a look at other grid samples that you might want to work on Microsoft Word shortly:
Assumption Grid Template

An assumption grid is designed to make decisions a lot more efficient and graphic. The grid formed here would display your ideas according to relationships, risk levels, and other decision-making organizational tools.
A5 Grid Note Taking Template

Use the A5 grid note taking template to make notetaking a lot more streamlined and easier for writing with visual cues. This A5-size template even has more writing space compared to smaller notetaking documents.
Grid and Matrix Graphic Organizer Template

Easily compare notions, ideas, and different objects in a simple yet effective perspective using a grid and matrix graphic organizer. Like any graphic organizer, this type of diagram helps people figure out similarities and differences of variables with grid-like graphics may you contrast about anime, food, map, math, or any other subject.
Geometric Grid Vector Template

A geometric grid vector is useful when you want to insert grids to Word as an image rather than a fillable table. The best part about this vector graphic is that you can go for a small or large geometric grid without having to disrupt its resolution and quality.
Clothing Grid Catalog Template

A clothing grid catalog is where you create a marketable catalog for your clothing business from brand offers, new collections, price markdowns, and other elements. You can incorporate grid motifs there for presenting apparel images and other data.
FAQs
What is another way to make grids in Word besides View Gridlines?
You may opt to set your document as a graph paper by clicking “Design” from the upper menu, selecting “Page Color,” choosing “Fill Effects,” and tapping the “Pattern” tab to create small or large grid patterns.
What is the default table style of Word?
By default, MS Word offers a table grid that consists of a black border on each cell.
How can I create a perfect square in Word?
Just press and hold “Shift” from your keyboard while dragging or creating shapes.
More in Microsoft Office
| 18+ Grid Based Website Themes & Templates | 10 Grid Style WordPress Themes: Putting Yourself On The Grid Has Never Been Easier |
| Understanding Bootstrap Grid System | Understanding Bootstrap Grid — Column Wrapping |
| 16+ Grid Paper Templates | 11+ Grid Paper Templates — Free Sample, Example, Format Download! |
| 12+ Printable Grid Paper Templates | 12+ Printable Grid Paper Templates |
| 8+ Abstract Grid Patterns | 8+ Grid Patterns |
| 9+ Masonry Grid Style WordPress Themes 2023 | 11+ Colorful Grid-based Portfolio WordPress Themes |