
How to draw in Word
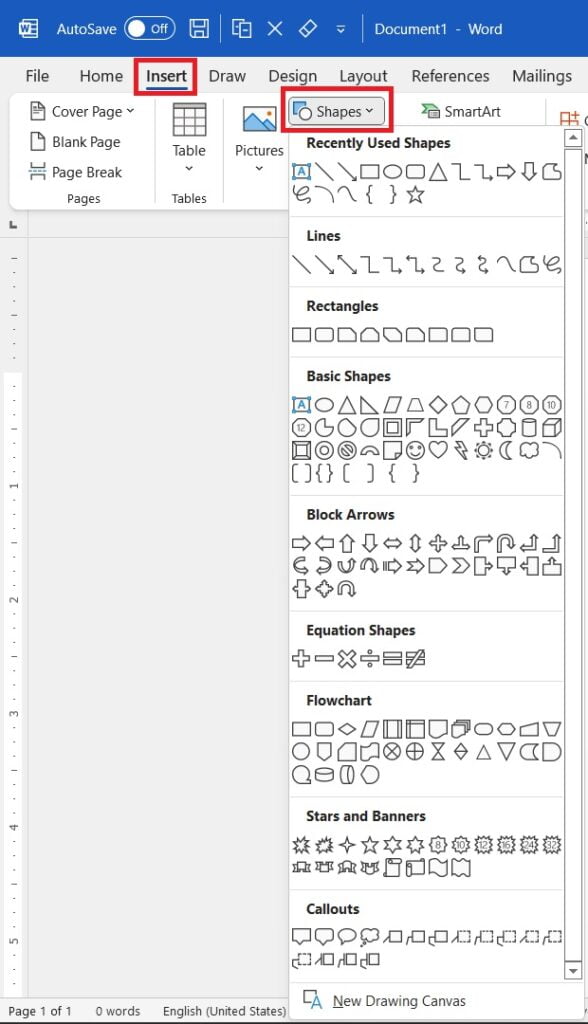
- In the ‘Insert tab,’ click the ‘Shapes’ button, and in the drop-down menu select ‘Scribble’
- Click and hold down your mouse to draw the shape you want.
- Release the mouse when you’ve finished drawing.
- Go to the ‘Shape Format’ tab to edit your shape.
Contents
- 1 How do I draw a circle in a screenshot in Word?
- 2 How do I draw freehand on a Word document?
- 3 How do you write on photos?
- 4 How do I put text and pictures side by side in Word?
- 5 How do I circle something in a picture?
- 6 How do you use pen in Word?
- 7 How do I enable the pen in Word?
- 8 Is there a drawing tool on word?
- 9 How do I edit text in a picture in Word?
- 10 How can I edit a picture in Word?
- 11 How do you put a picture in the corner of a Word document?
- 12 What app lets me draw on my pictures?
- 13 How do you make a Venn diagram on Microsoft Word?
- 14 Where is the pencil in Microsoft Word?
- 15 How do you write on screen?
- 16 Where are drawing tools in Word?
- 17 How do you draw on docs?
- 18 Where is the Drawing toolbar in Word 2013?
How do I draw a circle in a screenshot in Word?
Draw an oval or circle
On the Insert tab, click Shapes. Under Basic Shapes, click Oval. Click where you want the oval to start, and drag to draw the shape. To draw a circle, press Shift while you drag.
How do I draw freehand on a Word document?
Draw a freeform shape
Click anywhere in the document, and then drag to draw. To draw a straight segment with the Freeform tool, click one location, move your pointer to a different location, and then click again; to draw a curved segment, keep your mouse button pressed as you drag to draw.
How do you write on photos?
Add Text to Photos on Android Using Google Photos
- Open a photo in Google Photos.
- At the bottom of the photo, tap Edit (three horizontal lines).
- Tap the Markup icon (squiggly line). You can also select the color of text from this screen.
- Tap the Text tool and enter your desired text.
- Select Done when you’ve finished.
How do I put text and pictures side by side in Word?
Word – insert side by side images into document
- Click on the first of the two images that you want to align.
- Click the “Format” tab, then click “Wrap Text” in the Arrange group.
- Click the second image and repeat the process of changing the way text interacts with the image.
How do I circle something in a picture?
After you’ve taken a photo, tap on Edit, then Draw. Then select the shape you want to use. If you’re going to circle something on a picture, select either the square or the circle shape and drag it around your focus area.
How do you use pen in Word?
How to Use a Pen With MS Word
- Connect your writing tablet to your computer.
- Open the document you wish to write pen marks on.
- Click on the “Review” tab.
- Click “Start Inking” on the far right of the screen to begin using the tablet with Microsoft Word.
- Touch on the tablet to write using the pen tool.
How do I enable the pen in Word?
Select File > Options > Advanced. In the Pen section, select the box next to Use pen to select and interact with content by default.
Is there a drawing tool on word?
You can draw freely in Microsoft Word using the “Draw” feature whether you have Word for Mac or Windows. You can also insert customizable shapes into your document, or draw using the “Scribble” feature. The process of drawing in Word varies based on which version of Word and device you’re using.
How do I edit text in a picture in Word?
Click the picture to reveal the “Format” tab. Press the “Corrections” option to reveal the dropdown. This will reveal to you how to edit image text in word. Apply the required correction to complete the process in full.
How can I edit a picture in Word?
Open your collage, design, or photo in Fotor. Using the “Text” button, select and drag a text box to the desired location. Modify the text, change the font, color, size, background or transparency. Preview and save your work, choosing the size and format you wish.
How do you put a picture in the corner of a Word document?
To move an image a small amount to align it with another element in the document, select the image. Then, press and hold the Ctrl key while you press one of the arrow keys to move the picture in the direction you want it to go.
What app lets me draw on my pictures?
Annotate is a rather popular drawing and image editing tool on the Android ecosystem.Users can also upload or open images on its user interface. The application comes with custom-built filters and tools for editing and drawing on pictures.
How do you make a Venn diagram on Microsoft Word?
How to make a Venn diagram using SmartArt graphics in MS Word
- In Word, go to Insert > Illustrations > SmartArt.
- Go to Relationship > Basic Venn.
- Double-click “Text” to modify the text or use the text pane.
- Select the graphic, and click “Add Shape” to make your Venn diagram larger.
- Once finished, save the document.
Where is the pencil in Microsoft Word?
To start, press the Draw tab on the ribbon bar. This will display the pen drawing tool options for you to use. Three drawing options are available under the Tools section.
How do you write on screen?
How could I write on computer screen?
- In the Screen Draw Tools Pane, click Pen. tool.
- Drag the pointer to write on computer screen.
Where are drawing tools in Word?
Click View > Toolbars > Drawing. The Drawing toolbar is displayed or hidden. The Drawing toolbar contains a collection of icon buttons that allows the user to draw shapes and images in the document.
How do you draw on docs?
How to draw in Google Docs
- Log into Google Drive and open your Google Doc.
- In the toolbar, click “Insert.” Using your cursor, highlight “Drawing” in the sub-menu, then click “+ New” when it appears.
- A checkered window will pop up; this is, essentially, your digital sketchbook.
Where is the Drawing toolbar in Word 2013?
Click Insert. Click the Shapes button, then click the Scribble icon in the Lines section. Click and hold down the mouse button, then move the mouse cursor to draw. Click the Format tab under Drawing Tools to make any changes to your drawing.
Ms Word and PowerPoint has lot of feature to work on image. One such feature is cropping an image to circle or any custom shape. This blog covers 2 ways by which you can crop picture to circle or any other shape in Ms Word and PowerPoint. The video demonstration is also available here.
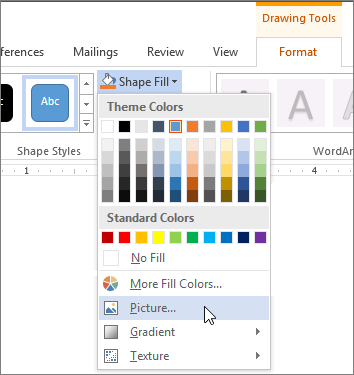
1st Method: Draw shape and fill it with picture (Works in all versions of Word & PowerPoint)
- Go to Insert > Shapes and draw shape into which you want to crop image
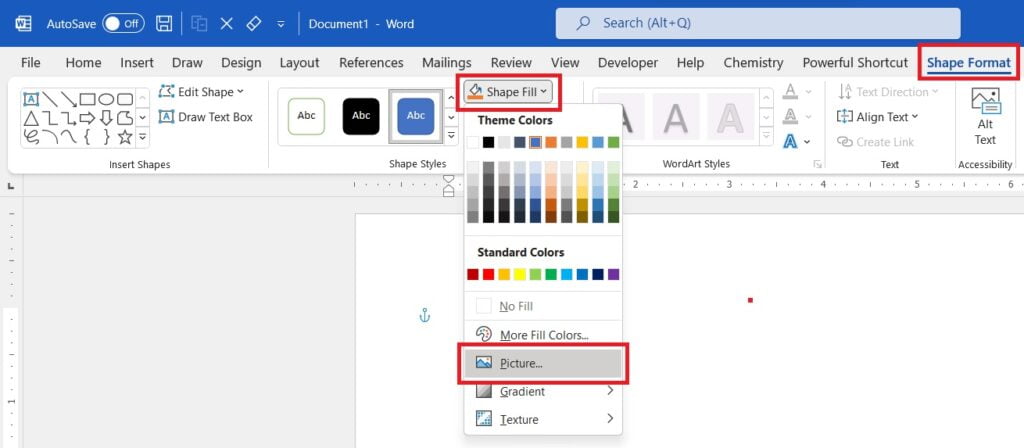
- Click shape and go to Shape Format tab > Shape Fill and select Picture….
- Browse picture/image and then click insert.
For instructions to Zoom in/out or move the image in shape, scroll down or click here to quickly go to the relevant section.
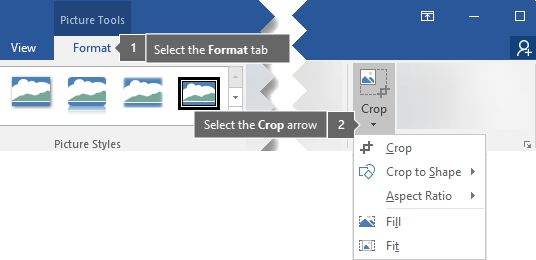
2nd Method: Crop image to shape in 1 click (Works only on newer version of Ms Word & PowerPoint)
This method allows you to crop image to shape in just 1 click. However, it works only in newer version of Ms Word and PowerPoint. Follow these steps
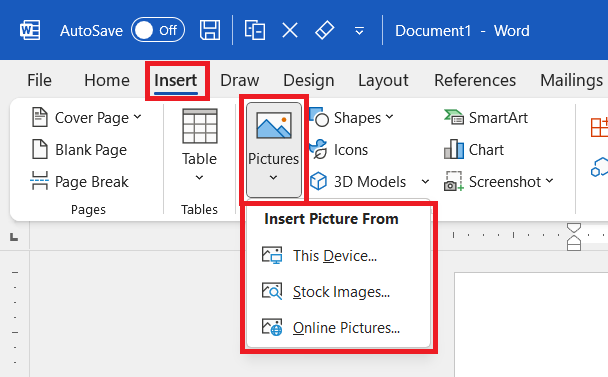
- Go to Insert > Picture and browse the image to insert
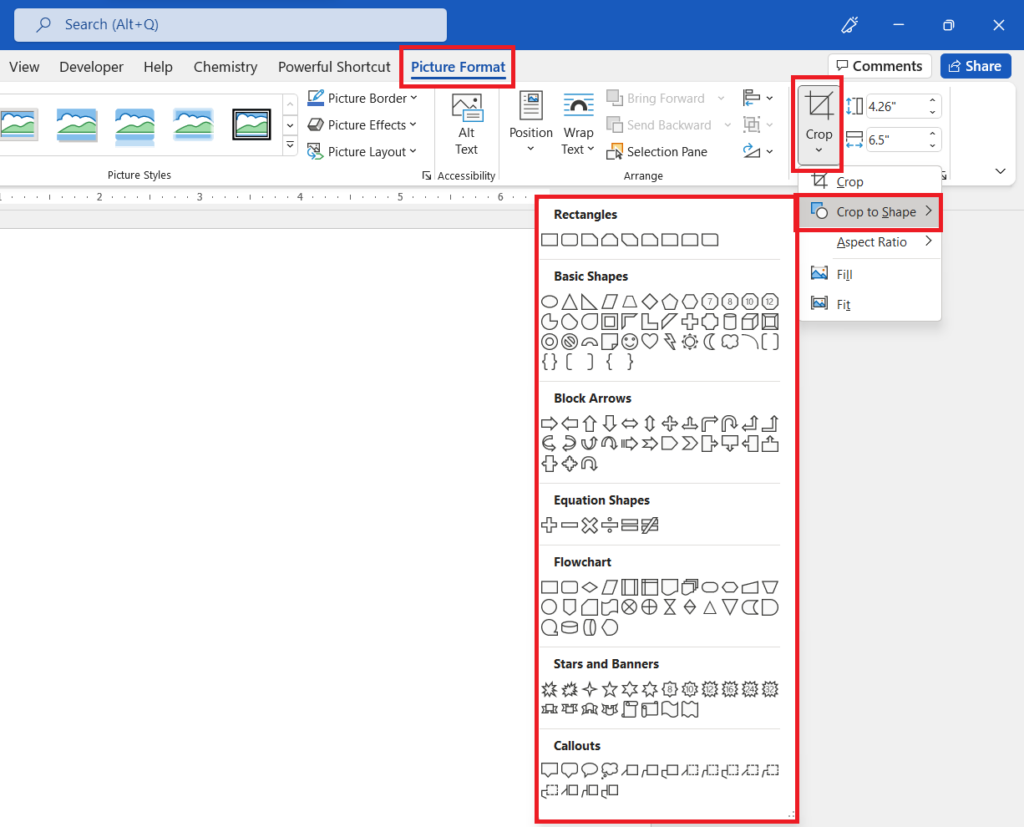
- Select image and go to Picture Format > Crop > Crop to Shape and click the desired shape
Following section describes instruction to zoom in/out or position picture inside shape
Zoom in/out or position the image after cropping
To zoom in/out or position the image after cropping, follow these steps
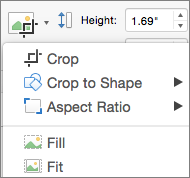
- Select cropped image and go to Picture Format and Click Crop
- Zoom in/out: Use the picture handles at the side or corners to resize.
- Position/Pan: Move image by holding the left button of your mouse to position the desired part of an image in shape
Video on how to crop image to any shape in Ms Word and PowerPoint
Related Posts
How can I draw on a picture in Word?
How to draw in Word
- In the ‘Insert tab,’ click the ‘Shapes’ button, and in the drop-down menu select ‘Scribble’
- Click and hold down your mouse to draw the shape you want.
- Release the mouse when you’ve finished drawing.
- Go to the ‘Shape Format’ tab to edit your shape.
Is there an app that lets you draw on photos?
You Doodle is the best app on Android to create art and draw on photos and draw on pictures. Doodling on a friend, or marking up a picture or adding text has never been easier. With it’s powerful text tool and simple brush tool, you can draw on photos and add text quickly and easily.
How do I write on a picture on my phone?
Add Text to Photos on Android Using Google Photos
- Open a photo in Google Photos.
- At the bottom of the photo, tap Edit (the three sliders icon).
- Tap Markup (the squiggly line icon). You can also select the color of text from this screen.
- Tap the Text tool and enter your desired text.
- Select Done when you’ve finished.
How do I circle something in a picture?
After you’ve taken a photo, tap on Edit, then Draw. Then select the shape you want to use. If you’re going to circle something on a picture, select either the square or the circle shape and drag it around your focus area.
How do I circle something in paint?
This tool is the oval button in the toolbar in the “Shapes” section. Press and hold ⇧ Shift . Click and drag with the mouse in the drawing area. Starting from where you click, the Ellipse tool will make a perfect circle instead of the normal ellipse.
What is the best app for drawing on iPad?
Regardless of whether you’re an amateur or a pro, these are the best drawing apps for iPad that’ll let you unleash your creativity effortlessly….Best Drawing Apps:
- Procreate.
- Linea Sketch.
- Paper.
- Affinity Designer.
- Adobe Illustrator Draw.
- Adobe Photoshop Sketch.
- Sketch Club.
- Astropad Standard.
How do I circle something in a photo?
How to circle out something in a picture?
- Layer > New layer.
- Make the layer to be the same size as the image and layer fill type to transparency.
- On the toolbox select the ellipse select tool and make an ellipse.
- Use the bucket fill tool to paint the ellipse with your desired color.
- Right click on it and go to Select > Shrink…
If you want to change the outline of a photo to make it a shape (like a circle or rounded rectangle), use the cropping tool on the ribbon  with the Crop to Shape option.
You can crop to a shape in Word, PowerPoint, Outlook, or Excel.
Crop an image to a shape, such as a circle
You can quickly change the shape of a picture by cropping it to a specific shape. The picture is automatically trimmed to fill the geometry of the selected shape while maintaining its proportions.
(If you want to crop the same picture to more than one shape, make copies of the picture and crop each to the desired shape individually.)

-
Use Insert > Picture to add the image to a Microsoft 365 file (such as a Word document, PowerPoint presentation, or an Outlook email message).
-
Click the picture.
You may crop multiple pictures at once, but you must crop them to the same shape. (But in Word, this is difficult, because you can’t multi-select pictures that have the default In Line with Text layout option.)
-
Click Picture Tools > Format, and in the Size group, click the arrow under Crop.

-
From the menu that appears, select Crop to Shape, and then click the shape you want to crop to.
The shape is immediately applied to the image.
-
Next, use Crop > Fit or Crop > Fill to change how much of the picture fits within the shape you’ve applied:
-
Fill Fills the entire shape with the picture. Some outer edges of the picture may be cropped away. There won’t be any empty space at the margins of the shape.
-
Fit Makes the entire picture fit within the shape while maintaining the picture’s original aspect ratio. There may be empty space at the margins of the shape.
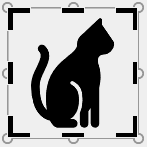
(Black crop handles appear on the edges and corners of the picture when you select the Fit or Fill option.)
-
-
You can adjust the position of the picture within the frame by selecting the picture and dragging it where you want. For example, this can help you center the most important part of the picture within the shape you’ve applied to the picture.
-
Crop the margins of the image by dragging a black crop handle as follows:
Description
Action
Crop one side
Drag inward on the side cropping handle
Crop two adjacent sides at the same time
Drag inward on the corner cropping handle
Crop equally on two parallel sides at once
Press and hold Ctrl while dragging inward on the side cropping handle
-
Click the Crop button again when you are done.
Start with a shape and add an image to it
You can add a picture as fill for a shape and then edit or crop the shape.
Add a picture to a shape
-
Add a shape to your document (see Add shapes for instructions) and click the shape to select it.
-
Click Drawing Tools > Format, and in the Shape Styles group, click Shape Fill > Picture.
-
Select the type of picture you want (such as From a File or Online Pictures) and then navigate to the picture you want and insert it.
Resize the shape
To change the filled shape’s dimensions while maintaining its basic format, select it and drag any of the sizing handles.
Choose how the picture fits in the shape
If your picture is skewed, cut off, or doesn’t fill the shape the way you want, use the Fit and Fill tools on the Crop menu for fine tuning:
-
Click a shape created using Shape Fill > Picture.
-
Click Picture Tools > Format, and in the Size group, click the arrow under Crop. A menu appears showing cropping options.
-
Choose Fit if you want as much of the picture as possible to fit within the shape; the original picture aspect ratio will be maintained, but you may have empty space inside your shape.
-
Choose Fill to have the shape fit within the bounds of the picture, cropping away everything outside the shape. You can drag the picture to change what part of it shows within the shape.
-
-
If you want, you can adjust the crop area by using the cropping handles, as described under Crop a picture.
-
When you’re finished, press Esc or click anywhere outside the picture within the document.
Use edit points to edit or crop the shape
Although cropping tools are not available for shapes, you can use the Edit Points tool to customize a shape.
-
Select the shape that you want to edit.
-
Click Shape Format, and in the Insert Shapes group, select Edit Shape
> Edit Points. -
Drag the shape’s vertex points (which appear as black dots around the shape’s perimeter) until the shape looks the way you want.
-
To delete a vertex point, hold Ctrl and click it. To add a vertex point, hold Ctrl while clicking anywhere on the perimeter of the shape that does not already have a vertex point.
 > Edit Points.
See Also
Crop a picture in Microsoft 365
Cut out or cover part of a picture
If you want to change the outline of a photo to make it a shape (like a circle or rounded rectangle), use the cropping tool on the ribbon .
You can crop to a shape in Word, PowerPoint, or Excel.
Crop to a specific shape
Quickly change the shape of a picture by cropping it to a specific shape. The picture is automatically trimmed to fill the geometry of the selected shape while maintaining its proportions.
If you want to crop the same picture to more than one shape, make copies of the picture and crop each to the desired shape individually.
-
Use Insert > Picture to add the image to an Office file (such as a Word document, PowerPoint presentation, or an Excel workbook).
-
In your file, select the picture that you want to crop.
-
On the Picture Format tab, click the arrow next to Crop.
(If you don’t see the Picture Format tab, make sure that you’ve selected a picture (not a shape).)
-
Point to Crop to Shape and then click the shape you want to crop to.
The shape is immediately applied to the image.
-
If you want to adjust the shape, click the Crop button again on the ribbon.
Black crop handles appear on the edges and corners of the picture.
-
Crop the image by dragging any crop handle inward. If you drag one of the corner handles, it crops two adjacent sides at the same time.

Crop to fit or fill a shape
After you have added a picture to a shape, you can choose how the picture fits in the shape by using the Fit and Fill tools for fine tuning.
-
In your file, select the picture that you want within the shape.
-
On the Picture Format tab, click the arrow next to Crop.
If you don’t see the Picture Format tab, make sure that you’ve selected a picture (and not a shape).
-
Click Fill or Fit, and then click outside the picture.
Option
Description
Fill
Removes (or «crops») part of the picture, but still fills the entire shape.
Fit
Makes the entire picture fit within the shape. The original picture aspect ratio is maintained, but you may have empty space inside your shape.
Which app are you using?
Word | PowerPoint
Word: Fit a picture inside a shape
Word for the web doesn’t have the «crop-to-shape» feature that the desktop app has, but you can still use quick picture-styles to apply some basic shapes to a picture, as described here:
-
Insert the image in your document. (Select Insert > Picture and then navigate to the picture you want to use.)
-
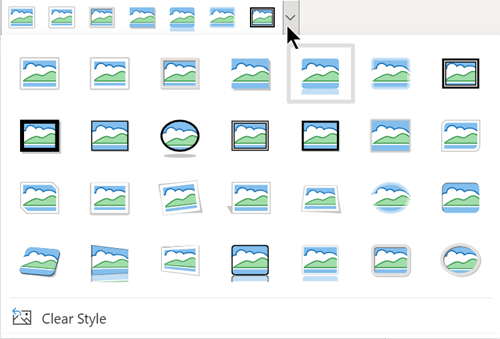
With the image selected on the canvas, select the Picture tab on the ribbon, and then open the Picture Styles gallery:
-
Select a shape to apply it to your picture.
-
Once the shape is applied, you can resize it as needed.
PowerPoint: Crop a picture to a shape
-
Select a picture on a slide to crop to a shape.
-
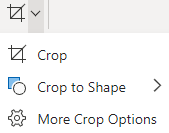
On the Picture tab, on the right end, select the arrow next to Crop.
Tip: If you don’t see the Picture tab, be sure to select a picture.
-
Select Crop to Shape, then choose a shape to apply to the border of the picture.
-
If you want to trim the margins of the picture, select Crop again, then drag a handle
inward as needed. Drag other handles as needed. -
To save your changes, select the Crop button again, or press Esc.
 inward as needed. Drag other handles as needed.
 ![]()
Download Article
![]()
Download Article
While you can’t outright draw free-form in Word, you can use the shapes menu to make shapes like circles. This wikiHow will teach you how to draw a circle in the computer desktop and mobile versions of Word.
-
1
Open a blank project in Word. When you tap to open Word, the program will launch and ask if you want to open a previous document or start a new one. You’ll want to open a new document to practice creating circles before you use them in any other documents.
- This app icon looks like two white pieces of paper on a blue background that you can find on your home screens, in the app drawer, or by searching.
-
2
Tap ••• (iOS) or
(Android) at the top of your keyboard. If you don’t see this menu, you’ll need to tap anywhere in the document to pull this menu up.
- The menu options will change and your keyboard should disappear.
- If you’re opening up a previous document, enable editing mode by tapping the pencil icon.
Advertisement
-
3
Tap the arrows next to Home. You’ll see this on the left side of your screen.
-
4
Tap Insert. The menu options in the right panel of the window will change.
-
5
Tap Shapes. Tapping this will bring you to a menu of shapes you can insert into the document.
-
6
Tap a circle you want to add. You can scroll through to find the «Basic Shapes» header; you’ll find a circle in that section if there isn’t one under «Recent Shapes.»
-
7
Edit the circle in your document. When you tap a circle shape from the menu at the bottom of the screen, it is copied into your document. You can pull, pinch, and drag the dots around the shape to edit its appearance.
- When you’re satisfied with the circle, tap the document around the circle and that editing menu will close. If you need to edit that shape again, you can tap on it.


Advertisement
-
1
Open Word. You’ll find this program in your Start Menu or Applications folder.
- You can either start a new document or resume a previously created document.
-
2
Click the Insert tab. You’ll see this in the editing ribbon above the document with «Home.»
-
3
Click Shapes. A menu of shapes you can add to the document will drop-down.
-
4
Click a circle you want to add. You’ll find circle shapes in «Basic Shapes.»
-
5
Click and drag while pressing ⇧ Shift on your keyboard to draw the circle on your document. After you select a circle theme and click and drag your mouse over the document to draw your circle, you can edit it.
- If you don’t hold down the Shift key, your shape may not result in a circle.
- You can change the overall look of your circle by changing the settings in Format > Shape Fill.[1]


Advertisement
Ask a Question
200 characters left
Include your email address to get a message when this question is answered.
Submit
Advertisement
Thanks for submitting a tip for review!
References
About This Article
Article SummaryX
1. Open a blank project in Word.
2. Tap the three-dots menu icon (iOS) or the up-pointing arrow icon (Android) .
3. Tap the arrows next to Home.
4. Tap Insert.
5. Tap Shapes.
6. Tap the circle icon.
7. Edit the circle in your document.
Did this summary help you?
Thanks to all authors for creating a page that has been read 14,265 times.