
Table of Contents
- How do I draw a square in Word?
- Is there a way to draw on Microsoft Word?
- How do I draw a crossed line in Word?
- What is the shortcut to draw a line in Word?
- How do you use the pen in Microsoft Word 2019?
- How do you use the pen in Word 2010?
- Where is the pen tool in Microsoft Word 2010?
- Why is draw disabled in Word?
- How do I open paint in Word?
- Can you insert a 3D model in Word?
- Can you insert an equation in Word?
- How do I make a 3D picture in Word?
- How do you insert a bookmark in Word?
- How do I jump to a different section in Word?
- Why can’t I add a bookmark in Word?
- How do I fix Bookmark not defined in Word?
- What does Bookmark not defined mean in Word?
- How do I fix error source not found in Word?
- How do I fix cross-references in Word?
- How do I fix references in Word?
- How do you automatically update fields in Word?
- How do I see all cross-references in Word?
- How do I link reference numbers in Word?
- How do I link paragraph numbers in Word?
- What is cross reference example?
- What does it mean to cross reference?
- How do you cross reference in an essay?
Add a shape in Excel, Outlook, Word, or PowerPoint
- On the Insert tab, click Shapes.
- Click the shape you want, click anywhere in the workspace, and then drag to place the shape. To create a perfect square or circle (or constrain the dimensions of other shapes), press and hold Shift while you drag.
Is there a way to draw on Microsoft Word?
How to draw in Word
- In the ‘Insert tab,’ click the ‘Shapes’ button, and in the drop-down menu select ‘Scribble’
- Click and hold down your mouse to draw the shape you want.
- Release the mouse when you’ve finished drawing.
- Go to the ‘Shape Format’ tab to edit your shape.
How do I draw a crossed line in Word?
Apply or remove double-line strikethrough formatting
- Select the text that you want to format.
- Go to Home and select the Font Dialog Box Launcher. , and then select the Font tab.
- Select Double strikethrough.
What is the shortcut to draw a line in Word?
Many users already know that easiest way to insert a plain horizontal line into a page is to use the keyboard shortcut of typing 3 dashes (—) then press ‘Enter’ – and voila! your line appears by magic!
How do you use the pen in Microsoft Word 2019?
Write, draw, or highlight text
- On the Draw tab of the Ribbon, tap a pen to select it.
- Tap again to open the menu of Thickness and Color options for the pen.
- A Pencil texture is also available:
- On the touch screen, begin writing or drawing.
How do you use the pen in Word 2010?
Use the Pens Tab in Word to Quickly “Pen” Your Signature
- The Pens tab can be added to the Word 2010/2013 Ribbon.
- The fist step in adding the Pens tab is to right click the ribbon and select “Customize the Ribbon” Then from the “Choose commands from” drop down choose the Tool Tabs.
- Once you click OK you will have the pens tab to work with.
- Share this:
Click “File” > “Options” > “Customize Ribbon” > “Main Tabs” box > Review. The improved inking feature in Word 2010 lets you make ink annotations on your document on your Tablet PC and save those ink annotations together with the document. You may use Text Effects, Text Highlight color, Change Styles as a workaround.
Why is draw disabled in Word?
In Word, you must be in Print layout to draw with ink. If the Draw tab is grayed out so that you can’t select a pen, go the View tab and select Print Layout. Tap again to open the menu of Thickness and Color options for the pen. Select your preferred size and color.
How do I open paint in Word?
Click Start in the lower-left corner of the desktop. In the Start menu, click All Programs, then Accessories, and then click the Paint program.
Can you insert a 3D model in Word?
To insert 3D models in Word, Excel, or PowerPoint for Windows Mobile go to the Insert tab of the ribbon and select 3D Models. The pane will open. Select one, or more, images and click Insert.
Can you insert an equation in Word?
To bring up the Equation Editor, On the Insert tab, in the Symbols group, click the arrow next to Equation, and then click Insert New Equation. This will bring up the equation editor toolbar and will place an edit box at the insertion point in the document.
How do I make a 3D picture in Word?
How?
- Click the picture that you want to apply the effect to, and then click the Format Picture tab.
- Under Picture Styles, click Effects, point to 3-D Rotation, and then click the effect that you want, such as Isometric Left Down.
How do you insert a bookmark in Word?
Bookmark the location
- Select text, a picture, or a place in your document where you want to insert a bookmark.
- Click Insert > Bookmark.
- Under Bookmark name, type a name and click Add. Note: Bookmark names need to begin with a letter. They can include both numbers and letters, but not spaces.
How do I jump to a different section in Word?
Jumping to a Section
- Choose Go To from the Edit menu, or press F5.
- On the left side of the dialog box, make sure Section is selected.
- If you just want to jump to the next section, you can simply click on Next.
- In the Enter Section Number box, enter the section number.
- Click on the Go To button.
Why can’t I add a bookmark in Word?
However, you can use the underscore symbol (_) to separate words or numbers. If you use an unacceptable character in the “Bookmark name:” field, the “Add” button appears grayed out and unavailable. You must then change the name to continue. To add the bookmark and close the dialog box, click the “Add” button.
How do I fix Bookmark not defined in Word?
Bookmark Not Defined.” or “Error! Reference source not found.” when you update a field that has a broken link to a bookmark. You can restore the original text by pressing Ctrl+Z immediately after receiving the error message. You can press Ctrl+Shift+F9 to convert the text in the field to regular text.
What does Bookmark not defined mean in Word?
The reason for this error is that word uses a hidden bookmark system for linking the table of content topics to the page number. Due to this reason when the bookmark gets deleted because of the topics getting erased from the word document or change in formatting we get this error bookmark not defined.
How do I fix error source not found in Word?
Press Ctrl + A keys together to select the whole document, and then press F9 key to unlock the fields. You can see error reference like this: 2. Select the error message, and press the Backspace or Delete key to remove these error references one by one.
How do I fix cross-references in Word?
Cross-references are resolved when dynamic updates occur, either when you press Ctrl + A and then F9 or if you are prompted to update while printing. To detect and correct unresolved cross-references: 1. Update dynamic items by pressing Ctrl + A and then F9.
How do I fix references in Word?
Answer
- Highlight the References list.
- Under Home tab, click on the arrow by Paragraph.
- In the Indentation section, use the drop down under Special to choose Hanging.
- Click OK.
How do you automatically update fields in Word?
Update all fields in a document Press F9. If your document has tables with fields or formulas, you might need to select each table separately and press F9. Tip: To make sure that you don’t forget to update your table of contents before you print the document, set Word to update fields automatically before printing.
How do I see all cross-references in Word?
Press Alt+F9 to toggle the display back to field results. Press Ctrl+A, then F9 to update fields. You should see all your cross-references with the formatting you chose.
How do I link reference numbers in Word?
Insert the cross-reference
- In the document, type the text that begins the cross-reference.
- On the Insert tab, click Cross-reference.
- In the Reference type box, click the drop-down list to pick what you want to link to.
- In the Insert reference to box, click the information you want inserted in the document.
How do I link paragraph numbers in Word?
Go to the References tab > Captions group, then click Cross-reference. In the Reference type field, click the drop-down arrow and select Numbered item (first in the list). In the Insert reference to field, click the drop-down arrow and select Paragraph number (no context).
What is cross reference example?
The term cross-reference (abbreviation: xref) can refer to either: An instance within a document which refers to related information elsewhere in the same document. For example, under the term Albert Einstein in the index of a book about Nobel Laureates, there may be the cross-reference See also: Einstein, Albert.
What does it mean to cross reference?
(Entry 1 of 2) : a notation or direction at one place (as in a book or filing system) to pertinent information at another place.
How do you cross reference in an essay?
Now, a decent cross-reference consists of several elements: Name of the source being referenced—This can either be the title or a general subject reference. If it is a chapter title or a heading, put it in quotation marks; if it is the name of a book, magazine, report, or reference work, put it in italics or underline.
Microsoft Word has a variety of tools that you can use to add different objects to your documents.
There are even drawing and shape tools that you can use when you want to know how to make a square in Word.
- Open the document.
- Choose where to put the square.
- Click the Insert tab.
- Select the Shapes button.
- Select a Rectangle option.
- Draw your square.
- Make the Length and Width options the same in the Size section.
Our guide continues below with additional information on how to add a square in Microsoft Word, including pictures of these steps.
Do you use Google Sheets for work or to manage data in your personal life? Our how to adjust column width in Google Sheets tutorial can show you a few ways to resize your rows and columns.
While you might have needed to add a picture or a table in a Word document in the past, there are some other options on that Insert tab that provide you with ways ot customize your document.
One of these tools lets you quickly add shapes to the document, which you can then modify to meet your needs.
Our tutorial below will show you more about how to add a shape, specifically a square, inside a Microsoft Word document that you are editing.
How to Create a Square Shape in a Microsoft Word Document
Use these steps to make a square in Microsoft Word.
Step 1: Open your Word document.
Step 2: Click where you want the square to appear.

Step 3: Select the “Insert” tab at the top of the window.

Step 4: Click the “Shapes” button.

Step 5: Select one of the rectangle options.

Step 6: Draw your square in the document.

Step 7: Use the “Size” section of the ribbon to make the length and width equal.

Now that you know how to make a square in Word you can use these same steps to create other shapes that you might need as well.
Did you know that you can quickly see the number of letters and numbers in your document? Find out how to get a character count in Word using the word count utility.
While many users typically consider Microsoft Word to be a tool for writing text, it actually has options for adding a variety of media types.
Whether you need pictures, videos, or objects from other document types, Microsoft Word usually has an option to help you accomplish it.
But you also have the ability to add shapes, meaning that it’s possible to learn how to make a square in Microsoft Word.
Our guide below will show you how to use the rectangle shape tool to draw a rectangle in the document, then adjust the size of that rectangle so that the length and width are the same, giving you a square.
Find out how to make columns in Word Office 365 if you are writing an article or another type of document that requires more than a single column.
After you have created the square in your Word document you can make additional adjustments to it by changing options on the Shape Format tab. For example, you can click the Shape Fill button in the Shape Styles section of the ribbon to change the color of the square, or you can click the Shape Outline button to change the color of the square’s border.
You can delete the square by clicking on it, then pressing the Delete key on your keyboard. Alternatively, you can copy the square by right-clicking on it and choosing the Copy option, then right-clicking again and choosing the Keep Source Formatting button under Paste Options.
Find out how to display the ruler in Microsoft Word if you would like to be able to judge the size of document elements using a ruler that remains visible on the screen at all times.

Matt Jacobs has been working as an IT consultant for small businesses since receiving his Master’s degree in 2003. While he still does some consulting work, his primary focus now is on creating technology support content for SupportYourTech.com.
His work can be found on many websites and focuses on topics such as Microsoft Office, Apple devices, Android devices, Photoshop, and more.
Excel for Microsoft 365 Word for Microsoft 365 Outlook for Microsoft 365 PowerPoint for Microsoft 365 Project Online Desktop Client Excel for Microsoft 365 for Mac Word for Microsoft 365 for Mac PowerPoint for Microsoft 365 for Mac Excel for the web PowerPoint for the web Excel 2021 Word 2021 Outlook 2021 PowerPoint 2021 Project Professional 2021 Excel 2021 for Mac Word 2021 for Mac PowerPoint 2021 for Mac Excel 2019 Word 2019 Outlook 2019 PowerPoint 2019 Project Professional 2019 Excel 2019 for Mac Word 2019 for Mac PowerPoint 2019 for Mac Excel 2016 Word 2016 Outlook 2016 PowerPoint 2016 Project Professional 2016 Excel 2016 for Mac Word 2016 for Mac PowerPoint 2016 for Mac Excel 2013 Word 2013 Outlook 2013 PowerPoint 2013 Project Professional 2013 Project Standard 2013 Excel 2010 Word 2010 Outlook 2010 PowerPoint 2010 More…Less
You can add shapes, such as boxes, circles, and arrows, to your documents, email messages, slide shows, and spreadsheets. To add a shape, click Insert, click Shapes, select a shape, and then click and drag to draw the shape.
After you add one or more shapes, you can add text, bullets, and numbering to them, and you can change their fill, outline, and other effects on the Format tab.
Tip: You can add individual shapes to a chart, or add shapes on top of a SmartArt graphic to customize the chart or the graphic.
Add a shape in Excel, Outlook, Word, or PowerPoint
-
On the Insert tab, click Shapes.

-
Click the shape you want, click anywhere in the workspace, and then drag to place the shape.
To create a perfect square or circle (or constrain the dimensions of other shapes), press and hold Shift while you drag.


To follow these steps, you need to open or create a report. To do that, on the Report tab, click Recent to open an existing report, or click More Reports to select a report from the list in the Reports dialog box or create a new report.
-
In the open report, on the Design tab, click Shapes.
-
Click the shape you want, click anywhere in the workspace, and then drag to place the shape.
To create a perfect square or circle (or constrain the dimensions of other shapes), press and hold Shift while you drag.
Insert a shape, or click an existing shape, and then enter text.
-
Right-click the shape and click Add Text or Edit Text, or just start typing.
Note: The text that you add becomes part of the shape — if you rotate or flip the shape, the text rotates or flips also.
-
To format and align your text, click the Home tab, and then choose options from the Font, Paragraph, or Alignment groups, depending on the program you’re using and what kind of formatting you want to apply. (Text formatting options are limited in Project.)
Note: These commands aren’t available in Project.
-
Click the shape you want to change.
To change multiple shapes, press Ctrl while you click the shapes that you want to change.
-
On the Format tab, in the Insert Shapes group, click Edit Shape
, point to Change Shape, and then click the new shape that you want.
 , point to Change Shape, and then click the new shape that you want.
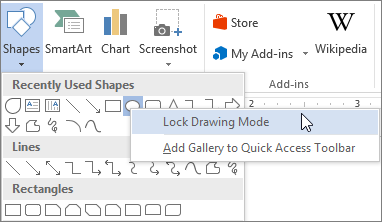
If you need to add the same shape repeatedly, you can do so quickly by using Lock Drawing Mode.
Note: Instead of adding individual shapes to create a drawing, you might want to Choose a SmartArt graphic. In a SmartArt graphic, the arrangement of the shapes and the font size in those shapes is updated automatically as you add or remove shapes and edit your text.
-
On the Insert tab, click Shapes.
-
Right-click the shape you want to add, and then click Lock Drawing Mode.
-
Click anywhere in the workspace, and then drag to place the shape.
-
Repeat step 3 to add the shape as many times as you like.
Tip: To create a perfect square or circle (or constrain the dimensions of other shapes), press and hold Shift while you drag.
-
After you add all the shapes you want, press Esc to turn off Lock Drawing Mode.
Note: This feature isn’t available in Project.
-
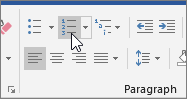
Select the text in the shape that you want to add bullets or numbering to.
-
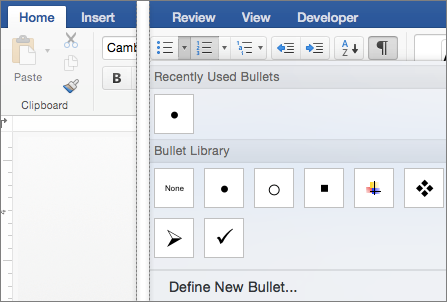
Select the Home tab on the ribbon, and in the Paragraph group, select Bullets or Numbering.
You can find different bullet styles and numbering formats by clicking the down arrow next to Bullets or Numbering.
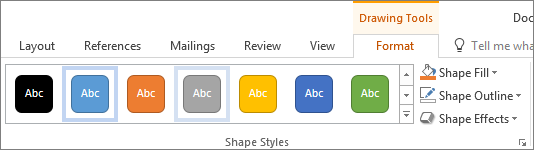
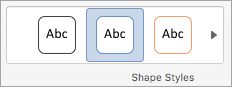
Quick Styles let you apply a style to your shape with one click. You’ll find the styles in the Quick Style gallery. When you rest your pointer over a Quick Style thumbnail, you can see how the style affects your shape.
-
Click the shape you want to change.
-
Select the Format tab, and in the Shape Styles group, select the Quick Style you want to use.
To see more Quick Styles, click the More button
.
 .
.Click the shape that you want to delete, and then press Delete. To delete multiple shapes, press Ctrl while you click the shapes that you want to delete, and then press Delete.
See Also
Draw or delete a line, connector, or freeform shape
Rotate a text box, shape, WordArt, or picture
Change the colors in a text box or shape
Draw a decorative line in Word or Outlook
Choose a SmartArt graphic
Create a chart from start to finish
Add clip art to a file
Draw and sketch notes on a page
After adding a shape to a document, you can modify it by adding connector lines, changing the style, adding a mirror image, changing the color, and applying a variety of other effects, such as shadows, glow, and 3-D.
Add a shape
-
On the Insert tab, click Shapes.
-
Click the shape you want, click anywhere in the workspace, and then drag to place the shape.

-
Right-click the shape and click Add Text or Edit Text, or just click inside the shape and start typing .
Note: The text that you add becomes part of the shape — if you rotate or flip the shape, the text rotates or flips also.
-
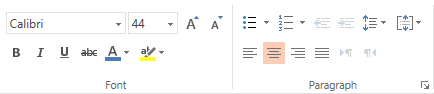
To format and align your text, click the Home tab, and then choose the available formatting options. For example, you can change font color, styles, sizes, change alignment or indentation, change the text orientation, to name a few.
-
Click the shape you want to change.
To change multiple shapes, press
while you click the shapes you want to change. -
On the Shape Format tab, click
, point to Change Shape, and click the new that you want.
 while you click the shapes you want to change.
 , point to Change Shape, and click the new that you want.
-
Select the shape you want to copy.
-
Press the option key and drag the shape anywhere you want. Release the mouse, and a copy of the shape is created. You can drag and release the shape as many times as necessary.
Note: Adding lists is not available in Excel 2016 for Mac.
-
Select the text in the shape that you want to add bullets or numbering to.
-
On the Home tab, click the arrow next to Bullets or Numbering.
-
Press Enter every time you want a new bullet or number, or press Enter twice to end the list.
-
Click the shape you want to change.
-
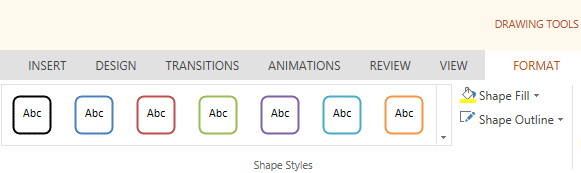
Click the Shape Format tab, and in the style gallery, click the style you want.
To see more styles, click
below the style gallery.
 below the style gallery.
-
Click the shape you want to change.
-
Click the Shape Format tab, and click
(Shape Fill icon). -
Do one of the following:
-
To use a different fill color, under Theme Colors or Standard Colors, click the color that you want to use.
-
To remove the color from the selected chart element, click No Fill.
-
To use a fill color that is not available under Theme Colors or Standard Colors, click More Fill Colors. In the Colors dialog box, use the available options to pick a color, and then click OK.
-
To fill the shape with a picture, click Picture. In the Insert Picture dialog box, click the picture that you want to use, and then click Insert.
-
To use a gradient effect for the selected fill color, click Gradient, and then click the gradient style that you want to use.
For additional gradient styles, click More Gradients, and then in the Format Chart Area pane, under Fill, click the gradient options that you want to use.
-
To use a texture fill, click Texture, and then click the texture that you want to use.
-
 (Shape Fill icon).
-
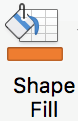
Click your shape, and then click the Shape Format tab.
-
In the Shape Styles group, click Shape Effects, point to an effect category, and then click the effect that you want.
-
On the Shape Format tab, click Format Pane.
-
In the Format Shape pane, click the Fill & Line tab, and then click either Fill or Line.
-
Drag the Transparency slider to achieve the effect you want.


Click the shape that you want to delete, and then press Delete. To delete multiple shapes, press Command while you click the shapes that you want to delete, and then press Delete.
See also
Change the size of an object
Crop a picture
Move, rotate, or group a picture, text box, or other object
Align objects in Word for Mac
Group or ungroup objects
You can add shapes, such as boxes, circles, and arrows, to your workbooks and presentations. (Word for the web doesn’t support shapes.) To add a shape, select Insert on the ribbon, select Shapes, and then choose a shape.
After you add a shape, you can move it and resize it; add text, bullets, or numbering; and you can change the fill color or outline.
-
On the Insert tab, select Shapes.
-
Select the shape you want from the drop-down gallery.
A default-sized shape is immediately inserted in the middle of the visible page.
-
Select a sizing handle on the perimeter of the shape and drag inward or outward to change the size of the shape.
To create a perfect square or circle (or constrain the dimensions of other shapes), press and hold Shift while you drag.
-
To move the shape, point the mouse at it until the pointer turns into a four-headed arrow. Then click and drag to move the shape where you want it.
When a shape is selected in your document, a Shape tab appears on the toolbar ribbon. It has buttons for things you can do with the shape such as adding a fill color or outline, or choosing a predefined shape style.
Note: If you have the Simplified Ribbon turned off, the tab name in step #4 is Format. For more information on the Simplified Ribbon see The new look of Microsoft 365.

Insert a shape, or click an existing shape, and then enter text, as follows:
-
Right-click the shape and select Edit Text.
A blinking cursor appears in the center of the shape.
-
Type the text you want to add to the shape.
-
To format and align your text, select the Home tab, and then choose options from the Font, Paragraph, or Alignment groups.
Quick Styles let you apply a style to your shape with one click. You’ll find the styles in the Shape gallery.
-
Select the shape you want to change.
-
On the Shape tab (or the Format tab if you have the Simplified Ribbon turned off), open the Shape Style gallery and select the Quick Style you want to use.
Select the down arrow on the end of the gallery to open it and see the complete list of options:
You can pause the mouse pointer over an option in the gallery to see a short description of it.

-
Select the shape you want to change.
-
On the Shape tab (or the Format tab if you have the Simplified Ribbon turned off), select the down arrow next to Fill to open the gallery of fill colors.
-
Select a color.
-
To make the shape transparent, select No Fill at the bottom of the color gallery.
-
Select the shape you want to change.
-
On the Shape tab, (or the Format if you’re still using the classic ribbon) select the down arrow next to Outline to open the gallery of outline colors.
-
Select a color.
-
At the bottom of the gallery there are also options for the thickness (Weight) of the outline, and whether the outline is solid, dotted, or a dashed line. Point at Weight or Dashes to see a pop-out list of options.
Click the shape that you want to delete, and then press the Delete key. To delete multiple shapes, press Ctrl while you select the shapes that you want to delete, and then press Delete.
Need more help?
Want more options?
Explore subscription benefits, browse training courses, learn how to secure your device, and more.
Communities help you ask and answer questions, give feedback, and hear from experts with rich knowledge.
For some charts or diagrams, you need to create a regular polygon – equiangular
(all angles are equal) or equilateral (all sides have the same length).
E.g., equilateral triangle, regular square, etc.
 ,
,
 ,
,
 ,
,
 ,
,
etc.
When you create a shape in Microsoft Word, you create a shape with proportions, which depend on
the selected area to which Word fits a shape. For example:

However, there is a way to add any of the available shapes in Microsoft Word, keeping the correct,
regular proportions:
1. On the Insert tab, in the Illustrations
group, click the Shapes button:

2. Select a shape you want to add to your document.
3. Holding Ctrl, click the selected shape. The
shape will be added at the current cursor position with regular proportions:

Note: All shapes will be added using the default size and style. You always can
change the default style for shapes, see
Change the default font and style for shapes in Word.
See also this tip in French:
Comment créer un triangle équilatéral, un carré et d’autres polygones réguliers dans Word.
Please, disable AdBlock and reload the page to continue
Today, 30% of our visitors use Ad-Block to block ads.We understand your pain with ads, but without ads, we won’t be able to provide you with free content soon. If you need our content for work or study, please support our efforts and disable AdBlock for our site. As you will see, we have a lot of helpful information to share.
In word processing, sometimes you also need drawings to make your article easier to convey to users. Make it easier for learners / listeners to visualize what you are saying!
This is a feature available in Word, we can draw many different types of shapes such as: Square, triangle, circle, ellipse… or combine them to draw diagrams without using any other software. .
And in this article, I will show you how to draw shapes and how to manipulate drawings in Word so that you can grasp this important skill.
Tips: In the whole tutorial, if I say something in Tab Format then you can double click (2 times left mouse button), it will go to Tab Format always for fast.
Read more:
I. How to draw shapes in Word simply
#first. Instructions for drawing shapes in Word
As I said above, in Word there are many drawings, so that we can choose from: Circle, triangle, polygon … depending on the purpose that you choose the shape to draw.
To draw shapes in Word, follow the steps below. For example, here I will draw a circle:
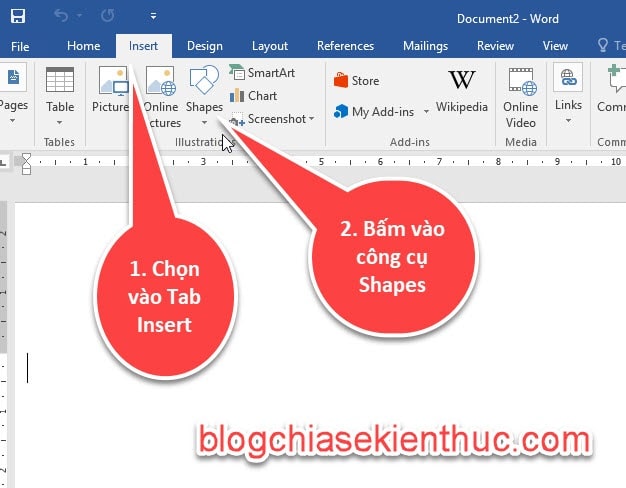
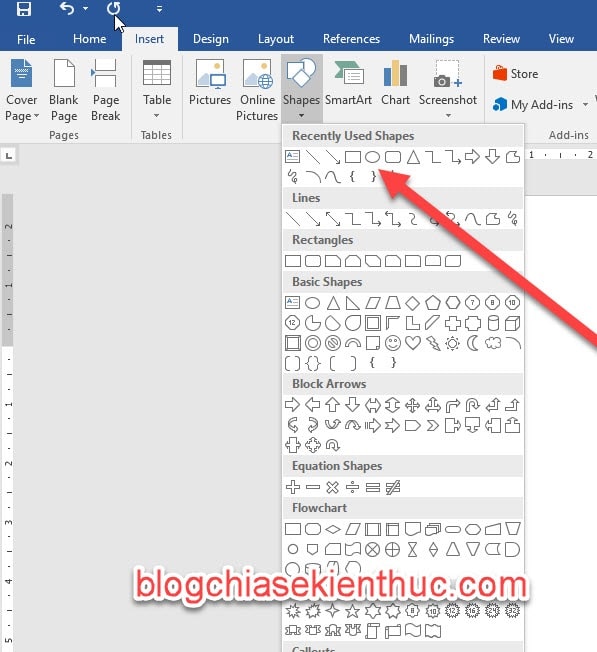
+ Step 1: Select Tab Insert => then select the tool Shapes.
+ Step 2: Now groups of shapes appear, click on any shape you want to draw.
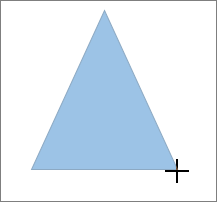
+ Step 3: Select the position you want to draw on Word, hold down the left mouse button and move the mouse to draw shapes.
To draw other shapes, you can do the same.
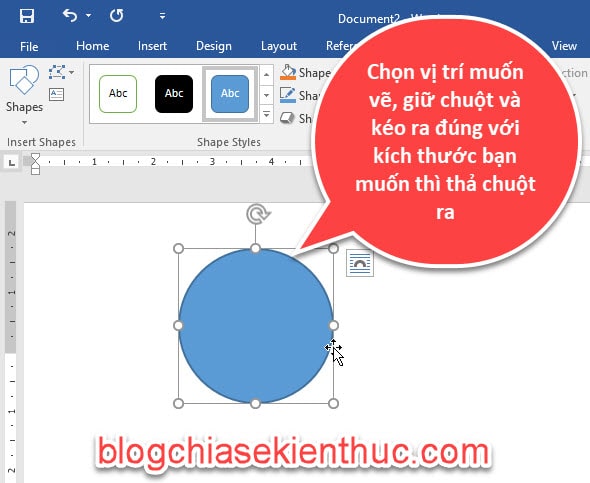
Note : To draw squares and circles, hold Shift before drawing, this will help your squares and circles be more balanced and accurate. You won’t lose time aligning or fear it’s distorted.
#2. Change another drawing
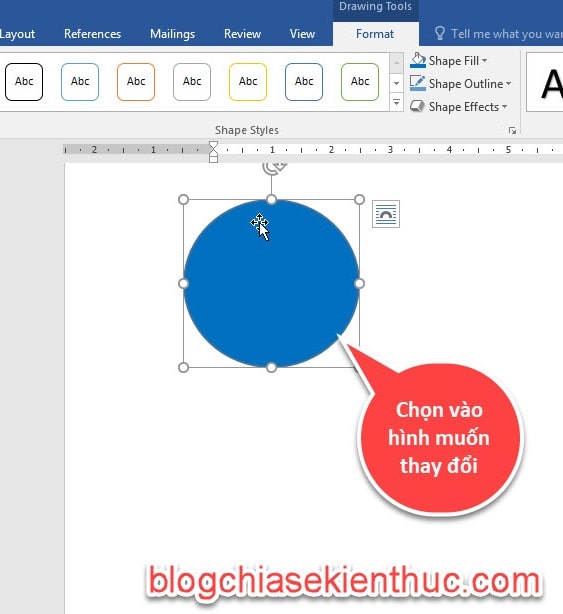
When you want to change the original image, the one you just drew => into another shape, you do the following.
Perform:
+ Step 1: Select the shape you want to change.
+ Step 2: Go to Tab Format => choose Change Shape => then select the drawing you want to change. The new image will now be the same size as the original image.
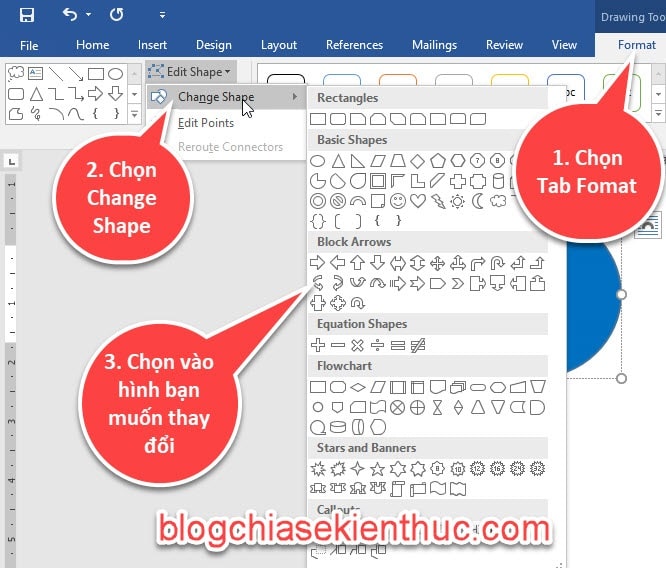
As a result, the image has been changed 😀
#3. Transforming drawings
In the shapes with yellow round dots, these are the shape positioning points, drag and drop these points, the drawing will change.
If the shapes in Word do not have the image you want, then you can select the same image so that you can transform it into the shape you want.
Perform:
+ Step 1: Select the shape you want to transform.
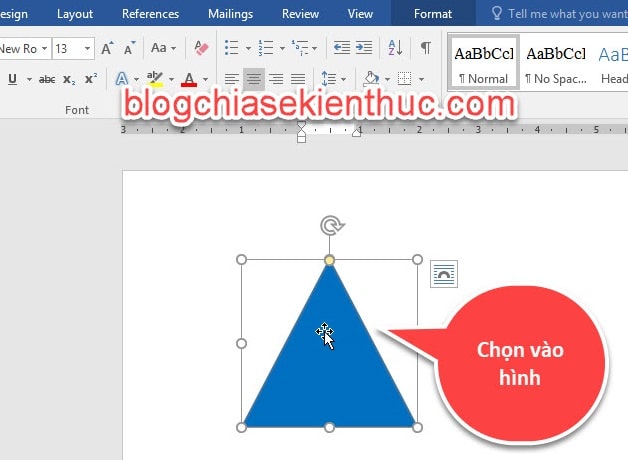
+ Step 2: Go to Tab Format => choose Change Shape => then select Edit Points.
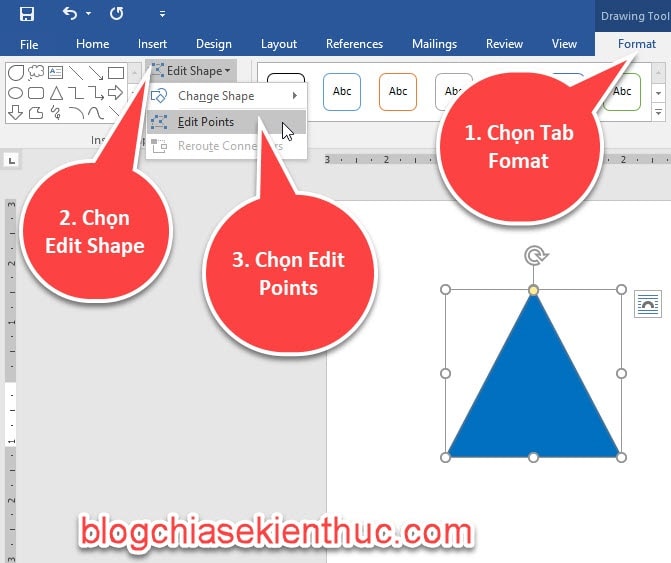
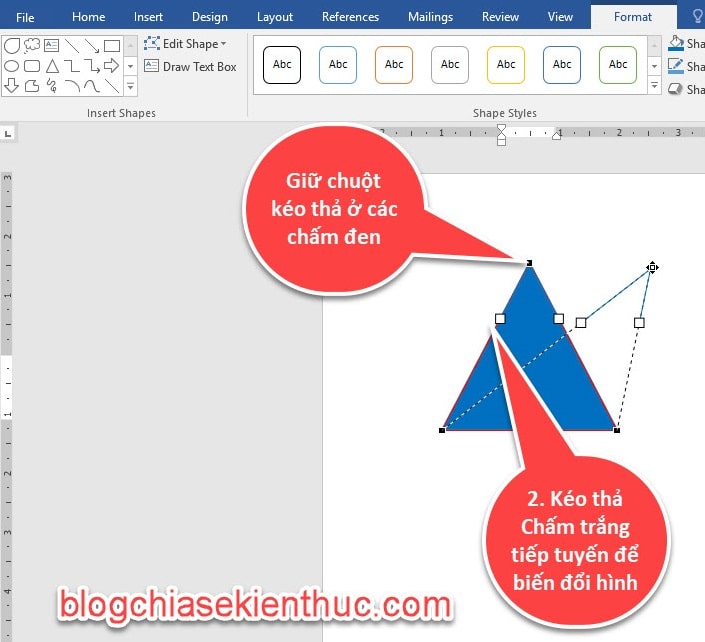
+ Step 3: Select on the black dot to drag and drop, the image will transform into another image, you also see 2 white tangent dots appear, you can also drag to continue to transform.
II. Resize, rotate, and move drawings in Word
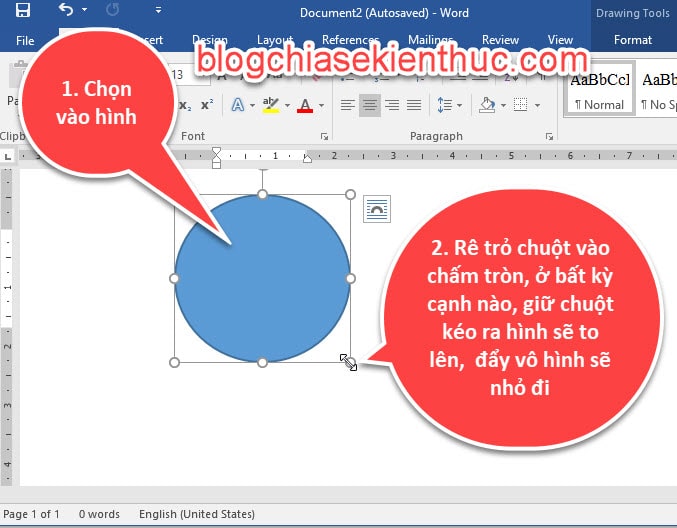
#first. Change the image size
To resize the image to larger / or smaller, do the following:
Way #1:
Select the image, then drag the mouse to the border => select the circle on any edge => then hold down the mouse and drag out => then the image will be larger, push in, the image will be smaller.
Method #2:
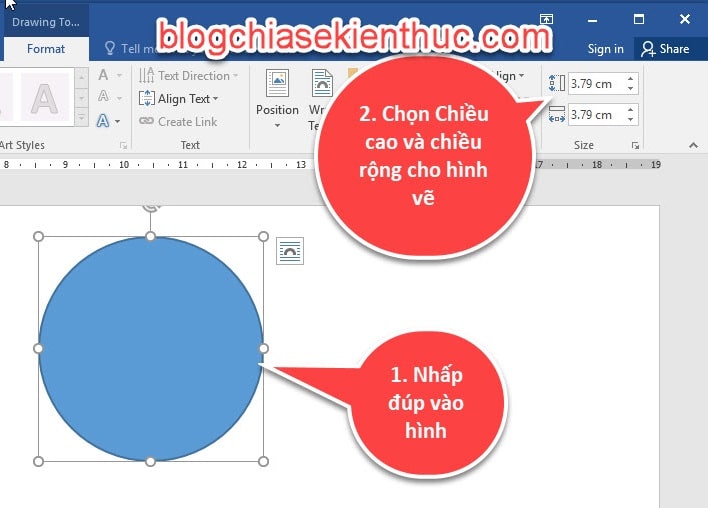
+ Step 1: Double-click the shape you want to resize.
+ Step 2: In the Width, Height You enter parameters to resize the image.
#2. Rotate images in Word
Perform:
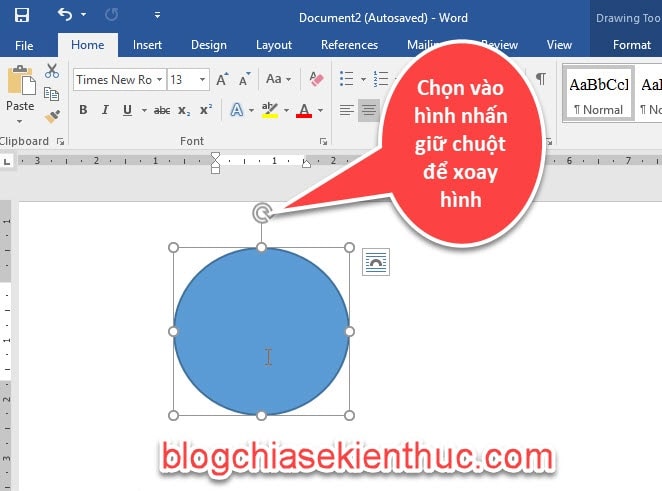
Method #1: Select the image you want to rotate, then a reverse arrow will appear, hold down the mouse to rotate in the direction you want.
Method #2:
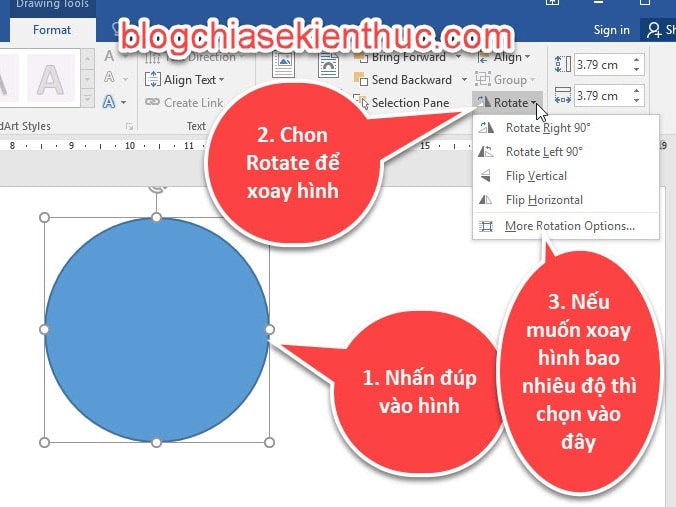
+ Step 1: Double-click the image you want to rotate.
+ Step 2: Select Rotate to rotate here only parts like:
- Rotate Right 90o : Rotate right 90o
- Rotate Left 90o : Rotate right 90o
- Flip Vertical: Flip the image vertically.
- Flip Horizontal: Flip the image horizontally.
If you want to rotate to a different angle, select More Rotation Options…
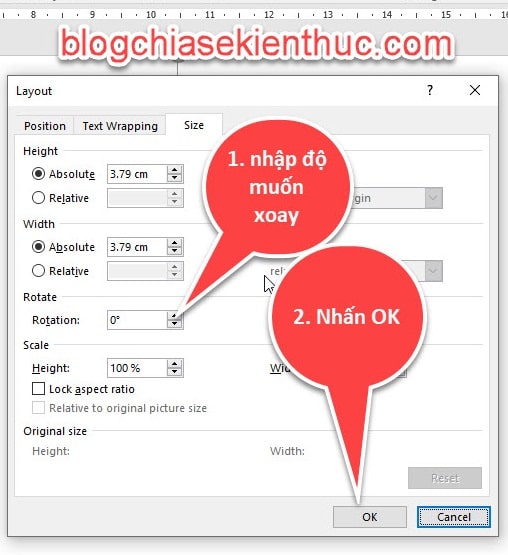
+ Step 3: Enter the degree you want to rotate in Rotation => then press OK
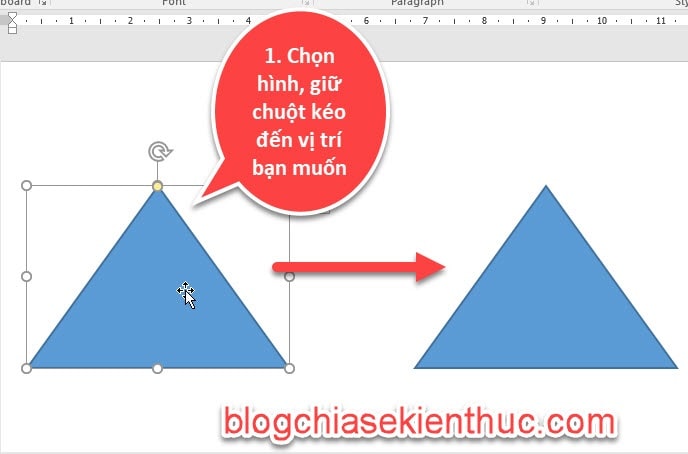
#3. Move the drawing
Perform:
+ Step 1: Select the drawing to be moved.
+ Step 2: Hold the mouse to move to the position you want and then release the mouse.
III. Conclude
So in this part 1, I have detailed instructions for you Drawing operations in Word as: Draw shapes, change shapes, transform shapes, rotate shapes… okay then.
See you in part 2, the next part I will guide you through the drawing formats as well as the content formats of the drawings. Please keep an eye on it.
CTV: Ngoc Cuong – techtipsnreview
The article achieved: 4.7/5 stars – (There are 3 reviews)
Note: Was this article helpful to you? Don’t forget to rate the article, like and share it with your friends and family!