
What is a text box generator?
learn more about this tool
With this online tool, you can add a frame around any text. The frame is made out of ASCII and Unicode characters and to draw it, the program computes the bounding box that surrounds the entire input text. The input text can be just a single letter or a digit, a word, a quote, a paragraph of text, or even a vertical list. In the «Box Style» option, you can choose from several different box styles. For example, the «ASCII Box with Corners» style uses the simplest characters available on any keyboard, such as «+» for corners, «-» for horizontal lines, and «|» for vertical lines. The «Unicode Box with Borders» style uses a continuous border line that’s only found on modern computers, and the «Unicode Thick Box» style uses filled block elements for the border. You can also create your own unique box style. To do this, switch to the «Custom» mode and in the options next to it, set the eight symbols that form the box. You can separately customize the top, bottom, left, and right borders, as well as the top-left, top-right, bottom-left-, and bottom-right corners of the box. By default, the box will fit around the text as tightly as possible but to make it looser, you can add padding between the text and the edges of the box. The «Vertical Padding» option adds empty space above and below the text, and the «Horizontal Padding» option adds extra space to the left and right sides of the text. The padding area is usually filled with regular space characters, but if necessary, you can set other symbols to fill the background area inside the box via the «Padding Fill Character» option. If the input text has more than one line, then you can choose how many boxes to draw for your text. For example, you can select the «One Box for All Text» mode and draw one big box around all lines of text. Or you can switch to the «Box for Each Line» mode and draw a border around each individual line of the text. Or you can select the «Box for Each Paragraph» mode and create boxes around individual text paragraphs. Textabulous!
With TikZ, a box that contains text is called a node. To start, let’s forget about style, once you understand the basic syntax, you can use them.
1. Here is a simple example without any style.
I use the positioning library which allows to place the node in relation to each other.
I proceeded by trial and error to find the width of the top one.

documentclass[border=5mm]{standalone}

usepackage{tikz}
usetikzlibrary{positioning}
begin{document}
begin{tikzpicture}
node[draw,fill=black,text=white] (primary) at (0,0) {Primary objectives};
node[draw,fill=black,text=white](experimental)[right=of primary]  {Experimental Design};
node[draw,fill=black,text=white](section)[right=of experimental]  {Fixed section / Part};
node[draw,fill=black,text=white](testing)[right=of section]  {Testing variables};
node[draw](aim)[above=of primary.west,anchor=west,minimum width=15.8cm]{Aim: investigate the performance / Investigate  Investigate Investigate Investigate};
end{tikzpicture}

end{document}
2. More precise relative placements:
It is possible to fix a minimum width to the box. This is appropriate here because the text is smaller than the box.
I fixed it at 3.5cm. The distance between the nodes can be set globally with the key node distance=2mm.
Likewise, by setting a minimum height greater than each text, here minimum height=2em the boxes all have the same height.
At each node, TikZ adds an invisible outer margin which by default measures half of the line width, here 0.4 pt. By setting this value to outer sep=0pt, the top box is as wide as the four boxes below it.
So the width of the top box is 4x3.5cm + 3x0.2cm=14.6cm.
begin{tikzpicture}[node distance=2mm,minimum width=3.5cm,minimum height=2em,outer sep=0pt]
This key node distance=2mm only works if the distance between two nodes is not set locally.
For example, I placed the top node 1mm above the other nodes. And so the global key node distance=2mm is not active.
I position this box above its north west corner and not above its west edge to avoid overlapping boxes.
node[draw](aim)[above=1mm of primary.north west,anchor=south west,minimum width=14.6cm]{Aim: investigate the performance / Investigate Investigate Investigate Investigate Investigate}; and so the node distance=2mm option is ignored.
Translated with www.DeepL.com/Translator (free version)

documentclass[border=5mm]{standalone}

usepackage{tikz}
usetikzlibrary{positioning}
begin{document}
begin{tikzpicture}[node distance=2mm,minimum width=3.5cm,minimum height=2em,outer sep=0pt]
node[draw,fill=black,text=white] (primary) at (0,0) {Primary objectives};
node[draw,fill=black,text=white](experimental)[right=of primary]  {Experimental Design};
node[draw,fill=black,text=white](section)[right=of experimental]  {Fixed section / Part};
node[draw,fill=black,text=white](testing)[right=of section]  {Testing variables};
node[draw](aim)[above=1mm of primary.north west,anchor=south west,minimum width=14.6cm]{Aim: investigate the performance / Investigate  Investigate Investigate Investigate};
end{tikzpicture}

end{document}
This is where the message goes!
Boxes: Additional Notes

Hate to read? No problem. We can read the text to you.
This feature is available completely free. While we will be keeping an eye on how feasible it is to eat the costs associated, we hope to keep it that way.
Just click «Listen with Drawabox»!
Initially I included these points as part of the Boxes page, but decided to separate them out on account of them not being that important in the context of what I’m trying to teach. They are good to know, but where the lesson material for boxes is already way too much to absorb, this stuff just doesn’t seem as critical, and it’s probably best to keep these ridiculously lengthy pages as short as possible so as to keep students from getting overwhelmed.

Foreshortening
Foreshortening is the rate at which an object gets smaller relative to its distance from the viewer. Using a box as an example, if the far end of the box is considerably smaller than the end nearest to the viewer, then it’s got a lot of foreshortening applied to it (often described as being more dramatic foreshortening).
If both ends of the box are close to the same size, with the far end only being slightly smaller, then it’s considered to have very little foreshortening, or ‘shallow’ foreshortening.
The foreshortening of an object tells us certain things about it. If an object has really dramatic foreshortening, it’s usually either VERY large (like when you look at the top of a tall building from the ground, there’s a visible size difference in the base and the top), or it’s extremely close to your eye. If it has shallower foreshortening, it’s going to either be smaller, a more relatable human scale, or very far away.
It is important that you keep this consistent in your scene. That is, if you have two objects that are meant to be the same size, it isn’t necessarily enough just to have the closer one be bigger and the farther one be smaller. If you have the farther one have more dramatic foreshortening, that’s going to immediately be glaringly inconsistent, and your viewer is going to have trouble making sense of it. For that reason, I use more dramatic foreshortening quite sparingly.
It’s also worth considering what is going to read as being the same size. If you have a bunch of boxes in your scene and nothing else (like the organic perspective exercise), then those boxes will automatically read as being the same size whether you mean for them to or not, because that’s what the brain expects. As such, having inconsistent foreshortening there is going to throw things off, even if you mean for certain boxes farther away to be absurdly large.
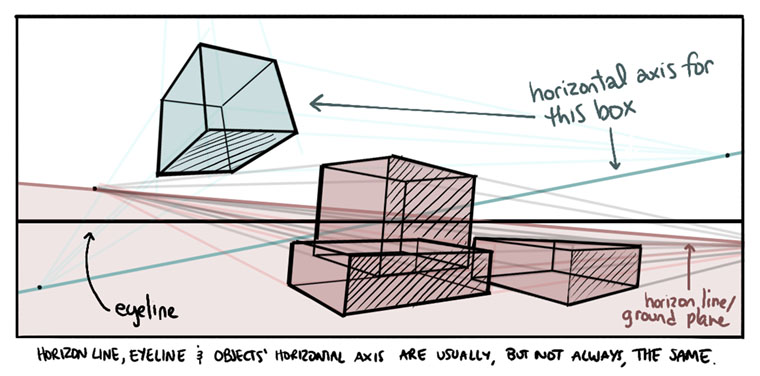
Horizon line, eye line, axis
You’ve probably heard about the horizon line, which establishes the ground plane in the scene. You can also usually think of it as the «eye line», as it is the line that represents where your eyes are relative to the scene you’re looking at. If it’s very high, then your eyes (and therefore you) are high up, with the bulk of your scene unfolding beneath your altitude. If it’s very low in the frame, your eyes are closer to the ground, as everything unfolds higher up.
When drawing a box, if that box is sitting on the ground, and therefore parallel to your vision (so your head is straight and so is the box), two of its vanishing points are going to sit on the horizon line. The second you tilt your head (sometimes referred to as a ‘Dutch angle’ or a ‘Dutch tilt’ in cinematography), your eye line is going to tilt along with it, but the box’s vanishing points will not follow.
As such, you can think of there being a number of different important lines that will usually but not always be represented by the same line.
-
Your (the viewer’s) eyeline, a line which passes through both of your eyes and tilts whenever your head does
-
The horizon line (which defines the ground plane)
-
The horizontal axis of an object, in this case a box, on which its horizontal vanishing points sit. When the box is set at an angle, this line tilts correspondingly
To repeat: the eye line, horizon line and object’s horizontal axis will frequently be the same, but not always.

Distortion
It is important to realize that there’s some flexibility to all of this. With two point perspective, you can’t be looking at the box from too high or too low of an angle — but you have a bit of wiggle room as to what constitutes «too high» or «too low». Same goes for one point perspective, where close enough to looking straight at one of the faces of the box will still work.
When you start pushing the boundaries of these «flexible limits», you start to get more and more distortion in your drawing. This is where things can get a little wacky, and where a drawing can start to feel wrong even though you’re following all of your vanishing points correctly.
A common place we see this is when we’re drawing a box in 2 point perspective, and part of the box falls outside of the space between the two vanishing points on the horizon. Here you’re going to start seeing a lot of distortion very quickly.
The trick I use to avoid that is to, first off, keep everything between the vanishing points — but this also happens vertically as well. So, you can imagine there being a circle that passes through both vanishing points — anything that exists within this circle should be reasonably free of distortion. Anything outside of it is going to get crazy.
It’s worth mentioning that this technique is actually a simplification, and while entirely workable, not 100% accurate. The size of this circle actually depends on the field of view of your eyes, which is the angle radiating out from the eye that we can see comfortably at a glance. The technique I describe above assumes an FoV of 90 degrees, which is not actually true to humans. We’re more comfortably around 60 degrees, where anything beyond that is going into our peripheral vision.
If you want to adhere to that, you can go through the trouble of figuring out where a circle two-thirds of the size I’m using would be — though at least for practice and exercises I wouldn’t bother with it. Just figured I’d say so for the sake of technical accuracy.
If you still don’t understand, the next point about placing vanishing points may help — but be warned, it digs deeper into technical perspective.
Placing vanishing points
This is one of the few technical perspective diagrams you’re going to see from me, but there is value in at least understanding the concepts, specifically to learn how far apart your vanishing points should be.
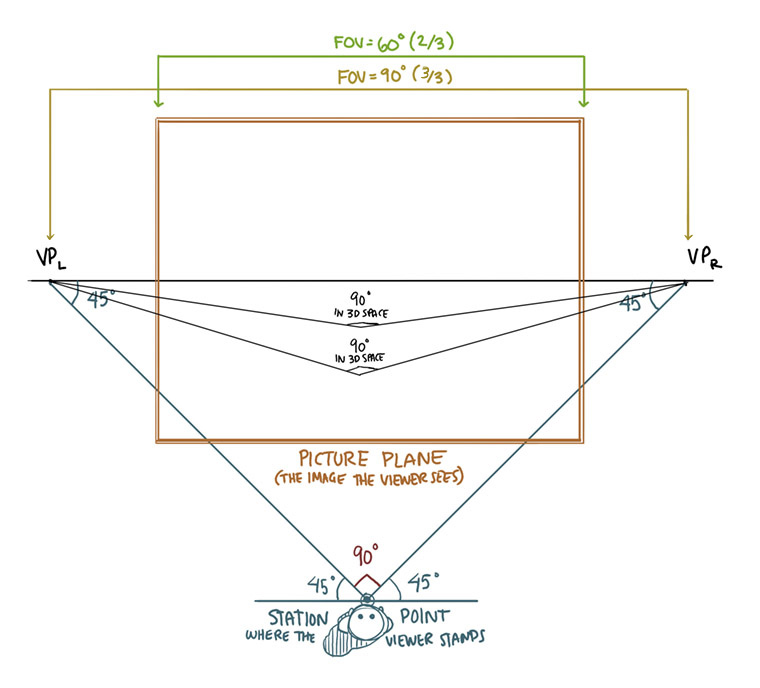
This diagram has a lot going on, so we’ll break it down bit by bit.
At the bottom, we have the station point. This is a somewhat abstract location — it doesn’t actually represent a physical location in the world of your drawing, but it relates to the position from which the viewer is seeing the scene. We can find this point by drawing lines out from each vanishing point at a 45 degree angle to the horizon. They will meet at the station point, with a 90 degree angle (a right angle) between them.
The rectangle in orange is the picture plane. Currently we have it centered between the vanishing points, but it doesn’t have to be — it can slide along the horizon line. Our actual drawing exists within this rectangle, you can actually picture it as the manifestation of your piece of paper — the window we use to look out into this world.
If the picture plane were wide enough to be touching both vanishing points (the width defined by the yellow lines marked FOV = 90°) we would be looking at the scene with a field of view of 90 degrees. What this basically means is the viewer would be able to see a full 90 degree arc in front of them, and it would all be packed into the picture plane. This corresponds to the 90 degrees at the station point (in red).
Now, as discussed in the previous section about distortion, the human eye is limited to an FOV of about 60°, so the picture plane containing a 90° arc of vision is going to result in some heavy distortion where all this information is being crammed into a smaller space than it should.
Therefore we draw our picture plane to be about two-thirds (2/3) of the distance between the left and right VPs. Again — the picture plane doesn’t need to be centered between them, we’re just talking about its width relative to the distance between these two vanishing points.
One last thing worth mentioning — each of the two vanishing points govern a set of parallel lines. A requirement for this whole setup is that the lines governed by each vanishing point must be perpendicular to each other. Meaning, the lines going to the left vanishing point are perpendicular to the lines going to the right vanishing point. These are not two arbitrary VPs.
This is what is illustrated with the two instances of «90° in 3D space» in the middle of the picture plane.

If you want to get creative with your text or simply have more flexibility, consider adding a customizing a text box in Word.
If you want more flexibility with certain text in your Word document, why not use a text box? Since a text box is considered an object, you can move it wherever you like in your document. This is handy for placing text in areas you normally wouldn’t.
You can use a text box to call attention to something in your document, rotate snippets of text, or create a unique appearance. Microsoft Word also provides formatting options for text boxes that give them their own nifty style or useful function.
Here, we’ll show you how to add or draw a text box and then format it to your liking in Microsoft Word.
With Word on Windows, you can either insert a preformatted text box or draw one of your own. Either way, you can customize it afterward, so choose the best option for you.
Go to the spot in your document where you want the text box and select the Insert tab. Click the Text Box drop-down arrow and pick a Built-In style or Draw a Text Box.

If you’re using Word on Mac, go to the Insert tab, click the Text drop-down arrow, and then the Text Box arrow. You can then choose to draw a simple text box or one where the text inside is vertical.

To draw your text box on either platform, drag the crosshairs to create the size you want. You can resize the text box any time after you draw it too.

When your text box appears, click inside to add your own words.
Format and Customize a Text Box in Word
Once you insert or draw your text box, select it and go to the Shape Format tab to view all of your formatting options. You’ll find the following features in Word on Windows, which may differ slightly in Word on Mac.

Shape Styles
Choose a theme or preset style for your text box. These options include filling colors and various effects.

Or you can use the Shape Fill, Outline, and Effects options to create your own distinctive style. From gradients and patterns to dashed lines and scribbles, you have many terrific options for customizing the appearance of your text box.

Note: Some options in the Shape Styles section may not be available if you select a preset text box.
WordArt Styles
Along with making the text box itself look snazzy, you can do the same with the text inside of it. Check out the Quick Styles in the WordArt Styles for premade options.

Or use the Text Fill, Outline, and Effects to make the text really pop. You can do things like add a shadow and glow or warp the text, so it’s curvy and cool.

Text, Accessibility, Arrange, and Size
The remaining sections of the ribbon allow you to change the direction of the text inside the box, use text wrapping with other elements in your document, rotate the text box, and adjust its exact size. You can also use the Alt Text Accessibility option to describe the text box.

Edit Your Text Box
After you customize your text box, you can still edit it anytime. Just note that when you select the text box to make changes, it may appear without some of the elements or effects you’ve applied. This is to make text editing simpler.
Once you complete your edits and deselect the text box, it will return to normal with your customizations.

Add Text Anywhere, Any Way in Word
Text boxes in Microsoft Word let you place text anywhere in your document without worries of margins or other normal text limitations. And because you can completely format the text box almost any way you want, it can be both a fun and useful addition to your document.
If you use Google Docs and Microsoft Word, take a look at how to work with text boxes in Docs too!
![]()
HOW TO DRAW A BOX AROUND TEXT IN WORD — YOUTUBE

Web Oct 3, 2019 Tutorials for Microsoft Word. In this video I show you how to draw a box around text in Word, how to format the box and how to customize it.#howtodrawaboxar…
From youtube.com
Author Lisa Doe
Views 54.5K
HOW TO DRAW A RECTANGLE IN WORD (MICROSOFT) — YOUTUBE
Web Oct 9, 2021 17K views 1 year ago How to Use Microsoft Word — QUICKLY Watch in this video How To Draw a Rectangle In Word document on the computer. Use the shapes option to insert …
From youtube.com
Author MrQuick
Views 18.3K
HOW TO DRAW BOX IN WORD (MS WORD) — YOUTUBE
Web Nov 6, 2021 How To Draw Box In Word (MS Word) MrQuick 2.17K subscribers Subscribe 1.7K views 1 year ago Watch in this video How To Draw Box In Word (MS Word) document with text. Use the …
From youtube.com
Author MrQuick
Views 2.1K
3 WAYS TO CREATE A 3D OBJECT IN MICROSOFT …
Web Feb 8, 2023 Select Insert > Text Box or Insert > WordArt. You’ll find the “Insert” menu at the top of the screen. …
From wikihow.com
Views 199.9K
ADD OR REMOVE BORDERS FOR TEXT BOXES, …
Web Select the shape or text box to which you want to add, change, or remove a border. Click Shape Format, and then click the arrow next to Shape Outline. Do any of the …
From support.microsoft.com
CREATE A BOX AND WHISKER CHART — MICROSOFT …
Web Right-click one of the boxes on the chart to select that box and then, on the shortcut menu, click Format Data Series. In the Format Data Series pane, with Series Options …
From support.microsoft.com
ADD, COPY, OR REMOVE A TEXT BOX IN WORD — MICROSOFT SUPPORT
Web Go to Insert and in Illustrations select Drawing. Select Text Box and use your cursor to create the text box. Insert text in box and apply any styling needed. Select Save …
From support.microsoft.com
HOW TO DRAW LINES, BORDERS, AND BOXES IN WORD 2013 — DUMMIES
Web Mar 26, 2016 To stick a box around any spate of words or paragraphs, summon the Borders and Shading dialog box, and choose a box style from the Setting column: Box, …
From dummies.com
HOW TO DRAW A TEXT BOX IN WORD (MICROSOFT) — MAC — YOUTUBE
Web Jul 16, 2021 2 Dislike Share Save MrQuick 605 subscribers How to Draw a TEXT BOX in Word document is shown in this video. After inserting the text box you can add text in …
From youtube.com
HOW TO MAKE DOTTED BOX IN WORD — [ DOTTED TEXT BOX ] — YOUTUBE
Web How to Make Dotted Box in Word — [ Dotted Text Box ] MrQuick 1.99K subscribers Subscribe 1.4K views 11 months ago How to Make Dotted Box in Word document with …
From youtube.com
HOW TO CREATE AND FORMAT A TEXT BOX IN MICROSOFT WORD
Web Jul 24, 2018 Switch over to the “Insert” tab on Word’s Ribbon, and then click the “Text Box” button. In the dropdown menu, click the “Draw Text Box” command. Your pointer …
From howtogeek.com
HOW TO DRAW IN MICROSOFT WORD — SOFTWARE ADVICE
Web Nov 8, 2021 How to draw in Word using shapes 1. Use lines to draw on a Word document Open your Word document. Place your cursor where you would like to start …
From softwareadvice.com
HOW TO CREATE BOXES IN WORD | TECHWALLA
Web Step 3. Select the text box you’d like to insert, or click «Draw Text Box» to create your own. If drawing a text box, locate the place in your document where you want the box, then …
From techwalla.com
ADD A DRAWING TO A DOCUMENT — MICROSOFT SUPPORT
Web Add a drawing to a document Click in your document where you want to create the drawing. On the Insert tab, in the Illustrations group, click Shapes. You can do any of …
From support.microsoft.com
HOW TO DRAW A BOX STEP BY STEP – FOR KIDS & BEGINNERS
Web Jan 20, 2021 Draw a close box: Step 1: Firstly draw the side of the box with a rhombus, try to draw without a ruler. Step 2: Draw the second side surface of the box, as shown in …
From howtodrawa.org
HOW TO DRAW A RED BOX AROUND TEXT IN WORD — YOUTUBE
Web Jun 2, 2022 2.1K views 7 months ago How to Use Microsoft Word — QUICKLY How To Draw a Red Box Around Text In Word is shown in this video. You can either put a solid …
From youtube.com
HOW I CAN DRAW A BOX AROUND A CERTAIN PART OF AN IMAGE
Web Nov 8, 2012 Obviously, in your case, you need to choose «over it». Place your image in the document, then set the «Wrapping» to «Behind the text». Now draw a square over the …
From answers.microsoft.com
BOX DRAWING — HOW TO DRAW A BOX STEP BY STEP — I HEART CRAFTY …
Web May 25, 2022 Step 2 – Draw some more of the box in this step. For this part of your box drawing, we shall start drawing “backward” into the picture to start creating the 3D …
From iheartcraftythings.com
HOW TO DRAW A SQUARE IN WORD (MICROSOFT) — SQUARE BOX
Web Nov 3, 2021 How to Draw a Square in Word (Microsoft) — Square Box MrQuick 2.87K subscribers Subscribe Share Save 10K views 1 year ago How to Use Microsoft Word — …
From youtube.com