
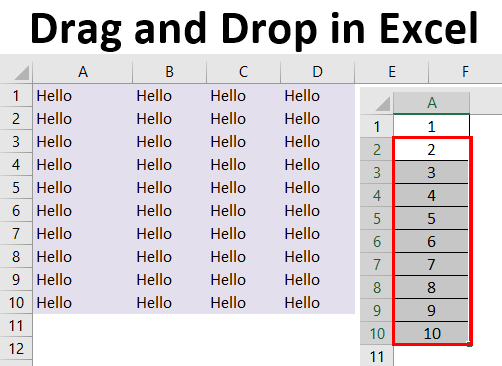
Вместо команд Вырезать, Копировать и Вставить, вы можете использовать способ drag-and-drop (тащи и бросай), чтобы перемещать содержимое ячеек.
Сначала переместим ячейки.
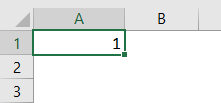
- Выделите ячейки, которые хотите переместить.
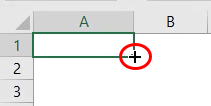
- Наведите указатель мыши на границу выделенной ячейки, курсор примет вид черного перекрестия со стрелками.
- Нажмите левую кнопку мыши и, не отпуская ее, переместите курсор в требуемое место.
- Отпустите левую кнопку мыши, ячейки окажутся в требуемом месте.
Чтобы скопировать ячейки проделайте те же операции, но перед перетаскиванием нажмите и удерживайте кнопку Ctrl.
- Выделите ячейку, которые хотите переместить.
- Наведите указатель мыши на границу выделенной ячейки, курсор примет вид черного перекрестия со стрелками.
- Нажмите кнопку Ctrl. Курсор примет вид стрелки с плюсиком.
- Нажмите левую кнопку мыши и, не отпуская ее, переместите курсор в требуемое место.
- Отпустите левую кнопку мыши, а затем отпустить кнопку Ctrl. Данные скопируются в новое место и при этом сохранятся в исходных ячейках.
Перетаскиванием удобно копировать небольшие небольшие наборы данных в пределах экрана. Копирование и перемещение больших таблиц, за пределы экрана или на другие листы книги Excel удобнее делать комбинацией клавиш Ctrl+C, Ctrl+X, Ctrl+V или с помощью пиктограмм на ленте инструментов.
Содержание
- Drag and Drop in Excel
- What is Drag and Drop in Excel?
- How to Drag and Drop in Excel?
- Example #1 – Copy Current Cell Value to other Cells
- Example #2 – Fill Serial Numbers
- Example #3 – Fill Serial Numbers without any Pattern
- Example #4 – Fill one Cell Formula to all below Cells
- Things to Remember About Excel Drag and Drop
- Recommended Articles
- Shortcuts for drag and drop
- Transcript
- Drag and Drop in Excel
- Excellent Uses of Drag and Drop Option in Excel
- Examples to use Drag and Drop in Excel
- Example #1 – Copy the Current Cell Value to other Cells
- Example #2 – Fill Serial Numbers
- Example #3 – Insert Serial Numbers Without Pattern
- Example #4 – Fill to All Below Cell Once
- Things to Remember
- Recommended Articles
Drag and Drop in Excel
Excel Drag and Drop (Table of Contents)
What is Drag and Drop in Excel?
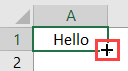
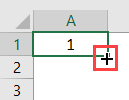
Drag and Drop is an alternative to Copy and Paste in MS Excel. It is a way to move or duplicate data. Excel Drag and Drop option is also known as “Fill Handle”. The plus (+) icon appears when the cursor is moved or hovered to the right bottom of a selected cell. The below image illustrates this option.
Excel functions, formula, charts, formatting creating excel dashboard & others
This plus icon can be dragged to top, bottom, left, or right.
How to Drag and Drop in Excel?
Let us see a few examples to drag and drop data in excel.
Example #1 – Copy Current Cell Value to other Cells
Let us say we have a value in cell A1 and we wish to fill or copy and paste this value to some other cells as well, say A1 through D10.

Let us see below how we can do this:
- Place the cursor to the right bottom of cell A1. Now the plus icon use to drag this value to the right and down of cell A1.
- After that, fill the range A1 through D1.

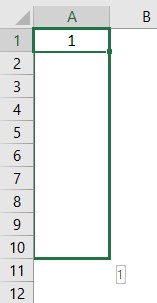
- In below, Drag and Drop cell A1 to D10.

- After doing this, we can see that there is a small square icon to the right bottom of these cells. When we click on this icon, we see the below available options.
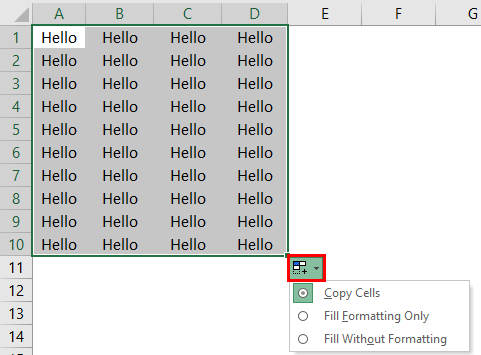
So we can see in the above screenshot that the “Auto-Fill” icon has a dropdown with three options. In the above case, we have dragged and dropped from A1 through D10 by taking the value from A1 only.
On selecting this option, we would get a visual as below:
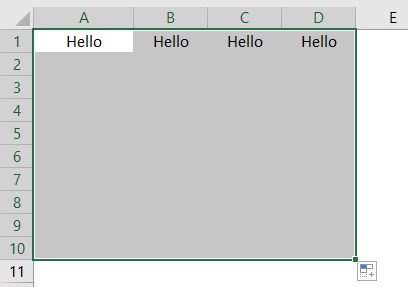
Now for A1 through D10, let’s see how these dragged cells (i.e. A2:D10) look like when the option of Fill Without Formatting” is selected.

On selecting this option, we would get a visual as below:

Example #2 – Fill Serial Numbers
We can even insert or fill serial numbers with the “Fill Handle” option. Let us see how this works.
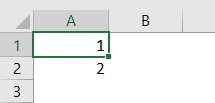
- Firstly two consecutive numbers are to be entered.
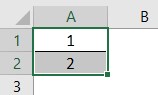
So we have entered two consecutive numbers: 1 and 2 in cells: A1 and A2.
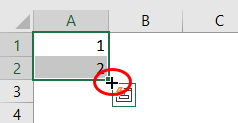
- Now we select these two cells and then hover the cursor to the right bottom of these.

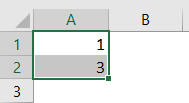
- Now drag and drop up to the row number; we require the serial number. So let’s say we require serial numbers from 1 to 10, so we drag and drop up to row number 10.
So let’s see the working of this in Excel. Using the two numbers: 1 and 2 entered, Excel identifies the increment value from the first cell to the second cell. In this case, the increment value is 1 (from 1 to 2). So every time a value is dragged to the next cell, the next value is incremented by 1. Thus, we get serial numbers: 1 to 10 in this case since we have dragged up to row number 10.
Now let’s say we enter 2 and 4 as two consecutive numbers in cells: C1 and C2. We now wish to drag and drop and fill these multiples of 2 up to row number 10. Let us see below how this works:
So, in this case, Excel identifies the increment value from the first cell to the second cell using the two numbers entered: 2 and 4. The increment value is 2 (from 2 to 4). So every time a value is dragged to the next cell, the next value is incremented by 2. Thus, we get multiples of 2: 2 to 20 in this case since we have dragged up to row number 10.
Example #3 – Fill Serial Numbers without any Pattern
We can even insert or fill serial numbers without guiding Excel with any predefined pattern using the “Fill Handle” option. Let’s say we require serial numbers from 1 to 10. Let us see how this works.
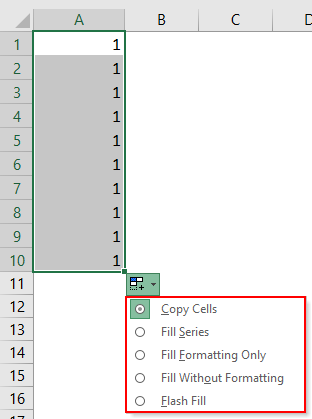
- Enter the value 1 in cell A1.
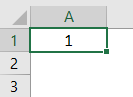
- Now we select this cell and then hover the cursor to the right bottom of this.
- Now drag and drop up to the row number; we require the serial number. So let’s say we require serial numbers from 1 to 10, so we drag and drop up to row number 10.
After doing this, we can see that there is a small square icon, i.e. the “Auto-Fill” option, to the right bottom of the dragged cells. When we click on this icon, we see the below available options.

So in order to get serial numbers incremented by 1, we choose the option: “Fill Series”. Now let’s see how these dragged cell values change when we select this option: So we get serial numbers from 1 to 10.
Example #4 – Fill one Cell Formula to all below Cells
We can even insert or copy one formula to all the below cells using the “Drag and Drop” option. Let’s say we have a dataset where we have income, expenditure, and savings of 3 persons in a month, where savings is calculated as Income minus Expenditure:

Now we wish to copy this formula to the other two cells, but not using the copy-paste option but using the “Drag and Drop” option. To do this, select the initial or topmost cell containing the formula and then hover the cursor to the right bottom of this.
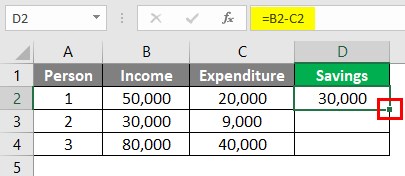
- Now we just need to double click on this position in order to drag and drop this formula to all the below cells.
So we can see in the above screenshot that the formula for savings is copied to the other two cells as well.
Things to Remember About Excel Drag and Drop
- Excel Drag and Drop option is often called “Fill Handle”.
- The drag and drop option can be used to paste or drag to a single row or column at a time.
- It is a technique to pick up a selection of cells and then drop those to a new place on the worksheet.
Recommended Articles
This is a guide to Excel Drag and Drop. Here we discuss How to Drag and Drop data in excel along with practical examples and a downloadable excel template. You can also go through our other suggested articles –
Источник
Shortcuts for drag and drop
Transcript
In this video, we’ll look at shortcuts related to drag and drop in Excel.
To drag and drop in Excel, just make a selection and hover the mouse over the edge of the selection. When the cursor changes, you can drag the selection to a new location.
With this method, drag and drop is equivalent to cut and paste. The content of selected cells is moved, and the selection you drag will completely overwrite the destination cells.
You can hold down the shift key to drag and insert. The difference is that the cells you drag are inserted rather than pasted. they don’t overwrite existing cells.
If you want to copy cells, instead of move them, hold down the control key in windows, and the option key on a Mac, while you drag. You’ll see the cursor change into a plus (+) symbol.
When you release the mouse, a copy of the cells will be placed at the destination.
Drag and drop is a really handy way to quickly reorganize rows and columns in a table. Just hold down the shift key to insert.
Notice also that you can work with entire rows and columns.
Also, with drag and drop, you can insert and copy at the same time.
In Windows, use Control + Shift, and on a Mac, use Option + Shift.
You can also drag a selection to another worksheet using Alt in Windows, and Command on a Mac.
Drag and drop also works on objects, which is mostly useful when you want to duplicate objects that float above the grid.
When you’re moving objects around on the worksheet, you can use the Alt key in Windows, and Command on a Mac to cause the object to snap to the cell grid.
Once you have an object moving in a vertical or horizontal direction, you can hold down the shift key restrict movement to that plane.
Finally, you can use drag and drop to copy entire worksheets.
On windows, click and drag a worksheet with the Control key down.
On a Mac, hold down the Option key.
One nice advantage to using drag and drop to duplicate worksheets is that you can put the new worksheet anywhere you want.
Источник
Drag and Drop in Excel


Excellent Uses of Drag and Drop Option in Excel
Excel drag and drop option, also known as “Fill Handle,” is the plus (+) icon that appears when moving the mouse or cursor to the right bottom of the selected cell. Using this plus icon, we can drag to the left, to the right, to the top, and the bottom from the active cell. Also, using this drag and drop option, we can do many smart things in Excel.
Table of contents
For example, look at the below image.
Examples to use Drag and Drop in Excel
Example #1 – Copy the Current Cell Value to other Cells
For example, assume you have a certain value in the A1 cell.

- We must use drag and drop options now. We can fill the same value besides cells as well. Then, place a cursor on the right bottom of the cell.
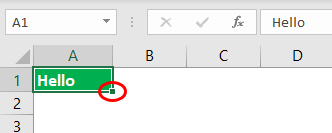
- Using this plus icon, we need to drag down to the right to fill the same value to all the dragged cells.

- After drag and drop, we can see a small icon on the right bottom of the selected cells. Click on this to see available options.
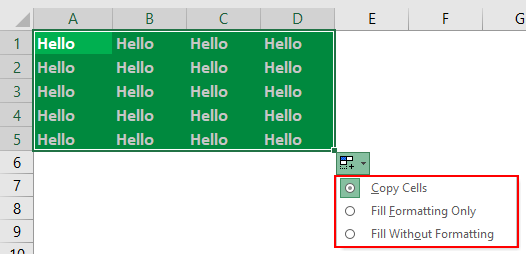
Here, we have three options: “Copy Cells,” “Fill Formatting Only,” and “Fill Without Formatting.” We have dragged and dropped from the active cell to the range A1 to D5, and it has taken everything from the active cell (A1).
But using this option, we can fill only formatting, i.e., without value from an active cell. We can also fill without formatting, i.e., the only value from the active cell without any formatting.
- Let us see how it looks when selecting “Fill Formatting Only.”
- Now, see “Fill Without Formatting.”

Example #2 – Fill Serial Numbers
Using this drag and drop, we can also insert serial numbers. For this first, we need to enter at least two consecutive numbers.
We have entered two consecutive serial numbers in cells A1 and A2. Now, select these two cells and place a cursor to the right bottom of the cell to see the drag and drop symbol.
Using this, drag and drop until the row number we want is the serial number. In this case, we have dragged until row 10, so our serial numbers will be from 1 to 10.
How does this Work?
The first thing we did was we had entered two consecutive serial numbers, 1 and 2. Using this sample, Excel identifies the increment number from one cell to another. In this case, the increment number is by 1, so every time we drag the value to the next new cell, it will increment the value by 1. Since we have dragged until the 10th row, it has incremented the value by ten times from the first cell value, 1.
For example, look at the below image now.
We have entered 1 and 3 in the first two cells. We will drag and drop until the 10th row and see what happens.
We did not get consecutive serial numbers. Instead, we got all the odd numbers from 1 to 19. That is because, in the first two cells, our values are 1 and 3. However, from the first cell to the second cell, the value is incremented by 2, so when we use drag and drop, Excel identifies the pattern as it has to increment by 2 every time it goes to the new cell.
Example #3 – Insert Serial Numbers Without Pattern
We can also insert serial numbers without entering two consecutive numbers. Instead, just enter 1 in any of the cells.
Now drag and drop until the 10 th row.
Now, click on the “AutoFill” options box.
We must choose the “Fill Series” option to get serial numbers incremented by 1.
So, we got serial numbers which are incremented by 1.
Example #4 – Fill to All Below Cell Once
We can fill the formula from one cell to all the below cells using the drag and drop option. For example, look at the below image.
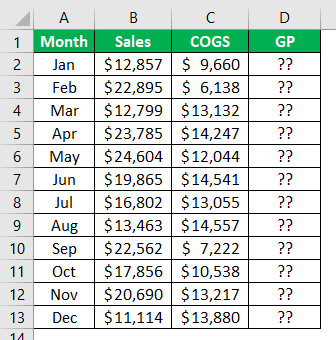
- To arrive at GP ( Gross ProfitGross ProfitGross Profit shows the earnings of the business entity from its core business activity i.e. the profit of the company that is arrived after deducting all the direct expenses like raw material cost, labor cost, etc. from the direct income generated from the sale of its goods and services.read more ), we need to enter the formula as Sales – COGS.
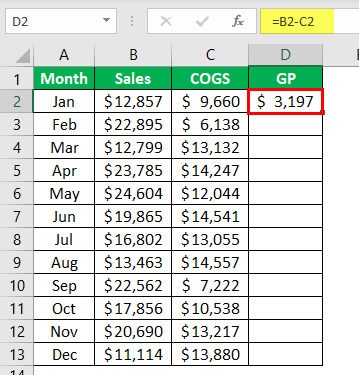
- We usually copy the formula from one cell and paste it to the below cells but this time, place a cursor to the right bottom of the formula cell, the D2 cell.
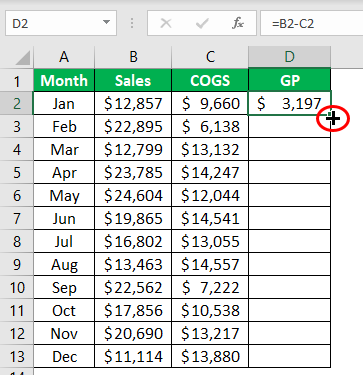
- When we see the “Drag & Drop” option, we need to double click to apply the formula to the below cells.
Things to Remember
- Drag and Drop are often called a fill handleFill HandleThe fill handle in Excel allows you to avoid copying and pasting each value into cells and instead use patterns to fill out the information. This tiny cross is a versatile tool in the Excel suite that can be used for data entry, data transformation, and many other applications.read more .
- The drag and drop is the alternative available to the copy and paste method.
- We can drag and drop to a single row and a single column at a time.
Recommended Articles
This article is a guide to Drag and Drop in Excel. Here, we learn some excellent uses of the Excel drag and drop option, also known as “Fill Handle,” along with some practical examples and a downloadable Excel template. You may learn more about Excel from the following articles: –
Источник
Excellent Uses of Drag and Drop Option in Excel
Excel drag and drop option, also known as “Fill Handle,” is the plus (+) icon that appears when moving the mouse or cursor to the right bottom of the selected cell. Using this plus icon, we can drag to the left, to the right, to the top, and the bottom from the active cell. Also, using this drag and drop option, we can do many smart things in Excel.
Table of contents
- Excellent Uses of Drag and Drop Option in Excel
- Examples to use Drag and Drop in Excel
- Example #1 – Copy the Current Cell Value to other Cells
- Example #2 – Fill Serial Numbers
- How does this Work?
- Example #3 – Insert Serial Numbers Without Pattern
- Example #4 – Fill to All Below Cell Once
- Things to Remember
- Recommended Articles
- Examples to use Drag and Drop in Excel
For example, look at the below image.
Examples to use Drag and Drop in Excel
You can download this Excel Drag and Drop Template here – Excel Drag and Drop Template
Example #1 – Copy the Current Cell Value to other Cells
For example, assume you have a certain value in the A1 cell.
- We must use drag and drop options now. We can fill the same value besides cells as well. Then, place a cursor on the right bottom of the cell.
- Using this plus icon, we need to drag down to the right to fill the same value to all the dragged cells.
- After drag and drop, we can see a small icon on the right bottom of the selected cells. Click on this to see available options.
Here, we have three options: “Copy Cells,” “Fill Formatting Only,” and “Fill Without Formatting.” We have dragged and dropped from the active cell to the range A1 to D5, and it has taken everything from the active cell (A1).
But using this option, we can fill only formatting, i.e., without value from an active cell. We can also fill without formatting, i.e., the only value from the active cell without any formatting.
- Let us see how it looks when selecting “Fill Formatting Only.”
- Now, see “Fill Without Formatting.”
Example #2 – Fill Serial Numbers
Using this drag and drop, we can also insert serial numbers. For this first, we need to enter at least two consecutive numbers.
We have entered two consecutive serial numbers in cells A1 and A2. Now, select these two cells and place a cursor to the right bottom of the cell to see the drag and drop symbol.
Using this, drag and drop until the row number we want is the serial number. In this case, we have dragged until row 10, so our serial numbers will be from 1 to 10.
How does this Work?
The first thing we did was we had entered two consecutive serial numbers, 1 and 2. Using this sample, Excel identifies the increment number from one cell to another. In this case, the increment number is by 1, so every time we drag the value to the next new cell, it will increment the value by 1. Since we have dragged until the 10th row, it has incremented the value by ten times from the first cell value, 1.
For example, look at the below image now.
We have entered 1 and 3 in the first two cells. We will drag and drop until the 10th row and see what happens.
We did not get consecutive serial numbers. Instead, we got all the odd numbers from 1 to 19. That is because, in the first two cells, our values are 1 and 3. However, from the first cell to the second cell, the value is incremented by 2, so when we use drag and drop, Excel identifies the pattern as it has to increment by 2 every time it goes to the new cell.
Example #3 – Insert Serial Numbers Without Pattern
We can also insert serial numbers without entering two consecutive numbers. Instead, just enter 1 in any of the cells.
Now drag and drop until the 10th row.
Now, click on the “AutoFill” options box.
We must choose the “Fill Series” option to get serial numbers incremented by 1.
So, we got serial numbers which are incremented by 1.
Example #4 – Fill to All Below Cell Once
We can fill the formula from one cell to all the below cells using the drag and drop option. For example, look at the below image.
- To arrive at GP (Gross ProfitGross Profit shows the earnings of the business entity from its core business activity i.e. the profit of the company that is arrived after deducting all the direct expenses like raw material cost, labor cost, etc. from the direct income generated from the sale of its goods and services.read more), we need to enter the formula as Sales – COGS.
- We usually copy the formula from one cell and paste it to the below cells but this time, place a cursor to the right bottom of the formula cell, the D2 cell.
- When we see the “Drag & Drop” option, we need to double click to apply the formula to the below cells.
Things to Remember
- Drag and Drop are often called a fill handleThe fill handle in Excel allows you to avoid copying and pasting each value into cells and instead use patterns to fill out the information. This tiny cross is a versatile tool in the Excel suite that can be used for data entry, data transformation, and many other applications.read more.
- The drag and drop is the alternative available to the copy and paste method.
- We can drag and drop to a single row and a single column at a time.
Recommended Articles
This article is a guide to Drag and Drop in Excel. Here, we learn some excellent uses of the Excel drag and drop option, also known as “Fill Handle,” along with some practical examples and a downloadable Excel template. You may learn more about Excel from the following articles: –
- Auditing Tools in Excel
- Fill Down in Excel
- Excel AutoFill
- Excel Flash Fill
- Histogram Formula
Excel Drag and Drop (Table of Contents)
- What is Drag and Drop in Excel?
- How to Drag and Drop in Excel?
What is Drag and Drop in Excel?
Drag and Drop is an alternative to Copy and Paste in MS Excel. It is a way to move or duplicate data. Excel Drag and Drop option is also known as “Fill Handle”. The plus (+) icon appears when the cursor is moved or hovered to the right bottom of a selected cell. The below image illustrates this option.
This plus icon can be dragged to top, bottom, left, or right.
How to Drag and Drop in Excel?
Let us see a few examples to drag and drop data in excel.
You can download this Drag and Drop Excel Template here – Drag and Drop Excel Template
Example #1 – Copy Current Cell Value to other Cells
Let us say we have a value in cell A1 and we wish to fill or copy and paste this value to some other cells as well, say A1 through D10.
Let us see below how we can do this:
- Place the cursor to the right bottom of cell A1. Now the plus icon use to drag this value to the right and down of cell A1.
- After that, fill the range A1 through D1.
- In below, Drag and Drop cell A1 to D10.
- After doing this, we can see that there is a small square icon to the right bottom of these cells. When we click on this icon, we see the below available options.
So we can see in the above screenshot that the “Auto-Fill” icon has a dropdown with three options. In the above case, we have dragged and dropped from A1 through D10 by taking the value from A1 only.
On selecting this option, we would get a visual as below:
Now for A1 through D10, let’s see how these dragged cells (i.e. A2:D10) look like when the option of Fill Without Formatting” is selected.
On selecting this option, we would get a visual as below:
Example #2 – Fill Serial Numbers
We can even insert or fill serial numbers with the “Fill Handle” option. Let us see how this works.
- Firstly two consecutive numbers are to be entered.
So we have entered two consecutive numbers: 1 and 2 in cells: A1 and A2.
- Now we select these two cells and then hover the cursor to the right bottom of these.
- Now drag and drop up to the row number; we require the serial number. So let’s say we require serial numbers from 1 to 10, so we drag and drop up to row number 10.
So let’s see the working of this in Excel. Using the two numbers: 1 and 2 entered, Excel identifies the increment value from the first cell to the second cell. In this case, the increment value is 1 (from 1 to 2). So every time a value is dragged to the next cell, the next value is incremented by 1. Thus, we get serial numbers: 1 to 10 in this case since we have dragged up to row number 10.
Now let’s say we enter 2 and 4 as two consecutive numbers in cells: C1 and C2. We now wish to drag and drop and fill these multiples of 2 up to row number 10. Let us see below how this works:
So, in this case, Excel identifies the increment value from the first cell to the second cell using the two numbers entered: 2 and 4. The increment value is 2 (from 2 to 4). So every time a value is dragged to the next cell, the next value is incremented by 2. Thus, we get multiples of 2: 2 to 20 in this case since we have dragged up to row number 10.
Example #3 – Fill Serial Numbers without any Pattern
We can even insert or fill serial numbers without guiding Excel with any predefined pattern using the “Fill Handle” option. Let’s say we require serial numbers from 1 to 10. Let us see how this works.
- Enter the value 1 in cell A1.
- Now we select this cell and then hover the cursor to the right bottom of this.
- Now drag and drop up to the row number; we require the serial number. So let’s say we require serial numbers from 1 to 10, so we drag and drop up to row number 10.
After doing this, we can see that there is a small square icon, i.e. the “Auto-Fill” option, to the right bottom of the dragged cells. When we click on this icon, we see the below available options.
So in order to get serial numbers incremented by 1, we choose the option: “Fill Series”. Now let’s see how these dragged cell values change when we select this option: So we get serial numbers from 1 to 10.
Example #4 – Fill one Cell Formula to all below Cells
We can even insert or copy one formula to all the below cells using the “Drag and Drop” option. Let’s say we have a dataset where we have income, expenditure, and savings of 3 persons in a month, where savings is calculated as Income minus Expenditure:
Now we wish to copy this formula to the other two cells, but not using the copy-paste option but using the “Drag and Drop” option. To do this, select the initial or topmost cell containing the formula and then hover the cursor to the right bottom of this.
- Now we just need to double click on this position in order to drag and drop this formula to all the below cells.
So we can see in the above screenshot that the formula for savings is copied to the other two cells as well.
Things to Remember About Excel Drag and Drop
- Excel Drag and Drop option is often called “Fill Handle”.
- The drag and drop option can be used to paste or drag to a single row or column at a time.
- It is a technique to pick up a selection of cells and then drop those to a new place on the worksheet.
Recommended Articles
This is a guide to Excel Drag and Drop. Here we discuss How to Drag and Drop data in excel along with practical examples and a downloadable excel template. You can also go through our other suggested articles –
- Excel DEGREES Function
- Write Formula in Excel
- Compare Two Lists in Excel
- Compare Dates in Excel
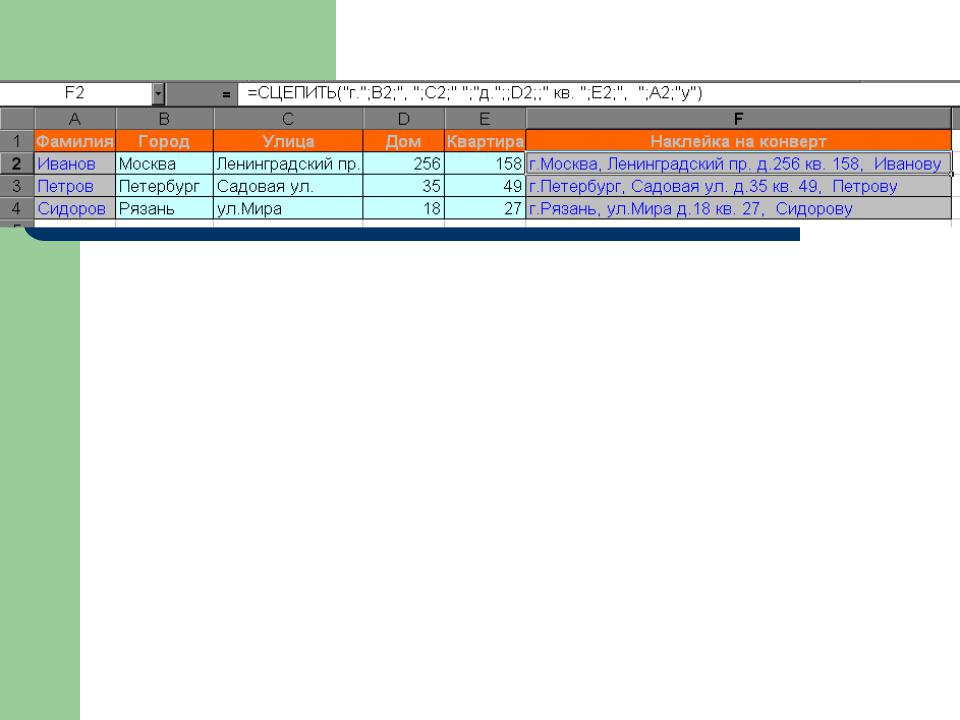
В таблицу занесены адреса учащихся таким образом, что фамилия, город, улица, номер дома и номер квартиры находятся в отдельных столбцах. Необходимо разослать всем учащимся письма. Чтобы распечатать адреса на конвертах на принтере, необходимо получить полный адрес в одной ячейке. Для этого:
1.Заполните таблицу по образцу, кроме столбца «Наклейка на конверт».
2.Используя текстовую функцию СЦЕПИТЬ получите наклейку на конверте. Чтобы слова были разделены пробелами и запятыми, пробелы и запятые вносят в функцию в кавычках (например вот так “, “).

Трудные вопросы
Л/Р
EXCEL

1.Способы защиты данных
Меню «Сервис»
Подменю «Защита»
Варианты – «Защитить лист», «Защитить книгу», «Защитить книгу и дать общий доступ».
Установить пароль
После защиты листа можно защитить отдельные ячейки следующим образом:
«Формат» «Ячейки» «Защита»

2. Элементы окна в Excel в отличие от Word
строка формул
закладки с именами листов
кнопки управления процессом
заголовки столбцов и строк
кнопка для выделения данных на всем листе

3. Назначение и смысл метода Drag and Drop
В дословном переводе метод называется «Перетащи и брось».
Основное назначение метода — это копирование и перенос файлов или данных внутри программы при помощи нажатой правой или левой кнопки мыши.
Существует возможность перетаскивания файла в формате Excel на рабочий лист. Это позволит сразу открыть документ.

4. Активация конкретного рабочего листа
Для активации нужного рабочего листа нужно щелкнуть мышью на закладке с его именем внизу документа

Самые трудные вопросы по тесту 4л (л/р Excel)
1.Перечислить наиболее популярные таблицы, кроме Excel?
2.Какие типа файлов можно открыть в Excel?
3.Факторы, влияющие на размер?

Перечислить наиболее популярные эл.таблицы (кроме Excel)
|
VisiCalc |
SuperCalc |
Multiplan |
EasyCalc
Quattro
![]()
Типы файлов, которые можно открыть в Excel
.html .htm
.txt
.xml

Факторы, влияющие на размер файла презентации, который может обрабатываться ПК
Количество ячеек
Количество графики
Количество диаграмм
Соседние файлы в папке Excel
- #
- #
- #
- #
- #