
Choose Design > Watermark. In the Insert Watermark box, select Text, and then choose DRAFT.
Contents
- 1 How do I insert watermark in Word?
- 2 How do I add or remove draft in Word?
- 3 What is draft in Word?
- 4 What is Draft watermark?
- 5 How do I get draft watermark on all pages?
- 6 How do you remove the word draft from a Word document on a Mac?
- 7 How do I add a draft Watermark in Excel?
- 8 Why we use Watermark in MS Word?
- 9 How do you draft a document?
- 10 How do you write a draft report?
- 11 Why is my Word document stuck in draft?
- 12 What is Watermark in Word document how can we convert text into Watermark?
- 13 How do you put a Watermark in front of a Word document?
- 14 How do I insert a draft Watermark in Word 2007?
- 15 How do I insert a logo on every page in Word?
- 16 How do I insert watermark in Word 2013?
- 17 How do I apply a custom watermark to only one page in Word?
- 18 How do I get rid of a watermark?
- 19 How do you add a draft watermark to a PDF?
- 20 How do I create a watermark?
How do I insert watermark in Word?
With your document open, switch over to the “Design” tab. In the Page Background group on that tab, click the “Watermark” button. On the drop-down menu, click any of the built-in watermarks to insert it into your document. Word places the watermark behind the text.
How do I add or remove draft in Word?
Remove a watermark
- Select Design > Watermark. (In Word 2010 or 2007, select Page Layout > Watermark.)
- Select Remove Watermark.
What is draft in Word?
Draft quality, Draft view, or draft mode is a feature found on older printers where they would lower their quality and saturation for a “test version” of a printed document.Today, many word processors include a draft mode that removes a document’s formatting.
What is Draft watermark?
A watermark is a faded image or text, that sits across the contents of a document. Watermarks can be used to indicate what stage the document is in, draft, confidential, final copy etc.
How do I get draft watermark on all pages?
Put a watermark on all pages
- Go to Design > Watermark > Custom Watermark.
- Choose Picture Watermark and select a picture, or choose Text watermark and type your watermark text in the Text box.
- Select OK.
How do you remove the word draft from a Word document on a Mac?
Word for Windows or Word Online: Go to the Design tab and select Watermark > Remove Watermark. Word for Mac: Select the Design tab. In the Page Background group, choose Watermark. Select No Watermark.
How do I add a draft Watermark in Excel?
Create a watermark
- Select Insert > Header & Footer.
- Tap on the header and on the Design tab on the ribbon, click Picture in the Header & Footer Elements group.
- Select one of the available options to insert your image. In the header, you’ll see & [Picture].
- Tap anywhere outside the header to see the watermark.
Why we use Watermark in MS Word?
Watermarks can be used to protect confidential information and to indicate the validity of a legal document. You’ll also watermarks any paper banknote, where they’re used to help prevent counterfeiting.
How do you draft a document?
Drafting Legal Documents, Principles of Clear Writing
- Write in the active voice. The active voice eliminates confusion by forcing you to name the actor in a sentence.
- Use action verbs.
- Use “must” instead of “shall”.
- Be direct.
- Use the present tense.
- Write positively.
- Avoid use of exceptions.
- Avoid split infinitives.
How do you write a draft report?
Here are some steps to follow when writing a report:
- Decide on terms of reference.
- Conduct your research.
- Write an outline.
- Write a first draft.
- Analyze data and record findings.
- Recommend a course of action.
- Edit and distribute.
Why is my Word document stuck in draft?
Microsoft Office Forums
Word>Word 2010 Stuck in Draft View! Please Help!
What is Watermark in Word document how can we convert text into Watermark?
Double-click near the top of the page, to open the header. Move the cursor over the watermark until the cursor displays a four-headed arrow, and then click the watermark to select it. On the Design tab, in the Page Background group, choose Watermark. Select Save Selection to Watermark gallery.
How do you put a Watermark in front of a Word document?
You’ll need to open the header to select the watermark.
- Double-click near the top of the page to open the header.
- Click the watermark to select it. (Try moving the cursor over the watermark until the cursor displays a four-headed arrow.)
- Drag the watermark where you want it on the page.
How do I insert a draft Watermark in Word 2007?
Workaround
- Open the Word 2007 document to which you want to add a watermark.
- On the Page Layout tab, click Watermark, and then click Printed Watermark.
- In the Printed Watermark dialog box, click either Picture watermark or Text watermark.
- Select the picture or the text that you want to use, and then click OK.
How do I insert a logo on every page in Word?
From the pull down menus, choose Insert > Header > Default. Click so that the cursor is inside the new header block. From the pull down menus, choose Insert > Picture > From File. Navigate to the desired logo, then click Open.
How do I insert watermark in Word 2013?
How to Add a Watermark to Documents in Word 2013
- Click the Design tab.
- In the Page Background group, click the Watermark button. A menu plops down with a host of predefined watermarks that you can safely duck behind the text on your document’s pages.
- Choose a watermark from the long, long list.
How do I apply a custom watermark to only one page in Word?
- Double-click inside the page where you want to insert the custom watermark.
- Select Watermark in the Page Background group (see figure 2).
- Right-click your custom watermark in the drop-down menu, and then select Insert at Current Document Position from the shortcut menu.
How do I get rid of a watermark?
Unwanted Object Remover – Remove Object from Photo (Android)
- Go to Play Store and install the app on your device.
- Open the app and tap “Object remove” to go to images on your mobile device.
- Select the area of watermark by using its main tools such as brush and lasso tool.
How do you add a draft watermark to a PDF?
If you have Adobe Acrobat, you can use its built-in watermark feature to add a watermark to a PDF file you’re editing. Go to the “Document” menu, click “Watermark” and then click “Add.” If you want to add a text-based watermark, click “Text” and enter the text that you want to add to the document.
How do I create a watermark?
How to make a watermark in 5 easy steps
- Open your logo, or make one with graphics and/or text.
- Create a transparent background for your watermark.
- Your image autosaves in PicMonkey’s cloud storage, or save it as a PNG to download.
- To use, add the watermark image on top of a photo.
Word for Microsoft 365 Word 2021 Word 2019 Word 2016 Word 2013 Word 2010 Word 2007 Word Starter 2010 More…Less
Use advanced Word options to customize editing tasks, document display, printing preferences, and more.
To choose your advanced Word options, select File > Options, and on the left pane, select Advanced.
|
Editing options Set up the way you select, replace, and format words and paragraphs. |
|
|
Cut, copy, and paste Choose how you want to paste content and formatting within the same document or between different documents and apps. |
|
|
Image Size and Quality Apply image size and quality settings for an open document or for all new documents. |
|
|
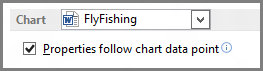
Chart Allow custom formatting and labels to stay with data points, even if the chart changes. |
|
|
Show document content Choose formatting, text, and image options. |
|
|
Display Choose a measurement format, show scrolling bars, and select the number of documents shown in the Recent Documents list. |
|
|
Optimize the appearance of the hard-copy version of the document or change your printer paper size. |
|
|
Save Save backup copies, automatically save changes to templates, or allow backup saves. |
|
|
Preserve fidelity when sharing this document Make sure the look of your document is preserved when you share the document with someone who uses a different version of Word. |
|
|
General Among the options in this section, you can change where Word saves your changes by selecting File Locations . Or choose to open documents in Draft view. |
|
|
Layout options for: Modify the layout, such as character spacing, for an open document or all new documents. |
|


To choose your advanced Word options, select File > Options, and on the left pane, select Advanced.
In this article
-
Editing options
-
Cut, copy, and paste
-
Image size and quality
-
Show document content
-
Display
-
Print
-
When printing this document
-
Save
-
Preserve fidelity when sharing this document
-
General
-
Compatibility
-
Compatibility options for
Editing options
Typing replaces selected text
Select this option to delete the selected text when you begin to type. If you clear this check box, Microsoft Office Word inserts new text in front of the selected text and does not delete the selected text.
When selecting, automatically select entire word
Select this option to select entire words when you select part of one word and then part of the next word. Turning this option on also causes Word to select a word and the space that follows it when you double-click a word.
Allow text to be dragged and dropped
Select this option to be able to move or copy selected text by dragging it. To move text, select the text, and then drag it to a new location. To copy text, select the text, and then hold down CTRL while you drag the selection to its new location.
Use CTRL + Click to follow hyperlink
Select this option to make it easier to edit the text of hyperlinks. When this option is turned on, you must press CTRL while you click the link in order to follow the link. When this option is turned off, clicking the link causes Word to go to the destination of the link, which makes it more difficult to edit the text of the link.
Automatically create drawing canvas when inserting AutoShapes
Select this option to place a drawing canvas around drawing objects or ink drawings and writing when you insert them into your document. A drawing canvas helps you to arrange drawing objects and pictures, and to move them as a unit.
Use smart paragraph selection
Select this option to select the paragraph mark when you select a whole paragraph. If you include the paragraph mark when you cut and paste a paragraph, you don’t leave a blank paragraph, and your formatting automatically stays with the paragraph.
Use smart cursoring
Select this option to specify that the cursor moves as you scroll up or down. When you press the LEFT ARROW, RIGHT ARROW, UP ARROW, or DOWN ARROW key after you scroll, the cursor responds at the page currently in view, not at its previous position.
Use the Insert key to control overtype mode
Select this option to turn Overtype mode on or off by pressing INSERT.
-
Use overtype mode
Select this option to replace existing text as you type, one character at a time. If Use the Insert key to control overtype mode is selected, you can turn this option on or off by pressing INSERT.
Add double quote for Hebrew alphabet numbering
Select this option to add double quotation marks («) to numbering.
This option is available only if Hebrew is enabled for editing text.
Prompt to update style
Select this option to be prompted when you directly modify text to which a style is applied and then you reapply the style to the modified text. When prompted, you can either update the style based on recent changes or reapply the formatting of the style.
Use Normal style for bulleted or numbered lists
Select this option to base list styles on the Normal paragraph style instead of the Paragraph List style.
Keep track of formatting
Select this option to keep track of your formatting as you type. This helps you to easily apply the same formatting elsewhere. This option must be turned on before you can use the Select Text with Similar Formatting command on the shortcut menu that appears if you right-click selected text. To display a list of the formatting that you used, click the Options command on the Style pane, and then select the Paragraph level formatting, Font formatting, and Bullet and numbering formatting check boxes.
-
Mark formatting inconsistencies
Select this option to mark formatting with a wavy blue underline when it is similar to, but not exactly the same as, other formatting in your documents. To use this option, you must also select the Keep track of formatting check box.
Updating style to match selection In the list, click Keep previous numbering and bullets pattern to make any paragraphs in that style that aren’t numbered stay unnumbered. Click Add numbering or bullets to all paragraphs with this style to number any paragraphs that have the style applied.
Enable click and type
Select this option to insert text, graphics, tables, or other items in a blank area of a document by double-clicking in the blank area. The Click and Type feature automatically inserts paragraphs and applies the alignment necessary to position the item where you double-clicked. This feature is available only in Print Layout view and Web Layout view.
-
Default paragraph style Select the style that is applied to text when you use click and type.
Show AutoComplete suggestions Select this option to see complete AutoText entries when you type the first four characters of the entry. You can press ENTER to add the full AutoText entry to your document, or you can continue to type the text you want. If you don’t want to see the AutoText suggestions, clear this check box.
Cursor movement
This option specifies the direction in which the cursor moves when you press the arrow keys on your keyboard.
This option is available only if a right-to-left language is enabled for editing text.
-
Logical Select this option to move the cursor according to the direction of the text encountered. For example, when you are using the arrow keys to move through Arabic and then English text in the same sentence, the cursor moves from right to left through the Arabic text and then starts at the leftmost character in the English word and progresses from left to right.
-
Visual Select this option to move the cursor to the next visually adjacent character. For example, when you are using the arrow keys to move from right to left through Arabic and then English text in the same sentence, the arrow key moves from right to left regardless of the direction of the text.
Cursor visual selection
This option specifies how text is selected as you extend the selection.
This option is available only if a right-to-left language is enabled for editing text.
-
Block Select this option to wrap text from line to line as you select downward, with all selected lines being the same width.
-
Continuous Select this option to wrap text from line to line as you select downward and vary the width of the final line of the block.
Use sequence checking
Select this option to validate whether a newly typed character occurs in the correct sequence to be used as a tone mark, diacritic, or vowel to be placed above, below, in front of, or behind the consonant it goes with.
This option is available only if a complex script language is enabled for editing text.
-
Type and replace Select this option to replace the previously typed character with the newly typed character if the two characters cannot coexist in the same text cluster.
Asian fonts also apply to Latin text
Select this option to change Latin characters to the selected Asian font when you apply the Asian font to selected text. Clear this check box if you want Latin characters to remain in the Latin font while you apply the Asian font to the rest of the document.
This option is available only if an East Asian language is enabled for editing text.
Automatically switch keyboard to match language of surrounding text
Select this option to change the keyboard language and font based on the language of the text where the cursor is placed. If you clear this option, only the font is changed.
Note: This option is available only if an East Asian language is enabled for editing text and an Input Method Editor for typing East Asian characters is installed.
IME Control Active
Select this option to start an Input Method Editor (IME). Clear this check box to stop an IME.
Note: This option is available only if an East Asian language is enabled for editing text and an Input Method Editor for typing East Asian characters is installed.
IME Settings
Click to open the Properties for IME Name dialog box. Use this dialog box to set or change the text, keyboard, character conversion, and other options for the active IME.
Note: This option is available only if an East Asian language is enabled for editing text and an Input Method Editor for typing East Asian characters is installed.
Top of Page
Cut, copy, and paste
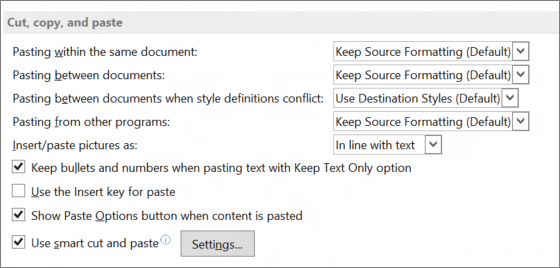
Pasting within the same document
This option displays the default behavior that occurs when you paste content into the same document from which you copied the content. In the drop-down list, select one of the following:
-
Keep Source Formatting (Default)
This option retains character styles and direct formatting that were applied to the copied text. Direct formatting includes characteristics such as font size, italic, or other formatting that is not included in the paragraph style. -
Merge Formatting
This option discards most of the formatting that was applied directly to the copied text, but it retains formatting that is considered emphasis, such as bold and italic, when it is applied to only a portion of the selection. The text takes on the style characteristics of the paragraph where it is pasted. The text also takes on any direct formatting or character style properties of text that immediately precedes the cursor when the text is pasted. -
Keep Text Only
This option discards all formatting and nontext elements, such as pictures or tables. The text takes on the style characteristics of the paragraph where it is pasted and takes on any direct formatting or character style properties of text that immediately precedes the cursor when the text is pasted. Graphical elements are discarded, and tables are converted to a series of paragraphs.
Pasting between documents
This option displays the default behavior that occurs when you paste content that was copied from another document in Word. In the drop-down list, select one of the following:
-
Keep Source Formatting (Default)
This option retains formatting that was applied to the copied text. Any style definition that is associated with the copied text is copied to the destination document. -
Merge Formatting
This option discards most formatting that was applied directly to the copied text, but it retains formatting that is considered emphasis, such as bold and italic, when it is applied to only a portion of the selection. The text takes on the style characteristics of the paragraph where it is pasted. The text also takes on any direct formatting or character style properties of text that immediately precedes the cursor when the text is pasted. -
Keep Text Only
This option discards all formatting and nontext elements, such as pictures or tables. The text takes on the style characteristics of the paragraph where it is pasted and takes on any direct formatting or character style properties of text that immediately precedes the cursor when the text is pasted. Graphical elements are discarded, and tables are converted to a series of paragraphs.
Pasting between documents when style definitions conflict
This option displays the default behavior that occurs when you paste content that was copied from another document in Word, and the style that is assigned to the copied text is defined differently in the document where the text is being pasted. In the drop-down list, select one of the following:
-
Keep Source Formatting
This option retains the look of the copied text by assigning the Normal style to the pasted text and applying direct formatting. Direct formatting includes characteristics such as font size, italic, or other formatting to mimic the style definition of the copied text. -
Use Destination Styles (Default)
This option retains the style name that is associated with the copied text, but it uses the style definition of the document where the text is being pasted. For example, you copy Heading 1 text from one document to another. In one document, Heading 1 is defined as Arial bold, 14-point, and in the document where you are pasting the text, Heading 1 is defined as Cambria bold, 16-point. When you use the Use Destination Styles option, the pasted text uses Heading 1 style, Cambria bold, 16-point. -
Merge Formatting
This option discards the style definition and most formatting that was applied directly to the copied text, but it retains formatting that is considered emphasis, such as bold and italic, when it is applied to only a portion of the selection. The text takes on the style definition in the document where the text is being pasted. -
Keep Text Only
This option discards all formatting and nontext elements, such as pictures or tables. The text takes on the style characteristics of the paragraph where it is pasted and takes on any direct formatting or character style properties of text that immediately precedes the cursor when the text is pasted. Graphical elements are discarded, and tables are converted to a series of paragraphs.
Pasting from other programs
This option displays the default behavior that occurs when you paste content that was copied from another program. In the drop-down list, select one of the following:
-
Keep Source Formatting (Default)
This option retains the formatting of the copied text. -
Merge Formatting
This option discards most formatting that was applied directly to the copied text, but it retains formatting that is considered emphasis, such as bold and italic, when it is applied to only a portion of the selection. The text takes on the style characteristics of the paragraph where it is pasted. The text also takes on any direct formatting characteristics of text that immediately precedes the cursor when the text is pasted. -
Keep Text Only
This option discards all formatting and nontext elements, such as pictures or tables. The text takes on the style characteristics of the paragraph where it is pasted and takes on any direct formatting or character style properties of text that immediately precedes the cursor when the text is pasted. Graphical elements are discarded, and tables are converted to a series of paragraphs.
Insert/paste pictures as
This option displays how Word inserts pictures relative to the text in your document. You can insert images inline with text, allow images to move with text, or wrap text around, in front of, or behind an image. In the drop-down list, select one of the following:
-
In line with text
This option inserts the graphic in a paragraph as if it were text. This option is used by default. The graphic moves as you add or delete text. You can drag the graphic to reposition it the same way that you drag text. -
Square
This option wraps the text around all sides of a square around the graphic. The graphic does not move as you add or delete text, but you can drag the graphic to reposition it. -
Tight
This option wraps the text around the graphic in an irregular shape around the actual image. The graphic does not move as you add or delete text, but you can drag the graphic to reposition it. -
Behind text
This option inserts the graphic so that the graphic floats on its own layer behind the text. There is no border around the graphic. The graphic does not move as you add or delete text, but you can drag the graphic to reposition it. -
In front of text
This option inserts the graphic so that the graphic floats on its own layer in front of the text. There is no border around the graphic. The graphic does not move as you add or delete text, but you can drag the graphic to reposition it. -
Through
This option wraps the text around the graphic, including filling the space created by a concave shape, such as a crescent moon. The graphic does not move as you add or delete text, but you can drag the graphic to reposition it. -
Top and bottom
This option prevents text from wrapping on the sides of the graphic. The graphic does not move as you add or delete text, but you can drag the graphic to reposition it.
Keep bullets and numbers when pasting text with Keep Text Only option
Select this option to convert numbering and bullets into text symbols.
Add control characters in Cut and Copy Select this option to retain right-to-left cursor movement when you cut or copy text from a Word document and paste as plain text (for example, in Notepad).
Use the Insert key for paste
Select this option to use the INSERT key to insert the contents of the Office Clipboard into a document.
Show Paste Options buttons when content is pasted
Select this option to display the Paste Options button when you paste content. You can use the Paste Options button to override or modify the settings you make in this section of the Word Options dialog box.
Use smart cut and paste
Select this option to automatically adjust formatting as you paste text. After you select this check box, you can click Settings to set additional options for pasting.
-
Settings
Click this to open the Settings dialog box. Use this dialog box to specify default behavior when merging, cutting, and pasting text. You can override default behavior by using the Paste Options button that appears when you paste content from the Clipboard into your document. This button is available only when the Use smart cut and paste option is turned on.-
Use default options for
Click an item in the list to pre-select a configuration of options in the dialog box. To select your own configuration of options, click Custom in this list. -
Adjust sentence and word spacing automatically
Select this option to remove extra spaces when deleting text or add necessary spaces when pasting text from the clipboard. -
Adjust paragraph spacing on paste
Select this option to prevent creating empty paragraphs and to prevent inconsistent paragraph spacing. -
Adjust table formatting and alignment on paste
Select this option to control the formatting and alignment of tables. When this option is turned on, single cells are pasted as text, table portions are pasted as rows into an existing table (rather than as a nested table), and when you add a table to an existing table, the pasted table is adjusted to match the existing table. -
Smart style behavior
Selecting this option has no effect. To fine-tune the behavior of styles when pasting content, use the Pasting options in the Cut, copy, and paste section of the Advanced options. -
Merge formatting when pasting from Microsoft PowerPoint
Select this option to control the results when you paste content from a PowerPoint presentation. When this option is turned on, the formatting of the surrounding text or table is applied to the pasted text, the most recently used bullet, number, or list style is applied to the pasted list, and the look of items such as tables, hyperlinks, images, OLE objects, and shapes is preserved from the source in PowerPoint. -
Adjust formatting when pasting from Microsoft Excel
Select this option to control the results when pasting data from Excel. When this option is turned on, pasted data is placed in a table, and charts are pasted as pictures rather than as OLE objects. -
Merge pasted lists with surrounding lists
Select this option to format list items to conform to the surrounding list when you are pasting the items into a list.
-
Top of Page
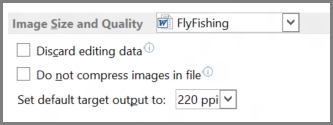
Image size and quality
Image Size and Quality Select the document that these settings apply to. In the list, click the name of a document that is already open, or click All New Documents to make the setting apply to all documents that you will create.
Discard editing data Select this option to save only the edited picture. Data from the original picture, before it was edited, will be unavailable.
Do not compress images in file Select this option to keep pictures at their full size. This option might make the document file size large.
Set default target output to This option determines the resolution of compressed images. Select a value for pixels per inch (ppi) from the list.
-
220 ppi Select this option if you’re planning to print your document.
-
150 ppi Select this option for documents that will be read on the screen.
-
96 ppi Select this option for documents you want to send in email.
Top of Page
Show document content
Show background colors and images in Print Layout view
Select this option to display background colors and images.
Show text wrapped within the document window
Select this option to wrap text to the document window, so that it is easier to read on the screen.
Show picture placeholders
Select this option to display an empty box in place of each picture in your documents. This option speeds the process of scrolling through a document that contains a large number of pictures.
Show drawings and text boxes on screen
Select this option to display objects that are created with the Word drawing tools in Print Layout view or Web Layout view. Clear this check box to hide drawings and possibly speed the display of documents that contain many drawings. Drawings will be printed even if you clear this check box.
Show text animation
Select this option to display text animations on your screen. Clear the check box to see how the text will look when printed.
Note: Use this option when viewing animated text in documents that were created in a version of Word earlier than Word 2007. The current version of Word no longer provides the ability to create animated text.
Show control characters
Select this option to display right-to-left control characters.
This option is available only if a right-to-left language is enabled for editing text.
Show bookmarks
Select this option to display bookmarks on the screen. If you assign a bookmark to an item, the bookmarked item appears in brackets ([…]). If you assign a bookmark to a location, the bookmark appears as an I-beam. The brackets and the I-beam do not appear in printed documents.
Show text boundaries
Select this option to display dotted lines around text margins, columns, and paragraphs. The boundaries are for layout purposes; they do not appear in printed documents.
Show crop marks
Select this option to display the corners of the margins.
Show field codes instead of their values
Select this option to display field codes instead of field results in your documents. For example, you may see { TIME @»MMMM, d, YYYY» } instead of February 4, 2008. Clear this check box to view field results.
Regardless of this setting, you can always switch between displaying field codes and field code results by pressing ALT+F9.
Field shading
This option displays whether and when fields are shaded. In the list, select Always or When Selected to shade your fields. Shading fields makes them easy to identify. The shading appears on the screen but not in the printed document.
Numeral
This option determines how numerals will appear in documents. Select an item from the list.
This option is available only if an Arabic language is enabled for editing text.
-
Arabic Select this option to display numerals in a format familiar to speakers of English and other European languages.
-
Hindi Select this option to display numerals in a format familiar to speakers of Arabic and Hindi.
-
Context Select this option to display numerals according to the language of the surrounding text.
-
System Select this option to display numerals according to the regional settings in Control Panel.
Month names
This option determines how Western (Gregorian) month names appear in Arabic text. Select an item from the list.
This option is available only if an Arabic language is enabled for editing text.
-
Arabic Select this option to use Arabic native month names.
-
English transliterated Select this option to spell out Western (Gregorian) month names in English pronunciation by using Arabic text.
-
French transliterated Select this option to spell out Western (Gregorian) month names in French pronunciation by using Arabic text.
Diacritics
This option displays diacritics in the document.
This option is available only if a language that uses diacritics is enabled for editing text.
-
Use this color for diacritics Select this option to specify a color for display of all diacritics, regardless of the color of the diacritics in the original document. In the list, select a color.
Use draft font in Draft and Outline views
On computers with extremely limited resources, select this option to speed the screen display of documents.
-
Name
Select the font to use for drafts of your documents. This option is available only when you select the Use draft font in Draft and Outline views check box. -
Size
Select the point size of the draft font. This option is available only when you select the Use draft font in Draft and Outline views check box.
Document view
This option specifies the text direction for new documents.
This option is available only if a right-to-left language is enabled for editing text.
-
Right-to-left Select this option to lay out documents right to left. For example, paragraphs start on the right side of a document with text flowing to the left.
-
Left-to-right Select this option to lay out documents left to right. For example, paragraphs start on the left side of a document with text flowing to the right.
Font Substitution
Click this to open the Font Substitution dialog box. Use this option to determine whether the active document uses any fonts that are not available on your computer. If the document uses fonts that are not on your computer, you can use the dialog box to specify a substitute font.
Top of Page
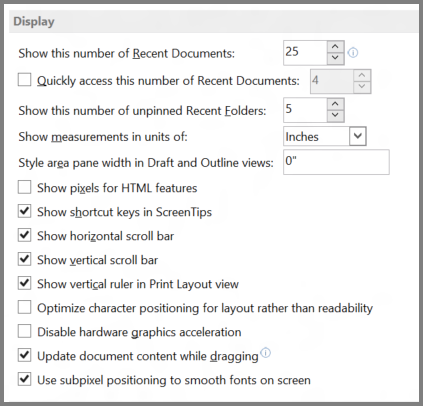
Display
Show this number of Recent Documents
Enter the number of items, between 1 and 50, to display in the Recent Documents list.
Note: Only the first nine files in the list are assigned an accelerator key. You can open these documents by pressing 1 through 9 after you press ALT+F.
Show measurements in units of
Select the measurement unit that you want to use for the horizontal ruler and for measurements that you type in dialog boxes.
Style area pane width in Draft and Outline views
Type a positive decimal, such as 0.5, in the box to open the style area, which displays the names of the styles applied to text. To close the style area, enter 0.
Show measurements in width of characters
Select this option to use character width as the basis for aligning text, such as in the vertical and horizontal rulers.
This option is available only if an East Asian language is enabled for editing text.
Show pixels for HTML features
Select this option to use pixels as the default unit of measurement in dialog boxes that are related to HTML features.
Show all windows in the Taskbar
Select this option to display an icon on the Microsoft Windows taskbar for each open window in a Microsoft Office program. Clearing this check box places a single icon for each open program on the taskbar.
Show shortcut keys in ScreenTips
Select this option to display keyboard shortcuts in ScreenTips.
Show horizontal scroll bar
Select this option to display the horizontal scrollbar at the bottom of the document window.
Show vertical scroll bar
Select this option to display the vertical scroll bar at the side of the document window.
-
Left scroll bar Select this option to place the vertical scroll bar on the left side of the document window. Use this option when working with documents that predominantly use right-to-left text.
This option is available only if a right-to-left language is enabled for editing text.
Show vertical ruler in Print Layout view
Select this option to display the vertical ruler at the side of the document window. Make sure that you also select the Ruler check box in the Show/Hide group on the View tab of the Ribbon, a component of the Microsoft Office Fluent user interface.
-
Show right ruler in Print Layout view Select this option to display the vertical ruler at the right side of the document window.
This option is available only if a right-to-left language is enabled for editing text.
Optimize character positioning for layout rather than readability
Select this option to display character positioning accurately, as it will appear in the printed document with respect to blocks of text. Spacing between characters may be distorted when this option is turned on. For best readability on the screen, turn this option off.
Disable hardware graphics acceleration Select this option to stop using the computer’s graphics card for rendering three-dimensional shapes, shape effects, and text effects.
Top of Page
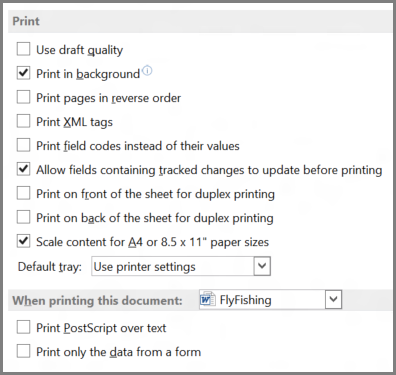
Use draft quality
Select this option to print the document with minimal formatting, which may speed the printing process. Many printers do not support this function.
Print in background
Select this option to print documents in the background, which allows you to continue to work while you print. This option requires more available memory to allow you to work and print at the same time. If working with your document while printing becomes unacceptably slow, turn this option off.
Print pages in reverse order
Select this option to print pages in reverse order, beginning with the last page in your document. Do not use this option when you print envelopes.
Print XML tags
Select this option to print the XML tags for the XML elements that are applied to an XML document. You must have a Schema attached to the document, and you must apply elements that are provided by the attached Schema. The tags appear in the printed document.
Print field codes instead of their values
Select this option to print field codes instead of field results — for example, { TIME @»MMMM, d, YYYY» } instead of February 4, 2008.
Allow fields containing tracked changes to update before printing Select this option to ensure that any field codes that were inserted while tracked changes were turned on will print showing the changed text.
Print on front of the sheet for duplex printing
Select this option to print the front of each sheet when printing on a printer that does not have duplex capability. Pages will print in reverse order so that when you flip the stack to print on the back, the pages will print in the proper order.
Print on back of the sheet for duplex printing
Select this option to print the back of each sheet when printing on a printer that does not have duplex capability. Pages will print in ascending order so that they correspond to a stack of pages that were printed on the front in reverse order.
Scale content for A4 or 8.5 x 11″ paper sizes
Select this option to automatically adjust documents that are designed for 8.5-by-11-inch paper to fit A4 paper and to adjust documents that are designed for A4 paper to fit 8.5-by-11-inch paper. This option takes affect only if the A4 or 8.5-by-11-inch paper in the printer does not match the paper size that is set on the Page Layout tab of Word. This option affects printouts only; it does not affect formatting.
Default tray
This option displays the printer tray that is used by default. To follow the settings in your printer, select Use printer settings. To choose a particular tray, select it in the list. The choices in the list depend on your printer’s configuration.
Top of Page
When printing this document
When printing this document
Select the document that these printing settings apply to. In the list, select the name of a document that is already open, or select All New Documents to make the setting apply to all documents that you will create.
Print PostScript over text
Select this option to print PostScript code when a document contains PRINT fields.
Print only the data from a form
Select this option to print the data that is entered into an online form without printing the form.
Top of Page
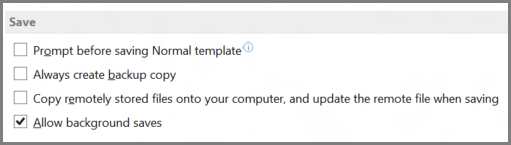
Save
Prompt before saving Normal template
Select this option to display, when you close Word, a message that asks if you want to save any changes that were made to the default template. Because changes to the default template will affect any new documents that you create, you may want to be alerted when the template has changed. Clearing this check box automatically saves changes without prompting you.
Always create backup copy
Select this option to create a backup copy of a document each time you save the document. Each backup copy replaces the previous backup copy. Word adds the phrase «Backup of» to the file name and applies the file extension .wbk to all backup copies. The backup copies are saved in the same folder as your original document.
Copy remotely stored files onto your computer, and update the remote file when saving
Select this option to temporarily store a local copy of a file that you store on a network or removable drive. When you save the local copy, Word saves your changes to the original copy. If the original file is not available, Word prompts you to save the file in another location to avoid data loss.
Allow background saves
Select this option to save your document while you work. A progress meter appears in the status bar when Word performs a background save.
Top of Page
Preserve fidelity when sharing this document
Preserve fidelity when sharing this document
Select the document that these settings apply to. In the list, select the name of a document that is already open, or select All New Documents to make the setting apply to all documents that you will create.
Save form data as delimited text file
Select this option to save the data that is entered into an online form as a single, tab-delimited text file in plain text format. You can then import the contents of that file into a database.
Embed linguistic data
Select this option to save linguistic data, such as speech and handwritten text.
Top of Page
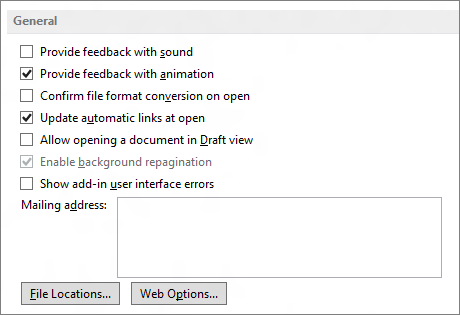
General
Provide feedback with sound
Select this option to add sounds to certain actions or events in Word and other programs in 2007 Microsoft Office system. For example, Word can play a sound when it completes a process. To change the sound that is associated with an event, open the folder for sounds and audio devices in Control Panel. Your computer must have a sound card to play most sounds.
Provide feedback with animation
Select this option to animate the movement of your pointer in Word and the other Office programs. This option also provides animated cursors for actions such as printing, saving, automatic formatting, and find-and-replace operations.
Confirm file format conversion on open
Select this option to choose the file converter that Word uses to open files that were created in another program. Clear this check box if you want Word to select a converter automatically.
Update automatic links at open
Select this option to automatically update any content that is linked to other files each time you open a document.
Allow opening a document in Draft view
Select this option to be able to open a document in Draft view.
Note: To make a document open in Draft view by default, you need to turn on this option and then on the View tab in the Document Views group, click Draft. Make some kind of change to the document, and then save the document.
Enable background repagination
Select this option to repaginate documents automatically as you work. This option is available in Draft and Outline views only. Clearing this check box prevents page numbers from updating (when displayed in the status bar) until you switch to Print Layout view.
Show add-in user interface errors
Select this option to display error messages from programs that customize the user interface. This option is especially useful for authors of software solutions, because it provides information for debugging customizations to the user interface.
Show customer submitted Office.com content Select this option to see templates and images created by customers in addition to the content provided by Microsoft Office.
Mailing address
Type the address that you want Word to use as the default return address for envelopes and letters.
File Locations
Click this to see the default storage location for documents, templates, and other items that you create and use in Word. In the File Locations dialog box, click the item you want to change, and then click Modify to set a new default location.
The default locations for templates and the Startup folder are treated as trusted locations. If you change the location, be sure that the new folder is a secure location.
Web Options
Click this to open the Web Options dialog box. Use this dialog box to set options for using Word to create Web pages.
Top of Page
Compatibility
English Word 6.0/95 documents
This option specifies your preferences for converting text. Earlier versions of Word were sometimes used in conjunction with third-party programs designed to support Chinese or Korean on English versions of Microsoft Windows. If the use of these add-ins results in incorrect text display in a document you are trying to open, you can use these options to convert the document so that text is displayed correctly. After successfully opening the file, be sure to reset this option to Open normally; otherwise, correctly stored files may be opened incorrectly.
This option is available only if an East Asian language is enabled for editing text.
-
Contain Asian text Select this option if you know the document contains East Asian text, so that the text will display correctly.
-
Open normally Select this option after the file has been opened to display the text correctly.
-
Automatically detect Asian text Select this option if you are not sure whether the document contains East Asian text. Word attempts to detect East Asian text and display it correctly.
Top of Page
Compatibility options for
Compatibility options for
Select the document that these settings apply to. In the list, select the name of a document that is already open, or select All New Documents to make the setting apply to all documents that you will create.
Lay out this document as if created in
Select the word-processing program that you expect to be used for opening the document. The settings in the list of Layout options change according to the word-processing program that you select. To specify your own configuration of settings, select Custom.
Layout options
Lists options for laying out the document. Select the check boxes for the options you want.
Top of Page
Important:
Office 2007 is no longer supported. Upgrade to Microsoft 365 to work anywhere from any device and continue to receive support.
Upgrade now
To choose your advanced Word options, click the Microsoft Office Button  > Word Options, and on the left pane, select Advanced.
In this article
-
Editing options
-
Cut, copy, and paste
-
Show document content
-
Display
-
Print
-
When printing this document
-
Save
-
Preserve fidelity when sharing this document
-
General
-
Compatibility
-
Compatibility options for
Editing options
Typing replaces selected text
Select this option to delete the selected text when you begin to type. If you clear this check box, Microsoft Office Word inserts new text in front of the selected text and does not delete the selected text.
When selecting, automatically select entire word
Select this option to select entire words when you select part of one word and then part of the next word. Turning this option on also causes Word to select a word and the space that follows it when you double-click a word.
Allow text to be dragged and dropped
Select this option to be able to move or copy selected text by dragging it. To move text, select the text, and then drag it to a new location. To copy text, select the text, and then hold down CTRL while you drag the selection to its new location.
Use CTRL + Click to follow hyperlink
Select this option to make it easier to edit the text of hyperlinks. When this option is turned on, you must press CTRL while you click the link in order to follow the link. When this option is turned off, clicking the link causes Word to go to the destination of the link, which makes it more difficult to edit the text of the link.
Automatically create drawing canvas when inserting AutoShapes
Select this option to place a drawing canvas around drawing objects or ink drawings and writing when you insert them into your document. A drawing canvas helps you to arrange drawing objects and pictures, and to move them as a unit.
Use smart paragraph selection
Select this option to select the paragraph mark when you select a whole paragraph. If you include the paragraph mark when you cut and paste a paragraph, you don’t leave a blank paragraph, and your formatting automatically stays with the paragraph.
Use smart cursoring
Select this option to specify that the cursor moves as you scroll up or down. When you press the LEFT ARROW, RIGHT ARROW, UP ARROW, or DOWN ARROW key after you scroll, the cursor responds at the page currently in view, not at its previous position.
Use the Insert key to control overtype mode
Select this option to turn Overtype mode on or off by pressing INSERT.
-
Use overtype mode
Select this option to replace existing text as you type, one character at a time. If Use the Insert key to control overtype mode is selected, you can turn this option on or off by pressing INSERT.
Add double quote for Hebrew alphabet numbering
Select this option to add double quotation marks («) to numbering.
This option is available only if Hebrew is enabled for editing text.
Prompt to update style
Select this option to be prompted when you directly modify text to which a style is applied and then you reapply the style to the modified text. When prompted, you can either update the style based on recent changes or reapply the formatting of the style.
Use Normal style for bulleted or numbered lists
Select this option to base list styles on the Normal paragraph style instead of the Paragraph List style.
Keep track of formatting
Select this option to keep track of your formatting as you type. This helps you to easily apply the same formatting elsewhere. This option must be turned on before you can use the Select Text with Similar Formatting command on the shortcut menu that appears if you right-click selected text. To display a list of the formatting that you used, click the Options command on the Style pane, and then select the Paragraph level formatting, Font formatting, and Bullet and numbering formatting check boxes.
-
Mark formatting inconsistencies
Select this option to mark formatting with a wavy blue underline when it is similar to, but not exactly the same as, other formatting in your documents. To use this option, you must also select the Keep track of formatting check box.
Enable click and type
Select this option to insert text, graphics, tables, or other items in a blank area of a document by double-clicking in the blank area. The Click and Type feature automatically inserts paragraphs and applies the alignment necessary to position the item where you double-clicked. This feature is available only in Print Layout view and Web Layout view.
-
Default paragraph style Select the style that is applied to text when you use click and type.
Cursor movement
This option specifies the direction in which the cursor moves when you press the arrow keys on your keyboard.
This option is available only if a right-to-left language is enabled for editing text.
-
Logical Select this option to move the cursor according to the direction of the text encountered. For example, when you are using the arrow keys to move through Arabic and then English text in the same sentence, the cursor moves from right to left through the Arabic text and then starts at the leftmost character in the English word and progresses from left to right.
-
Visual Select this option to move the cursor to the next visually adjacent character. For example, when you are using the arrow keys to move from right to left through Arabic and then English text in the same sentence, the arrow key moves from right to left regardless of the direction of the text.
Cursor visual selection
This option specifies how text is selected as you extend the selection.
This option is available only if a right-to-left language is enabled for editing text.
-
Block Select this option to wrap text from line to line as you select downward, with all selected lines being the same width.
-
Continuous Select this option to wrap text from line to line as you select downward and vary the width of the final line of the block.
Use sequence checking
Select this option to validate whether a newly typed character occurs in the correct sequence to be used as a tone mark, diacritic, or vowel to be placed above, below, in front of, or behind the consonant it goes with.
This option is available only if a complex script language is enabled for editing text.
-
Type and replace Select this option to replace the previously typed character with the newly typed character if the two characters cannot coexist in the same text cluster.
Asian fonts also apply to Latin text
Select this option to change Latin characters to the selected Asian font when you apply the Asian font to selected text. Clear this check box if you want Latin characters to remain in the Latin font while you apply the Asian font to the rest of the document.
This option is available only if an East Asian language is enabled for editing text.
Automatically switch keyboard to match language of surrounding text
Select this option to change the keyboard language and font based on the language of the text where the cursor is placed. If you clear this option, only the font is changed.
This option is available only if an East Asian language is enabled for editing text and an Input Method Editor for typing East Asian characters is installed.
Use legacy IME mode to enable Overtype mode
Select this option to allow the characters that you type to replace existing characters (overtype) while you are using an Input Method Editor (IME) on a computer that is running the Microsoft Windows XP operating system. If Word is installed on a computer that is running Windows Vista, this option does not appear because Overtype mode is supported automatically.
This option is available only if an East Asian language is enabled for editing text, and an Input Method Editor for typing East Asian characters is installed.
IME Control Active
Select this option to start an Input Method Editor (IME). Clear this check box to stop an IME.
This option is available only if an East Asian language is enabled for editing text and an Input Method Editor for typing East Asian characters is installed.
IME TrueInline
Select this option to use a natural language interface on IME-enabled computers.
This option is available only if an East Asian language is enabled for editing text and an Input Method Editor for typing East Asian characters is installed.
IME Settings
Click to open the Properties for IME Name dialog box. Use this dialog box to set or change the text, keyboard, character conversion, and other options for the active IME.
This option is available only if an East Asian language is enabled for editing text and an Input Method Editor for typing East Asian characters is installed.
Top of Page
Cut, copy, and paste
Pasting within the same document
This option displays the default behavior that occurs when you paste content into the same document from which you copied the content. In the drop-down list, select one of the following:
-
Keep Source Formatting (Default)
This option retains character styles and direct formatting that were applied to the copied text. Direct formatting includes characteristics such as font size, italic, or other formatting that is not included in the paragraph style. -
Match Destination Formatting
This option discards most of the formatting that was applied directly to the copied text, but it retains formatting that is considered emphasis, such as bold and italic, when it is applied to only a portion of the selection. The text takes on the style characteristics of the paragraph where it is pasted. The text also takes on any direct formatting or character style properties of text that immediately precedes the cursor when the text is pasted. -
Keep Text Only
This option discards all formatting and nontext elements, such as pictures or tables. The text takes on the style characteristics of the paragraph where it is pasted and takes on any direct formatting or character style properties of text that immediately precedes the cursor when the text is pasted. Graphical elements are discarded, and tables are converted to a series of paragraphs.
Pasting between documents
This option displays the default behavior that occurs when you paste content that was copied from another document in Word. In the drop-down list, select one of the following:
-
Keep Source Formatting (Default)
This option retains formatting that was applied to the copied text. Any style definition that is associated with the copied text is copied to the destination document. -
Match Destination Formatting
This option discards most formatting that was applied directly to the copied text, but it retains formatting that is considered emphasis, such as bold and italic, when it is applied to only a portion of the selection. The text takes on the style characteristics of the paragraph where it is pasted. The text also takes on any direct formatting or character style properties of text that immediately precedes the cursor when the text is pasted. -
Keep Text Only
This option discards all formatting and nontext elements, such as pictures or tables. The text takes on the style characteristics of the paragraph where it is pasted and takes on any direct formatting or character style properties of text that immediately precedes the cursor when the text is pasted. Graphical elements are discarded, and tables are converted to a series of paragraphs.
Pasting between documents when style definitions conflict
This option displays the default behavior that occurs when you paste content that was copied from another document in Word, and the style that is assigned to the copied text is defined differently in the document where the text is being pasted. In the drop-down list, select one of the following:
-
Keep Source Formatting
This option retains the look of the copied text by assigning the Normal style to the pasted text and applying direct formatting. Direct formatting includes characteristics such as font size, italic, or other formatting to mimic the style definition of the copied text. -
Use Destination Styles (Default)
This option retains the style name that is associated with the copied text, but it uses the style definition of the document where the text is being pasted. For example, you copy Heading 1 text from one document to another. In one document, Heading 1 is defined as Arial bold, 14-point, and in the document where you are pasting the text, Heading 1 is defined as Cambria bold, 16-point. When you use the Use Destination Styles option, the pasted text uses Heading 1 style, Cambria bold, 16-point. -
Match Destination Formatting
This option discards the style definition and most formatting that was applied directly to the copied text, but it retains formatting that is considered emphasis, such as bold and italic, when it is applied to only a portion of the selection. The text takes on the style definition in the document where the text is being pasted. -
Keep Text Only
This option discards all formatting and nontext elements, such as pictures or tables. The text takes on the style characteristics of the paragraph where it is pasted and takes on any direct formatting or character style properties of text that immediately precedes the cursor when the text is pasted. Graphical elements are discarded, and tables are converted to a series of paragraphs.
Pasting from other programs
This option displays the default behavior that occurs when you paste content that was copied from another program. In the drop-down list, select one of the following:
-
Keep Source Formatting (Default)
This option retains the formatting of the copied text. -
Match Destination Formatting
This option discards most formatting that was applied directly to the copied text, but it retains formatting that is considered emphasis, such as bold and italic, when it is applied to only a portion of the selection. The text takes on the style characteristics of the paragraph where it is pasted. The text also takes on any direct formatting characteristics of text that immediately precedes the cursor when the text is pasted. -
Keep Text Only
This option discards all formatting and nontext elements, such as pictures or tables. The text takes on the style characteristics of the paragraph where it is pasted and takes on any direct formatting or character style properties of text that immediately precedes the cursor when the text is pasted. Graphical elements are discarded, and tables are converted to a series of paragraphs.
Insert/paste pictures as
This option displays how Word inserts pictures relative to the text in your document. You can insert images inline with text, allow images to move with text, or wrap text around, in front of, or behind an image. In the drop-down list, select one of the following:
-
In line with text
This option inserts the graphic in a paragraph as if it were text. This option is used by default. The graphic moves as you add or delete text. You can drag the graphic to reposition it the same way that you drag text. -
Square
This option wraps the text around all sides of a square around the graphic. The graphic does not move as you add or delete text, but you can drag the graphic to reposition it. -
Tight
This option wraps the text around the graphic in an irregular shape around the actual image. The graphic does not move as you add or delete text, but you can drag the graphic to reposition it. -
Behind text
This option inserts the graphic so that the graphic floats on its own layer behind the text. There is no border around the graphic. The graphic does not move as you add or delete text, but you can drag the graphic to reposition it. -
In front of text
This option inserts the graphic so that the graphic floats on its own layer in front of the text. There is no border around the graphic. The graphic does not move as you add or delete text, but you can drag the graphic to reposition it. -
Through
This option wraps the text around the graphic, including filling the space created by a concave shape, such as a crescent moon. The graphic does not move as you add or delete text, but you can drag the graphic to reposition it. -
Top and bottom
This option prevents text from wrapping on the sides of the graphic. The graphic does not move as you add or delete text, but you can drag the graphic to reposition it.
Keep bullets and numbers when pasting text with Keep Text Only option
Select this option to convert numbering and bullets into text symbols.
Use the Insert key for paste
Select this option to use the INSERT key to insert the contents of the Office Clipboard into a document.
Show Paste Options buttons
Select this option to display the Paste Options button when you paste content. You can use the Paste Options button to override or modify the settings you make in this section of the Word Options dialog box.
Use smart cut and paste
Select this option to automatically adjust formatting as you paste text. After you select this check box, you can click Settings to set additional options for pasting.
-
Settings
Click this to open the Settings dialog box. Use this dialog box to specify default behavior when merging, cutting, and pasting text. You can override default behavior by using the Paste Options button that appears when you paste content from the Clipboard into your document. This button is available only when the Use smart cut and paste option is turned on.-
Use default options for
Click an item in the list to pre-select a configuration of options in the dialog box. To select your own configuration of options, click Custom in this list. -
Adjust sentence and word spacing automatically
Select this option to remove extra spaces when deleting text or add necessary spaces when pasting text from the clipboard. -
Adjust paragraph spacing on paste
Select this option to prevent creating empty paragraphs and to prevent inconsistent paragraph spacing. -
Adjust table formatting and alignment on paste
Select this option to control the formatting and alignment of tables. When this option is turned on, single cells are pasted as text, table portions are pasted as rows into an existing table (rather than as a nested table), and when you add a table to an existing table, the pasted table is adjusted to match the existing table. -
Smart style behavior
Selecting this option has no effect. To fine-tune the behavior of styles when pasting content, use the Pasting options in the Cut, copy, and paste section of the Advanced options. -
Merge formatting when pasting from Microsoft Office PowerPoint
Select this option to control the results when you paste content from a PowerPoint presentation. When this option is turned on, the formatting of the surrounding text or table is applied to the pasted text, the most recently used bullet, number, or list style is applied to the pasted list, and the look of items such as tables, hyperlinks, images, OLE objects, and shapes is preserved from the source in PowerPoint. -
Adjust formatting when pasting from Microsoft Office Excel
Select this option to control the results when pasting data from Excel. When this option is turned on, pasted data is placed in a table, and charts are pasted as pictures rather than as OLE objects. -
Merge pasted lists with surrounding lists
Select this option to format list items to conform to the surrounding list when you are pasting the items into a list.
-
Top of Page
Show document content
Show background colors and images in Print Layout view
Select this option to display background colors and images.
Show text wrapped within the document window
Select this option to wrap text to the document window, so that it is easier to read on the screen.
Show picture placeholders
Select this option to display an empty box in place of each picture in your documents. This option speeds the process of scrolling through a document that contains a large number of pictures.
Show drawings and text boxes on screen
Select this option to display objects that are created with the Word drawing tools in Print Layout view or Web Layout view. Clear this check box to hide drawings and possibly speed the display of documents that contain many drawings. Drawings will be printed even if you clear this check box.
Show text animation
Select this option to display text animations on your screen. Clear the check box to see how the text will look when printed.
Use this option when viewing animated text in documents that were created in a version of Word earlier than Word 2007. The current version of Word no longer provides the ability to create animated text.
Show control characters
Select this option to display right-to-left control characters.
This option is available only if a right-to-left language is enabled for editing text.
Show bookmarks
Select this option to display bookmarks on the screen. If you assign a bookmark to an item, the bookmarked item appears in brackets ([…]). If you assign a bookmark to a location, the bookmark appears as an I-beam. The brackets and the I-beam do not appear in printed documents.
Show smart tags
Select this option to display a purple dotted underline beneath text that is recognized as a smart tag.
Show text boundaries
Select this option to display dotted lines around text margins, columns, and paragraphs. The boundaries are for layout purposes; they do not appear in printed documents.
Show crop marks
Select this option to display the corners of the margins.
Show field codes instead of their values
Select this option to display field codes instead of field results in your documents. For example, you may see { TIME @»MMMM, d, YYYY» } instead of February 4, 2008. Clear this check box to view field results.
Regardless of this setting, you can always switch between displaying field codes and field code results by pressing ALT+F9.
Field shading
This option displays whether and when fields are shaded. In the list, select Always or When Selected to shade your fields. Shading fields makes them easy to identify. The shading appears on the screen but not in the printed document.
Numeral
This option determines how numerals will appear in documents. Select an item from the list.
This option is available only if an Arabic language is enabled for editing text.
-
Arabic Select this option to display numerals in a format familiar to speakers of English and other European languages.
-
Hindi Select this option to display numerals in a format familiar to speakers of Arabic and Hindi.
-
Context Select this option to display numerals according to the language of the surrounding text.
-
System Select this option to display numerals according to the regional settings in Control Panel.
Month names
This option determines how Western (Gregorian) month names appear in Arabic text. Select an item from the list.
This option is available only if an Arabic language is enabled for editing text.
-
Arabic Select this option to use Arabic native month names.
-
English transliterated Select this option to spell out Western (Gregorian) month names in English pronunciation by using Arabic text.
-
French transliterated Select this option to spell out Western (Gregorian) month names in French pronunciation by using Arabic text.
Diacritics
This option displays diacritics in the document.
This option is available only if a language that uses diacritics is enabled for editing text.
-
Use this color for diacritics Select this option to specify a color for display of all diacritics, regardless of the color of the diacritics in the original document. In the list, select a color.
Use draft font in Draft and Outline views
On computers with extremely limited resources, select this option to speed the screen display of documents.
-
Name
Select the font to use for drafts of your documents. This option is available only when you select the Use draft font in Draft and Outline views check box. -
Size
Select the point size of the draft font. This option is available only when you select the Use draft font in Draft and Outline views check box.
Document view
This option specifies the text direction for new documents.
This option is available only if a right-to-left language is enabled for editing text.
-
Right-to-left Select this option to lay out documents right to left. For example, paragraphs start on the right side of a document with text flowing to the left.
-
Left-to-right Select this option to lay out documents left to right. For example, paragraphs start on the left side of a document with text flowing to the right.
Font Substitution
Click this to open the Font Substitution dialog box. Use this option to determine whether the active document uses any fonts that are not available on your computer. If the document uses fonts that are not on your computer, you can use the dialog box to specify a substitute font.
Top of Page
Display
Show this number of Recent Documents
Enter the number of items, between 1 and 50, to display in the Recent Documents list.
Only the first nine files in the list are assigned an accelerator key. You can open these documents by pressing 1 through 9 after you press ALT+F.
Show measurements in units of
Select the measurement unit that you want to use for the horizontal ruler and for measurements that you type in dialog boxes.
Style area pane width in Draft and Outline views
Type a positive decimal, such as 0.5, in the box to open the style area, which displays the names of the styles applied to text. To close the style area, enter 0.
Show measurements in width of characters
Select this option to use character width as the basis for aligning text, such as in the vertical and horizontal rulers.
This option is available only if an East Asian language is enabled for editing text.
Show pixels for HTML features
Select this option to use pixels as the default unit of measurement in dialog boxes that are related to HTML features.
Show all windows in the Taskbar
Select this option to display an icon on the Microsoft Windows taskbar for each open window in a Microsoft Office program. Clearing this check box places a single icon for each open program on the taskbar.
Show shortcut keys in ScreenTips
Select this option to display keyboard shortcuts in ScreenTips.
Show horizontal scroll bar
Select this option to display the horizontal scrollbar at the bottom of the document window.
Show vertical scroll bar
Select this option to display the vertical scroll bar at the side of the document window.
-
Left scroll bar Select this option to place the vertical scroll bar on the left side of the document window. Use this option when working with documents that predominantly use right-to-left text.
This option is available only if a right-to-left language is enabled for editing text.
Show vertical ruler in Print Layout view
Select this option to display the vertical ruler at the side of the document window. Make sure that you also select the Ruler check box in the Show/Hide group on the View tab of the Ribbon, a component of the Microsoft Office Fluent user interface.
-
Show right ruler in Print Layout view Select this option to display the vertical ruler at the right side of the document window.
This option is available only if a right-to-left language is enabled for editing text.
Optimize character positioning for layout rather than readability
Select this option to display character positioning accurately, as it will appear in the printed document with respect to blocks of text. Spacing between characters may be distorted when this option is turned on. For best readability on the screen, turn this option off.
Top of Page
Use draft quality
Select this option to print the document with minimal formatting, which may speed the printing process. Many printers do not support this function.
Print in background
Select this option to print documents in the background, which allows you to continue to work while you print. This option requires more available memory to allow you to work and print at the same time. If working with your document while printing becomes unacceptably slow, turn this option off.
Print pages in reverse order
Select this option to print pages in reverse order, beginning with the last page in your document. Do not use this option when you print envelopes.
Print XML tags
Select this option to print the XML tags for the XML elements that are applied to an XML document. You must have a Schema attached to the document, and you must apply elements that are provided by the attached Schema. The tags appear in the printed document.
Print field codes instead of their values
Select this option to print field codes instead of field results — for example, { TIME @»MMMM, d, YYYY» } instead of February 4, 2008.
Print on front of the sheet for duplex printing
Select this option to print the front of each sheet when printing on a printer that does not have duplex capability. Pages will print in reverse order so that when you flip the stack to print on the back, the pages will print in the proper order.
Print on back of the sheet for duplex printing
Select this option to print the back of each sheet when printing on a printer that does not have duplex capability. Pages will print in ascending order so that they correspond to a stack of pages that were printed on the front in reverse order.
Scale content for A4 or 8.5 x 11″ paper sizes
Select this option to automatically adjust documents that are designed for 8.5-by-11-inch paper to fit A4 paper and to adjust documents that are designed for A4 paper to fit 8.5-by-11-inch paper. This option takes affect only if the A4 or 8.5-by-11-inch paper in the printer does not match the paper size that is set on the Page Layout tab of Word. This option affects printouts only; it does not affect formatting.
Default tray
This option displays the printer tray that is used by default. To follow the settings in your printer, select Use printer settings. To choose a particular tray, select it in the list. The choices in the list depend on your printer’s configuration.
Top of Page
When printing this document
When printing this document
Select the document that these printing settings apply to. In the list, select the name of a document that is already open, or select All New Documents to make the setting apply to all documents that you will create.
Print PostScript over text
Select this option to print PostScript code when a document contains PRINT fields.
Print only the data from a form
Select this option to print the data that is entered into an online form without printing the form.
Top of Page
Save
Prompt before saving Normal template
Select this option to display, when you close Word, a message that asks if you want to save any changes that were made to the default template. Because changes to the default template will affect any new documents that you create, you may want to be alerted when the template has changed. Clearing this check box automatically saves changes without prompting you.
Always create backup copy
Select this option to create a backup copy of a document each time you save the document. Each backup copy replaces the previous backup copy. Word adds the phrase «Backup of» to the file name and applies the file extension .wbk to all backup copies. The backup copies are saved in the same folder as your original document.
Copy remotely stored files onto your computer, and update the remote file when saving
Select this option to temporarily store a local copy of a file that you store on a network or removable drive. When you save the local copy, Word saves your changes to the original copy. If the original file is not available, Word prompts you to save the file in another location to avoid data loss.
Allow background saves
Select this option to save your document while you work. A progress meter appears in the status bar when Word performs a background save.
Top of Page
Preserve fidelity when sharing this document
Preserve fidelity when sharing this document
Select the document that these settings apply to. In the list, select the name of a document that is already open, or select All New Documents to make the setting apply to all documents that you will create.
Save smart tags as XML properties in Web pages
Select this option to save all of the smart tags in a document as Extensible Markup Language (XML) within a Hypertext Markup Language (HTML) file.
Save form data as delimited text file
Select this option to save the data that is entered into an online form as a single, tab-delimited text file in plain text format. You can then import the contents of that file into a database.
Embed linguistic data
Select this option to save linguistic data, such as speech and handwritten text.
Embed smart tags
Select this option to save smart tags as part of your document.
Top of Page
General
Provide feedback with sound
Select this option to add sounds to certain actions or events in Word and other programs in 2007 Microsoft Office system. For example, Word can play a sound when it completes a process. To change the sound that is associated with an event, open the folder for sounds and audio devices in Control Panel. Your computer must have a sound card to play most sounds.
Provide feedback with animation
Select this option to animate the movement of your pointer in Word and the other Office programs. This option also provides animated cursors for actions such as printing, saving, automatic formatting, and find-and-replace operations.
Confirm file format conversion on open
Select this option to choose the file converter that Word uses to open files that were created in another program. Clear this check box if you want Word to select a converter automatically.
Update automatic links at open
Select this option to automatically update any content that is linked to other files each time you open a document.
Allow opening a document in Draft view
Select this option to be able to open a document in Draft view.
To make a document open in Draft view by default, you need to turn on this option and then on the View tab in the Document Views group, click Draft. Make some kind of change to the document, and then save the document.
Allow background open of Web pages
Select this option to open Web page documents in the background while you work. A progress meter appears in the status bar when Word opens the page in the background.
Enable background repagination
Select this option to repaginate documents automatically as you work. This option is available in Draft and Outline views only. Clearing this check box prevents page numbers from updating (when displayed in the status bar) until you switch to Print Layout view.
Show add-in user interface errors
Select this option to display error messages from programs that customize the user interface. This option is especially useful for authors of software solutions, because it provides information for debugging customizations to the user interface.
Mailing address
Type the address that you want Word to use as the default return address for envelopes and letters.
File Locations
Click this to see the default storage location for documents, templates, and other items that you create and use in Word. In the File Locations dialog box, click the item you want to change, and then click Modify to set a new default location.
The default locations for templates and the Startup folder are treated as trusted locations. If you change the location, be sure that the new folder is a secure location.
Web Options
Click this to open the Web Options dialog box. Use this dialog box to set options for using Word to create Web pages.
Service Options
Click this to open the Service Options dialog box. Use this dialog box to set options for shared workspaces.
Top of Page
Compatibility
English Word 6.0/95 documents
This option specifies your preferences for converting text. Earlier versions of Word were sometimes used in conjunction with third-party programs designed to support Chinese or Korean on English versions of Microsoft Windows. If the use of these add-ins results in incorrect text display in a document you are trying to open, you can use these options to convert the document so that text is displayed correctly. After successfully opening the file, be sure to reset this option to Open normally; otherwise, correctly stored files may be opened incorrectly.
This option is available only if an East Asian language is enabled for editing text.
-
Contain Asian text Select this option if you know the document contains East Asian text, so that the text will display correctly.
-
Open normally Select this option after the file has been opened to display the text correctly.
-
Automatically detect Asian text Select this option if you are not sure whether the document contains East Asian text. Word attempts to detect East Asian text and display it correctly.
Top of Page
Compatibility options for
Compatibility options for
Select the document that these settings apply to. In the list, select the name of a document that is already open, or select All New Documents to make the setting apply to all documents that you will create.
Lay out this document as if created in
Select the word-processing program that you expect to be used for opening the document. The settings in the list of Layout options change according to the word-processing program that you select. To specify your own configuration of settings, select Custom.
Layout options
Lists options for laying out the document. Select the check boxes for the options you want.
Top of Page
Need more help?
Want more options?
Explore subscription benefits, browse training courses, learn how to secure your device, and more.
Communities help you ask and answer questions, give feedback, and hear from experts with rich knowledge.
Follow these tips for drafting faster in Microsoft Word using styles, templates and the Quick Access toolbar.
Do you spend more time than you’d like drafting documents? If so, you’re not alone. With these three simple tips, you can shave hours off your document drafting process.
Table of contents
- 1. Control Your Formatting With Styles
- 2. Draft From Templates
- 3. Work from the Quick Access Toolbar
- Get All the Microsoft Word Tips
1. Control Your Formatting With Styles
Did you know that Word uses Styles whether you want it to or not? That’s right. Word is using styles without your knowledge or consent. Not only that, but Word’s use of styles probably drives you a little crazy on occasion. If you’ve ever had a random font appear in your document, you have styles to thank.
The issue isn’t that styles are broken; it’s that not using them intentionally causes problems. Styles are such an excellent tool for formatting your documents that Microsoft word assumes you’re going to use them to control your document’s formatting. When you don’t, things start to get a little wonky.
Using styles isn’t hard once you know how. Styles can save you a significant amount of time when it comes to formatting and will ensure that your documents are formatted consistently throughout. Who doesn’t want that?
The key is modifying a document’s existing styles to meet your needs or creating new styles that do. Every Word document has more than 200 styles built into it. You read that right — over 200 styles in every Word document. Most of the time, it’s easiest to modify one of those pre-existing styles. Start with the Normal style; it contains your default formatting. Then modify the heading and body styles to meet your needs.
Related: “Resetting Default Heading and Body Styles in Microsoft Word.”
2. Draft From Templates
You need to draft a document for a new client. What do you do? If you dig into your files, find a document you drafted last month for a similar client and “save as” a new document, you are opening the door to several potential problems. For one, it’s too easy to leave the wrong name or pronoun in the document accidentally. Further, it’s easy to forget things you might have modified for just that client — resulting in a document that isn’t your best work for the client at hand.
The good news is it’s faster and easier to draft documents from templates. A template is a document that includes all of your boilerplate language and commonly used optional provisions. Text that changes, like client names, is marked in a way that makes it easy to find and replace — such as placing it inside brackets.
When creating a template, save it as a “.dotx” file extension (a template) rather than a “.docx” (a document). The difference is when you double-click on the file to open it. When you double-click on a document, the document opens and it’s easy to make edits and override the prior version. When you double-click on a template, a new document opens. The new document contains the same text and formatting as the template, but you can’t accidentally override the template with the save button. When you click save the first time, it’ll prompt you to save it as a new document. This can save you a lot of heartache from accidentally saving over your template when you draft a document for a client.
Related: “Using Microsoft Word Templates to Create Model Documents That Save Time and Improve Accuracy”
The ribbon interface works great if you’re formatting a document with styles or using basic formatting tools. It quickly falls down, though, if you’re using some of the most powerful formatting settings, working with sections, or using cross references. Switching back and forth between ribbons or opening up the font and paragraph formatting dialogs can get irritating fast.
That’s where the Quick Access Toolbar can help. When you click on a different tab in Word, the ribbon changes, but the Quick Access Toolbar stays the same. Customize the Quick Access Toolbar with the tools you use most often, and you’ll always have one-click access to them.
Add tools you can’t find on the home ribbon to minimize how often you need to switch ribbons or dive into the formatting dialogs. You’ll save yourself time and frustration.
Get All the Microsoft Word Tips
Want to learn more about drafting faster? Check out Affinity Consulting Group’s Microsoft Word for Legal Professionals, available for download in the Attorney at Work bookstore, or opt for a license for all your attorneys. A version for Mac users is available as well: “Word for Mac for Legal Professionals” – 2019 and Office 365.
About Affinity Consulting Group
Affinity Consulting Group inspires, enables, and empowers legal teams of all sizes to work smarter, from anywhere. The company’s holistic approach incorporates people, process, and technology. Affinity’s passionate, well-connected industry experts work hand in hand with you to help you better understand and optimize your business—from software to growth strategy, and everything in between.
©iStockphoto.com

Revising draft documents in Microsoft Word—especially after a substantive review by the-freelance-editor—can seem daunting, especially at first glance! With stricken text, redlined and highlighted suggestions, queries and notes in the margin to explain and guide changes, your “hilited” (to signify the text is highlighted with suggested changes) file can appear particularly so; the “acpted” (with those changes accepted, to ease readability, but notations remaining in the margin) file is only minimally better. However, if you take the suggestions one by one, any real challenges will be overcome much more easily. We trust the rewards will help you along, too.
A reminder of what you get
As noted on our “samples of work” web page, substantive reviews created by the-freelance-editor consist of these primary parts:
- in the running text, we place redlined changes (including stricken text and new text; note that, besides grammatical corrections, these changes are never mandated but are suggested changes or merely indications that some of the wording might not be saying quite what you intended it to say in the best way possible);
- in the comments sidebar, we place queries, additional notes, possible options for rewording or rephrasing, and ideas for improving organization, logic, and intended meaning—as well as compliments and praise!
In most cases, you will receive this information in two different electronic files. One file will use Microsoft Word’s Track Changes tool to show all suggested deletions, possible replacement text, and thoughts for other “improvements” (this file uses your original file title along with a version number and the abbreviation hilited, for example originalFileName-ver1,hilited). The other file will have nearly all of those options approved (this file uses your original file title along with a version number and the abbreviation acpted, for example originalFileName-ver1,acpted); it looks cleaner and is less overwhelming but does not always convey all the information shared in the hilited file. Both files include an identical series of queries and notes in the comments sidebar.
You will need to decide which file to work with, but I’ve found that most clients end up preferring the hilited file—though it does take some getting used to. This file allows authors to see exact errors alongside suggested changes as distinguished against their original (or previous) version.
Revising a draft document in MS Word: Preparing the app
Before you start revising a document for the first time, you should make the tools you’ll need in Word readily available to you. While each version and installation can be a little different—I’ve never found consistency to be a Microsoft asset—some general assistance follows (you may also find this image helpful):
- Open a new, blank document in your application of Word.
- At the very top of your screen, you should see a “quick access toolbar”—out of the box, this toolbar generally includes a save icon, arrows for undo and redo, maybe a printer icon, and a small down-pointing arrow: click on the arrow and slide your mouse down to More Commands on the drop-down menu to add more quick-access shortcuts.
- In the dialog box that opens, move to the right-hand boxed column and use the drop-down menu in the Choose commands from box to select All Commands; at the same time, make sure the other drop-down menu, in the Customize Quick Access Toolbar is set to For all documents (it should already be selected, but make sure it is). In that boxed column, you should see all of the icons from your current Quick Access Toolbar.
- In the box under All Commands scroll until you locate Accept This Change and click on it with your mouse; select “Add” from the middle column, and the new command should appear in the lineup of your Quick Access Toolbar. Continue scrolling and do the same for Reject Change.
- Note: As you scroll, you’ll see other choices for both “accept…” and “reject…”; feel free to experiment with the others if you wish, but I find their actions do too much at once or otherwise confuse what we’re trying to do. Still, you may find a variation you like better.
- When you’re finished adding to your menu, select OK at the bottom of the large dialog box.
- You should now see the new icons in your personal Quick Access Toolbar. Close the new document.
You can also find these commands in the Review tab, but having them available any time you want them at the top of your screen will make your revising job easier in the long run.
Now, you can open the document you’re ready to work with.
Revising a draft document in MS Word: Doing it!
Step 1 in your revision should be to rename the file so that you can save your updated document. My suggestion for renaming is to keep your original file name and replace my attached identifier, similar to this: instead of originalFileName-ver1,hilited rename your new file originalFileName-ver2. If you want to keep a variety of files with different revisions, you can use the names originalFileName-ver2a, originalFileName-ver2b, or even originalFileName-ver2b1. When you are ready, just send me the file you wish to move forward with. (In case you’re interested in looking ahead, the next review file you get from the-freelance-editor will be named originalFileName-ver2b1,hilited—or whatever your current version number was—to reflect the progress in your project.)
Next, let’s start working through your document.
Redlined “highlighted” text
The term redlining dates to the early days of correcting handwritten or typed text, times when a red pencil (later, a red pen) was used to mark up pages. While I did start my career with a designated red pen, nearly all revisions are now done on computer screens and any color can be used to highlight changes. Regardless, the term has carried forward.
When you receive a reviewed document from the-freelance-editor, you will likely notice redlined changes right off the bat. Remember that these changes are not mandatory but are intended to mark specific points where your document may need some attention. If you agree with my suggested change, simply highlight the relevant text with your cursor, move your mouse to your Quick Access Toolbar, and select the checkmark icon to Accept This Change. If you disagree with a suggested change or want to make your own revision, highlight the relevant text with your cursor, move to your Quick Access Toolbar, and select the X icon to Reject Change. If you are using the Track Changes feature of Word yourself, any revisions you make will show up as a redlined change in a color different from any other user.
Continue working through your document, accepting and rejecting or revising as you wish. When rejecting a change, be sure to consider how to best get your point across to your readers—it is seldom your best option to revert the text back to its original without any sort of revision.
Queries about meaning, intention, and word choice, as well as explanations about errors and reasons for suggestions, along with compliments and thoughts about options all appear as comments in boxed bubbles located in the right margin of many, if not most, reviewed pages you get back from the-freelance-editor. As you work through these boxes, you’ll have two ways of treating them.
- If the information in a box is merely informational, you can delete it when you’re ready by right-clicking inside the comment box and choosing to delete it. (You may also delete the box by right-clicking in the running text highlighted by that box’s shadow.)
- If the text in a box asks a question or if you want to respond to my text for any reason, hover over the comment box or click inside it; doing so will reveal two new options at the bottom of that box: Reply or Resolve. In general, please do not use the resolve option (do so, however, for your own use if you want to mark a box that you’ve considered but want to react to later; then, delete it when you’re done). If you wish to respond to my text, either to explain something or to answer a question, just click on Reply and write your text in the new, connected box that appears.
To create a comment box of your own, venture to the Review tab of your document and select New Comment; an empty box will appear in the margin, with your cursor already located inside it. If you wish to associate a box with specific text, highlight the text before selecting New Comment. Note that you can also delete comment boxes from the menu of this tab.
Comment boxes sometimes compress on themselves so that more boxes can appear on a page. When this happens, the-freelance-editor will insert random page breaks so that you can fully read the complete comments of a box without having to click inside it. When used, I will insert an explanation as part of the break.
Revising a draft document in MS Word: That’s all!
With a bit of practice, you’ll easily master this “system” of revising a draft document in Microsoft Word, and you’ll be able to return your second version of text so that we can move along with the process of finishing your project—ensuring that its text (1) says what you want to say to the audience you want to reach and (2) allows your readers to concentrate on your message, not your mistakes.
Of course, if you have further questions, do not hesitate to contact us. We are always here for our clients—existing and prospective. Best wishes,
Stephen, the-freelance-editor,
where we work with our clients to help them say
what they want to say to the audience they want to reach.
Contact us, even when you just think you might be needing us!
And, please like or share this post or leave a comment—
on any of our growing social media outlets.
the-freelance-editor.com has many specialty divisions that include fact-checking and
ghostwriting—whatever it takes to help you craft your words into a valuable message.
originally posted February 28, 2022;
no text revisions to date
image information: Both images consist of screenshots with Microsoft Word menus and an open document, manipulated in Canva by the-freelance-editor.
more posts
A watermark is a faded image or text, that sits across the contents of a document. Watermarks can be used to indicate what stage the document is in, draft, confidential, final copy etc. Some companies even use watermarking as a way to add their company logo onto the background of a document to avoid copyright infringement.

Some designers even use watermarks to add some creative flair to their documents or files, the reason as to why would may want to add a watermark to your Word Document are truly limitless.
In the article, we will show you how to add a watermark to your document in a few simple steps.
Adding a Draft Watermark to your Word Document
- Open Word
- Find and click the Design tab
- Press Watermark
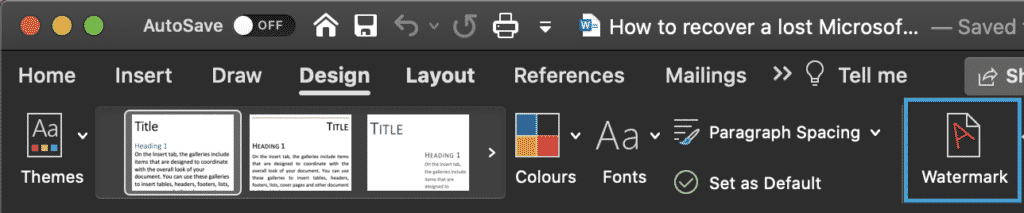
- Find the Text box
- Type desired word, in this example it is DRAFT into the text box
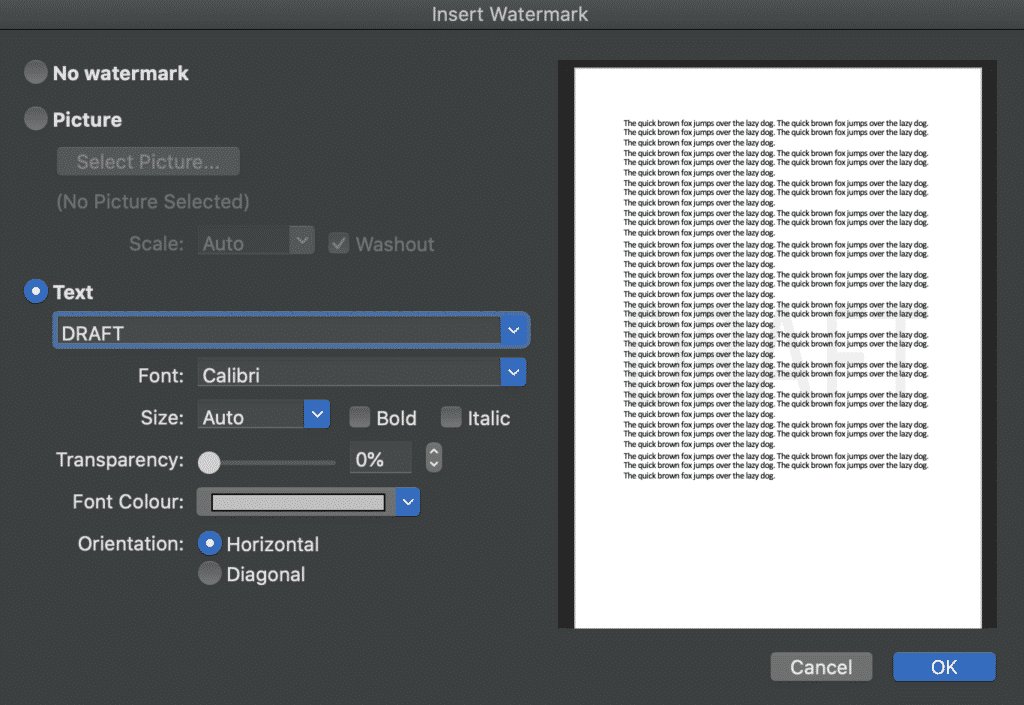
- Select your font type, colour, size and orientation.
- Click OK

The DRAFT watermark has now been added to each page of your document.
Searching for a better way to track and manage version control?
When you are collaborating with more than one other person on a Microsoft Word document keeping track of every version and update can be challenging.
Watermarking your document with the word DRAFT can help, so that everyone collaborating knows they have not yet reached the final version.
This can also elevate the need for _draft or _final to be added to the end of your documents file name, which is likely to already be looking something like proposalv3_update_7 before someone else goes and adds another word or number to the end, hoping that it will make sense to the other collaborates when they are looking at a list of the versions available.
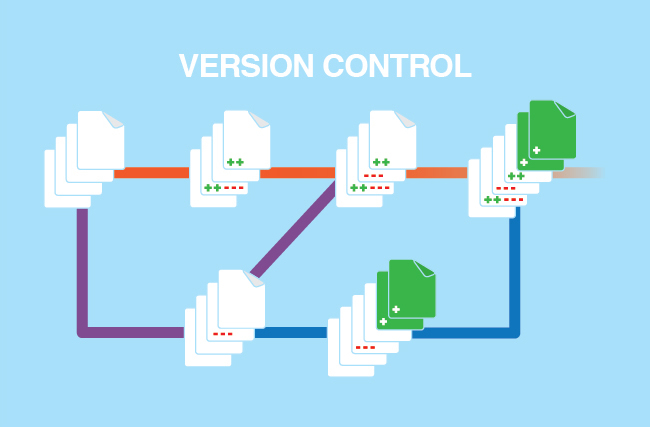
Adding numbers to the end of your document name is the best way to manually manage version control, but it doesn’t come without its flaws as well.
When a team member adds _updated or _final too soon, the file name just gets longer and longer and before you know it you need to expand the size of the box your documents all live in just to see the full file name.
With so many of us facing the same frustrations when collaborating in Microsoft Word, it’s no surprise that there are now some amazing purpose-built tools on the market that are here to make version control easy.
Tools such as Simul Docs.
Numerical file names is the best way to manage version control, you’ve been using some form of this method for a while now. But Simul takes it to a whole new level.
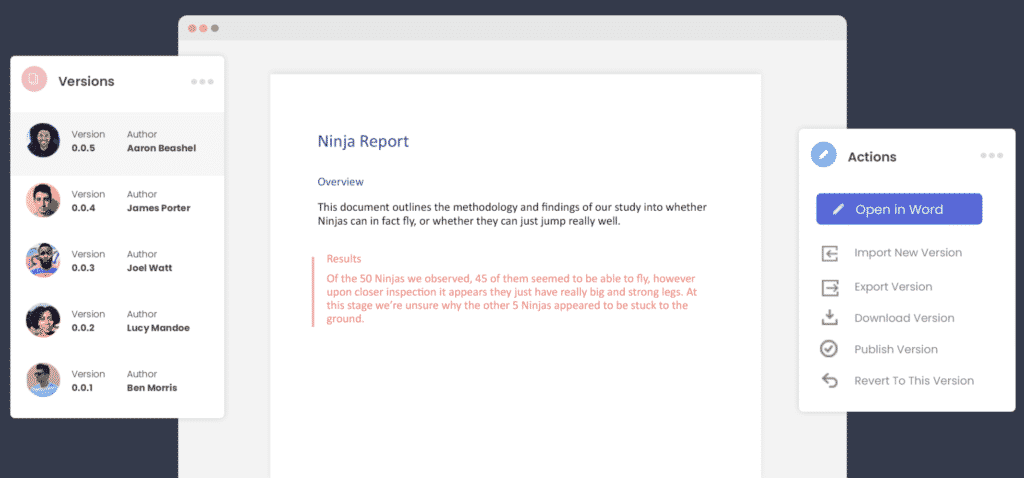
Removing the variable of individual decisions or file name preferences, Simul will automatically save a document under a new name when a change is made.
Here’s how it works:
You own the first draft, Simul would call this version 0.0.1.
Someone else opens version 0.0.1 and makes a few minor changes and without this author having to think about pressing save, or coming up with a new file name, Simul has automatically saved the document for them and called it version 0.0.2.
Then you jump back in and add a few extra pieces of information, this version is automatically saved as version 0.0.3.
Its version control done right. The way you’ve always dreamt it would be done.
With Simul managing version control for you, you will never have to search through a long list of documents and crazy file names again to find the latest version. You also won’t accidentally save over an old version without realising.
So you’ve finished collaborating and you now have a final version. Congratulations!
You can easily export or share your document directly from Simul Docs. Use the export button to take the file out in either Word or PDF formate, or use the share button to share the file using a direct link, email or any cloud sharing system such as Dropbox, GoogleDrive, OneDrive and Sharepoint.
If you share the working file with someone outside of your organisation and they would like to track a few last updates for you or make a comment on the document, that’s ok. Simul is happy for you to share the document with anyone and allow them to collaborate with you using all of the amazing Simul Docs features.
Leaving you to collaborate, share and work on your document without any of the painful bits, the bits we all wish weren’t a part of collaborating in Word.
Simul Docs is the answer to collaboration done right.