
![]()
Download Article
A user-friendly guide to typing a dotted line in Microsoft Word on your computer or mobile device
![]()
Download Article
- Using Keyboard Shortcuts
- Using the Insert Tool on Desktop
- Using the Insert Tool on Mobile
|
|
Do you want to add a dotted or dashed line to your Microsoft Word document? You can use an easy keyboard shortcut to add a dotted line across the page, or you can use Word’s «Insert» function to manually draw a line. After inserting the line, you’ll be able to change its size, thickness, color, and more. This wikiHow will show you how to insert a dotted line into your Microsoft Word document using your computer, iPhone, or Android device.
Things You Should Know
- Type three asterisks (*) where you want your dotted line, then press «Enter».
- Click «Insert» → «Shapes» → select a line. Click «Shape Outline» → «Dashes».
- On mobile, click «Home» → «Insert» → «Shape» → select a line. Tap «Shape Style» and select dotted.
-

1
-
2
Place your cursor where you want your line to appear. You’ll need to be on a blank line, as this won’t work if there is text before or after your cursor on the same line.
- You’ll be creating a horizontal line that spans from one edge of your page to the other. The line will stop at your set margins.
- If you want to make the line span the whole page, you’ll need to change your document margins.
Advertisement
-
3
Type three asterisks (*) in a row. Hold down Shift and press 8 on the number row at the top of your keyboard to create an asterisk.
-
4
Press ↵ Enter to convert the dashes into a line. AutoCorrect will automatically create a dotted line.
- If you don’t have AutoCorrect enabled, do so by clicking File → Options → Proofing → AutoCorrect Options…. This will open a new window.
- Make sure the Border Lines box is checked. This can be found underneath Apply as you type.
- If you want to turn off AutoCorrect, uncheck the boxes.
- If you don’t have AutoCorrect enabled, do so by clicking File → Options → Proofing → AutoCorrect Options…. This will open a new window.
-
5
Use different characters for different line styles (optional). You can create different lines by using characters other than the dash.
- Thin line: Three hyphens (-).
- Thick line: Three underscores (_).
- Double line: Three equal signs (=).
- Triple line: Three pound signs (#).
- Squiggly line: Three tildes (~).


Advertisement
-
1
Open a project in Microsoft Word. This looks like a W on top of a blue square. Microsoft Word is available to install for Windows and Mac.[1]
- You must have a subscription to use Office 365.
-
2
Click the Insert tab. This tab is in the blue ribbon at the top of the Word window, between Home and Draw.
-
3
Click Shapes. It’s in the Insert toolbar, next to the icon of an overlapping circle and square.
- A drop-down menu will appear.
-
4
Select a line shape. In the «Lines» heading, click one of the line templates. You can choose a line, line arrow, double line arrow, and more. These lines can be adjusted to be dotted later.
-
5
Draw your line. Click and drag across the document to create your line.
- If you need to adjust the line’s length and orientation, click the left or right circle. Drag it left or right to adjust the length, or drag it up and down to adjust the orientation.
- To move the line, double-click and drag it to the desired position.
-
6
Double-click the line. You’ll be taken to the Shape Format tab.
-
7
Click Shape Outline. This will be in the Shape Styles section.
- A drop-down menu will open.
-
8
Click Dashes. The menu will expand.
-
9
Select a dash style. You can choose from the available presets or click More Lines to customize your own in the Format Shape panel.
- In the Format Shape panel, you can adjust the color, transparency, width, and more.


Advertisement
-
1
Open a document in the Microsoft Word app. This looks like a blue notebook next to a W.
- Microsoft Word is available for iOS in the App Store and for Android in the Google Play Store.
- Tap Blank document to open a new document or tap a file to open an existing document.
-
2
Tap the «Edit» icon at the top. It’s on the blue toolbar at the top. This will open the editing menu in the bottom half of your screen.
- On iPhone/iPad, this button looks like a white «A» and a pencil icon on the blue toolbar.
- On Android, you may find the same icon or just a white pencil.
-
3
Tap the Home button. It’s in the upper-left corner of the toolbar menu at the bottom. This will open your toolbar tabs.
-
4
Select Insert on the toolbar menu. This will open the available options.
-
5
Select Shape. This will open a menu with all the available shapes you can add.
-
6
Select the type of line you want to add. This will add the selected line to your document.
- You can add dots to your line later.
-
7
Drag the blue end-points of the line to adjust the line (optional). Adjust the size and position of your line from the blue dots on both ends of the shape.
- You can also do this after adding dots to your line.
-
8
Tap Shape Style on the Shape menu. This will open all the available styles for your line.
-
9
Select a dotted style. This will turn the selected line into a dotted line. You can size and position it however you want.


Advertisement
Ask a Question
200 characters left
Include your email address to get a message when this question is answered.
Submit
Advertisement
Thanks for submitting a tip for review!
About This Article
Article SummaryX
1. Open a document.
2. Type «***» where you want the line.
3. Press Enter or Return on your keyboard.
Did this summary help you?
Thanks to all authors for creating a page that has been read 179,002 times.
Is this article up to date?

Microsoft Word makes it easy to add a dotted line as a separator in your documents, and there are multiple ways to do it. We’ll show you how in this guide.
How to Create a Dotted Line with a Shortcut
An easy way to create a dotted line in a Word document is to use a shortcut that you can type into your document, which Word will then automatically convert into various types of dotted lines.
To use a line shortcut, first, open your document with Microsoft Word. Next, place your cursor where you want to add a dotted line in your document.

Type the asterisk sign (“*”) three times in your document.
Now, press Enter, and Word will convert your asterisks into a dotted line automatically.
Besides asterisks, you can also use the following characters for other dotted-line styles:
- three dashes (“—“)
- three equal signs (“===”)
- three underscores (“___”)
- three hashes (“###”)
- three tildes (“~~~”)
Feel free to experiment with these and see which one you like best. You can also undo each line that you make by pressing Ctrl+Z on Windows or Command+Z on Mac.
And if these automatic horizontal lines ever get on your nerves, you can turn them off completely in Word’s AutoCorrect options.
RELATED: How to Remove Automatic Horizontal Lines in Word
How to Add a Dotted Line from a Shape Preset
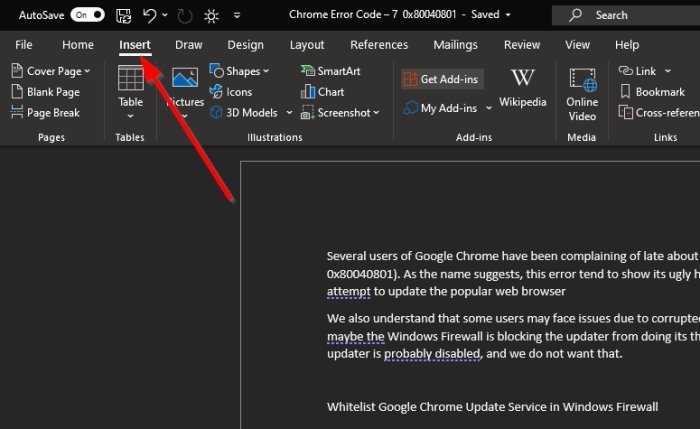
Microsoft Word offers presets for many shapes, including dotted lines, in many styles. To access these presets, first, open your document in Microsoft Word.
Click “Insert” in the top menu and then click “Shapes.” In the pop-up menu that appears, choose the first line style in the “Lines” section.
Use your mouse to draw a line in your document. It can be whatever length you want. Then, make sure that your new line is selected (by clicking it once) and select “Shape Format” from the menu at the top of the Word window.
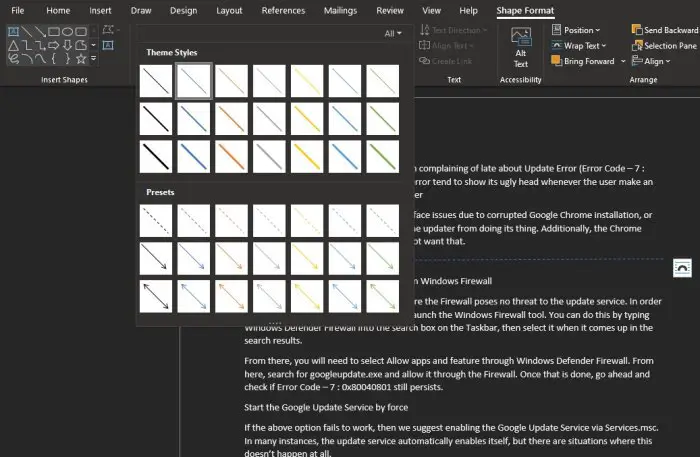
In the Shape Format tab, under the “Shape Styles” section, click the More icon, which looks like a carat pointing downward with a horizontal line above it.
Under the More menu, choose a dotted line style from the “Presets” list. Once you click it, the style will be applied to the line that you just drew and selected in the document.
And that’s it! If you change your mind, don’t be afraid to undo your changes with Ctrl+Z (Windows) or Command+Z (Mac). Happy drawing!
READ NEXT
- › How to Insert a Vertical Line in Microsoft Word: 5 Methods
- › How to Circle Text in Microsoft Word
- › How to Insert a Line in Microsoft Word
- › 5 Ways to Underline in Microsoft Word
- › The New NVIDIA GeForce RTX 4070 Is Like an RTX 3080 for $599
- › Expand Your Tech Career Skills With Courses From Udemy
- › How to Adjust and Change Discord Fonts
- › BLUETTI Slashed Hundreds off Its Best Power Stations for Easter Sale
How-To Geek is where you turn when you want experts to explain technology. Since we launched in 2006, our articles have been read billions of times. Want to know more?
Sometimes, you need to place a dotted line in MS Word. It may be for dividing the page into two parts. Or, you may want to show where the reader can cut the page after printing the contents. You may also want to draw angular dotted lines for diagrams. It is also possible to place short dotted lines for showing blanks that the reader can fill-in.
- Using Auto-Correct Options
- Using a Shape Preset
- Using Shape Outlines
- Using the Tab key
We will show you step-wise instructions for all the methods of inserting dotted lines in MS Word.
Let us begin.
Method #1: Using Auto-Correct Options
Step #1: Open the MS Word document
Open the Word document and place the cursor where you want the dotted line to appear.
Step #2: Type in three asterisks
Using your keyboard, type in three asterisks (Shift+8, three times).

Step #3: Convert to a dotted line
Hit the Enter key on your keyboard.
Word auto-corrects the three asterisks to a dotted line covering the entire width of the page.

Method #2: Using a Shape Preset
Step #1: Open the MS Word document
Open the Word document and place the cursor where you want the dotted line to appear.
Step #2: Insert a line
Click on the Insert tab in the top main menu bar to change the icon.

In the section Illustrations, click on the Shapes icon.

This opens the Shapes menu.
In the Lines section, click on the Line icon.

The cursor changes to a cross.

Place the cursor where you want to start the line.
Press the left mouse button and hold it.
Drag the cursor to the end point of the line before releasing the mouse button.
You should have a line in the document.

Also, the ribbon changes to the Format tab.
Step #3: Change the line to a preset shape.
In the section Shape Styles, click on the down triangle on the right side of the Subtle Line icons.

This opens the Preset Shapes menu.
Under the section Presets, click on the Dash-Dark 1 icon (you can select any other icon instead).

Word changes the line to a dotted line.

Advantages: This method allows drawing dotted lines at any angle and any length.
Method #3: Using Shape Outlines
Step #1: Open the MS Word document
Open the Word document and place the cursor where you want the dotted line to appear.
Step #2: Insert a line
Click on the Insert tab in the top main menu bar to change the icon.

In the section Illustrations, click on the Shapes icon.

This opens the Shapes menu.
In the Lines section, click on the Line icon.

The cursor changes to a cross.

Place the cursor where you want to start the line.
Press the left mouse button and hold it.
Drag the cursor to the end point of the line before releasing the mouse button.
You should have a line in the document.

Also, the ribbon changes to the Format tab.
Step #3: Change the color, weight, and outline of the line
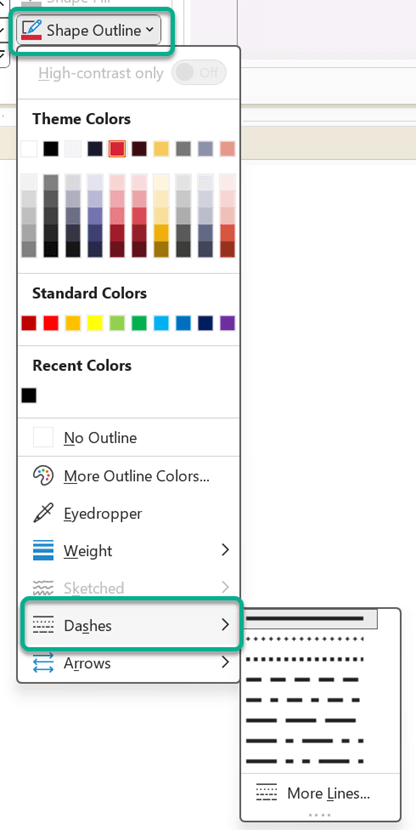
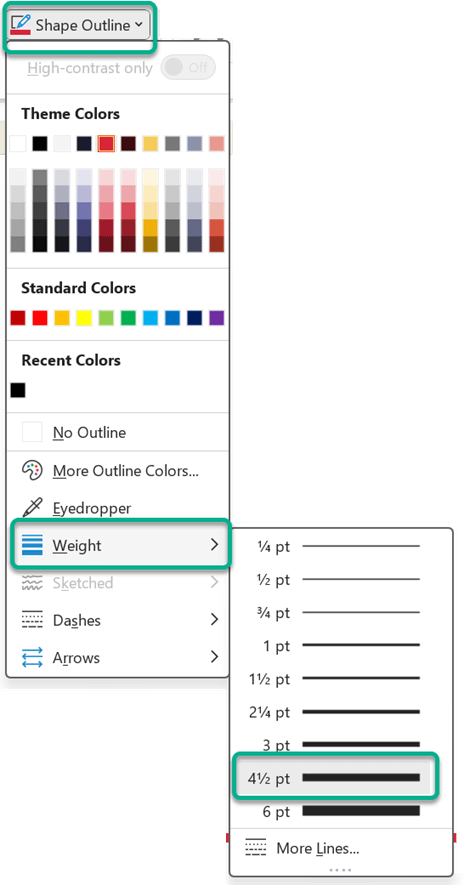
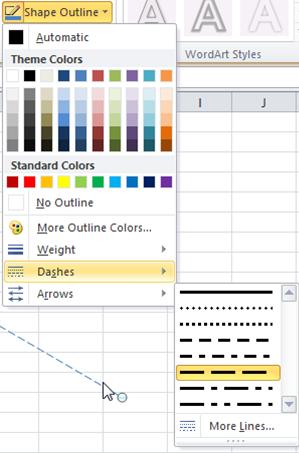
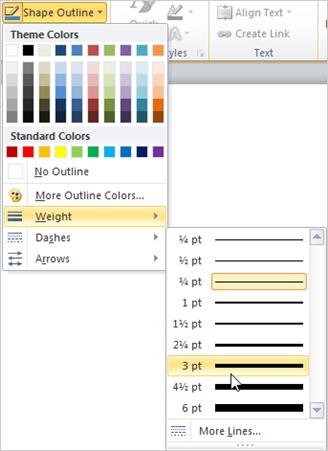
Under Shape Styles, click on Shape Outline.

This opens the Theme Colors menu.
Click on the color you want.

Click on the Weight icon.
This opens a menu showing different weights.
Click on the weight you prefer for the line.

Click on the Dashes icon.
This opens a menu showing different dots and dashes.
Click on the most suitable one for your line.

Word replaces the line with the color, weight, and outline you have selected.

Advantages: This method allows drawing different types of dotted and dashed lines.
Method #4: Using the Tab key
Step #1: Open the MS Word document
Open the Word document and select the text where you want the dotted line to appear.

Step #2: Define the Tab stop
Click on the Home tab on the top menu bar to change the ribbon.

In the section Paragraphs, click the dialog box launcher in the bottom right corner.

This launches the Paragraph dialog box.
Click on Tabs tab at the bottom

This launches the Tabs dialog box.
Under Tab stop position, enter 6 (length of tab in inches, you can change this number).
Under Alignment, click on Left.
Under Leader, click on 2….
Click on Set.
Click on Ok to exit the dialog box.

Step #3: Insert dotted line
Within the text you selected earlier, place the cursor on the left side of the tab stop position you defined earlier (6 inches, refer Step #2).
The top ruler has a mark for the tab stop.

Press the Tab key on your keyboard.
Word places a dotted line from the cursor to the 6-inch mark on the ruler.

Note:
- The dotted lines will appear only within the selected text.
- You must redefine the tab stop for other selections.
- The dotted line will appear only when the cursor is initially placed on the left of the tab stop.
Conclusion
We have shown you four methods of adding a dotted line in an MS Word document. Using our method, you can add a dotted line across a page. You can also add a dotted line at any angle, any color, and any weight. Add a dotted line where you can fill in as in a form. Use our step-by-step instructions for adding the type of dotted line you need.
To use a line shortcut, first, open your document with Microsoft Word. Next, place your cursor where you want to add a dotted line in your document. Type the asterisk sign (“*”) three times in your document. Now, press Enter, and Word will convert your asterisks into a dotted line automatically.
https://www.youtube.com/watch?v=W5l5DNYsF9s
Contents
- 1 Is there a dotted line font in Word?
- 2 How do I insert a dotted line in Word for Mac?
- 3 How do you put a dot under a letter in Word?
- 4 How do you put a dotted line in a table of contents in Word?
- 5 How do you put a dotted bottom border in Word?
- 6 How do I put two dots above a letter in Word?
- 7 How do you get the dots under letters on a keyboard?
- 8 How do you type theta dot?
- 9 How do you insert lines in Word?
- 10 Where is line spacing in Word?
- 11 How do you put a box around a border in Word?
- 12 What is the Alt code for umlaut?
- 13 What does two dots over a letter mean?
- 14 How do I put an accent over a letter?
- 15 How do I type an umlaut in Windows?
- 16 How do you put a dot above a letter in Word on a Mac?
- 17 What is this symbol ρ?
- 18 How do you write gamma dots?
- 19 How do you put a line above text in Word?
- 20 How do you do 1.5 line spacing in Word?
Is there a dotted line font in Word?
Word doesn’t have something built-in to make your font dotted. However, you can do a web search for dotted font and then download and install one of the many available. Be sure to read the information about licensing. Some fonts are free for any use except re-selling or modifying.
How do I insert a dotted line in Word for Mac?
Make a line dashed
- Select the line you want to change.
- Click the Shape Format tab, click the arrow next to Shape Outline, point to Dashes, and then click the style you want.
- To create a custom style, click More Lines, and then choose the options that you want.
How do you put a dot under a letter in Word?
2 Answers
- Type 0323 , then press Alt + X for the dot symbol to appear below the character placeholder.
- Press Space , to show the character placeholder, type your character.
How do you put a dotted line in a table of contents in Word?
Change the layout of your table of contents
- To add a dot leader, or dotted line, between each entry and its page number, click the Tab leader list and then click the dotted line.
- To change the overall appearance of your table of contents, click the Formats list, and then click the format that you want.
How do you put a dotted bottom border in Word?
Select a word, line, or paragraph. On the Home tab, click the arrow next to the Borders button. In the Borders gallery, click the border style that you want to apply.
How do I put two dots above a letter in Word?
Hold down the “Ctrl” and “Shift” keys, and then press the colon key. Release the keys, and then type a vowel in upper or lower case. Use Office’s Unicode shortcut combination to put an umlaut over a non-vowel character.
How do you get the dots under letters on a keyboard?
On an iOS or Android device, access umlaut marks by tapping and holding a particular key. For example, tap and hold the uppercase or lowercase O key, then slide your finger over to ö or Ö to use it in texts, emails, and other documents.
How do you type theta dot?
Hold the Alt key and type 952. The diaeresis can be entered from the symbol menu (Character Code 0308). Have your cursor after the theta before inserting. If this will be a frequent symbol, consider recording a macro and assigning a keyboard shortcut.
How do you insert lines in Word?
Insert a line
- On the Insert tab, select Shapes.
- Under Lines, select any line style you like.
- Select a location in the document, hold and drag your pointer to a different location, and then release the mouse button.
Where is line spacing in Word?
Go to Home > Line and Paragraph Spacing. Choose the number of line spaces you want or select Line Spacing Options, and then select the options you want under Spacing.
How do you put a box around a border in Word?
Boxing text or paragraphs
Select the text you want to box in. Choose the Borders and Shading command from the bottom of the Border menu. The Borders and Shading dialog box appears. If you want to apply the border to only text (words) and not to the entire paragraph, choose Text from the Apply To drop-down list.
What is the Alt code for umlaut?
132
Press NUM on the number pad of your keyboard to activate the NUM-lock. Then press ALT and keep it pressed while you type the code 132 on the number pad. 132 is the code for the letter ä, the a umlaut.
What does two dots over a letter mean?
umlaut
If you’ve ever studied German, you’ve seen an umlaut. It’s a mark that looks like two dots over a letter, and it signifies a shift in pronunciation.The word is German and means “change of sound,” from um, “about,” and laut, “sound.”
How do I put an accent over a letter?
For keyboard shortcuts in which you press one key immediately followed by another key, the keys to press are separated by a comma (,).
Keyboard shortcuts to add language accent marks in Word.
| To insert this | Press |
|---|---|
| ã, ñ, õ Ã, Ñ, Õ | CTRL+SHIFT+~ (TILDE), the letter |
| ä, ë, ï, ö, ü, ÿ, Ä, Ë, Ï, Ö, Ü, Ÿ | CTRL+SHIFT+: (COLON), the letter |
| å, Å | [email protected], a or A |
How do I type an umlaut in Windows?
umlaut: Hold down “control” and press the colon (:) (i.e. Shift + 😉 [Nothing will appear on your screen when you press this combination of keys]. Then release all three keys you just pressed and type the letter over which you wish the umlaut to be (i.e. “a,” “o,” or “u”). The umlaut should now appear.
How do you put a dot above a letter in Word on a Mac?
Press Alt + X to see the dot above the letter.
What is this symbol ρ?
Rho
Rho (uppercase/lowercase Ρ ρ) is the 17th letter of the Greek alphabet. It is used to represent the “r” sound in Ancient and Modern Greek. In the system of Greek numerals, it has a value of 100.
How do you write gamma dots?
Another method: After typing the gamma, type the numbers 0307 and press Alt+X. Character 0307 is the “combining dot above”, which automatically combines with whatever the preceding character is.
How do you put a line above text in Word?
Type the text you want to overline into your Word document and make sure the “Home” tab is active on the ribbon bar. Click the down arrow on the “Borders” button in the “Paragraph” section of the “Home” tab. Select “Top Border” from the drop-down menu.
How do you do 1.5 line spacing in Word?
To format line spacing:
- Click Format on the menu bar.
- Select Paragraph. The Paragraph dialog box appears.
- Click the Indents and Spacing tab.
- In the line spacing drop-down menu, you can select single, 1.5, or double spacing. The default is single spacing.
- Click OK.
Download PC Repair Tool to quickly find & fix Windows errors automatically
Microsoft Word is quite powerful in terms of the features it brings to the table. There are many features most people have yet to learn about, including those on the advanced spectrum. One such feature is the ability to add a dotted line to documents.
As we know, it is super easy to add a regular line in Microsoft Word without breaking a sweat, but the same cannot be said about a dotted line. This article will explain how to get it done in the easiest of ways. There are multiple ways to do it, so read and determine which one is best for you.
- Navigate to Insert and draw a line on your document
- Go to Shape Styles on Ribbon and choose a dotted line Preset
- Use a shortcut to create a dotted line
Let us talk about this in a more detailed manner.
1] Navigate to Insert
OK, so the first thing you will want to do is open a Microsoft Word document then click on the Insert button via the Ribbon. Doing this should highlight several options to choose from, but only a single one at this time makes the most sense.

The next step to take here is to draw a line in your Word document.
To get this done, click Shapes, then select the regular Line icon. From there, use the mouse to draw a line under the preferred body of text.
2] Go to Shape Styles on Ribbon
Once you’ve added your line under the text, navigate to Shape Format, then go ahead and select Shape Styles.
Now, the final thing you will want to do here is to click on the More Menu button to reveal a host of shape styles.
From the Presets menu, choose a dotted line, and right away, the line under your document will change to your selection.
3] Use a shortcut to create a dotted line
The easiest way in our eyes to create a dotted line is to use a shortcut. To do this, place the cursor under the text, then type three asterisk signs (“*”). From there, hit the Enter key and watch as the asterisks transform into a dotted line.
If you’re not interested in using asterisks, then how about taking advantage of the following options:
- three dashes (“—“)
- three equal signs (“===”)
- three underscores (“___”)
- three hashes (“###”)
- three tildes (“~~~”)
These work very well, so play around with them to determine which one is best for what you need to do.
Read next: How to add Handwritten signatures to Word.

Vamien has studied Computer Information Services and Web Design. He has over 10 years of experience in building desktop computers, fixing problems relating to Windows, and Python coding.
You can change the look of a line shape by changing its color, line style, or weight. If you are using Excel, Outlook, Word, or PowerPoint, you can apply a predefined Quick Style to quickly change the look of your line.
Note: These features are available only in the desktop versions of the programs listed above.
What do you want to do?
-
Add a Quick Style to a line
-
Change the color of a line
-
Make a line dotted or dashed
-
Change the weight of a line
-
Work with lines in Project
-
Format cell borders in Excel
Add a Quick Style to a line
Quick Styles for lines include theme colors from the document theme, shadows, line styles, gradients, and three-dimensional (3-D) perspectives. When you position your pointer over a Quick Style thumbnail, you can see how the style affects your line. Try different Quick Styles until you find one that you like.
-
Select the line you want to change.
If you want to change multiple lines, select the first line, and then press and hold Ctrl while you select the other lines.
-
On the Format tab, click the Quick Style you want.
To see more Quick Styles, click the More button
.Note: If you don’t see the Format tab, make sure you’ve selected the line.
 .
.Top of Page
Change the color of a line
-
Select the line that you want to change.
If you want to change multiple lines, select the first line, and then press and hold CTRL while you select the other lines.
-
On the Format tab, click the arrow next to Shape Outline, and then click the color that you want.
Note: If you don’t see the Format tab, make sure you’ve selected the line.
To use a color that isn’t a theme color, click More Outline Colors, and then click the color you want on the Standard tab, or mix your own color on the Custom tab. Custom colors and colors on the Standard tab are not updated if you later change the document theme.

Top of Page
Make a line dotted or dashed
-
Select the line you want to change.
If you want to change multiple lines, select the first line, and then press and hold CTRL while you select the other lines.
-
On the Format tab, click the arrow next to Shape Outline.
Note: If you don’t see the Format tab, make sure you’ve selected the line.
-
Point to Dashes, and then click the style you want.
To create a custom style, click More Lines, and then choose the options that you want.
Top of Page
Change the weight of a line
-
Select the line that you want to change.
If you want to change multiple lines, select the first line, and then press and hold Ctrl while you select the other lines.
-
On the Format tab, click the arrow next to Shape Outline.
Note: If you don’t see the Format tab, make sure you’ve selected the line.
-
Point to Weight, and then click the line weight that you want.
To create a custom line weight, click More Lines, and then choose the options that you want.
Note: To draw a double line, draw a single line, copy and paste a second line next to it, and then group the two lines.
Top of Page
Format cell borders in Excel
If you want to apply line styles and colors to borders in Excel spreadsheets or tables, see the following articles:
-
Apply or remove cell borders
-
Create and apply a border cell style
-
Show or hide gridlines on a worksheet
Top of Page
Work with lines in Project
You need to have a Gantt chart open to follow these steps.
-
Right-click the line you want to change and click Properties.
-
Under Line, choose a color from the Color list and a line thickness from the Line list.
Top of Page
See Also
Draw or delete a line or connector
Format the bar chart of a Gantt Chart view in Project
Important:
Office 2010 is no longer supported. Upgrade to Microsoft 365 to work anywhere from any device and continue to receive support.
Upgrade now
What do you want to do?
-
Add a Quick Style to a line
-
Change the color of a line
-
Make a line dotted or dashed
-
Change the weight of a line
Add a Quick Style to a line
Quick Styles for lines include theme colors from the document theme, shadows, line styles, gradients, and three-dimensional (3-D) perspectives. Try different Quick Styles until you find one that you like. With live preview, when you position your pointer over a Quick Style thumbnail, you can see how the Quick Style affects your line.
-
Select the line that you want to change.
If you want to change multiple lines, select the first line, and then press and hold CTRL while you select the other lines.
-
Under Drawing Tools, on the Format tab, in the Shape Styles group, click the Quick Style that you want.
To see more Quick Styles, click the More button
.
Example of the Shape Styles group on the Format tabIf you do not see the Drawing Tools or Format tabs, make sure that you have selected the line. You might have to double-click the line to open the Format tab.

Top of Page
Change the color of a line
-
Select the line that you want to change.
If you want to change multiple lines, select the first line, and then press and hold CTRL while you select the other lines.
-
Under Drawing Tools, on the Format tab, in the Shape Styles group, click the arrow next to Shape Outline, and then click the color that you want.
Example of the Shape Styles group on the Format tab.If you do not see the Drawing Tools or Format tabs, make sure that you have selected the line. You might have to double-click the line to open the Format tab.
To change to a color that is not in the theme colors, click More Outline Colors, and then either click the color that you want on the Standard tab, or mix your own color on the Custom tab. Custom colors and colors on the Standard tab are not updated if you later change the document theme.
Top of Page
Make a line dotted or dashed
-
Select the line that you want to change.
If you want to change multiple lines, select the first line, and then press and hold CTRL while you select the other lines.
-
Under Drawing Tools, on the Format tab, in the Shape Styles group, click the arrow next to Shape Outline.
If you do not see the Drawing Tools or Format tabs, double-click the line to make sure that you selected it.
-
Point to Dashes, and then click the line style that you want.
To create a custom style, click More Lines, and then choose the options that you want.
Top of Page
Change the weight of a line
-
Select the line that you want to change.
If you want to change multiple lines, select the first line, and then press and hold CTRL while you select the other lines.
-
Under Drawing Tools, on the Format tab, in the Shape Styles group, click the arrow next to Shape Outline.
If you do not see the Drawing Tools or Format tabs, double-click the line to make sure that you selected it.
-
Point to Weight, and then click the line weight that you want.
To create a custom line weight, click More Lines, and then choose the options that you want.
Note: To draw a double line, draw a single line, copy and paste a second line next to it, and then group the two lines.
Top of Page
See Also
Draw or delete a line or connector
What do you want to do?
-
Add a Quick Style to a line
-
Change the color of a line
-
Make a line dotted or dashed
-
Change the weight of a line
-
Work with lines in Publisher
Add a Quick Style to a line
Important: Quick Styles are available only in these 2007 Microsoft Office system programs: Excel, Outlook, Word, and PowerPoint.
Quick Styles for lines include theme colors from the document theme, shadows, line styles, gradients, and three-dimensional (3-D) perspectives. Try different Quick Styles until you find one that you like. When you place your pointer over a Quick Style thumbnail, you can see how the Quick Style affects your line.
-
Select the line that you want to change.
If you want to change multiple lines, select the first line, and then press and hold CTRL while you select the other lines. For more information about selecting lines, see Select a shape or other object.
-
Under Drawing Tools, on the Format tab, in the Shape Styles group, click the Quick Style that you want.
To see more Quick Styles, click the More button
.If you do not see the Drawing Tools or Format tabs, double-click the line to make sure that you selected it.
Top of Page
Change the color of a line
-
Select the line that you want to change.
If you want to change multiple lines, select the first line, and then press and hold CTRL while you select the other lines. For more information about selecting lines, see Select a shape or other object.
-
Under Drawing Tools, on the Format tab, in the Shape Styles group, click the arrow next to Shape Outline, and then click the color that you want.
If you do not see the Drawing Tools or Format tabs, double-click the line to make sure that you selected it.
To change to a color that isn’t in the theme colors, click More Outline Colors, and then either click the color that you want on the Standard tab, or mix your own color on the Custom tab. Custom colors and colors on the Standard tab are not updated if you later change the document theme.
Make a line dotted or dashed
In Excel, Outlook, PowerPoint, and Word
-
Select the line that you want to change.
If you want to change multiple lines, select the first line, and then press and hold CTRL while you select the other lines. For more information about selecting lines, see Select a shape or other object.
-
Under Drawing Tools, on the Format tab, in the Shape Styles group, click the arrow next to Shape Outline.
If you do not see the Drawing Tools or Format tabs, double click the line to make sure that you selected it.
-
Point to Dashes, and then click the line style that you want.
To create a custom style, click More Lines, and then choose the options that you want.
Change the weight of a line
In Excel, Outlook, PowerPoint, and Word
-
Select the line that you want to change.
If you want to change multiple lines, select the first line, and then press and hold CTRL while you select the other lines. For more information about selecting lines, see Select a shape or other object.
-
Under Drawing Tools, on the Format tab, in the Shape Styles group, click the arrow next to Shape Outline.
If you do not see the Drawing Tools or Format tabs, double click the line to make sure that you selected it.
-
Point to Weight, and then click the line weight that you want.
To create a custom line weight, click More Lines, and then choose the options that you want.
Top of Page
Work with lines in Publisher
-
Select the line that you want to change.
If you want to change multiple lines, select the first line, and then press and hold CTRL while you select the other lines.
-
On the Drawing toolbar, click Dash Style
, Line/Border Style , or the arrow next to Line Color , and then click the style that you want.To change to a color that is not displayed, click More Outline Colors, and then either click the color that you want on the Standard tab, or mix your own color on the Custom tab.
To create a custom weight, click More Lines, and then choose the options that you want.
 , Line/Border Style
  , or the arrow next to Line Color
  , and then click the style that you want.
Top of Page
See Also
Draw or delete a line or connector


Microsoft Word makes it easy to add a dotted line as a separator in your documents, and there are several ways to do this. We’ll show you how in this guide.
How to create a dotted line with a shortcut
An easy way to create a dotted line in a Word document is to use a shortcut that you can type in your document, which Word will then automatically convert to different types of dotted lines.
To use a line shortcut, first open your document with Microsoft Word. Next, place your cursor where you want to add a dotted line in your document.

Type the asterisk sign («*») three times in your document.

Now press enter and Word will automatically convert your asterisks to dotted line.

In addition to the asterisks, you can also use the following characters for other dashed line styles:
- three dashes («-«)
- three equal signs («===»)
- three underscores («___»)
- three hashes («###»)
- three tildes («~~~»)
Feel free to experiment with them and see which one you like best. You can also undo each line you create by pressing Ctrl + Z on Windows or Command + Z on Mac.
And if those automatic horizontal lines irritate you, you can turn them off completely in Word’s AutoCorrect options.
How to add a dotted line from a shape preset
Microsoft Word offers presets for many shapes, including dashed lines, in many styles. To access these presets, first open your document in Microsoft Word.
Click on «Insert» in the top menu, then on «Shapes». In the context menu that appears, choose the first line style in the «Lines» section.

Use your mouse to draw a line in your document. It can be any length you want. Next, make sure your new line is selected (by clicking it once) and select «Format Shape» from the menu at the top of the Word window.

On the Format Shape tab, under the «Shape Styles» section, click the plus icon, which looks like a carat pointing down with a horizontal line above it.

From the More menu, choose a dotted line style from the «Presets» list. Once you click on it, the style will be applied to the line you just drawn and selected in the document.

And that’s all! If you change your mind, don’t be afraid to undo your changes with Ctrl + Z (Windows) or Command + Z (Mac). Good drawing!
★ ★ ★ ★ ★
Writing Tremplin Numérique, French web agency. Our authors provide you daily and free of charge with the latest tech and digital news, in France and around the world.
To use a line shortcut, first, open your document with Microsoft Word. Next, place your cursor where you want to add a dotted line in your document. Type the asterisk sign (“*”) three times in your document. Now, press Enter, and Word will convert your asterisks into a dotted line automatically.
Furthermore, Is there a dotted line font in Google Docs?
Is there a dotted font in Google Docs? In GOOGLE DOCS there’s a Font! It’s called Raleway Dots! … Just click on Fonts-at the bottom- Add Fonts- then search Raleway Dots. =)
Simply so How do I insert a dotted line in word for Mac?
Make a line dashed
- Select the line you want to change. …
- Click the Shape Format tab, click the arrow next to Shape Outline, point to Dashes, and then click the style you want.
- To create a custom style, click More Lines, and then choose the options that you want.
Also, How do I remove the dotted line in word? How do I remove the dotted line under text in Word?
- On the Home tab of the Ribbon, click the ¶ button to display paragraph marks (¶s).
- Select the paragraph mark above the line you want to delete.
- In the Paragraph section of the Home Tab, click the Borders and Shading list box button and select No Border.
How do I insert a dotted line Tab leader in word?
Show dots or leaders between tabs
- Select Layout or Page Layout.
- Select the Paragraph dialog launcher. and then select Tabs.
- Add or select a tab stop, and then select leader character option under Leader you want displayed.
What is blue dotted line in Google Docs? You can now insert a next page or continuous section break in Google Docs by going to Insert > Break. … When Show selection breaks is enabled, you’ll see a blue dotted line where each section break is located.
How do I add a font to Mac word?
Tap “Preferences.” Tap “Font.”
…
How to Add New Fonts to Microsoft Word on an Android Device
- Install GO Launcher EX from Google Play to your Android device.
- Once it’s done, restart your device.
- When the device is up and running, the entire interface of your device will now be GO Launcher EX.
How do I trace a font?
How to identify fonts in pictures
- Step 1: Find a picture with the font you want identified. …
- Step 2: Open your favorite Web browser and navigate to www.whatfontis.com.
- Step 3: Click on the Browse button on the Web page and navigate to the picture you saved in Step 1.
How do you make a horizontal line on a Mac?
How do I insert a horizontal line in Word for Mac?
- Place the cursor where you want to insert a line.
- Go to the Home tab.
- In the Paragraph group, select the Borders drop-down arrow and choose Horizontal Line.
- To change the look of the line, double-click the line in the document.
How do you add a line on a Mac?
Add and edit a line
- Click in the toolbar, then in the Basic category, click a line. Options include a straight line with or without endpoints, or a line with editing points to create a curved line.
- Click to select an existing line on a page.
How do you insert a line on a Macbook Air?
Click the line or paragraph (or select multiple paragraphs) where you want to add the border or rule. In the Format sidebar, click the Layout button near the top. Click the pop-up menu next to Borders & Rules, then choose a line type (solid, dashed, or dotted). Set where the line appears: Click a position button.
If you work often in Print Layout view, you may find text boundaries helpful. These are dotted lines that appear in your document to mark the limits of text elements.
Why is there a black line on my Word document?
It’s almost certainly a paragraph border, under the paragraph – that’s what you get when you type three or more underscores then press Enter. Select the paragraph immediately above the line and use the Home Tab->Paragraph Group->Borders button (it’s at the bottom right of the group), then click No border.
What does a blue dotted line mean in Word?
Wavy blue lines that appear under text in a Word document indicate that the Format Consistency Checker is turned on and is functioning in the background as you type. The lines indicate that the Format Consistency Checker has detected an inconsistency that you may want to look at and to correct.
How do I align in Word?
How to Adjust Paragraph Alignment in Word
- Click anywhere in a paragraph you want to align, or select multiple paragraphs.
- Click an alignment option in the Paragraph group. Shortcuts: To align left, press Ctrl + L. To align right, press Ctrl + R. To align center, press Ctrl + C. To justify, Ctrl + J.
What is a tab stop in Word?
A tab stop is a horizontal position which is set for placing and aligning text on a page. There are at least five kinds of tab stops in general usage in word processing or in Microsoft Word. … text extends to the left from the tab stop until the tab’s space is filled, and then the text extends to the right.
What is a dot leader in word?
Dot Leaders add a visual link to separated words on one line (typically seen as ……. between left and right text on the same line) and can be created using the tabs dialogue box.
Where is section break in Google Docs?
Section breaks can be easily added in Docs by selecting “Break” under the “Insert” tab – this will allow you to choose a “Page break” that starts on a new page, a “Section break (continuous)” that starts a new section on the same page, or a “Section break (next page)” that begins a new section on the next page.
How do I get rid of the blue dotted lines in Google Docs?
How do I eliminate them. Go to the Table Tools > Layout tab > Table group. Click the highlighted View Gridlines button to turn them off.
Why does my Google Doc not have page breaks?
It sounds like you accidentally changed your view. Please go to View > Print layout and click on Print layout to put a check mark there.
Where is the Font Book on a Mac?
Computer: Fonts are available to any user on this Mac and are located in the Fonts folder in the system Library (/Library/Fonts/). You must enter an administrator’s password to install fonts here.
What is Apple’s system font?
SF Pro. This neutral, flexible, sans-serif typeface is the system font for iOS, iPad OS, macOS and tvOS. SF Pro features nine weights, variable optical sizes for optimal legibility, and includes a rounded variant.
How do I find my fonts on Mac?
Preview fonts
If the preview pane isn’t shown, choose View > Show Preview. In the Font Book app on your Mac, select a font collection in the sidebar to see the fonts in it: All Fonts: Every font associated with the Computer and User collections, as well as additional system fonts available for download.
As the most commonly used office software, Microsoft Word hides many useful functions. For example, you can easily make a dotted line in a word document by taking the following operations.
Method 1:
Insert a line first.

Go to the Format, choose Shape Style, and change the line into a dotted line.


Method 2:
In fact, Sandra has already told you this way in the previous tutorial.
You just need type “*” for three times and press Enter key as the following.

Ok, that’s all for today. Hope this weill be helpful to you.
Copyright Statement: Regarding all of the posts by this website, any copy or use shall get the written permission or authorization from Myofficetricks.