

Asked by: Hongyu Schimek
asked in category: technology and computing Last Updated: 3rd September, 2020
Right-click the line, then click «Format Shape,» or as an alternative, with the line selected, click the «Drawing Tools Format» tab on the Ribbon. To change the line to dashes or dots, click the «Shape Outline» command in the Shape Styles group, then click «Dashes.» Select the desired line dash type.
Read remaining answer here. Likewise, people ask, how do I insert a vertical dotted line in Word?
Vertical Lines in Word
- Display the Insert tab of the ribbon.
- Click the Shapes tool and then click one of the line shapes from the Line group.
- Click at one end of where you want your line, but don’t release the mouse button.
- Drag the mouse to where you want the other end of the line positioned.
- Release the mouse button.
how do I make a dotted line with scissors in Word? So, you can insert a dotted line at first.
How to Insert an Icon of Scissors into Word
- Switch to Insert tab, click Icons in Illustrations section.
- Input “scissors” in the search box and press [Enter] to find proper icons.
- Select the icon you want, hit Insert to add it.
Correspondingly, how do you make a dotted circle on word?
On the Insert tab, click Shapes. Under Basic Shapes, click Oval. Click where you want the oval to start, and drag to draw the shape. To draw a circle, press Shift while you drag.
What are dotted lines?
Definition of dotted line. 1 : a line that is made up of a series of dots. 2 : a line on a document that marks where one should sign Sign your name on the dotted line.
Are the paragraphs in all your Word documents surrounded by dotted line boxes? The lines look exactly like paragraph borders, but look greyed out, and turning off borders doesn’t make them disappear.
Here’s what I mean:
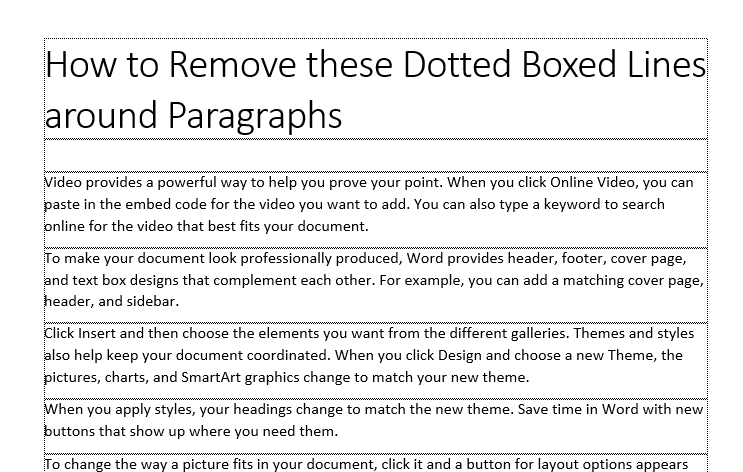
For more proof that these are no ordinary borders, you may have noticed that all new empty documents begin with an empty box by default. So clearly, they are not related to any style or formatting options.
What they are in actual fact are Text Boundaries, and they’re useful for showing page margins.
In older versions of Word (2010 and below) the text boundaries use to cover the entire page’s content (i.e in one large box) but starting with Word 2013, Microsoft updated the layout so that the lines delineated each paragraph.
This has of course been cause for confusion for some users who never realized the change after updating their Word versions, especially since they look exactly like paragraphs borders with dotted lines instead of solid ones.
Anyway, here’s how to disable them.
How to Disable Text Boundaries
- Go to Word Options > Advanced
- Scroll down to Show document options
- Remove the checkmark from the option Show text boundaries and click OK to save settings. That’s it.
Kelvin Kathia is a writer based in Kenya that’s passionate about sharing solutions to everyday tech problems. He’s the founder and editor of Journey Bytes, a tech blog and web design agency. Feel free to leave him comments or questions regarding this post, or by leaving him a message on the contact page. If you found his content helpful, a donation is much appreciated.

|
05-20-2012, 11:27 AM |
|||
|
|||
|
line with dotted box Using Word 2007 in a long manuscript I have a horizontal line with a grey box around it at the top of my bibliography that I can’t delete. I don’t think it is a border problem and have tried all that to delete it. Any help would be appreciated. I attached a screenshot.
Thanks,
|


|
05-21-2012, 08:00 AM |
|||
|
|||
|
Test In the text file, no graphic properties are available. You’ll need to post the word file, or at least one page with the graphic element on it. Best,
|
![]()
Download Article
A user-friendly guide to typing a dotted line in Microsoft Word on your computer or mobile device
![]()
Download Article
- Using Keyboard Shortcuts
- Using the Insert Tool on Desktop
- Using the Insert Tool on Mobile
|
|
Do you want to add a dotted or dashed line to your Microsoft Word document? You can use an easy keyboard shortcut to add a dotted line across the page, or you can use Word’s «Insert» function to manually draw a line. After inserting the line, you’ll be able to change its size, thickness, color, and more. This wikiHow will show you how to insert a dotted line into your Microsoft Word document using your computer, iPhone, or Android device.
Things You Should Know
- Type three asterisks (*) where you want your dotted line, then press «Enter».
- Click «Insert» → «Shapes» → select a line. Click «Shape Outline» → «Dashes».
- On mobile, click «Home» → «Insert» → «Shape» → select a line. Tap «Shape Style» and select dotted.
-

1
-
2
Place your cursor where you want your line to appear. You’ll need to be on a blank line, as this won’t work if there is text before or after your cursor on the same line.
- You’ll be creating a horizontal line that spans from one edge of your page to the other. The line will stop at your set margins.
- If you want to make the line span the whole page, you’ll need to change your document margins.
Advertisement
-
3
Type three asterisks (*) in a row. Hold down Shift and press 8 on the number row at the top of your keyboard to create an asterisk.
-
4
Press ↵ Enter to convert the dashes into a line. AutoCorrect will automatically create a dotted line.
- If you don’t have AutoCorrect enabled, do so by clicking File → Options → Proofing → AutoCorrect Options…. This will open a new window.
- Make sure the Border Lines box is checked. This can be found underneath Apply as you type.
- If you want to turn off AutoCorrect, uncheck the boxes.
- If you don’t have AutoCorrect enabled, do so by clicking File → Options → Proofing → AutoCorrect Options…. This will open a new window.
-
5
Use different characters for different line styles (optional). You can create different lines by using characters other than the dash.
- Thin line: Three hyphens (-).
- Thick line: Three underscores (_).
- Double line: Three equal signs (=).
- Triple line: Three pound signs (#).
- Squiggly line: Three tildes (~).


Advertisement
-
1
Open a project in Microsoft Word. This looks like a W on top of a blue square. Microsoft Word is available to install for Windows and Mac.[1]
- You must have a subscription to use Office 365.
-
2
Click the Insert tab. This tab is in the blue ribbon at the top of the Word window, between Home and Draw.
-
3
Click Shapes. It’s in the Insert toolbar, next to the icon of an overlapping circle and square.
- A drop-down menu will appear.
-
4
Select a line shape. In the «Lines» heading, click one of the line templates. You can choose a line, line arrow, double line arrow, and more. These lines can be adjusted to be dotted later.
-
5
Draw your line. Click and drag across the document to create your line.
- If you need to adjust the line’s length and orientation, click the left or right circle. Drag it left or right to adjust the length, or drag it up and down to adjust the orientation.
- To move the line, double-click and drag it to the desired position.
-
6
Double-click the line. You’ll be taken to the Shape Format tab.
-
7
Click Shape Outline. This will be in the Shape Styles section.
- A drop-down menu will open.
-
8
Click Dashes. The menu will expand.
-
9
Select a dash style. You can choose from the available presets or click More Lines to customize your own in the Format Shape panel.
- In the Format Shape panel, you can adjust the color, transparency, width, and more.


Advertisement
-
1
Open a document in the Microsoft Word app. This looks like a blue notebook next to a W.
- Microsoft Word is available for iOS in the App Store and for Android in the Google Play Store.
- Tap Blank document to open a new document or tap a file to open an existing document.
-
2
Tap the «Edit» icon at the top. It’s on the blue toolbar at the top. This will open the editing menu in the bottom half of your screen.
- On iPhone/iPad, this button looks like a white «A» and a pencil icon on the blue toolbar.
- On Android, you may find the same icon or just a white pencil.
-
3
Tap the Home button. It’s in the upper-left corner of the toolbar menu at the bottom. This will open your toolbar tabs.
-
4
Select Insert on the toolbar menu. This will open the available options.
-
5
Select Shape. This will open a menu with all the available shapes you can add.
-
6
Select the type of line you want to add. This will add the selected line to your document.
- You can add dots to your line later.
-
7
Drag the blue end-points of the line to adjust the line (optional). Adjust the size and position of your line from the blue dots on both ends of the shape.
- You can also do this after adding dots to your line.
-
8
Tap Shape Style on the Shape menu. This will open all the available styles for your line.
-
9
Select a dotted style. This will turn the selected line into a dotted line. You can size and position it however you want.


Advertisement
Ask a Question
200 characters left
Include your email address to get a message when this question is answered.
Submit
Advertisement
Thanks for submitting a tip for review!
About This Article
Article SummaryX
1. Open a document.
2. Type «***» where you want the line.
3. Press Enter or Return on your keyboard.
Did this summary help you?
Thanks to all authors for creating a page that has been read 179,002 times.
Is this article up to date?
Underlining in Word is easy, but overlining a text is a bit more complicated. An overline in Word is also known as an overbar, d bar symbol, or overscore and is commonly used for scientific texts. Even outside of these texts, you may have numerous reasons for wanting to overline text. Overlining text in Word isn’t straightforward, but it isn’t impossible either. There are actually at least four ways to do it. You could use the field code, the equation editor, the method of adding a paragraph border, or the individual letters method.
The Field Code Method
The field code method is probably the most technical way to add a bar over text ion word. However, once you get the hang of it, it is convenient and can be done fairly quickly.
- Start opening the document in Word where you want to add the overline.
- Position the cursor at the point where you want to put the text you’re going to overbar.
- Press “Ctrl + F9” on your keyboard and the field code brackets will appear. They are highlighted gray, and the cursor gets automatically positioned within the brackets.
- Enter “EQ x to()” within the brackets. Note the space “EQ” and “x” and also the space between “x” and “to.” This field code is made to create an equation, hence the code “EQ” at the beginning. The rest are simply switches that will be used to format the text or equation. There are lots of switches you can use for this particular field code, with some of them applying bars in other positions, such as the right, the left, and the bottom of the text. Some even apply box borders around the text.
- Put the cursor between the parentheses “()” and type in the text you would like to overline.
- You will notice that the whole thing still appears like a field code, rather than overlined text. To solve this, simply right click at any point in the field code and select the option labeled “Toggle Field Codes” from the menu that pops up. The text will now appear as overline text.
- While the field code is in the form of overline text, you can format it however you want to. Simply highlight it and apply formatting as you please, such as altering the color, font, size, and so on.
If you want to display the field code again at any point, just perform the procedure you performed to toggle to overlined text: right click at any point in the text and select the field code toggle. Whenever you place the cursor in the text that was generated with the help of a field code, the text will appear in gray highlight, just like the field code that was used to generate it.
Extending the Overline
If you want the overline to extend beyond the text on either side, simply add spaces on the side where you want it to extend. It can prove useful when you want to create lines for signatures with words under them. The beauty of field codes is that they work in all versions of Word, whether on Mac or PC.
Equation Editor Method
Another way to add an overbar over text is to use the equation editor.
- Start by clicking on the “Insert” tab at the top right of your document.
- You will find the “Equation” button in the “Symbols” section of this tab. Click on that button to open the “Equation Tools” Display.
- In the display, click on the “Design” tab. Under the section marked “Structures,” click on the button labeled “Accent” to open a pop up with different accents that you could add to text in your equation. Some of these are a single dot, a few dots, a curly line, and so on. What you’re looking for is the “Bar” accent.
- You can either select the bar accent or go directly to “Overbars and Underbars” and select “Overbar.” When you use the latter option, you’ll get a slightly longer overbar than you would if you simply went for the “Bar” accent.
- A small dotted box will appear in the equation object with the accent you selected over it.
- Enter your text on inside the dotted box. To do this, simply click on the dotted box in order to select it and then type in your text. As you type your text, the line will extend to cover it.
- Once you’re done typing in the text, click outside of the dotted box and the overlined text will be shown without the equation object.
The equation editor comes with its own quirks, which you may or may not want. For example, if you enter hyphenated words into the editor, there will be spaces before the dash as well as after it. That is because Word treats the dash as a minus since the object is an equation object. There are also other quirks that come about as a result of the fact that Word interprets whatever you’re writing as an equation. If you don’t like the quirks, then it may be a good idea to either use the other methods outlined.
The Paragraph Border Method
You can also use paragraph borders to add an overbar to text.
- Start by making sure the active tab in the ribbon is the “Home” tab.
- Type in the word you would like to overscore in the document.
- On the “Home” Tab, in the “Paragraph” section, there is a “Borders” button. Click on that downward arrow next to that button. A drop-down menu will appear.
- From the drop-down menu, select the “Top Border” option.
- When you select “Top Border,” you will notice that the top border extends from one margin of the page to the other. You only want it to extend from one end of your text to the other. To do that, you’ll have to adjust the indents for that specific paragraph.
- Click on the “View” tab on the ribbon.
- Under the section labeled “Show,” click on the checkbox marked “Ruler.”
Now that the ruler is visible, you can change the indents for the paragraph. Place the cursor in the paragraph and position your mouse over any one of the markers for indent on the ruler. Click and drag the indent until the line is at your preferred length. Once you’re done moving the indent marker, you can release the mouse button. Your line is now at the length you want it.
The Individual Letters Method
If you would only like to add a bar over a single letter, then this method proves fast and convenient.
- Position your cursor where you would like to add the overline.
- On the “Insert” tab, in the “Symbols” section, click on the “Symbols” button.
- In the drop-down menu, click on the button labeled “Special Characters” and then “More Symbols.”
- You will find a list of special characters under this section. Scroll through them until you find the specific overlined letter you want to add, such as an a with a line over it, and then click on it.
- Click on the “Insert” option when you have selected a character in order to insert it into your document.
To use a line shortcut, first, open your document with Microsoft Word. Next, place your cursor where you want to add a dotted line in your document. Type the asterisk sign (“*”) three times in your document. Now, press Enter, and Word will convert your asterisks into a dotted line automatically.
https://www.youtube.com/watch?v=W5l5DNYsF9s
Contents
- 1 Is there a dotted line font in Word?
- 2 How do I insert a dotted line in Word for Mac?
- 3 How do you put a dot under a letter in Word?
- 4 How do you put a dotted line in a table of contents in Word?
- 5 How do you put a dotted bottom border in Word?
- 6 How do I put two dots above a letter in Word?
- 7 How do you get the dots under letters on a keyboard?
- 8 How do you type theta dot?
- 9 How do you insert lines in Word?
- 10 Where is line spacing in Word?
- 11 How do you put a box around a border in Word?
- 12 What is the Alt code for umlaut?
- 13 What does two dots over a letter mean?
- 14 How do I put an accent over a letter?
- 15 How do I type an umlaut in Windows?
- 16 How do you put a dot above a letter in Word on a Mac?
- 17 What is this symbol ρ?
- 18 How do you write gamma dots?
- 19 How do you put a line above text in Word?
- 20 How do you do 1.5 line spacing in Word?
Is there a dotted line font in Word?
Word doesn’t have something built-in to make your font dotted. However, you can do a web search for dotted font and then download and install one of the many available. Be sure to read the information about licensing. Some fonts are free for any use except re-selling or modifying.
How do I insert a dotted line in Word for Mac?
Make a line dashed
- Select the line you want to change.
- Click the Shape Format tab, click the arrow next to Shape Outline, point to Dashes, and then click the style you want.
- To create a custom style, click More Lines, and then choose the options that you want.
How do you put a dot under a letter in Word?
2 Answers
- Type 0323 , then press Alt + X for the dot symbol to appear below the character placeholder.
- Press Space , to show the character placeholder, type your character.
How do you put a dotted line in a table of contents in Word?
Change the layout of your table of contents
- To add a dot leader, or dotted line, between each entry and its page number, click the Tab leader list and then click the dotted line.
- To change the overall appearance of your table of contents, click the Formats list, and then click the format that you want.
How do you put a dotted bottom border in Word?
Select a word, line, or paragraph. On the Home tab, click the arrow next to the Borders button. In the Borders gallery, click the border style that you want to apply.
How do I put two dots above a letter in Word?
Hold down the “Ctrl” and “Shift” keys, and then press the colon key. Release the keys, and then type a vowel in upper or lower case. Use Office’s Unicode shortcut combination to put an umlaut over a non-vowel character.
How do you get the dots under letters on a keyboard?
On an iOS or Android device, access umlaut marks by tapping and holding a particular key. For example, tap and hold the uppercase or lowercase O key, then slide your finger over to ö or Ö to use it in texts, emails, and other documents.
How do you type theta dot?
Hold the Alt key and type 952. The diaeresis can be entered from the symbol menu (Character Code 0308). Have your cursor after the theta before inserting. If this will be a frequent symbol, consider recording a macro and assigning a keyboard shortcut.
How do you insert lines in Word?
Insert a line
- On the Insert tab, select Shapes.
- Under Lines, select any line style you like.
- Select a location in the document, hold and drag your pointer to a different location, and then release the mouse button.
Where is line spacing in Word?
Go to Home > Line and Paragraph Spacing. Choose the number of line spaces you want or select Line Spacing Options, and then select the options you want under Spacing.
How do you put a box around a border in Word?
Boxing text or paragraphs
Select the text you want to box in. Choose the Borders and Shading command from the bottom of the Border menu. The Borders and Shading dialog box appears. If you want to apply the border to only text (words) and not to the entire paragraph, choose Text from the Apply To drop-down list.
What is the Alt code for umlaut?
132
Press NUM on the number pad of your keyboard to activate the NUM-lock. Then press ALT and keep it pressed while you type the code 132 on the number pad. 132 is the code for the letter ä, the a umlaut.
What does two dots over a letter mean?
umlaut
If you’ve ever studied German, you’ve seen an umlaut. It’s a mark that looks like two dots over a letter, and it signifies a shift in pronunciation.The word is German and means “change of sound,” from um, “about,” and laut, “sound.”
How do I put an accent over a letter?
For keyboard shortcuts in which you press one key immediately followed by another key, the keys to press are separated by a comma (,).
Keyboard shortcuts to add language accent marks in Word.
| To insert this | Press |
|---|---|
| ã, ñ, õ Ã, Ñ, Õ | CTRL+SHIFT+~ (TILDE), the letter |
| ä, ë, ï, ö, ü, ÿ, Ä, Ë, Ï, Ö, Ü, Ÿ | CTRL+SHIFT+: (COLON), the letter |
| å, Å | [email protected], a or A |
How do I type an umlaut in Windows?
umlaut: Hold down “control” and press the colon (:) (i.e. Shift + 😉 [Nothing will appear on your screen when you press this combination of keys]. Then release all three keys you just pressed and type the letter over which you wish the umlaut to be (i.e. “a,” “o,” or “u”). The umlaut should now appear.
How do you put a dot above a letter in Word on a Mac?
Press Alt + X to see the dot above the letter.
What is this symbol ρ?
Rho
Rho (uppercase/lowercase Ρ ρ) is the 17th letter of the Greek alphabet. It is used to represent the “r” sound in Ancient and Modern Greek. In the system of Greek numerals, it has a value of 100.
How do you write gamma dots?
Another method: After typing the gamma, type the numbers 0307 and press Alt+X. Character 0307 is the “combining dot above”, which automatically combines with whatever the preceding character is.
How do you put a line above text in Word?
Type the text you want to overline into your Word document and make sure the “Home” tab is active on the ribbon bar. Click the down arrow on the “Borders” button in the “Paragraph” section of the “Home” tab. Select “Top Border” from the drop-down menu.
How do you do 1.5 line spacing in Word?
To format line spacing:
- Click Format on the menu bar.
- Select Paragraph. The Paragraph dialog box appears.
- Click the Indents and Spacing tab.
- In the line spacing drop-down menu, you can select single, 1.5, or double spacing. The default is single spacing.
- Click OK.
Updated: 05/16/2020 by
Microsoft Word gives you hundreds of page border options, allowing you to surround a page with a clean or fancy border, like a frame for a picture. You can also set a border to provide a shadow or 3D effect.
Add a border
- Open Microsoft Word.
- Click the Page Layout tab. In Word 2013 and 2016, click the Design tab instead.
- In the Page Background group, click the Page Borders option.
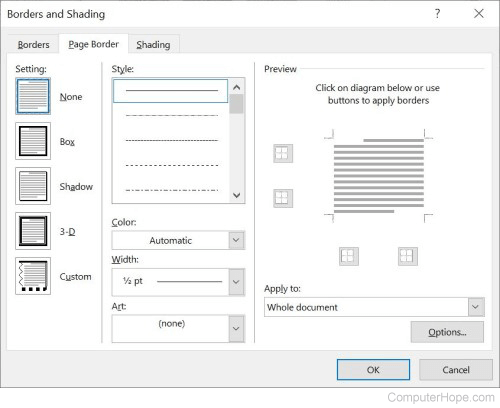
- In the Borders and Shading window (shown below), if not already selected, click the Page Border tab.
- Select Box if you want a square border around your page.
- Select the Style of border you want on the page, which can be solid, dotted, or dashed. Select the Color and Width of the border. If you want to select artwork to use as the border, click the down arrow for the Art drop-down menu. In the example below, we’re using the hearts art as a border.

Tip
By default, the borders are applied to the whole document, which means every page has the same border. Clicking the down arrow on Apply to gives you the option to select the first page only, selected page, all pages but the first page, and other options.
- Once you’ve selected all the border options you want to use in your document, click the OK button to apply the border.
Modify a border
- Open Microsoft Word.
- Click the Page Layout tab. In Word 2013 and 2016, click the Design tab instead.
- In the Page Background group, click the Page Borders option.
- In the Borders and Shading window (shown below), if not already selected, click the Page Border tab.
- Make the desired changes to the border that is currently set for the document or page. You can change the type of border in the Settings section, choosing from Box, Shadow, 3-D, or Custom. You can also change the style, color, and width of the order, and add or change art used in the border.
- When you have finished making the desired changes to the border, click the OK button to apply the changes.
Remove a border
- Open Microsoft Word.
- Click the Page Layout tab. In Word 2013 and 2016, click the Design tab instead.
- In the Page Background group, click the Page Borders option.
- In the Borders and Shading window (shown below), if not already selected, click the Page Border tab.
- Select None to remove any border on the page.
- Click the OK button to remove the border.