Variety and novelty in English lessons encourage learners to be more engaged. On the contrary, monotonous tasks, no matter how useful they are, cause boredom. How to bring variety without too many changes in the process of learning vocabulary? Use word clouds.
Word clouds are a graphical representation of words and words combinations. They can be used for:
- vocabulary revision
- presenting lexis
- practicing new words
- student’s projects.
It is just a more visually appealing way to teach vocabulary. Instead of using lists, which students are probably fed up with, make clouds. You can utilize them for word searches, making monologues and dialogues, word games, writing tasks, etc.
Here are some examples of the tasks.
Task 1
Make a story about a detective investigating a case using all the words and tell your partner (the teacher).
Task 2
Work in pairs. Ask and answer five questions using the words.
Task 3
Give a definition of one of the words. Can your partner guess the word? Swap roles.
There are some services for creating word clouds:
Word Art
Wordle
Word clouds
I personally prefer to use Word art because it’s possible to create clouds containing collocations. As we know teaching collocations is more effective for learners. Other services just break the word pairs into single words.
Let’s see how to create word clouds using Word art. It’s quick and easy, no registration is required. So click ‘Create’ and make your cloud.
Step 1
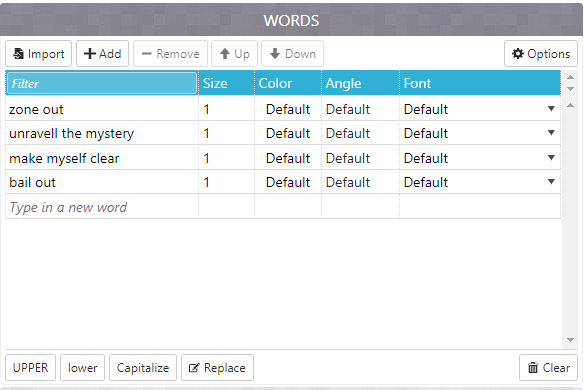
Fill in the words or word combinations. You can type as many words as you need, even 30 or even 50. It’s possible to Capitalize letters, use the UPPER or lower case. Click ‘Options’ and opt for repetition of the words as you see in one of the pictures above or choose no repetition.
Step 2
Choose the shape of your cloud: animals, nature, people or some holidays themes. If you want to see the changes, click the red button ‘Visualize’.
For example, this charming ladybird will definitely catch kids’ interest.
 Step 3
Choose a font which you like. There are more than 50 fonts to select.
Step 4
Pick out a layout: horizontal, vertical, crossing words, dancing words, slopes and random. The layout will depend on the task and the learners. Teens prefer something less ordinal and more creative. For adults, I usually make more conservative things like a horizontal layout.
Step 5
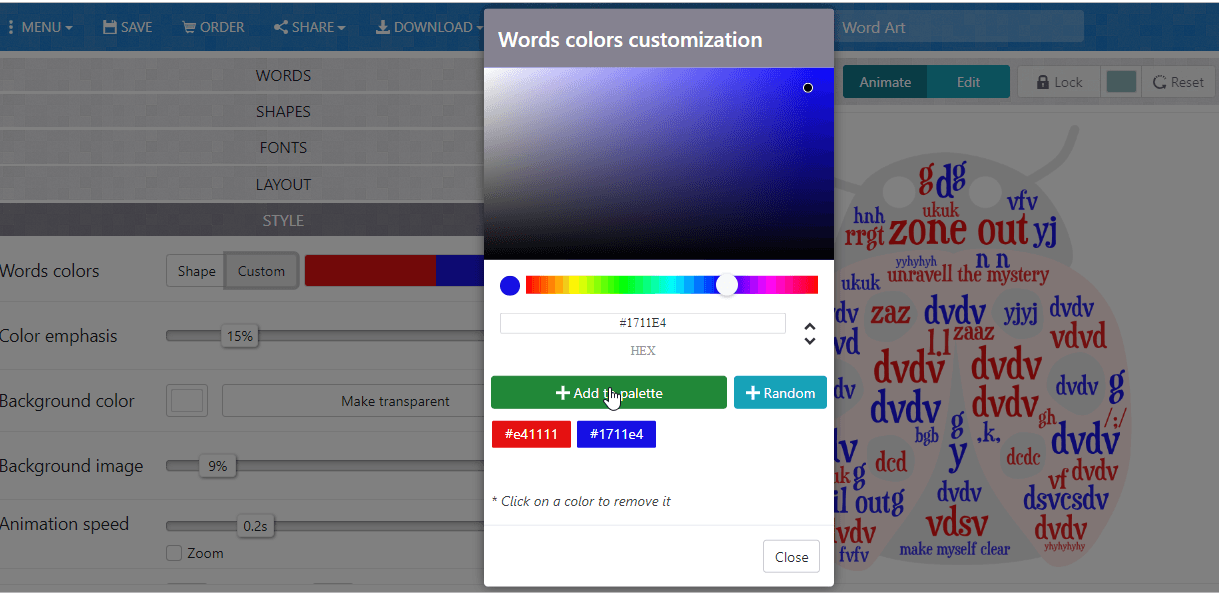
Choose a style: colours of the words and the background. If you want to change a colour of the words, click ‘Words colours’ and ‘Custom’ and add more colours to the pallette.
Step 6
To apply all the changes, press ‘Print’ or ‘Download’ your cloud and enjoy it in your lessons.
The word cloud is an original solution for many creative, commercial and personal tasks. Create a unique cloud of words with the WordCloud.pro service and you can:
- illustrate the report or presentation,
- make an unusual website design,
- create an exclusive banner,
- add extraordinary images to the blog,
- give a unique card to a friend,
- congratulate your chief on his birthday,
- сonfess your love or ask for forgiveness,
- create a great poster on the wall.
Regardless of the purpose you want to use pictures made of words, the WordCloud.pro will help you implement all of your ideas quickly and easily. Use the detailed instruction to see all the features of the service.
Selecting a sketch
To create a new design, select the «Studio» from the main menu.
First of all, you should decide which design you like. What do you want your word cloud to look like? Select the suited sketch from the represented collection.
To find a suitable design, you can use a filter or search by name. To filter you should select one or more appropriate tags. If you want to exclude a collection with a specific tag from your selection, click on the tag again.
To better view the design, increase the sketch by clicking on it.
Some sketches are presented in several options. Go to the next option by clicking on the image or using the «forward» / «backward» pointers.
Click the «Select» button if you like the sketch. It will become the basis of your picture of the words. If you don’t like this sketch, just close the window to pick up something else. The selected sketch will be highlighted with a green line.
Adding words
After you have selected the design of the sketch, it’s time to adding words from which your cloud will consist. Go to the second stage «Add desired words».
The words you add at this stage will be repeated in the picture in random order, forming a picture with the selected sketch. You can use only one word, then the image will consist only of its repetitions. But the more words you add, the better the picture you will get. Remember that words are the colors of your picture, make it brighter!
You can make a list of your own words and phrases, add selected text or use prepared collections.
Your list of words or prepared text
If you want to use your own words, enter them into the field «Your own words» and add to the list by clicking the mouse button or the «Enter» key. Each line should contain just one word or phrase.
If you have a ready list of words, you can add it entirely to the field «Prepared text».
Click the «Import» button and paste the previously copied text into the appeared window. The words in the text can be separated by spaces or commas, the editor will automatically break the text into words that will become the basis for your word cloud.
You can create a picture using any text from a book or an article the same way.
You can also add text by simply copying the link and pasting it into a special editor field. Please, note that all words on the page by this link will be used.
Prepared collections
You can use the collections, which we have prepared specially for you. To do this, choose one or more collections to add to your word cloud.
If you know exactly what collection you need — use the search. Also you can use filters by types, tags and language for selection of collections.
All prepared collections are divided into two types — icons and words. You can make your picture more informal if you add several collections of icon-emoji.
To select collections by tags, select one or more suitable topics. You can add a collection of words to the cloud of words in different languages. Switching the language is at the bottom of the filter panel.
Tick off all suitable collections to add them to your word cloud.
You can add any words and phrases that are not included in the collection. All words will be placed randomly in the picture, but the words from your list have priority over the words from the collections.
Final view, change and save the picture
It’s time to see what picture you created. To do this, go to the third stage «Evaluate the result».
Click on the button «Update design», and you will see your word cloud.
To change the random order of words in the picture — update the design once more. All words will be arranged in a different order, and the cloud will be different.
To add or remove some words, go back to the stage of adding words, make the necessary changes, then re-evaluate the result. You can also change the design of the sketch by returning to the first stage, the selected words will be saved.
If you like finished picture you should save the changes. You can also undo changes and return to the previous version, create a copy or delete the design.
Save the changes to download the finished word cloud. Also you should select the license format based on your usage goals. A personal license allows you to download a low-resolution image for free and allows to use the picture only for personal non-commercial purposes. Standard and advanced licenses allow you to download high-resolution images and use pictures for any purpose, including commercial. More information about licenses and prices you can find on the «Pricing» page.
After selecting the license format, click «Download». If you choose a paid license, you will see information about image payment. The download will begin after your payment confirmation. If the credits on the current balance are not enough, you will be offered options for buying a credits.
If you choose a free license, download will start automatically.
After you have downloaded the image, you can use it according to the purchased license. We hope that you liked the WordCloud.pro service and you come for new ideas and beautiful word clouds again!
Download PC Repair Tool to quickly find & fix Windows errors automatically
Microsoft Word is not only useful for typing or editing, but it can also be used for photo editing too. It might not be as advanced as Photoshop and other advanced photo editing programs, but it can create posters, brochures, greeting cards, and Word Clouds. A Word Cloud is a cluster of words portrayed in different sizes. It is also known as a text cloud or tag cloud. The bigger the word is, the more it is important. Word Cloud is used in textual data such as Blog posts, speeches, databases, interviews, and other texts. In this tutorial, we will explain how to create a Word Cloud in Microsoft Word.
Follow the steps below to create a Word Cloud in Microsoft Excel:
- Launch Microsoft Word.
- Go to the Insert tab and click Get Add-ins.
- In the search engine, type Word Cloud, then press Enter.
- Select the Pro Word Cloud option.
- Click Continue.
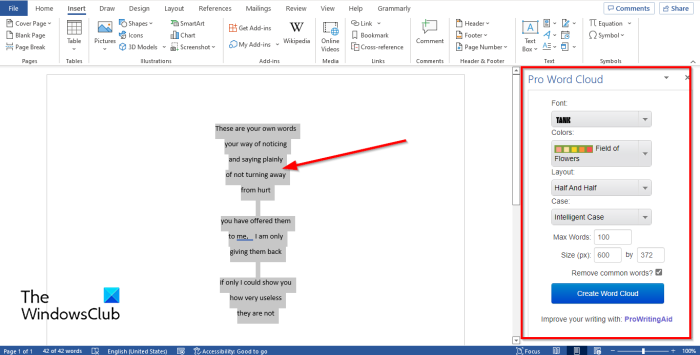
- Highlight the paragraph you have in your document.
- In the pane, you can customize the Font, Colors, Layout, and Cases.
- You can also select the Maximum Words, increase or decrease the size or remove common words by unchecking its check box.
- Then click Create Word Cloud.
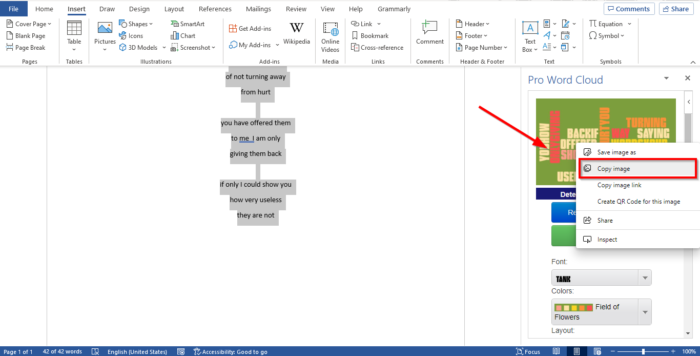
- Right-click the Word Cloud display in the Pro Word Cloud pane and select Copy image and paste it into the document and remove the original text.
Let’s see this in detail.
Launch Microsoft Word.
In your Word document, you can type a paragraph or copy a paragraph from a digital book or off the internet.
Go to the Insert tab and click Get Add-ins in the Add-ins group.
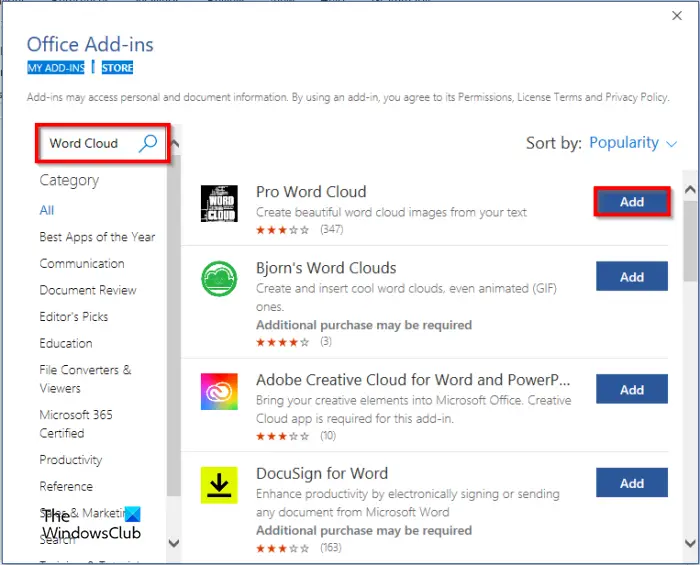
An Office Add-ins dialog box will open.
In the search engine, type Word Cloud, then press Enter.
A list of Word Cloud apps will pop up, choose Pro Word Cloud, and click the Add button.
A window will pop up displaying the License Term and Policy, then click Continue.
A Pro Word Cloud pane will appear on the right with some settings.
Highlight the paragraph you have in your document.
In the Pane, you can customize the Font, Colors, Layout, and Cases by clicking their drop-down arrows and selecting an option.
You can also change the Maximum Words, increase or decrease the Size or Remove common words by unchecking its check box, if desired.
Then select the Create Word Cloud button.
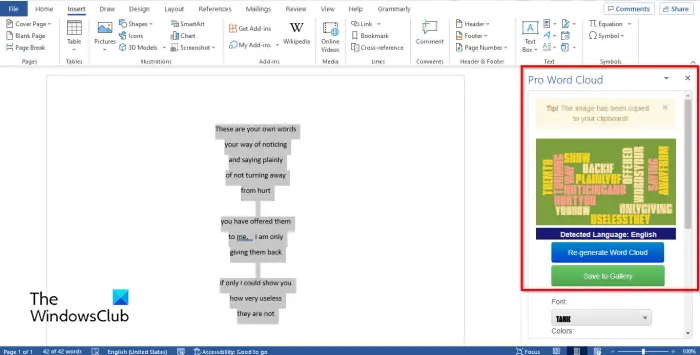
You will then see a display of the Word Cloud on the right; you can choose to Re-generate Word Cloud, it means to switch to a different display of the Word Cloud.
You can also choose to save your Word Cloud by clicking Save to Gallery if desired.
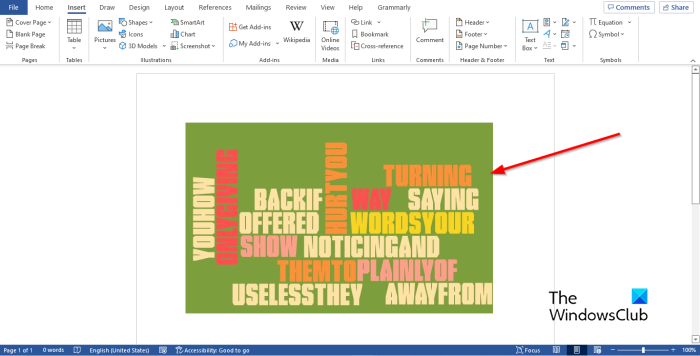
To add the Word Cloud to your document, right-click the Word Cloud display in the Pro Word Cloud pane and select Copy image and paste it into the document and remove the original text.
Close the Pro Word Cloud pane.
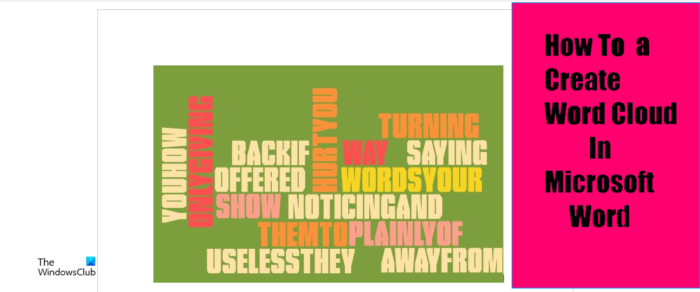
Now we have a Word Cloud in Microsoft Word.
We hope this tutorial helps you understand how to create Word Cloud in Microsoft Word.
READ: How to make Font blurry in Microsoft Word
Where can I create a Word Cloud?
You can create a Word Cloud using Microsoft Office, so you do not have to use some advanced programs. You can use Microsoft Word and PowerPoint, which can create some great Word Clouds by using the Word Cloud add-in apps offered by Microsoft.
READ: How to insert Text in Circle OR Circle Text in Microsoft Word
How do I make a Word Cloud for free?
Word Cloud is a cluster of words, and you can make one for free online. You can make Word Clouds on a website called wordclouds.com, where you can paste text and open a document or a URL to generate a Word.
Shantel has studied Data Operations, Records Management, and Computer Information Systems. She is quite proficient in using Office software. Her goal is to become a Database Administrator or a System Administrator.
Posted on: Oct, 2021
By: Judd Albrecht
Get Started Creating Word Clouds
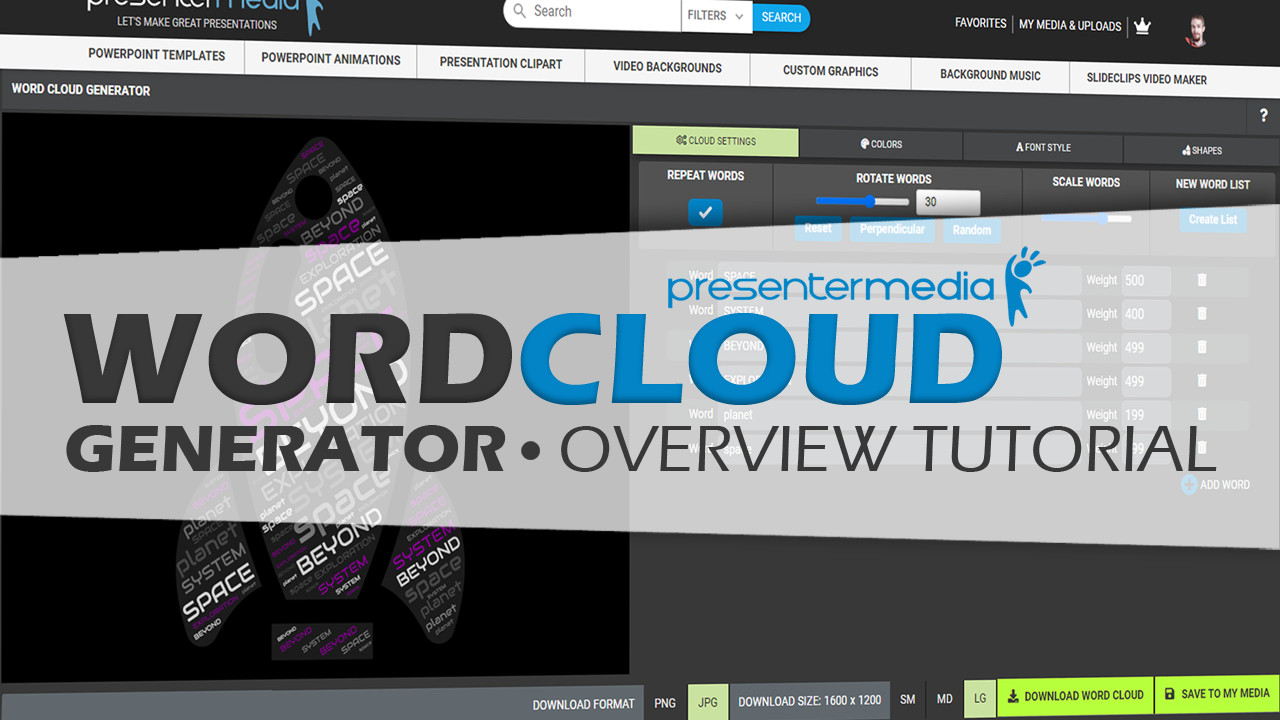
This video explains how to customize a word cloud using our word cloud generator. After watching this tutorial on how to create word clouds, you will be ready to dive in and start building your personalized word cloud art.
ADVANCED TUTORIAL
How to Combine Your Created Word Clouds with Customizable Graphics.
This wordcloud tutorial video shows a powerful technique for taking the word cloud you create from our online wordcloud generator and adding them to our customizable graphics. The result of doing this will give you a new spin on creating word clouds that your viewers will love.
After you make a word cloud, open a customizable graphic in the online customizer app, then load the word art you made into the custom graphic word area. Once in place, click build custom graphic, and it will output the custom graphic with your word cloud embedded in it.
How to Create a Word Cloud from Scratch.
Starting from scratch is another option as you begin to create a word cloud. There will be no design loaded in when you open the word cloud creator and start from scratch. At first, this can seem a little overwhelming as you think; where do I begin. No worries, check out this quick video tutorial below to see how you can quickly start creating a design scratch.
Add your word clouds to PowerPoint slides.
So what do you do once you have your word cloud created? Well, if you are using presentation software like PowerPoint, Google Slides, Keynote, or Prezi, you can easily insert it into your slides as an image. Using our animated PowerPoint templates is a great way to call attention to essential points or concepts in the presentation you create.
Have fun, be creative, and start creating some awesome word cloud art.

By: Judd Albrecht
Judd enjoys anything creative. As a content designer at PresenterMedia, he gets to put that creative desire to use everyday. «Every day I’m excited to come into work and start creating great content for our subscribers». He has degree in computer animation with over 15 years of graphic design experience, which has given him the skills to design quality graphic content. When he’s not at work, he finds time enjoying the great outdoors, jamming on the bass guitar and playing with his kids.
A word cloud (otherwise known as a tag cloud, wordle or word collage) is a digital image of words that can be displayed in different colours to highlight key themes or topics. Live word clouds are used in scenarios such as virtual or hybrid lectures, meetings, classes, training and events to engage audience all of kinds and to increase collaboration.
Live word clouds can be run via PowerPoint polling integrations or with polling software (as displayed in the header image). This live word cloud is created by asking an audience to send in word responses via an app and to form the wordcloud by the most popular words sent in. Live words clouds are impressive for many reasons, but we often hear how audiences love how this type of software can build word clouds instantly and it’s great for audience participation. You can find out more about why audiences and presenters love word cloud polling in this article here.
Typically, creating live word clouds are used with the purpose of brainstorms, for topic creation, crowdsourcing and visual representations. Using this visual display of words which forms a cloud shape with the most popular words or keywords in bold makes it easier to focus your attention and to gauge for topic analysis. If you’re wanting tips for what scenarios you could use live word clouds for, then read this article: «6 effective ways to use interactive word clouds to increase audience engagement».
Top 7 Word Cloud Generators
There are lots of different word cloud generators out there which all work in different ways, so depending on what you want a word cloud for, we’ve provided you with a list of the best ones that you can pick and choose from.
1. Vevox
Vevox is an interactive word cloud generator, polling and Q&A app that can be utilised to run live word cloud polls. If you’re looking to find a tool that can enable everyone to contribute to a word cloud and display the most popular word responses in an instant display or to build the word cloud dynamically, then your looking at the right tool. Live word clouds can either be run in the Vevox dashboard via the present view to show the word clouds on a large screen or run with the Vevox PowerPoint add-in to run the word cloud polls easily in your PowerPoint slide deck. You can see some live word clouds in action in this webinar ‘How to wow with word cloud polling’. (please note: we changed company names as of March 2019 and were formerly known as ‘Meetoo’. The display of the ‘present view’ feature has also been updated since this recording went live).
We’ve seen live word cloud polls used in a number of cases, from using them in lectures to increase student collaboration and engagement to meetings and events to collect snappy employee feedback and for honest sentiment analysis. If you would like to have a demo of how live word clouds work, contact us on hello@vevox.com. Recommendation: For those wanting to run live word clouds polls in presentations, lectures, internal meetings and events to increase engagement and collect instant feedback.
2. WordCloud.com
WordClouds.com is a great tool if you’re a beginner at creating static word clouds and if you want to use the image in any content materials. A nice feature on the website is that the wizard tool (which pops up with a speech message on your first visit to the site) allows you to upload any document (PDF, Word, PPT, Text etc.) to its site to create a word cloud image from. Once it’s created your word cloud you can edit it with the customization features to make it look the way you want it to. By using the word list you can alter and add new words, change the font size, colour and even the shape of the word cloud. One thing I did like about this tool is that you can export word cloud images easily to the dimensions and format you require, as it clearly gives you the option to export for different social media sites, different resolutions and other use cases. However, this tool does lack an intuitive part to prevent the repetition of words. Recommendation: For beginners wanting to create static word cloud designs in seconds.
3. Word Art
Word Art is a website where you can create your own word cloud art to share with others with ease and without any graphical design experience. It’s quite a nice tool to manipulate the word cloud to whatever design you want it to look like, from choosing a set shape to generating a word cloud that can be animated. You can import words in bulk from excel spreadsheets, then choose your customization options and then select ‘visualize’… and abracadabra, your word cloud has been produced. It’s easily one of the best for manipulating static word cloud images to your chosen design needs. Recommendation: For those wanting to create a beautiful static word cloud image to share on their websites, social or in resources.
4. Twinkl
Twinkl is a resource centre for any teachers and educators looking for materials that can help them with planning classes, teaching methods and assessments. They do offer a word cloud generator tool for subscribed users on their site to create word clouds as a resource for visual learning. What I do like with their word cloud tool is that they offer design templates and borders that it can create an A4 poster with the word cloud design in the middle to make it look really neat for sharing with students in your classes. Throughout the process you also have options for tips and advice for how you can turn these word cloud images in to activities for classes. Recommendation: For teachers wanting to create word cloud resources as teaching materials.
5. Word It Out
Worditout is a word cloud generator that you don’t need to sign up to and is quite easy to use for creating static images to embed in any resource you need. What I quite like about this word cloud tool is that you can see hundreds of examples on their site, that you can use for inspiration or to even use for yourself. You can also choose to filter words out during the uploading process and even add symbols or emojis. The automation options during the upload process is a bit more intuitive and clever than a few of the other static image creators. Recommendation: For those wanting to experiment with other source types other than text and for crowdsourcing word cloud ideas.
6. ABCya
ABCya is a digital gaming tool for teaching and for primary education. It does have a word cloud generator but it comes across as a game rather than a tool. That being said, I do like the simple design, how it can easily randomize words and produce different layouts dynamically. It has a much more interactive way of creating the word cloud and lots of the buttons seem to be animated. You can also set word limits unlike some other static image generators out there to avoid any ridiculously long words from ruining your image design. Recommendation: For primary school teachers/educators wanting to display a word cloud in class or for teaching materials.
7. Tricklar
Tricklar is a news tool to discover the latest news, trending words and to read any trending content over the world. Tricklar does have a word cloud creator, but it is a bit more niche than the other tools. This tool allows you to pick new topics or trending words that then automatically forms a word cloud from news articles on their own site and in other media content. There is no need to sign up to use the tool and it’s quite easy to type in a news topic to generate a trending cloud. All you need to do is select the time, location and choose a news topic and it can pull in relevant words in from these parameters. Recommendation: It’s main use would be if you wanted to create a static word cloud image based on current trends and news. Great for inspiration and automatically generating the words for you.
Recommended Word Cloud Articles:
«6 effective ways to use interactive word clouds to increase audience engagement»
«5 reasons why word cloud polling is popular and powerful»


