
You can change the default settings for new documents by making changes to the Normal template that new documents are based on. You can modify the Normal template to change its default formatting or content so that any new document that you create will use the new settings.
Important: If you mistakenly modify the Normal template, you can easily restore the default behavior by deleting, renaming, or moving it. The Normal template is automatically recreated the next time that you open Word. However, the same cannot be said for other templates. You should always create a copy of any other template before you change it.
Change the default font
Changing the default font in any template means that the font is used in every new document that is based on that template. For example, the default font for new blank documents is based on the Normal template.
-
Open the template or a document based on the template whose default settings you want to change.
-
On the Format menu, click Font, and then click the Font tab.
-
Make any changes that you want, and then click Default.
Note: Most of the styles in Word are based on the Normal style. Changing the default font also changes the Normal style, which affects any other style that is built on the Normal style.
Change the default character spacing
Changing the default character spacing in any template means that the settings for scale, spacing, position, kerning, and other typographic features are used in every new document that is based on that template. For example, the character spacing for new blank documents is based on the Normal template.
-
Open the template or a document based on the template whose default settings you want to change.
-
On the Format menu, click Font, and then click the Advanced tab.
-
Make any changes that you want, and then click Default.
Change the default margins
Changing the default margins in any template means that the margin settings are used in every new document that is based on that template. For example, the margins for new blank documents are based on the Normal template.
-
Open the template or a document based on the template whose default settings you want to change.
-
On the Format menu, click Document, and then click the Margins tab.
-
Make any changes that you want, and then click Default.
Change the default layout
Changing the default layout in any template means that the section breaks, headers and footers, and other layout attributes are used in every new document that is based on that template. For example, the layout attributes for new blank documents are based on the Normal template.
-
Open the template or a document based on the template whose default settings you want to change.
-
On the Format menu, click Document, and then click the Layout tab.
-
Make any changes that you want, and then click Default.
Change other default settings in the Normal template
You can customize the Normal template and change default settings for many aspects of a document, such as text formatting, paragraph formatting, document formatting, styles, text, pictures, AutoText entries, and keyboard shortcuts. To make changes to Normal.dotm, you must open the file from Word. If you open Normal.dotm from the Finder, Word will create a new blank document based on the template.
-
On the File menu, click Open.
-
In the Open dialog box, browse to the folder that contains the Normal.dotm file.
-
If you are using Word 2016 for Mac, go to /Users/username/Library/Group Containers/UBF8T346G9.Office/User Content/Templates
-
If you are using Word for Mac 2011, go to /Users/username/Library/Application Support/Microsoft/Office/User Templates/My Templates
Note: If you are using Mac OS X 10.7 (Lion), the Library folder is hidden by default. To browse to the Library folder from the Open dialog box, press COMMAND + SHIFT + G , and in the Go to folder box, type ~/Library.
-
-
Double-click Normal.dotm. The Normal template opens.
-
In the Normal template, make the changes that you want.
-
Save and close the Normal template.
Tips:
-
If you make extensive changes to your Normal template, we recommend that you periodically back up the file. To back up your Normal template, copy the file and rename it, or move it to another location.
-
You can quickly and easily format a whole document to give it a professional and modern look by applying a document theme. A document theme is a set of formatting choices that can include a color scheme (a set of colors), a font scheme (a set of heading and body text fonts), and an effects scheme (a set of lines and fill effects). To apply a theme:
-
In Word 2016 for Mac, on the Design tab, click Themes, and then choose a theme.
-
In Word for Mac 2011, on the Home tab, under Themes, click Themes, and then choose a theme.
-
-
You can change the page margins in your doc and create custom margins. But the next time you create a new document, Word for the web will revert to the Normal margin setting of one inch on each side of the page.
Microsoft Word allows its users to personalize their experience. With our guides below, you can learn where to look for settings and how to change them. Features can be useful to someone but make Word hard to use for another person. When looking around in Word’s settings, you might even find features you never knew existed. If you want to learn about Word’s many options, follow the steps below.

Quick Answer
When you open up Microsoft Word, you can find each one of its settings somewhere in the menu above the ribbon. Click on the File menu, then choose Options to bring up the many options necessary to alter Word’s features.

These allow you to customize the application to work how you want it to. You can also use the View menu from the ribbon to change the way Word looks.

You can often change settings by adding or removing a tick in the box next to a setting. You can find more settings by clicking on buttons that bring up further options in a tab.
After altering settings, click OK to apply the changes. Experts recommend that you restart Word for your customized settings to work.
How to change your ribbon on Windows
There are many ways you can personalize the ribbon in Office products, including Word.
What can you change in the ribbon?
Before you make any changes, it’s important to review what you can alter in the ribbon.
One way to customize your ribbon is to rearrange tabs and commands in the most beneficial way. You can even hide and unhide tabs and commands you use less often.
If needed, you can hide the entire ribbon itself.
You can also export your customized ribbon and import different ribbons.

What can you not change in the ribbon?
You can’t change the size of the ribbon itself or the size of the icons and text inside it.
Changing your screen resolution is an option if you want to resize your ribbon. Note that everything else will also scale accordingly to the resolution you choose.
It’s impossible to change the color of the ribbon unless you change the theme that Word is using.
How to change default settings
If you want to change the default settings for new documents, you can make changes to the Normal template. Every new document uses the Normal template when it’s created.
When you modify the Normal template, every new document will adjust to the changes. This allows you to personalize your Word experience further.
- Open Word and go to the File menu.

- Click on Open.

- Navigate to C:UsersusernameAppDataRoamingMicrosoftTemplates.
- Open the Normal template (Normal.dotm).
You can change the default font, character spacing, margins, layout, and some other settings. Make your desired changes as you would to any document, then Save.
Your defaults will be updated to the new settings.
Note: You can always restore the default Normal template. This will change Word back to its original settings for new documents.
Restore the Normal template by deleting, renaming or moving it. This will cause Word to recreate the original Normal template automatically.
However, you can’t use this method for any of the other templates. You should always make a backup of any template you plan to tamper with.
How to change the spelling, grammar, and proofing settings
Want to change the way Word is handling your spelling and grammar? You can customize many settings related to this topic.
- Select the File menu.
- Click on Options.
- Find the Proofing tab. This allows you to optimize your experience using Word to help you type.
- Enable or disable any feature, then click the OK button to save your changes.
You can also find extra settings for features such as AutoCorrect and AutoFormat by clicking the AutoCorrect options button.

Conclusion
The instructions above open the door for anyone curious about Word’s many settings. Of course, you can check other tabs and windows for more ways of altering how Word behaves that weren’t mentioned above.
Don’t be afraid to change things around. You can always return to Word’s default settings. Follow this video by HOWZA to quickly get everything back to normal.
Aside from changing settings in Word, we got a lot of tips on our blogs! One of which is how you can effectively add or remove buttons from the toolbars in Office.
If you’re looking for a software company you can trust for its integrity and honest business practices, look no further than SoftwareKeep. We are a Microsoft Certified Partner and a BBB Accredited Business that cares about bringing our customers a reliable, satisfying experience on the software products they need. We will be with you before, during, and after all the sales.
Further Reading
» 7 Microsoft Word Hacks You Need to Know
» How to Collaborate In Microsoft Word
» Google Docs vs. Microsoft Word: Which One Is Suitable for You?
» What’s New in Office 2021: Everything You Need To Know
» An Insanely Simple Way To Improve Productivity With Microsoft Word
» Top 14 Microsoft Word Tricks and Tips that you Should Know
How to change the ‘Blank Document’ defaults in Microsoft Word in two ways. Either ‘Set Default’ choices or update Word’s core template. aka all about Normal.dotm in Microsoft Word.
- Where does Word get its initial doc settings?
- Normal.dotm is the key
- Changing Settings – current or all docs?
- Changing defaults for ‘blank document’
- Set As Default
- Styles in a Template
- Edit the template directly
- NormalEmail.dotm for Outlook emails
- Word Document Inheritance 101
Back in 2015 Microsoft made another update blunder which deleted the key Microsoft Word normal.dotm file. That led to some questions from Office-Watch.com readers about normal.dotm and why it matters so much.
Where does Word get its initial doc settings?
When you choose ‘Blank Document’ where does Word get the initial settings from?

After all, a ‘blank’ document isn’t really blank. It might not have any visible text, but Word has to know what page size to use and many other basic settings. All the basic styles (Normal, Heading 1 etc.) need a font, font size, justification and a myriad of other adjustments.
On top of all that, there’s other personal configuration items like Ribbon, AutoText and Building Blocks that have to be saved somewhere.
Most, but not all, Word settings are saved in the normal.dotm template.
Normal.dotm is the key
It’s all in Normal.dotm (before Word 2007 it was normal.dot). Normal.dotm is the foundation for many Word documents.
A change to normal.dotm will affect any document (new or past) that’s based on that template.
Mostly you’ll never have to change normal.dotm directly (though that’s possible, see below). Most common changes (default font settings, page size, orientation etc) you can update from the Word dialog boxes and choosing the correct option (also see below).
Changing Settings – current or all docs?
When you make default changes to Word document settings, you’re given a choice about where to save it. Do you want it as the default setting for the current document or all documents based on the current template?
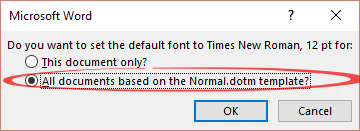
For example, the Font settings dialog has a ‘Set as Default’ button. Click on that and you’ll get this choice.

People get confused at this and probably click OK not realizing its importance.
This document only – the setting is saved in the current document only. It has no effect on any other document.
All documents based on the Normal.dotm template – changes the setting in the template (in this case normal.dotm).
Once you’ve changed a setting in Normal.dotm that setting will take effect in all documents based on that template. That can be great for consistency across many documents. But it’s most noticeable in a new document based on that template.
We’re going to focus on normal.dotm in this article. The same applies to other templates that are the basis for other documents.
Changing defaults for ‘blank document’
There are two ways to change the defaults for ‘Blank Document’. You can use ‘Set as Default’ buttons available in some Word dialogs or edit normal.dotm directly.
Set As Default
A common request is to change the default font for a blank document. Put the cursor on a line and make sure the Normal style is selection from Home | Styles. Then go to Home | Font and click the little arrow in the bottom right of that section.

That opens the full Font dialog box that’s little changed for many versions of Word.

Choose the new font, style and size you want then click ‘Set As Default’ at bottom left.
This is where you choose how to apply the new default. If you want the changes to apply to all future new documents, choose the “All documents based on the Normal.dotm template” option. Click OK.
You’ve actually changed the style Normal stored in Normal.dotm.
Styles in a Template
Style settings are stored in a template. Just like font settings, you can change a style and then choose whether that change applies to the current document or all documents using the underlying template.
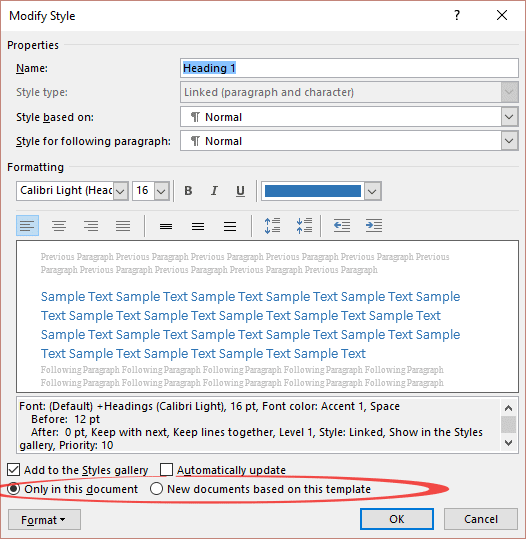
At the bottom of the Modify Style dialog are the two options:
Only in this document – save change to document only
New documents based on this template – this text is a little misleading. It says that the change will only apply to new documents from the template. That’s wrong. The change will apply to all documents which use that template and linked style.
The alternate message (example above) “All documents based on the Normal.dotm template” is more accurate.
Edit the template directly
The direct way to change defaults is to open the template directly. This usually is NOT necessary because the options in Word dialog boxes should do it all for you. But sometimes the whole thing gets too messy and it becomes more direct to just open the template file and change it.
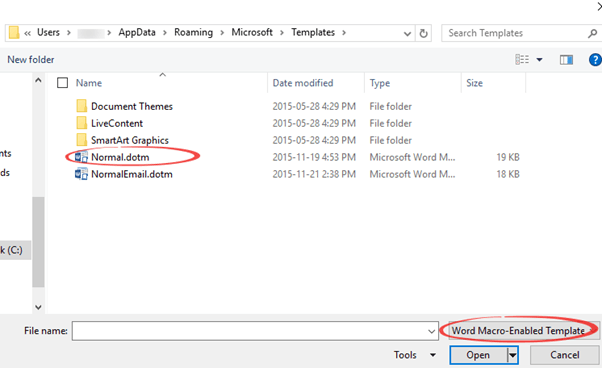
First you have to find normal.dotm . It’s normally at
C:Users<Windows user name>AppDataRoamingMicrosoftTemplates
Check the template location at Options | Advanced| General | File Locations
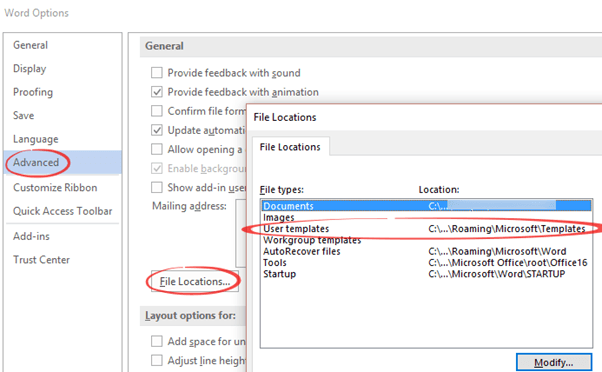
User Templates has the location of your main templates.
Open normal.dotm from File | Open. Change the file type to Word Macro-Enabled Templates. Choose Normal.dotm then Open.
We strongly suggest you make a backup copy of normal.dotm, just in case your changes have unintended effects.
Now you can edit the template directly. Change the styles, page size or orientation and many other things. Save the template then open a new document to see the results.
NormalEmail.dotm for Outlook emails
As you can see in the above picture, there’s also a NormalEmail.dotm template in the same folder as Normal.dotm. That’s the basis for Outlook emails because the Outlook email editor is really Microsoft Word in disguise.
Changing NormalEmail.dotm will change the defaults for new emails in Outlook.
Word Document Inheritance 101
Document settings (as opposed to settings for the Word program as a whole) can be saved in template files (dotx or dotm) as well as the document itself.
Word will check the document for a setting. If there’s nothing, there it’ll look in the template for the setting.

This is called inheritance because the document will ‘inherit’ a setting from a template.
(yes, there can be multiple templates involved with one template linked to another and so on. To keep it simple we’ll stick with one document and one template.)
For example, the font choice for a paragraph. That can be saved in the document itself but, if it’s not then Word will check the template to get the setting.
(yes, we know that there can be direct formatting, then document based styles, then possibly multiple templates. We’re trying to keep it simple – OK?)
Why choose Body Text vs Normal style in Word
Two ways to change the default font and more in Word
Set the default translation language in Word
Подавляющее большинство пользователей Word вообще не заглядывает в настройки текстового редактора после его установки или обновления, полагая, что Microsoft о них хорошо позаботилась. Отчасти это так. С другой стороны, некоторые параметры всё же стоило бы подкрутить. О них мы вам и расскажем.

Во вступлении хочу поделиться полезным наблюдением, которое и навеяло тему этой статьи.
Каждое обновление Windows 10 Insider Preview сбрасывает счётчик пробного периода Microsoft Office 2016. Как правило, ранние сборки «десятки» выходят чаще одного раза в месяц и 30 дней пробного срока попросту не успевают закончиться.
С помощью этой особенности я полноценно пользуюсь последними версиями Word, Excel и иже с ними абсолютно бесплатно и абсолютно легально уже на протяжении семи месяцев. Единственное неудобство — сброс настроек, которые необходимо устанавливать заново. Но это, как мне кажется, ничтожная цена. Пользуйтесь на здоровье, пока лавочку не прикрыли.
Тема Office
В Word 2016 предусмотрены три темы оформления. Белую тему можно назвать нетленной классикой всех поколений офисного пакета. Новая тема «Разные цвета» помогает ориентироваться среди нескольких одновременно запущенных приложений. Тёмно-серая тема увеличивает контрастность отдельных элементов интерфейса, что может оказаться полезным для людей с ослабленным зрением или уставшими глазами.
Как правило, мы работаем за компьютером в разное время суток и при разных источниках света: естественном, искусственном и смешанном. Попробуйте тёмно-серую тему в обычных для себя ситуациях: возможно, вашим глазам станет легче.
Настройка находится во вкладке «Общие» параметров Word.
Автозамена
Навскидку напомним себе самые распространённые сценарии применения автозамены:
- Сокращение сложных и длинных терминов, названий организаций, фамилий с инициалами и должностей. Например, какой-нибудь «инженер-системотехник сектора информационной безопасности отдела внедрения» так и напрашивается на автозамену, чтобы не мучиться с написанием заявлений.
- Исправление типичных описок и ошибок, связанных с индивидуальными особенностями печати текста и пробелами в знании русского языка, а также исключение двоякого написания слов. Так, Word принимает как слово «матрац», так и слово «матрас». Автозамена исключит один из вариантов на ваше усмотрение.
- Упрощение ввода специальных символов и математических знаков. Самый явный пример — это постоянные поиски маленького кружка верхнего регистра, когда дело доходит до градусов Цельсия.
Польза автозамены математическими символами особенно очевидна, если запомнить основные команды и разрешить их использование вне областей формул.
Настройка находится во вкладке «Правописание» параметров Word.
Требование буквы «ё»
Среди носителей русского языка регулярно возникают споры относительно некоторых его норм. Так, есть недопонимания по поводу англицизмов, правильного определения рода отдельных существительных и необходимости буквы «ё». Как поясняет «Грамота.ру», написание буквы «ё» лишь в некоторых случаях обязательно, а в основном — факультативно, то есть является делом вкуса. Я люблю эту букву, пускай до неё тяжело дотягиваться на клавиатуре и легко пропустить в спешке. Чтобы такого не происходило и ваш текст всегда придерживался общей нормы, задайте строгое требование «ё» во вкладке «Правописание» параметров Word.
Автосохранение
Предположим, вы печатаете со средней скоростью около 300 символов в минуту. Это несколько строчек текста, которые вы хорошо помните и можете без труда повторить. За 10 минут вы успеваете положить на бумагу приличный объём материала в 3 000 символов, детали которого не так просто восстановить. И именно раз в 10 минут Word автоматически сохраняет ваши труды.
За это время может случиться разная бяка: например, сядет батарея, «прыгнет» электричество, произойдёт сбой оборудования или флешка вывалится из гнезда. Установите малый интервал автосохранения, чтобы обезопасить себя от неприятностей. Пары минут будет вполне достаточно. И не стоит переживать, что Word во время сохранения будет чувствительно подвисать: те времена давно прошли. И не забудьте разрешить сохранение последней автосохранённой версии при закрытии без сохранения!
Внедрение шрифтов
Конечно, Word далеко не лучшая программа для создания графических макетов, но и её шаблоны не так редко используют для подготовки открыток, грамот и афиш. При этом применяются специфические декоративные шрифты, подчёркивающие общую стилистику документа. Одна беда: эти шрифты вряд ли установлены у тех, кому они адресованы, и Word заменит их на похожие при открытии документа, что может полностью убить всю вёрстку. Чтобы этого не произошло, разрешите внедрение шрифтов в файл, если вам приходится заниматься подобными украшательствами. Настройка находится во вкладке «Сохранение» параметров Word.
Значения нового документа
Сложно сказать, чем Microsoft приглянулся Calibri, 11 пт, но именно этот шрифт мелкого размера назначен по умолчанию для всех новых документов текстового редактора. Откровенный промах, от которого некоторые пользователи Word могут страдать по нескольку раз на день. При этом его легко исправить в настройках шрифта (Ctrl + D): выберите подходящие значения и нажмите кнопку «По умолчанию» в левом нижнем углу окошка, подтвердите своё решение, назначив параметры для всех будущих документов шаблона Normal.
Таким же образом можно настроить значения абзаца, например междустрочный интервал или отступ первой строки.
Автоматическое переключение раскладки
Сколько раз вы открывали документ Word и по невнимательности начинали печатать не на том языке? Много. Причём в отдельных случаях вы успевали набрать изрядное количество текста, прежде чем недоразумение всплывало наружу. Настройка «Автоматически переключать раскладку клавиатуры в соответствии с языком окружающего текста» исключает подобные промахи.
Проставьте галочку, чтобы раскладка автоматически переключалась на кириллицу для каждого нового документа (необходима русская локализация офисного пакета). В том случае, если вы работаете в уже существующем файле, язык будет соответствовать языку текущего абзаца, будь то русский, английский или любой другой иностранный. Дополнительный плюс этой настройки — уменьшение нагрузки и истирания клавиш Ctrl и Alt. 
Есть что добавить? Пишите о своих дежурных настройках Word в комментариях.
![]()
Download Article
Learn the basics of formatting a Microsoft Word document
![]()
Download Article
- Formatting the Layout
- Formatting Text
- Adding Pictures, Graphs, & Tables
- Using a Formatted Template
- Saving in Other Formats
- Q&A
|
|
|
|
|
Microsoft Word is the world’s most popular word processing app. Depending on what kind of legal, formal, or personal paper you’re writing, each has its own formatting guidelines. Fortunately, Microsoft Word makes it easy to format the layout, text, and other objects in your document. If you’re new to using Microsoft Word, don’t worry. You can be formatting your document like a pro in no time. This wikiHow guide will teach you simple ways to format a Word document on your PC or Mac computer.
Things You Should Know
- You can find most of the formatting tools you’ll need in the Ribbon menu at the top of your document.
- If you don’t want to do all the formatting from scratch, try using one of Word’s premade templates.
- Save your document in different file formats using the Save a Copy or Save As menu.
-

1
Explore the Word user interface. You can access most of Word’s formatting tools from the Menu Bar or the Ribbon at the top of the window. You can modify which tools are visible using the View menu.
- The Menu Bar is the area at the top of the screen where you will find File, Edit, View, and other important menu commands.
- The Ribbon is at the top of your workspace and contains icons, menus, and shortcuts to common tasks.
-
2
Align your document. Different types of documents call for different text alignments. You can choose whether to align your entire document to the left, right, or at the center on the Home tab by clicking the Alignment buttons in the «Paragraph» section.
- These are the buttons that look like a small version of a document, with small black lines arranged according to their button’s alignment function.
- You can also adjust alignment by selecting the text and objects you want to align, right-clicking the selection, and choosing Paragraph. Select your preferred alignment from the Alignment menu under the General header.
- You can either set the alignment for the whole document or just a selected piece of text.
Advertisement
-
3
Set the line spacing of your document. Need to change your document to single or double-space? You can adjust the spacing of your entire document, or for selected text.
- If you haven’t begun typing or adding content to your Word document, click the Home tab, click the «Line and Paragraph Spacing» icon (a row of lines with vertical arrows to the left of the lines pointing up and down, and select an option.
- If your document already has text or other content, press Ctrl + A (PC) or Cmd + A (Mac) to select everything in the document, right-click the selection, and choose Paragraph. You can then choose your desired spacing from the «Line Spacing» menu.
- For a single-spaced document, choose 1.0. For double-spacing, choose 2.0.
- Many professional documents, like college essays and cover letters, should be double-spaced.
-
4
Adjust the page orientation. If you need to write the document in a different orientation, click the Layout tab at the top of Word, select Orientation, and choose either Portrait or Landscape.
-
5
Change the size of the paper. If you need to print the document on a specific paper size, click the Layout tab, click Size, and then select your desired size from the drop-down list.
- This will change the virtual size of the document you’re writing as well as the actual size of the printout.
-
6
Adjust the headers and footers. A header contains details that will appear on every page of the paper, such as page numbers, your name, or the document title.
- To set the header of your document, double-click on the topmost part of the page, and the header field will appear. You can also click the Insert tab and select Header.
- Footers are just like headers. All text in the footer will appear at the bottom of each page of your document. To set the footer, double-click on the bottommost part of the page, and the footer field will appear. You can also use the Footer button on the Insert tab.
- You can also format your headers and footers by selecting the View tab and clicking Header and Footer on the list. This action will open the headers and footers on your page and allow you to edit them.
-
7
Insert page or section breaks with the Breaks menu. Go to the Layout tab in the and click Breaks if you want to start a new page or section in your document. You can choose from a variety of types of breaks, including Page, Column, and Section. This is a very useful tool if you need to format different sections of your document in different ways.[1]
- For example, you can use section or page breaks to help you format your page numbers so that the numbering restarts with each new section.
-
8
Adjust the margin size with the Margins tool. Click the Margins button in the Layout tab and select a margin from the pre-defined margin settings listed on the drop-down list.
- If you want to use your own margin measurements, click Custom Margins at the very bottom of the drop-down list to set your own.
-
9
Add columns to split your text vertically on the page. If you need to create a newspaper-like document, you can do so by adjusting the format of the document to columns. Click the Layout tab, select the Columns option, and choose the number and alignment of columns from the drop-down list.
- The Columns button looks like a rectangle with two vertical columns of blue lines on it.
- If you want to create one, two, or three columns, you can do so from the preset options. If you’d like to create more, you’ll need to choose More Columns from the bottom of the dropdown menu.
- Note that this column option is different from the columns you get when you insert items like tables on your document.
-
10
Add bullets and numbers to make lists. Highlight the text that you would like to be numbered or bulleted and click the Numbering or Bullets button on the Home tab of the Ribbon.
- These buttons can be found side by side on the Ribbon, near the alignment buttons. The Numbering button displays three small lines with numbers to the left of the lines and the Bullets button displays three small lines with bullet points to the left of the lines.
- There’s also a third button that allows you to create more elaborate multi-level list styles, which is useful for formatting outlines.
-
11
Experiment with document styles. All documents have standard built-in styles (for example, Normal, Title, Heading 1). The default style for text is Normal. The template that a document is based on (for example, Normal.dotx) determines which styles appear on the Ribbon and on the Styles tab. You can see the current style presets for your document in the Home tab of the Ribbon.
- Before you apply a style, you can see all of the available styles and preview how they will appear when applied.
- On the Home tab, click a style to apply it to selected text.
- Click the Styles Pane button (the arrow pointing down and to the right) to view and select from advanced Style options.
- By default, Word applies a paragraph style (for example, Heading 1) to the entire paragraph. To apply a paragraph style to part of a paragraph, select only the specific part that you wish to modify.
-
12
Reveal hidden formatting symbols if you’re having trouble. Word documents often contain hidden code that can cause frustrating problems when you’re trying to modify your formatting. For instance, an invisible extra paragraph mark or section break can create unwanted spaces between paragraphs or lines of text. To see formatting symbols that are normally hidden so you can delete or modify them, you can click the ¶ button in the Home tab, or try one of the following:[2]
- On Windows, open File, select Options, and click Display. Tick the box next to Show all formatting marks.
- In Word for Mac, open the Word menu, then Preferences, then View. Check the box next to All in the Show Non-Printing Characters section of the View menu.
-
13
Use the View menu to change your view of the document. The View menu can let you change how your document looks in Word without actually making changes to the format. For example, Print Layout will show approximately what your document will look like when it’s printed out, while Web Layout will display the whole document in one long chunk without any page breaks.
- The View menu also lets you zoom in and out on your document.
- You can also change your view with the buttons and zoom slider at the bottom right side of the document pane, or with the View tab in the Ribbon.


Advertisement
-
1
Change the font face. On the Home tab, you will a drop-down menu containing a list of fonts to choose from. Use your mouse to select the text you want to change, then choose a font from the list.
-
2
Change font size and color. Also on the Home tab, you can change the size, color, and highlighting for your font. Select the text you want to format, then choose your options.
- By default, they will be set to the size and font associated with your document’s current Style settings. For example, if you’re using Word’s default template, the Normal style will use Calibri as the default font and 12 pt. as the default text size.
- Always consider the formatting guidelines of the document you are writing when choosing the font style and size.
- The standard font for most college and professional papers is Times New Roman font, text size 12.
-
3
Make text bold, underlined, or italicized. Besides setting the font style and size, you can also adjust the emphasis of words and lines in your document. Near the font and text size menus, you will see the Bold, Italics, and Underline buttons.
- Just click the buttons to make your text bold, underlined, or italicized.
- In this section, you can also find special text formatting options such as Strikethrough, Subscript, and Superscript.
-
4
Highlight text on the page. If you would like to change the background color behind selected text, similar to using a highlighter on a printed page, click the Text Highlight icon, which is a pen above a colored line.
- You can also add special text effects with the Text Effects button, which looks like a capital A with a glowing blue border.


Advertisement
-
1
Drag an image into your document. This is a quick way to add a picture to your Word document. Simply select an image on your desktop and drag and drop it into the document window. Make sure your image is placed exactly where you want it before you drop it.
- You can also insert an image by going to the Insert tab, then clicking Pictures. Select one of the options to browse for images on your computer, the web, or Word’s gallery of stock photos.
- You can also insert graphics or other media (such as video or audio clips) using the Shapes, Icons, or 3D Models, and Media buttons.
-
2
Enable text wrapping. Text wrapping changes the layout of your document, allowing the text to flow around the image no matter where it is placed. To turn on text wrapping:
- Right-click (or ctrl-click, on a Mac) on the image and hover over Wrap Text. Select the alignment that best suits your document. You will see a preview as you hover over each option.
- To change the location of the image in the document, select the image and then hold the Ctrl key. While holding the key, use the arrow keys to move the picture around the document.
- When you right-click or ctrl-click your image, you’ll also see an option in the context menu to add a caption under your image.
-
3
Edit your image in the Picture Format tab. Once you insert your image, you can select it to open a new Picture Format tab in the ribbon. From there, you can choose from a variety of tools, such as:
- Making corrections or adding artistic filters to the image
- Adding style effects, such as a drop shadow or frame, to the picture
- Entering alt text
- Tweaking the position of your image or changing the text-wrap settings
-
4
Add a graph or chart in the Insert tab. Click the Insert tab on the Ribbon, and then click the Chart option. Choose your preferred type of graph, such as a pie or bar chart, from the dropdown menu.
- Depending on the type of chart or graph you choose, Word may automatically launch Excel and create a new spreadsheet, where you can enter data for your chart.
-
5
Modify your graph. When you choose a graph type, a new tab will appear in the Ribbon menu called Chart Design. Navigate to that tab with the chart selected to make changes to the look of your graph or chart, or choose the Edit in Excel button to make changes to the data in your chart.
-
6
Use the Table tool to insert a table. If you want to add a table to your document, head over to the Insert tab and click the Table button. A menu will pop open where you can either scroll over a grid of squares to select your number of rows and columns, or select an option like Insert Table or Draw Table.
- Insert Table opens a pop-up menu where you can specify parameters like the number of rows and columns and whether or not the contents of the table autofit your document window.
- The Draw Table tool allows you to draw the table with your mouse directly in the document.
- Once you start creating a table, you’ll see several new table editing tools in the Layout tab.


Advertisement
-
1
Choose a template from the New Documents pane. Templates are a great way to create a nice-looking document without having to do all the formatting from scratch. To use one, open Word and select New from the side menu to create a new document, or select New from Template from the File menu. Click one of the templates on the screen to select it.[3]
- If you don’t see a template you like, use the Search bar at the top of the window to find one that fits your needs. For instance, use keywords like “flyer,” “resume,” or “research paper” to find different styles of templates.
-
2
Click Create to open the template. The template will open as a new document.
-
3
Select text within the template to modify it. Word templates are simply preformatted documents with text, graphics, and other elements already in place. To add your own text, select text anywhere on the document and type in your own. The new text will have the same format as whatever text you selected and replaced. You can also click on a blank area of the document and start typing to add new text.
- To select a single word, double-click it. You can select longer pieces of text by clicking and dragging your mouse, or positioning your cursor at the start of the selection and holding down Shift while pressing the Right Arrow key.
- You can also select and move, delete, or replace other elements in the template, such as images, graphs, or tables.
-
4
Modify your template with the Styles pane. Templates use styles to create their distinctive looks. If you want to change the look of the template, click the Styles button in the Home tab of the ribbon toolbar. Click the down arrow next to any of the style elements and select Modify Style… to make changes.
- You can also make any other types of changes you like using the rest of the tools in the ribbon menu or Format menu.
-
5
Save your modified template as a document. When you’ve made the changes you want to the template, save it the same way you would any other Microsoft Word document.


Advertisement
-
1
Click the file menu and select Save a Copy…. If you want to save a document as a file type other than .DOCX, you can do so with the Save a Copy function.
- If it’s a brand-new document that you haven’t already saved, select Save As… instead.
-
2
Open the File Format dropdown menu. You’ll see this menu at the bottom of the Save a Copy or Save As window.
-
3
Select the format you want from the menu. In addition to common formats like .DOC, .DOCX, .TXT and .RTF, you can also save your document as a PDF, an XML file, or a macro-enabled Word file.
- Check out the list of file formats that are supported in word here.


Advertisement
Add New Question
-
Question
What is Microsoft publishing?

UK_Gamer05
Community Answer
Publisher is a tool for making posters, leaflets, booklet,s etc. It’s for when you need to create something that isn’t a standard document.
-
Question
How do I move from page one to page two of a Word document?
UK_Gamer05
Community Answer
In Word 2016, on the insert tab, either select insert new page or page break.
Ask a Question
200 characters left
Include your email address to get a message when this question is answered.
Submit
Advertisement
Thanks for submitting a tip for review!
Tip
- Unless free-handedly writing your paper, consult the guidelines of your document first before adjusting its format.
- Besides the header, footer, and page layout formats (which affect the entire document), all the other formatting tools can be applied only on specific parts of the document.
About This Article
Thanks to all authors for creating a page that has been read 309,741 times.