
Содержание
- Способ 1: Автоматически
- Способ 2: Вручную
- Способ 3: Восстановление несохраненных документов
- Способ 4: Восстановление резервной копии
- Способ 5: Поиск несохраненных файлов и копий
- Дополнительно: Настройка автосохранения
- Восстановление документа при зависании программы
- Вопросы и ответы

Способ 1: Автоматически
Если работа Майкрософт Ворд была экстренно завершена, например, вследствие зависания программы, ее принудительного закрытия или отключения ПК, восстановить последний несохраненный документ(ы), с которым(и) вы работали, будет предложено при следующем запуске.
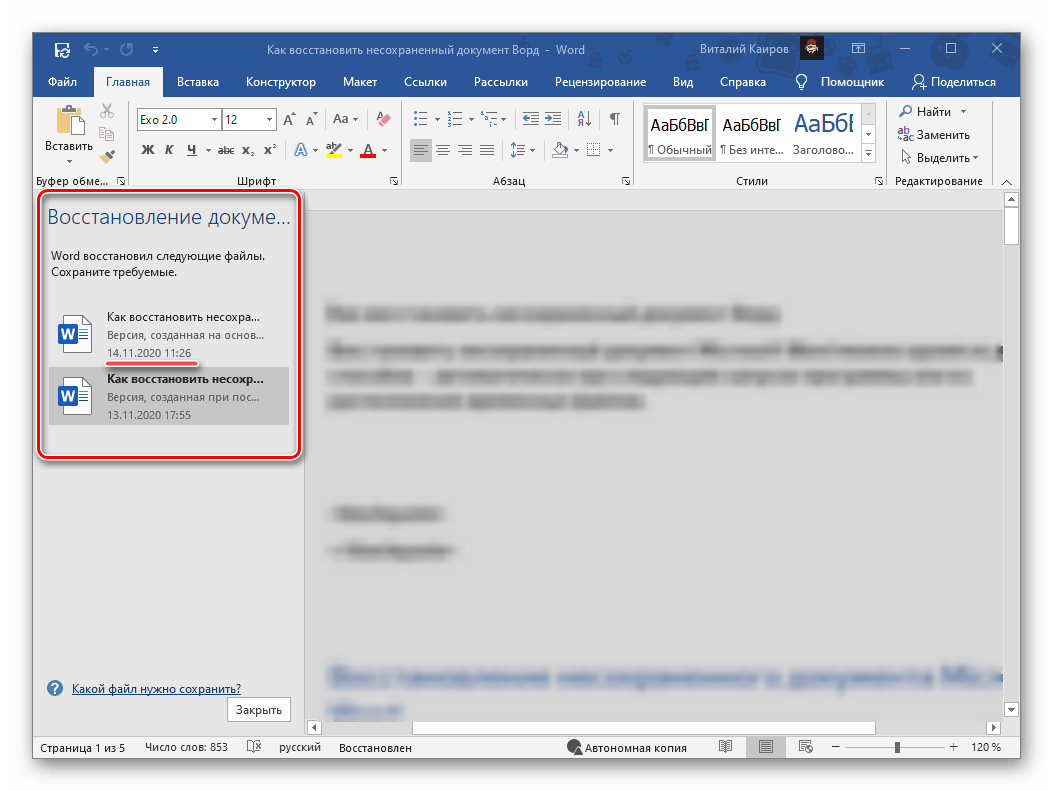
- Откройте текстовый редактор. Слева в его главном окне будет находиться блок «Восстановление документов» со списком «Доступные файлы». Ознакомьтесь с ним и, ориентируясь на название, дату и время создания (ищите самую «свежую» версию), найдите тот документ, который не удалось своевременно сохранить. Отыскав, кликните по нему левой кнопкой мышки.
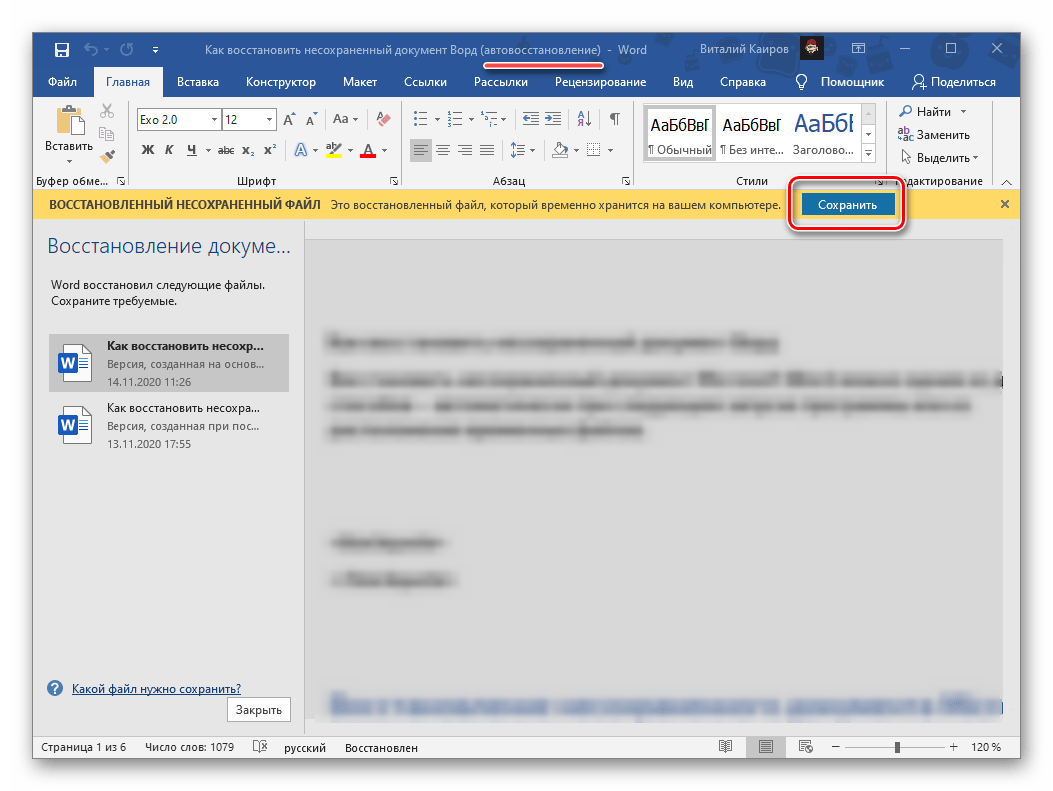
- Файл будет открыт в новом окне. Сохраните его в любое удобное место на диске ПК:

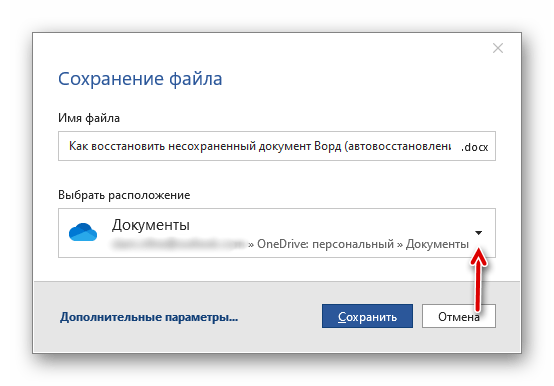
Воспользуйтесь для этого обозначенной выше кнопкой, затем выберите расположение

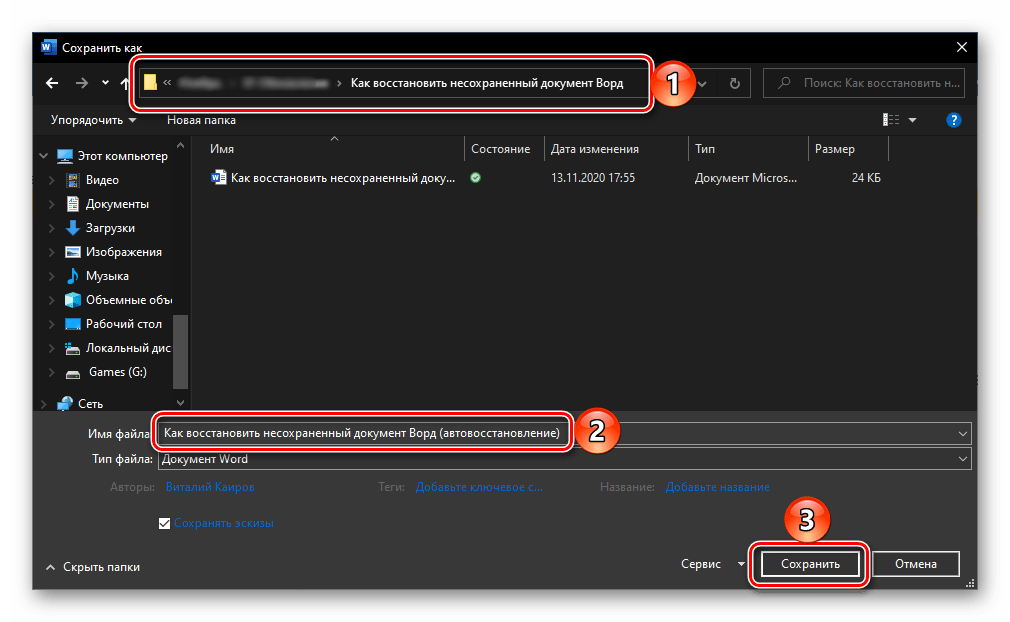
и укажите его в «Проводнике». Для подтверждения нажмите «Сохранить».

Примечание: К изначальному наименованию текстового документа будет добавлена приписка «(Автосохраненный)» или «(автовосстановление)». Если вы хотите сохранить его под прежним именем, заменив оригинальный файл, сначала закройте первое окно программы. Отметим, что к последнему решению стоит прибегать только в том случае, если больше нет документов для восстановления.
- Область «Восстановление документа» в его обновленной версии будет закрыта. Если требуется восстановить еще один или несколько файлов, которые тоже не были сохранены, вернитесь к первому открытому окну программы и повторите действия из первого шага настоящей инструкции.
В большинстве случаев содержимое текстового документа данным методом восстанавливается не в полном объеме. В первую очередь это связано с тем, какое значение времени установлено для доступной в Word функции автосохранения (подробнее о ней будет рассказано в предпоследней части статьи), – по умолчанию это 10 минут, и за этот промежуток более-менее опытные пользователи вполне могли написать достаточно большой фрагмент текста. К сожалению, он наверняка будет потерян.
Способ 2: Вручную
Упомянутая выше функция автоматического сохранения создает резервные копии документов Ворд и помещает их в указанное расположение на диске. Это те же файлы, которые предлагается восстановить при запуске программы после ее аварийного закрытия, но это происходит не всегда. Именно в таком случае потребуется самостоятельно выполнить данные действия.
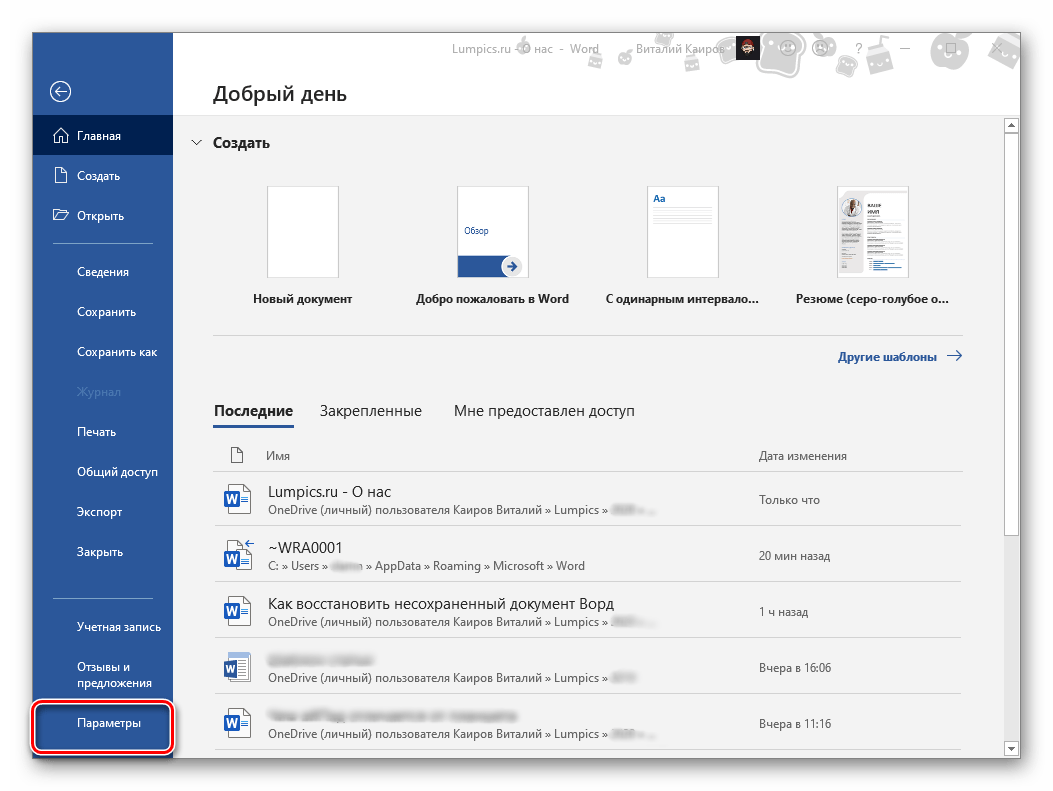
- Запустите Word, вызовите его меню «Файл» (в ранних версиях это расположенная слева на панели инструментов кнопка с логотипом MS Office)

и откройте «Параметры».
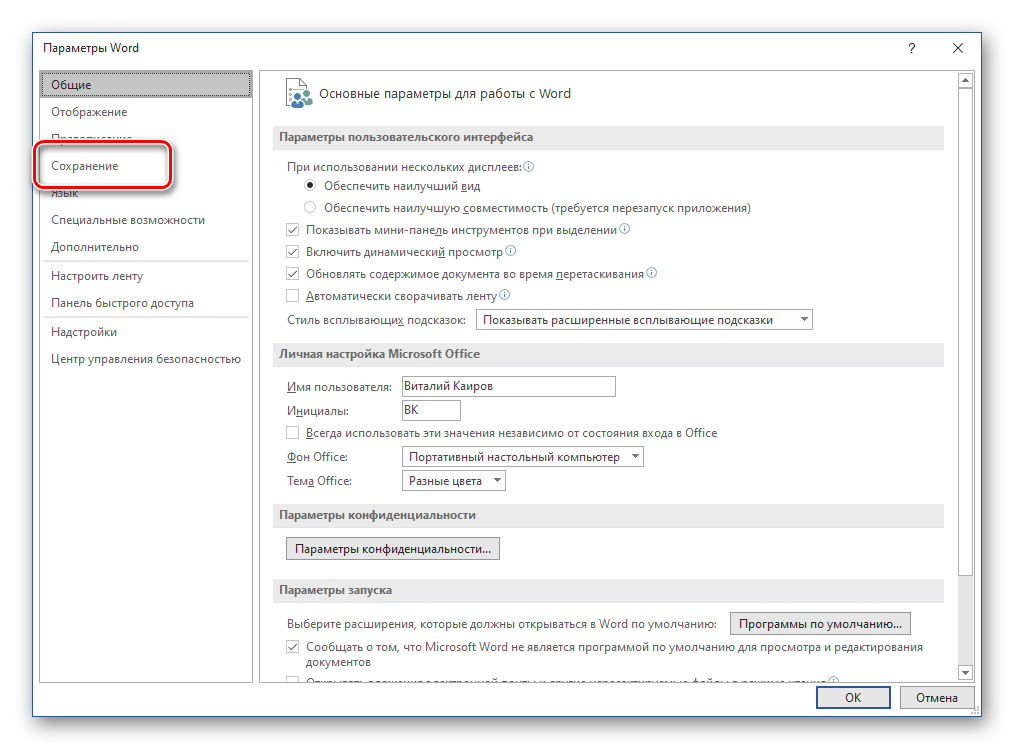
- В открывшемся окне перейдите во вкладку «Сохранение».
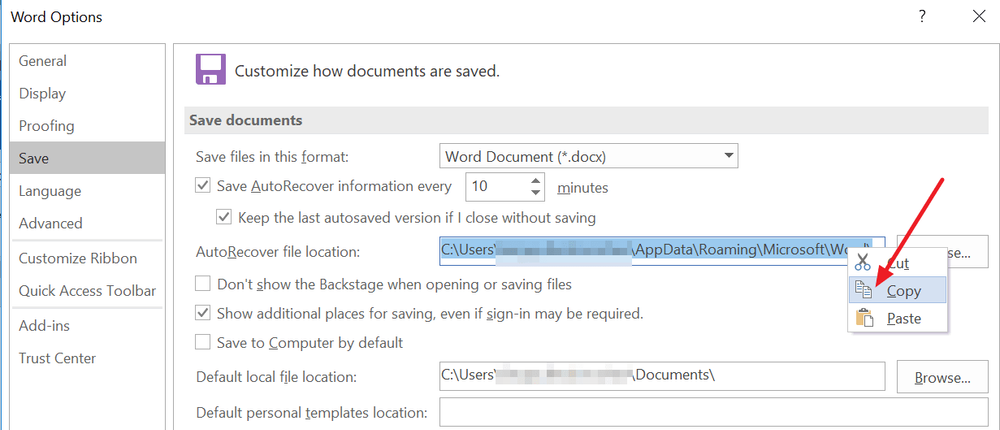
- Именно здесь задаются все параметры автосохранения, но сейчас нас интересует только один – «Каталог данных для автовосстановления». Скопируйте путь, указанный напротив данного пункта.
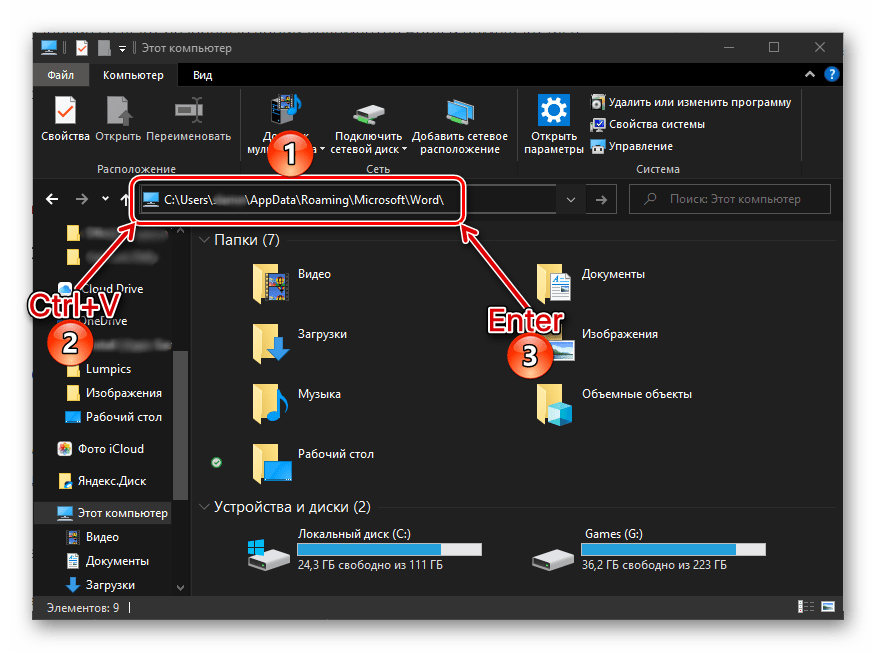
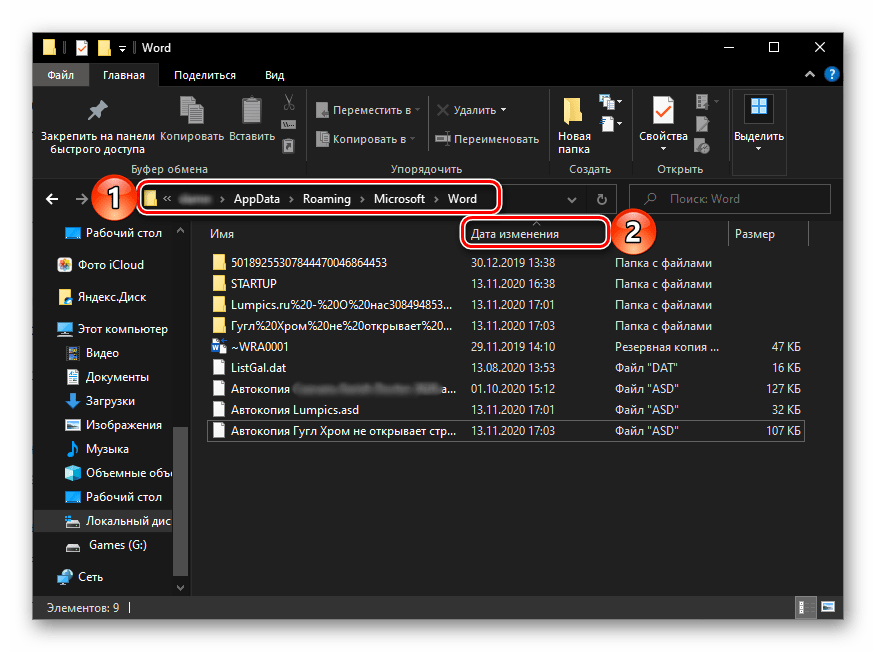
- Откройте «Проводник», например, воспользовавшись клавишами «Win+E», введите в его адресную строку скопированный на предыдущем шаге путь и нажмите «Enter» для перехода в это расположение.

Читайте также: Как открыть «Проводник» на компьютере с Windows
- В открывшейся директории может быть довольно много файлов и папок, но, так как нас интересуют последние версии, для удобства навигации следует упорядочить содержимое по дате изменения.
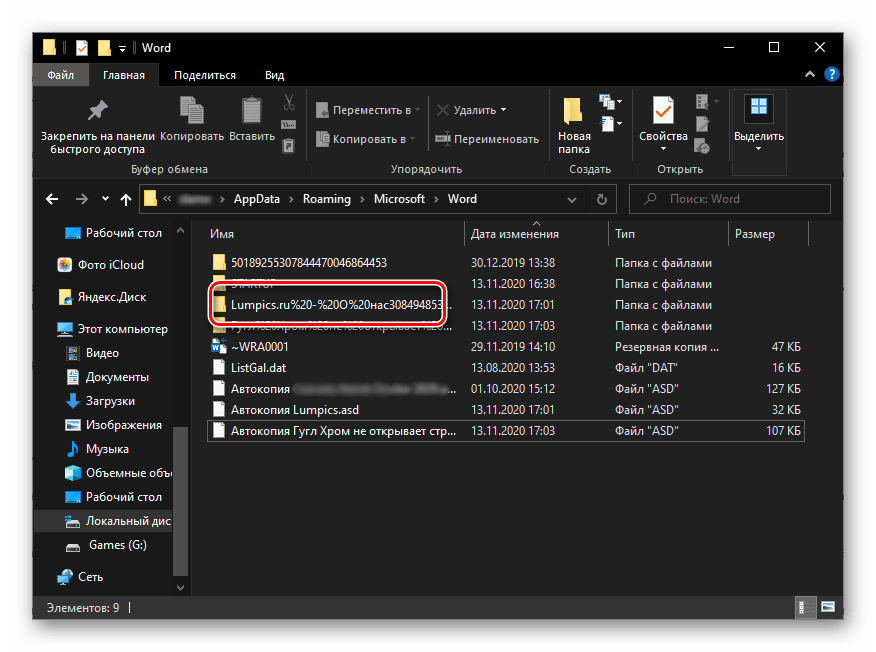
Резервная копия файла может храниться как непосредственно в самом каталоге, так и в отдельной папке,
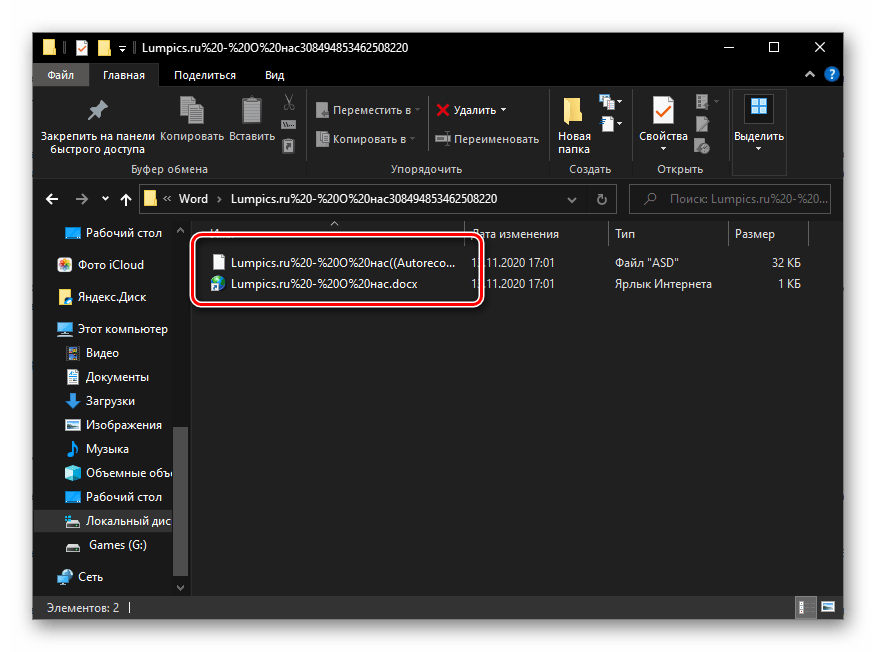
название которой будет повторять название документа, но «разбавленное» символами вместо пробелов. - Как и в предыдущем методе, ориентируясь на наименование документа и дату его создания, найдите тот, который не был сохранен и сейчас требуется восстановить.
- Откройте его двойным нажатием левой кнопки мышки или через контекстное меню и повторно сохраните на диск.


В плане результативности этот способ ничем не отличается от предыдущего и имеет те же недостатки – часть содержимого документа, которая была создана с момента последнего автоматического сохранения, не будет восстановлена. При этом в некоторых случаях такой подход является единственным решением задачи, озвученной в заголовке статьи.
Способ 3: Восстановление несохраненных документов
Помимо автоматического сохранения текстовых файлов в процессе работы с ними, Word также создает резервные копии, которые можно восстановить через меню программы.

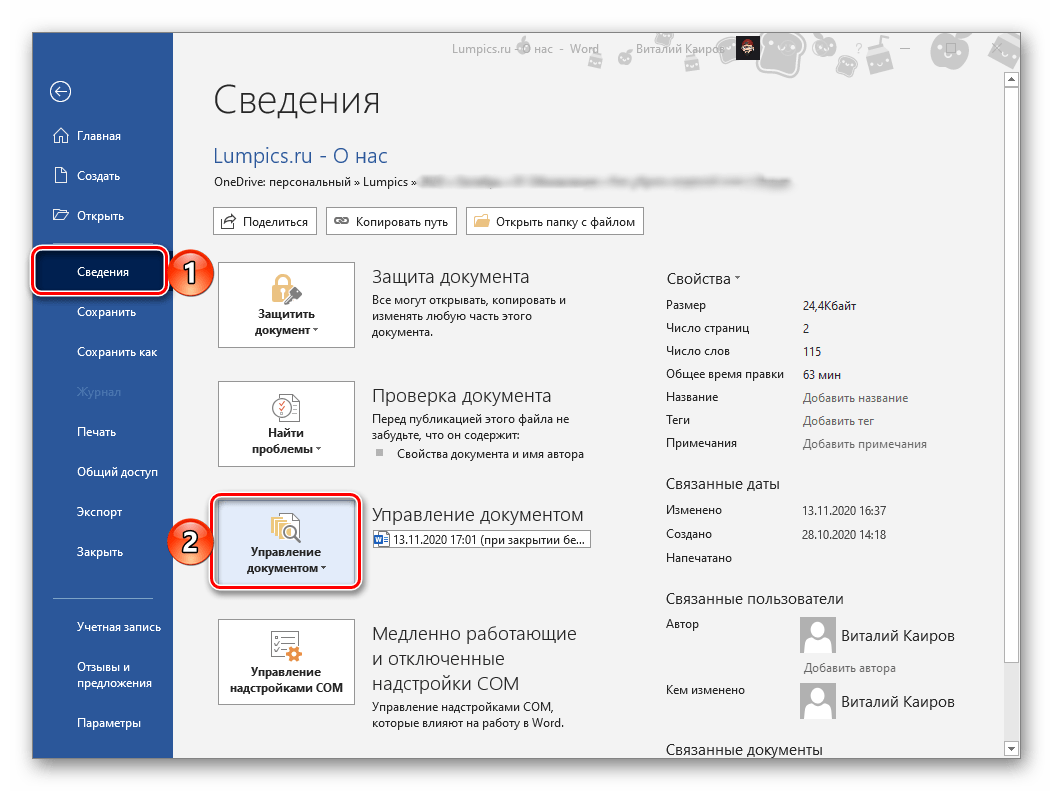
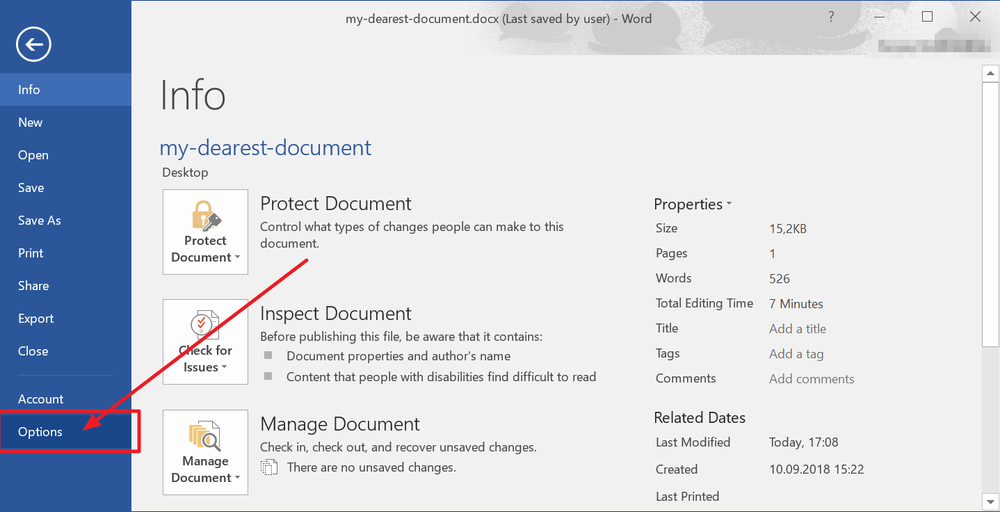
- Откройте Ворд, вызовите меню «Файл», перейдите к разделу «Сведения» и нажмите на кнопку «Управление документом».
- Выберите пункт «Восстановить несохраненные документы».
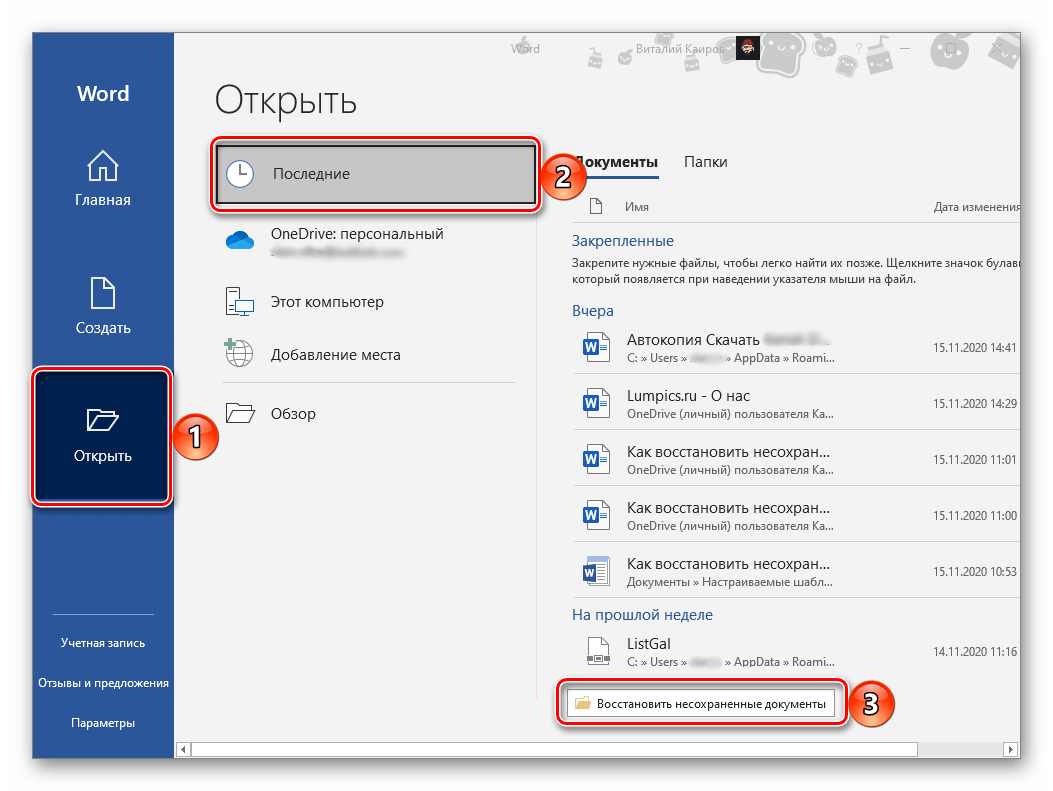
Примечание: Получить доступ к данной возможности программы можно и несколько иначе, перейдя по пути «Файл» — «Открыть» — «Последние» и нажав кнопку «Восстановить несохраненные документы».
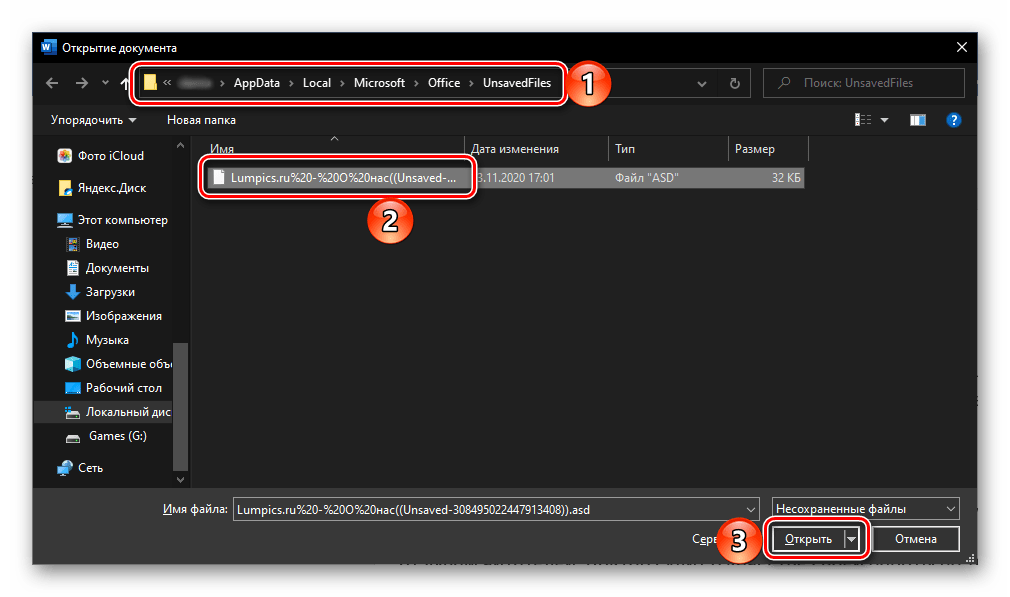
- Будет открыто окно системного «Проводника», в котором указано расположение папки с резервными копиями. Ориентируясь на название, найдите тот файл, который ранее не удалось сохранить. Выделите его и нажмите на кнопку «Открыть».

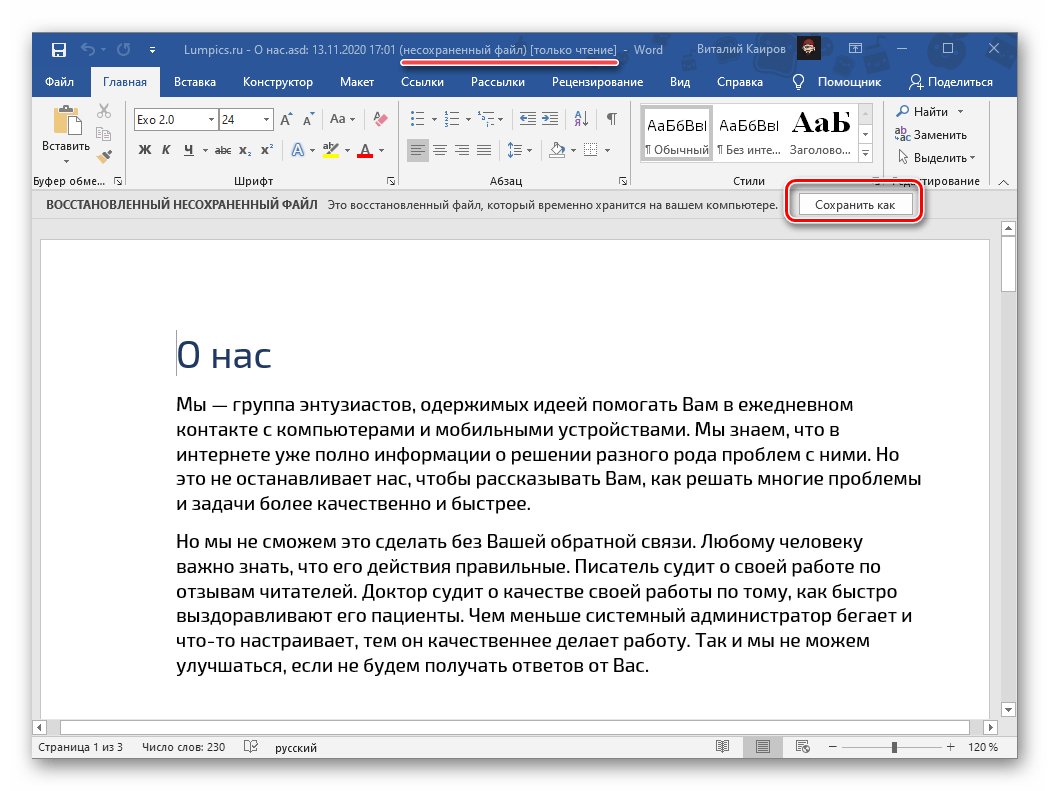
Все что остается сделать далее – повторно сохранить этот документ в любое удобное место на диске (изначально он будет открыт в режиме «Только чтение»).
Как и в рассмотренных выше случаях, велика вероятность, что содержимое будет восстановлено не полностью.
Способ 4: Восстановление резервной копии
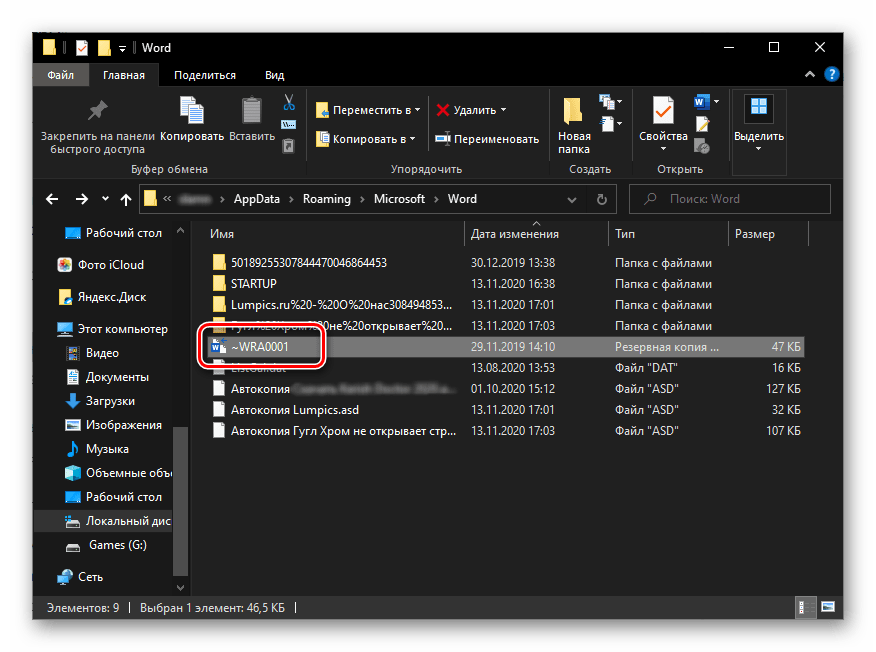
При выполнении инструкции из Способов 2 и 3 вы наверняка могли заметить файлы в неизвестных форматах, которые содержатся в папке автосохранений Ворд. Среди них вполне могут находиться несохраненные документы, восстановить которые можно через саму программу.
- Выполните действия из шагов № 1-3 части «Способ 2: Вручную» настоящей статьи. То есть узнайте расположение папки с автоматическими сохранениями и скопируйте его.
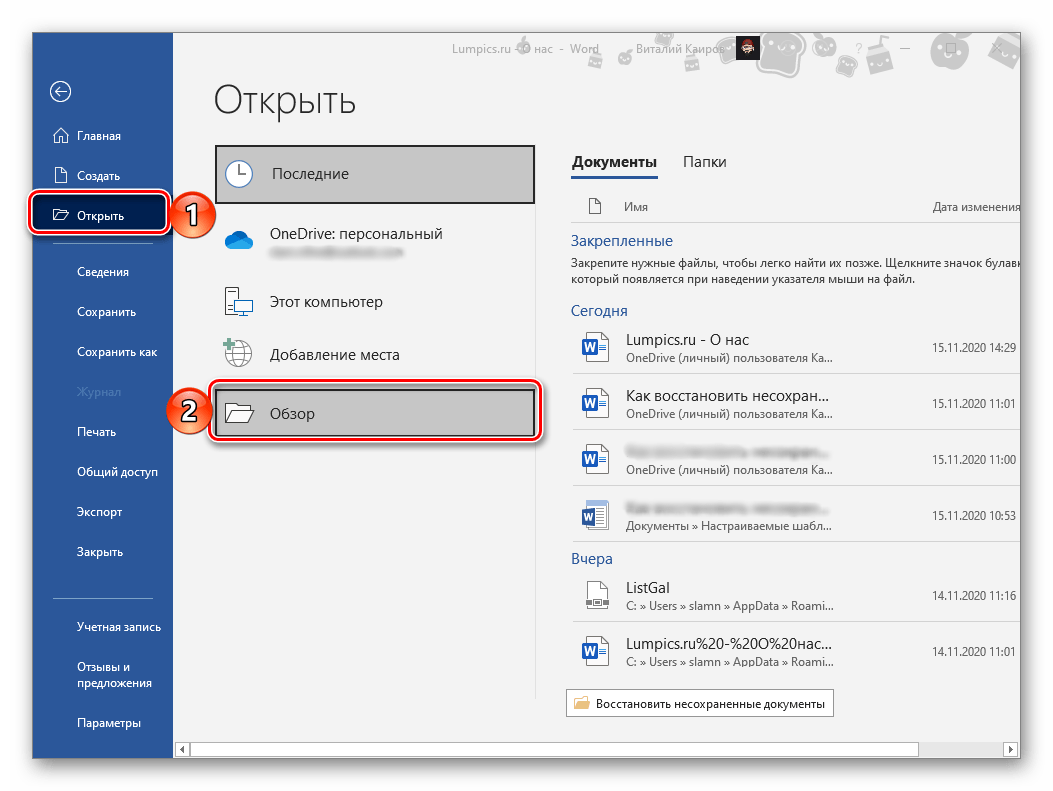
- Откройте меню «Файл» в Word, выберите пункт «Открыть», затем «Обзор».
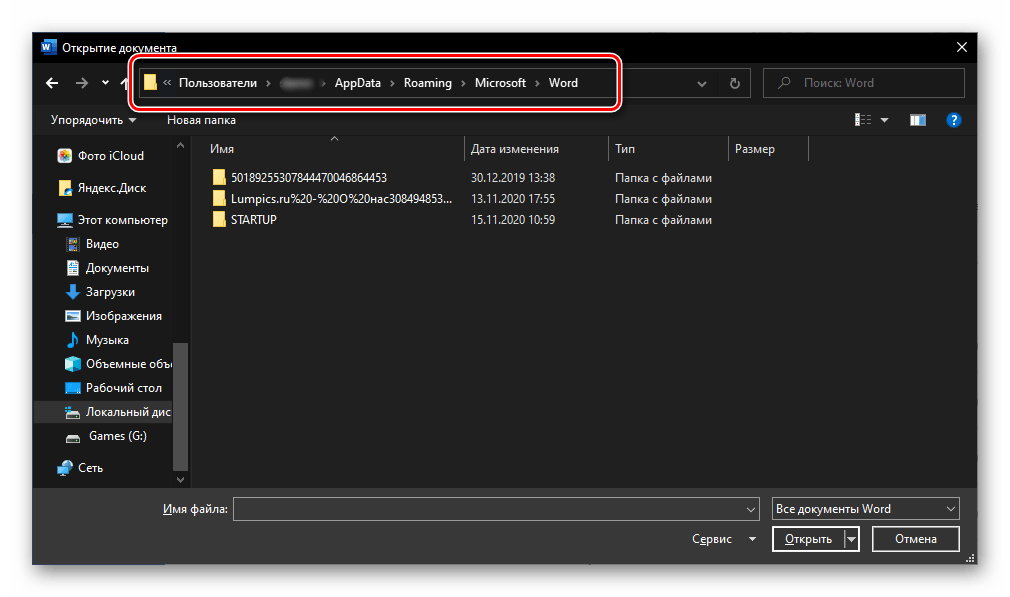
- В адресную строку открывшегося «Проводника» вставьте скопированный адрес и перейдите к нему, нажав «Enter» или расположенную справа стрелку.
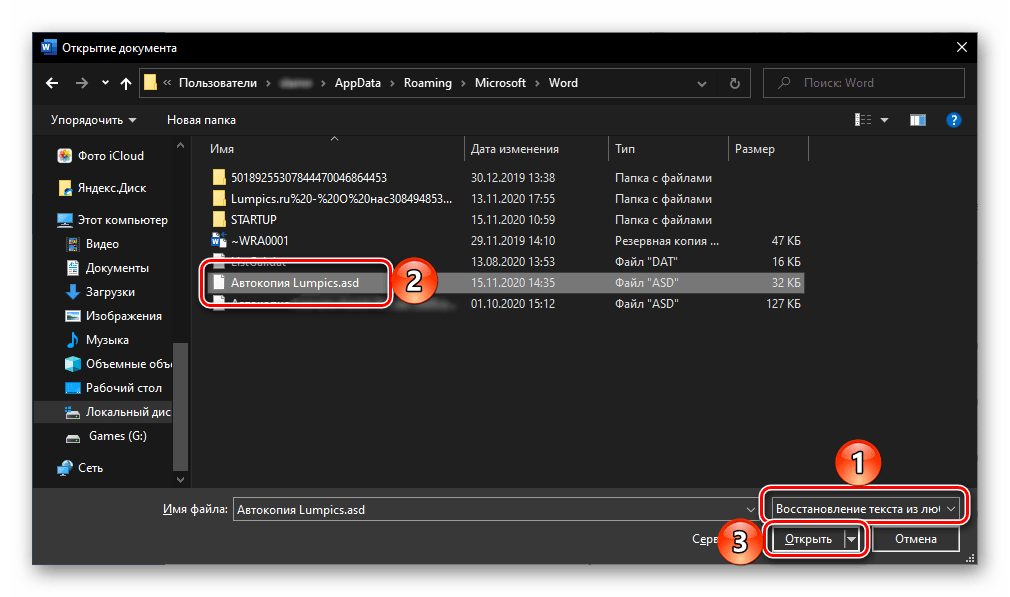
- В выпадающем списке «Все файлы» выберите «Восстановление текста из любого файла». Затем, ориентируясь на название и дату создания, найдите документ (или папку с ним), который требуется восстановить, выделите его и нажмите «Открыть».
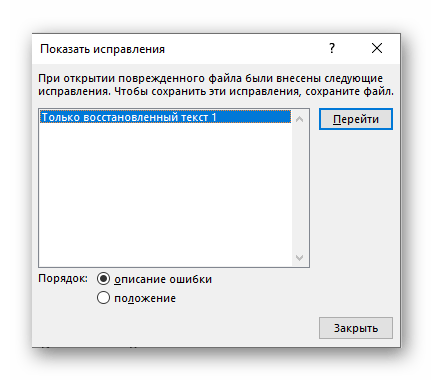
- Появится окно «Показать исправления» — ознакомьтесь с указанными в нем сведениями и нажмите «Закрыть».
Несохраненный документ будет открыт в Ворде, но со сброшенным форматированием – это обычный текст со шрифтом, размером и отступами по умолчанию, без какого-либо оформления. К сожалению, его придется восстанавливать самостоятельно, что поможет сделать отдельная инструкция на нашем сайте.
Подробнее: Как форматировать текст в документе Word
Отметим, что данный метод тоже не гарантирует полного восстановления содержимого текстового файла.
Способ 5: Поиск несохраненных файлов и копий
Последний метод восстановления несохраненных документов представляет собой смесь всех предыдущих. Заключается он в самостоятельном поиске файлов резервных копий и их последующем открытии в Ворде.
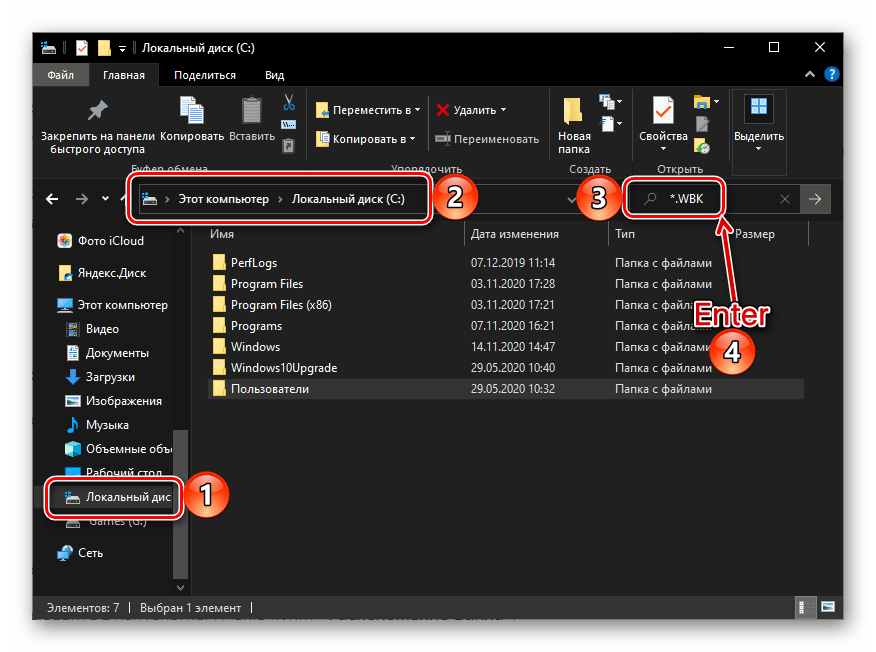
- Откройте «Проводник», перейдите в корень системного диска (в нашем примере таковым является (C:)), скопируйте и введите в его поисковую строку первое из указанных ниже значений. Нажмите «Enter» для начала поиска.
*.WBK
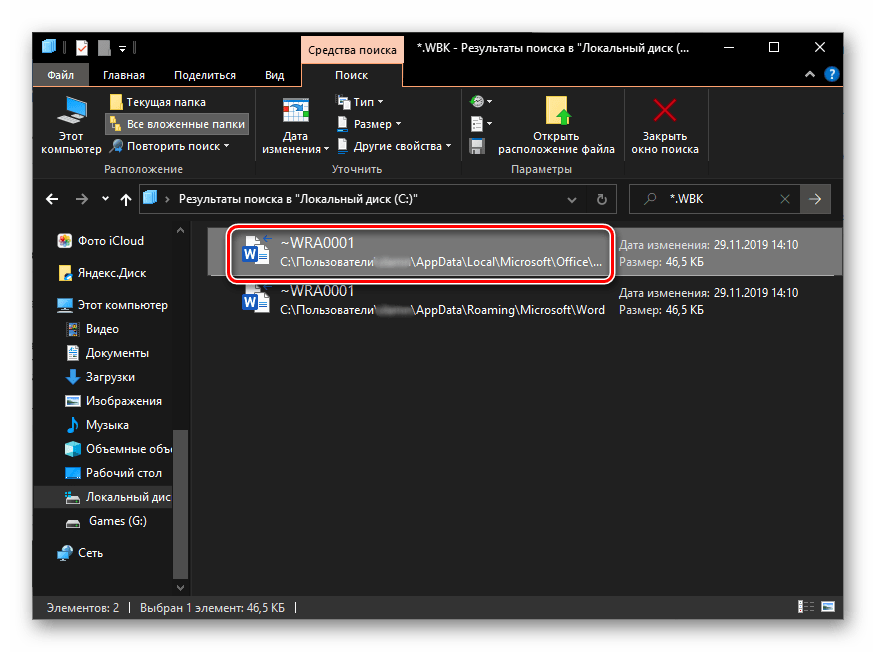
*.ASD - Ожидайте, пока процедура будет завершена (обычно это занимает несколько минут), после чего откройте найденный документ или документы. Его название скорее всего будет состоять из произвольных символов, поэтому ориентируйтесь в первую очередь на дату последнего изменения.
- Ознакомьтесь с содержимым файла и сохраните его.
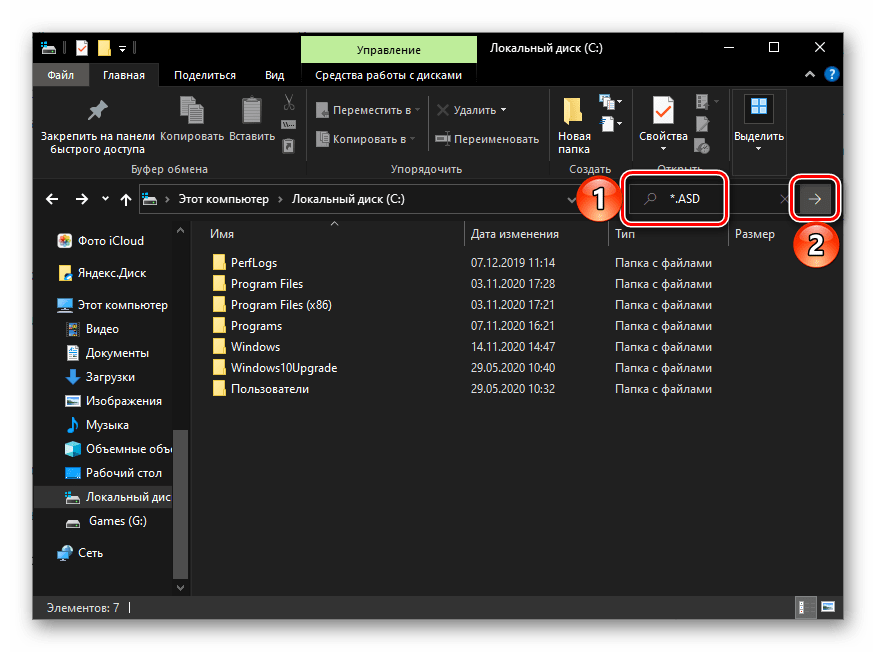
- Снова перейдите в «Проводнике» к системному диску, скопируйте второе из указанных выше значений, вставьте его в строку поиска и запустите процедуру.
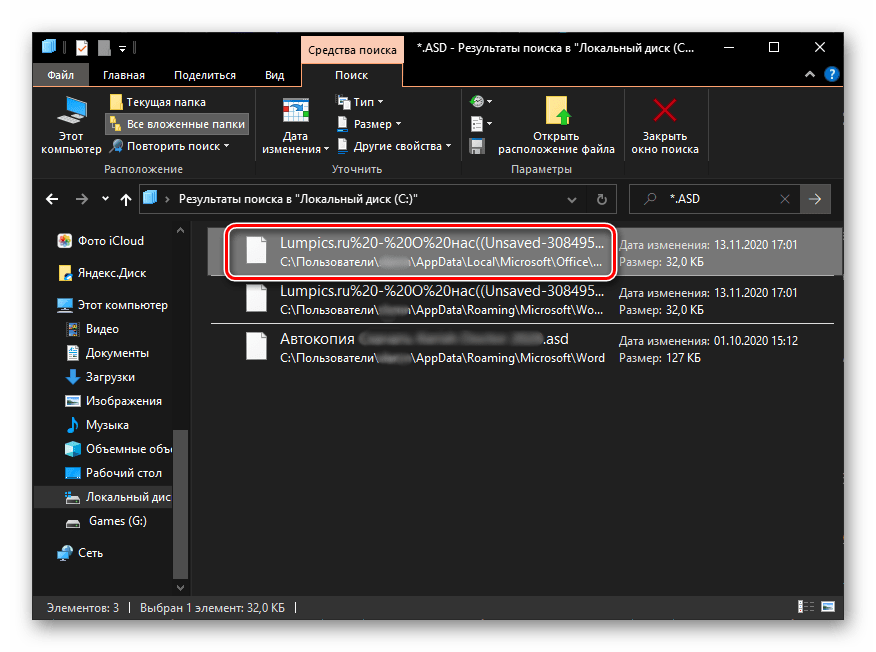
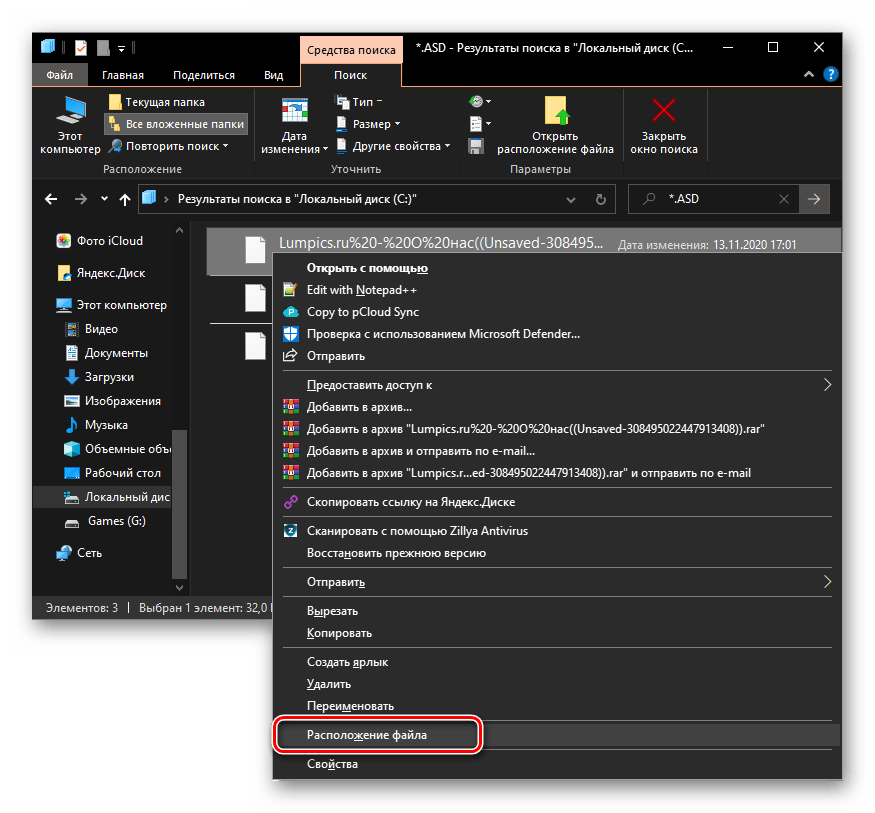
- Дождитесь, пока поиск будет завершен, и ознакомьтесь с его результатами. Ориентируясь на название и дату изменения документа, найдите тот, который требуется восстановить.
- Нажмите по нему правой кнопкой мышки и выберите в контекстном меню пункт «Расположение файла».
- Скопируйте указанный в адресной строке «Проводника» путь и выполните инструкцию из предыдущей части статьи, чтобы восстановить несохраненный документ Word.
Данный метод найдет свое применение в случаях, когда в программе были изменены параметры автосохранения, в первую очередь, место для хранения резервных копий, или если она установлена не в папку по умолчанию. Сам же несохраненный документ может иметь как формат WBK, так и ASD, поэтому мы и искали их по порядку, в вашем же случае, возможно, будет достаточно найти один из них.
Дополнительно: Настройка автосохранения
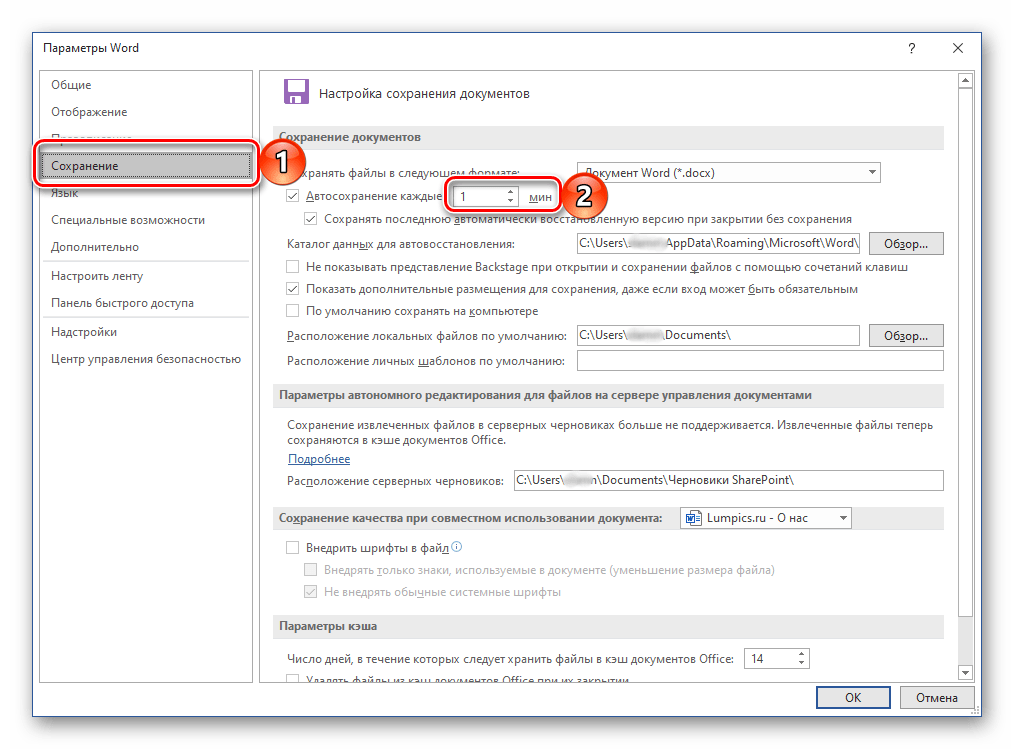
Для того чтобы предотвратить возникновение подобных проблем в будущем или хотя бы минимизировать их последствия, рекомендуется изменить параметры автоматического сохранения, задав меньший чем указанный по умолчанию временной интервал. Оптимальным решением будет минимальное значение – 1 минута. Сделать это можно в разделе «Параметров» Ворд, который мы с вами открыли на третьем шаге инструкции из Способа 2, для получения более детальных сведений по самой процедуре ознакомьтесь с представленной по ссылке ниже статьей.
Подробнее: Настройка функции автосохранения в Microsoft Word
Обратите внимание! В лицензионных версиях Microsoft Office с авторизованным в приложении аккаунтом Microsoft сохранение осуществляется в фоновом режиме, на постоянной основе. Это исключает необходимость ручного или автоматического сохранения текстового документа, а значит, рассматриваемая нами в рамках настоящей статьи проблема в таком случае попросту не возникнет.
Восстановление документа при зависании программы
Если сохранить документ Ворд не удалось не по причине экстренного закрытия программы, а из-за ее зависания, алгоритм процедуры восстановления может выглядеть несколько иначе. Так, если текстовый редактор все еще запущен, но не отвечает и не реагирует на какие-либо действия, единственное, что остается – это сделать скриншот текста на экране и затем распознать его с помощью специализированного софта. Процедура автоматического и/или ручного восстановления, рассмотренная нами выше, в подобных ситуациях, к сожалению, доступна далеко не всегда.
Подробнее: Как сохранить текстовый документ, если Word завис
Еще статьи по данной теме:
Помогла ли Вам статья?
Applied to: Microsoft Office Word 2020, 2019, 2016, 2013, 2010, 2007, and 2003
Closing the Word accidentally or a program/system crash may cause the unsaved Word document to disappear. Luckily, there is still a chance to recover unsaved Word documents in Windows 10/11 from Temporary Files, AutoRecover, or Word Document Recovery.
Besides, if your saved Word document gets deleted, you can restore deleted Word documents from the Recycle Bin or by using one of the best data recovery software.
| Workable Solutions | Step-by-step Troubleshooting |
|---|---|
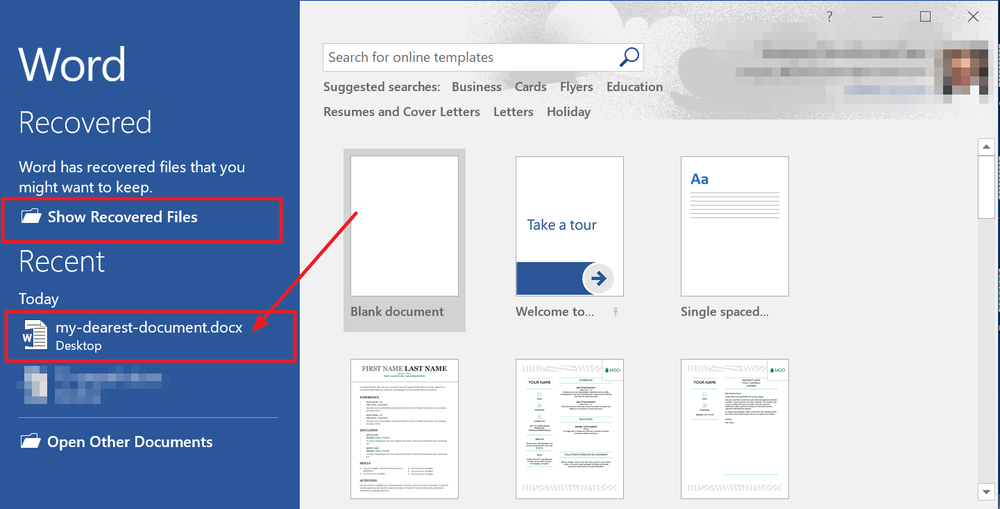
| Fix 1. Recover unsaved Word from Temporary Files | Open Word program, click «File» > «Info» > «Manage Document» > «Recover Unsaved Documents»…Full steps |
| Fix 2. Restore unsaved Word documents from AutoRecover | Open Word > click «File» > «Options» > «Save» > copy AutoRecover file location path and paste it…Full steps |
| Fix 3. Retrieve unsaved Word with Document Recovery | When your system comes back online, reopen Word, click available files under Document Recovery…Full steps |
| Fix 4. Restore deleted Word from Recycle Bin | Go to the Recycle Bin. Check if the deleted word file is still there. If you don’t know the name…Full steps |
| Fix 5. Recover lost Word documents with Data Recovery Software | Choose the hard disk drive or a specific folder where the Word document was saved, click «Scan»…Full steps |
Have you accidentally closed your Word application without saving the document you had been working for a few hours? Have you lost the Word file unsaved due to a sudden program crash? Or mistakenly deleted some saved and essential Word document? If you are looking for an effective solution, you’ve come to the right place.
In this article, we will show you the most useful ways to recover unsaved Word documents. Furthermore, we also introduce you to a renowned office file recovery tool — EaseUS Data Recovery Wizard to help you restore deleted or permanently deleted Word documents in a few clicks. It is also competent to repair corrupted DOCX/DOC files as well as other documents.
Solution 1. Recover Unsaved Word Document from Temporary Files
Unsaved Word documents vanishing is a very unpleasant problem. Take it easy. There are three possible ways to find a Word document that is not saved. The following operations use Word 2016 edition as an example. The steps for Word 2013-2019 are similar.
Recovering unsaved Word documents requires you to turn on AutoSave in advance. If this feature is turned on, you can find the unsaved files through the following path:
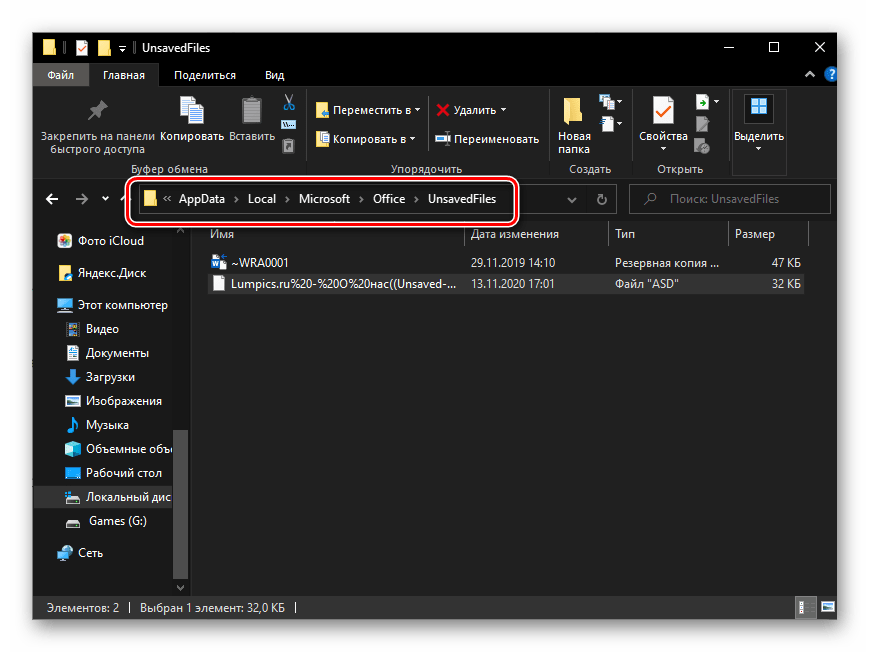
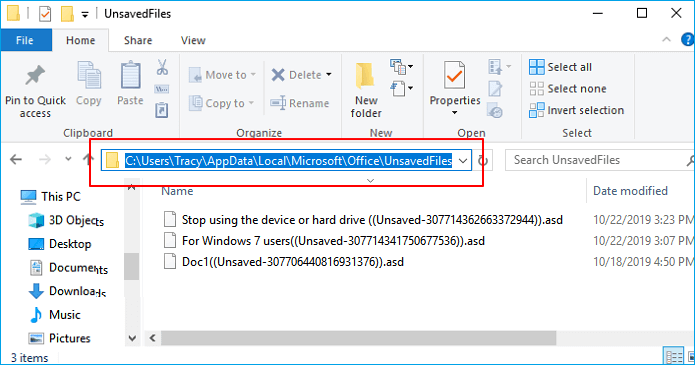
C:UsersOwnerAppDataLocalMicrosoftOfficeUnsavedFiles
Or you can follow the steps given below to do it.
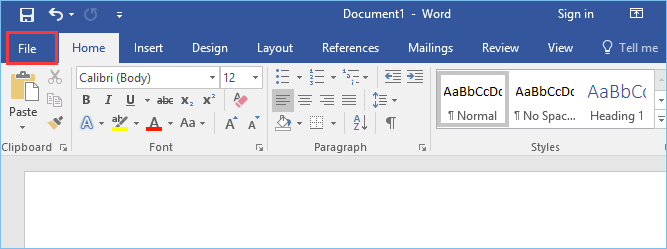
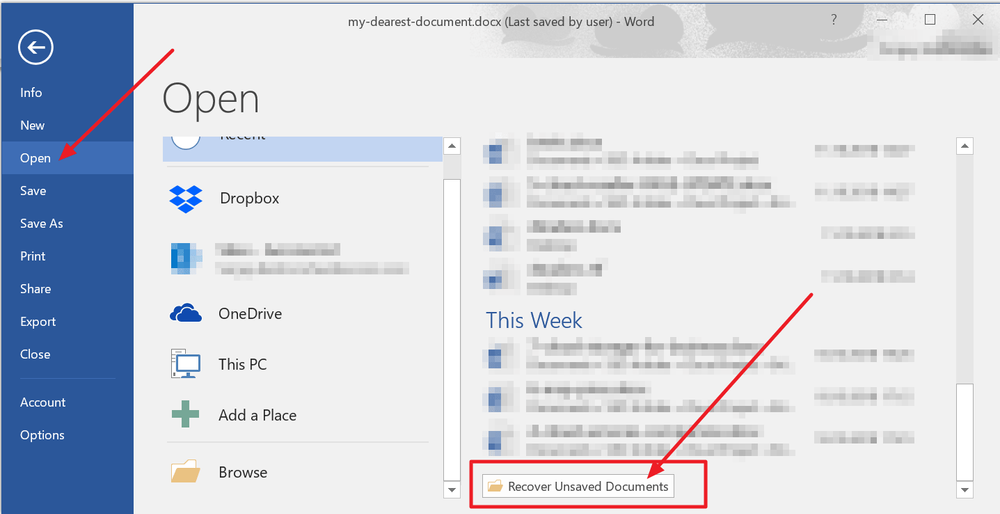
Step 1. In MS Word, click the «File» tab in the upper left.
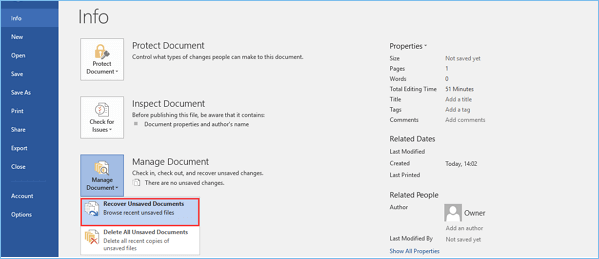
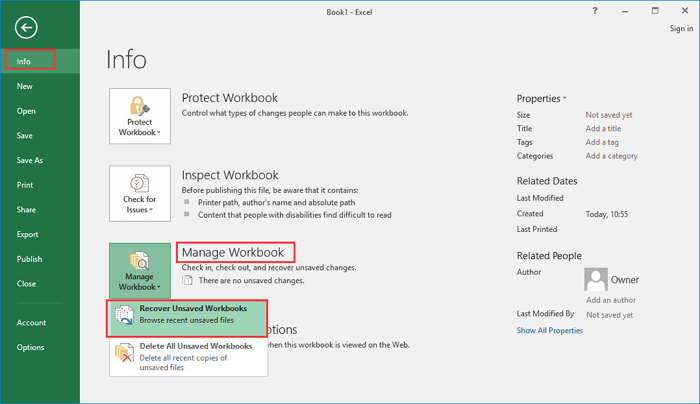
Step 2. Click «Manage Document» and select «Recover Unsaved Documents» from the drop-down list.
Step 3. Check for your missing File in the dialog box. If it was a recent loss, it should appear.
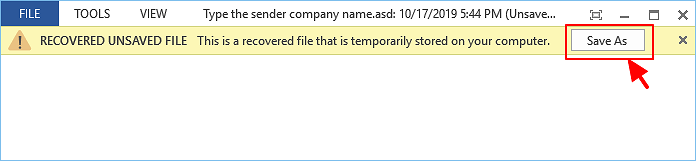
Step 4. Open the recovered Word document and click the «Save As» button in the top banner.
Additional Help — How to Turn on AutoRecover
Many of us have experienced a situation where we have created a Word document and then accidentally closed it out without saving it. To avoid this kind of situation, you’d better enable AutoRecove.
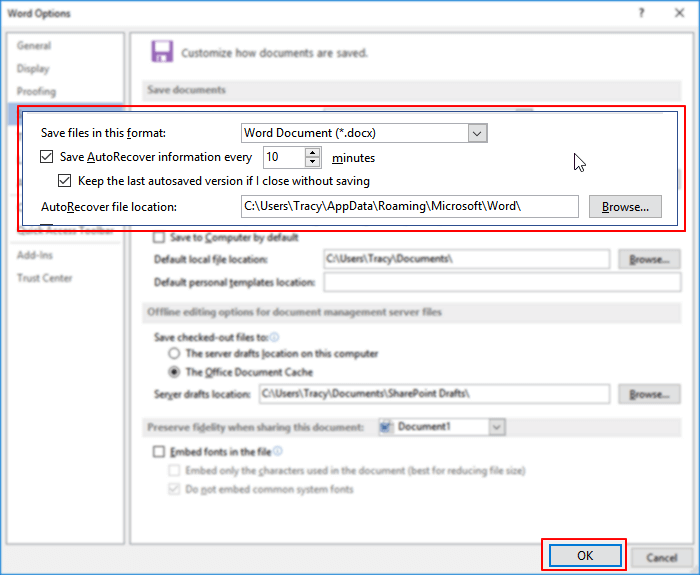
Step 1. Open Word, go to «File» > «Options» > «Save».
Step 2. Tick the box of «Save AutoRecover information every * minutes» and «Keep the last autosaved version if I close without saving».
Step 3. Click «OK» to save the changes.
Excel, like Word, is an indispensable office software. If you lose an unsaved Excel document, you can use the methods we recommend to retrieve it.
![]()
Solution 2. How to Recover Unsaved Word Document from AutoRecover
Another way to get back an unsaved Word document is by using AutoRecover. AutoRecover file names end in the .asd file name extension. By default, Word searches for AutoRecover files every time that it starts, and then it displays any data found in the Document Recovery task pane. If the Document Recovery pane does not open, manually search for auto-recovered files. To do this, use one of the following procedures according to your Word version:
For Word 2010 — 2019:
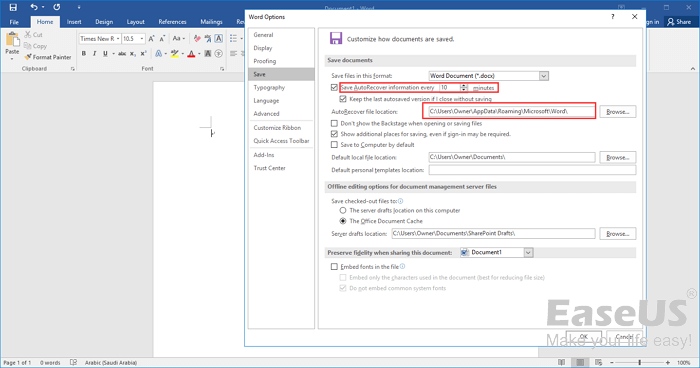
Step 1. Open the Word program, and click «File» > «Options». In the left navigation pane, click «Save». Copy the AutoRecover file location path and paste it into File Explorer.
Tip: You can change the time of AutoSave interval in «Save AutoRecover information every xx minutes» and click OK.
Step 2. Go to the File Explorer, find the unsaved document, and copy the .asd file.
Step 3. Go to your Word app, click «File» > «Open» > «Recover Unsaved Documents» at the bottom.

Step 4. Paste the copied .asd file into the File Name box popping up. Open the Word file recover it.

If Word warns that «Word experienced an error…», repeat the steps and click «Open and Repair» at the open Unsaved Document window.

For Word 2002 — 2007:
| Versions | Steps |
|---|---|
| Word 2007 |
1. Click the Microsoft Office Button, and then click «Word Options» > «Save». 2. In the AutoRecover file location box, note the path, and then click «Cancel» and close Word. 3. Open the folder that you noted in step 2. 4. Look for the Word document that you are looking for ends in .asd (AutoRecover files). Then, double-click it to open and save it immediately. |
| Word 2003 & 2002 |
1. On the «Tools» menu, click «Options». 2. Click the File Locations tab, double-click AutoRecover files, note the path, click «Cancel», and then click «Close». Note: In the Modify Location dialog box, you may have to click the down arrow in the Folder name list to see the whole path to your AutoRecover files. Close Word. 3. Look for files whose names end in .asd (AutoRecover files) after locating the AutoRecover file location. 4. Double-click the Word document to open it. Next, save it immediately. |
Then, you can check the file content and save it as a new Word file at another secure location.
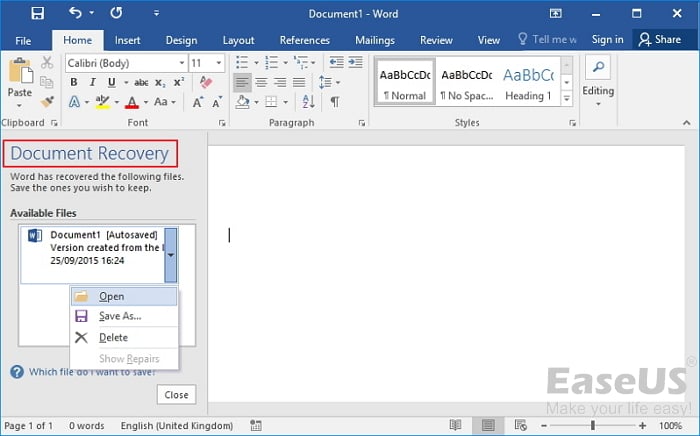
Solution 3. How to Restore Unsaved Word with Document Recovery
If your Word crashes or closes abruptly, it will automatically restore unsaved Word documents in most cases when it comes back online. You can find the unsaved Word documents on the left panel, under Document Recovery.
Solution 4. How to Recover Word Document from Recycle Bin
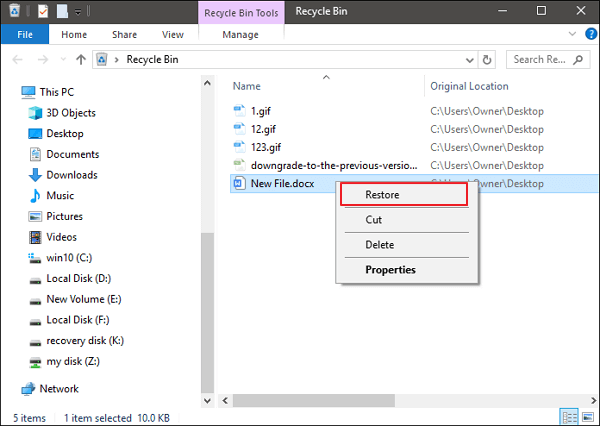
If you deleted a Word document without emptying the Recycle Bin, you could undelete the Word document with simple clicks.
Step 1. Go to the Recycle Bin. Check if the deleted word file is still there. If you don’t know the name, look for file types such as DOC, DOCX, DOT, etc.
Step 2. Select the Word file and click «Restore» to recover it.
If you have emptied the recycle bin after deleting files, the deleted Word file may have been permanently removed. If you are in the same case, follow the next solution to restore deleted Word documents with a data recovery program.
Solution 5. How to Recover a Word Document with Word File Recovery Software
If you have lost saved Word documents because of careless deletion, hard drive formatting, or system errors, the above ways won’t work. At this time, you have to resort to a professional hard drive recovery software — EaseUS Data Recovery Wizard.
With this capable tool, you can recover deleted files in Windows 11/10/8/7 in various formats, including documents, videos, audio files, emails, ZIP, and more.
Note: This solution can be only used to recover deleted or lost Word documents that were saved on your computer before.
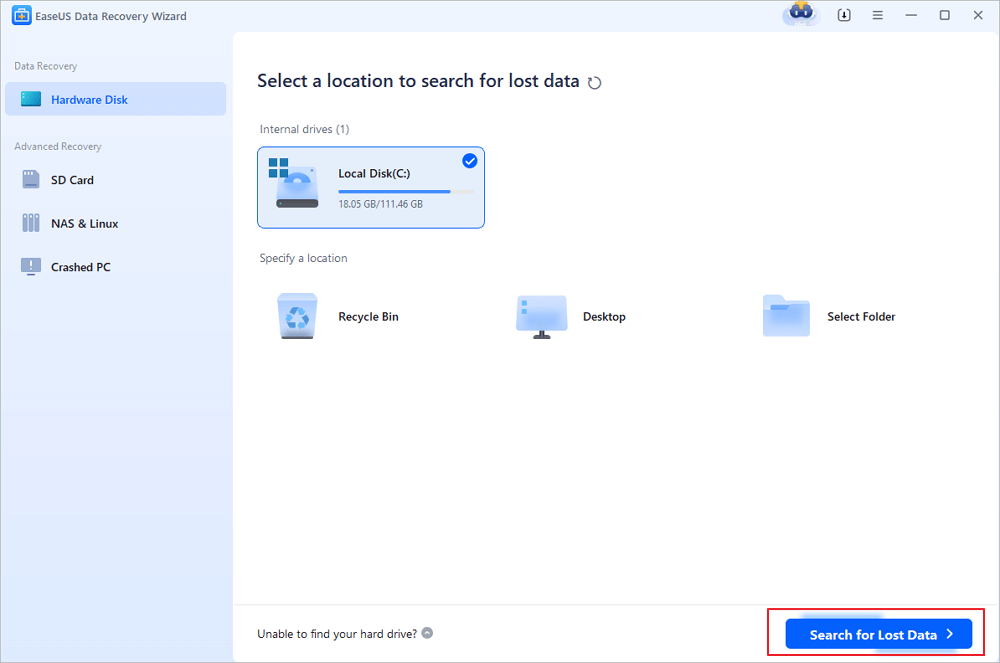
Step 1. Choose the Word file location
Choose the drive or a specific folder and click the «Scan» button.
Step 2. Locate your Word files
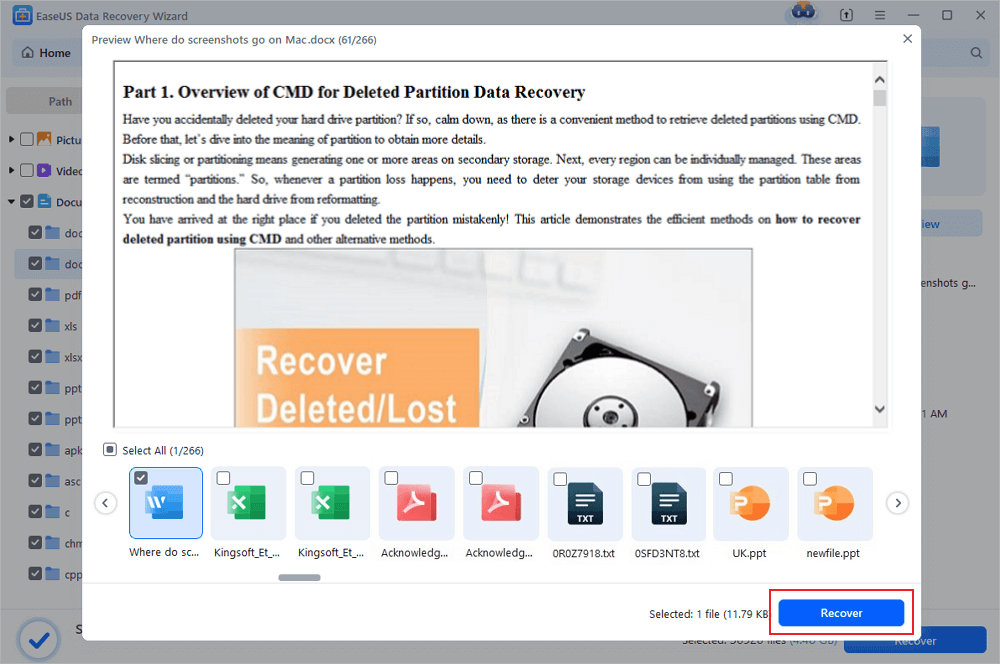
The software will start immediately scanning all lost data on the selected drive. After the scan, click the «Documents» option in the left panel. Choose «Word» from the category bar. Then, click «Preview».
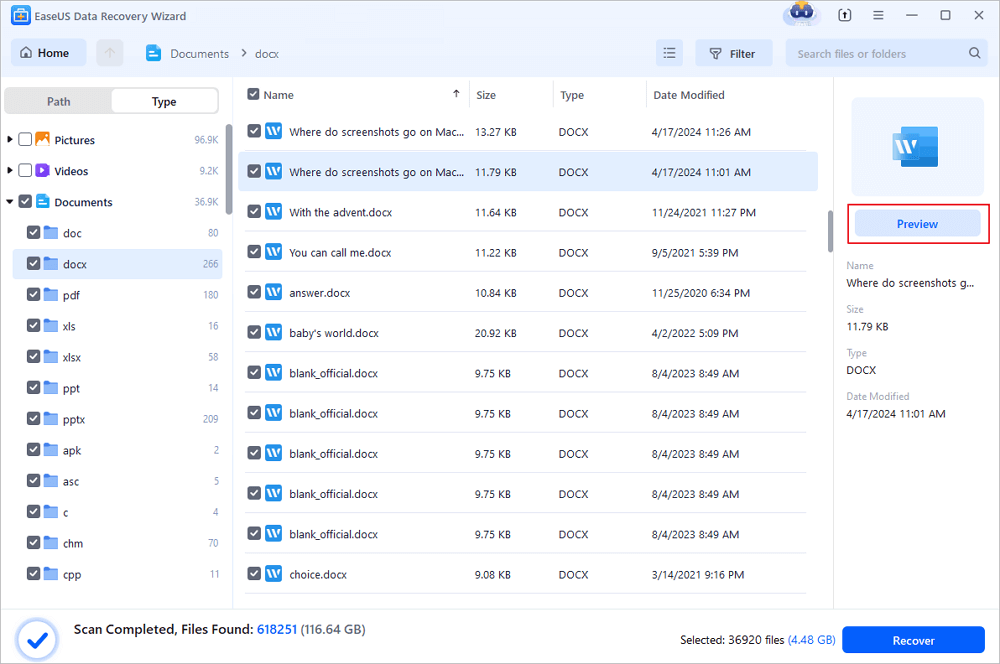
Step 3. Recover Word files
After previewing the lost Word files, select the desired Word files and click «Recover». Then, select a folder to store the Word files.
- Important
- We don’t recommend you try any data recovery software to recover unsaved Word documents. This type of program only helps you recover lost saved Word document due to accidental deletion, disk formatting, virus attack, partition loss, etc. Namely, there needs to be an original file saved before on your computer or storage media.
How to Recover Unsaved Word Document on Mac in 2 Ways
On Mac, AutoRecover is turned on by default. Take the two methods below to recover unsaved Word on Mac by using the AutoRecover function.
Solution 1. Restore Unsaved Word Document in Finder
Step 1. Start your Mac and open the Finder window.
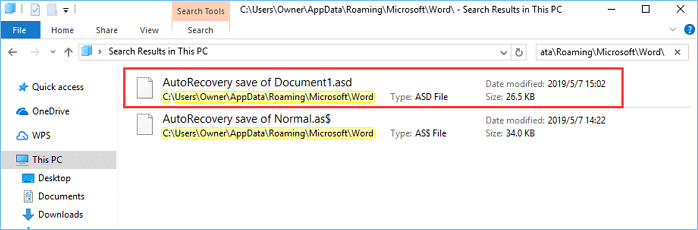
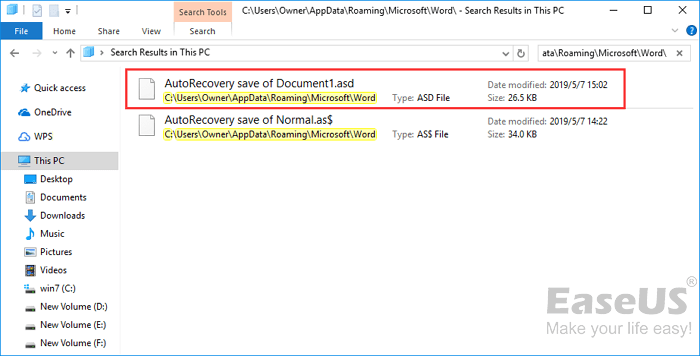
Step 2. Search for AutoRecovery in the search bar. A list of files Word documents named «AutoRecovery save of» will appear.
Step 3. Find and open the Word document you want to recover.
Step 4. Click the «File» menu and choose «Save As». Rename the restored files and click the Save button.
Solution 2. Restore Unsaved Word Document with Terminal
The unsaved Word document can be recovered from the temporary folder by using Terminal.
Step 1. Open your Mac and go to «Applications» > «Utilities» > «Terminal».
Step 2. Type open $TMPDIR and find the TemporaryItems folder on the list.
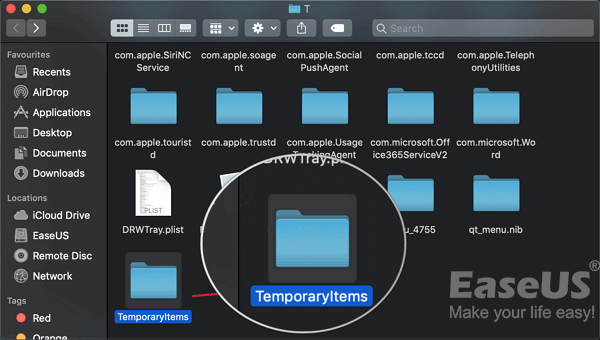
Step 3. Find the file you need. Open and save it to recover unsaved Word documents.
Conclusion
In this tutorial, you can learn five ways to recover unsaved Word documents on Windows and Mac devices. With the help of EaseUS file recovery software, you can restore lost Word documents, whether they are deleted, encrypted by malware, or corrupted when it was saved on a faulty partition.
Hope these solutions can help you get back any lost Word documents.
Recover Unsaved Word Document Frequently Asked Questions
If you still have some Word recovery problems, you can read the following questions and answers to get more help.
How do I recover an unsaved Word document Windows 10?
Step 1. Click the «File tab», then choose «Info», then select «Manage Documents».
Step 2. Select «Recover Unsaved Documents» from the drop-down menu.
Step 3. Click «Open» when you have selected the document you want to recover.
Step 4. Click the «Save As» button and save your Word document.
How to recover unsaved Word document from USB?
If you have unsaved changes to a Word document that is stored on a USB drive, you can recover your work in two ways:
One way is to try opening the document from the Recent Documents list in Microsoft Word. To do this, open Word and click on the File menu. Then, click on Open and select Recent Documents. If your unsaved document is listed, you should be able to open it and recover your work.
Another way to recover an unsaved Word document from a USB drive is to use the Autosave feature. To do this, open the document that you were working on and look for the Autosave folder. If you find the file, you can recover your work by opening it in Word.
How to recover unsaved Word document 2016?
Try these methods to restore unsaved Word document in Word 2019, 2016, 2013, or 2010:
- Check your recently opened documents
- Try opening a temporary file
- Use the AutoRecover tool
Where are unsaved Word documents stored?
These Word files can be found via «File> Open» and click the «Recover Unsaved Documents» button at the very bottom of the Recent File List.
MS Word, или просто Word, увидел свет в далеком 1989 году, и это событие можно сравнить по значимости только с запуском первого космического спутника. Удобный текстовый редактор освободил миллионы людей из рабства шариковой ручки, больше нам не нужно тренировать каллиграфию или переписывать целые страницы из-за одной помарки…
Есть только одна проблема, связанная с MS Word. Иногда документы формата .doc и .docx повреждаются в процессе работы, после чего их нельзя открыть. Просто представьте, как вы поставили последнюю точку в тексте, над которым трудились несколько недель, и вдруг выскакивает вот такое сообщение:
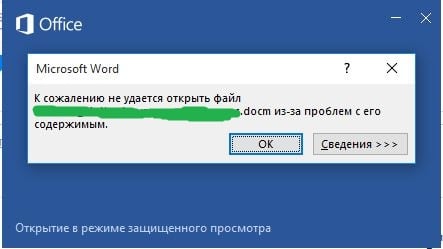
или вот такое:
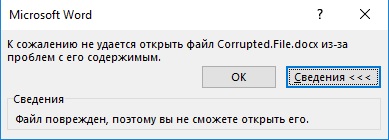
Говорят, что рукописи не горят, но как быть в такой ситуации? Удалить файл, а потом начинать все с начала? Ни в коем случае! Есть простая и недорогая программа, умеющая «воскрешать» даже сильно поврежденные документы.
Это известная среди специалистов программа Recovery Toolbox for Word, но прежде чем скачивать ее, имеет смысл сперва попробовать решить проблему штатными средствами Word. Возможно, для кого-то их существование станет приятным сюрпризом.
Почему файл не открывается?
Не стоит винить себя в том, что файл оказался поврежден. В большинстве случаев это происходит не из-за ошибок пользователей, а по техническим причинам. Сбой питания, физическое повреждение носителя информации, битые сектора на жестком диске… Существуют десятки причин для подобного.
Если ситуация повторяется, необходимо срочно проводить диагностику компьютера, а если такое случилось впервые, можно ограничиться стандартными мерами профилактики:
- Настройка автосохранения в Word
- Копирование документов на съемные носители
- Переход с устаревшего редактора на актуальную версию (формат .doc менее надежен, чем .docx)
Все очень просто, но как показывает практика, пользователи начинают беспокоиться по поводу сохранности своих данных лишь после того, как проведут за их восстановлением пару бессонных ночей.
Проверяем поврежденный документ
Первое, что нужно предпринять, — это проверить размер поврежденного документа. Делаем по нему правый клик кнопкой мыши, затем «Свойства» – «Размер». Если размеры файла соответствуют (или примерно соответствуют) изначальным, это хороший знак. Пациент скорее жив, чем мертв! А если от изначальных 500 килобайт осталось два или три, новости неутешительны. Вернуть файл уже невозможно.
Для справки. Такое часто происходит при неудачном переносе документа на съемный носитель. В будущем просто не забывайте проверять его работоспособность перед удалением с диска.
Штатные средства восстановления Word
Многие не в курсе, но специалисты Майкрософт снабдили Word собственными инструментами для восстановления поврежденных документов. К сожалению, успех при работе с ними вовсе не гарантирован, в первую очередь ваши шансы зависят от степени повреждения документа.
Если легкие повреждения не препятствуют возвращению файла целиком, то глубокие позволяют в лучшем случае надеяться на возвращение одного текста (без рисунков и графиков). Методов восстановления несколько. Самый простой – открыть файл в режиме черновика, делается это следующим образом:
- Создаем пустой документ Word
- Переходим на вкладку «Вид» (или View)
- Нажимаем на кнопку «Разметка страницы» (или Documents Views)
- Выбираем кнопку «Черновик» (или Draft)

- Переходим в раздел Файл (или File)
- Выбираем в самом низу «Параметры» (или Options)
- Переходим в меню «Дополнительно» (или Advanced)
- В разделе «Показывать содержимое документа» (или Show document content) нужно отметить галочкой опцию «Использовать шрифты черновика в режимах черновика и структуры» (или Use Draft font in Draft and Outline)
- В том же разделе ставим галочку напротив «Показывать коды полей вместо их значений» (или Show Picture Placeholders)

- Прокручиваем раздел «Общие» (или General) до самого конца, и снимаем галочку напротив пункта «Автоматически обновлять связи при открытии» (или Update automatic links at Open).
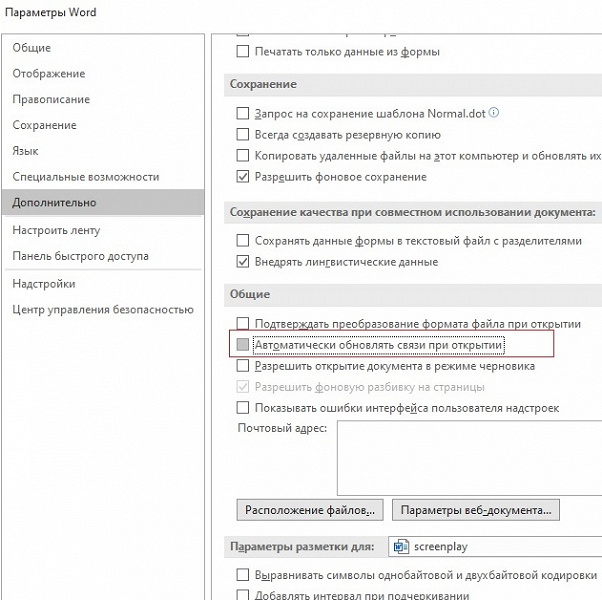
- Теперь подтверждаем внесенные изменения, нажав ОК.
На этом все. Теперь можно попробовать вновь открыть проблемный файл. Если не получается – ничего страшного. Есть еще один метод, суть которого заключается в том, чтобы попытаться вставить поврежденный документ в рабочий файл. Делается это следующим образом:
- Создаем пустой документ Word
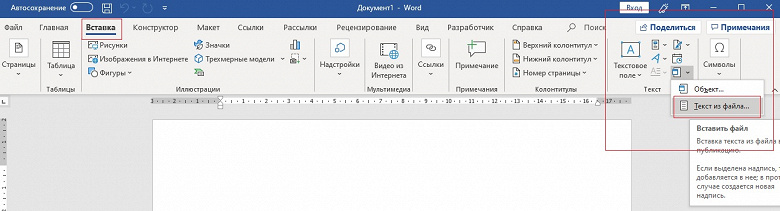
- Заходим в меню «Вставка» (Insert)
- Далее заходим в подменю Текст (Text) появятся команды «Объект» (или Insert Object) и Текст из файла (или Text from file)
- Выбираем пункт «Текст из файла»
- Выбираем во всплывшем окне поврежденный документ
- Нажимаем кнопку «Вставить».
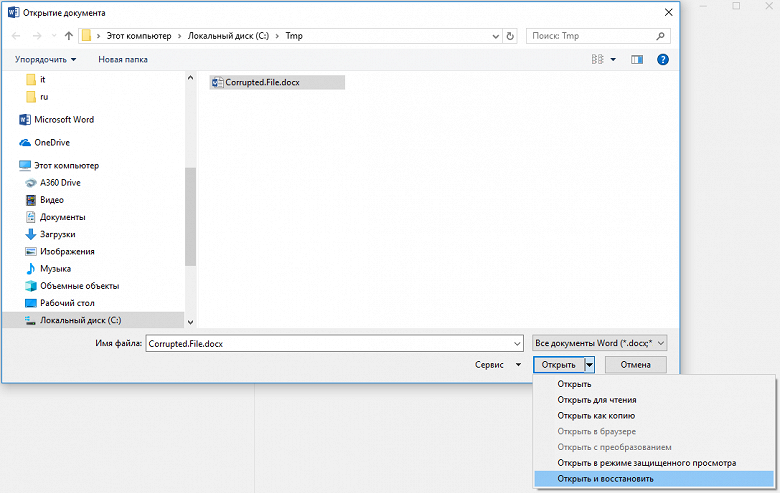
Третий метод заключается в использовании встроенной в офисный пакет утилиты для восстановления. Чтобы ей воспользоваться, нужно опять создать документ Word, открыть его. Перейти в меню «Файл» (File). Во всплывшем окне указываем путь к поврежденному документу, затем нажимаем на стрелку возле «Открыть» (Open). Затем выбираем опцию «Открыть и восстановить». Готово.
Конвертер Recover Text from Any File
Пользователи, у которых на ПК стоят последние версии офисного пакета Майкрософт, могут воспользоваться встроенным конвертером. Всем остальным необходимо либо обновить свой «Офис», либо прибегнуть к помощи сторонних приложений (о них мы поговорим чуть позже).
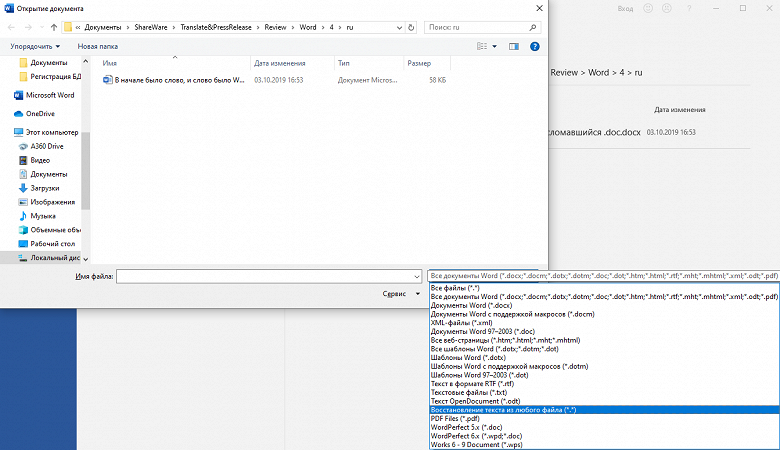
Чтобы получить доступ к штатному инструменту, нужно запустить Word, затем перейти «Файл» (File) – «Открыть» (Open). В диалоговом окне нужно выбрать проблемный документ, а затем нажать на кнопку «Тип файлов» и выбрать из списка Recover Text from Any File.
Встроенный сервис позволяет восстанавливать файлы даже с глубокими повреждениями, но, к сожалению, он не дает возможности сохранять рисунки, таблицы и другие элементы. С ними, как и с форматированием текста, придется распрощаться навсегда.
Последний шанс вернуть файл
Если штатные инструменты «Офиса» не принесли пользы, решить проблему помогут только сторонние ресурсы. Выбор огромен, и чтобы не тратить время, лучше сразу обратиться за помощью к лидеру в этой сфере – компании Recovery Toolbox.
Разработчик использует продвинутые алгоритмы восстановления данных, которые могут похвастать большей эффективностью, чем встроенные инструменты Майкрософт. Предусмотрено два способа восстановления: онлайн-сервис и приложение для компьютера.
Онлайн-сервис очень удобен. Чтобы воспользоваться им, нужно всего лишь загрузить поврежденный документ на страничке https://word.recoverytoolbox.com/online/ru/, затем заполнить специальную форму. От вас требуют лишь указать e-mail и заплатить 10$ за услуги сервиса. Исправленный файл придет вам на почту через несколько секунд.
Если нерабочих документов несколько, гораздо выгодней приобрести приложение для ПК. Лицензия на Recovery Toolbox for Word обойдется вам всего в 27$, это немного дороже, но зато проблема неработающих файлов .doc и .docx будет решена навсегда.
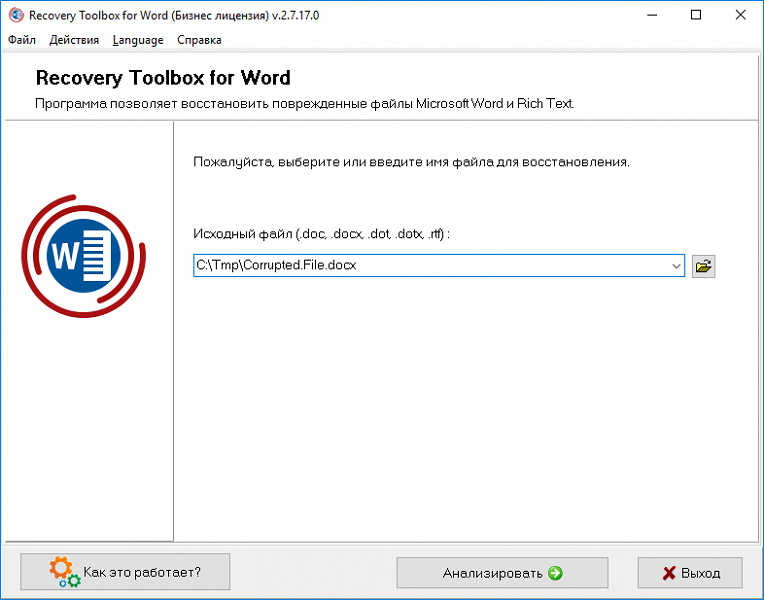
Работать с программой не сложнее, чем с ее онлайн-аналогом:
- Скачиваем и запускаем Recovery Toolbox for Word
- Указываем путь к нерабочему файлу
- Нажимаем «Анализировать»
- Выбираем «Старт восстановления»
- Нажимаем «Экспортировать в MS Word»
Обратите внимание! Оба ресурса платные, но цена на них вполне демократична. А самое главное, у вас будет возможность протестировать их работу перед покупкой. Так что никакого риска нет.
P. S. Как быть с тегами XML
В заключении нельзя не затронуть тему неверных тегов XML. Сегодня мы не будем останавливаться на этом подробно, это тема отдельной статьи. Что вам нужно знать сейчас, это то, что файлы Word представляют собой полноценные архивы, хранящие информацию в сжатом виде. И их в любой момент можно распаковать при помощи обычного архиватора.
Если при открытии файла выскакивает ошибка: «Имя в конечном теге должно совпадать с типом элемента в начальном теге», то сперва нужно разархивировать этот документ Word в отдельную папку, затем найти в ней файл с названием «document.xml» и открыть его приложением Notepad++. Это бесплатная программа, отыскать ее не составит для вас труда.
Чтобы исправить файл, нужно вручную указать верный порядок закрытия тегов (он указан в ошибке). Первый открывшийся тег должен закрываться последним, второй – предпоследним и т. д.
Заключение
Надеемся, благодаря этой статье вы смогли успешно решить свою проблему. Иначе и быть не могло. В будущем не забывайте делать бэкап, чтобы не терять нервы, ведь их программным методом не восстановишь.
Как много у вас страхов? Если обратиться к рейтингу человеческих фобий, на первых местах традиционно располагаются пауки, змеи и прочие твари. А теперь вспомните то чувство, когда вы случайно удаляете отчет, над которым трудились всю ночь. Сколько адреналина!
Если вы оказались в подобной ситуации, отбросьте панику. Сейчас мы разберем, как восстановить несохраненный документ Word, и спасем вас от гнева руководителя.
Скачайте лучшую программу для восстановления документов прямо сейчас
Скачать бесплатно!
Отлично работает на Windows 11, 10, 8, 7 и XP
ФЕНИКСВосстановление файлов
Содержание:
1. Как быстро восстановить документ Word
2. Как восстановить удаленный документ Word с помощью сторонних программ
3. Подводя итоги
Как быстро восстановить документ Word
Не хотите прибегать к помощи утилит? Внутренние параметры системы предусматривают несколько способов, которыми вы можете воспользоваться для спасения данных:
- Проверьте корзину. Звучит глупо, но это работает. В ней находятся удаленные файлы, которые были сохранены. Все просто: откройте корзину, найдите причину переполоха и кликните по кнопке «Восстановить выделенные объекты».
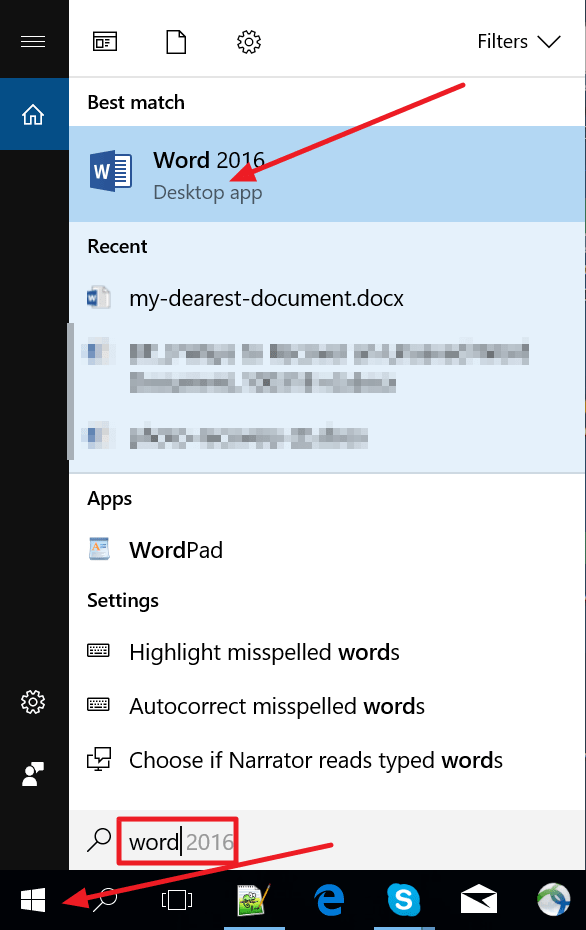
- Выполните поиск исходного документа. В этом случае сначала введите имя документа в строку, расположенную на панели «Пуск». Перед вами возникнет список файлов, в названии которых содержатся соответствующие слова. Пропажа нашлась? Щелкните по ней дважды. Другой вариант — указать расширение .tmp: искомое может оказаться в списке временных файлов. Данный метод также работает на компьютерах с более ранними версиями Windows, включая 7.
- Если при настройке Microsoft вы сделали выбор в пользу «Всегда создавать резервную копию», то можно произвести поиск по папке, в которой хранился документ. Для этого введите тип расширения .wbk.
- Начните поиск файлов автовосстановления. Зайдите в Диспетчер задач, найдите Microsoft Word и завершите процесс. Запустите программу снова: откроется окно, содержащее документы, готовые к восстановлению. Если оно не появляется, придется действовать через меню «Файл» —> «Открыть». В проводнике выполните поиск неоходимых файлов с расширением .asd.
Как восстановить удаленный документ Word
с помощью сторонних программ
Описанные выше способы работают не всегда. Тем не менее существует большое количество софта, где можно произвести восстановление несохраненного документа Word.
ФЕНИКС
Отечественное ПО с удобным интерфейсом. Позволяет с легкостью восстановить удаленные тексты, фотографии, видео, музыку и даже электронные письма в самых проблемных случаях, включая вредоносные атаки и системные сбои. На этот процесс вам потребуется всего пара минут — вне зависимости от того, насколько вы опытный пользователь. При разработке ФЕНИКСа использовались новейшие алгоритмы, так что вероятность повредить данные равна нулю.
Не сохранился документ Word? Следуйте простой инструкции ниже:
1. Скачайте дистрибутив программы и произведите установку. Ничего сложного — следуйте указаниям установщика. Как только настройка будет завершена, нажмите на ярлык.
2. Появится стартовое меню. На этом этапе вы должны выбрать тип накопителя — место, где ранее находился удаленный файл. Это может быть компьютер, телефон на базе Android, планшет, фотокамера или флешка. Кликните по соответствующему значку.
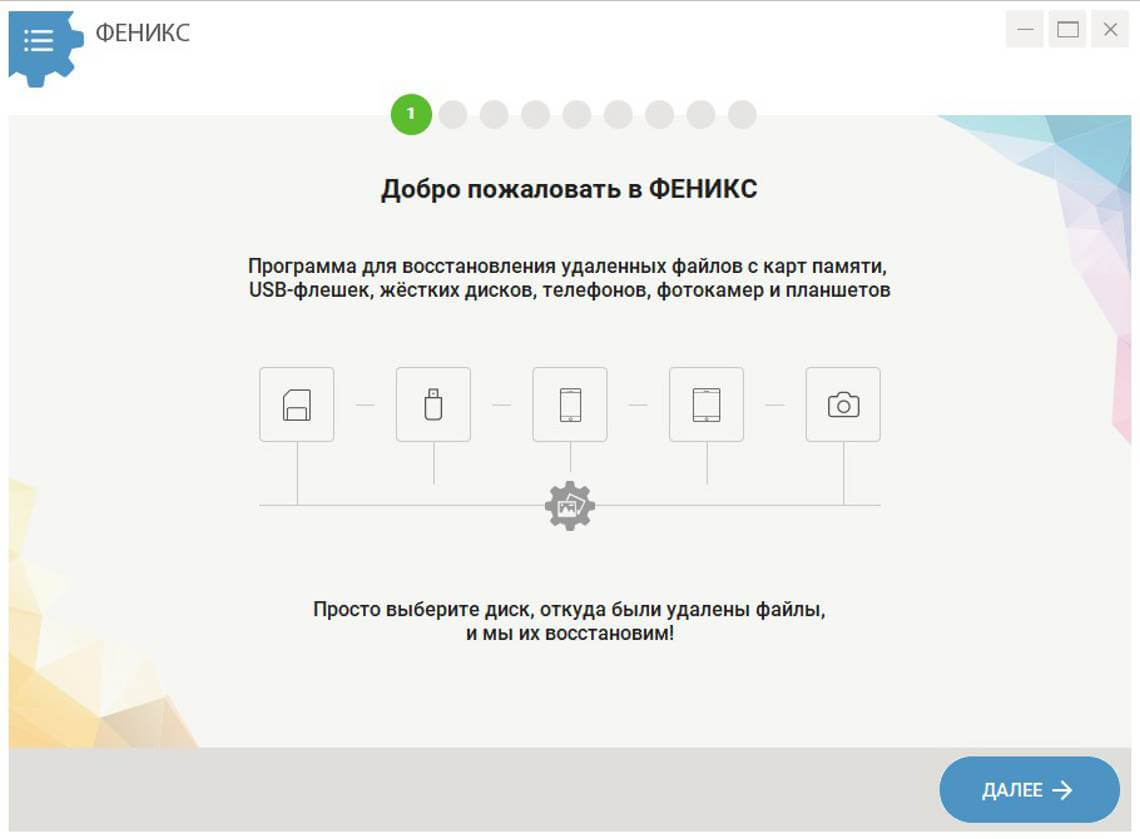
Стартовое окно программы
3. Далее откроется список доступных дисков, где вы должны найти нужный носитель. Если среди вариантов его не оказалось, воспользуйтесь кнопкой обновления.
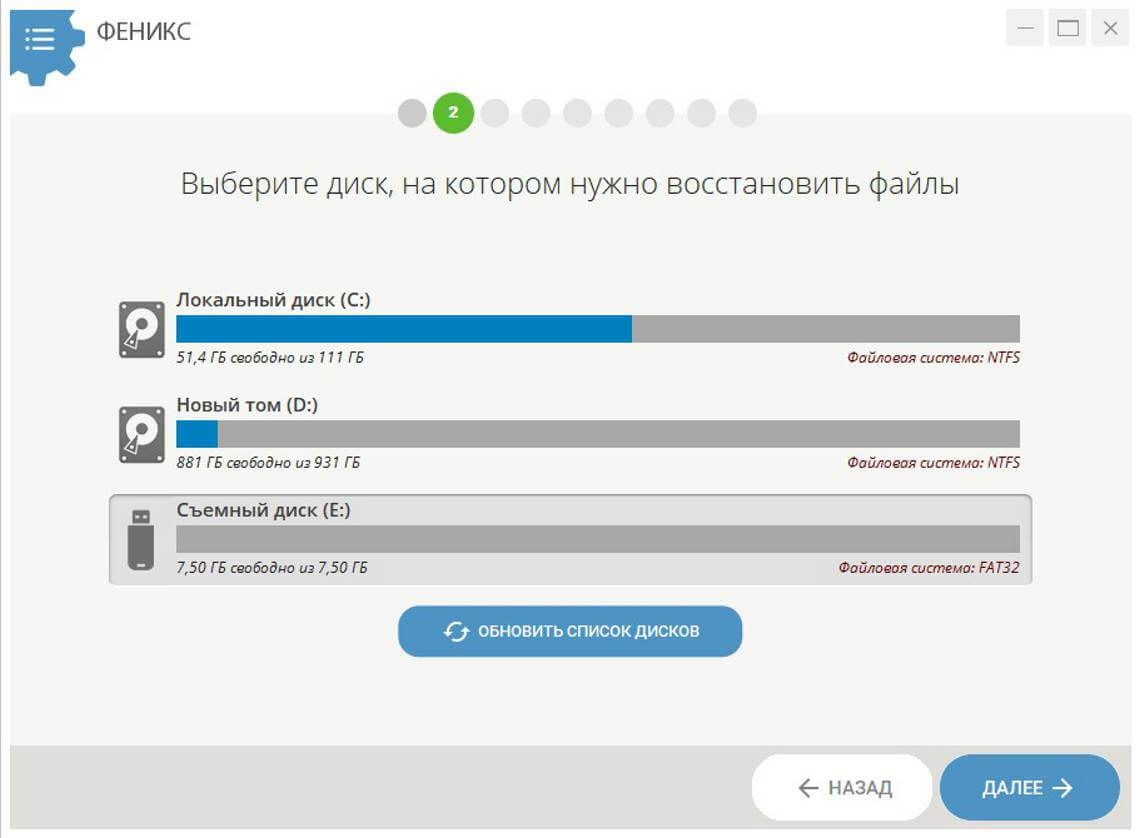
Выберите диск
4. Определите способ восстановления. В ФЕНИКСе есть два метода анализа: глубокий и быстрый. Если документ удален несколько минут назад, то целесообразным будет сделать выбор в пользу второго. В случае, если быстрый поиск не даст результата, вы всегда сможете вернуться и выбрать тщательное сканирование диска.
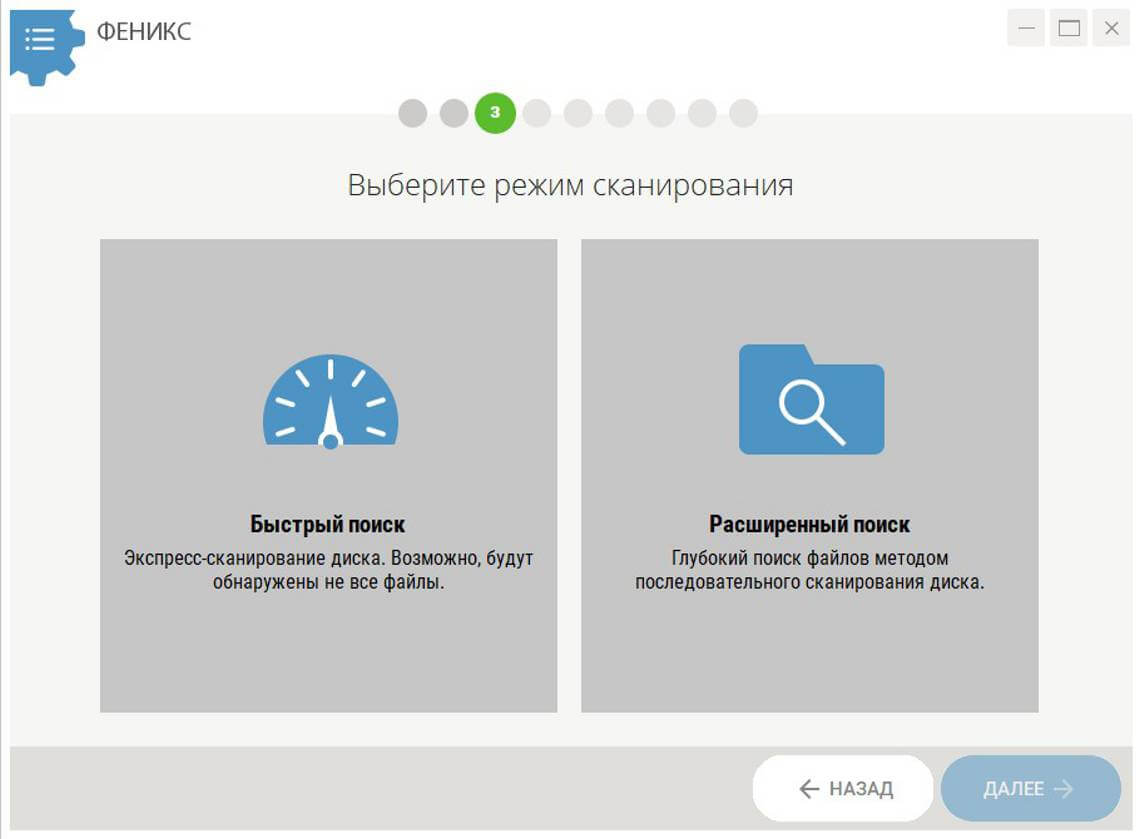
Глубокий анализ потребует больше времени
5. Процесс можно ускорить, если применить фильтры поиска. Избавьтесь от всех галочек, помимо соответствующей пункту «DOC, DOCX». Чуть ниже находится область, где предлагается указать размер искомого файла путем обозначения диапазона. Обычно текстовые документы весят 10-100 Кбайт. Впрочем, если вы не поскупились на иллюстрации, картина будет отличаться — размер может составлять десятки мегабайт. Настройки завершены? Кликните по кнопке «Сканировать».
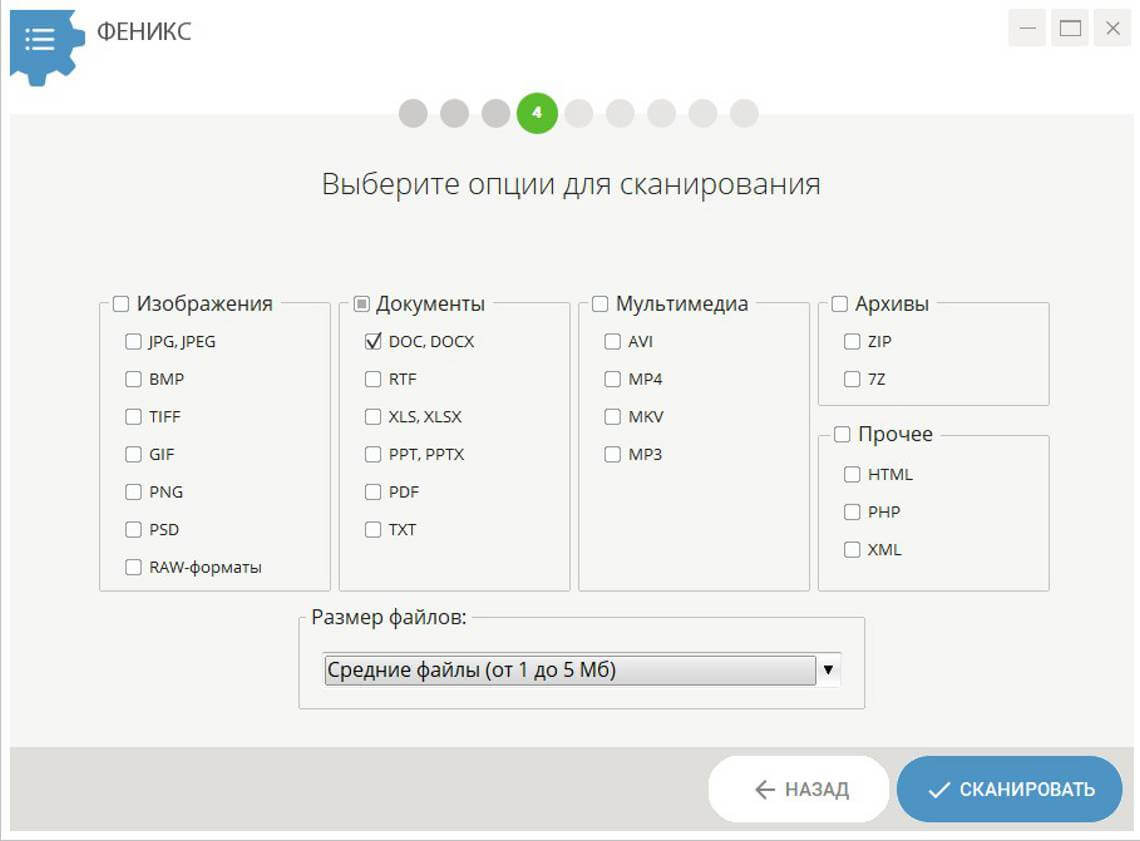
Можно ли восстановить несохраненный документ ворд быстро? Используйте фильтрацию
6. Результаты поиска откроются в виде списка. Для более удобной ориентации вы можете осуществить сортировку по имени или размеру файла. Проставьте галочки напротив нужных документов и кликните по кнопке «Восстановить». Остается выбрать место сохранения: папку на компьютере, CD диск или FTP-сервер.
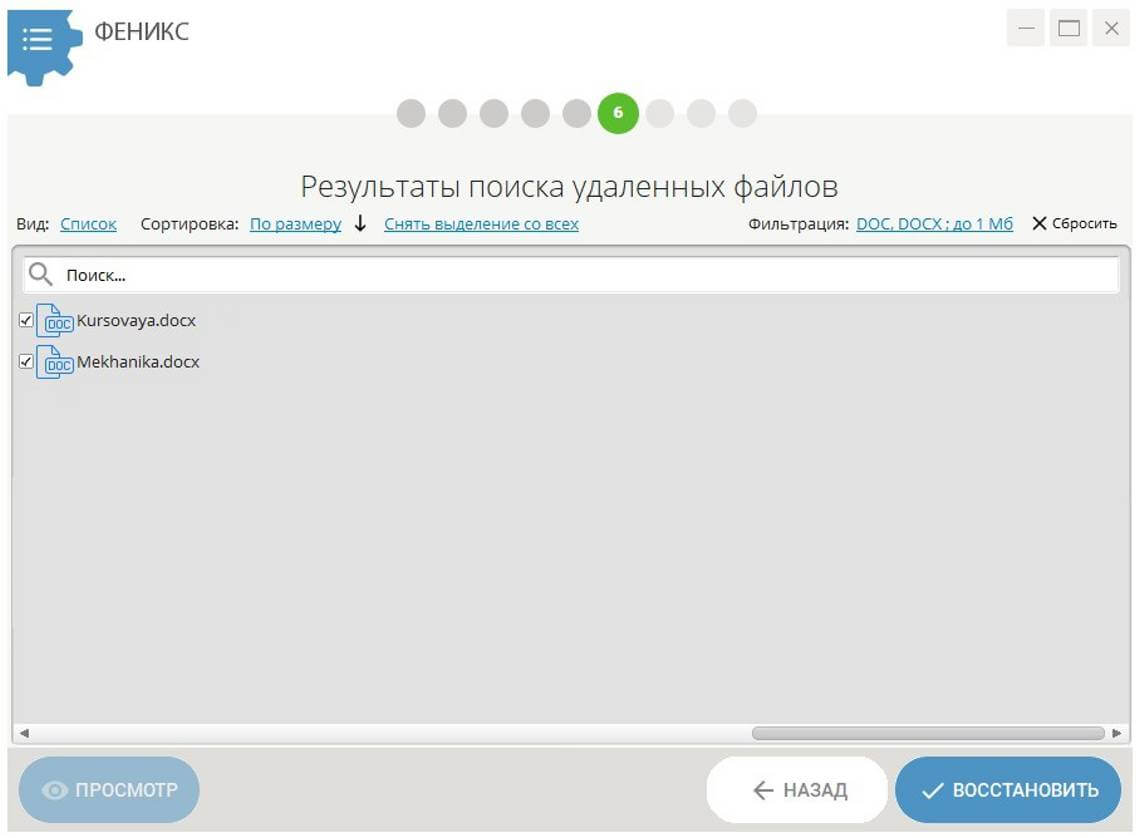
Избавьтесь от лишних галочек
Дождитесь завершения процесса. Готово? Теперь гнев начальства вам точно не грозит!
ФЕНИКС вернет все удаленные документы.
Скачайте программу прямо сейчас!
Скачать бесплатно!
Отлично работает на Windows 11, 10, 8, 7 и XP
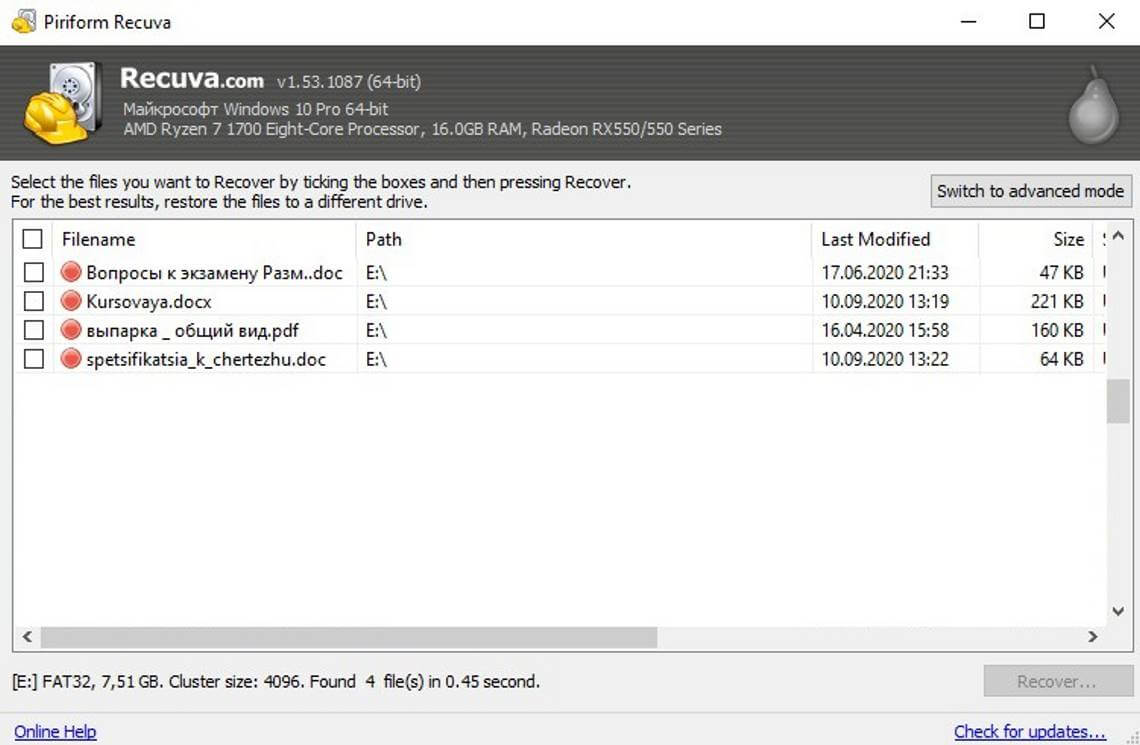
Recuva
Один из лучших аналогов ФЕНИКСа. Если вы не сохранили документ Word 2007 и теперь думаете, как его восстановить, скачайте Recuva. Работать с ней достаточно просто. Чтобы увидеть полный перечень удаленных объектов, нужно определить тип файла и обозначить носитель. Рядом с названиями найденных документов вы заметите цветные маркеры состояния: к сожалению, часть содержимого восстановлению не подлежат. Если искомый текст избежал этой печальной участи, верните его.
Recuva занимает мало места и распространяется абсолютно бесплатно. Однако она неэффективна при потере большого количества файлов, а также в случае форматирования.
Recuva
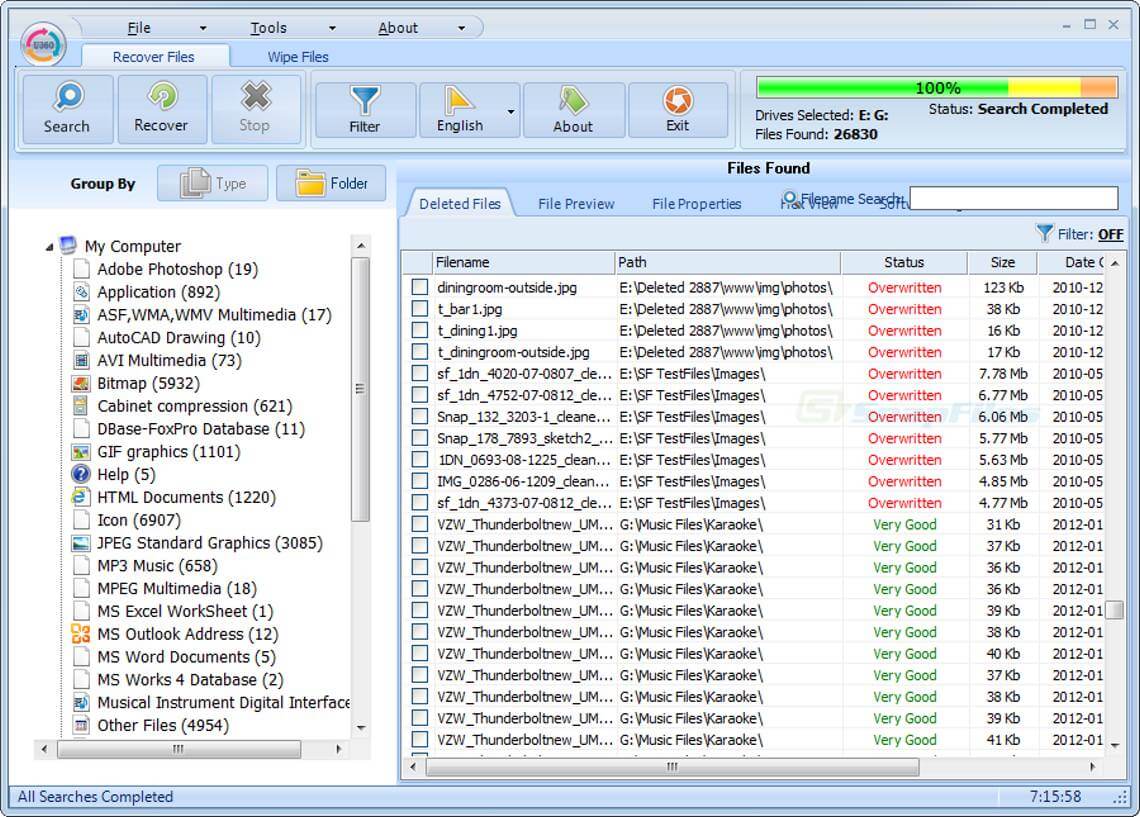
Undelete 360
Undelete 360 позволяет быстро и безопасно вернуть удаленные документы. Данная утилита работает с такими неприятными факторами, как вирусы или неожиданные сбои программного обеспечения. Восстановите любой файл из каталога компьютера, с флешки, карты памяти или дисковода Pen. Отличительной особенностью Undelete 360 является возможность безвозвратного удаления объекта: идеальное решение для тех, кто не хочет хранить свои секреты за трехэтажными паролями.
Скачать это ПО можно бесплатно с сайта компании-разработчика. Серьезных минусов пользователями замечено не было, но иногда встречаются неприятные баги. Часто происходит путаница из-за наслаивания букв в интерфейсе.
Undelete 360
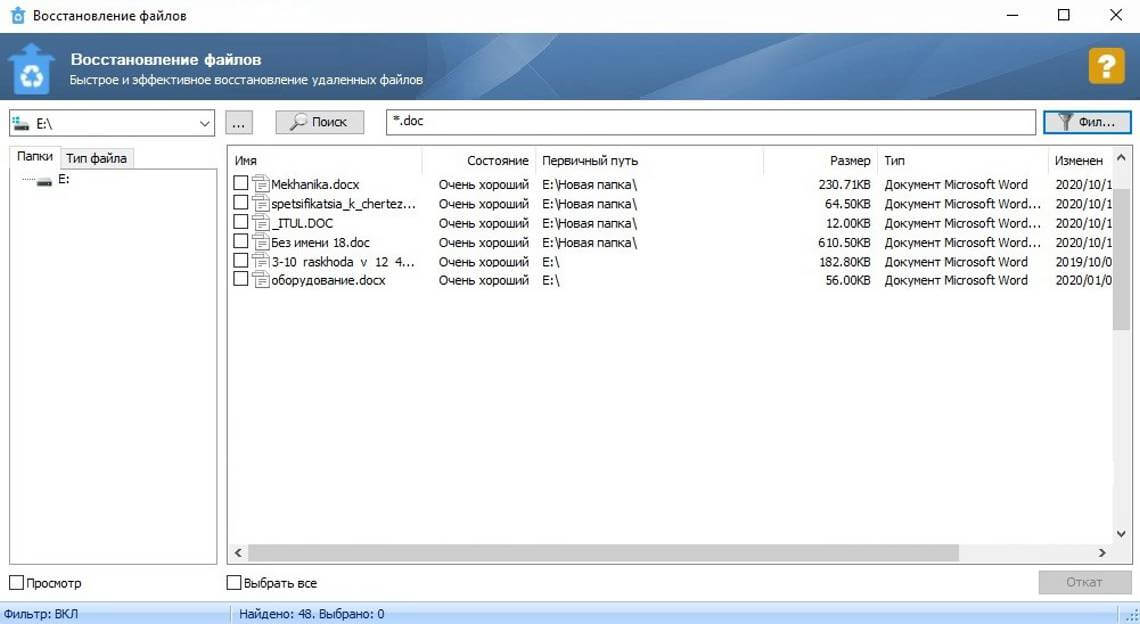
Glary Undelete
Если вы задаетесь вопросом: «Можно ли восстановить несохраненный документ Word 2003 и как это сделать?» — хорошим вариантом станет Glary Utilities. Это приложение создано для улучшения работы ПК в целом. При скачивании вам откроется множество полезных функций: чистка реестра и удаление временных файлов, дефрагментация жесткого диска, а также оптимизация процесса автозапуска.
В Glary Utilities можно вернуть файлы с любых устройств, даже если они были заражены вирусом. Вы легко отсортируете найденное, выставив фильтры по названию, дате, размерам или по перспективам восстановления. Из недостатков — может не заметить некоторые объекты. Страдает распознавание внешних носителей.
Glary Undelete
Подводя итоги
Как видите, восстановить текст в ворде не так уж и сложно. Вы можете попробовать вернуть пропажу своими силами, но такой подход потребует больше времени и сил. Гораздо легче воспользоваться специальным ПО — вероятность успеха будет куда выше, а нервы целее. Если рассматривать с точки зрения простоты интерфейса и результативности проведенного поиска, то лучшим из вышеперечисленных вариантов будет ФЕНИКС. С этой программой вам точно не придется переживать за свои отчеты.
Восстановите удаленные документы прямо сейчас – скачайте ФЕНИКС!
Скачать бесплатно!
Отлично работает на Windows 11, 10, 8, 7 и XP
Вам также может быть интересно:
There are few experiences as universally familiar as losing a Word document. Everyone from high schoolers with Catcher in the Rye book reports to business executives with quarterly earnings knows the panic of their work disappearing when it’s just a few crossed-t’s away from being completed.
Fortunately, there are dependable ways to recover Word documents quickly and reliably. Whether your work was accidentally deleted, lost in a Microsoft Word crash, or simply disappeared, here’s a simple guide on how to recover unsaved Word documents.
And remember, if all else fails, installing a data recovery program like Acronis Revive or falling back on a recent file or system backup may help get your documents back (at least in a workably recent state).
Can I retrieve a Word document that wasn’t saved?
Whether you rely on Word for personal or business tasks, losing an unsaved document sucks.
If you don’t save your Word documents manually, your files can fall victim to an unexpected crash. If you’ve already experienced such loss, chances are you have a habit of pressing the «Save» button once (or twice) every so minutes. However, not many users have that habit.
Nonetheless, even if your system crashes with an unsaved document open, you can still recover it through several options.
You can recover unsaved files through Temporary Files, AutoRecover Files, Document Recovery, Recycle Bin, and Data Recovery solutions. We’ll explore all of those options more deeply a bit later in the article.
Does Word keep backup files?
Like most programs in its class, Microsoft Word has an in-built «auto-save» feature to automatically back up your progress every few minutes. The default auto-save folder to support this function is the AppData folder.
Examples of the file path to harvest copies of your work are:
C:UsersYour_UsernameAppDataLocalMicrosoftWord
Or
C:UsersYour_UsernameAppDataLocalTemp
Or
C:UsersYour_UsernameAppDataLocalMicrosoftOfficeUnsavedFiles
Word backup files carry the «.wbk» extension. If you haven’t disabled the backup option in Word, the program will make copies of your documents regularly.
To check if the backup option is active, go to «File» -> «Options» -> «Advanced»; then scroll down to the «Save» section -> select «Always create backup copy».
Can Word save to the Cloud?
Yes, it can. If you rely on the native Windows option, your documents will be uploaded to OneDrive.
Having your documents on the cloud enables easier sharing and improves collaboration. It also allows easier mobile access (from a PC, laptop, smartphone, or tablet) and enhances data protection.
To save files to the cloud, do the following:
1. Select the «File» menu and go for the «Save As» option;
2. Choose «OneDrive»;
3. Choose a descriptive file name and go for «Save».
You can save personal and payment information to OneDrive – Personal, with work-related files going to a company OneDrive. You can also pick an alternative location in the list or «Add a Place» of your preference.
If you’re using a third-party backup solution like Acronis Cyber Protect Home Office, you can upload backup files to the Acronis cloud. Storing your files with a dedicated cloud backup service provides improved cybersecurity via backup encryption, automated backups, and concrete data recovery processes.
How do I restore a permanently deleted file?
Multitasking on a device may lead to losing critical data. (files, documents, images, audio, video, etc.)
Sometimes, you can get distracted and accidentally delete files and folders. The most common reasons for an accidental deletion are:
· Accidentally emptying your Recycle Bin;
· Erasing documents via «Shift+Delete» keys;
· Deleting files via the command line;
· Deleting files with the «Do not move deleted files to Recycle Bin» option enabled
File deletion or corruption can also result from malware or virus infection on your device.
Fortunately, you can recover perma-deleted data and documents in several feasible ways. Not all of them are guaranteed to recover permanently deleted documents, but you may try all of them in order when needed.
You can still recover seemingly perma-deleted files due to how your hard drive operates. Every file on your device resides on a specific portion of the hard drive. When you delete a file from your hard drive, the drive removes the deleted data and marks the space it used to occupy as «free» for writing new data.
However, the file can be restored to its original location unless you write new data on the newly available space. Remember, you need to act quickly – even if you don’t save new data to the hard drive manually, your computer can initiate updates or save system data on the newly available space.
In such a scenario, recovering permanently deleted files becomes close to impossible.
How to recover deleted Word documents via Backup?
Windows 10 and 11 pack a new feature called Backup and Restore.
The option enables users to create backups of their data to restore them later if needed. To recover permanently deleted files via Backup and Restore, you’d need to have enabled the option on your Windows device.
Here’s how to do it:
· Connect the external media carrier holding the backup to your primary device
· Go to «Control Panel» -> select «System and Security» -> click «Backup and Restore (Windows 7)» option
· Once in the Backup and Restore menu, go for the «Restore my files» option -> a Restore wizard will pop up to start file recovery
· If you can’t find the «Restore my files» option, go for the «Select another backup to restore files» option. Again, a wizard will pop up to assist you with your recovery
Recovering via Backup and Restore will replace all data on your Windows device with backed-up data. So, to avoid further data loss, make sure the backup contains all your crucial data.
How to recover deleted Word documents via Previous Windows 10/11 version?
Windows 10 and 11 offer another convenient feature to restore permanently deleted files – the «File History» option. If you had enabled the option before deleting a document, you could use it to recover permanently deleted files without additional software.
To do so:
· Type «File History» in the Start menu or the Windows search bar
· Select «File History Settings»
· From the left panel on the pop-up window, choose «Restore personal files»
· Navigate the feature to the backup you wish to restore. You can do that via the left and right navigation buttons at the bottom of the window. While you switch between backups, you can preview backup dates and the folders within them
· Once you’ve located the specific backup storing the deleted documents, press the «Restore» button to recover the files to their original location
· If Windows suggests it already carries a file with the same name in the destination folder, go for the «Replace the file in the destination» option
Lastly, close the window and check if the recovery is successful.
How to recover deleted Word documents via Command Prompt?
Sometimes, files and folders can be hidden due to the «Hidden files and folders» feature in Windows. You can use the Command Prompt to try and recover them.
To do so:
· Type in «cmd» in the Search Bar on the Start menu
· Choose the «Run as administrator» option
· Type chkdsk *: /f in the Command Prompt. The * represents the letter of your hard drive, so replace it properly. Once you do, hit «Enter»
· Type ATTRIB -H -R -S /S /D D:*.* in the Command Prompt window. Here, replace the «D» with the letter corresponding to your hard drive. Once you do, hit «Enter» again
A recovery process should start immediately if you’ve followed the above steps successfully. Let it finish and check if your files have been restored.
How to recover deleted Word documents via System Restore?
If you’re running Windows 10 or 11, you can opt for a System Restore to recover permanently deleted files. As System Restore takes regular (automated) snapshots of your whole OS, you can revert any unwanted changes to your system by reverting it to a previous point in time.
However, you’d need to have activated the System Restore option beforehand.
To recover perma-deleted files via System Restore, you need to:
· Type in «create a restore point» in the Start menu or Windows search bar, and click «Enter»
· Select «System Restore»
· Go through potential system restore points in time and select the most appropriate to recover the deleted document; then, click «Next»
· Confirm the specific restore point and choose «Finish»
· Your PC or laptop will then restart to allow Windows to apply the changes
Although this option is convenient, you must remember that System Restore may affect recently installed drives, programs, and browser updates. As its primary goal is to repair your Windows environment, it will revert your device to an older version of itself. And that older version may not have some programs or apps installed or updated correctly.
Nonetheless, before the System Restore process starts, the feature will show you a window containing all programs that will be affected by it. This way, you can back up all potentially affected programs and files before you revert your system.
How to recover deleted Word documents via System Image Recovery?
System Image backup enables users to back up the entirety of a Windows 10 or 11 OS. However, the feature doesn’t allow single file and folder backup, so you wouldn’t be able to restore individual documents if needed.
Here, it’s either recover everything or don’t recover anything.
To recover documents via System Image Recovery, you need to:
· Type «settings» in the Start menu or Windows search bar, and click «Enter»
· Browse and select «Update & Security»
· From the options list on the left, go for «Recovery»
· Save the progress on any open documents or programs
· Then, go for the «Restart now» button (you can find it under «Advanced Startup»)
· Afterward, select “Troubleshoot” -> “Advanced Options” -> “See more recovery options” -> “System Image Recovery”
· Browse through the list of System Image backup files and select the one containing the deleted document, then click «Next»
· Choose additional restore options, then click «Next»
· Review all System Image properties and click on «Finish» to start the restoration process
Once the restoration is complete, the deleted document should be restored to its original location. (or an alternative location, if you’ve chosen so in the Restore settings)
How to recover deleted Word documents via a third-party Backup solution?
If you’re using a dedicated backup solution, you can initiate data recovery and restore permanently deleted files from your device.
For example, Acronis Backup and Recovery enables users to initiate efficient backups with over 20 supported platforms. Via the cloud, your data is securely stored in physical, cloud, virtual, and mobile environments.
If you need to recover files from Acronis backup, you can do it via the user-friendly interface.
To do so:
· Start Acronis Cyber Protect Home Office -> select «Backup» on the sidebar
· Select the backup containing the deleted documents from the backup list
· On the panel to the right, select «Recovery»
· The interface will present you with possible recovery models for the selected backup; depending on the backup’s type, you’d be able to choose from «Entire PC», «Disks», «Partitions», and «Files» options. To recover one or more documents, select «Files»
· Cyber Protect Home Office will display the backup’s properties and the data inside it. Then, select a specific version of the backup based on the date and time. The default option here is the latest backup
· The panel on the left lets you navigate the files you wish to restore in the panel on the right; after you select all needed documents, press «Next»
· Choose a recovery destination on your device to place the selected documents after restoration. Here, you have two options – recover the data to its original location or choose a new location via the «Browse» button
· You can customize the recovery settings for the current session via the «Recovery options» menu.
· Once you’re done with the settings, go for the «Recovery now» button.
You can terminate recovery via the «Cancel» button at any time. However, aborted recoveries can still cause changes in the selected destination folder, so only go for the option if absolutely necessary.
Tips on preventing your Word Files from being deleted or unsaved
How to recover Unsaved Word Document?
We rely heavily on autosaves, yet huge chunks of progress and entire versions of documents can be lost when we don’t manually save our work. The good news is, this problem is so common that Microsoft has made it easy to recover unsaved Word documents:
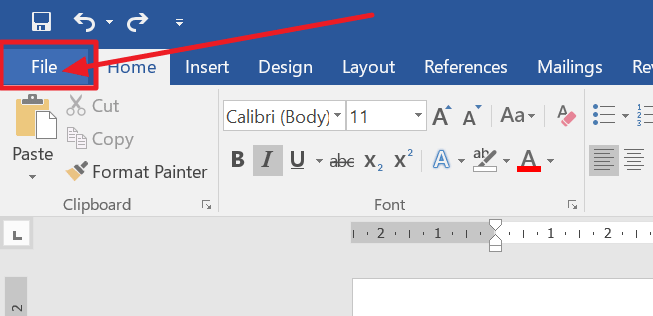
1. In MS Word, click the File Tab in the upper left.
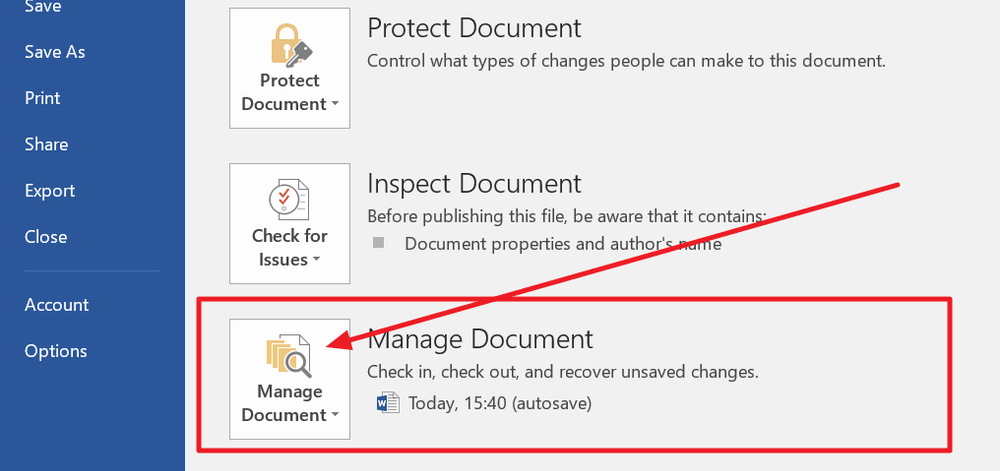
2. Click Manage Document and select Recover Unsaved Documents from the drop-down list.
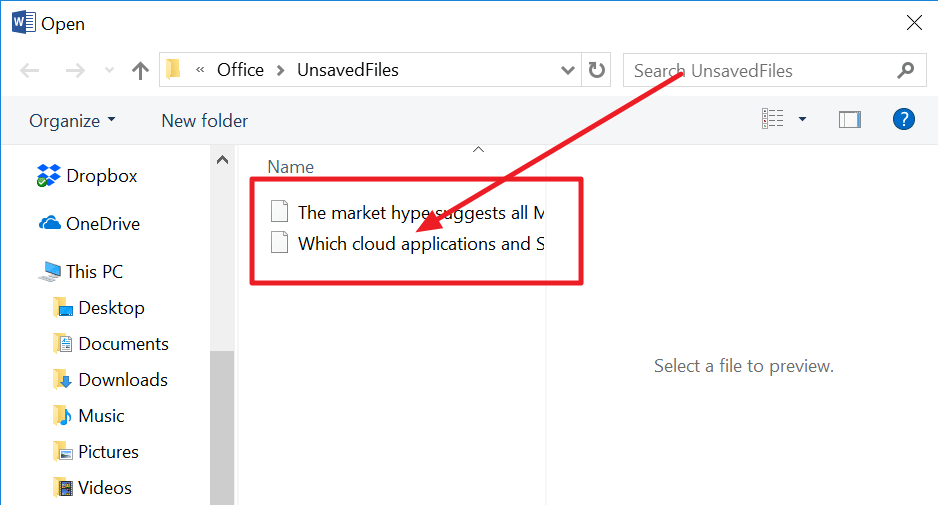
3. Check for your missing file in the dialog box. If it was a recent loss it should appear.
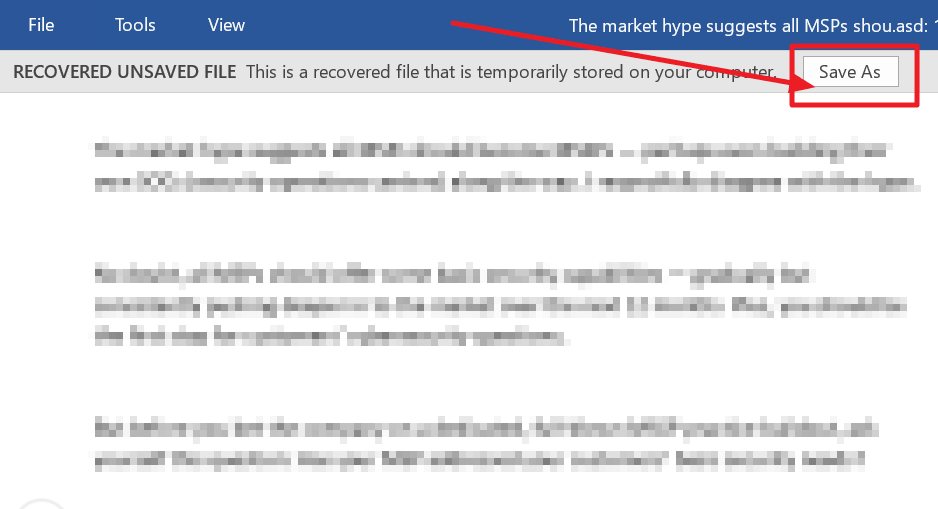
4. Open the recovered Word document and click the Save As button in the top banner.
Did You Know?
You can update the frequency with which Microsoft Word autosaves your documents. Click File > Options > Save and change the number of minutes to ensure you have a recoverable version of all your docs available in case you need to recover Word documents in the future.
Knowing how to recover deleted Word documents will make you seem like a wizard to many of the people in your office, but it’s not complicated at all. Whether you’re trying to recover MS Word documents that were accidentally deleted or compromised by malware, there are a few easy steps that could help you get it back.
1. On your desktop, open the Recycle Bin
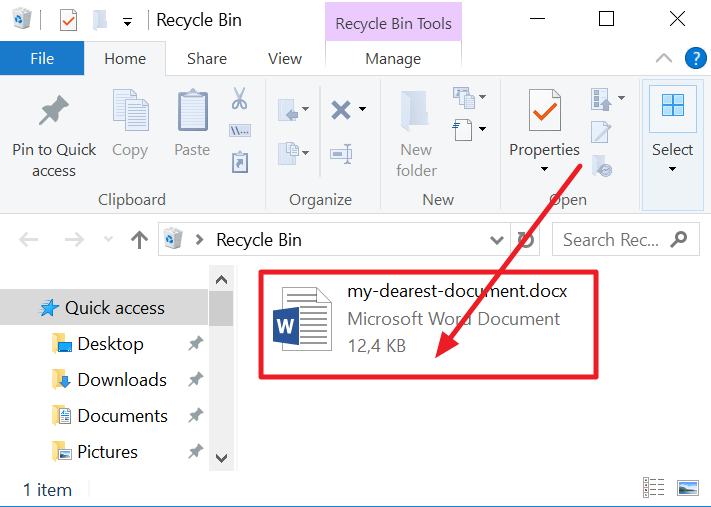
2. Search for your file by document name, file type, or date deleted. If you find your missing file, note the Original Location. When you recover deleted Word documents, they automatically are restored to that location.
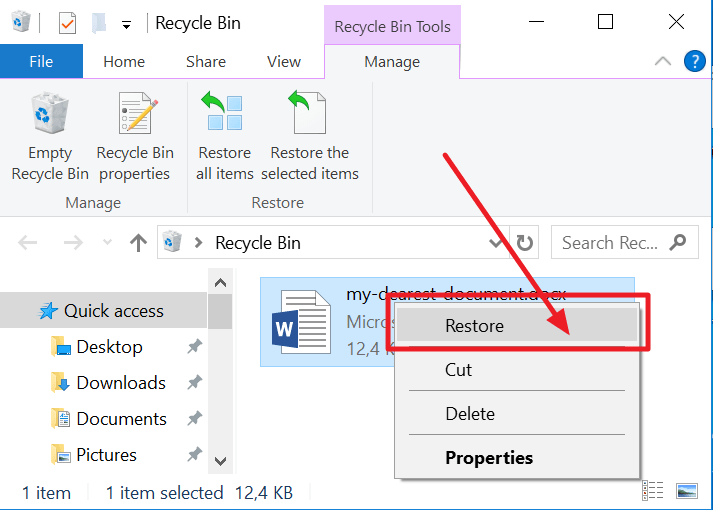
3. Restore the deleted document and either find it in its original location or click Quick Access to find it in the Recent Files list.
Did You Know?
When a file is deleted you’re actually just removing a marker that points to where the file was stored on the disc. The file actually exists on the disc until its space is overwritten by new information. Until that happens, you have a chance to recover Word documents.
How to recover Word Documents after a Crash?
Recovering Word documents that didn’t save doesn’t always stem from user errors. Whether your system unexpectedly went down or Microsoft Word crashed, Word documents can be recovered if you quickly search for the lost files before other files can take their disk space.
1. When your system comes back online, reopen Microsoft Word. The program automatically recovers unsaved Word documents in most cases.
2. If your document doesn’t appear in the AutoRecover list, click on File, then Options, then Save.
3. Copy the AutoRecover file location filepath and paste it into File Explorer.
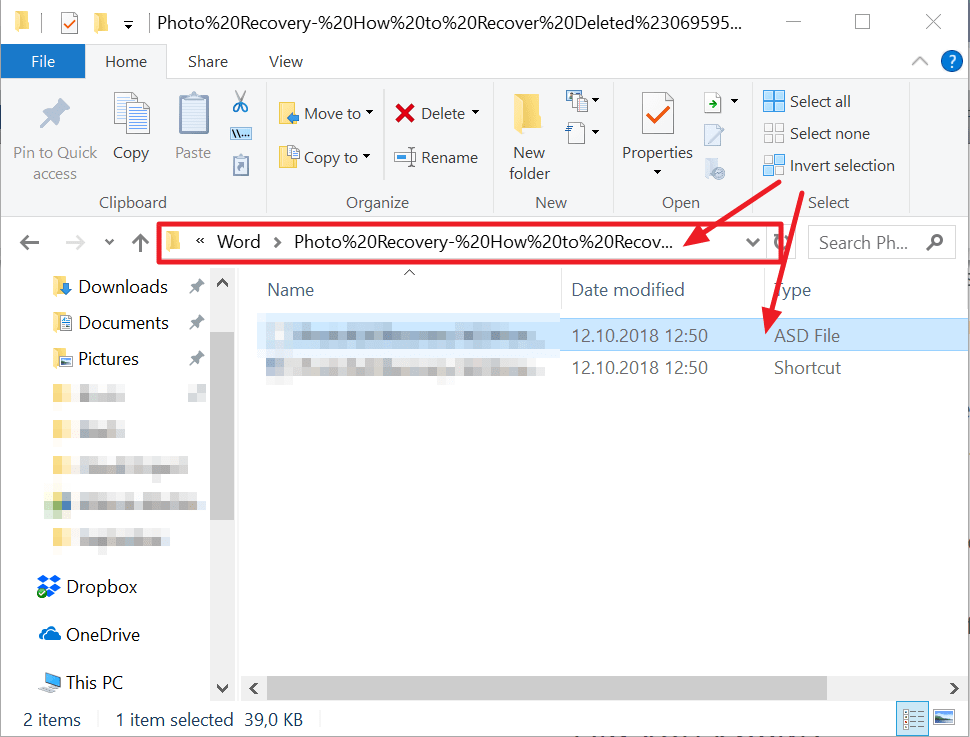
4. Open the folder with your document’s name and copy the .asd file with the most recent modification date and time.
5. Return to MS Word, click File, then Open, then scroll to the bottom of the recent documents list and click Recover Unsaved Documents.

6. Paste the copied file into the folder that pops up and open the file to recover it.
Did You Know?
One of the most common reasons for Microsoft Word crashing is corrupt add-on or template. If your program consistently crashes, try running Word without any of these features loaded to see if that helps to improve reliability.
Can I recover a permanently deleted word doc without a backup?
Recovering a permanently deleted file via backup is the easiest and most reliable option. However, sometimes, users don’t have the chance to add a specific document to the backup. If they then accidentally delete the document, recovery gets a hell of a lot more complicated.
In such a scenario, you have two primary options.
The first one is to use data recovery software. Nowadays, many recovery tools claim to have an exceptionally high rate of recovering permanently deleted files. Usually, such solutions can recover over 1000 file types and formats and claim to restore data even from corrupted partitions or bad sectors on your hard drive.
They typically operate by collecting the lost data bit-by-bit until they can fully restore its original state. Such an approach can prove handy occasionally, but that depends heavily on the state of your computer’s hard drive.
If you lose a document due to a bad sector on your hard drive, the software may not be able to recover all of the document’s pieces successfully. This may lead to an altered version of the document or may not be able to restore it at all. In such a case, the document would be lost unless you have it stored in some form of backup.
This leads us to the second option.
Suppose a user perma-deletes a document by accident. In that case, most often, their reaction is to panic, especially if they don’t have the document stored in a backup outside their primary device.
However, we live in a technologically webbed world – anyone can send documents to multiple recipients via email, social media platforms, or free cloud services.
You can go through old emails, check DropBox or OneDrive shared storage, or go through your correspondence on Facebook and Instagram to find the deleted file. Nonetheless, if you’re 100% sure you haven’t sent the document to anyone, you can opt for the data recovery software option.
As we’ve mentioned, AutoSave is an in-built feature available in Word, Excel, and PowerPoint. (given you have a Microsoft 365 subscription)
AutoSave saves the progress on your Word files every few seconds unless you tell it otherwise. If you store your Word files on OneDrive, SharePoint, or OneDrive for Business, AutoSave is enabled by default.
To save a copy of your work before implementing any changes, it’s better to use the command «File -> Save a Copy» rather than «File -> Save As». That way, AutoSave will not overwrite the original document with the changes you make afterward.
If you skip that step and end up with an overwritten document, you can still restore the original via Version History. To do so:
· Open the Word file you wish to restore to a previous version
· At the top of the windows, click on the filename and go for «Version History»
· Review the dates and times of all versions to find the one you wish to restore -> click «Open Version»
· An additional window will pop up and show you the specific version of the document
· Once you’ve made sure this is the version you want to restore, click «Restore»
Whenever you open a Word document and make first changes, AutoSave will save those changes by adding a new file version to Version History. Afterward, AutoSave will regularly save changes to the document but only add new versions to Version History about every 10 minutes until you terminate the session. (ending the session means closing the Word document)
How do I get Microsoft Word to save AutoRecover versions every minute?
If you’re handling critical information via Word documents, saving a version of the file every 10 minutes may seem risky. However, Microsoft has thought of that – you can change the AutoRecover frequency to any number that suits you.
Here’s how to do it:
· Open Word and go to File -> Options -> Save
· You’ll see a settings section labeled «Save documents»
· Under the «Save documents» line, type your chosen number (of minutes) in the «Save AutoRecover information every (…)» box
· Once done, press «OK»
If you want to change the location for AutoRecover documents, go to:
· File -> Options -> Save
· Under the «Save documents» line, browse or type in the save path for saved documents in the «AutoRecover file location» field
· Once done, press «OK»
The AutoRecover settings window allows you to also:
· Disable AutoSave for OneDrive and SharePoint online files by default
· Change the cache location for AutoRecover files. The default should be «C:UsersYour_UsernameAppDataRoamingMicrosoft[OFFICEAPPFOLDER]
· Enable AutoSave on the computer by default
According to Microsoft, however, there is no option to use AutoSave locally in Office 2019 or 2021. Nonetheless, the AutoRecovery feature is still active to periodically save copies of your Word files to negate accidental data loss due to a crash.
Can I turn on AutoRecover in Word for Mac?
As with Windows, AutoRecover is available for Mac to protect the progress on your Word documents. Its default function here is the same – it makes a copy of your document every 10 minutes.
To enable AutoRecover and set the timeframe for making copies, you need to:
· With Word open on your Mac, go to the «Word» submenu on the top
· Choose «Preferences»
· Choose the «Save» option
· Choose «Save Auto-Recovery Information» and type in the duration you wish to set for AutoRecover copy creation
Microsoft advises users not to rely on AutoRecover as a substitute for manually saving their documents. (by clicking on the «Save» icon)
The most optimal way to preserve changes to your document is by manually saving it after every significant change. Nonetheless, it doesn’t hurt to set the AutoRecover timer to 5 minutes instead of 10 to guarantee you won’t lose progress due to a crash.
Keep in mind, when you manually save a document, its previous AutoRecover versions are removed.
On the other hand, AutoSave is a feature that saves your documents as you work on them. It works as if you’ve manually saved your progress. For Mac, AutoSave is available in Word, Excel, and PowerPoint for Mac and Microsoft 365 subscribers.
If you have AutoSave enabled, it’s less likely you’d need to rely on AutoRecover files.
Where is Autosave in Word located on Mac?
The AutoSave and AutoRecover features are linked in the Word menu. The path to enable AutoSave follows the same steps as with AutoRecover. However, you’ll have a few extra steps to complete before AutoSave is active for Word on your Mac.
Here’s how to do it:
· Open Word
· From the top menu, choose «Word» -> «Preferences»
· Click on the «Save» icon
· Tick the checkbox labeled «Turn on AutoSave by default»
· From the Word document, enable the AutoSave toggle to save your progress to the cloud (OneDrive or SharePoint)
· Explore more options from the AutoSave tab and select the «Automatically Save» option
· The AutoSave toggle will appear on the top side of the Word toolbar
· Name the document you’re working on and choose OneDrive or SharePoint as the storage location of the Word file
· Click «Save» to enable AutoSave to store changes in your desired location in real-time
· Your document will then be uploaded to the chosen location
·Once that’s done, AutoSave is on, and all changes you make to the document will be saved to OneDrive or SharePoint
Where can I find AutoSave Word documents on my computer?
If a power failure or a crash occurs, AutoRecover will typically recover the last version of your Word document automatically when you launch the app. Once AutoRecover opens the existing recovery file, it’s best to save it before editing or closing it immediately.
However, you may need to find AutoRecover files on your computer for other reasons. To do so:
· Switch to Finder
· Click «Go»
· Click «Go to Folder» (you can also use the SHIFT + COMMAND + G combo)
· Enter the specific folder path corresponding to Word, Excel, or PowerPoint
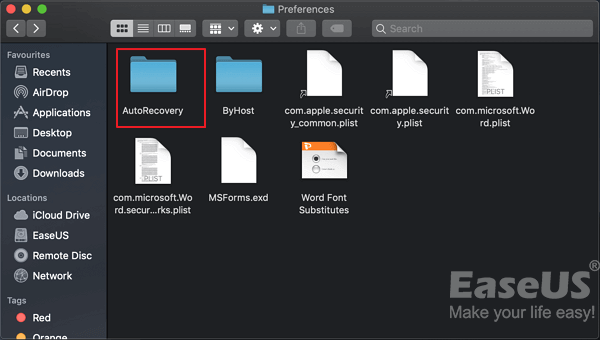
For Word:
/Users/Your_Username/Library/Containers/com.Microsoft/Data/Library/Preferences/AutoRecovery
For Excel:
/Users/Your_Username/Library/Containers/com.microsoft.Excel/Data/Library/Application Support/Microsoft
For PowerPoint: /Users/Your_Username/Library/Containers/com.Microsoft.Powerpoint/Data/Library/Preferences/AutoRecovery
Just a reminder: Replace «Your_Username» with your actual username.
As the AutoRecovery folder is hidden, typically, you won’t be able to find it by navigating in Finder. That’s why you need to use the «Go to Folder» feature and type in the full path to reach the folder.
Additionally, if you close a Word document and click «Don’t Save», the AutoRecover option won’t be active. The feature will delete the AutoRecover file because it assumes everything is okay and you wouldn’t need the AutoRecover file.
Can Microsoft Word recover previous versions of my document?
If you have turned the AutoRecover option on, it will automatically save versions of your documents regularly. (usually, at 10-minute intervals)
Once you have the AutoRecover files for your document, you can recover them depending on when you saved them.
There are two options: recover a saved file or an unsaved one.
If you have saved the document, you have to:
· Open the document you were working on
· Select “File” -> “Info”
· Find «Manage Documents» and choose the file labeled (when I closed without saving)
· A bar on the top of the file will appear; choose «Restore» to overwrite any previously saved versions
You can also compare AutoRecover versions by choosing «Compare» instead of «Restore».
If you haven’t saved the document, you have to:
· Open Word and go for “File” -> “Info” -> “Manage Document” -> “Recover Unsaved Documents”
· Select the specific file and click «Open»
· In the top file bar, choose «Save As» to save the document
If you have stored AutoRecover files in OneDrive or SharePoint in Microsoft 365, you can view all historical versions of a document.
To do so in Office 365:
· Open the file you want to inspect
· Select “File” -> “Info” -> “Version History”
· Browse through versions and select them to open them in a separate window
· If you want to restore the document to one of the previous versions, choose «Restore»
Keep in mind, if you operate via a Microsoft account, you’d be able to retrieve the last 25 versions of a document. If you sign in with a school or work account, the retrievable version volume will depend on your library configuration.
To view AutoRecover versions in Office 2019-2016:
· Open the document you want to inspect
· Click “File” -> “History”
· Choose a version to open in a separate window
If you can’t locate the «History» tab on the Word navigation pane, you may have a subscription version of Microsoft Office. If that’s the case, click the «Info» button and try accessing Version History from there.
To view AutoRecover versions on Mac:
· Open the document you want to view
· If you are using Microsoft 365 for Mac, choose the name of the document from the app’s title bar -> click «Browse Version History»
If you’re running Office 2016 or 2019 for Mac, go for «File» -> «Browse Version History»
· Browse AutoRecover versions and choose which ones to open in a separate window.
To view AutoRecover versions on the web:
· Open the document you want to view
· Go for “File” -> “Info” -> “Version History”
· Browse through AutoRecover versions and open the ones you want in a separate window
· When you find the version you’re looking for, choose «Restore»
If you use SharePoint in Microsoft 365 to handle documents, you can track AutoRecover versions, share them with others, and check recycle bin storage if you accidentally delete a file.
How to search for Word doc which I know I saved?
If you’re sure you have saved a Word document but haven’t been able to locate it, worry not. There are several ways to unfold saved documents, even when you’re computer is swamped with Word files.
You can search a file via the taskbar, the Documents tab, or File Explorer.
To find a Word document via the taskbar, type in the document’s name (if you remember it correctly) into the search box on the Windows taskbar. If you don’t know the full name of the document, you can use a keyword from it.
You can get results even if you remember a keyword from the text body of the document. (and not its name)
Once you type the name or keyword, Windows will show all matches on your device and OneDrive.
You can select the Documents tab if you wish to narrow your search. Once you do, your search results will only show documents.
Moreover, you can open File Explorer from a taskbar shortcut or right-click the Windows Start menu and choose File Explorer. Afterward, you can select a location on your hard drive from the left window pane.
You can then search or browse to find the document you need. You can search your entire device by selecting «This PC», or go for «Documents» and only look for files stored there.
How to search for Word backup files?
Although Word backup is seamless once set up for users, finding specific Word backups may be difficult without preparation. Luckily, you can learn how to pinpoint different Word backups below.
Check Word settings
If you remember how to open the AutoSave settings in Word, you can skip the next set of instructions. If not, you need to:
· Start Word -> click on «File»
· Choose «Options» and then click on «Save» on the left
· Ensure that the «Save AutoRecover information» option is enabled
Once you reach the settings window, go to the AutoRecover File Location field. Here, you can check the current AutoSave directory location.
By default, it would be «C:UsersYour_UsernameAppDataRoamingMicrosoftWord»
Once you locate the AutoSave directory location, you need to:
· Launch Word
· Navigate to the AutoSave directory
· Look for the version of the automatically saved backup and double-click it; the file will open in Word
As we’ve mentioned, the AutoSave directory may be a hidden folder on your computer, primarily if it resides in the AppData folder. However, you can bypass that by pasting the directory location in File Explorer’s address bar.
Nevertheless, you can navigate to the folder manually if you follow the path. Just make sure to reveal hidden items to be able to see the AppData folder. Once that’s done, you should easily find your way to the AutoSave directory.
Check the AppData folder
As we’ve said, the AppData folder is the default location for AutoSave backups. The pathing to the AutoSave directory can vary; the most common places to look are:
C:UsersYour_usernameAppDataLocalMicrosoftWord
and
C:UsersYour_usernameAppDataLocalTemp
Sometimes, the most recent AutoSave versions may use a different location. Most often, you’d be able to find them in
C:UsersYour_usernameAppDataLocalMicrosoftOfficeUnsavedFiles
As with previously shown paths, replace «Your_Username» with the username corresponding to your user account.
Regardless of which folder holds your Word backups, the AutoSave files have weird-looking names, especially for a casual user. They typically have a tilde before their name and the «.tmp» extension alongside a 4-digit number assigned to them.
Below are some examples of what Word backup files look like in different scenarios:
· ~wrdxxxx.tmp – such a name relates to a Word document within an AutoSave folder;
· ~wrfxxxx.tmp – such a name relates to a temporary document file;
· ~wraxxxx.tmp – such a name relates to an AutoRecovery file;
Complete AutoRecovery files won’t carry the «.tmp» extension but rather the «.wbk» extension. Once you locate them, you can double-click them to open the document in Word. An important note is always to save the file after you open it.
How to use the Recover unsaved documents option?
Sometimes, you’re sure you’ve saved a Word document, but your PC crashes, and you can’t locate the file afterward.
In such cases, you can still recover the document from the AutoSave location. To do so:
· Open Word and go to «File»
· Click «Recent», then select «Recover Unsaved Documents»
· You will be redirected to the AutoSave location folder; you can browse the documents here and find the one you’re looking for
Another path to reach the AutoSave folder is as follows:
“File” -> “Info” -> “Manage Versions” -> “Recover Unsaved Documents”
After you open the file, make sure to save it.
Check the Documents directory
To check the Documents directory, you should:
· Start Word
· Select «File», then choose «Open»
· Go for «Browse» and navigate to the directory you suspect holds the document
· Ensure to change the File Type of the folder from «All Word documents» to «All Files»
· If you’ve opened the correct folder, you should be able to see all corresponding backup files; you should easily spot the specific file as it is typically titled «Backup of (…)»
· Once you find the backup, you can open and save it
How to search your Windows temporary files manually?
In some instances, finding a backup file via traditional methods is more challenging, especially if you can’t find the AutoSave folder.
However, you can manually search for temporary files by tracking their extensions. Autosaved Word files usually carry the .asd or .wbk file extension.
To search for those, you should:
· Press the Windows Key + E on your keyboard; this will launch the File Explorer
· Once it’s up, click on the search bar on the top right
· Type in «.asd» or «.wbk» (without the quotes)
· Press «Enter»
· Windows will now search for all .asd and .wbk extensions
· Once the search is complete, you can browse through the matches and find the file you’re looking for
· Upon finding the specific file, right-click it and choose «Open File Location»; this will open the AutoSave directory location so that you can see all automatically saved backup files
If searching for .asd and .wbk extensions doesn’t bear any fruits, you can search for .tmp extensions. However, .tmp files aren’t necessarily all Word files. Many of them can support files from other applications, so you’d have to do some sorting.
How to recover Word Documents through Data Recovery Programs?
If none of these methods help you recover unsaved Word documents, your best bet is either backup software or data recovery software.
As always, the most secure and reliable way to recover data is with regular full image backups. Whether you use a Windows PC, a Mac, or a mobile device, having up-to-date backups ensure that you don’t lose your files – no matter what.
That said, if you didn’t have a backup plan in-place and active when you lost your Word document, you won’t have a backup to restore the file from.
In this case, personal cyber protection solutions like Acronis Cyber Protect Home Office are the best way to help you recover Word documents. Acronis Cyber Protect Home Office is an easy-to-use software solution that allows you to backup up the entire contents of your system so in the event of a disaster, you can locate a lost file and restore the MS Word document with just a few clicks.
Final Thought
Whether your Word doc was deleted, encrypted by malware or corrupted when it was saved on a faulty partition, you can recover it with Acronis Cyber Protect Home Office. When armed with regular backups, your docs can be recovered quickly and easily so you never have to worry about losing a Word doc or any other file ever again.