
The document map in Word is a useful aspect that enables easy navigation in long documents. You can find your way in the document using the headings or pages. It will also give a bird’s eye view of the document’s structure.
Some features were added to the Navigation Pane in Word like a Find Tab and the ability to reorganize the document by dragging and dropping headings. Nevertheless, the Document map in Word is still necessary. Below we are going to explore how to use it to navigate a document, how to view a document’s structure and how to change the style of the Document Map outline.
Point to note: For you to make full use of the Document Map, you have to format the headings in your document using the built-in headings styles. The document outline on the Document map is generated using the built-in headings in your document.
A step by step guide to using the document map in Microsoft Word
- To view the Document map, click the View tab on the ribbon and choose the Document Map check box in the Show/Hide group.
- A pane will show on the left side of the Word window. By default, the Document map will show. Click on any heading in the outline to quickly move to that section of your document.
- You can also view a collection of thumbnails of all the pages in your document. To get this done, click Thumbnails from the drop-down list at the top of the Document Map pane.
- A collection of thumbnails representing all pages in the document shows in the Document Map pane. Select a page to quickly get onto it.
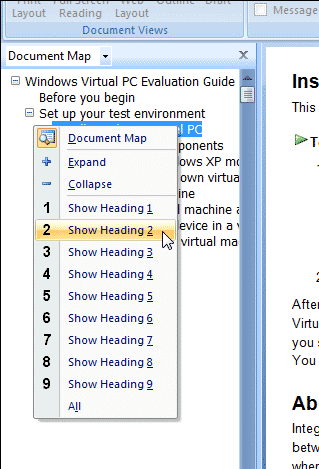
- You can choose which heading level you would want to display by right-clicking on the Document map pane to choose a Show Heading option. For example; if you select Show Heading 2, then all “Heading 1” items will show expanded to only show Heading 2 items. Any headings under Heading 2 are collapsed and do not show.
Note: You can as well expand or collapse the headings using the plus and minus signs to the left of the headings.
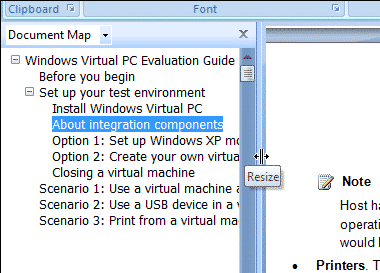
- Then you can resize the Document Map pane by placing your cursor over the border between the pane and your document until it looks like the cursor in the image below and shows Resize. Select and hold on the border then drag it to the left or right to make the pane narrower or wider.
- Sadly, the Document Map context menu does not offer a way to change the formatting of the Document Map outline. Nevertheless, you can change this formatting by changing the Document Map style. To do this, select the Styles dialog box launcher icon in the Styles group on the Home tab. You can also press Alt + Ctrl + Shift + S.
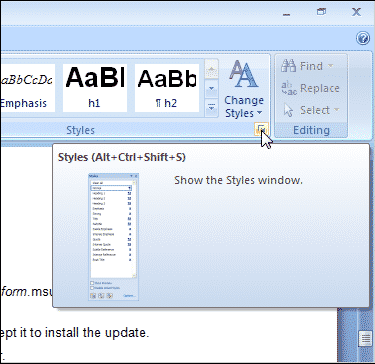
- The Styles window then shows. Select the Manage Styles icon at the bottom of the Styles window.
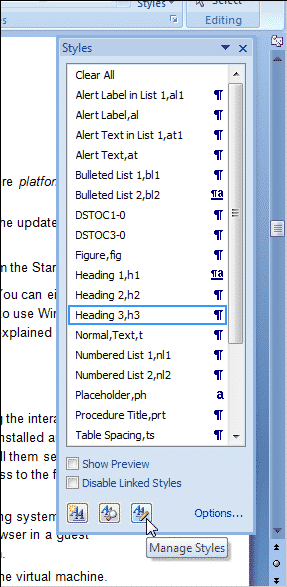
- On the Edit tab, on the Manage Styles dialog box, scroll in the Select a style to edit box until you find the Document Map style. Select it and click Modify.
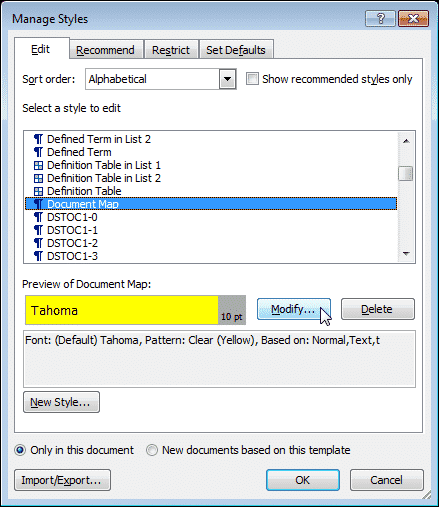
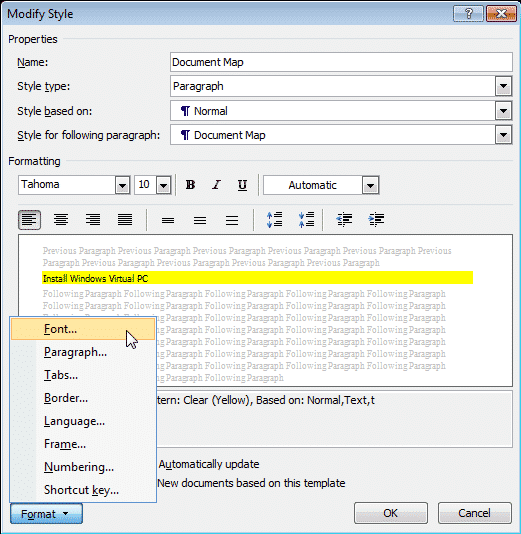
- Choose the desired formatting options on the Modify Style dialog box. Use the Format icon to access more options to set. Click OK when you are finished changing the formatting. You will be returned to the Manage Styles dialog box then click OK to close it.
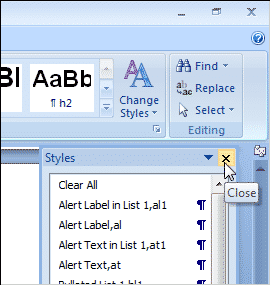
- To close the Styles window, select the X button in the upper, right corner of the window.
Note: In Microsoft Word 2007, the Document Map sometimes shows the outline of the headings in a tiny, unreadable type. This is a commonly known bug. However, there is a workaround. The solution is to switch to Outline View and then back again. To do this, click Outline in the Document Views group on the View tab. Then, click Close Outline View on the Outlining tab.
Besides allowing for easy navigation within your document, the Document Map also tells you where you are in your document. As you scroll through your document using the scroll bar or the Page Up and Page Down keys, the Document Map highlights the current heading.
In need of a better solution to track changes and improve collaboration while using Microsoft Word?
Keeping track of your document can be a challenge especially if you are collaborating without remote access to the rest of your team. While working in a shared drive, someone may take the document out and save it to their desktop to work offline. Once they are back in the office or somewhere with a working internet connection it may seem simple to just drop it back into the drive and continue collaborating.
What if you had made changes to the file online while this was happening? After both of you have saved the changes made, what often happens is that there will be two ‘updated’ versions of the same document. No one will be able to know the most recent file, what changes were made and by whom.
People may always need to access files offline for various valid reasons. They could be travelling, working from home or at an airport or aeroplane without access to an internet connection. This can most likely leave the whole team open to disjointed file management.

Tracking changes is very important. Without this, nobody can keep up. For this reason, Microsoft Word added a Tracked Changes feature which is definitely helpful but only if you remember to turn it on.
No one can ever be sure why they always seem to forget. Even we do. It happens. You find yourself over halfway through the document with progress and then you remember. Now you have to reread the whole document to identify what has changed.

Some will be easier to identify than others. It’s the small changes that were not given much thought like punctuation that prove to be more taxing.
Another problem with Microsoft’s Track Changes is not this mistake but the fact that a fellow team member can join the document without your knowledge, edit and make changes that won’t be brought to your attention because Microsoft Word will only track the changes that you request it to. This leaves you oblivious to the changes that could be made by someone else.
This cane is detrimental to the company’s work output because so many details can go unapproved. It becomes a huge risk when you can’t control or oversee every change that is made on top of time being wasted because you forgot to turn on ‘Track Changes’. It can be frustrating.
To save everyone from this hassle, you can employ the help of innovative collaboration tools on the market such as Simul Docs that will ensure a better experience while collaborating with Word.
It not only manages version control but also allows you to work from anywhere at any time.

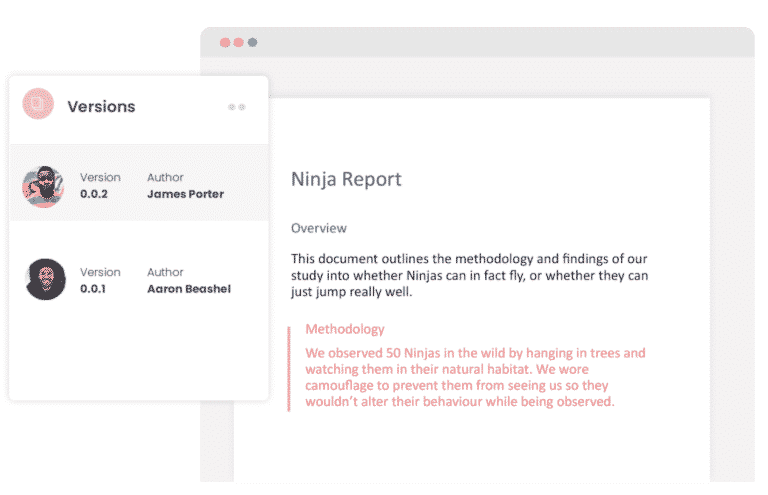
Simul is aware of the fact that you want a document saved as a new file while changes are being made. It knows that you also do not want to remember to click “Save As” every 30 minutes so all the changes being made will be saved automatically. You don’t have to remember and there is no consequence when you forget. A new version of the file will be saved into the version history as it processes the changes that have been made by any of the team members, whether offline or online.
You can access all your documents offline on Simul knowing that once you make changes and reformat, it will update the file for the rest of your team to see once your device is back online.
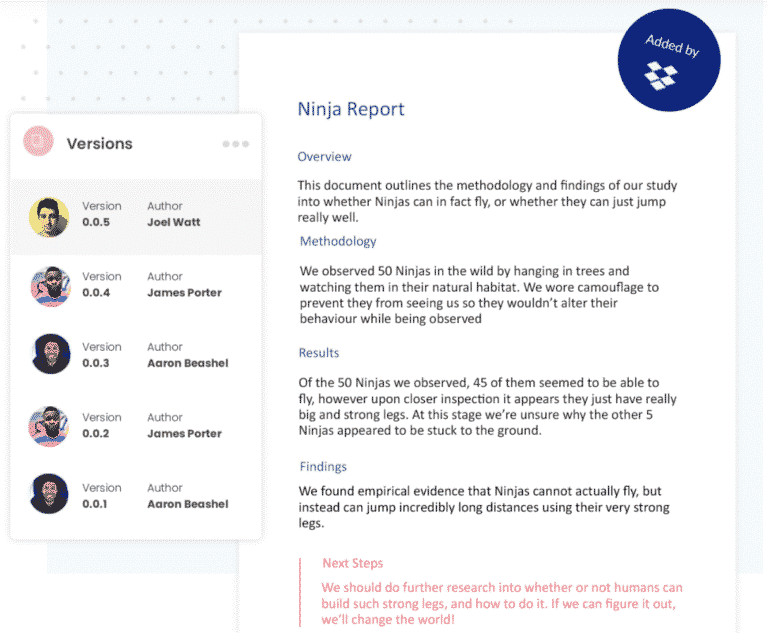
If two members of the collaboration team happen to be working on the document, offline, each one will be saved and updated as a new version and sent to the document owner to put them on notice about two new versions to be reviewed.
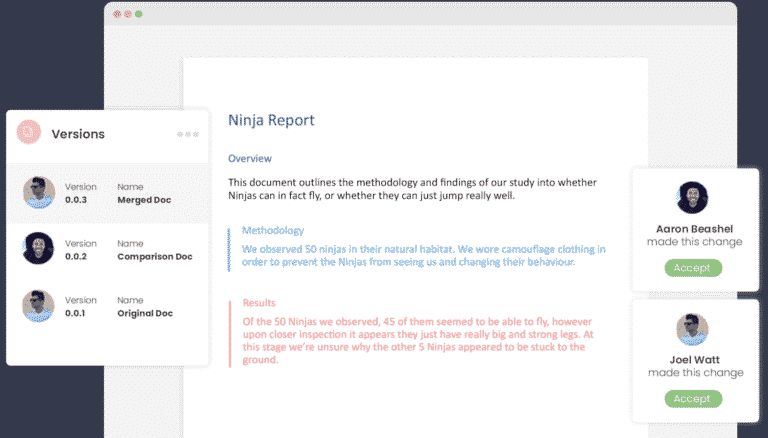
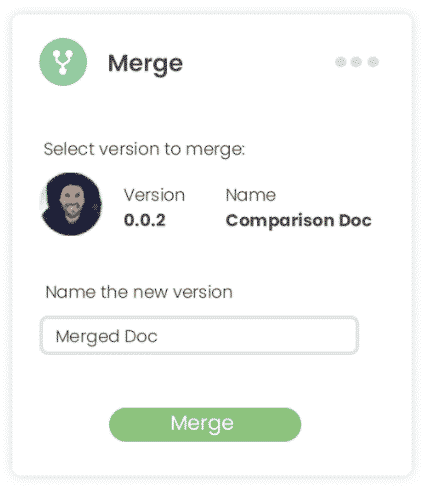
The document owner can then review the documents and merge them at the click of a button.
Because of the automatic track changes feature you can’t make any changes that will go unnoticed and each one will have both an Accept and Decline icon next to it, similar to what is with the Microsoft Track Changes feature. The changes can be quickly reviewed this way.
On top of that, your colleagues can also leave comments or notes within the document to give you additional information. This comments feature can also be used in Simul to start an in the document conversation thread, allowing you to type short messages between your collaborating team members about the document while keeping everything in the same place. Living in the document, as they should.
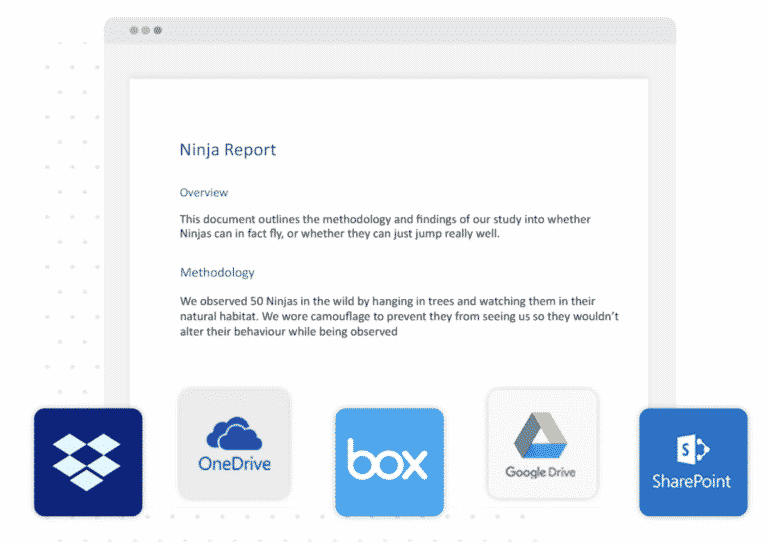
When you are done collaborating and are ready to share the document, export it, Simul has all the features needed to share wherever necessary via the preferred tool or source.
You can save your document as a Word file or PDF document.
Share it via a direct link, email or a cloud system such as GoogleDrive, OneDrive, Dropbox and more.
Simul is providing the best solutions to Microsoft Word collaboration challenges and allows you to do so from anywhere at any time. Easy collaboration is addictive and you do not want to miss out on the convenience.
The Document Map is an easy navigation pane on the left-hand side of the MS Word document that helps us to navigate to a page or a heading in a lengthy Word document without scrolling. This article demonstrates how to use the document map and generate a table of content automatically.
Step 1: Click on the ‘View’ tab, find ‘Navigation Pane‘ in the ‘Show’ group.

Step 2: Check the box adjacent to the ‘Navigation Pane’ under the ‘View’ tab, and now Navigation pane is displayed on the left side of the Word document.

If you have many headings and subheadings in your lengthy Word document, you need to use the ‘Styles‘ option under the ‘Home’ Tab.

Step 3: Select main or section headings in your document [I’m selecting ‘Molecules of life’ as a section heading in my Word document] and on the ‘Home’ tab, find ‘Styles’ and click Heading 1. Now, the main heading displayed in left-sided Navigation Pane.

Step 4: Select subheadings in your document [I’m selecting ‘Carbohydrates’ as a subheading in my document as this comes under main heading ‘Molecules of life’] and on the ‘Home’ tab, find ‘Styles’ and click Heading 2. Now, subheading displayed in left-sided Navigation Pane.

Step 5: Like this, you need to select your main headings and different levels of subheadings and assign respective ‘Styles’ accordingly. Now your document map is ready where you can navigate where ever you want easily without scrolling in the lengthy Word document.

Now we’re going to learn how to generate a ‘Table of Contents’ automatically in a lengthy Word document. Microsoft Word has a handy tool where you can create the Table of Contents automatically provided if you are using Document Map.
Step 6: First, you need to decide where you want to insert ‘Table of Contents’ and then click on that page of the Word document.

Step 7: Click on the ‘References’ tab, then find the ‘Table of Contents’ and click on it.

Step 8: Select any desired built-in automatic ‘Table of Contents’ style. That’s it; you have generated a Table of Contents to your Word documents with page numbers automatically.

Step 9: If you make any changes in the Word documents, you need to update the Table of Contents. Click anywhere on the Table; the entire ‘Table of Contents’ is going to be highlighted and find ‘Update Table’ on the left top of the Table.

Step 10: Click on ‘Update Table’ and click ‘Update entire table’. Now, whatever changes in the documents, including page numbers updated in the Table of Contents.

Please watch the below-embedded video where I have demonstrated the use of document maps and the generation of a table of contents automatically.
What is a document map?
Document Map comes handy browsing large documents in Word. The feature creates a list of all headings and sub headings and displays in a separate pane.
How does Document Map help you?
You can quickly jump from one heading/subheading to another. Saves you from tireless browsing to get to a specific section.
How does Document Map work?
Word creates Document Map based on the heading styles applied in the document. Therefore, use built-in heading styles.
Note: To know how to apply built-in heading styles in your Word document, read the following article:
https://wordknowhow.wordpress.com/2013/05/20/how-to-fix-multilevel-list-in-word/
When you click an entity from the Map, Word brings up the corresponding section of the document to the top.
How can you view Document Map?
From the Word Ribbon, click tab menu View.
From the group Show/Hide, click select check box Document Map. Word displays the Document Map pane on the left.

You can expand a heading level in Document Map to view its sub headings or collapse to hide all. Right-click anywhere in the Document Map pane, select a heading level. Document Map pane displays headings till that level only, e.g. if you select heading level 5, Document Map pane will display heading 1 through heading 5.

How will you fix Document Map to remove unwanted entries?
Click the unwanted entry from the document map. Word places the cursor at the beginning of the corresponding heading/body text in the document.
Now, select the heading/body text and then right-click.
From the right-click menu, click Paragraph. The Paragraph dialog box appears.
On the Paragraph dialog box, under the tab Indent and Spacing and within section General, view the field Outline Level with a drop-down list.
Now, select the outline level as Body Text from the drop-down list. The content will no more be part of Document Map.

About wordknowhowhttp://wordknowhow.comThis blog site was started to help people with Microsoft Word. I use Word a lot at work, and I understand that some features are difficult to use. There were no simplified instructions online to help me use these features. It is for this reason that this site exists; to make your life easier with Word.
Feel free to post your comments, queries, suggestions, etc. I will do my best to help you!

I still use Microsoft Word extensively for my writing projects.
But first, I want to point out that this article is not about which writing software is better. I know some die-hard Scrivener fans, and some writers who like the simplicity of a no frills text editor. Writers tend to have strong opinions on their preferred writing tool, but I gotta say, I’m a big believer in just use what you like best. There is no ‘best’ software. I just happen to prefer Word.
If you like Word too, and want to get more out of it, then perhaps this article will be of use (or at least that was my goal for writing it).
Which brings me to main focus – using the Document Map feature in Word to quickly jump around the document from scene to scene or chapter to chapter.
I don’t write linearly – I didn’t with my non-fiction books, and I don’t with my fiction books. I like jumping around and ‘layering’ my books as the moods strikes.
For those that haven’t used this feature before, you can easily turn it on by going to the View tab, and clicking the checklist (it won’t be pink – I just highlighted it here so you can see it more easily).

This will open up a panel on the left hand side of your screen.
If you are in a new document, it will be probably be blank, but if you are in a current working document – depending on how you’ve set up your styles – you’ll see a whole bunch of headings and other notes here.
Here’s what my current WIP’s document map looks like:

You can see fairly clearly that I’ve listed all my chapters sequentially and I’ve also got notes of what happens in the scene, and sometimes other notes including things I still need to do.
How do you get your document map to look like this?
Heading Styles.
As I’m writing the document, I attribute my chapters and notes to different headings.
Chapter 1 (for example) will get the Heading 1 style. Scene description will get heading 2 and sometimes I’ll write extra notes using heading 3.
This is a quick guide of which styles I personally use, although you should play around with it for what works best for you:
Heading 1 attribute: ACT #, Chapter #
Heading 2 attribute: POV, Scene Description, Scene # (if more than one scene per chapter)
Heading 3 attribute: Notes, Word Counts, To Do’s
The hierarchy of the Document Map shows Heading 1’s first, Heading 2’s indented under that, and Heading 3’s indented further again.
You can also open or close anything under the Heading styles using the tiny + or – box next to the main heading. This helps if you have a lot of notes, and just want to skip quickly around to each chapter.
I like using the document map so that I can quickly jump around my manuscript by clicking on the left which then brings me to the correct place on the right side of the screen, so I can continue writing.
It’s much better than scrolling through your manuscript trying to navigate to earlier or later chapters which can be a pain for large books. It’s also a good method to see at a glance what’s going on – to see the big picture.

You might be wondering by now, what happens to these notes once you’ve finished your manuscript. I delete them.
Using the document map like this is only useful in your drafts (and I keep a few draft versions), so you will need to delete anything that isn’t necessary in your final clean document before you upload to stores.
I do keep the notes in until the very last-minute though. They are even included when my editor goes through it. She likes that she can see a good overview of the book at a glance and says it makes her job easier, too.
Using Commenting to keep track of details.
Another small tip I do is write notes such as character hair color and so on, by using the commenting feature of Word.

* No laughing at the story – it’s still very rough first draft 😉
Usually I do this for minor characters only (as I prefer to have a separate scene and character document for major characters and locations).
It’s a quick way to find out what hair or eye color you’ve made for one of your characters as you can view all of your comments at once by opening the Reviewing Pane (from the Review tab). You can either open it in place of Word’s Document Map or at the bottom of your working document.
I hope you’ve found these tips useful for using Word to write your next book.
Happy writing,
Tracey 🙂

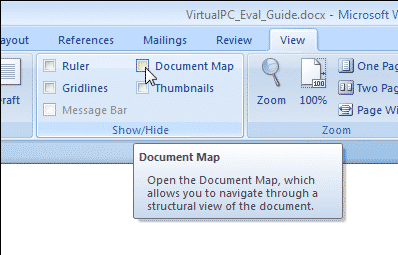
The Document Map in Word 2007 provides easy navigation in long documents. You can jump around your document by headings or pages. It also provides a bird’s-eye view of your document’s structure.
Recently, we showed you how to use the navigation pane in Word 2010. It is similar to the Document Map in Word 2007. Several features were added to the Navigation Pane in Word 2010, such as a Find tab and the ability to reorganize your document by dragging and dropping headings.
However, the Document Map in Word 2007 is still useful. This article shows you how to use it to navigate your document and to view your document’s structure and how you can change the style of the Document Map outline.
NOTE: To make full use of the Document Map, you must format the headings in your document using the built-in headings styles. The document outline on the Document Map is generated using the built-in headings in your document.
To view the Document Map, click the View tab on the ribbon and select the Document Map check box in the Show/Hide group.

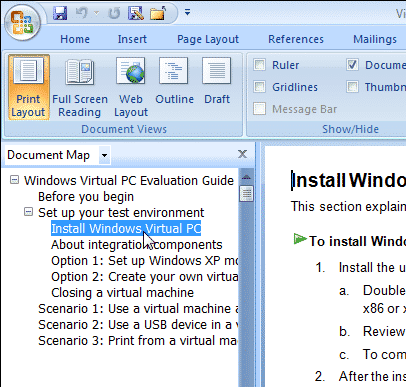
A pane displays on the left side of the Word window. By default, the Document Map displays. Click on any heading in the outline to quickly jump to that section of your document.
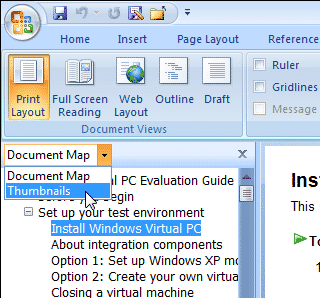
You can also view a collection of thumbnails of all the pages in your document. To do this, select Thumbnails from the drop-down list at the top of the Document Map pane.
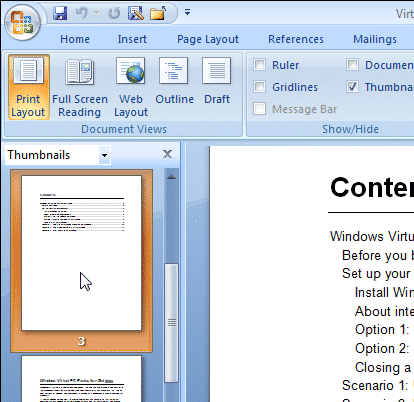
A collection of thumbnails representing all the pages in your document displays in the Document Map pane. Click on a page to quickly jump to that page.
You can select which heading level you want to display by right-clicking on the Document Map pane and selecting a Show Heading option. For example, if you select Show Heading 2, then all Heading 1 items display expanded to only show Heading 2 items. Any headings under Heading 2 are collapsed and do not show.
NOTE: You can also expand or collapse the headings using the plus and minus signs to the left of the headings.
You can resize the Document Map pane by moving your cursor over the border between the pane and your document until it looks like the cursor in the image below and says Resize. Click and hold on the border and drag it to the left or right to make the pane narrower or wider.
Unfortunately, the Document Map context menu does not provide a way to change the formatting of the Document Map outline. However, you can change this formatting by changing the Document Map style. To do this, click the Styles dialog box launcher button in the Styles group on the Home tab. You can also press Alt + Ctrl + Shift + S.
The Styles window displays. Click the Manage Styles button at the bottom of the Styles window.
On the Edit tab, on the Manage Styles dialog box, scroll in the Select a style to edit box until you find the Document Map style. Select it and click Modify.
Select the desired formatting options on the Modify Style dialog box. Use the Format button to access more options to set. Click OK when you are finished changing the formatting. You are returned to the Manage Styles dialog box. Click OK to close it.
To close the Styles window, click the X button in the upper, right corner of the window.
NOTE: In Word 2007, the Document Map sometimes displays the outline of the headings in tiny, unreadable type. This is a known bug. However, there is a workaround. The solution is to switch to Outline View and then back again. To do this, click Outline in the Document Views group on the View tab. Then, click Close Outline View on the Outlining tab.
Besides allowing you easy navigation within your document, the Document Map also tells you where you are in your document. As you scroll through your document using the scroll bar or the Page Up and Page Down keys, the Document Map highlights the current heading.
End.
READ NEXT
- › HoloLens Now Has Windows 11 and Incredible 3D Ink Features
- › Google Chrome Is Getting Faster
- › This New Google TV Streaming Device Costs Just $20
- › How to Adjust and Change Discord Fonts
- › BLUETTI Slashed Hundreds off Its Best Power Stations for Easter Sale
- › The New NVIDIA GeForce RTX 4070 Is Like an RTX 3080 for $599
How-To Geek is where you turn when you want experts to explain technology. Since we launched in 2006, our articles have been read billions of times. Want to know more?