
Содержание
- Create and manage Sheet Views in Excel
- Business document management overview
- Supported deployments
- Supported Microsoft Office applications
- Business document availability
- Configure ER parameters
- Import ER solutions
- Enable Business document management
- Configure parameters
- Prerequisites for parameter setup
- Set up parameters
- Configure access permissions
- Use Business document management to edit templates
- Initiate editing templates owned by your configuration provider
- Initiate editing templates owned by other providers
- Start editing a template
- Edit a template in Microsoft 365
- Edit a template in the Office desktop application
- Validate a template
- Test the modified template
- Create an alternative template revision
- Delete a modified template
- Revoke changes of template
- Publish a modified template
- Frequently asked questions
- I selected Edit document, but instead of going to the BDM template editor page in Finance, I was sent to the Microsoft 365 webpage.
- I understand how to edit a template by using Microsoft 365 in the first application session, and how to use the template in the second application session and adjust the template to see how my changes affect the generated business document. Can I use the Office desktop application in the same way?
- When I select Open in Desktop App, I receive the following error message: «Value cannot be null. Parameter name: externalId.» How do I work around this issue?
- Additional resources
- List of ER configurations that have been released in Finance to support configurable business documents
Create and manage Sheet Views in Excel
Have you ever collaborated with someone else in a worksheet, looking at a large data set, and suddenly the table shrinks and you’re unable to finish your work? It’s pretty disruptive, isn’t it?
Sheet Views is an innovative way of letting you create customized views in an Excel worksheet without being disrupted by others. For instance, you can set up a filter to display only the records that are important to you, without being affected by others sorting and filtering in the document. You can even set up multiple Sheet Views on the same worksheet. Any cell-level edits you make will automatically be saved with the workbook regardless of which view you’re in.
Select the worksheet where you want the Sheet View, then click to View > Sheet View > New.
Apply the sort/filter that you want. Excel automatically names your new view Temporary View to indicate the Sheet View isn’t saved yet.
To save it, click Temporary View in the Sheet View menu, type the new sheet view name, and then press Enter.
Keep in the mind the following:
Once you create a Sheet View, it’s available on all Excel platforms: Excel for Desktop and Mac, Excel for the web, and Excel on a mobile device.
If other people are working on the file, you can sort or filter, and Excel asks if you want to apply that sort or filter for just you, or everyone. This is another entry point for Sheet Views.
When you’re ready to display a particular view, you can select it from the Sheet View menu.
The Sheet View menu only displays views for the active worksheet.
When a Sheet View is applied, an eye symbol appears next to the worksheet tab name. Hovering over the eye will display the active Sheet View’s name.
When you first create a new Sheet View, Excel will preserve your initial view and display it in the Sheet View switcher as Default. Selecting the default option will reset your view to the main view of the document.
To close a Sheet View and return to the default view, select View > Sheet View > Exit.
To switch between views, select View > Sheet View, and then select your view from the Sheet View menu.
If you decide that you no longer want a particular Sheet View, select View > Options, select the view in question, and then press Delete.
Select View > Options.
In the Sheet View options dialog box, select Rename or Duplicate existing views.
To activate a view, double-click the sheet name in the list.
It’s more useful when everyone in a document uses Sheet View so that when coauthoring, no one is being impacted by each other’s sorts and filters. If you are not in Sheet View, you will be impacted by others who sort and filter. To reduce this impact, we will sometimes opt you into a Sheet View so that you are unaffected by sorts and filters from others.
While using a Sheet View, you can hide, or display columns and rows just as you would normally. This lets you see only the columns and rows you care about without changing the view for others.
Additionally, we will not opt you into a Sheet View when you hide, or display columns and rows in the document. You must enter a Sheet View and perform these actions there just as you would normally. If you hide or display columns or rows in default view, it persists across all Sheet Views on Excel for Desktop and Mac, and Excel for the web. For Excel on a mobile device, then it opts-in to Sheet View instead.
Why do my Sheet View options appear grayed out? You can only use Sheet Views in a document that is stored in a SharePoint or OneDrive location. Sheet Views are supported in Excel for Microsoft 365 and Excel 2021. If you save a local copy of a file that contains sheet Views, the Sheet Views will be unavailable.
Is a Sheet View private, and only for me? No, other people who share the workbook can see views you create if they go to the View tab and look at the Sheet View menu in the Sheet Views group.
Can I make different Sheet Views? You can create up to 256 Sheet Views, but you probably don’t want to get overly complicated.
Источник
Business document management overview
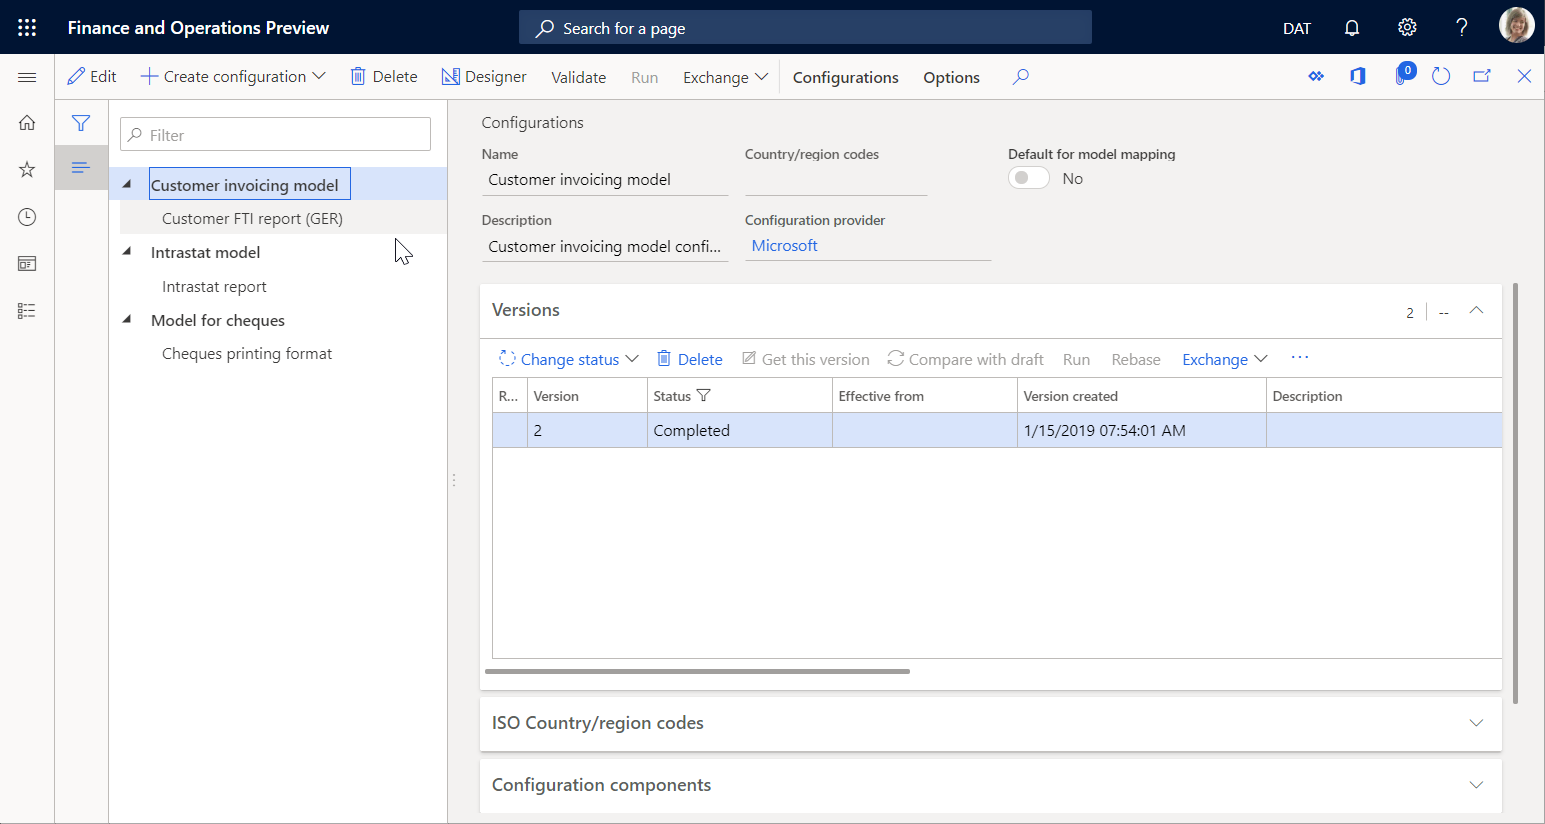
Business users use the Electronic reporting (ER) framework to configure formats for outbound documents in accordance with the legal requirements of various countries/regions. Users can also define the dataflow to specify what application data is placed in generated documents. The ER framework generates outbound documents in Microsoft Office formats (Excel workbooks or Word documents) by using predefined templates. The templates are populated with required data in accordance to configured dataflow while required documents are generated. Each configured format can be published as part of an ER solution to generate specific outbound documents. This is represented by an ER format configuration that can contain templates you can use to generate different outbound documents. Business users can use this framework to manage required business documents.
Business document management is built on top of the ER framework and enables business users to edit business document templates by using Microsoft 365 service or appropriate Microsoft Office desktop application. Edits to the documents might include changing business document designs and adding placeholders for additional data without source code changes and new deployments. No knowledge of the ER framework is required to update templates of business documents.
Be aware that Business document management allows you to modify templates that are used to produce business documents such as orders, invoices, etc. While a template has been modified and a new version of it has been published, this version is used to generate required business documents. Business document management cannot be used to modify already generated business documents.
Supported deployments
Currently, the Business document management feature is implemented only for cloud deployments. If this feature is critical to your on-premises deployment, let us know by providing feedback on the Ideas site.
Supported Microsoft Office applications
To use Business document management for editing templates in Excel or Word formats by using Microsoft Office desktop applications, you must have Microsoft Office 2010 or later installed. This is supported in cloud and on-premises deployments.
To use Business document management for editing templates in Excel or Word formats by using Microsoft 365 applications, you must have Microsoft 365 Office for the web subscription. This is supported in cloud deployment.
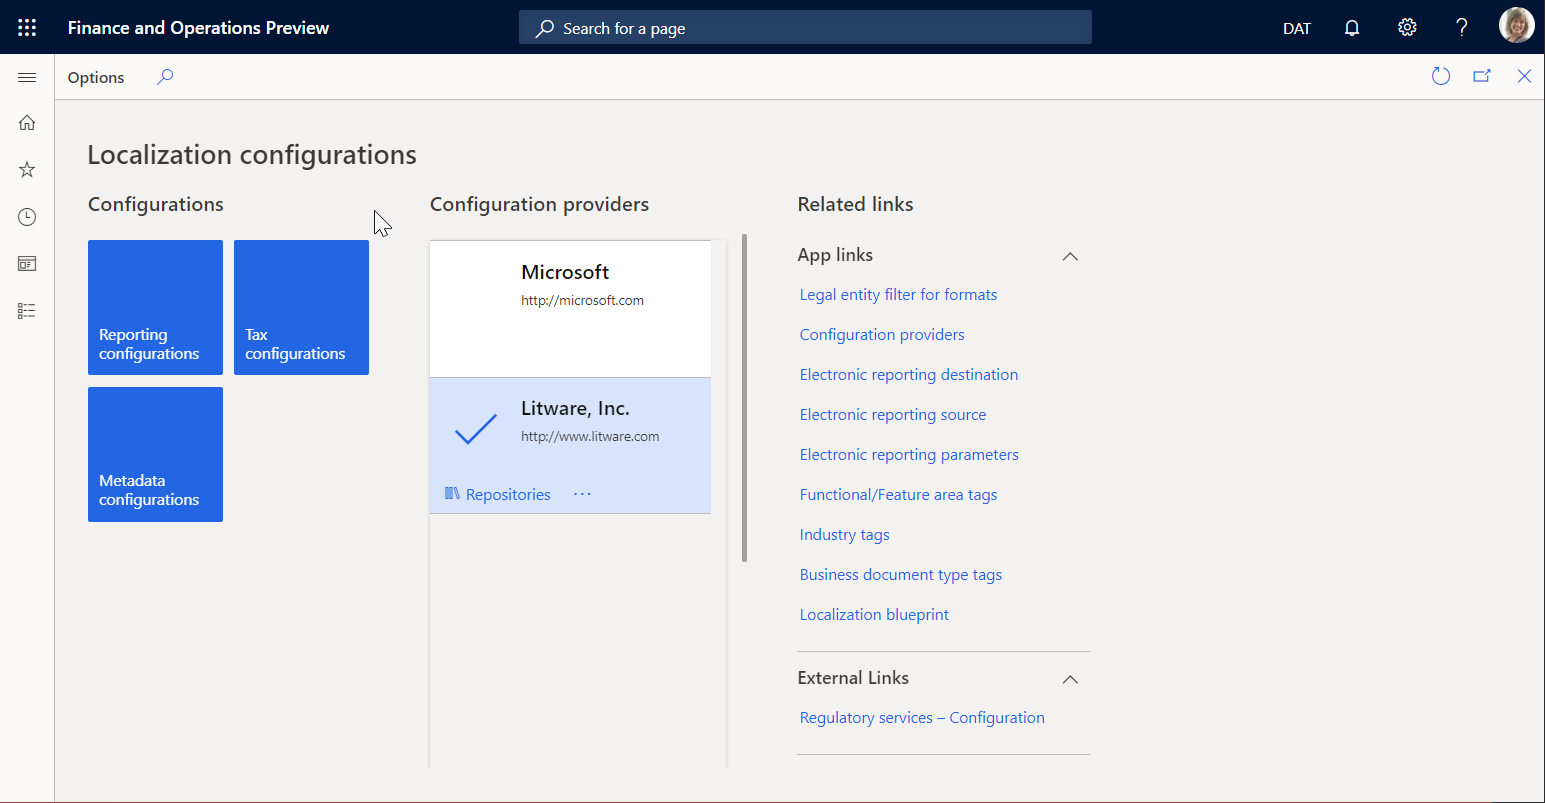
Business document availability
For a complete list of all the reports planned for the October 2019 release, see Configurable business documents reporting in Word and Excel.
For a complete list of all the reports planned for the October 2020 release, see Configurable business documents – Word templates.
More reports will become available in future releases. Special notifications about additional reports will be sent separately. To learn how to review the list of currently available reports, see the section List of ER configurations that have been released in Finance to support configurable business documents below.
To learn more about this feature, complete the example in this article.
Configure ER parameters
Because Business document management is built on top of the ER framework, you must configure the ER parameters to start working with Business document management. To do this, you need to set up the ER parameters as described in Configure the Electronic reporting (ER) framework. You also need to add a new configuration provider as described in Create configuration providers and mark them as active.
Import ER solutions
Sample ER configurations are used in the example of this procedure. You must import, into your current instance of Dynamics 365 Finance, the ER configurations that contain the business document templates that can be edited by using Business document management. Download, and then locally store the following files to complete this procedure.
Sample ER customer invoicing solution
| File | Content |
|---|---|
| Customer invoicing model.version.2.xml | ER data model configuration |
| Customer FTI report (GER).version.2.3.xml | Free text invoice ER format configuration |
Sample ER payment checks solution
| File | Content |
|---|---|
| Model for cheques.version.10.xml | ER data model configuration |
| Cheques printing format.version.10.9.xml | Payment cheque ER format configuration |
Sample ER foreign trade solution
| File | Content |
|---|---|
| Intrastat model.version.1.xml | ER data model configuration |
| Intrastat report.version.1.9.xml | Intrastat control report ER format configuration |
Use the following procedure to import each file. Import the ER data model configuration of each ER solution in the tables above before you import the corresponding ER format configuration.
- Open the Organization administration >Electronic reporting >Configurations page.
- On the top of the page, select Exchange.
- Select Load from XML file.
- Select Browse to load the required XML file.
- Select OK to confirm configuration’s import.
Alternatively, you can import the officially published ER format configurations from Microsoft Dynamics Lifecycle Services. For example, to complete this procedure you can import the latest version of the Free text invoice (Excel) ER format configuration. The corresponding ER data model and ER model mapping configurations will be imported automatically.
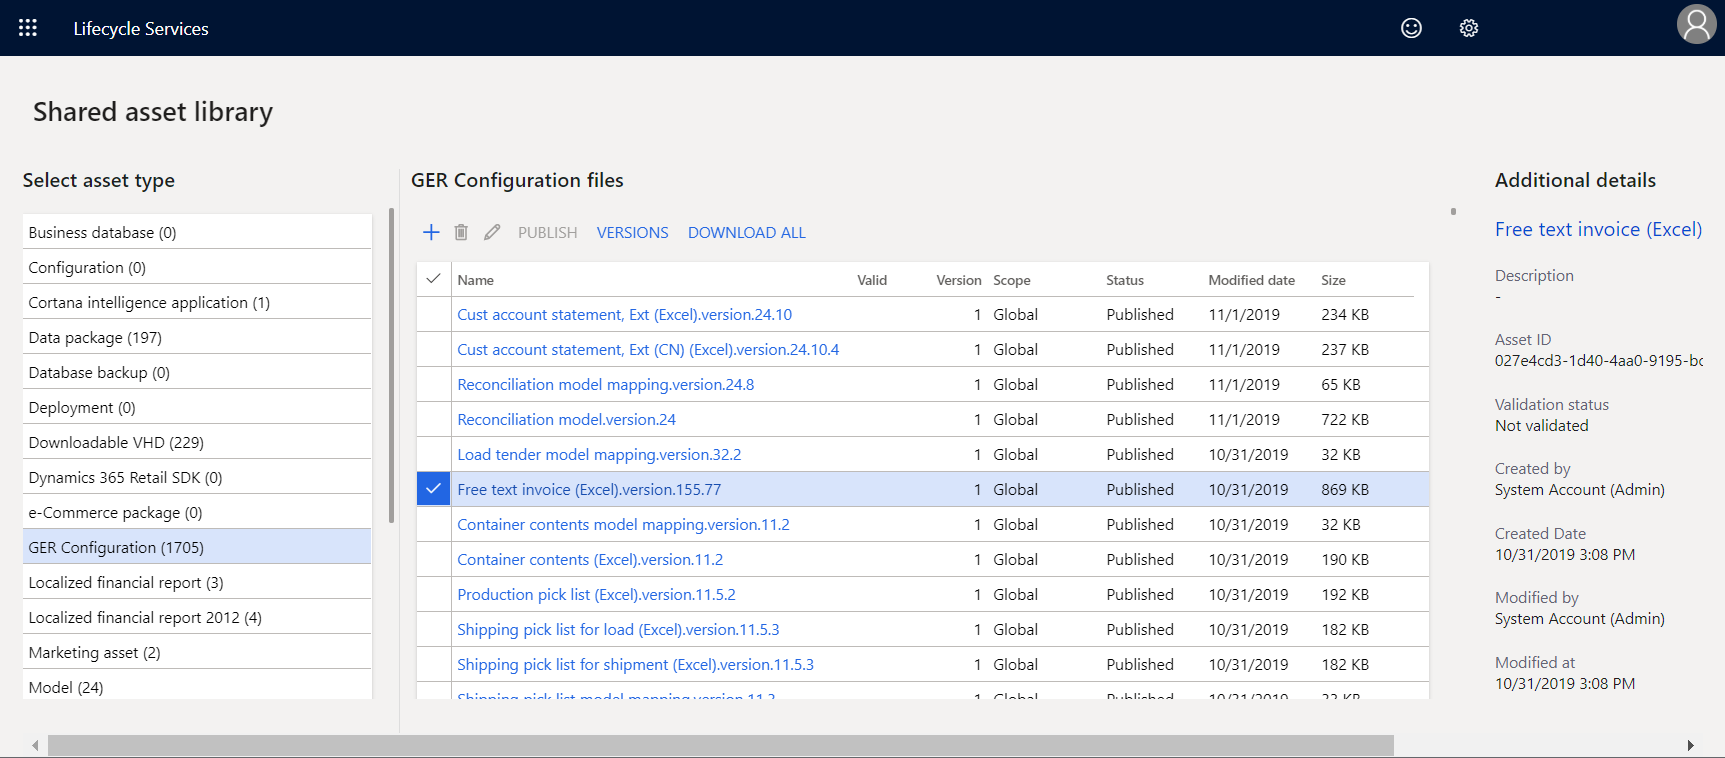
For more information about importing ER configurations, see Manage the ER configuration lifecycle.
Enable Business document management
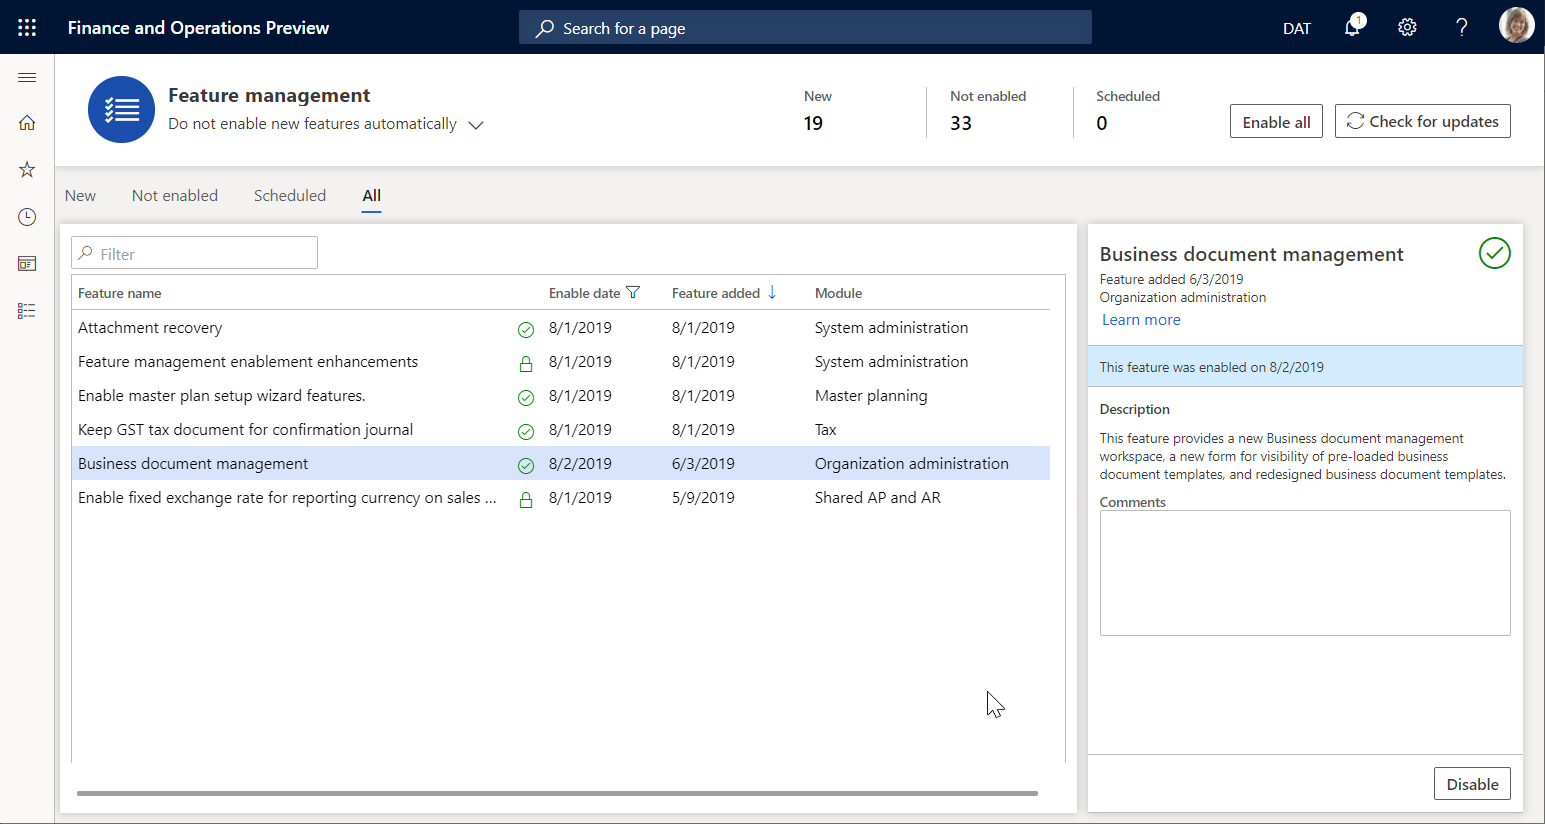
In versions of Finance before 10.0.21, Business document management functionality had to be explicitly enabled. However, starting in version 10.0.21, the Business document management feature was automatically enabled. Then, starting in version 10.0.29, the feature became mandatory. In other words, it was automatically turned on and couldn’t be turned off. In Finance version 10.0.32, the feature has been eliminated.
The system behavior assumes that Business document management functionality is enabled out of the box. This section is applicable to Finance versions earlier than 10.0.21.
To start Business document management, you need to open the Feature management workspace and enable the Business document management feature.
Use the following procedure to enable Business document management functionality for all legal entities.
- Open the Feature management workspace.
- On the New tab, select the Business document management feature in the list.
- Select Enable now to turn on the selected feature.
- Refresh the page to access the new feature.
For more information about using the new document user interface in Business document management, see New document user interface in Business document management.
For more information about activating new features, see Feature management overview.
Configure parameters
Use the information in the following sections to set up the basic parameters for Business document management.
Prerequisites for parameter setup
Before you can set up Business document management, you must set up the required document type in the Document management framework. This document type is used to specify a temporary storage of documents in Office formats (Excel and Word) that are used as templates for ER reports. The temporary storage template can be edited by using the Office desktop applications.
For this document type, the following attribute values must be selected.
| Attribute name | Attribute value |
|---|---|
| Class | Attach file |
| Group | File |
| Location | SharePoint |
For information about how to set up the required document management parameters and document types, see Configure document management.

Set up parameters
Basic Business document management parameters can be set up on the Business document parameters page. Only specific users can access the page. This includes:
- Users who are assigned to the System administrator role.
- Users who are assigned to any role that is configured to perform the duty, Maintain Business document management parameters (AOT name ERBDMaintainParameters).
Use the following procedure to set up the basic parameters for all legal entities.
- Sign in as a user with access to the Business document parameters page.
- Go to Organization administration >Electronic reporting >Business document management >Business document parameters.
- On the Business document parameters page, on the Attachments tab, in the SharePoint document type field, define the document type that should be used to temporarily store templates in Office formats while they are edited using the Office desktop applications.
Only document types that are configured using a SharePoint location are available for this parameter.
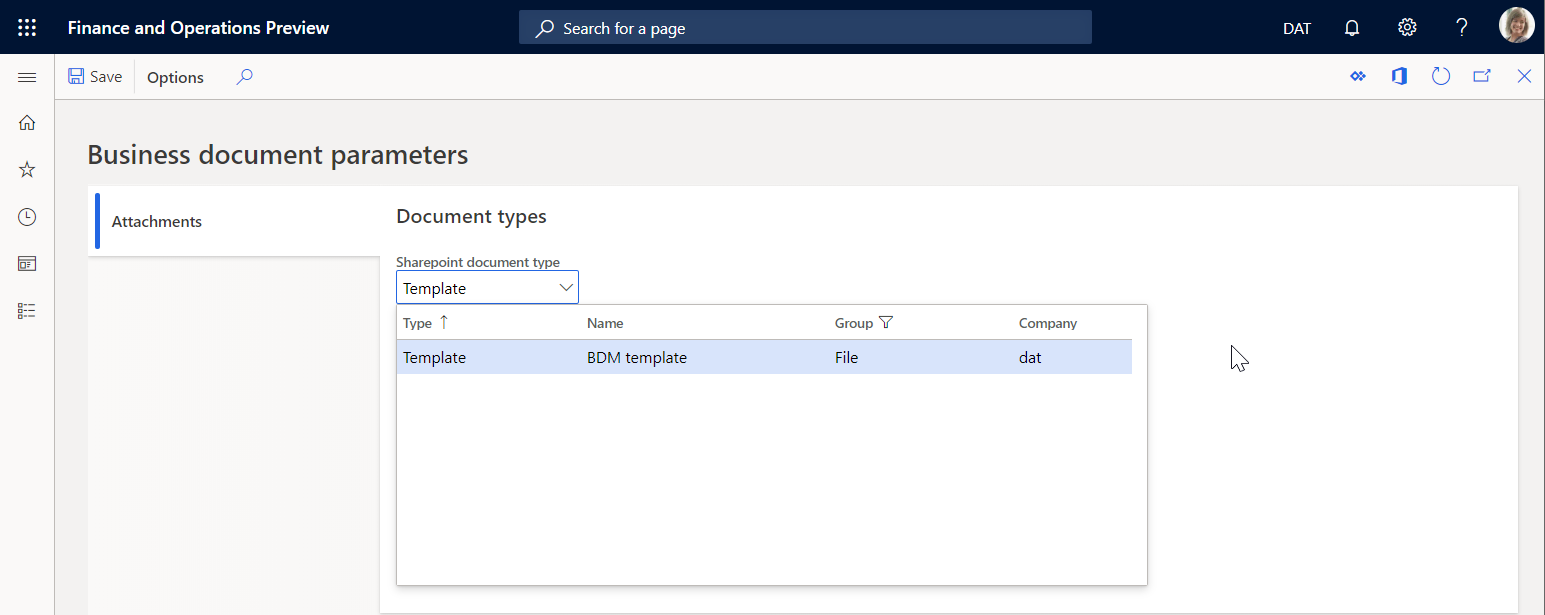
The selected document type is company-specific and will be used when the user is working with Business document management in the company for which the selected document type is configured. When the user is working with Business document management in another company, the same selected document type will be used if one has not been configured for this company. When a document type has been configured, it will be used instead of the one selected in the SharePoint document type field.
The SharePoint document type parameter defines a SharePoint folder as temporary storage for templates that are editable using either Microsoft Excel or Word. You need to set up this parameter if you plan to use these Office desktop applications for editing templates. For more information, see Edit a template in the Office desktop application. You can keep this parameter blank if you plan to modify the template by only using the functionality in Microsoft 365. For more information, see Edit a template in Microsoft 365.
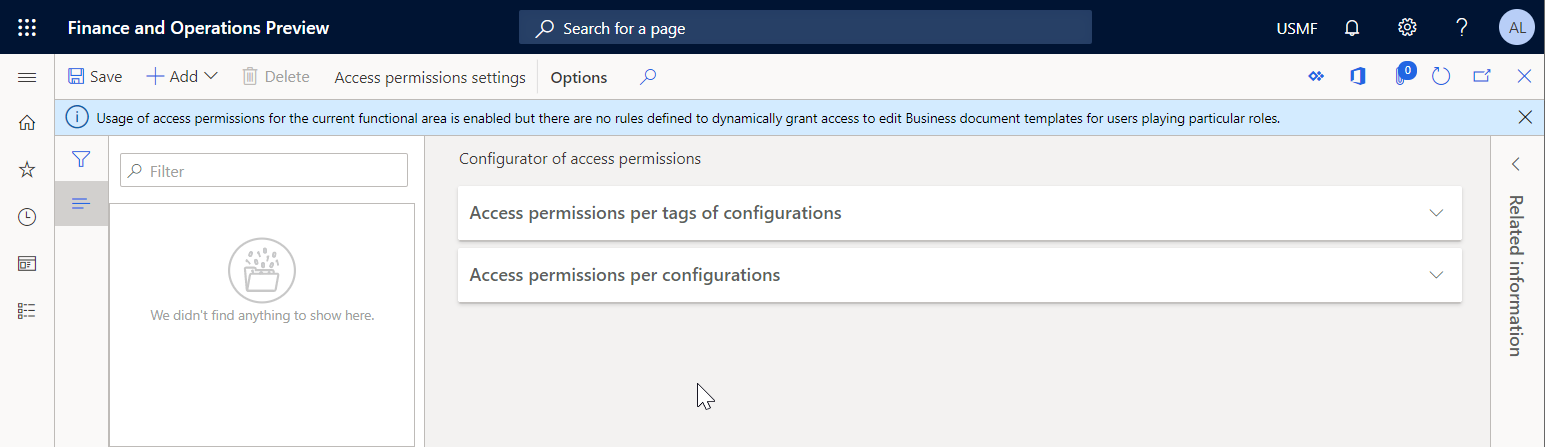
Configure access permissions
By default, when access to Business document management permissions is not enabled, every user with access to the Business document management workspace will see all of the ER solution templates that are available. The Business document management workspace will show only those templates that reside in ER format configurations and that are marked by a Business document type tag.
The list of templates available in the Business document management workspace can be restricted by configuring access permissions. This may be important when different templates are used to produce business documents for different business domains (functional areas), and you want to allow specific users access to different templates for editing in the Business document management workspace.
Business document management access permissions can be set on the Configurator of access permissions. Only the following users can access the page:
- Users assigned to the System administrator role.
- Users assigned to any other role that is configured to perform the duty, Configure permissions to access Business document templates for editing (AOT name ERBDTemplatesSecurity).
Use the following procedure to set up the access Business document management permissions for all legal entities.
Sign in as a user with access to the Configurator of access permissions page.
Go to Organization administration > Electronic reporting > Business document management > Manage access permissions.
Pay attention to the notification informing you that the usage of access permissions for Business document management is currently not enabled.
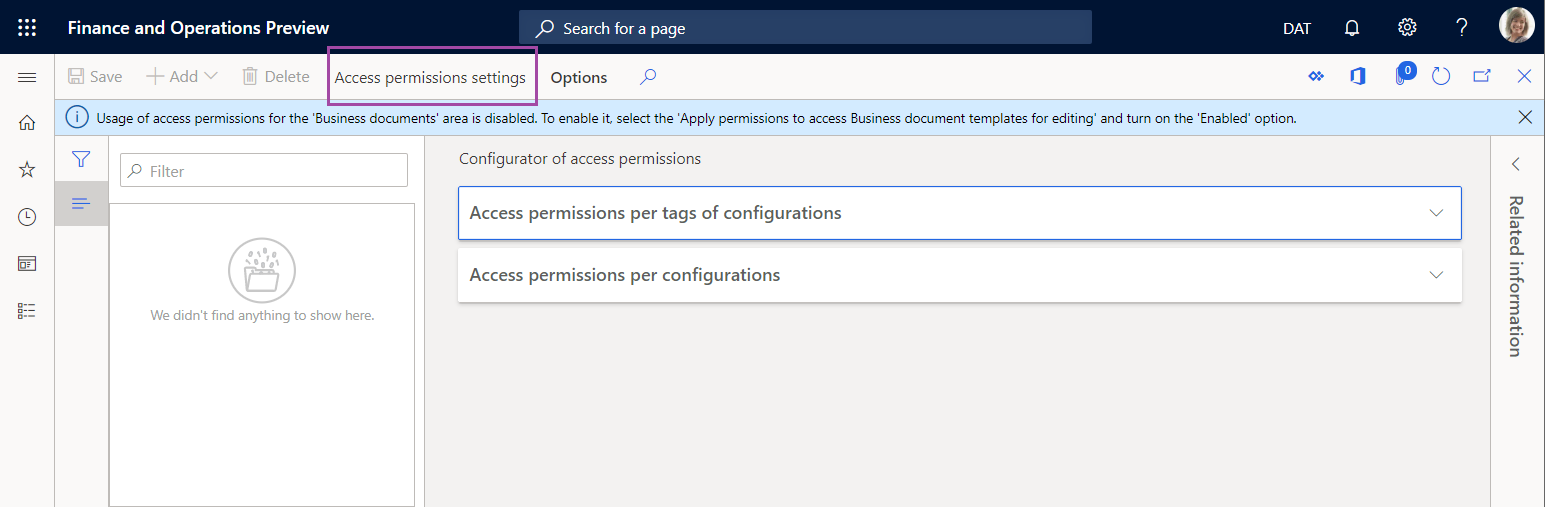
With this setting, every user assigned to any security role that is configured to perform the Manage Business document templates (AOT name ERBDManageTemplates) duty is able to open the Business document management workspace and can edit any template that is available.
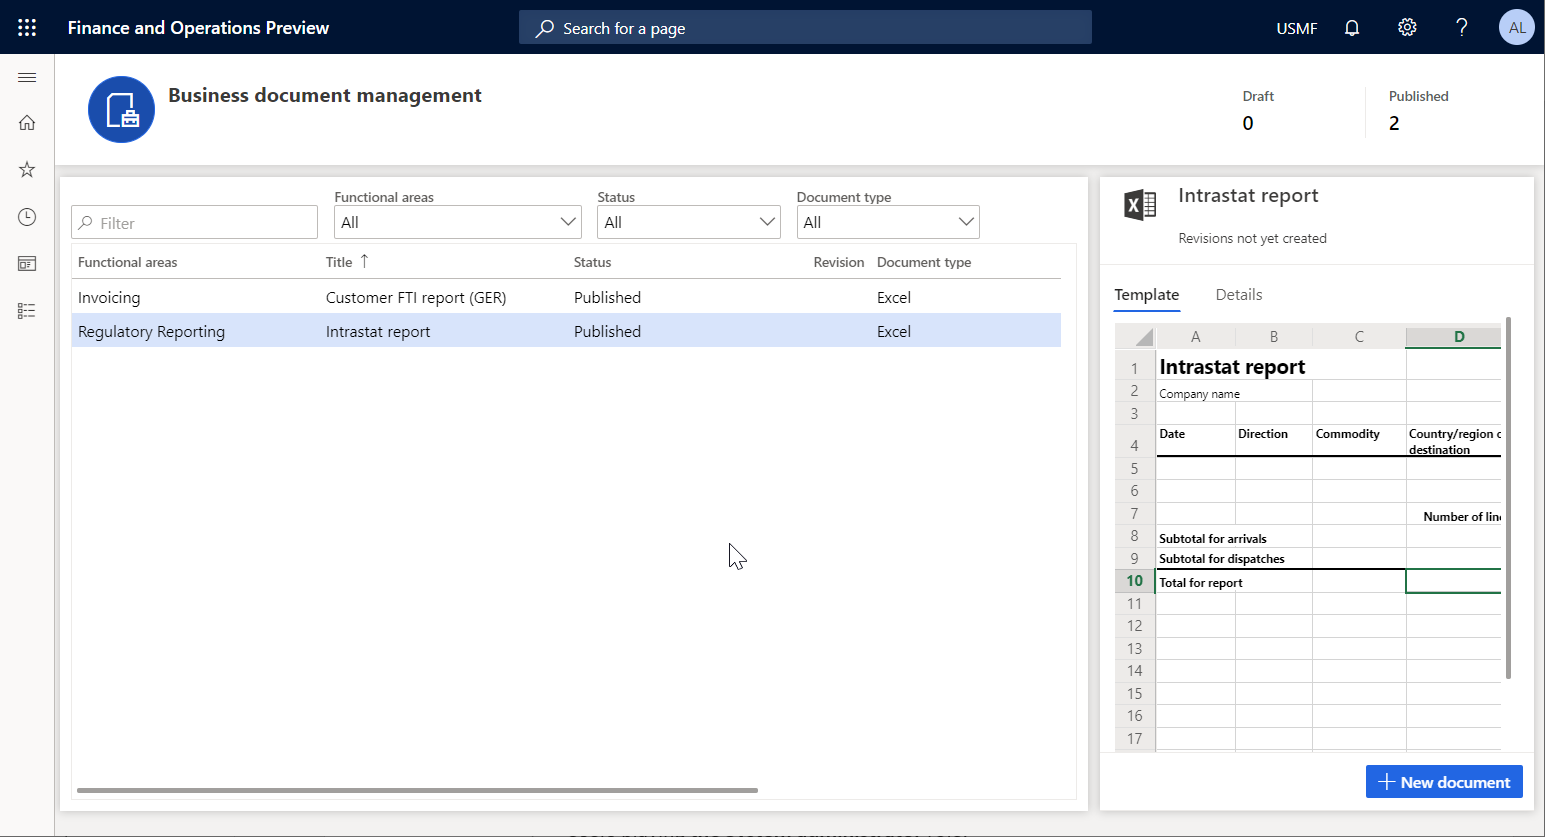
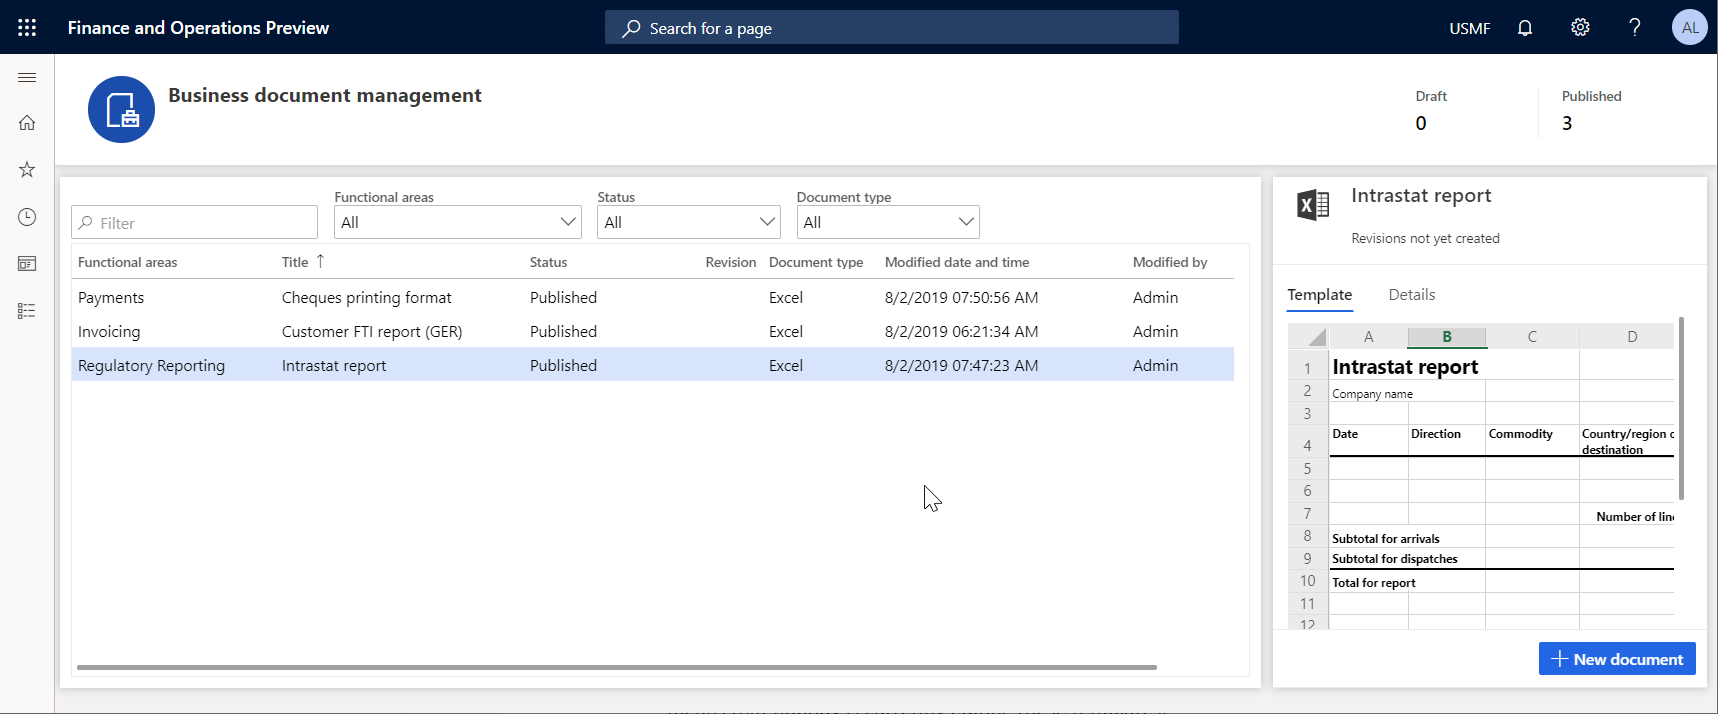
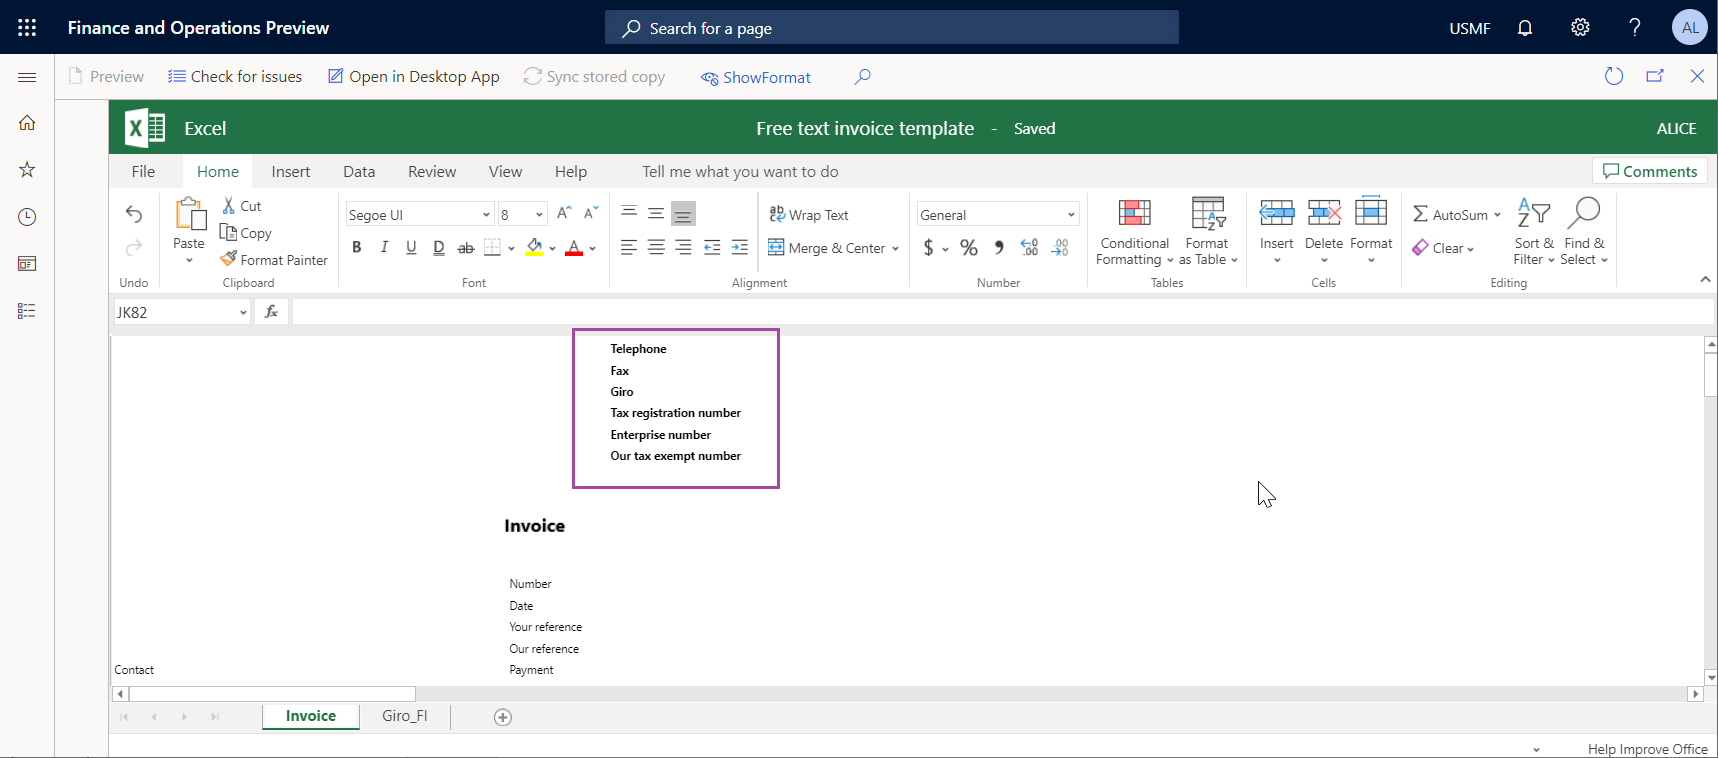
The following graphic shows what is available in the Business document management workspace for users assigned to the Accounts receivable clerk role. With the current access permissions setting, the user can edit business document templates from different functional areas including invoicing, regulatory reporting, and payments.
On the Configurator of access permissions page, select Access permissions setting.
In the Settings of access permissions to edit templates dialog box, enable the Apply configured access permissions option.
Select OK to confirm that Business document management access permissions have been enabled.
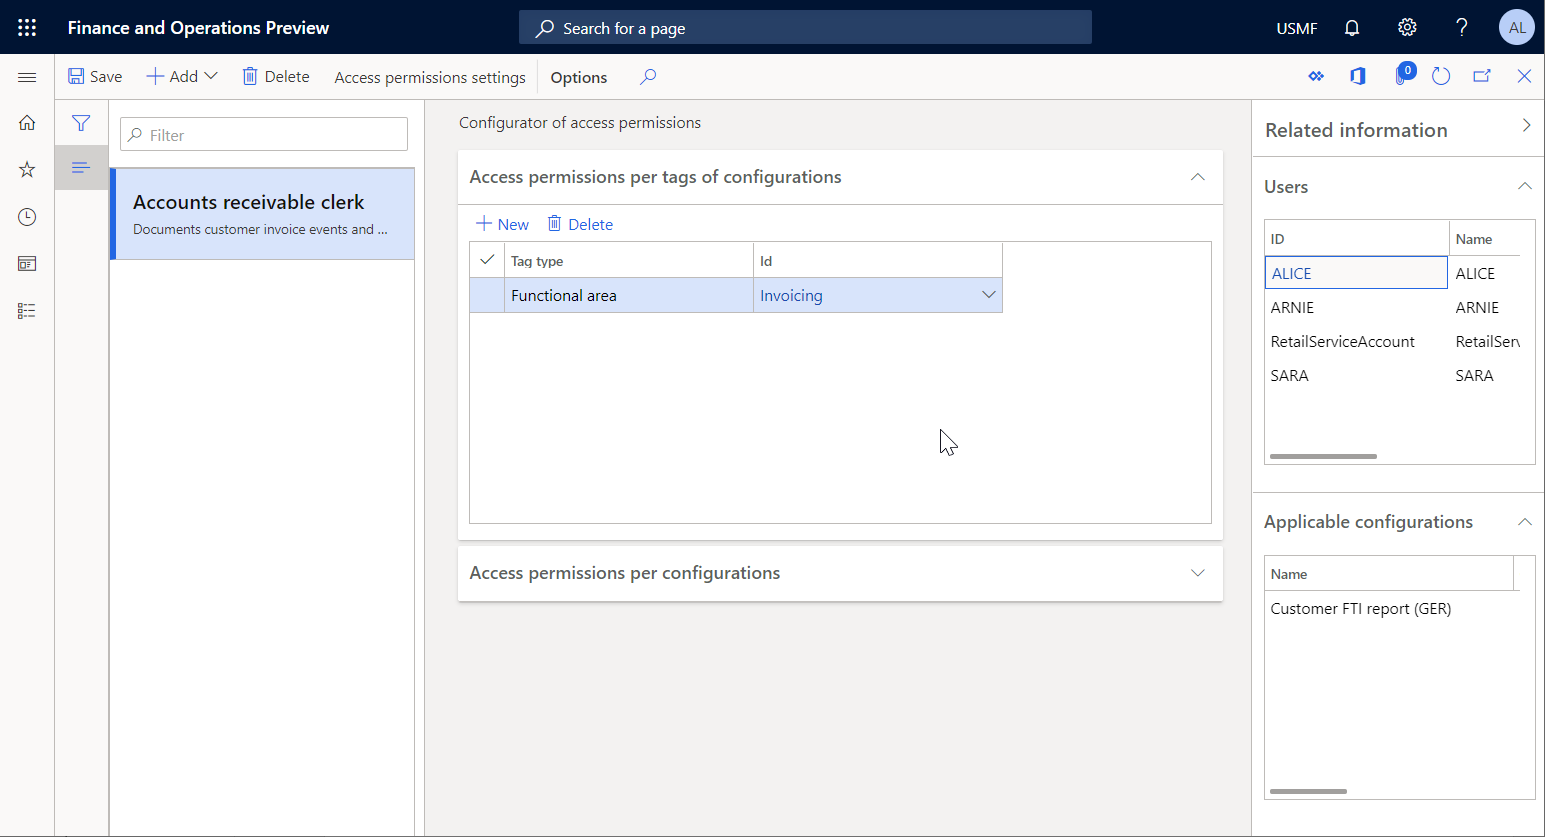
Select Add to enter a new business role for which permissions to access Business document management templates must be configured.
In the Security roles dialog box, select the Accounts receivable clerk role and then select OK to confirm the role selection.
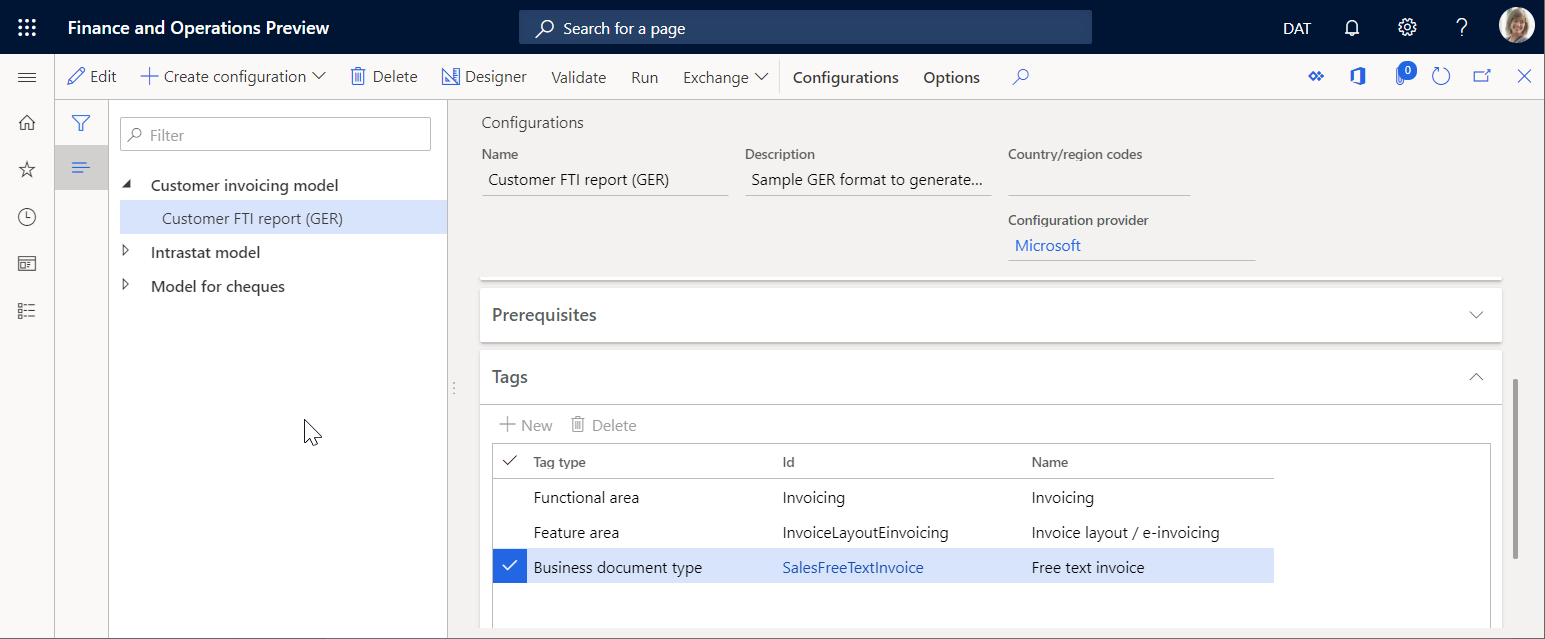
On the Access permissions per tags of configurations tab, select New.
In the Tag type field, select Functional area, and in the ID field, select Invoicing.
Select Save to store configured access permissions for the selected role.
The current setting means that for any user who is assigned to the Accounts receivable clerk role and performing the duty, Manage Business document templates (AOT name ERBDManageTemplates), ER format configuration templates that have the Invoicing value for the Functional area tag will be available to edit in the Business document management workspace.
Switch the Related information pane from the right side of the current page. The Related information pane shows how the configured access permissions will be applied, including what ER configuration templates will be available for users that are assigned to the Accounts receivable clerk role.
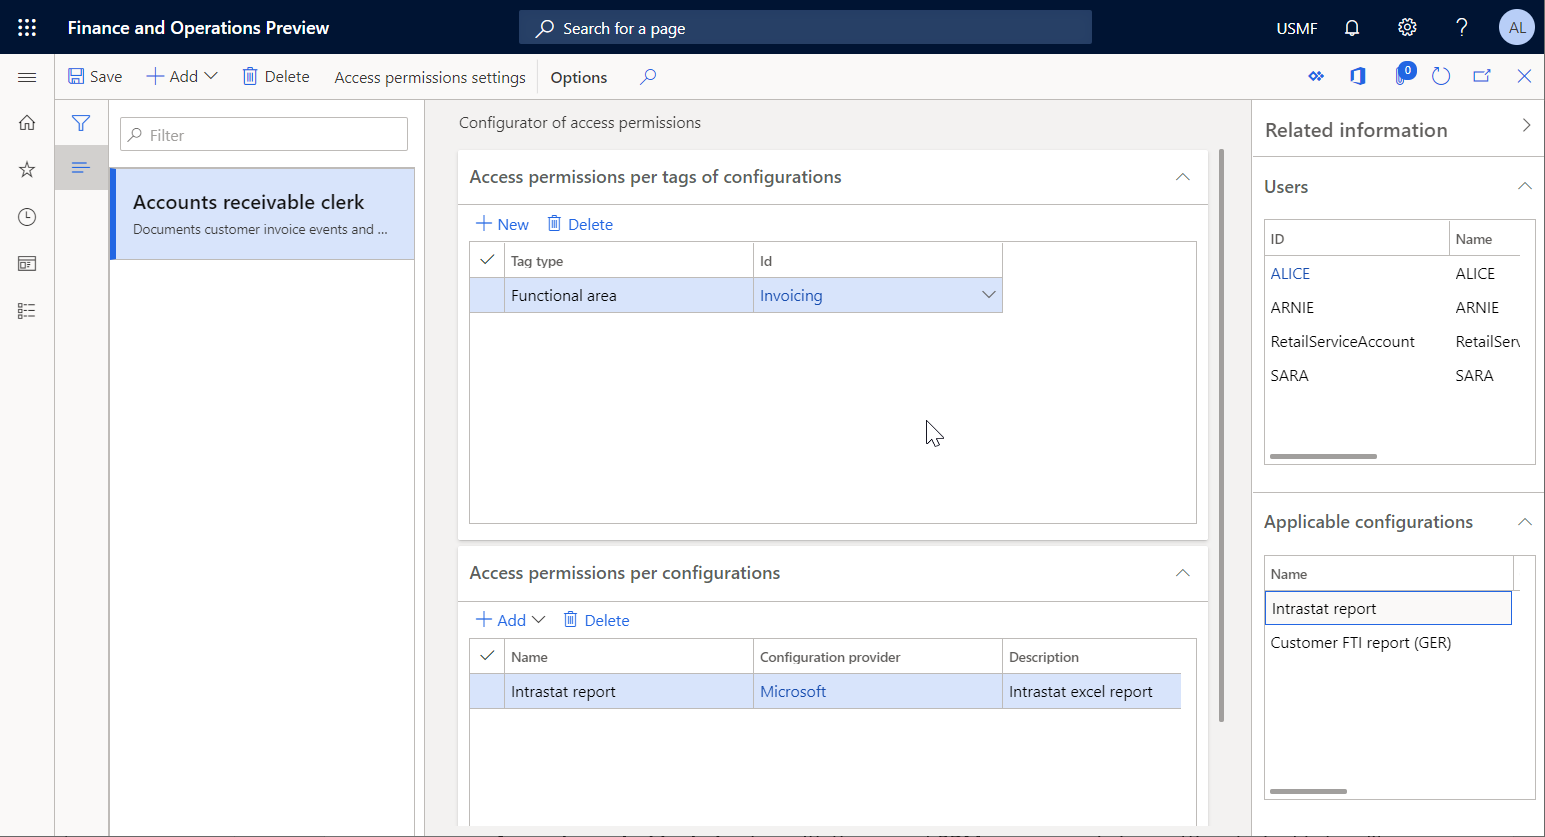
On the Access permissions per configurations tab, select the Add option.
In the Select configuration dialog box, mark the Intrastat report ER format configuration.
Select OK to confirm the entry of the selected configurations and then select Save to store the configured access permissions for the selected role.
The current setting means that for any user assigned to the Accounts receivable clerk role and performing the duty, Manage Business document templates (AOT name ERBDManageTemplates), the following templates will be available to edit in the Business document management workspace:
- Templates that have the value, Invoicing for the Functional area tag.
- Templates from ER format configurations that are listed on the Access permissions per configurations tab (templates from the Intrastat report format configuration of the Statutory reporting domain in this example).
The following graphic shows what the Business document management workspace provides to a user assigned to the Accounts receivable clerk role. With the current Business document management access permissions setting, the user can edit business document templates from the Invoicing domain and the Intrastat report ER format configuration. Templates from the Payments domain are not accessible for the Accounts receivable clerk role.
The Access permissions per configurations rules are stored by using the unique identification ID of an ER format configuration. This means that these rules will not be deleted when an ER configuration that refers to them is deleted. When you import deleted configurations back to this instance, these rules will refer to them again. There is no need to set up the rules again after the deleted configurations are imported again.
Use Business document management to edit templates
Business users can access business document templates for editing in the Business document management workspace. Only the following users can access the Business document management workspace:
- Users assigned to the role, System administrator.
- Users assigned to any role that is configured to perform the duty, Manage Business document templates (AOT name ERBDManageTemplates).
Use the following procedure to edit free text invoice templates in the Business document management workspace. Before you complete this procedure, you must have completed all of the preceding procedures in this article.
- Sign in as a user with access to the Business document management workspace.
- Open the Business document management workspace.
Starting in Finance version 10.0.21, the Office-like UI experience for Business document management feature was turned on by default. Then, starting in Finance version 10.0.29, the feature became mandatory and couldn’t be turned off. Starting in Finance version 10.0.32, the feature has been eliminated.
When the Office-like UI experience for Business document management feature is turned off in the Feature management workspace, the main grid in the Business document management workspace shows the following templates:
- Templates that are owned by your ER configuration provider (that is, the provider that is currently marked as active in the Electronic reporting workspace). After you select one of these templates, you can select Edit template to start or continue to edit it.
- Templates that are owned by other ER configuration providers. After you select one of these templates, you can select New document to create a copy of it that is owned by your ER configuration provider, and then start to edit the copy.
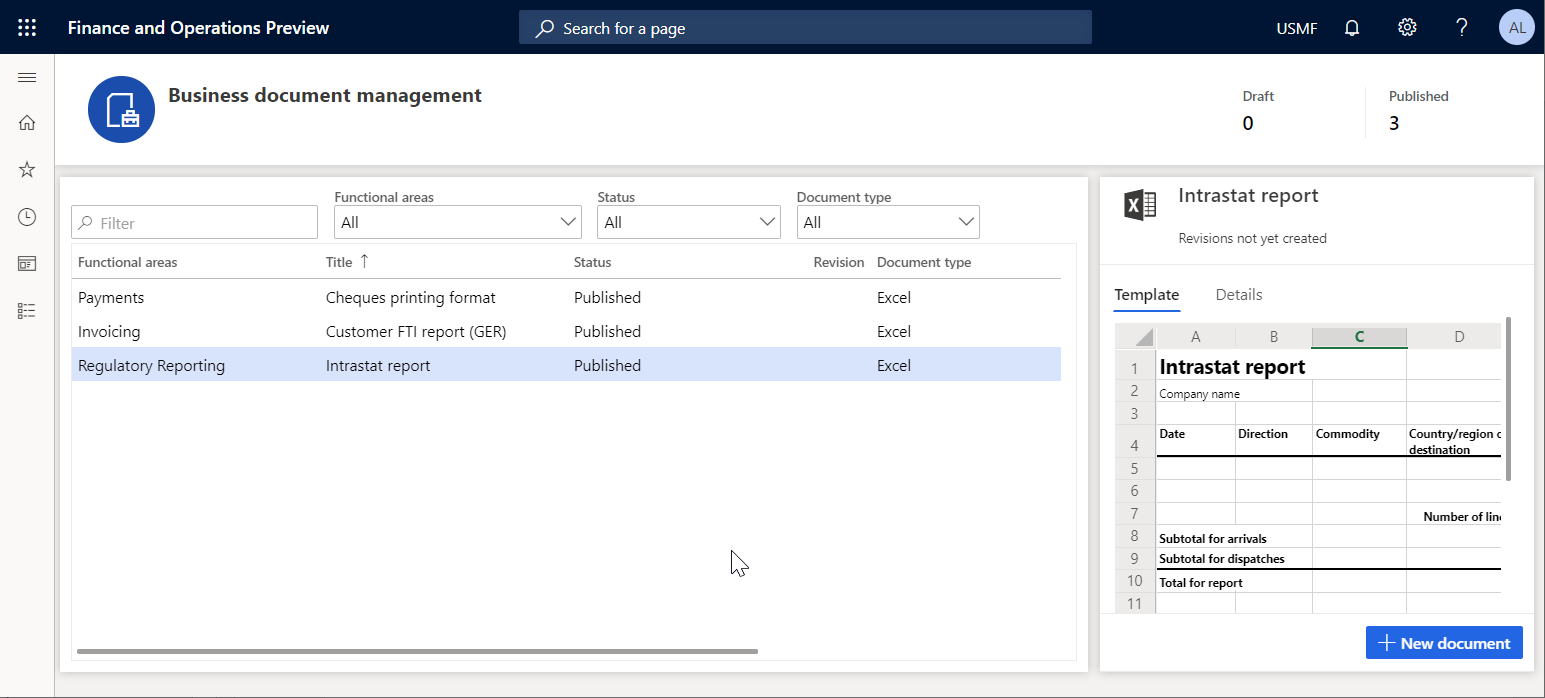
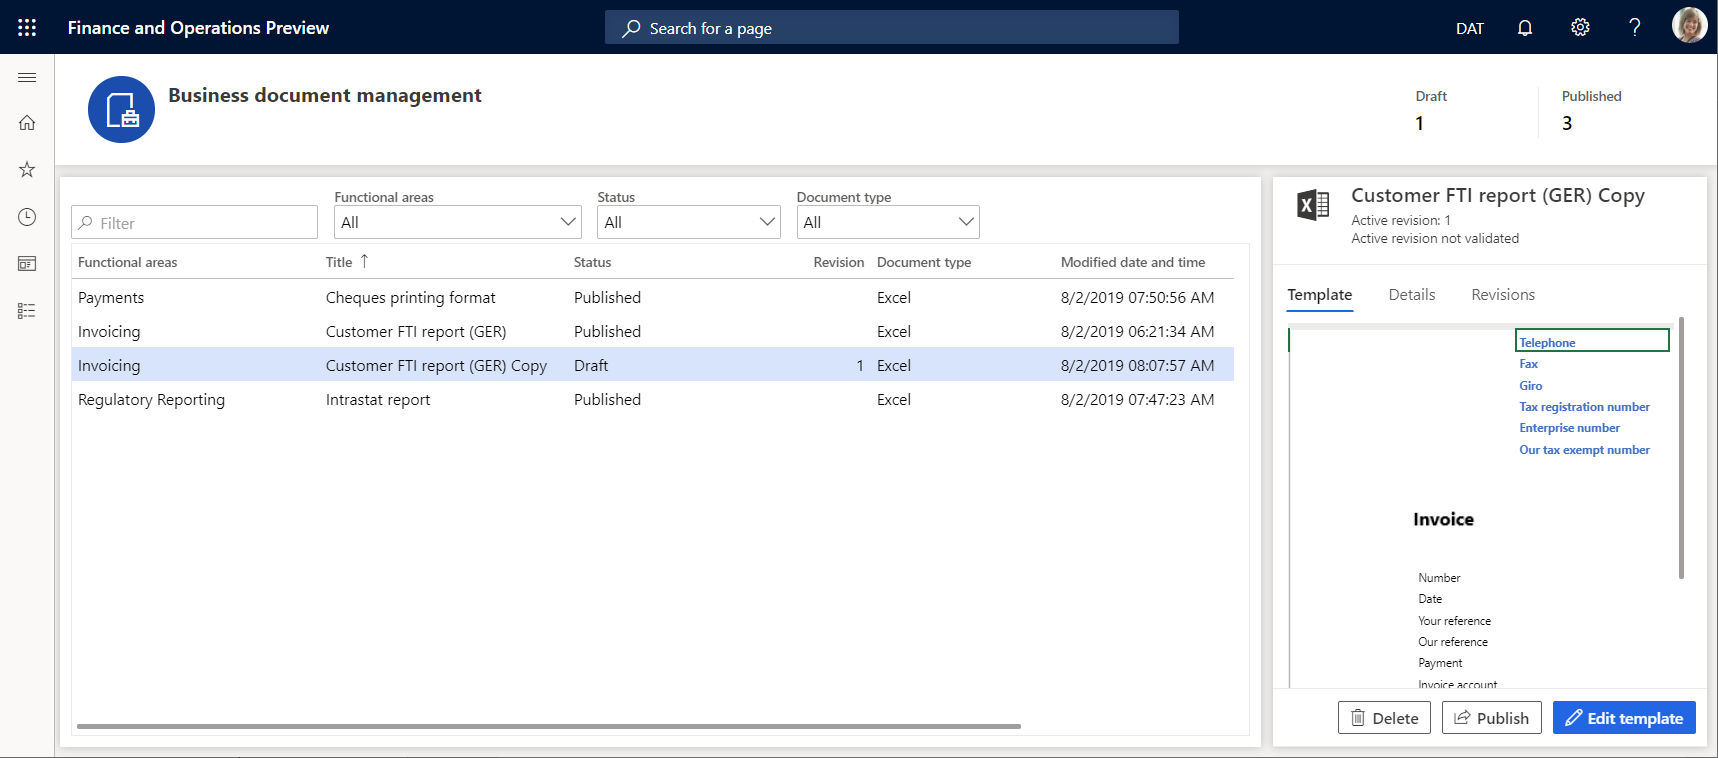
The Template tab presents the content of the selected template. Select the Details tab to review details of the selected template as well as details of an ER format configuration this template resides in. Notice that all of the templates have a status of Published, and contain no details in the Revision column. This means that these templates are not currently being edited.
When the Office-like UI experience for Business document management feature is turned on in the Feature management workspace, the main grid in the Business document management workspace shows templates that are owned by your ER configuration provider (that is, the provider that is currently marked as active in the Electronic reporting workspace). After you select one of these templates, you can select Edit template to start or continue to edit it.
To work with templates that are owned by other ER configuration providers, select New document to create a copy of the template that is owned by your ER provider. You can then start to edit the copy. For more information, see New document user interface in Business document management.
Initiate editing templates owned by your configuration provider
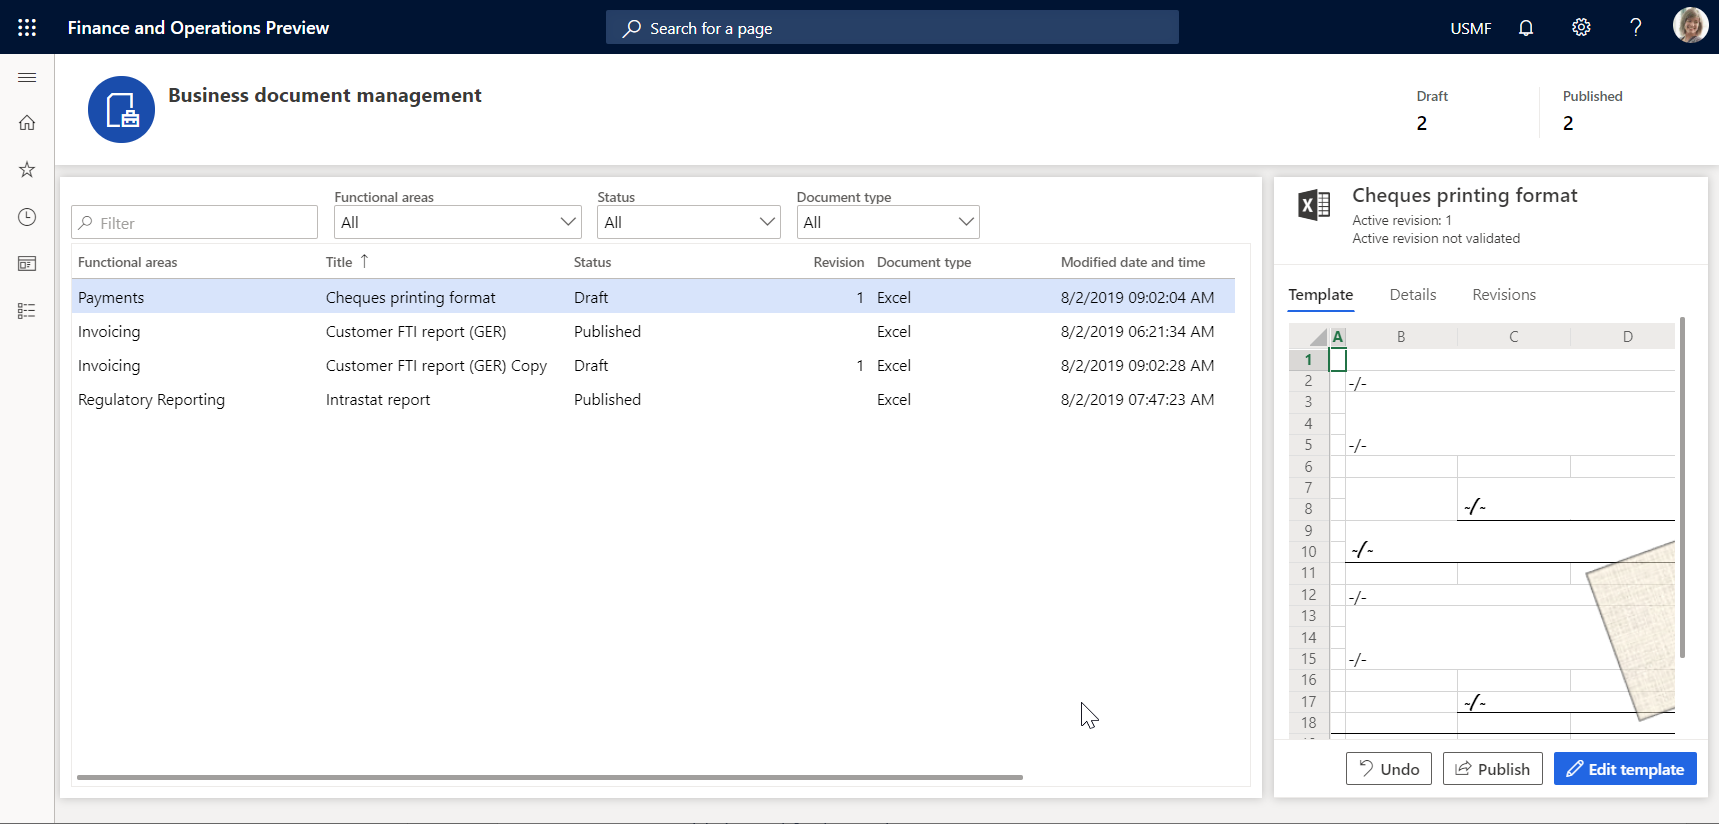
- In the Business document management workspace, select the Cheques printing format template in the list.
- Select the Details tab.
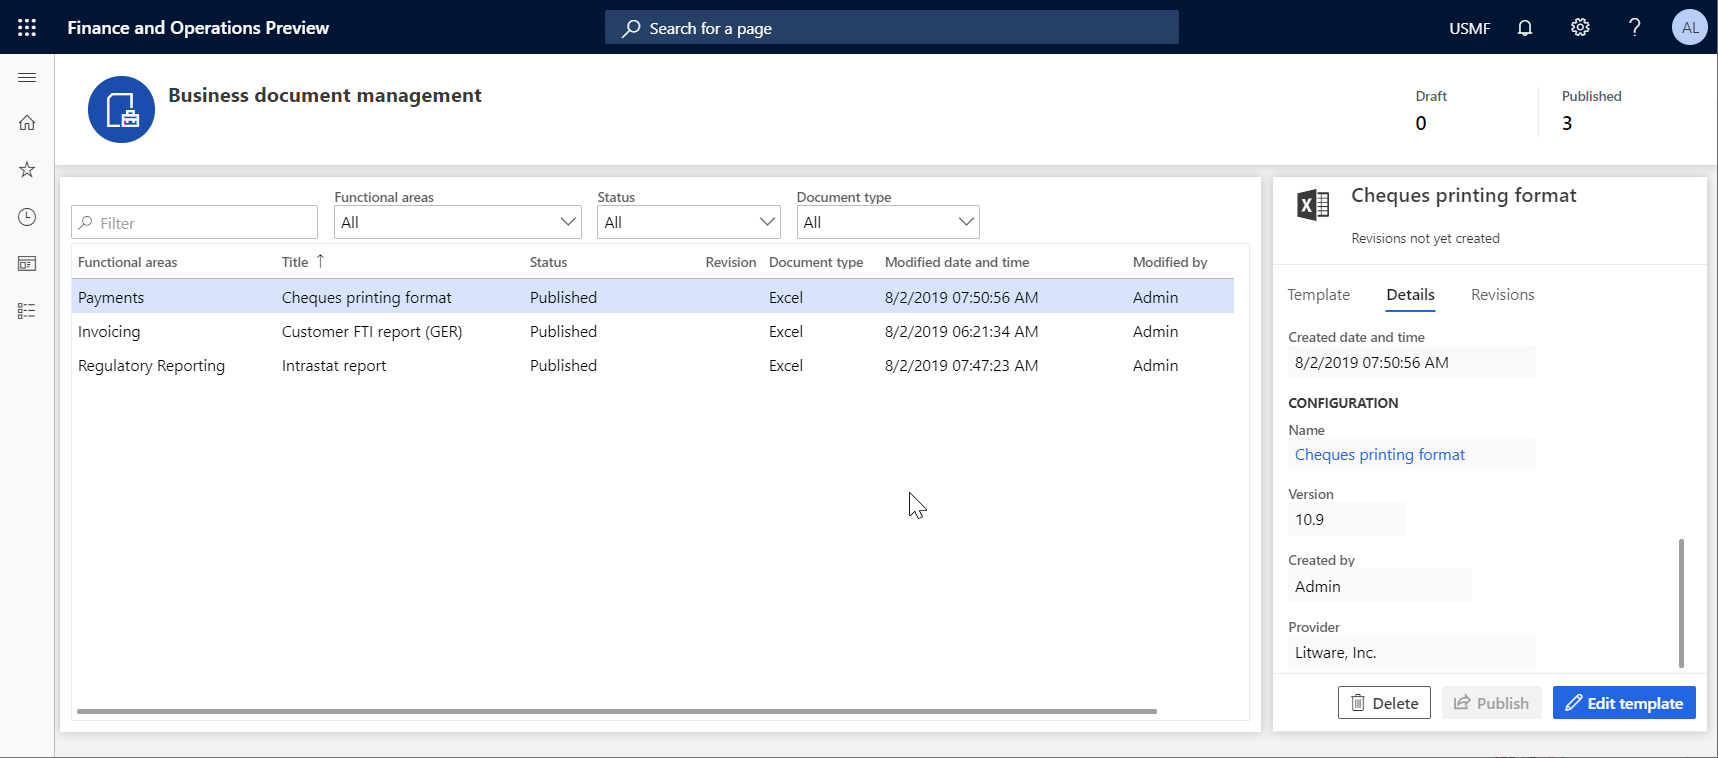
The Edit template option is available for the selected template. This option is always available for a template in an ER format configuration that is owned by the active ER configuration provider (Litware, Inc. in this example). When Edit template is selected, the existing template from the draft version of the underlying ER format configuration will be available to edit.
Initiate editing templates owned by other providers
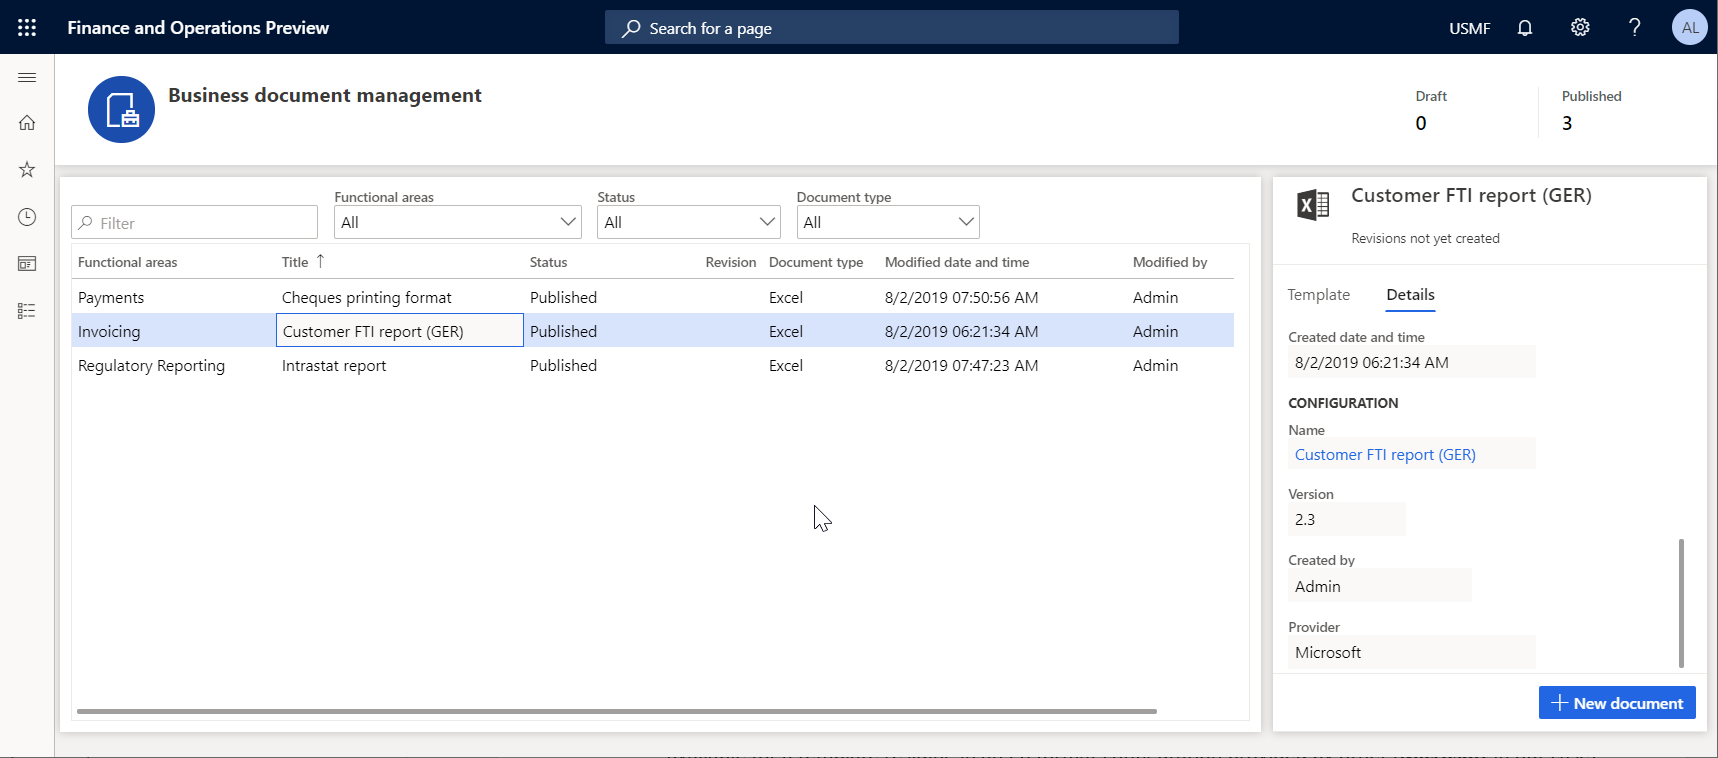
In the Business document management workspace, select the document that you want to use as a template.
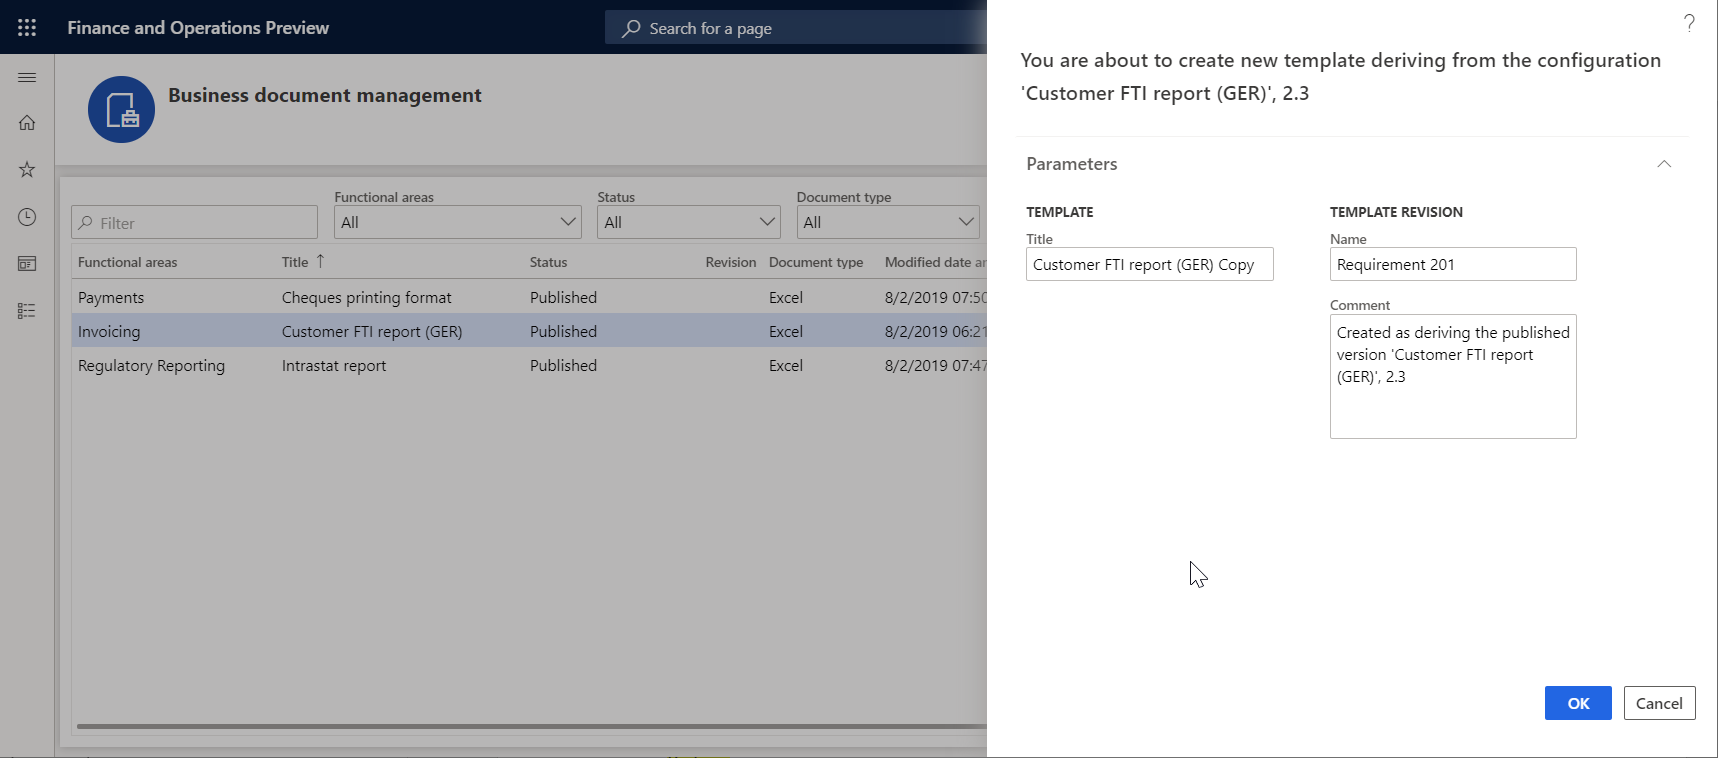
Select New document, and in the Title field, change the title of the editable template if needed. The text will be used to name the ER format configuration that is automatically created. Note that the draft version of this configuration (Customer FTI report (GER) Copy) that will contain the edited template will automatically be marked to run this ER format for the current user. At the same time, the non-modified original template from the base ER format configuration will be used to run this ER format for any other user.
In the Name field, change the name of the first revision of the editable template that will be created automatically.
In the Comment field, change the comment for the automatically created revision of the editable template.
Select OK to confirm the start of the editing process.
If there is no any provider it will be offered to create. If there is no active provider it will be offered to choose it for activate.
To create a provider, change the name of the provider in the Name field, update the internet address of the new provider in the Internet address field, and select OK to confirm.
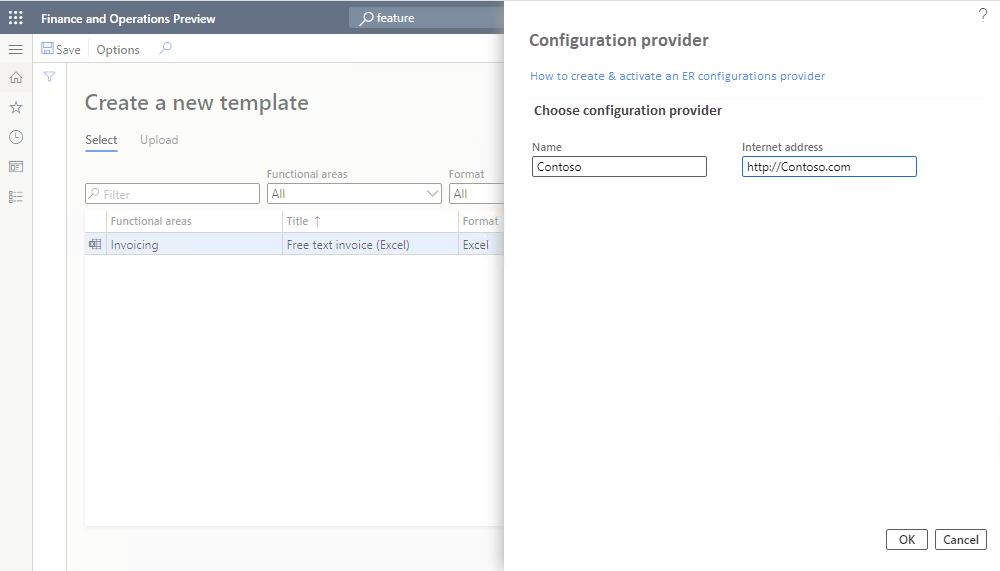
To activate existing provider, choose the name of the provider in the Configuration provider field, and select OK to set the provider as active.
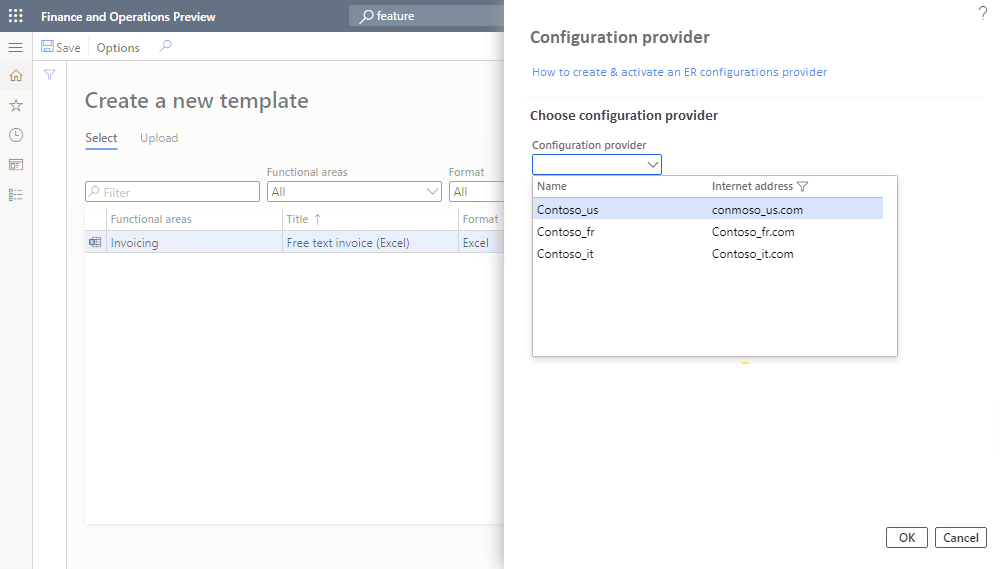
Each BDM template refers to the provider as the author of the configuration. This is why an active provider is required for the template.
The New document option is always available for a template in an ER format configuration provided by current and another provider (Microsoft in this example) that doesn’t have any revision. The edited template will then be stored in a new ER format configuration that is automatically generated.
Start editing a template
From the selected template, select Edit document.
In the Name field, change the name of the first revision of the editable template that will be created automatically.
In the Comment field, change the remark for the automatically created revision of the editable template.
Select OK to confirm the start of the editing process.
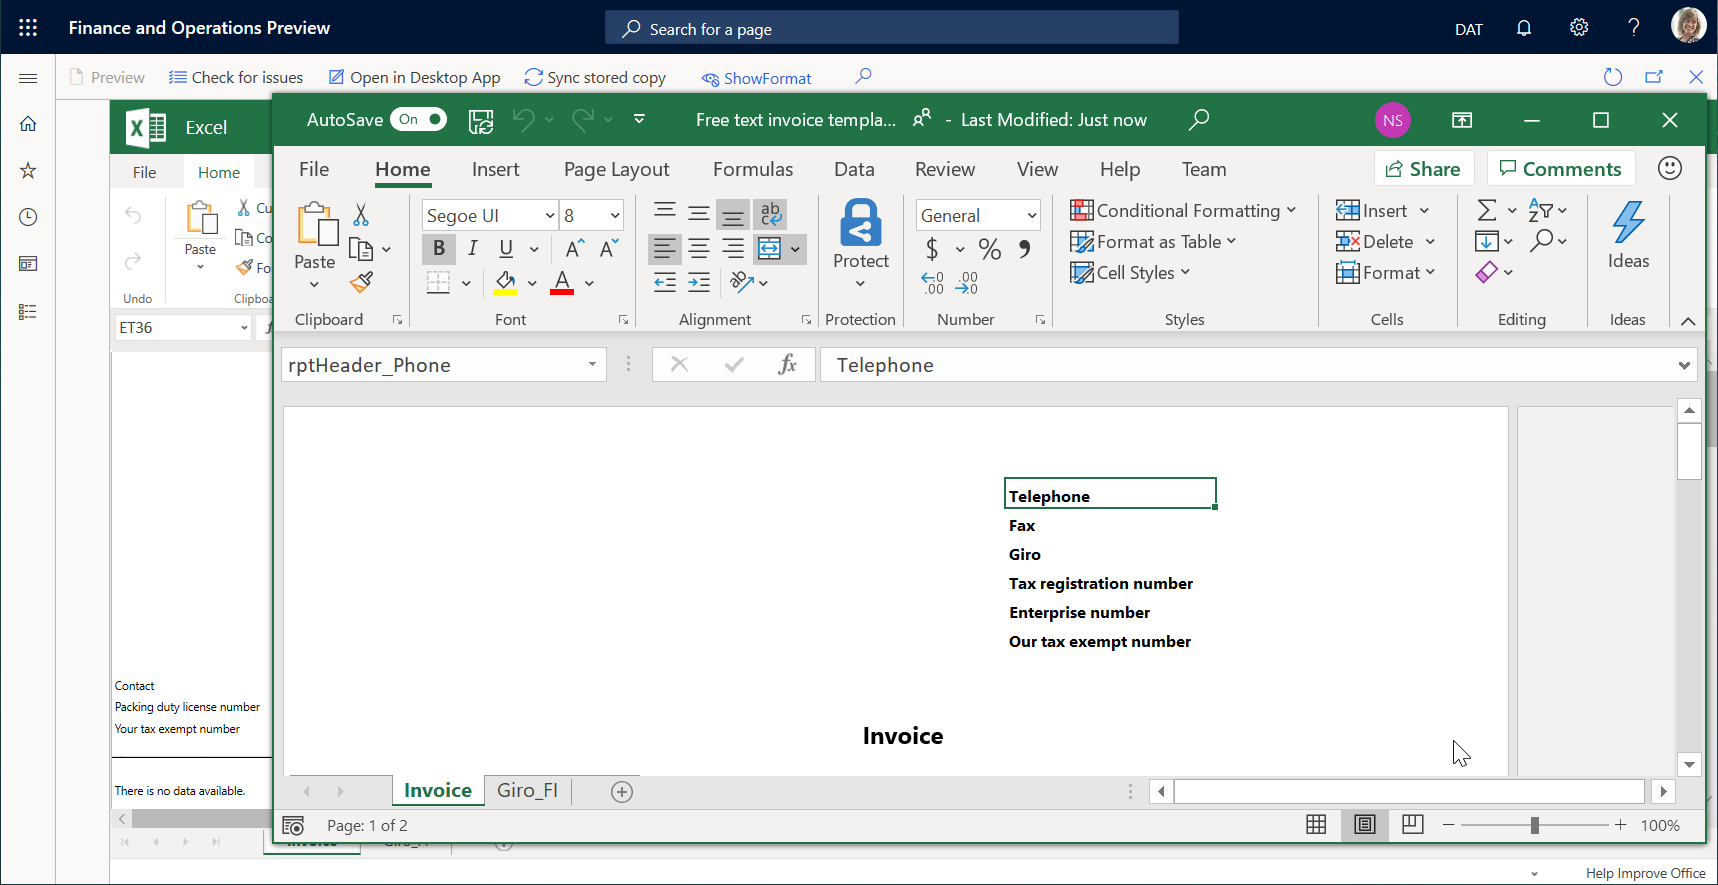
The BDM template editor page will open. The selected template will be available for online editing by using Microsoft 365.
Edit a template in Microsoft 365
You can modify the template using Microsoft 365. For example, in Office online, change the font of the field prompts in the template header from Regular to Bold. These changes are automatically stored in the editable template that is stored in the primary template’s storage (by default, the Azure blob storage). This is configured for the ER framework.
Edit a template in the Office desktop application
This function is only available when the SharePoint document type parameter is properly configured. For more information, see Configure parameters.
Select the Open in Desktop App option to modify the template by using the functionality of the Office desktop application (Excel in this example). The editable template is copied from the permanent storage to the temporary storage configured in the Business document management parameters as a SharePoint folder.
Confirm that you want to open the template from the temporary file storage in the Office desktop Excel application.
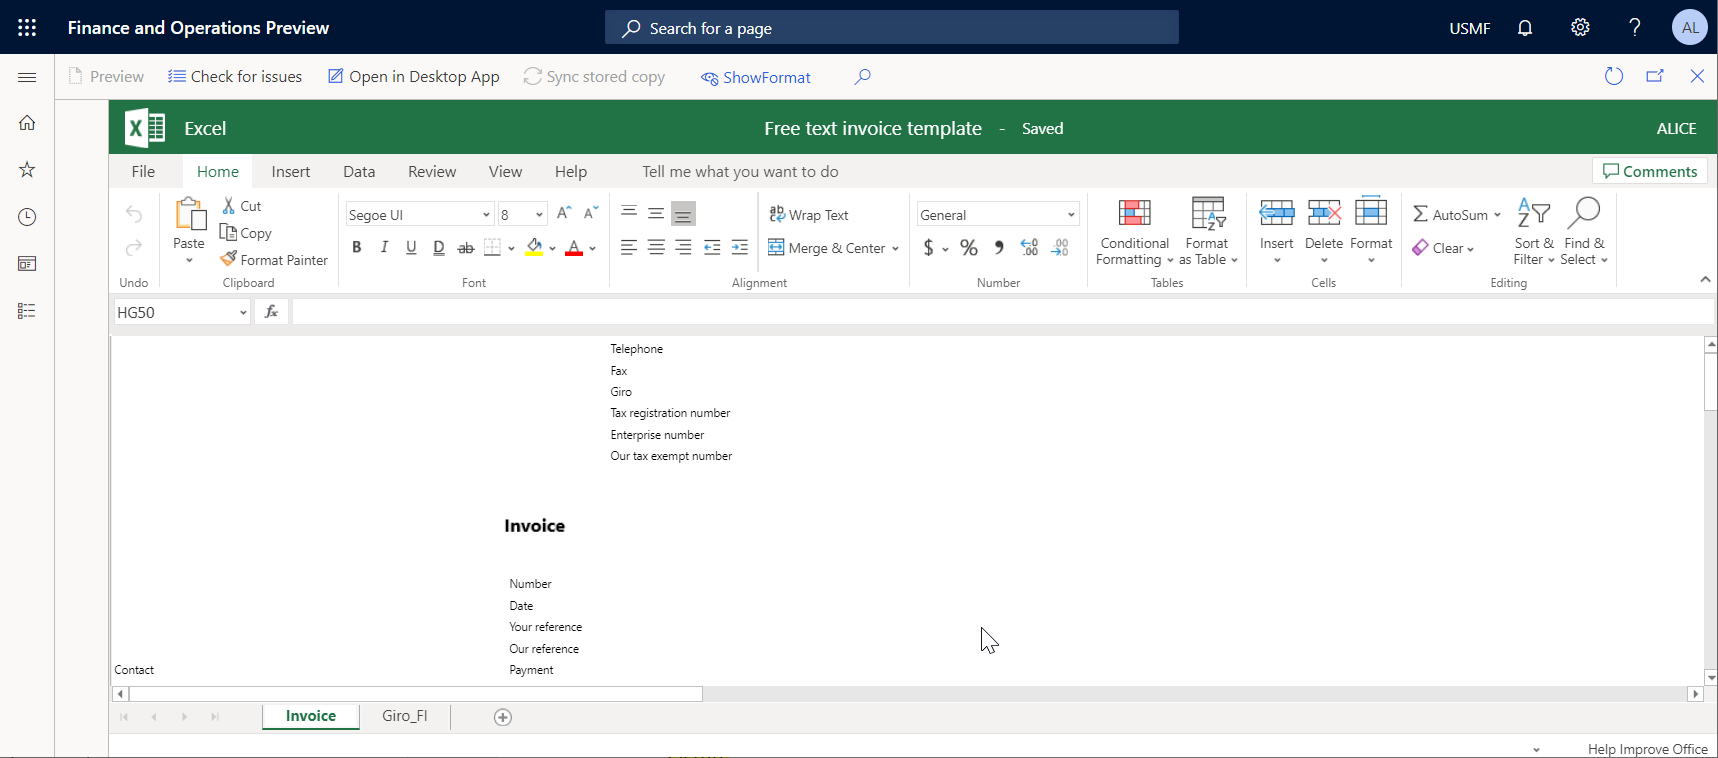
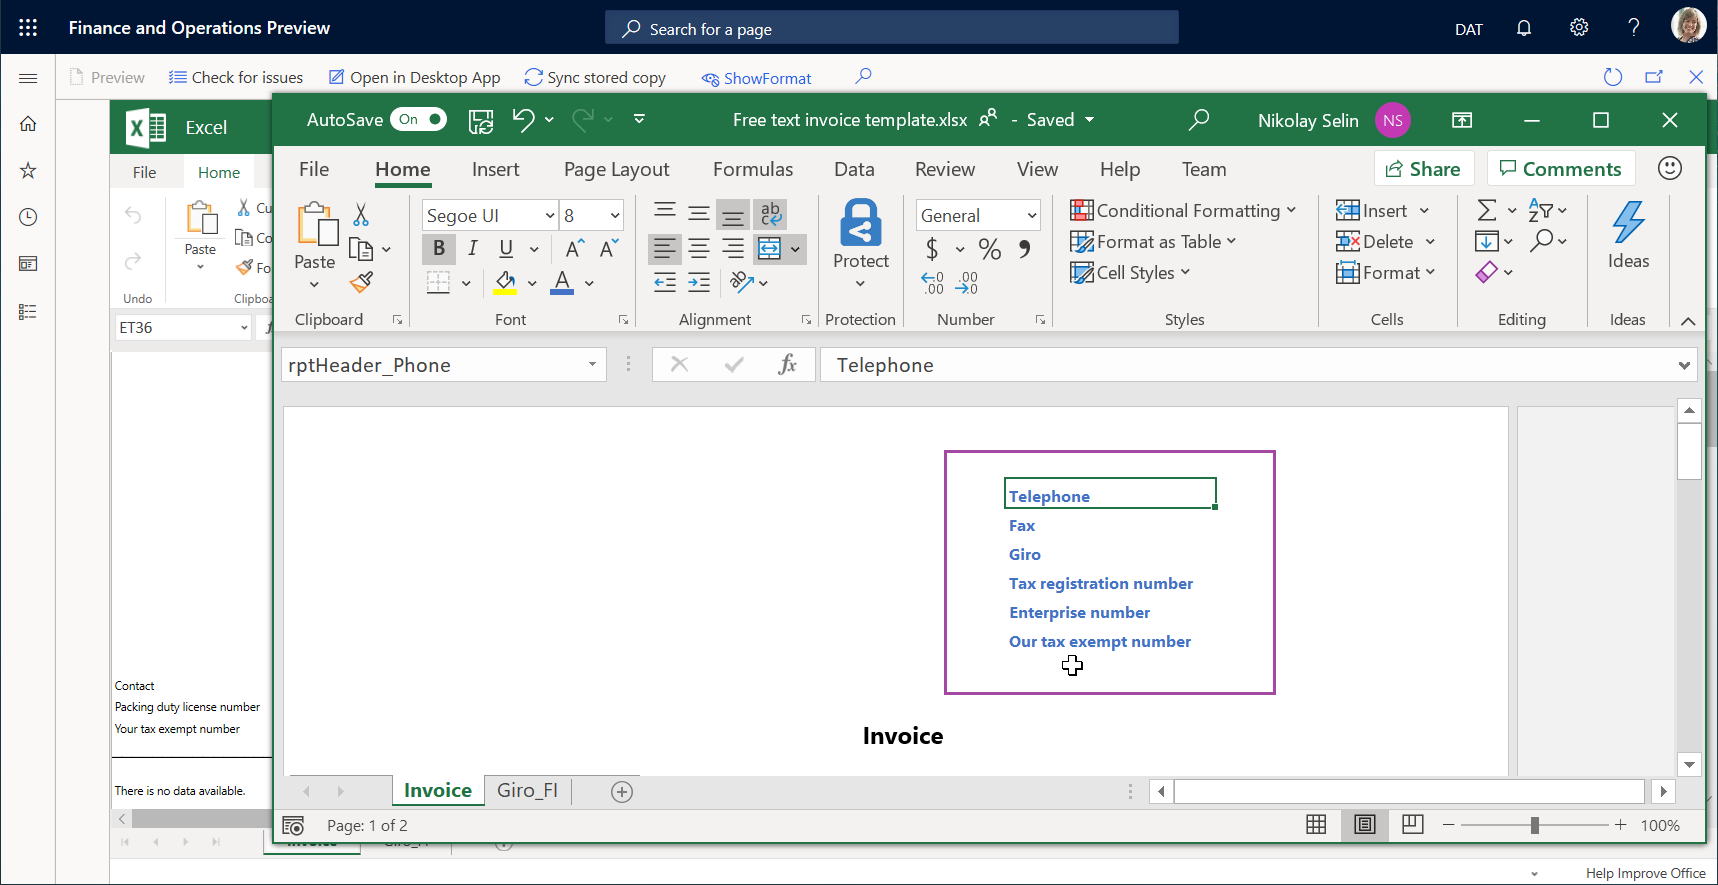
Modify the template. For example, change the font of the fields prompts in the template header by updating color from Black to Blue.
Select Save in the Excel desktop application to store the template changes in the temporary storage.

Close the Excel desktop application.
Select Sync stored copy to synchronize the temporary template storage to the permanent template storage.
The copy of the editable template in the temporary file storage is kept for only the current session of template editing. When you finish this session by closing the BDM template editor page, this copy will be deleted. If you adjusted the template in the temporary file storage and did not select Sync stored copy, when you try to close the BDM template editor page, a message will ask whether you want to store introduced changes. Select Yes if you want to save your changes to the template in the permanent file location.
Validate a template
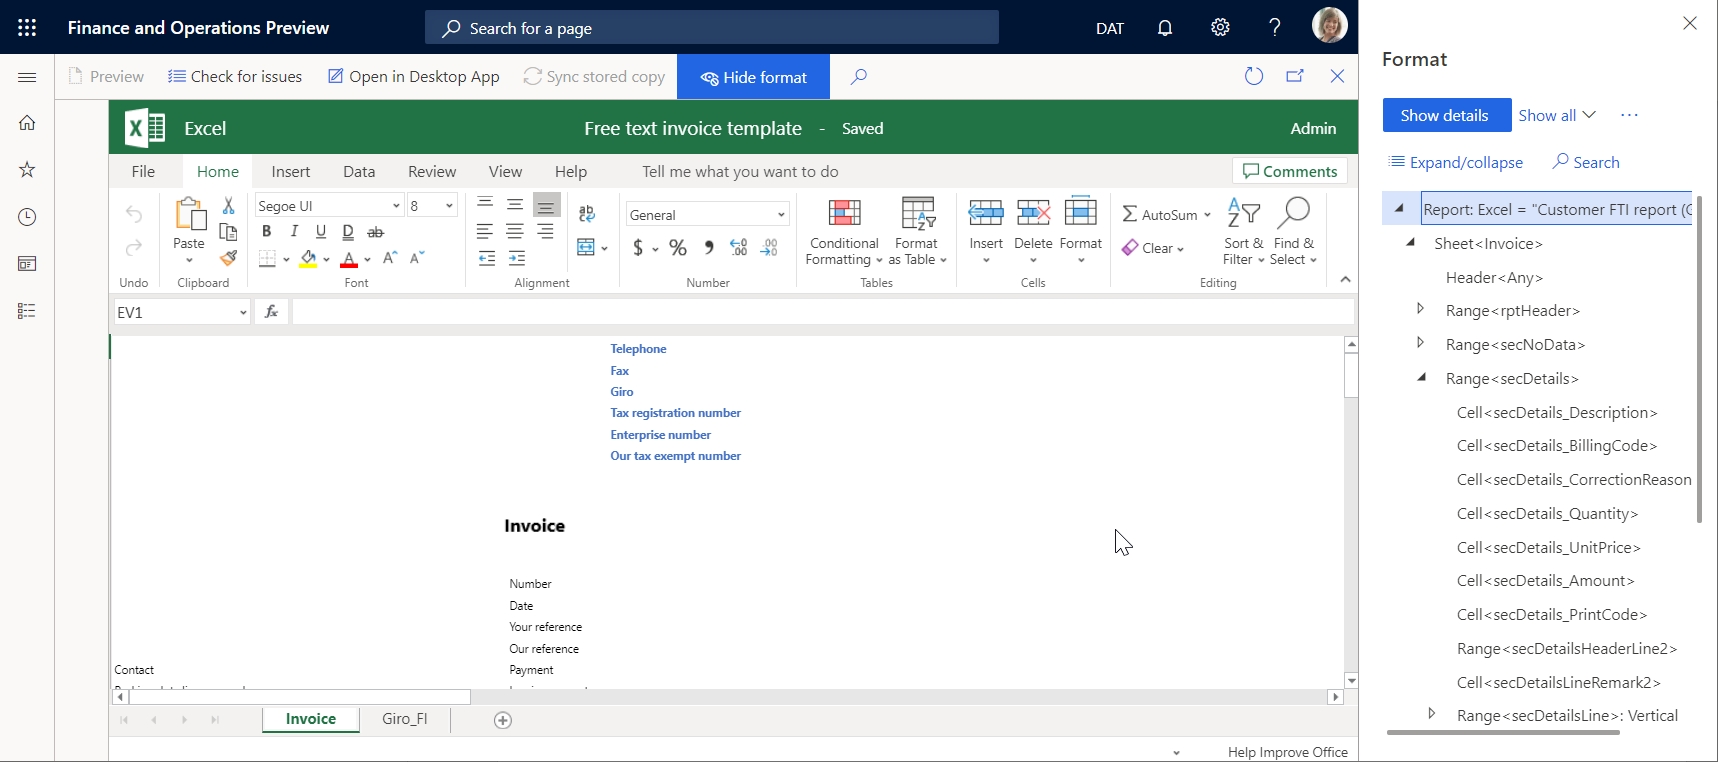
On the BDM template editor page, select Check for issues to validate the modified template against the underlying ER format configuration. Follow the recommendations (if any) to align the template with the structure of the format from the base ER format configuration.
Select Show format to view the current structure of the format from the base ER format configuration that must be aligned with the editable template.
Select Hide format to close the pane.
Close the BDM template editor page.
The updated template is shown on the Template tab. Notice that the status of the edited template is now Draft and the current revision is no longer empty. This means that the process of this template’s editing has been started.
Test the modified template
In the application, change to the company, USMF.
Go to Accounts receivable > Invoices > All free text invoices.
Select the FTI-00000002 invoice, and then select Print management.
Select the Module — accounts receivable > Documents > Free text invoice > Original document level to specify the scope of invoices for processing.
In the Report format field, select the Customer FTI report (GER) Copy ER format for the specified document level.
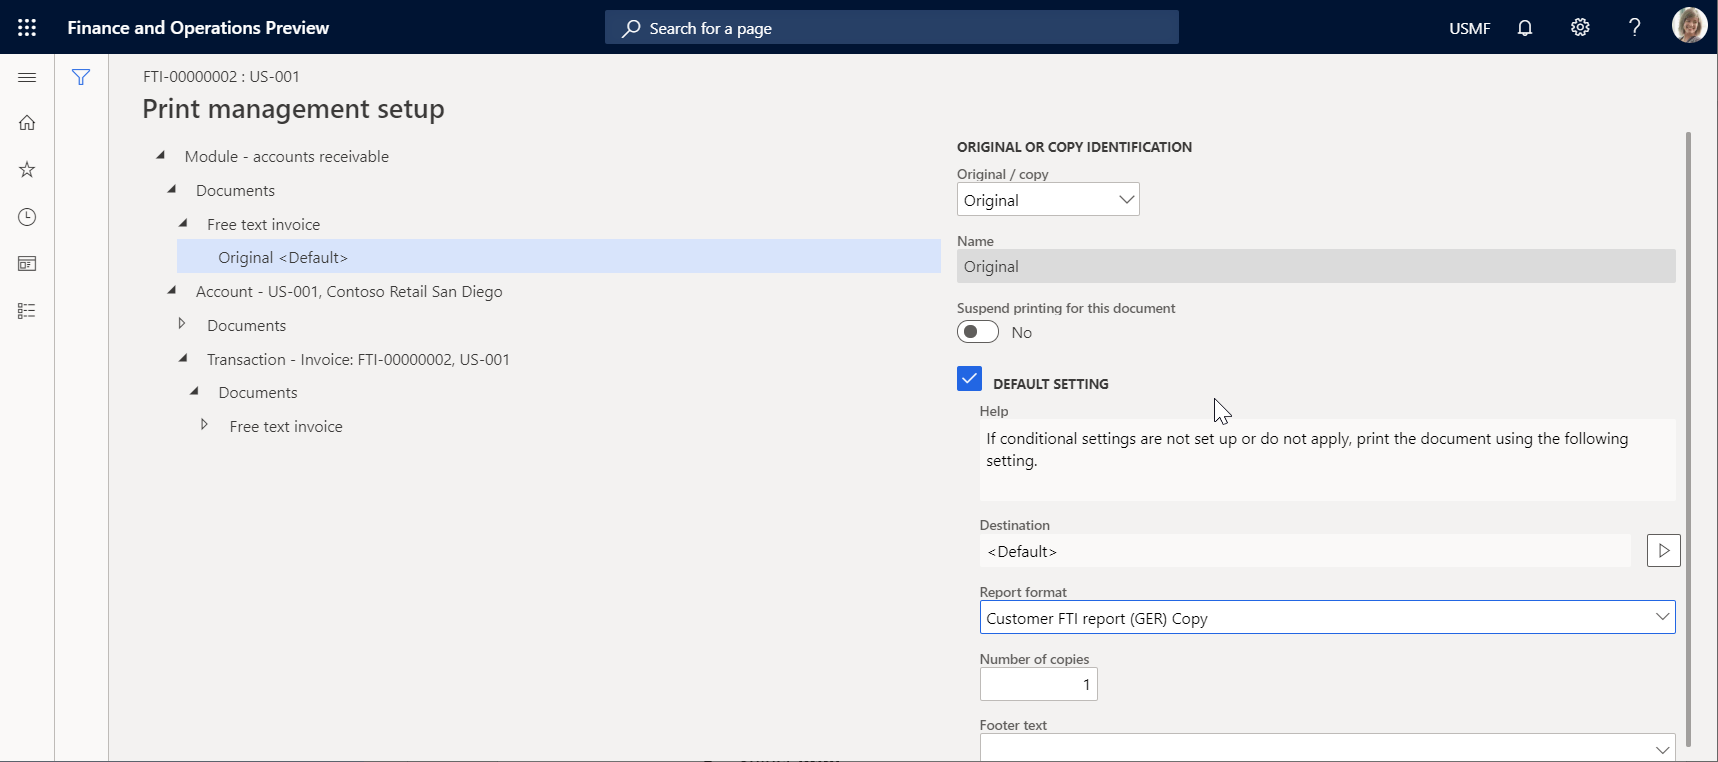
Press Escape to close the current page.
Select Print, and then select Selected.
Download the document and open it using the Excel desktop application.
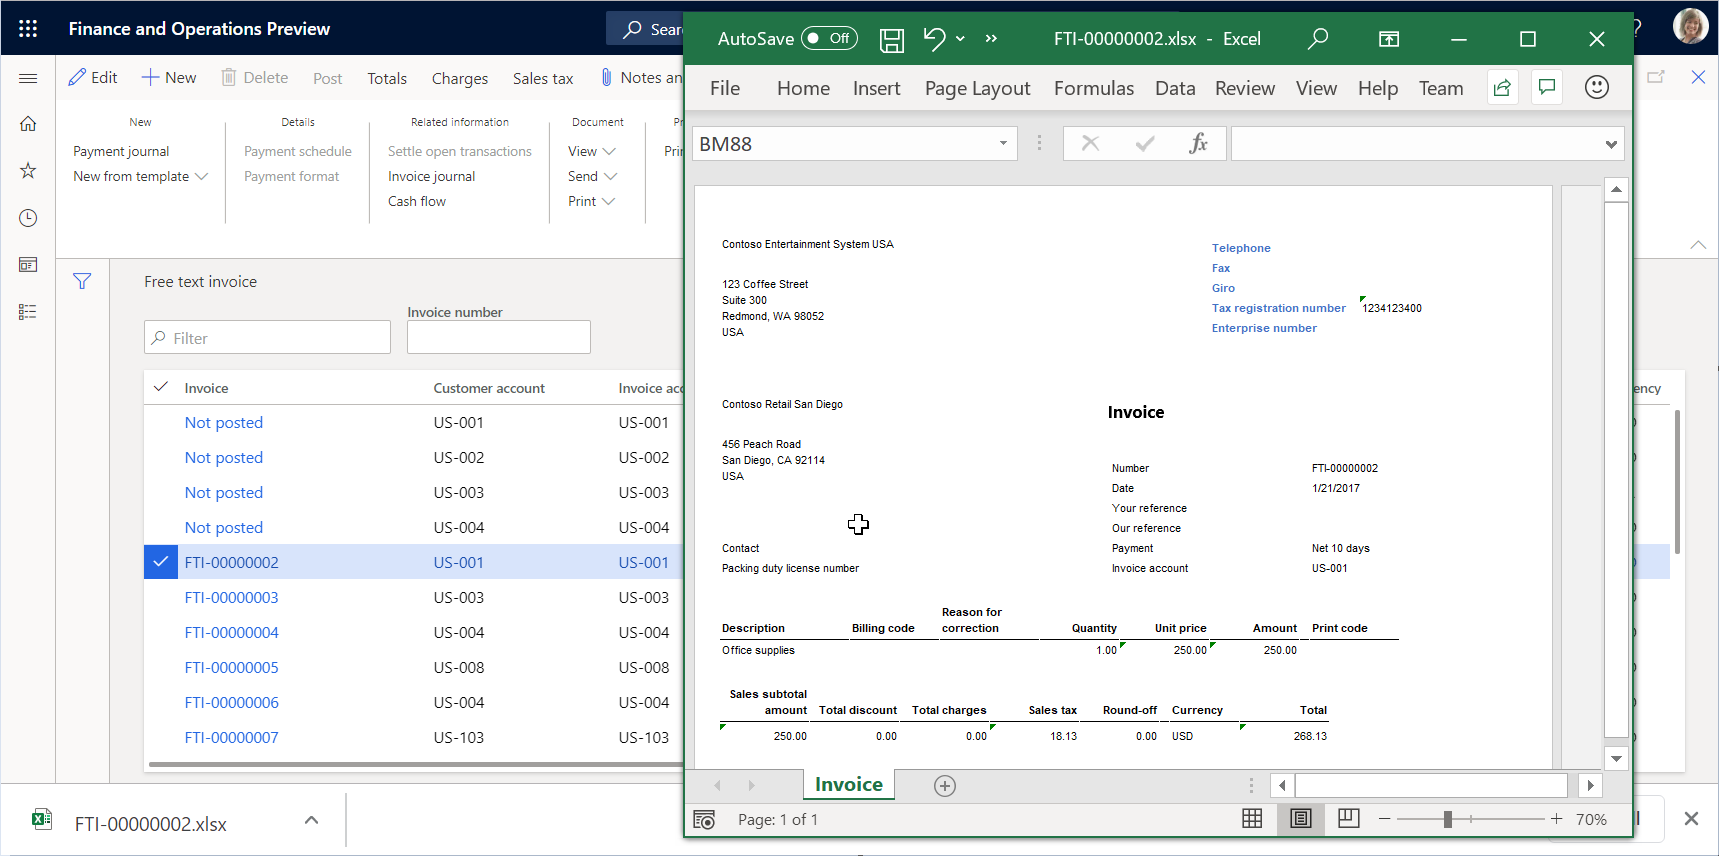
The modified template is used to generate the free text invoice report for the selected item. To analyze how this report is affected by the changes that you introduced to the template, you can run this report in one application session right after you modified the template in another application session.
Create an alternative template revision
Open the BDM template editor page and select the Customer FTI report (GER) Copy template.
On the Revisions tab, select New.
If needed, in the Name field, change the name of the second revision and base it on the currently active first revision.
If needed, in the Comment field, change the remark for the automatically created revision of the editable template.
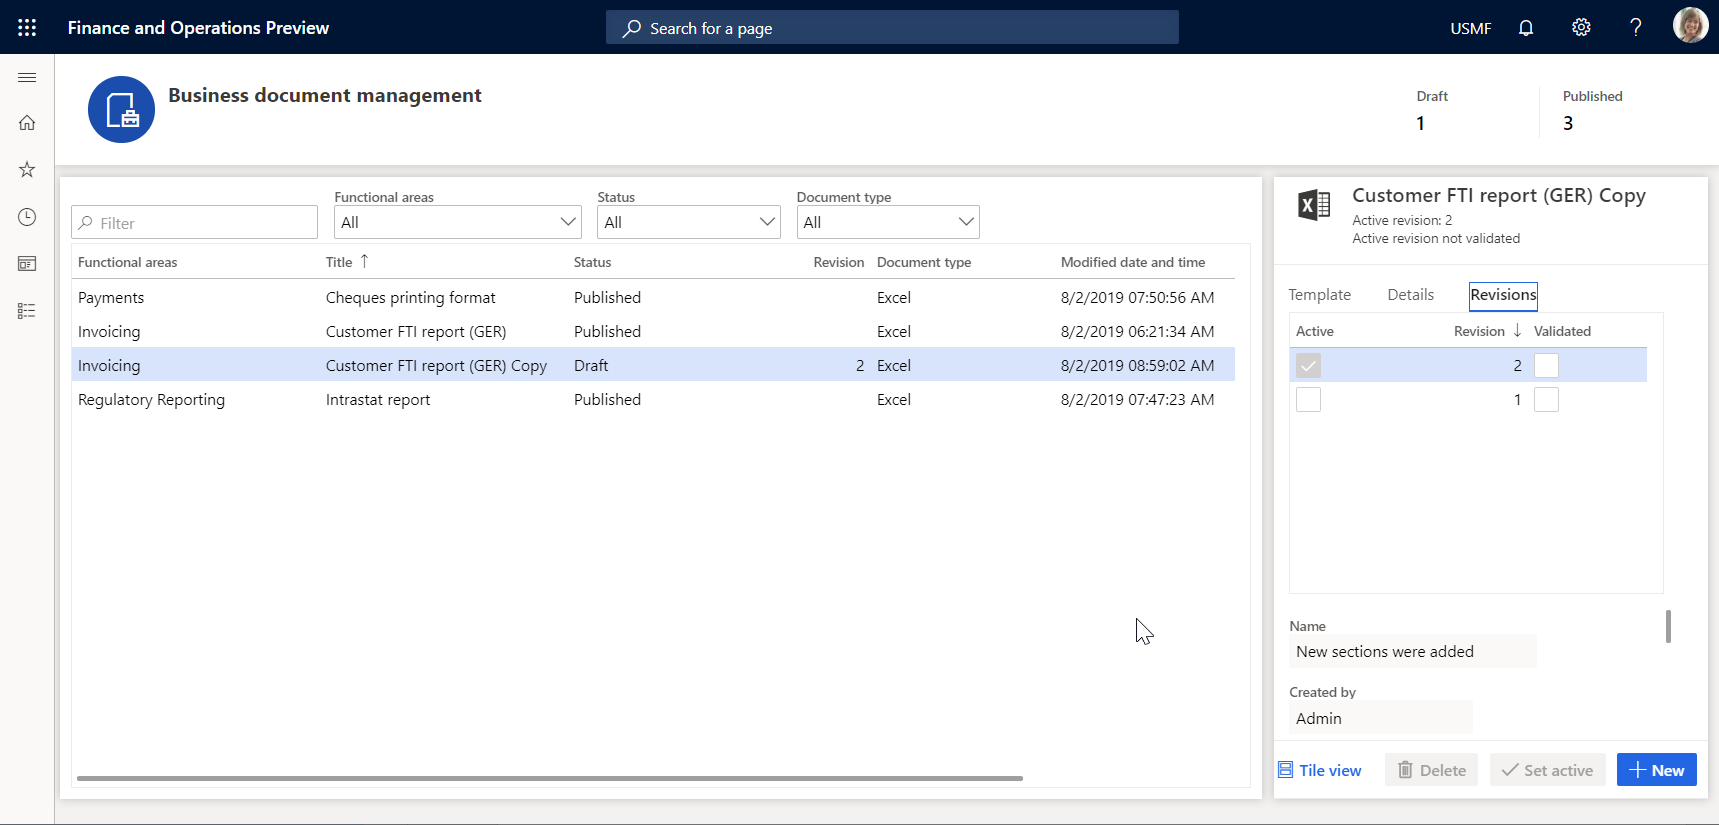
You created a new revision of your template that has been stored in the permanent template’s storage. Now you can continue editing the template of the second revision that is currently selected as active.
Select the first revision and then select Set active. You can select another revision as active if at any time you want to return to that revision of the template.
Select the second revision, and then select Delete.
Select OK to confirm that you want to delete the selected revision. You can delete any of the non-active revisions when they are no longer needed.
Delete a modified template
- On the BDM template editor page, select the Template tab.
- Select Delete.
- If you select OK to confirm deletion, the Customer FTI report (GER) Copy ER format with the modified template will be deleted. Select Cancel to explore other options.
Revoke changes of template
When you edit the template from an ER format that is owned by the current active provider, you will be offered the option to revoke changes introduced for the template.
- On the BDM template editor page, select the Template tab.
- Select Undo.
- If you select OK to revoke the changes introduced for the template, the modified template will be replaced by the original template and all changes will be removed. When you revoke changes to the template, you will be able to delete the template. Select Cancel to explore other options.
Publish a modified template
- On the BDM template editor page, on the Template tab, select Publish.
- If you select OK to confirm publishing, the draft version of the derived Customer FTI report (GER) Copy ER format that contains the modified template will be marked as completed. The modified template becomes available for other users. The completed versions of this ER format will keep only the last active revision of your template. Other revisions will be deleted. Select Cancel to explore other options.
Frequently asked questions
I selected Edit document, but instead of going to the BDM template editor page in Finance, I was sent to the Microsoft 365 webpage.
This issue is a known issue that involves Microsoft 365 redirection. It occurs when you sign to Microsoft 365 for the first time. To work around this issue, select Back in your browser to return to the previous page.
I understand how to edit a template by using Microsoft 365 in the first application session, and how to use the template in the second application session and adjust the template to see how my changes affect the generated business document. Can I use the Office desktop application in the same way?
Yes, you can. In the first application session, select Open in Desktop App. Your template will be stored in the temporary file storage and opened in the Office desktop application. Next, complete the following steps to preview your template changes in the generated business document:
- Make changes in the template by using the Office desktop application.
- Select Save in the Office desktop application.
- On the BDM template editor page of the first application session, select Sync stored copy.
- Execute this template ER format in the second application session.
When I select Open in Desktop App, I receive the following error message: «Value cannot be null. Parameter name: externalId.» How do I work around this issue?
Most likely you signed in to the current instance of the app of the Azure AD domain which differs from the Azure AD domain that was used to deploy this instance. Because the SharePoint service, which is used to store templates for making them available for editing by using the Office desktop applications, belongs to the same domain, we have no permissions to access the SharePoint service. To resolve this issue, sign in to the current instance using the credentials of a user with the correct Azure AD domain.
Additional resources
List of ER configurations that have been released in Finance to support configurable business documents
The list of ER configurations for Finance is constantly updated. Open the Global repository to review the list of ER configurations that are currently supported. You can filter the Global repository to review the list of ER configurations that are used to support configurable business documents.
The following table shows the list of ER configurations that support configurable business documents and that have been released in Finance up until December 2020.
Источник
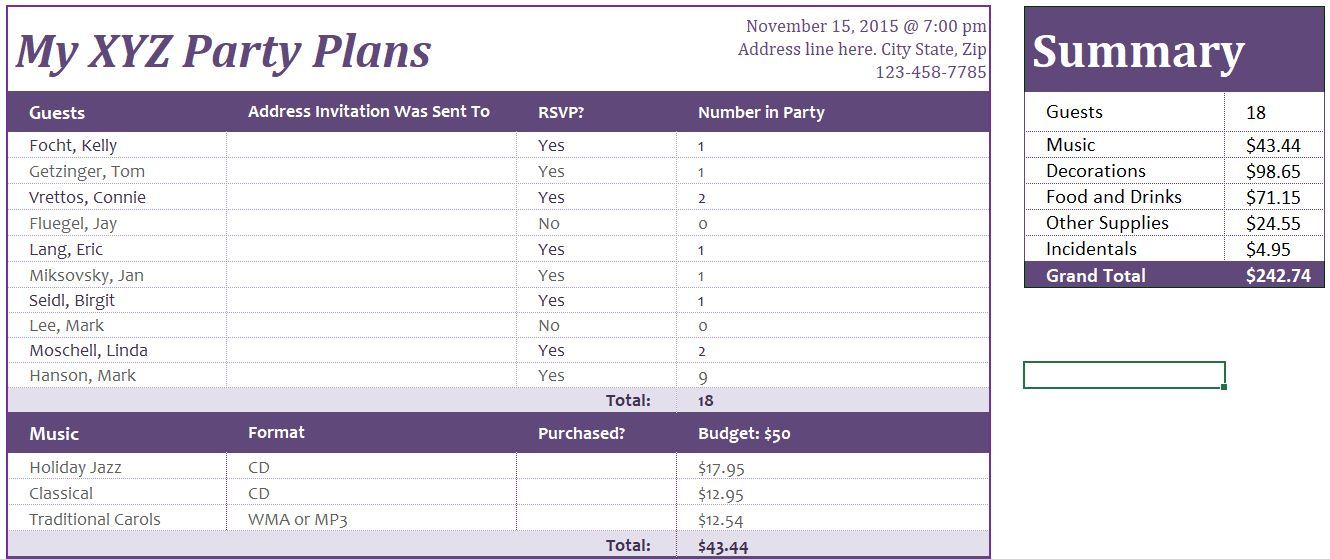
If you’re working on a project or a monthly reporting process, document control can be the most time-consuming activity. Often there are so many documents that it is difficult to keep up with all the inputs and revisions flying about all over the place. Which documents have we got? Which documents are missing? Have we got the latest version of this or that? When was a document revised, or superseded by a new version? Aaaahhhhhh! Too many questions. This is why I created a Document Control Template for Excel, it enables me to keep track of documents for all important processes. If you think I’m just talking about using a spreadsheet like a list, then you’ll be pleasantly surprised. It’s so much more than that.
By using the Document Control Template, which I am about to share with you, it is possible to
- “Check in” documents – moving and re-naming documents into specific folders with specific file names
- See at a glance the documents which have been received or are missing
- Keep track of the “current” version, and retain copies of all previous versions of a file
- Delete old files without needing to find it in the folder structure
- Open of files in their default application with a single click
- “Roll-over” the Document Control Template for the next period/version
- Work with all file types, not just Excel workbooks
The biggest benefit of using a Document Control Template is knowing the specific file path of each document. As it then becomes possible to use other automation macros, such as consolidating workbooks, merging PDFs, or printing specific schedules of each workbook. This automation is much harder or impossible if = the exact file path of each document is now known.
Much of the code for the Document Control Template can be found in the VBA Code Snippets library. To find out more information on any of the VBA code below, follow these links.
- Selecting a file using the File Dialog Box
- Find out if a file is already open by you or another user
- Copy, move, rename, delete and confirm existence of files
- Create, delete, rename and confirm existence of folders
Introducing the Document Control Template for Excel
Download the Document Control Template
You do not need to download the file to create your own Document Control Template, all the instructions and VBA code are in the sections below. But, it will be much easier to follow along if you have the Template downloaded. If you just want to get stuck right in, you can download the file and ignore the second part of this article.
![]()
Download the file: Document Control Template
Disclaimer:
Whilst I try to create safe and reliable templates and add-ins, I can (and often do) make mistakes. Please backup copies of your files before opening this template or running any VBA code. If you do find any bugs or errors, please let me know using my contact page.
By using any templates, add-ins, downloads or information from the site, you agree that I will not be held liable for any type of damages, and use is entirely at your own risk.
Using the Document Control Template?
Below is a screenshot from the Document Control Template, each feature is described below.
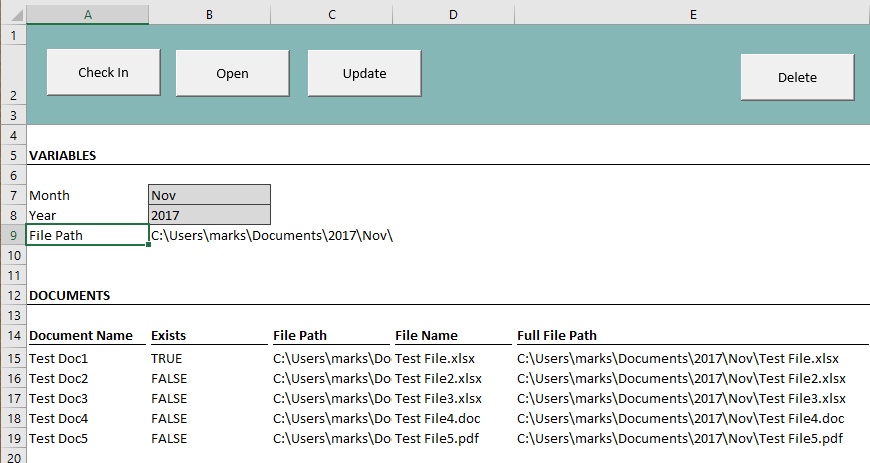
Check In Button:
To ‘Check In’ a file, select a cell with a valid file path (e.g. Cells E15-E19) then click the Check In button. A file selection window will open, navigate to the location where the file is currently saved, click Open. For this button to work a “valid file path” is where the folder exists, but the file name does not. The selected file is automatically moved to the file path selected in the cell.
Open Button:
Select a cell containing a valid file path (e.g. Cells E15-E19), then click the Open button. For this button to work a “valid file path” is where both the folder and file exist. The file will open within its default application.
Update Button:
The Update button functions in a similar way to the Check In button. The key difference being the file must already exist in the selected location. The existing file is renamed to include the day and time it was replaced, then the new file is renamed to the file name in the selected cell.
Delete Button:
Select a cell containing a valid file path, where the folder and file already exist, click Delete. The file will be deleted.
Cell Variables:
Cells B7 and B8 are variables. These are used to construct the file path in Cell B9. If the year or period changes, so does the file path. This makes the template useful for any regular reporting cycles, just change the variables and subsequent files are saved in a new location.
Existence:
Cells B15-B19 displays TRUE or FALSE to indicate if a file already exists in the location shown in Cells E15-E19.
File Path & File Name:
In my template, the File Path (Cells C15-C9) is based on the value in Cell B9. However, the file path could be unique for each file, and could incorporate other variables.
The file names (Cells D15-D19) are the names which the files will be renamed to.
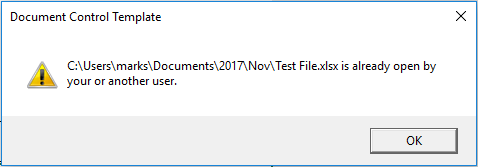
Warning messages
Using invalid file paths will trigger warning messages similar to the one below.
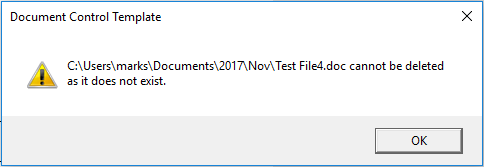
The VBA code also checks to ensure the file is not already open by another user.
There are many ways this file could be used, it is up to you to work with it and see what you can achieve.
Create your own Document Control Template
If you’re interested in making your own Document Control Template from scratch, or if you’re a VBA fan, then all the necessary steps and code are contained below.
VBA Code for the Document Control Template
Copy the code below into a Module within the Visual Basic Editor. I won’t go through the code line by line, there are comments within the code provide some guidance. Or check out the articles in the VBA Code Snippets Library for further information.
Option Explicit
Function doesFileExist(filePath) As Boolean

'Make the calculation volatile, forcing recalculation when used as
'a worksheet function
Application.Volatile

doesFileExist = Dir(filePath) <> ""

End Function
Function doesFolderExist(folderPath) As Boolean

'If blank cell selected will cause error: return false
'If not blank, then check for folder existence
If folderPath = "" Then

    doesFolderExist = False

Else

    doesFolderExist = Dir(folderPath, vbDirectory) <> ""

End If

End Function
Function IsFileOpen(fileName As String)

Dim fileNum As Integer
Dim errNum As Integer

'Allow all errors to happen
On Error Resume Next
fileNum = FreeFile()

'Try to open and close the file for input.
'If Error it means the file is already open
Open fileName For Input Lock Read As #fileNum
Close fileNum

'Get the error number
errNum = Err

'Do not allow errors to happen anymore
On Error GoTo 0

'Check the Error Number
Select Case errNum

    'errNum = 0 means no errors, therefore file closed
    Case 0
        IsFileOpen = False

    'errNum = 70 means the file is already open
    Case 70
        IsFileOpen = True

    'Something else went wrong
    Case Else
        IsFileOpen = errNum

End Select

End Function
Sub DocControlCheckIn()
'Assign this Macro to the Check In button

FileActions ("CheckIn")

End Sub
Sub DocControlOpen()
'Assign this Macro to the Open button

FileActions ("Open")

End Sub
Sub DocControlDelete()
'Assign this Macro to the Delete button

FileActions ("Delete")

End Sub
Sub DocControlUpdate()
'Assign this Macro to the Update button

FileActions ("Update")

End Sub
Sub FileActions(action As String)

Dim folderPath As String
Dim errorCount As Integer
Dim fileName As String
Dim positionOfSlash As Integer
Dim msgAns As Long

'Check if selection is blank
If Selection.Value = "" Then errorCount = errorCount + 1

'Get the folder path from the selected cell, by finding final backslash
positionOfSlash = InStrRev(Selection.Value, "")
If positionOfSlash >= 1 Then
    folderPath = Left(Selection.Value, positionOfSlash)
Else
    folderPath = Selection.Value
    errorCount = errorCount + 1
End If

'Check if the folder path exists
If doesFolderExist(folderPath) = False Then errorCount = errorCount + 1


'Display error message for selecting a cell with an invalid file path
If errorCount >= 1 Then
    MsgBox "The selected cell does not contain a valid file path.", _
        vbExclamation, "Document Control Template"
    Exit Sub
End If

'Check if file is already open
If IsFileOpen(Selection.Value) = True Then
    MsgBox Selection.Value & " is already open by your or another user.", _
        vbExclamation, "Document Control Template"
    Exit Sub
End If

Select Case action

    'Delete file if it exists, includs confirmation to delete
    Case "Delete"
         If doesFileExist(Selection.Value) = True Then
             msgAns = MsgBox("Are you sure you wish to delete " & _
                 Selection.Value & "?", vbYesNo, "Document Control Template")
             If msgAns = vbYes Then
                 Kill Selection.Value
             End If
         Else
             MsgBox Selection.Value & " cannot be deleted as it does not exist.", _
                 vbExclamation, "Document Control Template"
             Exit Sub
         End If


    'Check In the file if the file does not already exist
    Case "CheckIn"
        If doesFileExist(Selection.Value) = True Then
            MsgBox "Unable to Check In " & Selection.Value & _
                " as the file already exists", vbExclamation, _
                "Document Control Template"
            Exit Sub
        Else
            Call saveFileInLocation(Selection.Value)
        End If


    'Open the file if it exists
    Case "Open"
        If doesFileExist(Selection.Value) = True Then
            CreateObject("Shell.Application").Open (Selection.Value)
        Else
            MsgBox "Unable to open " & Selection.Value & _
                " as the file does not exist.", vbExclamation, _
                "Document Control Template"
            Exit Sub
        End If


    'Update the file if it exists
    Case "Update"
        If doesFileExist(Selection.Value) = True Then
            fileName = folderPath & Mid(Left(Selection.Value, _
                InStrRev(Selection.Value, ".") - 1), Len(folderPath) + 1) & "_" & _
                Format(Now(), "yymmddhhmmss") & _
                Mid(Selection.Value, InStrRev(Selection.Value, "."))
            Name Selection.Value As fileName
            Call saveFileInLocation(Selection.Value)
        Else
            MsgBox "Unable to update " & Selection.Value & _
                " as the file does not already exist.", vbExclamation, _
                "Document Control Template"
            Exit Sub
        End If


End Select

'Recalculate sheet.  This should force the doesFileExist function in
'Cells B15-B19 to recalculate to show correct TRUE/FALSE value
ActiveSheet.Calculate

End Sub
Sub saveFileInLocation(savePath As String)

Dim dialogBox As FileDialog
Dim selectedFile As String

Set dialogBox = Application.FileDialog(msoFileDialogOpen)

'Do not allow multiple files to be selected
dialogBox.AllowMultiSelect = False

'Set the title of the DialogBox
dialogBox.Title = "Select a file"

'Show the dialog box and assign full file path and file name to variable
If dialogBox.Show = -1 Then
    selectedFile = dialogBox.SelectedItems(1)
End If

'Check if the selectedFile is already open
If IsFileOpen(selectedFile) = True Then
    MsgBox selectedFile & " is already open by your or another user.", _
        vbExclamation, "Document Control Template"
    Exit Sub
End If

'Catch errors when moving file to final location
On Error Resume Next

'Rename the file
Name selectedFile As savePath

If Err.Number <> 0 Then

    MsgBox "Unable to Check In the file"

End If

On Error GoTo 0


End Sub
Creating the buttons on the worksheet
There are 4 main actions within the VBA code above; Check In, Open, Update, Delete. Create a button for each action. From the Developer Ribbon click Insert -> Form Controls -> Button (Form Controls). Click and draw a rectangle on the worksheet. This creates a new button. Allocate each button created to the 4 macros
- Check In – Macro: DocControlCheckIn
- Open – Macro: DocControlOpen
- Update – Macro: DocControlUpdate
- Delete – Macros: DocControlDelete
Screen shot below shows how to create a button and allocate a Macro.
Right click on the Button to edit the text to your requirements.
File paths
The last thing required to create the template are cells with folder and file paths. How you create these paths is up to you, in my template I have chosen to use Year and Month as variables to construct the file path. This enables the document to be used for a monthly process. File paths must be valid. For Open, Delete and Update the specified file must already exist in that location, for Check In, the folder must exist, but the file does not exist.
File paths must be valid. For Open, Delete and Update the specified file must already exist in that location, for Check In, the folder must exist, but the file most not exist.
Check for existence
The VBA code includes a User Defined Function, which checks for a file’s existence.
=doesFileExist(E15)
In the User Defined Function above the file path is contained in Cell E15. The function will return TRUE if the file exists and FALSE if it does not.
Save the Template
The final step is to save the file you have created as a macro enabled workbook, an .xlsm file type.
Conclusion
There was a lot of code in there, but keep referring back to the original document, and it should all makes sense. Having a document control template has saved me hours of time every month, I hope it will give you similar benefits too.

About the author
Hey, I’m Mark, and I run Excel Off The Grid.
My parents tell me that at the age of 7 I declared I was going to become a qualified accountant. I was either psychic or had no imagination, as that is exactly what happened. However, it wasn’t until I was 35 that my journey really began.
In 2015, I started a new job, for which I was regularly working after 10pm. As a result, I rarely saw my children during the week. So, I started searching for the secrets to automating Excel. I discovered that by building a small number of simple tools, I could combine them together in different ways to automate nearly all my regular tasks. This meant I could work less hours (and I got pay raises!). Today, I teach these techniques to other professionals in our training program so they too can spend less time at work (and more time with their children and doing the things they love).
Do you need help adapting this post to your needs?
I’m guessing the examples in this post don’t exactly match your situation. We all use Excel differently, so it’s impossible to write a post that will meet everybody’s needs. By taking the time to understand the techniques and principles in this post (and elsewhere on this site), you should be able to adapt it to your needs.
But, if you’re still struggling you should:
- Read other blogs, or watch YouTube videos on the same topic. You will benefit much more by discovering your own solutions.
- Ask the ‘Excel Ninja’ in your office. It’s amazing what things other people know.
- Ask a question in a forum like Mr Excel, or the Microsoft Answers Community. Remember, the people on these forums are generally giving their time for free. So take care to craft your question, make sure it’s clear and concise. List all the things you’ve tried, and provide screenshots, code segments and example workbooks.
- Use Excel Rescue, who are my consultancy partner. They help by providing solutions to smaller Excel problems.
What next?
Don’t go yet, there is plenty more to learn on Excel Off The Grid. Check out the latest posts:
Project management templates are an essential ingredient in replicating successful projects. With Microsoft Excel’s free templates, you can turn your simple spreadsheets into powerful project management tools.
In this article, you’ll find some of the most useful and free Microsoft Excel project management and project tracking templates you’ll want to use for your next project.
Microsoft Excel Project Timeline Templates
Let’s have a look at the best Microsoft Excel project management templates.
Note: We cover both native and third-party templates here. To find the pre-installed Excel spreadsheet templates, open Excel and search for the respective keyword from the New document screen.
If you’re already in Excel, go to File > New to bring up the template search. Check the Managing Microsoft Excel Templates section below for more details. Excel comes with several timelines and Gantt chart templates provided by Microsoft, but it also integrates templates from Vertex42, one of the most popular third-party resources for spreadsheets.
1. Work Plan Timeline
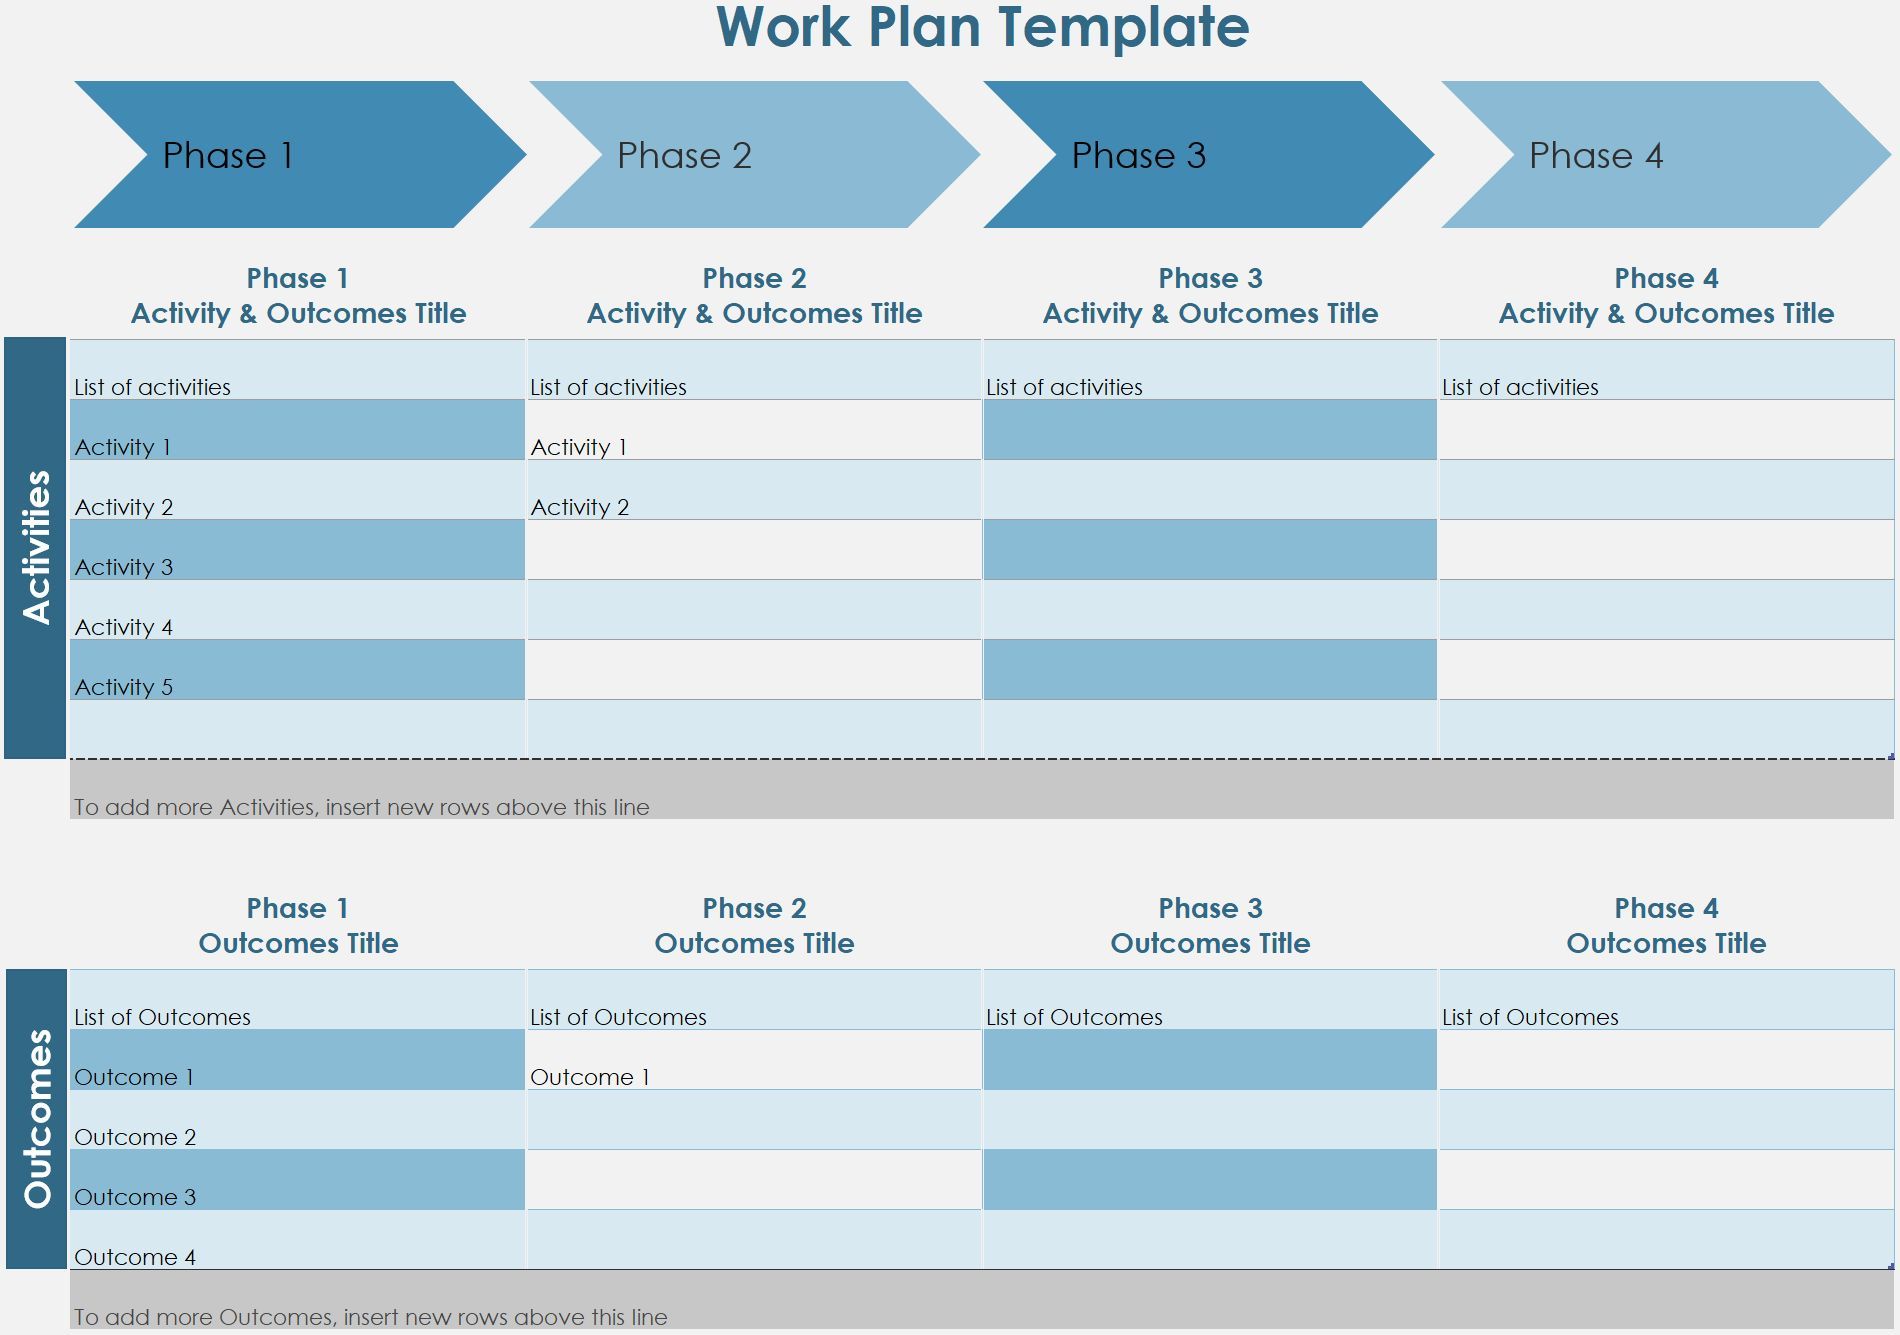
The Work Plan Timeline template is suitable for a basic project with multiple phases. When you enter your data into the worksheet, the roadmap will update automatically. This template comes pre-installed with Microsoft Excel 2016 and up.
2. Date Tracking Gantt Chart
![]()
Gantt charts are a staple in every project manager’s toolset. They help you visualize the flow of your tasks and track progress.
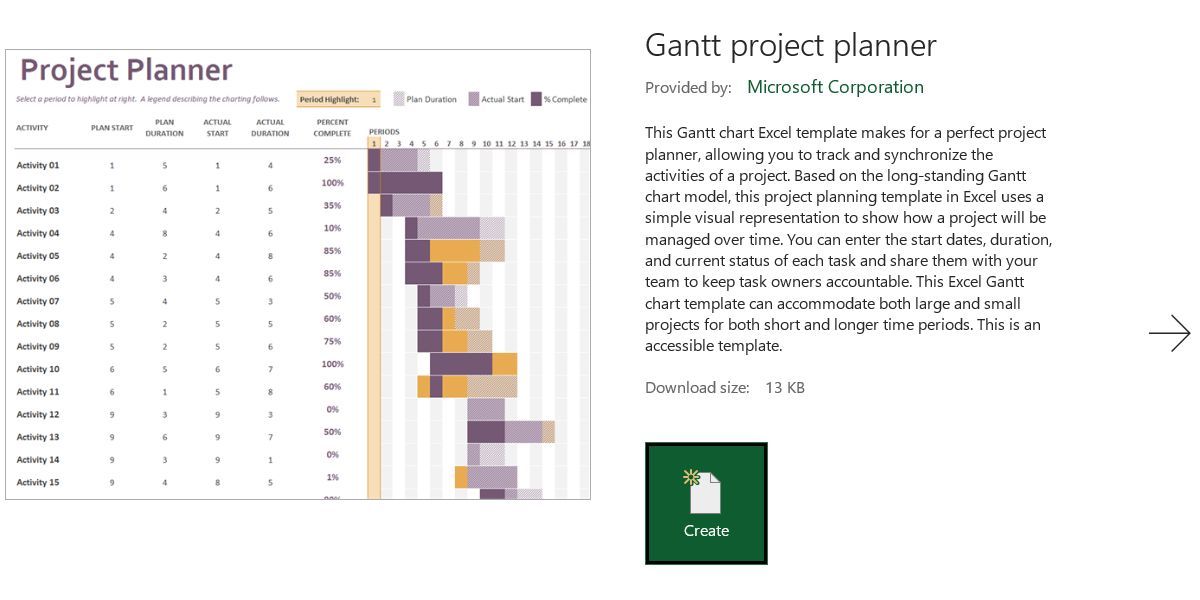
With this template, you can create a comprehensive Gantt chart with minimal effort. Just enter each task, complete with a description, who it’s assigned to, a percentage to indicate progress, a start date, and allocated days until completion. This template is a Microsoft Excel default.
3. Milestone and Task Project Timeline
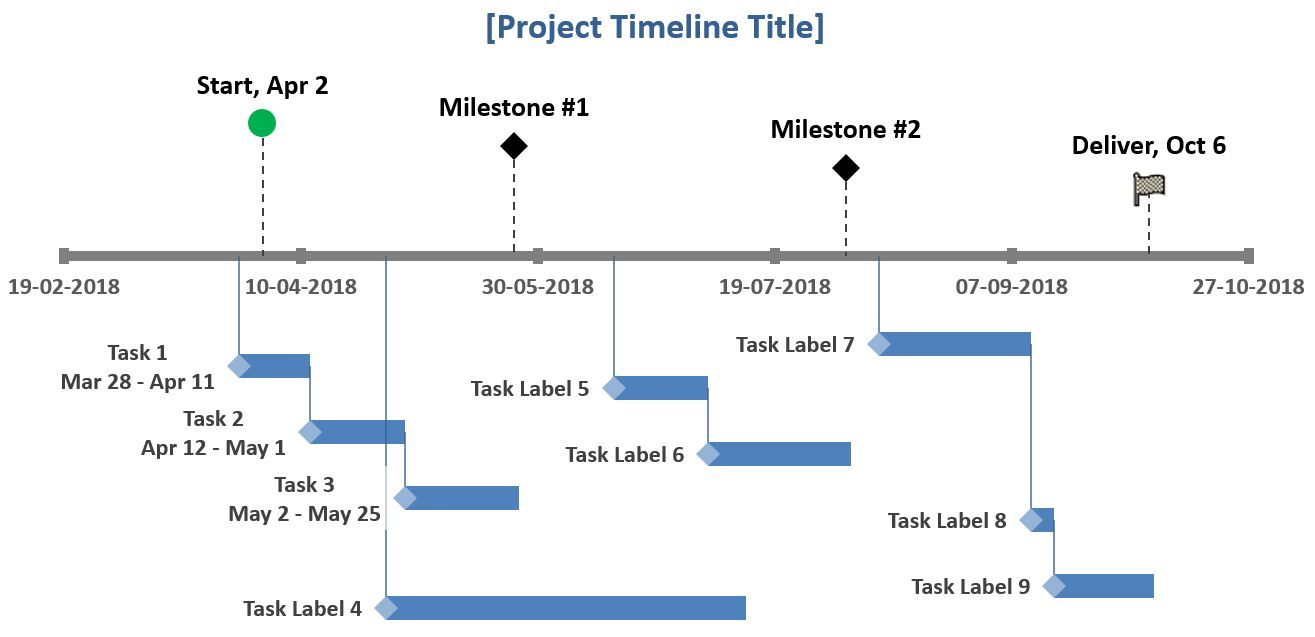
If you want to integrate milestones into a basic timeline, this template provided by Vertex42 is ideal. It combines the best elements of a Gantt chart, i.e. the visualization of the task flow, with milestones hovering above the timeline.
Just fill in the respective tables to populate the visual. You can find this template by searching in Excel.
Excel Project Plan Templates
A project plan is a document that may require Excel charts, but is otherwise composed in Microsoft Word. For basic projects, however, you may get away with only a Microsoft Excel document.
4. Simple Gantt Chart
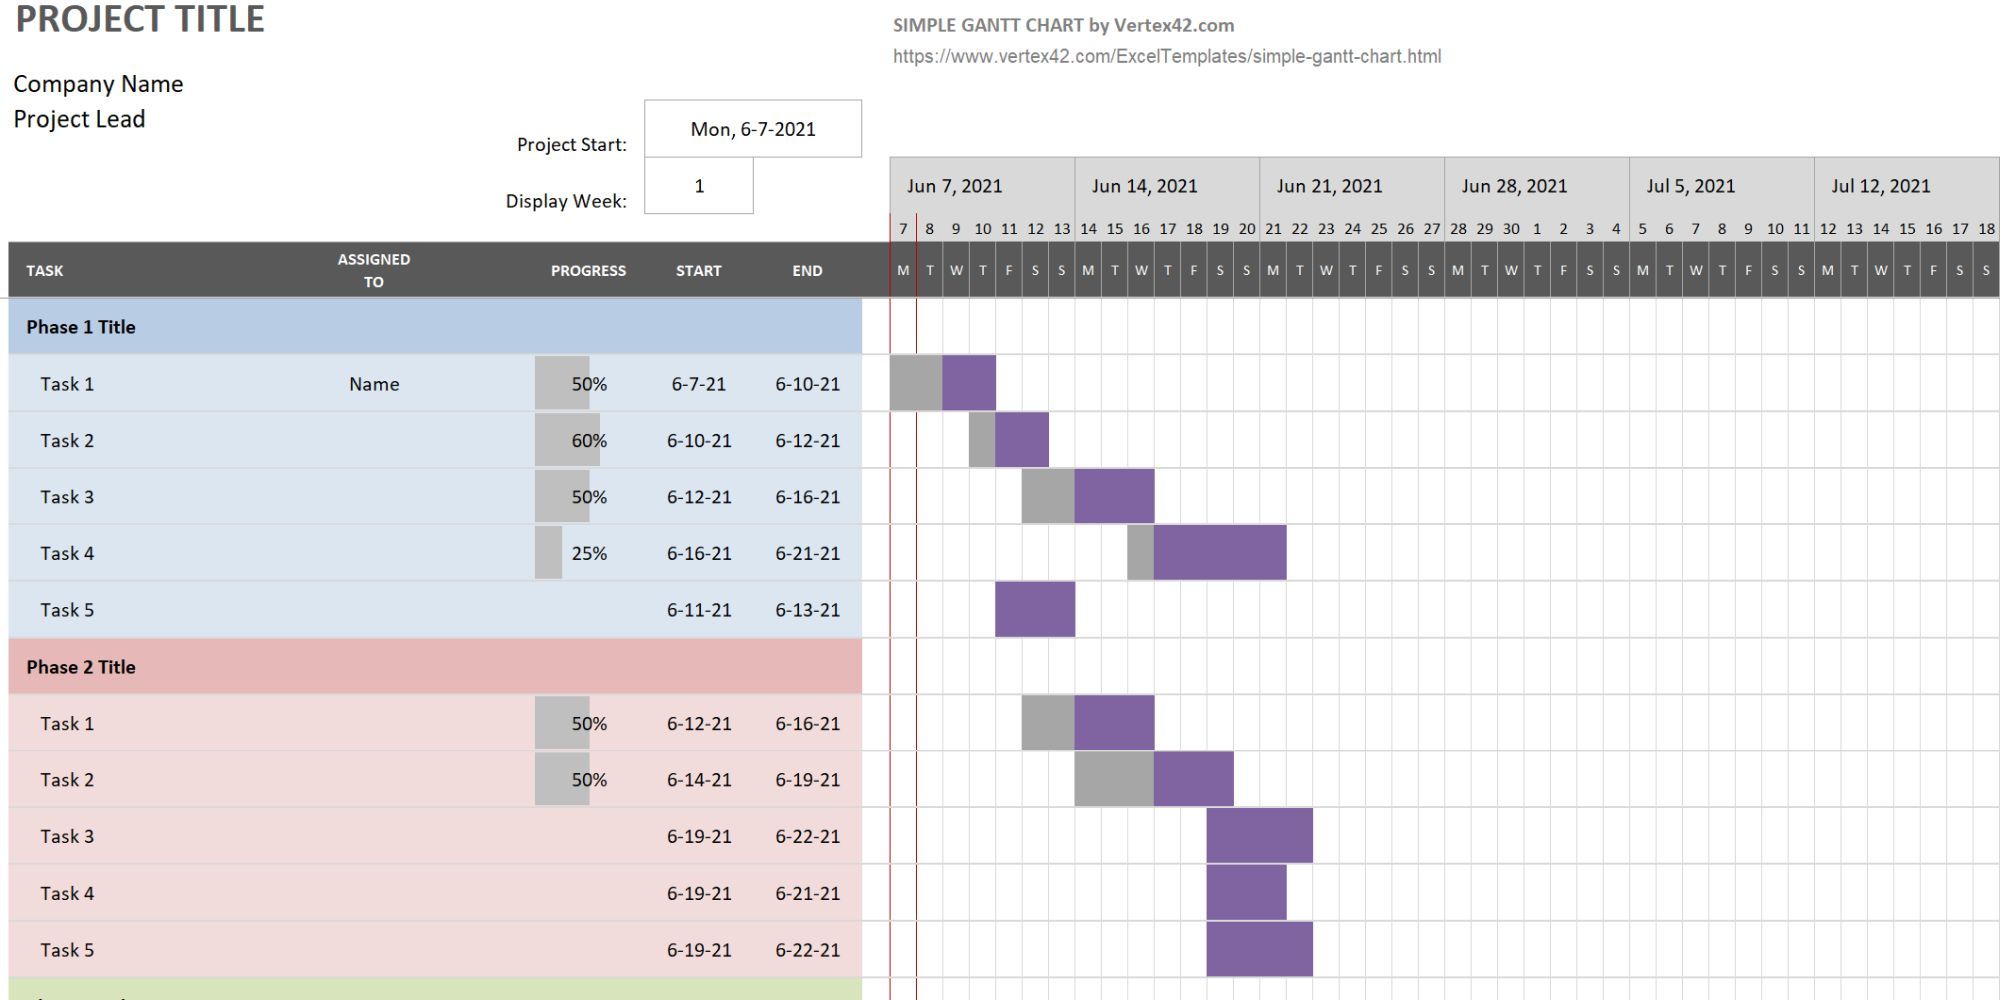
When you search Excel’s template repository for project plan templates, you’ll mainly find different Gantt chart variations, including this Simple Gantt Chart from Vertex42. What sets it apart from the Gantt chart above is the inclusion of project phases. This template is included in Microsoft Excel.
5. Event Planner Template
A project plan really isn’t something you typically put together in Excel. However, if you are planning a small project, like a party, you just need a one-page template that lists the essential tasks and lets you define a schedule and a budget. This template from Office Templates Online is a great start.
Excel Project Tracker Template
A search for a tracker will bring up a wild mix of personal and business-related Excel spreadsheet templates for tracking. However, you can narrow down your search by selecting the categories that relate to the project management task you’re dealing with.
6. Activity-Based Cost Tracker
![]()
This tracking template can help you get an overview of direct, indirect, and general and administrative product costs.
7. Project Tracking Template
![]()
This Vertex42 template is essential if you are handling multiple different clients, projects, and/or deliverables. It combines project details, expenses, task statuses, and due dates.
Business Plan Templates
Microsoft Excel 2016 had its own category for business plans. You could search for business and select the Business Plans category on the right. In Excel 2019 and onwards, you can perform either query, but the latter misses some templates, while the former might be overwhelming. We recommend looking into the following.
Business Plan Checklist

Creating a business plan can be a complex project in and of itself. This checklist will help you cover all your bases by guiding you through the process using a SWOT (strengths, weaknesses, opportunities, threats) analysis. Note that you’ll find two similar templates in Excel, but they’re both identical SWOT analyses checklists, differing only in their formatting.
Startup Expenses
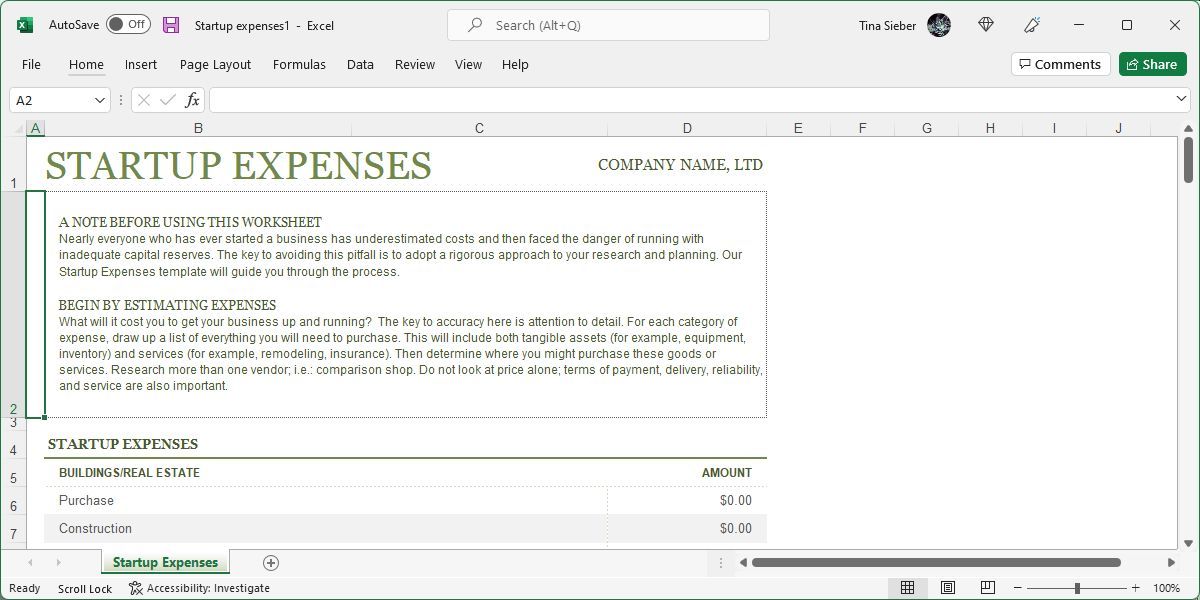
This template is a great starting point for a budding business owner who needs some help with projecting the costs of their endeavor. The template will guide you through the most common assets and services your new business might require.
Once you’ve filled in all the potential expenses, you’ll have a much better idea of how much funding you’ll need to raise to get your business up and running. For more business plan templates, have a look at our dedicated article.
Search for Online Templates
Couldn’t find the exact project management template you need inside Excel? Turn to a third-party online resource for a wider selection of Excel spreadsheet templates. We recommend the following sites.
Vertex42

This website has a few great project management templates for Microsoft Office 2003 and up. The site notes that its templates are mostly related to project scheduling. Anything more complicated might require Microsoft Project or other project management software.
On the page dedicated to project management, you’ll find a list of useful material, including, but not limited to, the following:
- Timeline
- Project Budgeting
- Critical Path Method
Each page contains a quick rundown of what the template does, one or more templates, and further tips and tricks for the respective project management tool. It’s a great resource for budding project managers.
TidyForm
![]()
TidyForm has a respectable selection of Microsoft Excel project management templates. The most popular categories are listed on the homepage. If you can’t immediately spot what you need, switch to the Business section or try the search feature.
When you scroll to the bottom of a section, you’ll see a list of popular categories and related categories. This can be helpful when trying to find just the right template.
We recommend the following pages:
- Project Budget
- Project Proposal
- Work Breakdown Structure
Still looking for the perfect template? You might have to create custom Excel templates to get exactly what you want.
Managing Microsoft Excel Templates
First, let’s see what templates you already have installed in Microsoft Excel. For the purpose of this demonstration, we’ve used Excel 2019, but the procedure is similar in Microsoft Office 2013 and Office 2016.
Defaults
When you start up Microsoft Excel, the first window you see will contain a search field for online templates. When you’re starting from an existing workbook, go to File > New to arrive at the same view.
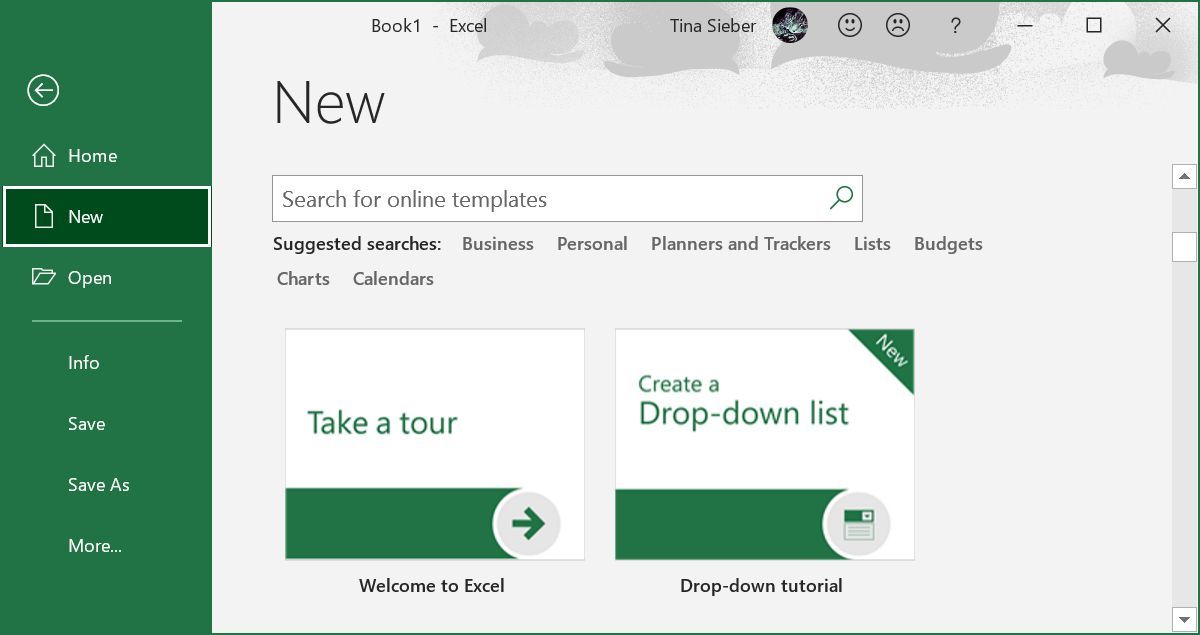
Microsoft Excel comes with a selection of pre-installed templates. They are listed underneath the search field. You can pin favorite ones by clicking the respective symbol in the bottom right of the listing.

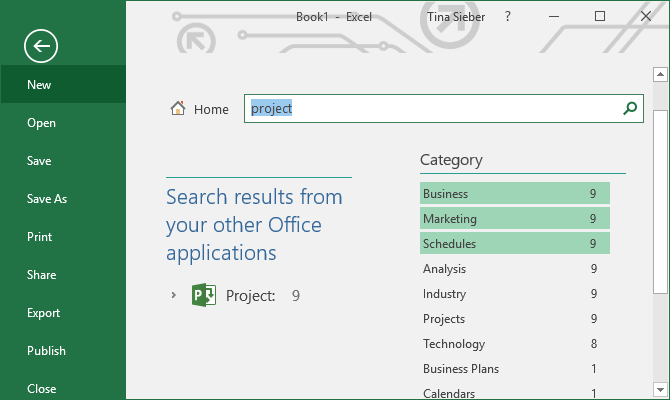
Search Online for More Project Templates (Excel 2016)
Searching for the type of template you need is the fastest way to locate it. For example, if you search for the term «project,» you may also see template categories listed next to the templates that match your search. The category feature no longer appears in Excel 2019.

Narrow Down Your Search (Excel 2016)
A neat feature is that you can narrow down your search by selecting multiple categories. This helps you exclude templates that may match your keyword, but not your desired category. On the downside, you may find that the perfect template is not available in Microsoft Excel.
Preview & Create Your Template
When you click a template, you’ll see a preview with a brief description of what the template provides. You can also pin the template from its preview; the symbol sits in the top right.
To download and use a template, click the Create button, which will open a new Microsoft Excel workbook with the template pre-filled.
Template Ready, Set, Go
Now that you have all the project management templates you could ever need, maybe you’re interested in additional tools, tips, and tricks. For example, did you know that you could integrate OneNote with Outlook for project management? The possibilities are endless.
Consulting assingments typically come with myriad view points and tonnes of information. It becomes critical to sift through the entire information to get a clear overview of the problem at hand. Sadly, nobody has the casestudy written. Everyone has their own share of information /data/documents.
Recently we had a client sharing with us an elaborate list of documents as part of one consulting engagements. There were more than a hundred documents (excels, ppts, docs and loads of zipfiles as well) and we had to go through the same along with meetings and conf. calls. During this I have realized that excel can help greatly in processing these documents in an organized way and help in gathering views from multiple parties.
So this post explains how it can be done. [Download the excel Document Management Using Excel]
- First I got a list of all the document names in the target directory in a textfile. To get it; go to CMD window (start->run->cmd) and then go to the target directory (cd [target directory path]) and then finally type (DIR /B/S > filenames.txt). You will have all the file names piped in to that folder.
- Then I copied the contents of that text file to an excel sheet.

- Then I created an user defined formula for reversing the contents of a cell. (read How to reverse cell contents)
- Then, I have added Doctype, Location, Comments? and Reversed columns to the sheet next to filenames column.
- In «Reversed» column (Column G), I have typed the following formula,
- Now I need to know the type of document each line is having. This can be dervied the from the extension of the file (or lack of it would mean a dirctory). Extension of the file is the substring after the last «.» in the filename. How do we know where is the last dot? Well, we dont, but we do know where the first dot is in the reversed string [or anystring, just write, find(«.»,»somestrng.stritir.fdkfjsdk») and it will return the first dot location]. So, the document type formula is,
=IF(ISERROR(FIND(«.»,RIGHT(B2,8))), «Directory», RIGHT(B2,FIND(«.»,G2)-1))
Remember, column G has the reversed Strings. - Next is the Location of the document, The formula for this would be,
=IF(C2=»Directory»,B2,LEFT(B2,LEN(B2)-FIND(«»,G2)))
«Column-C» has the document type. - Once this is done you will have a structure like this,
- Now share the excel sheet with others [Tools -> Share Workbook …] and let everyone add their comments on each file. Managing the collective understanding of the documents is easy now.


Type: Document Managment, Data Analytics, Macro, String Functions
Applicability: In Consulting engagements, Better management of time, effort and knowledge.
Excel Knowledge Required: Medium
Ease of Implementation: Medium

Search document tracker in the excel format here to save time. Gantt chart template and issue log excel templates are also listed here. Check out more issue, expense budget tracking template for documentation properly. Documentation is a prime part of the business as most operations of the business are dependent on the documents.
Multiple project tracking templates is very useful for creating documentation and instant reporting anytime. In 3rd stage of project planning, you must track document. In this case if you don’t have any tool/template then you are wasting your time. You have to purchase tracking templates and start project tracking right away.
Without document tracker, you can’t keep project at right rack. We design some useful Template suit in starting phase to closure stage.
Download Template: Project management Documents Template
- Use in Project Tracking & Monitoring Phase of project life-cycle
- According to PMP and PMBOK guide
- Documentation tracker required change request form, so download also
- Request ProjecTime.Net for access download this template
- Task management tracking easy
- Templates includes (project Charter, Project Status Report, Project portfolio Dashboard, project Costing Tracker)
Before initiation of any business on small or large scale registration process is required and these registered documents are helpful from keeping the business away from any legal trouble. Excel124 will guide you about how to use this template effectively.
Owners of the business and professional people are especially focused on preparing documents to keep effective business relationships among two parties so that they can come into contact again for some other proposal of the business.
Document Tracker Excel Template are also formulated among tenants and house owners when a property is given by the landlord to another party on rent or lease for the residential or commercial use.

![]()
Format of Document Tracker Excel
Different types of documents tracking sheets are formulated like project timeline, to do list, project tracker template, and project risk.
- Usually, the purpose of the sheet and date of creation is mentioned on the top of the sheet.
- Documents types are listed in the columns like sent, received, prepared, altered and bought documents.
- Author of the document and the remarks column is added to show more details related to the document.
Budget Tracker Template Excel
Budgets are set for successful operations of the project and to keep an effective focus on each of the stages of the process. It is also set to show the profit earning the potential of the project, therefore, keeping the project according to the budget is an attribute of skilled project manager.
Budget document tracking is very important in must include template in bundle template. We design change management also, so you can easily change budget during any phase of project life-cycle.
Download Template: EVM Template
Issue Tracker Template Excel
Observing the issue face by workers in any particular stage of the projector as a whole is require to find a solution for them.
Another must include template, part of risk management process. We also have Professional PPT slides for presenting projects to stakeholder, investors and others.
Issues tracking can be time-consuming for the business and increasing the expense at the same time therefore, issue-tracking templates are adopted by most businesses.
Customise Tracking of Document Using Risk Management
Multiple tracking templates helps project managers relates to document tracking because the projects have risks involve in it. Therefore, it is mandatory to maintain the record of tracking the risks that are involved in each document to manage or complete it effectively.

An efficient project manager must have to deal with the risks carefully. Therefore, it is mandatory for the project managers to keep track of the risks that are involve in the Document Tracker Excel Template.
- Simple negligence may turn your project out of your budget and may face failure in future terms.
- Therefore, you need a considerable and useful template to systematically track your risks, manage, and control them effectively by using this tracker.
Each undertaking has a hazard. In case you are do not think in this way, at that point you are tricking yourself and are in for terrible amazement. Some document tracker template is ready for professional use.
Planning and Management Avoids Wrong Document Tracking
The sharp task director will comprehend that while chance is unavoidable, the capacity to figure it and set up a technique to adjust whatever wrongs may happen amid the undertaking is a piece of what making arrangements for a venture are.
In any case, it is insufficient to just do the due persistence and set you up. Must set up to manage that hazard, whatever it might be, the point at which it happens.
![]()
One thing that is pivotal is to have an instrument set up to track hazard all through your undertaking’s life cycle. On the off chance that you at first do not recognise it, that is an issue, yet once you see it, on the off chance that you do not track it, well, that is a disaster.
Execution of Documentation According to Project Management Template
In this way, you have to deliberately track and assess the execution of the moves you make to alleviate hazard against built-up measurements all through the procurement procedure while creating different alternatives.
- Project Document Tracker Excel (See Template)
This is the place a hazard following format proves to be useful. It gives all of you the spots to gather the required information to take after that hazard and perceive how your activities to cure it are working.
Ask more about Document Tracker Excel
Multiple templates are suing in tracking multiple documents. First, understand what type of documentation you want to track? Mostly project manager using a tracking tool for judging the credibility, copyright protected, and other variance in the documentation. We recently upload post related to project timeline template, you must review for tracking project through timeline.
Questions And Answers (FAQS)
Following are some questions and their answers according to template document tracker.
Is Document Tracker available in GOOGLE Sheet (Spreadsheet?
Yes, template is available on demand, you can get particular template through EMAIL or VIA COMMENT US about particular template requirement in spreadsheet.
In which Format we can download this Document Tracker Excel Template (WORD, EXCEL, PDF)?
In that case, you must download our premium template (ADVANCE project Portfolio Manager) you can get project report in PDF, Excel and Word format.
Can I Tracking Multiple Project in One template?
Yes, through our project portfolio you can manage multiple project under one umbrella.