
 This tutorial shows how to use the Editor in Word for Microsoft 365. The Editor is an update to the spelling and grammar check available in older versions of Word.
If you are using an older version of Word that doesn’t have an Editor button, please see my other tutorial “How to Use the Spelling and Grammar Check in Microsoft Word.”
This tutorial covers five topics:
- How to Select Grammar Issues and Refinements
- How to Run the Editor
- How to Review the Suggested Edits
- How to Finish the Edit
- How to Run a Fresh Edit
Attention Mac Users: The Editor is available in Word for Microsoft 365 for Mac. The basic steps are similar to those shown here. However, the process of selecting grammar issues and refinements is different, so we will cover the Editor in Word for Mac in a separate tutorial.
This tutorial is also available as a YouTube video showing all the steps in real time.
Watch more than 150 other writing-related software tutorials on my YouTube channel.
Are you looking for information about editing in Word with Track Changes instead of using the Editor? If so, visit “How to Use Track Changes in Microsoft Word” for a step-by-step tutorial covering ten editing tasks.
How to Select Grammar Issues and Refinements
The Editor can check for over 150 grammar issues and refinements beyond spelling, including the following:
- hyphenation
- passive voice
- Oxford comma
- clichés
All the grammar and refinement options are available in the Word Options dialog box. You should select from these options before running the Editor.
- Select the File tab in the ribbon.

- Select the Options tab in the Backstage view.

- Select the Proofing tab in the Word Options dialog box.

- Review the spelling and grammar options that affect how the Editor interacts with your document:
A. Ensure that Check spelling as you type and Mark grammar errors as you type are selected if you want issues to be marked in the text as you type.
B. Ensure that Check grammar and refinements in the Editor Pane is selected to include grammar and refinements.
C. (Optional) Ensure that Show readability statistics is selected to show your readability statistics after running the Editor.
D. Ensure that Hide spelling errors in this document only and Hide grammar errors in this document only are not selected.

Pro Tip: Always run the Editor, even if you have spelling and grammar issues marked as you type, because you may not notice all the in-text edits. Plus, the Editor seems to be more thorough than the check provided as you type.
- Select Grammar & Refinements or Grammar in the Writing Style menu. (Most users will want to choose Grammar & Refinements because it offers more options.)

- Select the Settings button.

- Select or deselect options from the Grammar Settings dialog box.

Defining each grammar option is beyond the scope of this tutorial. However, the Microsoft Office Support website provides a detailed explanation for many of the options sorted by language.
- Select the OK button to close the Grammar Settings dialog box.

- Select the OK button to close the Word Options dialog box.

Now that you have decided how you want Word to proof your document, you can run the Editor.
- Select the Home tab in the ribbon.

- Select the Editor button. (The Editor button is also available in the Proofing group on the left end of the Review tab.)

The Editor Pane will appear on the right side of your screen.
How to Review the Suggested Edits
- Review your Editor Score. This score will change based on choices you make within the Editor Pane. Therefore, you may choose to disregard this number while working with the Editor.

- (Optional) Select a level of formality from the drop-down menu.
- Formal—The Editor will apply all the grammar and refinement rules, resulting in the most recommendations.
- Professional—The Editor will apply most of the grammar and refinement rules, resulting in fewer recommendations than the Formal option.
- Casual—The Editor will apply the fewest number of grammar and refinement rules, resulting in the fewest recommendations.
Your Editor Score will change based on your choice of formality.

Pro Tip: Use the Formal writing option for the strictest edit even on less formal writing because you can always ignore suggestions—but you can’t ignore suggestions you never see.
- Select the Editor Score (see figure 12) to review each of the recommendations starting from the current placement of your cursor. Or, skip to step 4 to review by category.
- Select the Corrections or Refinements category you want to review. The available categories will depend on your selections in the Grammar Settings dialog box (see figure 7).
Categories with a checkmark don’t have any suggestions.

Spelling
- Choose a suggestion to change the individual spelling error.

Or, open the drop-down menu for the suggestion and select Change All to change every instance of the spelling error.
You can also choose (a) Ignore Once to ignore that spelling one time, (b) Ignore All to ignore that spelling every time it appears in the document, or (c) Add to Dictionary to add the word with its current spelling to your custom dictionary.

If the Editor is unable to provide any spelling suggestions, it will still let you add the word to your custom dictionary, ignore the word once, or ignore all instances of the word.
After you select or ignore a suggestion, the Editor will automatically move to the next issue in that category or return you to the main view to chose a new category.
Grammar and Refinement Issues
- Review each grammar or refinement issue. In some cases, the Editor will suggest a way to rewrite the text.
Or, select (a) Ignore Once to ignore that instance of the issue or (b) Don’t check for this issue to stop checking for that type of issue in the rest of the document.

Open the drop-down menu above the text box if you want additional information about the issue.

Pro Tip: The navigation arrows on the right side of the pane let you move forward and backward to issues you have not yet addressed. The arrow on the left side will return you to the Editor’s main view.

The Editor Pane also provides options to search the web for similar text and give feedback to Microsoft about the Editor.

How to Finish the Edit
If you included readability statistics in your proofing options in the Word Options dialog box (see figure 4), the Readability Statistics dialog box will appear after you have accepted or ignored all the Editor’s suggestions.
- Select the OK button to close the Readability Statistics dialog box.

- Select the OK button in the dialog box stating that you have finished reviewing the Editor’s suggestions.

How to Run a Fresh Edit
If you have updated your text since running the Editor, you may want to run a fresh check.
- Select the File tab in the ribbon (see figure 1).
- Select the Options tab in the Backstage view (see figure 2).
- Select the Proofing tab in the Word Options dialog box (see figure 3).
- Select the Recheck Document button.

- Select the Yes button in the dialog box stating that the new spelling and grammar check (Editor) will recheck issues that you ignored during the last check.

- Select the OK button to close the Word Options dialog box (see figure 9).
Follow the steps in the How to Run the Editor section above to recheck your document.
Important Note: Microsoft plans to continually add new features to Word for Microsoft 365. Therefore, your version of Word may have different features than those shown here.
Related Resources
How to Change the Proofing Language in Microsoft Word
How to Use the Clipboard in Microsoft Word
How to Edit Your Custom Dictionary in Microsoft Word
How to Create an Exclusion Dictionary in Microsoft Word
Updated September 25, 2022
Design and edit in Word
Use Styles
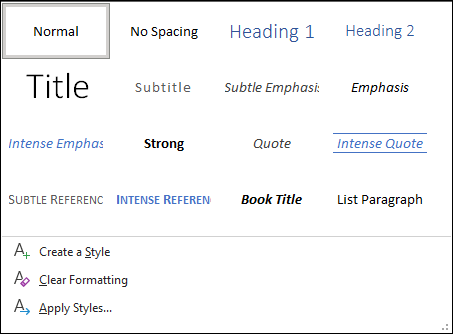
Styles templates apply a consistent font, font size, font color, and spacing to headings, paragraphs, and titling throughout your document.
-
Select the words, paragraph, list or table to edit.
-
On the Home tab, select a style.
If you don’t see the style you want, click the More button
 to expand the gallery.
 to expand the gallery.

Apply Themes
Themes add a professional look to your document.
-
Select Design > Themes.
-
Point to a theme to preview how it will look.
-
Select the theme you want.

Check spelling and grammar
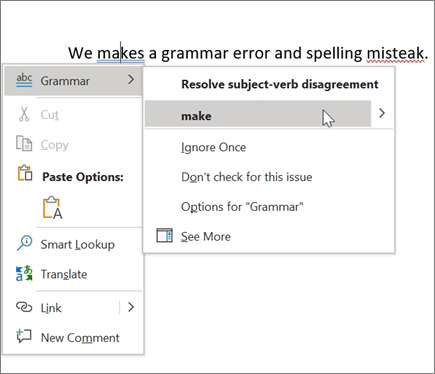
Word marks misspelled words with a red squiggly underline and grammar mistakes with a blue double underline.
-
Right-click the word.
-
Select a correction, or select Ignore.
Note: Spelling and grammar check work a little differently in newer versions of Word and Microsoft 365. For more, see Editor — your writing assistant.
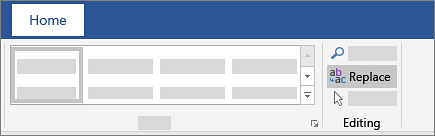
Find and replace text
-
Select Home > Replace.
-
For Find what, enter a word or phrase to search. For Replace with, enter the new text.
-
Select Find next, and then select:
-
Replace to replace the first instance, or
-
Replace all to replace all instances.
-
Next:
Collaborate in Word
Need more help?
Want more options?
Explore subscription benefits, browse training courses, learn how to secure your device, and more.
Communities help you ask and answer questions, give feedback, and hear from experts with rich knowledge.

Everyone could use a little help writing. With Microsoft Editor in Word, you can improve your skills and your document at the same time.
Not long ago, we explained what Microsoft Editor is and what it can do for you. Here, we’ll go into more detail on the features of the tool in Microsoft Word. With helpful suggestions and tips, you can use these to enhance your writing and improve your document.
Currently, Microsoft Editor offers a few extra features in Word for the web than in the desktop version of Word. So we’ll walk through using the tool there first.
Visit the Word website, sign in, and open your document. Head to the Home tab and click the Editor button in the toolbar. You’ll immediately see the Editor sidebar open with everything you need to improve your document.

Editor Score
The first thing you’ll see in the sidebar is your Editor Score. The tool calculates this score “based on the number and type of suggestions to be reviewed and the document length”. Obviously, the higher your score, the better.

Writing Style
Next, you can select the style of writing you’re using for the document. Choose from Formal, Professional, or Casual in the drop-down list. Keep in mind that the more formal your document is, the more stringent the refinements will be.

Corrections and Refinements
The following two sections for Corrections and Refinements are what you want to review. If you see a checkmark next to a category like spelling, clarity, or conciseness, that means you’ve done well! If you see a number, click to review the issues that were found.

In our example, we see Formality has the number 4, so we click to see each problem in our writing. You’ll see a small pop-up explaining the issue and providing a suggestion. Click to use the suggestion or choose to Ignore instead.

You can also click the light bulb icon to see a helpful tip for that particular item.

When you finish handling the item found, click the arrow at the bottom of the pop-up to go to the next one in the list. After you address each issue, you should see the number decrease in the sidebar and your score increase at the top!

Web Similarity
The Similarity checker is a helpful tool to see if any online writings closely resemble yours. With many locations, such as schools and publications, checking for plagiarism, this is a handy check to use.
If a similarity is found, you’ll see a pop-up corresponding to that source in your content. You can then visit the website, add an in-text citation, or copy the full citation and paste it yourself.

Text Predictions
To help speed up your writing, you can enable Text Predictions. With it, Word will anticipate your next words as you type.

Document Insights
When you need document statistics such as word count, time to read, and readability, click to see the Document stats box.

Microsoft Editor in Word on Your Desktop
With Word on your Windows desktop, you can take advantage of only a few of the same features as Word online. As of this writing, here’s what you’ll find and how to use the Microsoft Editor.
Go to the Home tab, click the Editor button in the toolbar, and the Editor sidebar will open. You’ll then see the Total Suggestions at the top with Corrections and Refinements beneath.
Like online, you want to see checkmarks next to the items, and if you see a number, that shows how many issues were found. Click that number and the sidebar will transform into an informative area.

You’ll see an explanation of the problem that you can expand for further details. You’ll also receive suggestions that you can click to use. If you’re unsure, click the arrow next to a suggestion to hear it read aloud or spelled out for you.

After you take care of refinements, the sidebar will show you the next one. You can also manually move through them using the arrows on the top right of the sidebar.

You also have the option to adjust the settings for Microsoft Editor in Word on your desktop. Click Settings at the bottom of the sidebar. This opens the Word Options window right to the Proofing settings you can adjust.

Will You Use Microsoft Editor in Word?
As you use Microsoft Editor for your Word documents, you’ll likely pay more attention to the items that the tool finds every time. And hopefully, with each use, it will find fewer issues. This can not only help you improve your writing skills but provide better final documents.
If you also use Google Docs, take a look at how to enhance your writing skills with the Explore feature.
![]()

Introduction to Microsoft Word Editing Tools
The Microsoft word editing tools are defined as the editing toolbar, in which the content can be added or edited by using the toolbar, and it allows to access the toolbar that adds the functionality of it in their content, it provides access to the commonly used functionalities in word processing application and powerful documentation software, where making changes like editing, formatting, inserting or deleting text, copying or moving text, replacing text, resizing the window, linking with other web pages, creating a new document, etc, operations can performed and by moving the mouse over icons it will show a description about its functionality.
Tools for Microsoft Word Editing
Microsoft word provides commonly used functionalities that are given below:
1. Format text
The Formatted text has commands to perform formatting tasks which are found on the home tab in the font group. When we want to format the text then first we have to select the text which we want to format, if want to format a single word then double click on it, we can also select a line of text, and then select an option to change the font, font size and we can make the text bold or italic or underline. In formatting text, head style, can make words bold text or italic text, also can underline the text, highlight the text, can make an unordered list and ordered list, we can change alignment as left or right or at the center.
2. Insert hyperlink(link)
The hyperlink in a document has a different color than other texts and it is underlined. A hyperlink in a document helps the reader to jump from one place in the document to a different file or website or go to the new emails.
We can add or delete hyperlinks in the word document. If we want to add a link in the document, first we have to select text or image which want to link, then right-click on the selected text or image choose the ‘Hyperlink’ option, link or hyperlink is depend on the version, after that, we have to select the type of destination which we want to link, it has some information that has to fill correctly, choose an option ‘Existing file or Web page’, go to the ‘Address’ text box then enter URL, then choose ‘Place in this document and select a location within the document, so now click on ‘Create new document’ go to the text box ‘Name of the document’ and enter the name, there is an edit section in which we can choose whether we want to edit the document now or later.
Then choose ‘Email address’ and click on the text box of ‘Email address’ then we can enter the email address to which the reader can send an email. There is also a ‘Type of subject’ option we can subject type and then click on ‘Ok’. The text now shows up as a hyperlink in the document.
3. Edit and Remove links
For editing the link first select the link which we want to edit and then select the Insert/edit link option, update the web address and then click on the ‘Create link’. We can remove or delete the existing hyperlink, for deleting the hyperlink right-click on it and click on the ‘Remove hyperlink’.
4. Copy and paste from word
The copy and paste function from the word we can use to remove the hidden Microsoft characters which may affect how our document will appear. To select and copy the word content, click on the ‘Paste’ special function button, select or tick on the bullet ‘Paste from Microsoft word’ then paste our word text in the text box and then click on ‘Complete paste’.
5. Add a table
A table is a combination of rows and columns and the intersection of rows and columns is called a cell. To create or insert a table in the document click on the ‘Insert’ tab which is on the ribbon then click on ‘Table’, the insert table window will be opened, we have to select the size of the table in columns and rows, and then click on ‘Ok’. When the table is created the ‘Tab’ key can be used to move from one cell to the other, by pressing the tab key new row is created, if we want to move one cell back in the table then we can ‘Shift+Tab’ keys, the arrow keys allow we to go up, down, left, right.
6. Edit a table
Microsoft word editing tools allow us to edit a table, if we want to edit a table then first we have to select a cell in which we want to edit then click on the table icon it will give some options out of them select ‘Edit table’ so that we can change the general setting of the table. While editing if we want to add a new row then click on the insert below or insert above, for adding the column click on the insert left or insert the right column button. We can also delete columns or rows from the table.
7. Html editor
We can also edit our text by using Html editor, this function is also provided by Microsoft word editing tools. To get the Html view and to edit text, click on the ‘File’ tab then click on ‘Open’, then we can browse the web page file, double click on the file name, our web file opens as a plain text file which has Html code.
8. Resize the edit window
We can also resize the edit window, it has resized button. By clicking on the resize button we will get the full-screen view of the edit window, to return its normal view, click on the same button.
Conclusion
In this article, we conclude that Microsoft Word is a powerful word processing application that has wonderful tools to get reader’s attention, also it has various features where we can do formatting, editing, searching, insertion of images as per the user’s requirement, which keeps track of our various commands that we use to create the document.
Recommended Articles
This is a guide to Microsoft Word Editing Tools. Here we discuss the various tools for editing in Microsoft word in a detailed explanation. You may also have a look at the following articles to learn more –
- Video Editing Tools
- Microsoft Word Shortcut Keys
- Microsoft Word Features
- VMware Tools
Edit Word and PDF documents online from any device
Online Document Editor
Open, create and edit documents online for free. The handy document editor can be a simple online alternative to Microsoft Word and OpenOffice.
This is an Easy to use, Fast and 100% Free solution to edit DOCX, ODT, RTF, PDF files. No registration, no ads, no watermarks, no need to download or install anything. Free convenient Document Editor works from any web browser.
Edit Documents Online for Free
Have you ever been in a situation where you need to work on a document but don’t have a full-featured editor at hand? This may be the case when your colleague emailed you a file and you need to quickly edit it and send back.
Use this online service to change documents on the go with your laptop, mobile phone, tablet, and anywhere you have an internet connection. After modifying a document, you can save it back to your device in a wide variety of file formats.
Edit Word, PDF, HTML, Markdown documents Online
Just upload a document file and start working with it like you would with a common office suite. The user-friendly Document Editor opens files quickly and provides standard text formatting features that you may need in your work. It also supports full-screen mode designed for distraction-free work.
Online Office Editor available around the clock and always at your fingertips. Our company develops modern document editing solutions for the digital office.