
Пример создания документа и заполнения листов:
import openpyxl
from openpyxl.writer.excel import save_workbook

columns = ['Name', 'Age', 'Course']
rows = [
    ['Vasya', '16', 1],
    ['Anya', '17', 2],
    ['Inna', '16', 1],
]

FILE_NAME = 'excel.xlsx'

try:
    wb = openpyxl.load_workbook(FILE_NAME)
except:
    wb = openpyxl.Workbook()

    # Удаление листа, создаваемого по умолчанию, при создании документа
    for sheet_name in wb.sheetnames:
        sheet = wb.get_sheet_by_name(sheet_name)
        wb.remove_sheet(sheet)

# Создание нового листа, названия новых листов будут автоматически инкрементироваться: Students, Students1, Students2, и т.п.
ws = wb.create_sheet('Students')

for i, value in enumerate(columns, 1):
    ws.cell(row=1, column=i).value = value

for i, row in enumerate(rows, 2):
    for j, value in enumerate(row, 1):
        ws.cell(row=i, column=j).value = value

save_workbook(wb, FILE_NAME)
После пары запусков:

Installation
Install openpyxl using pip. It is advisable to do this in a Python virtualenv
without system packages:
Note
There is support for the popular lxml library which will be used if it
is installed. This is particular useful when creating large files.
Warning
To be able to include images (jpeg, png, bmp,…) into an openpyxl file,
you will also need the “pillow” library that can be installed with:
or browse https://pypi.python.org/pypi/Pillow/, pick the latest version
and head to the bottom of the page for Windows binaries.
Working with a checkout
Sometimes you might want to work with the checkout of a particular version.
This may be the case if bugs have been fixed but a release has not yet been
made.
$ pip install -e hg+https://foss.heptapod.net/openpyxl/openpyxl/@3.1#egg=openpyxl
Create a workbook
There is no need to create a file on the filesystem to get started with openpyxl.
Just import the Workbook class and start work:
>>> from openpyxl import Workbook
>>> wb = Workbook()
A workbook is always created with at least one worksheet. You can get it by
using the Workbook.active property:
Note
This is set to 0 by default. Unless you modify its value, you will always
get the first worksheet by using this method.
You can create new worksheets using the Workbook.create_sheet() method:
>>> ws1 = wb.create_sheet("Mysheet") # insert at the end (default)
# or
>>> ws2 = wb.create_sheet("Mysheet", 0) # insert at first position
# or
>>> ws3 = wb.create_sheet("Mysheet", -1) # insert at the penultimate position
Sheets are given a name automatically when they are created.
They are numbered in sequence (Sheet, Sheet1, Sheet2, …).
You can change this name at any time with the Worksheet.title property:
Once you gave a worksheet a name, you can get it as a key of the workbook:
>>> ws3 = wb["New Title"]
You can review the names of all worksheets of the workbook with the
Workbook.sheetname attribute
>>> print(wb.sheetnames)
['Sheet2', 'New Title', 'Sheet1']
You can loop through worksheets
>>> for sheet in wb:
...     print(sheet.title)
You can create copies of worksheets within a single workbook:
Workbook.copy_worksheet() method:
>>> source = wb.active
>>> target = wb.copy_worksheet(source)
Note
Only cells (including values, styles, hyperlinks and comments) and
certain worksheet attributes (including dimensions, format and
properties) are copied. All other workbook / worksheet attributes
are not copied — e.g. Images, Charts.
You also cannot copy worksheets between workbooks. You cannot copy
a worksheet if the workbook is open in read-only or write-only
mode.
Playing with data
Accessing one cell
Now we know how to get a worksheet, we can start modifying cells content.
Cells can be accessed directly as keys of the worksheet:
This will return the cell at A4, or create one if it does not exist yet.
Values can be directly assigned:
There is also the Worksheet.cell() method.
This provides access to cells using row and column notation:
>>> d = ws.cell(row=4, column=2, value=10)
Note
When a worksheet is created in memory, it contains no cells. They are
created when first accessed.
Warning
Because of this feature, scrolling through cells instead of accessing them
directly will create them all in memory, even if you don’t assign them a value.
Something like
>>> for x in range(1,101):
...        for y in range(1,101):
...            ws.cell(row=x, column=y)
will create 100×100 cells in memory, for nothing.
Accessing many cells
Ranges of cells can be accessed using slicing:
>>> cell_range = ws['A1':'C2']
Ranges of rows or columns can be obtained similarly:
>>> colC = ws['C']
>>> col_range = ws['C:D']
>>> row10 = ws[10]
>>> row_range = ws[5:10]
You can also use the Worksheet.iter_rows() method:
>>> for row in ws.iter_rows(min_row=1, max_col=3, max_row=2):
...    for cell in row:
...        print(cell)
<Cell Sheet1.A1>
<Cell Sheet1.B1>
<Cell Sheet1.C1>
<Cell Sheet1.A2>
<Cell Sheet1.B2>
<Cell Sheet1.C2>
Likewise the Worksheet.iter_cols() method will return columns:
>>> for col in ws.iter_cols(min_row=1, max_col=3, max_row=2):
...     for cell in col:
...         print(cell)
<Cell Sheet1.A1>
<Cell Sheet1.A2>
<Cell Sheet1.B1>
<Cell Sheet1.B2>
<Cell Sheet1.C1>
<Cell Sheet1.C2>
Note
For performance reasons the Worksheet.iter_cols() method is not available in read-only mode.
If you need to iterate through all the rows or columns of a file, you can instead use the
Worksheet.rows property:
>>> ws = wb.active
>>> ws['C9'] = 'hello world'
>>> tuple(ws.rows)
((<Cell Sheet.A1>, <Cell Sheet.B1>, <Cell Sheet.C1>),
(<Cell Sheet.A2>, <Cell Sheet.B2>, <Cell Sheet.C2>),
(<Cell Sheet.A3>, <Cell Sheet.B3>, <Cell Sheet.C3>),
(<Cell Sheet.A4>, <Cell Sheet.B4>, <Cell Sheet.C4>),
(<Cell Sheet.A5>, <Cell Sheet.B5>, <Cell Sheet.C5>),
(<Cell Sheet.A6>, <Cell Sheet.B6>, <Cell Sheet.C6>),
(<Cell Sheet.A7>, <Cell Sheet.B7>, <Cell Sheet.C7>),
(<Cell Sheet.A8>, <Cell Sheet.B8>, <Cell Sheet.C8>),
(<Cell Sheet.A9>, <Cell Sheet.B9>, <Cell Sheet.C9>))
or the Worksheet.columns property:
>>> tuple(ws.columns)
((<Cell Sheet.A1>,
<Cell Sheet.A2>,
<Cell Sheet.A3>,
<Cell Sheet.A4>,
<Cell Sheet.A5>,
<Cell Sheet.A6>,
...
<Cell Sheet.B7>,
<Cell Sheet.B8>,
<Cell Sheet.B9>),
(<Cell Sheet.C1>,
<Cell Sheet.C2>,
<Cell Sheet.C3>,
<Cell Sheet.C4>,
<Cell Sheet.C5>,
<Cell Sheet.C6>,
<Cell Sheet.C7>,
<Cell Sheet.C8>,
<Cell Sheet.C9>))
Note
For performance reasons the Worksheet.columns property is not available in read-only mode.
Values only
If you just want the values from a worksheet you can use the Worksheet.values property.
This iterates over all the rows in a worksheet but returns just the cell values:
for row in ws.values:
   for value in row:
     print(value)
Both Worksheet.iter_rows() and Worksheet.iter_cols() can
take the values_only parameter to return just the cell’s value:
>>> for row in ws.iter_rows(min_row=1, max_col=3, max_row=2, values_only=True):
...   print(row)

(None, None, None)
(None, None, None)
Data storage
Once we have a Cell, we can assign it a value:
>>> c.value = 'hello, world'
>>> print(c.value)
'hello, world'

>>> d.value = 3.14
>>> print(d.value)
3.14
Saving to a file
The simplest and safest way to save a workbook is by using the
Workbook.save() method of the Workbook object:
>>> wb = Workbook()
>>> wb.save('balances.xlsx')
Warning
This operation will overwrite existing files without warning.
Note
The filename extension is not forced to be xlsx or xlsm, although you might have
some trouble opening it directly with another application if you don’t
use an official extension.
As OOXML files are basically ZIP files, you can also open it with your
favourite ZIP archive manager.
If required, you can specify the attribute wb.template=True, to save a workbook
as a template:
>>> wb = load_workbook('document.xlsx')
>>> wb.template = True
>>> wb.save('document_template.xltx')
Saving as a stream
If you want to save the file to a stream, e.g. when using a web application
such as Pyramid, Flask or Django then you can simply provide a
NamedTemporaryFile():
>>> from tempfile import NamedTemporaryFile
>>> from openpyxl import Workbook
>>> wb = Workbook()
>>> with NamedTemporaryFile() as tmp:
        wb.save(tmp.name)
        tmp.seek(0)
        stream = tmp.read()
Warning
You should monitor the data attributes and document extensions
for saving documents in the document templates and vice versa,
otherwise the result table engine can not open the document.
Note
The following will fail:
>>> wb = load_workbook('document.xlsx')
>>> # Need to save with the extension *.xlsx
>>> wb.save('new_document.xlsm')
>>> # MS Excel can't open the document
>>>
>>> # or
>>>
>>> # Need specify attribute keep_vba=True
>>> wb = load_workbook('document.xlsm')
>>> wb.save('new_document.xlsm')
>>> # MS Excel will not open the document
>>>
>>> # or
>>>
>>> wb = load_workbook('document.xltm', keep_vba=True)
>>> # If we need a template document, then we must specify extension as *.xltm.
>>> wb.save('new_document.xlsm')
>>> # MS Excel will not open the document
Loading from a file
You can use the openpyxl.load_workbook() to open an existing workbook:
>>> from openpyxl import load_workbook
>>> wb = load_workbook(filename = 'empty_book.xlsx')
>>> sheet_ranges = wb['range names']
>>> print(sheet_ranges['D18'].value)
3
Note
There are several flags that can be used in load_workbook.
- data_only controls whether cells with formulae have either the
formula (default) or the value stored the last time Excel read the sheet.
- keep_vba controls whether any Visual Basic elements are preserved or
not (default). If they are preserved they are still not editable.
- read-only opens workbooks in a read-only mode. This uses much less
memory and is faster but not all features are available (charts, images,
etc.)
- rich_text controls whether any rich-text formatting in cells is
preserved. The default is False.
- keep_links controls whether data cached from external workbooks is
preserved.
Warning
openpyxl does currently not read all possible items in an Excel file so
shapes will be lost from existing files if they are opened and saved with
the same name.
Errors loading workbooks
Sometimes openpyxl will fail to open a workbook. This is usually because there is something wrong with the file.
If this is the case then openpyxl will try and provide some more information. Openpyxl follows the OOXML specification closely and will reject files that do not because they are invalid. When this happens you can use the exception from openpyxl to inform the developers of whichever application or library produced the file. As the OOXML specification is publicly available it is important that developers follow it.
You can find the spec by searching for ECMA-376, most of the implementation specifics are in Part 4.
This ends the tutorial for now, you can proceed to the Simple usage section
Документ электронной таблицы Excel называется рабочей книгой. Каждая книга может хранить некоторое количество листов. Лист, просматриваемый пользователем в данный момент, называется активным. Лист состоит из из столбцов (адресуемых с помощью букв, начиная с A) и строк (адресуемых с помощью цифр, начиная с 1).
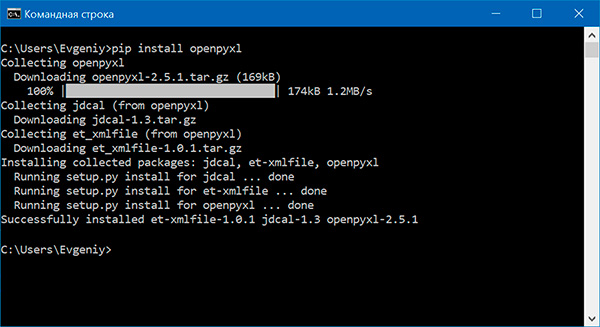
Модуль OpenPyXL не поставляется вместе с Python, поэтому его предварительно нужно установить:
> pip install openpyxl
Чтение файлов Excel
Начинаем работать:
>>> import openpyxl
>>> wb = openpyxl.load_workbook('example.xlsx')
>>> type(wb)
<class 'openpyxl.workbook.workbook.Workbook'>
>>> wb.sheetnames
['Лист1', 'Лист2', 'Лист3']
>>> sheet = wb.active
>>> sheet
<Worksheet "Лист1">
>>> sheet['A1']
<Cell Лист1.A1>
А теперь небольшой скрипт:
import openpyxl

# читаем excel-файл
wb = openpyxl.load_workbook('example.xlsx')

# печатаем список листов
sheets = wb.sheetnames
for sheet in sheets:
    print(sheet)

# получаем активный лист
sheet = wb.active

# печатаем значение ячейки A1
print(sheet['A1'].value)
# печатаем значение ячейки B1
print(sheet['B1'].value)
Результат работы:
Лист1
Лист2
Лист3

2015-04-05 13:34:02
Яблоки
Как получить другой лист книги:
# получаем другой лист
sheet2 = wb['Лист2']
# печатаем значение ячейки A1
print(sheet2['A2'].value)
Как сделать лист книги активным:
# делаем третий лист активным
wb.active = 2
Как задать имя листа:
sheet.title = 'Третий лист'
Объект Cell имеет атрибут value, который содержит значение, хранящееся в ячейке. Объект Cell также имеет атрибуты row, column и coordinate, которые предоставляют информацию о расположении данной ячейки в таблице.
# получаем ячейку листа B2
cell = sheet['B2']
print('Строка: ' + str(cell.row))
print('Столбец: ' + cell.column)
print('Ячейка: ' + cell.coordinate)
print('Значение: ' + cell.value)
Строка: 2
Столбец: B
Ячейка: B2
Значение: Вишни
К отдельной ячейке можно также обращаться с помощью метода cell() объекта Worksheet, передавая ему именованные аргументы row и column. Первому столбцу или первой строке соответствует число 1, а не 0:
# получаем ячейку листа B2
cell = sheet.cell(row = 2, column = 2)
print(cell.value)
Вишни
Размер листа можно получить с помощью атрибутов max_row и max_column объекта Worksheet:
rows = sheet.max_row
cols = sheet.max_column

for i in range(1, rows + 1):
    string = ''
    for j in range(1, cols + 1):
        cell = sheet.cell(row = i, column = j)
        string = string + str(cell.value) + ' '
    print(string)
2015-04-05 13:34:02 Яблоки 73
2015-04-05 03:41:23 Вишни 85
2015-04-06 12:46:51 Груши 14
2015-04-08 08:59:43 Апельсины 52
2015-04-10 02:07:00 Яблоки 152
2015-04-10 18:10:37 Бананы 23
2015-04-10 02:40:46 Земляника 98
Чтобы преобразовать буквенное обозначение столбца в цифровое, следует вызвать функцию
openpyxl.utils.column_index_from_string()
Чтобы преобразовать цифровое обозначение столбуа в буквенное, следует вызвать функцию
openpyxl.utils.get_column_letter()
Для вызова этих функций загружать рабочую книгу не обязательно.
>>> from openpyxl.utils import get_column_letter, column_index_from_string
>>> get_column_letter(1)
'A'
>>> get_column_letter(27)
'AA'
>>> column_index_from_string('A')
1
>>> column_index_from_string('AA')
27
Используя срезы объектов Worksheet, можно получить все объекты Cell, принадлежащие определенной строке, столбцу или прямоугольной области.
>>> sheet['A1':'C3']
((<Cell 'Лист1'.A1>, <Cell 'Лист1'.B1>, <Cell 'Лист1'.C1>),
 (<Cell 'Лист1'.A2>, <Cell 'Лист1'.B2>, <Cell 'Лист1'.C2>),
 (<Cell 'Лист1'.A3>, <Cell 'Лист1'.B3>, <Cell 'Лист1'.C3>))
for row in sheet['A1':'C3']:
    string = ''
    for cell in row:
        string = string + str(cell.value) + ' '
    print(string)
2015-04-05 13:34:02 Яблоки 73
2015-04-05 03:41:23 Вишни 85
2015-04-06 12:46:51 Груши 14
Выводим значения второй колонки:
>>> sheet['B']
(<Cell 'Лист1'.B1>, <Cell 'Лист1'.B2>, <Cell 'Лист1'.B3>, <Cell 'Лист1'.B4>, ..., <Cell 'Лист1'.B7>)
for cell in sheet['B']:
    print(cell.value)
Яблоки
Вишни
Груши
Апельсины
Яблоки
Бананы
Земляника
Выводим строки с первой по третью:
>>> sheet[1:3]
((<Cell 'Лист1'.A1>, <Cell 'Лист1'.B1>, <Cell 'Лист1'.C1>),
 (<Cell 'Лист1'.A2>, <Cell 'Лист1'.B2>, <Cell 'Лист1'.C2>),
 (<Cell 'Лист1'.A3>, <Cell 'Лист1'.B3>, <Cell 'Лист1'.C3>))
for row in sheet[1:3]:
    string = ''
    for cell in row:
        string = string + str(cell.value) + ' '
    print(string)
2015-04-05 13:34:02 Яблоки 73
2015-04-05 03:41:23 Вишни 85
2015-04-06 12:46:51 Груши 14
Для доступа к ячейкам конкретной строки или столбца также можно воспользоваться атрибутами rows и columns объекта Worksheet.
>>> list(sheet.rows)
[(<Cell 'Лист1'.A1>, <Cell 'Лист1'.B1>, <Cell 'Лист1'.C1>),
 (<Cell 'Лист1'.A2>, <Cell 'Лист1'.B2>, <Cell 'Лист1'.C2>),
 ..........
 (<Cell 'Лист1'.A6>, <Cell 'Лист1'.B6>, <Cell 'Лист1'.C6>),
 (<Cell 'Лист1'.A7>, <Cell 'Лист1'.B7>, <Cell 'Лист1'.C7>)]
for row in sheet.rows:
    print(row)
(<Cell 'Лист1'.A1>, <Cell 'Лист1'.B1>, <Cell 'Лист1'.C1>)
(<Cell 'Лист1'.A2>, <Cell 'Лист1'.B2>, <Cell 'Лист1'.C2>)
..........
(<Cell 'Лист1'.A6>, <Cell 'Лист1'.B6>, <Cell 'Лист1'.C6>)
(<Cell 'Лист1'.A7>, <Cell 'Лист1'.B7>, <Cell 'Лист1'.C7>)
>>> list(sheet.columns)
[(<Cell 'Лист1'.A1>, <Cell 'Лист1'.A2>, <Cell 'Лист1'.A3>, <Cell 'Лист1'.A4>, ..., <Cell 'Лист1'.A7>),
 (<Cell 'Лист1'.B1>, <Cell 'Лист1'.B2>, <Cell 'Лист1'.B3>, <Cell 'Лист1'.B4>, ..., <Cell 'Лист1'.B7>),
 (<Cell 'Лист1'.C1>, <Cell 'Лист1'.C2>, <Cell 'Лист1'.C3>, <Cell 'Лист1'.C4>, ..., <Cell 'Лист1'.C7>)]
for column in sheet.columns:
    print(column)
(<Cell 'Лист1'.A1>, <Cell 'Лист1'.A2>, <Cell 'Лист1'.A3>, <Cell 'Лист1'.A4>, ..., <Cell 'Лист1'.A7>)
(<Cell 'Лист1'.B1>, <Cell 'Лист1'.B2>, <Cell 'Лист1'.B3>, <Cell 'Лист1'.B4>, ..., <Cell 'Лист1'.B7>)
(<Cell 'Лист1'.C1>, <Cell 'Лист1'.C2>, <Cell 'Лист1'.C3>, <Cell 'Лист1'.C4>, ..., <Cell 'Лист1'.C7>)
Выводим значения всех ячеек листа:
for row in sheet.rows:
    string = ''
    for cell in row:
        string = string + str(cell.value) + ' '
    print(string)
2015-04-05 13:34:02 Яблоки 73
2015-04-05 03:41:23 Вишни 85
2015-04-06 12:46:51 Груши 14
2015-04-08 08:59:43 Апельсины 52
2015-04-10 02:07:00 Яблоки 152
2015-04-10 18:10:37 Бананы 23
2015-04-10 02:40:46 Земляника 98
Выводим значения второй строки (индекс 1):
for cell in list(sheet.rows)[1]:
    print(str(cell.value))
2015-04-05 03:41:23
Вишни
85
Выводим значения второй колонки (индекс 1):
for row in sheet.rows:
    print(str(row[1].value))
Яблоки
Вишни
Груши
Апельсины
Яблоки
Бананы
Земляника
Запись файлов Excel
>>> import openpyxl
>>> wb = openpyxl.Workbook()
>>> wb.sheetnames
['Sheet']
>>> wb.create_sheet(title = 'Первый лист', index = 0)
<Worksheet "Первый лист">
>>> wb.sheetnames
['Первый лист', 'Sheet']
>>> wb.remove(wb['Первый лист'])
>>> wb.sheetnames
['Sheet']
>>> wb.save('example.xlsx')
Метод create_sheet() возвращает новый объект Worksheet, который по умолчанию становится последним листом книги. С помощью именованных аргументов title и index можно задать имя и индекс нового листа.
Метод remove() принимает в качестве аргумента не строку с именем листа, а объект Worksheet. Если известно только имя листа, который надо удалить, используйте wb[sheetname]. Еще один способ удалить лист — использовать инструкцию del wb[sheetname].
Не забудьте вызвать метод save(), чтобы сохранить изменения после добавления или удаления листа рабочей книги.
Запись значений в ячейки напоминает запись значений в ключи словаря:
>>> import openpyxl
>>> wb = openpyxl.Workbook()
>>> wb.create_sheet(title = 'Первый лист', index = 0)
>>> sheet = wb['Первый лист']
>>> sheet['A1'] = 'Здравствуй, мир!'
>>> sheet['A1'].value
'Здравствуй, мир!'
Заполняем таблицу 3×3:
import openpyxl

# создаем новый excel-файл
wb = openpyxl.Workbook()

# добавляем новый лист
wb.create_sheet(title = 'Первый лист', index = 0)

# получаем лист, с которым будем работать
sheet = wb['Первый лист']

for row in range(1, 4):
    for col in range(1, 4):
        value = str(row) + str(col)
        cell = sheet.cell(row = row, column = col)
        cell.value = value

wb.save('example.xlsx')
Можно добавлять строки целиком:
sheet.append(['Первый', 'Второй', 'Третий'])
sheet.append(['Четвертый', 'Пятый', 'Шестой'])
sheet.append(['Седьмой', 'Восьмой', 'Девятый'])
Стилевое оформление
Для настройки шрифтов, используемых в ячейках, необходимо импортировать функцию Font() из модуля openpyxl.styles:
from openpyxl.styles import Font
Ниже приведен пример создания новой рабочей книги, в которой для шрифта, используемого в ячейке A1, устанавливается шрифт Arial, красный цвет, курсивное начертание и размер 24 пункта:
import openpyxl
from openpyxl.styles import Font

# создаем новый excel-файл
wb = openpyxl.Workbook()
# добавляем новый лист
wb.create_sheet(title = 'Первый лист', index = 0)
# получаем лист, с которым будем работать
sheet = wb['Первый лист']

font = Font(name='Arial', size=24, italic=True, color='FF0000')
sheet['A1'].font = font
sheet['A1'] = 'Здравствуй мир!'

# записываем файл
wb.save('example.xlsx')
Именованные стили применяются, когда надо применить стилевое оформление к большому количеству ячеек.
import openpyxl
from openpyxl.styles import NamedStyle, Font, Border, Side

# создаем новый excel-файл
wb = openpyxl.Workbook()
# добавляем новый лист
wb.create_sheet(title = 'Первый лист', index = 0)
# получаем лист, с которым будем работать
sheet = wb['Первый лист']

# создаем именованный стиль
ns = NamedStyle(name='highlight')
ns.font = Font(bold=True, size=20)
border = Side(style='thick', color='000000')
ns.border = Border(left=border, top=border, right=border, bottom=border)

# вновь созданный именованный стиль надо зарегистрировать
# для дальнейшего использования
wb.add_named_style(ns)

# теперь можно использовать именованный стиль
sheet['A1'].style = 'highlight'

# записываем файл
wb.save('example.xlsx')
Добавление формул
Формулы, начинающиеся со знака равенства, позволяют устанавливать для ячеек значения, рассчитанные на основе значений в других ячейках.
sheet['B9'] = '=SUM(B1:B8)'
Эта инструкция сохранит =SUM(B1:B8) в качестве значения в ячейке B9. Тем самым для ячейки B9 задается формула, которая суммирует значения, хранящиеся в ячейках от B1 до B8.
Формула Excel — это математическое выражение, которое создается для вычисления результата и которое может зависеть от содержимого других ячеек. Формула в ячейке Excel может содержать данные, ссылки на другие ячейки, а также обозначение действий, которые необходимо выполнить.
Использование ссылок на ячейки позволяет пересчитывать результат по формулам, когда происходят изменения содержимого ячеек, включенных в формулы. Формулы Excel начинаются со знака =. Скобки () могут использоваться для определения порядка математических операции.
Примеры формул Excel: =27+36, =А1+А2-АЗ, =SUM(А1:А5), =MAX(АЗ:А5), =(А1+А2)/АЗ.
Хранящуюся в ячейке формулу можно читать, как любое другое значение. Однако, если нужно получить результат расчета по формуле, а не саму формулу, то при вызове функции load_workbook() ей следует передать именованный аргумент data_only со значением True.
Настройка строк и столбцов
С помощью модуля OpenPyXL можно задавать высоту строк и ширину столбцов таблицы, закреплять их на месте (чтобы они всегда были видны на экране), полностью скрывать из виду, объединять ячейки.
Настройка высоты строк и ширины столбцов
Объекты Worksheet имеют атрибуты row_dimensions и column_dimensions, которые управляют высотой строк и шириной столбцов.
sheet['A1'] = 'Высокая строка'
sheet['B2'] = 'Широкий столбец'

sheet.row_dimensions[1].height = 70
sheet.column_dimensions['B'].width = 30
Атрибуты row_dimensions и column_dimensions представляют собой значения, подобные словарю. Атрибут row_dimensions содержит объекты RowDimensions, а атрибут column_dimensions содержит объекты ColumnDimensions. Доступ к объектам в row_dimensions осуществляется с использованием номера строки, а доступ к объектам в column_dimensions — с использованием буквы столбца.
Для указания высоты строки разрешено использовать целые или вещественные числа в диапазоне от 0 до 409. Для указания ширины столбца можно использовать целые или вещественные числа в диапазоне от 0 до 255. Столбцы с нулевой шириной и строки с нулевой высотой невидимы для пользователя.
Объединение ячеек
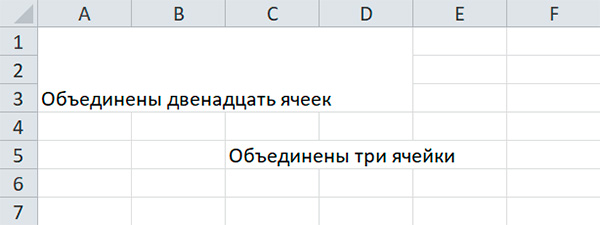
Ячейки, занимающие прямоугольную область, могут быть объединены в одну ячейку с помощью метода merge_cells() рабочего листа:
sheet.merge_cells('A1:D3')
sheet['A1'] = 'Объединены двенадцать ячеек'

sheet.merge_cells('C5:E5')
sheet['C5'] = 'Объединены три ячейки'
Чтобы отменить слияние ячеек, надо вызвать метод unmerge_cells():
sheet.unmerge_cells('A1:D3')
sheet.unmerge_cells('C5:E5')
Закрепление областей
Если размер таблицы настолько велик, что ее нельзя увидеть целиком, можно заблокировать несколько верхних строк или крайних слева столбцов в их позициях на экране. В этом случае пользователь всегда будет видеть заблокированные заголовки столбцов или строк, даже если он прокручивает таблицу на экране.
У объекта Worksheet имеется атрибут freeze_panes, значением которого может служить объект Cell или строка с координатами ячеек. Все строки и столбцы, расположенные выше и левее, будут заблокированы.
| Значение атрибута freeze_panes | Заблокированные строки и столбцы |
|---|---|
sheet.freeze_panes = 'A2' |
Строка 1 |
sheet.freeze_panes = 'B1' |
Столбец A |
sheet.freeze_panes = 'C1' |
Столбцы A и B |
sheet.freeze_panes = 'C2' |
Строка 1 и столбцы A и B |
sheet.freeze_panes = None |
Закрепленные области отсутствуют |
Диаграммы
Модуль OpenPyXL поддерживает создание гистогорамм, графиков, а также точечных и круговых диаграмм с использование данных, хранящихся в электронной таблице. Чтобы создать диаграмму, необходимо выполнить следующие действия:
- создать объект
Referenceна основе ячеек в пределах выделенной прямоугольной области; - создать объект
Series, передав функцииSeries()объектReference; - создать объект Chart;
- дополнительно можно установить значения переменных
drawing.top,drawing.left,drawing.width,drawing.heightобъектаChart, определяющих положение и размеры диаграммы; - добавить объект
Chartв объектWorksheet.
Объекты Reference создаются путем вызова функции openpyxl.charts.Reference(), принимающей пять аргуменов:
- Объект
Worksheet, содержащий данные диаграммы. - Два целых числа, представляющих верхнюю левую ячейку выделенной прямоугольной области, в которых содержатся данные диаграммы: первое число задает строку, второе — столбец; первой строке соответствует 1, а не 0.
- Два целых числа, представляющих нижнюю правую ячейку выделенной прямоугольной области, в которых содержатся данные диаграммы: первое число задает строку, второе — столбец.
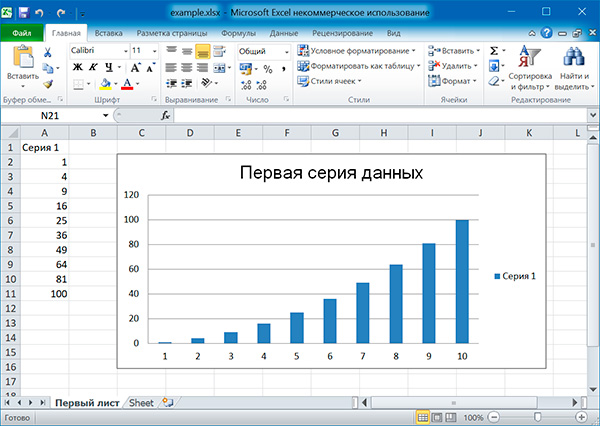
from openpyxl import Workbook
from openpyxl.chart import BarChart, Reference

# создаем новый excel-файл
wb = Workbook()
# добавляем новый лист
wb.create_sheet(title = 'Первый лист', index = 0)
# получаем лист, с которым будем работать
sheet = wb['Первый лист']

sheet['A1'] = 'Серия 1'
# это колонка с данными
for i in range(1, 11):
    cell = sheet.cell(row = i + 1, column = 1)
    cell.value = i * i

# создаем диаграмму
chart = BarChart()
chart.title = 'Первая серия данных'
data = Reference(sheet, min_col = 1, min_row = 1, max_col = 1, max_row = 11)
chart.add_data(data, titles_from_data = True)

# добавляем диаграмму на лист
sheet.add_chart(chart, 'C2')

# записываем файл
wb.save('example.xlsx')
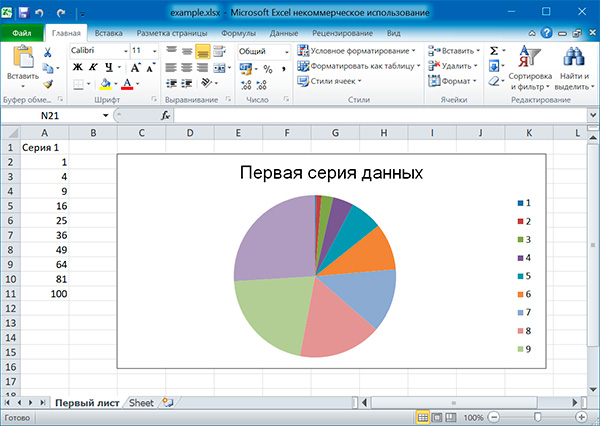
Аналогично можно создавать графики, точечные и круговые диаграммы, вызывая методы:
openpyxl.chart.LineChart()openpyxl.chart.ScatterChart()openpyxl.chart.PieChart()
Поиск:
Excel • MS • Python • Web-разработка • Модуль
В Pandas есть встроенная функция для сохранения датафрейма в электронную таблицу Excel. Все очень просто:
|
df.to_excel( path ) # где path это путь до файла, куда будем сохранять |
Как записать в лист с заданным именем
В этом случае будет создан xls / xlsx файл, а данные сохранятся на лист с именем Sheet1. Если хочется сохранить на лист с заданным именем, то можно использовать конструкцию:
|
df.to_excel( path, sheet_name=«Лист 1») # где sheet_name название листа |
Как записать в один файл сразу два листа
Но что делать, если хочется записать в файл сразу два листа? Логично было бы использовать две команды
df.to_excel друг за другом, но с одним путем до файла и разными
sheet_name , однако в Pandas это так не работает. Для решения этой задачи придется использовать конструкцию посложнее:
|
from pandas.io.excel import ExcelWriter with ExcelWriter(path) as writer: df.sample(10).to_excel(writer, sheet_name=«Лист 1») df.sample(10).to_excel(writer, sheet_name=«Лист 2») |
В результате будет создан файл Excel, где будет два листа с именами Лист 1 и Лист 2.
Как добавить ещё один лист у уже существующему файлу
Если использовать предыдущий код, то текущий файл будет перезаписан и в него будет записан новый лист. Старые данные при этом, ожидаемо, будут утеряны. Выход есть, достаточно лишь добавить модификатор «a» (append):
|
with ExcelWriter(path, mode=«a») as writer: df.sample(10).to_excel(writer, sheet_name=«Лист 3») |
Но что, если оставить этот код, удалить существующий файл Excel и попробовать выполнить код? Получим ошибку Файл не найден. В Python существует модификатор «a+», который создает файл, если его нет, и открывает его на редактирование, если файл существует. Но в Pandas такого модификатора не существует, поэтому мы должны выбрать модификатор для ExcelWriter в зависимости от наличия или отсутствия файла. Но это не сложно:
|
with ExcelWriter(path, mode=«a» if os.path.exists(path) else «w») as writer: df.sample().to_excel(writer, sheet_name=«Лист 4») |
К сожалению в Pandas, на момент написания поста, такого функционала нет. Но это можно реализовать с помощью пакета openpyxl. Вот пример такой функции:
|
def update_spreadsheet(path : str, _df, starcol : int = 1, startrow : int = 1, sheet_name : str =«ToUpdate»): »’ :param path: Путь до файла Excel :param _df: Датафрейм Pandas для записи :param starcol: Стартовая колонка в таблице листа Excel, куда буду писать данные :param startrow: Стартовая строка в таблице листа Excel, куда буду писать данные :param sheet_name: Имя листа в таблице Excel, куда буду писать данные :return: »’ wb = ox.load_workbook(path) for ir in range(0, len(_df)): for ic in range(0, len(_df.iloc[ir])): wb[sheet_name].cell(startrow + ir, starcol + ic).value = _df.iloc[ir][ic] wb.save(path) |
Как работает код и пояснения смотри в видео
Если у тебя есть вопросы, что-то не получается или ты знаешь как решить задачи в посте лучше и эффективнее (такое вполне возможно) то смело пиши в комментариях к видео.
Электронные таблицы Excel — это интуитивно понятный и удобный способ манипулирования большими наборами данных без какой-либо предварительной технической подготовки. По этому, это один из форматов, с которым, в какой-то момент времени, вам придется иметь дело. Часто будут стоять задачи по извлечению каких-то данных из базы данных или файла логов в электронную таблицу Excel, или наоборот, преобразовывать электронную таблицу Excel в какую-либо более удобную программную форму, примеров этому масса.
Модуль openpyxl — это библиотека Python для чтения/записи форматов Office Open XML (файлов Excel 2010) с расширениями xlsx/xlsm/xltx/xltm.
Установка модуля openpyxl в виртуальное окружение.
Модуль openpyxl размещен на PyPI, поэтому установка относительно проста.
# создаем виртуальное окружение, если нет
$ python3 -m venv .venv --prompt VirtualEnv
# активируем виртуальное окружение
$ source .venv/bin/activate
# ставим модуль openpyxl
(VirtualEnv):~$ python3 -m pip install -U openpyxl
Основы работы с файлами Microsoft Excel на Python.
- Создание книги Excel.
- Новый рабочий лист книги Excel.
- Копирование рабочего листа книги Excel.
- Удаление рабочего листа книги Excel.
- Доступ к ячейке электронной таблицы и ее значению.
- Доступ к диапазону ячеек листа электронной таблицы.
- Получение только значений ячеек листа.
- Добавление данных в ячейки списком.
- Сохранение созданной книги в файл Excel.
- Сохранение данных книги в виде потока.
- Загрузка документа XLSX из файла.
Создание книги Excel.
Чтобы начать работу с модулем openpyxl, нет необходимости создавать файл электронной таблицы в файловой системе. Нужно просто импортировать класс Workbook и создать его экземпляр. Рабочая книга всегда создается как минимум с одним рабочим листом, его можно получить, используя свойство Workbook.active:
>>> from openpyxl import Workbook
# создаем книгу
>>> wb = Workbook()
# делаем единственный лист активным
>>> ws = wb.active
Новый рабочий лист книги Excel.
Новые рабочие листы можно создавать, используя метод Workbook.create_sheet():
# вставить рабочий лист в конец (по умолчанию)
>>> ws1 = wb.create_sheet("Mysheet")
# вставить рабочий лист в первую позицию
>>> ws2 = wb.create_sheet("Mysheet", 0)
# вставить рабочий лист в предпоследнюю позицию
>>> ws3 = wb.create_sheet("Mysheet", -1)
Листам автоматически присваивается имя при создании. Они нумеруются последовательно (Sheet, Sheet1, Sheet2, …). Эти имена можно изменить в любое время с помощью свойства Worksheet.title:
Цвет фона вкладки с этим заголовком по умолчанию белый. Можно изменить этот цвет, указав цветовой код RRGGBB для атрибута листа Worksheet.sheet_properties.tabColor:
>>> ws.sheet_properties.tabColor = "1072BA"
Рабочий лист можно получить, используя его имя в качестве ключа экземпляра созданной книги Excel:
Что бы просмотреть имена всех рабочих листов книги, необходимо использовать атрибут Workbook.sheetname. Также можно итерироваться по рабочим листам книги Excel.
>>> wb.sheetnames
# ['Mysheet1', 'NewPage', 'Mysheet2', 'Mysheet']

>>> for sheet in wb:
...     print(sheet.title)
# Mysheet1
# NewPage
# Mysheet2
# Mysheet
Копирование рабочего листа книги Excel.
Для создания копии рабочих листов в одной книге, необходимо воспользоваться методом Workbook.copy_worksheet():
>>> source_page = wb.active
>>> target_page = wb.copy_worksheet(source_page)
Примечание. Копируются только ячейки (значения, стили, гиперссылки и комментарии) и определенные атрибуты рабочего листа (размеры, формат и свойства). Все остальные атрибуты книги/листа не копируются, например, изображения или диаграммы.
Поддерживается возможность копирования рабочих листов между книгами. Нельзя скопировать рабочий лист, если рабочая книга открыта в режиме только для чтения или только для записи.
Удаление рабочего листа книги Excel.
Очевидно, что встает необходимость удалить лист электронной таблицы, который уже существует. Модуль openpyxl дает возможность удалить лист по его имени. Следовательно, сначала необходимо выяснить, какие листы присутствуют в книге, а потом удалить ненужный. За удаление листов книги отвечает метод Workbook.remove().
Смотрим пример:
# выясним, названия листов присутствуют в книге
>>> name_list = wb.sheetnames
>>> name_list
# ['Mysheet1', 'NewPage', 'Mysheet2', 'Mysheet', 'Mysheet1 Copy']

# допустим, что нам не нужны первый и последний
# удаляем первый лист по его имени с проверкой
# существования такого имени в книге
>>> if 'Mysheet1' in wb.sheetnames:
        # Если лист с именем `Mysheet1` присутствует
        # в списке листов экземпляра книги, то удаляем
...     wb.remove(wb['Mysheet1'])
...
>>> wb.sheetnames
# ['NewPage', 'Mysheet2', 'Mysheet', 'Mysheet1 Copy']

# удаляем последний лист через оператор
#  `del`, имя листа извлечем по индексу
# полученного списка `name_list`
>>> del wb[name_list[-1]]
>>> wb.sheetnames
# ['NewPage', 'Mysheet2', 'Mysheet']
Доступ к ячейке и ее значению.
После того как выбран рабочий лист, можно начинать изменять содержимое ячеек. К ячейкам можно обращаться непосредственно как к ключам рабочего листа, например ws['A4']. Это вернет ячейку на A4 или создаст ее, если она еще не существует. Значения могут быть присвоены напрямую:
>>> ws['A4'] = 5
>>> ws['A4']
# <Cell 'NewPage'.A4>
>>> ws['A4'].value
# 5
>>> ws['A4'].column
# 1
>>> ws['A4'].row
# 4
Если объект ячейки присвоить переменной, то этой переменной, также можно присваивать значение:
>>> c = ws['A4']
>>> c.value = c.value * 2
>>> c.value
# 10
Существует также метод Worksheet.cell(). Он обеспечивает доступ к ячейкам с непосредственным указанием значений строк и столбцов:
>>> d = ws.cell(row=4, column=2, value=10)
>>> d
# <Cell 'NewPage'.B4>
>>> d.value = 3.14
>>> print(d.value)
# 3.14
Примечание. При создании рабочего листа в памяти, он не содержит ячеек. Ячейки создаются при первом доступе к ним.
Важно! Из-за такого поведения, простой перебор ячеек в цикле, создаст объекты этих ячеек в памяти, даже если не присваивать им значения.
Не запускайте этот пример, поверьте на слово:
# создаст в памяти 100x100=10000 пустых объектов
# ячеек, просто так израсходовав оперативную память.
>>> for x in range(1,101):
...        for y in range(1,101):
...            ws.cell(row=x, column=y)
Доступ к диапазону ячеек листа электронной таблицы.
Диапазон с ячейками активного листа электронной таблицы можно получить с помощью простых срезов. Эти срезы будут возвращать итераторы объектов ячеек.
>>> cell_range = ws['A1':'C2']
>>> cell_range
# ((<Cell 'NewPage'.A1>, <Cell 'NewPage'.B1>, <Cell 'NewPage'.C1>),
# (<Cell 'NewPage'.A2>, <Cell 'NewPage'.B2>, <Cell 'NewPage'.C2>))
Аналогично можно получить диапазоны имеющихся строк или столбцов на листе:
# Все доступные ячейки в колонке `C`
>>> colC = ws['C']
# Все доступные ячейки в диапазоне колонок `C:D`
>>> col_range = ws['C:D']
# Все доступные ячейки в строке 10
>>> row10 = ws[10]
# Все доступные ячейки в диапазоне строк `5:10`
>>> row_range = ws[5:10]
Можно также использовать метод Worksheet.iter_rows():
>>> for row in ws.iter_rows(min_row=1, max_col=3, max_row=2):
...    for cell in row:
...        print(cell)
# <Cell Sheet1.A1>
# <Cell Sheet1.B1>
# <Cell Sheet1.C1>
# <Cell Sheet1.A2>
# <Cell Sheet1.B2>
# <Cell Sheet1.C2>
Точно так же метод Worksheet.iter_cols() будет возвращать столбцы:
>>> for col in ws.iter_cols(min_row=1, max_col=3, max_row=2):
...     for cell in col:
...         print(cell)
# <Cell Sheet1.A1>
# <Cell Sheet1.A2>
# <Cell Sheet1.B1>
# <Cell Sheet1.B2>
# <Cell Sheet1.C1>
# <Cell Sheet1.C2>
Примечание. Из соображений производительности метод Worksheet.iter_cols() недоступен в режиме только для чтения.
Если необходимо перебрать все строки или столбцы файла, то можно использовать свойство Worksheet.rows:
>>> ws = wb.active
>>> ws['C9'] = 'hello world'
>>> tuple(ws.rows)
# ((<Cell Sheet.A1>, <Cell Sheet.B1>, <Cell Sheet.C1>),
# (<Cell Sheet.A2>, <Cell Sheet.B2>, <Cell Sheet.C2>),
# (<Cell Sheet.A3>, <Cell Sheet.B3>, <Cell Sheet.C3>),
# ...
# (<Cell Sheet.A7>, <Cell Sheet.B7>, <Cell Sheet.C7>),
# (<Cell Sheet.A8>, <Cell Sheet.B8>, <Cell Sheet.C8>),
# (<Cell Sheet.A9>, <Cell Sheet.B9>, <Cell Sheet.C9>))
или свойство Worksheet.columns:
>>> tuple(ws.columns)
# ((<Cell Sheet.A1>,
# <Cell Sheet.A2>,
# ...
# <Cell Sheet.B8>,
# <Cell Sheet.B9>),
# (<Cell Sheet.C1>,
# <Cell Sheet.C2>,
# ...
# <Cell Sheet.C8>,
# <Cell Sheet.C9>))
Примечание. Из соображений производительности свойство Worksheet.columns недоступно в режиме только для чтения.
Получение только значений ячеек активного листа.
Если просто нужны значения из рабочего листа, то можно использовать свойство активного листа Worksheet.values. Это свойство перебирает все строки на листе, но возвращает только значения ячеек:
for row in ws.values:
   for value in row:
     print(value)
Для возврата только значения ячейки, методы Worksheet.iter_rows() и Worksheet.iter_cols(), представленные выше, могут принимать аргумент values_only:
>>> for row in ws.iter_rows(min_row=1, max_col=3, max_row=2, values_only=True):
...   print(row)
# (None, None, None)
# (None, None, None)
Добавление данных в ячейки листа списком.
Модуль openpyxl дает возможность супер просто и удобно добавлять данные в конец листа электронной таблицы. Такое удобство обеспечивается методом объекта листа Worksheet.append(iterable), где аргумент iterable — это любой итерируемый объект (список, кортеж и т.д.). Такое поведение позволяет, без костылей, переносить в электронную таблицу данные из других источников, например CSV файлы, таблицы баз данных, дата-фреймы из Pandas и т.д.
Метод Worksheet.append() добавляет группу значений в последнюю строку, которая не содержит данных.
- Если это список: все значения добавляются по порядку, начиная с первого столбца.
- Если это словарь: значения присваиваются столбцам, обозначенным ключами (цифрами или буквами).
Варианты использования:
- добавление списка:
.append([‘ячейка A1’, ‘ячейка B1’, ‘ячейка C1’]) - добавление словаря:
- вариант 1:
.append({‘A’ : ‘ячейка A1’, ‘C’ : ‘ячейка C1’}), в качестве ключей используются буквы столбцов. - вариант 2:
.append({1 : ‘ячейка A1’, 3 : ‘ячейка C1’}), в качестве ключей используются цифры столбцов.
- вариант 1:
Пример добавление данных из списка:
# существующие листы рабочей книги
>>> wb.sheetnames
# ['NewPage', 'Mysheet2', 'Mysheet']

# добавим данные в лист с именем `Mysheet2`
>>> ws = wb["Mysheet2"]
# создадим произвольные данные, используя
# вложенный генератор списков
>>> data = [[row*col for col in range(1, 10)] for row in range(1, 31)]
>>> data
# [
#     [1, 2, 3, 4, 5, 6, 7, 8, 9],
#     [2, 4, 6, 8, 10, 12, 14, 16, 18],
# ...
# ...
#     [30, 60, 90, 120, 150, 180, 210, 240, 270]
# ]

# добавляем данные в выбранный лист
>>> for row in data:
...     ws.append(row)
...
Вот и все, данные добавлены… Просто? Не просто, а супер просто!
Сохранение созданной книги в файл Excel.
Самый простой и безопасный способ сохранить книгу, это использовать метод Workbook.save() объекта Workbook:
>>> wb = Workbook()
>>> wb.save('test.xlsx')
Внимание. Эта операция перезапишет существующий файл без предупреждения!!!
После сохранения, можно открыть полученный файл в Excel и посмотреть данные, выбрав лист с именем NewPage.
Примечание. Расширение имени файла не обязательно должно быть xlsx или xlsm, хотя могут возникнуть проблемы с его открытием непосредственно в другом приложении. Поскольку файлы OOXML в основном представляют собой ZIP-файлы, их также можете открыть с помощью своего любимого менеджера ZIP-архивов.
Сохранение данных книги в виде потока.
Если необходимо сохранить файл в поток, например, при использовании веб-приложения, такого как Flask или Django, то можно просто предоставить tempfile.NamedTemporaryFile():
from tempfile import NamedTemporaryFile
from openpyxl import Workbook

wb = Workbook()

with NamedTemporaryFile() as tmp:
    wb.save(tmp.name)
    tmp.seek(0)
    stream = tmp.read()
Можно указать атрибут template=True, чтобы сохранить книгу как шаблон:
>>> from openpyxl import load_workbook
>>> wb = load_workbook('test.xlsx')
>>> wb.template = True
>>> wb.save('test_template.xltx')
Примечание. Атрибут wb.template по умолчанию имеет значение False, это означает — сохранить как документ.
Внимание. Следующее не удастся:
>>> from openpyxl import load_workbook
>>> wb = load_workbook('test.xlsx')
# Необходимо сохранить с расширением *.xlsx
>>> wb.save('new_test.xlsm') # MS Excel не может открыть документ

# Нужно указать атрибут `keep_vba=True`
>>> wb = load_workbook('test.xlsm')
>>> wb.save('new_test.xlsm')

>>> wb = load_workbook('test.xltm', keep_vba=True)
# Если нужен шаблон документа, то необходимо указать расширение *.xltm.
>>> wb.save('new_test.xlsm') # MS Excel не может открыть документ
Загрузка документа XLSX из файла.
Чтобы открыть существующую книгу Excel необходимо использовать функцию openpyxl.load_workbook():
>>> from openpyxl import load_workbook
>>> wb2 = load_workbook('test.xlsx')
>>> print(wb2.sheetnames)
# ['Mysheet1', 'NewPage', 'Mysheet2', 'Mysheet']
Есть несколько флагов, которые можно использовать в функции openpyxl.load_workbook().
data_only: определяет, будут ли содержать ячейки с формулами — формулу (по умолчанию) или только значение, сохраненное/посчитанное при последнем чтении листа Excel.keep_vbaопределяет, сохраняются ли какие-либо элементы Visual Basic (по умолчанию). Если они сохранены, то они не могут изменяться/редактироваться.
Reading Excel spreadsheets is all well and good. However, you also need to be able to create or edit a spreadsheet. The focus of this chapter will be on learning how to do that! OpenPyXL lets you create Microsoft Excel spreadsheets with a minimum of fuss.
Creating Excel spreadsheets using Python allows you to generate a new type of report that your users will use. For example, you might receive your data from a client in the form of JSON or XML. These data formats are not something that most accountants or business people are used to reading.
Once you learn how to create Excel spreadsheets with Python, you can leverage that knowledge to transform other data into Excel spreadsheets. This knowledge also allows you to do the reverse, taking in an Excel spreadsheet and output a different format, such as JSON or XML.
In this article, you will learn how to use OpenPyXL to do the following:
- Create a spreadsheet
- Write to a spreadsheet
- Add and remove sheets
- Insert and delete rows and columns
- Edit cell data
- Create merged cells
- Fold rows and columns
Let’s get started by creating a brand new spreadsheet!
Editor’s note: This article is based on a chapter from the book: Automating Excel with Python. You can order a copy on Gumroad or Kickstarter.
Creating a Spreadsheet
Creating an empty spreadsheet using OpenPyXL doesn’t take much code. Open up your Python editor and create a new file. Name it creating_spreadsheet.py.
Now add the following code to your file:
# creating_spreadsheet.py

from openpyxl import Workbook


def create_workbook(path):
    workbook = Workbook()
    workbook.save(path)


if __name__ == "__main__":
    create_workbook("hello.xlsx")
The critical piece here is that you need to import the Workbook class. This class allows you to instantiate a workbook object that you can then save. All this code does is create the file that you pass to it and save it.
Your new spreadsheet will look like this:
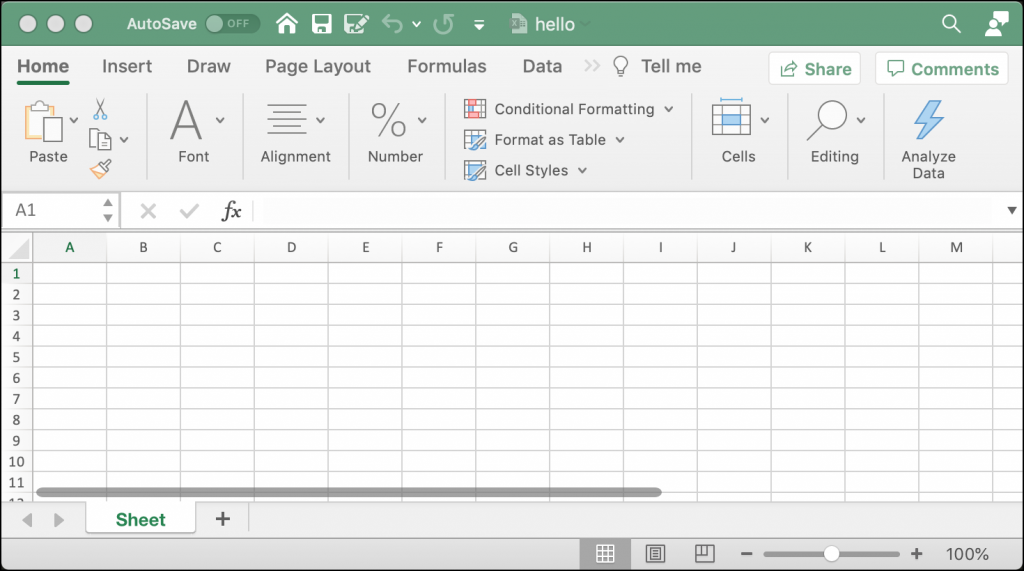
Now you’re ready to learn how to add some data to the cells in your spreadsheet.
Writing to a Spreadsheet
When writing data in a spreadsheet, you need to get the “sheet” object. You learned how to do that in the previous chapter using workbook.active, which gives you the active or currently visible sheet. You could also explicitly tell OpenPyXL which sheet you want to access by passing it a sheet title.
For this example, you will create another new program and then use the active sheet. Open up a new file and name it adding_data.py. Now add this code to your file:
# adding_data.py

from openpyxl import Workbook


def create_workbook(path):
    workbook = Workbook()
    sheet = workbook.active
    sheet["A1"] = "Hello"
    sheet["A2"] = "from"
    sheet["A3"] = "OpenPyXL"
    workbook.save(path)


if __name__ == "__main__":
    create_workbook("hello.xlsx")
This code will overwrite the previous example’s Excel spreadsheet. After you create the Workbook() object, you grab the active Worksheet. Then you add text strings to the cells: A1, A2, and A3. The last step is to save your new spreadsheet.
When you run this code, your new spreadsheet will look like this:

You can use this technique to write data to any cell in your spreadsheet.
Now let’s find out how to add and remove a worksheet!
Adding and Removing Sheets
Adding a worksheet to a workbook happens automatically when you create a new Workbook. The Worksheet will be named “Sheet” by default. If you want, you can set the name of the sheet yourself.
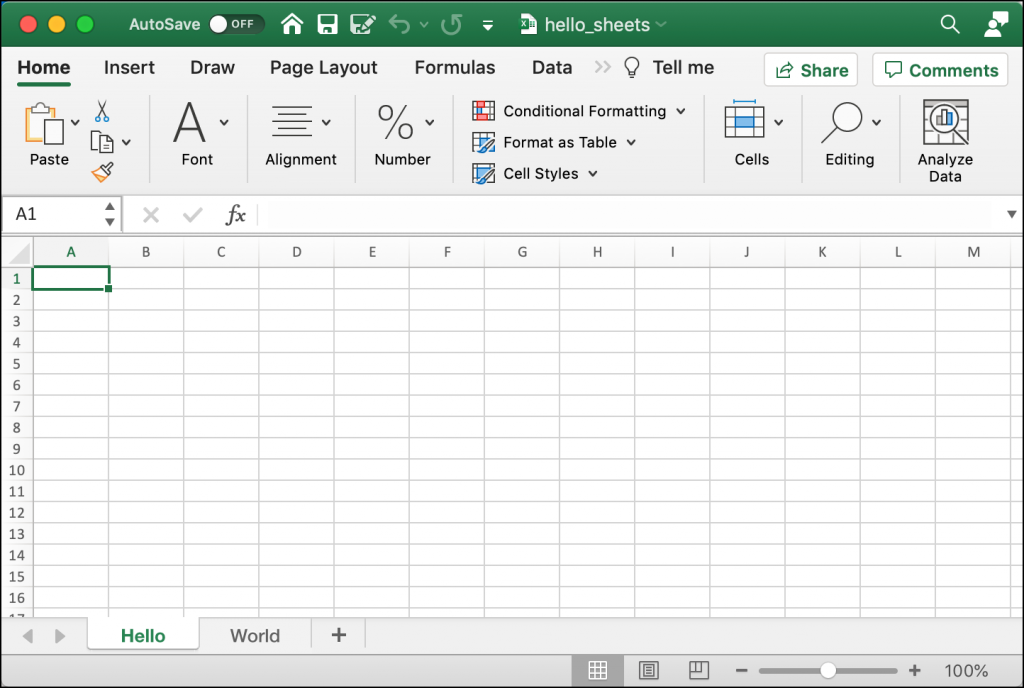
To see how this works, create a new file named creating_sheet_title.py and add the following code:
# creating_sheet_title.py

from openpyxl import Workbook


def create_sheets(path):
    workbook = Workbook()
    sheet = workbook.active
    sheet.title = "Hello"
    sheet2 = workbook.create_sheet(title="World")
    workbook.save(path)


if __name__ == "__main__":
    create_sheets("hello_sheets.xlsx")
Here you create the Workbook and then grab the active Worksheet. You can then set the Worksheet’s title using the title attribute. The following line of code adds a new worksheet to the Workbook by calling create_sheet().
The create_sheet() method takes two parameters: title and index. The title attribute gives a title to the Worksheet. The index tells the Workbook where to insert the Worksheet, from left to right. If you specify zero, your Worksheet gets inserted at the beginning.
If you run this code, your new spreadsheet will look like this:
Sometimes you will need to delete a worksheet. Perhaps that sheet no longer has valid information, or it was created by accident.
To see how to delete a worksheet, create another new file and name it delete_sheets.py. Then add this code:
# delete_sheets.py

import openpyxl


def create_worksheets(path):
    workbook = openpyxl.Workbook()
    workbook.create_sheet()
    print(workbook.sheetnames)
    # Insert a worksheet
    workbook.create_sheet(index=1, title="Second sheet")
    print(workbook.sheetnames)
    del workbook["Second sheet"]
    print(workbook.sheetnames)
    workbook.save(path)


if __name__ == "__main__":
    create_worksheets("del_sheets.xlsx")
In this example, you create two new sheets. The first Worksheet has no title specified, so it defaults to “Sheet1”. You supply a title to the second sheet, and then you print out all the current worksheet titles.
Next, you use Python’s del keyword to delete the Worksheet’s name from the workbook, which removes the sheet. Then you print out the current worksheet titles again.
Here is the output from running the code:
['Sheet', 'Sheet1']
['Sheet', 'Second sheet', 'Sheet1']
['Sheet', 'Sheet1']
The first Worksheet gets created automatically when you instantiate the Workbook. The Worksheet is named “Sheet”. Then you make “Sheet1”. Lastly, you create “Second sheet”, but you insert it at position 1, which tells the Workbook to shift ‘Sheet1’ to the right by one position.
You can see from the output above how the worksheets are ordered before and after you add and delete the “Second sheet”.
Now let’s learn about inserting and removing rows and columns!
Inserting and Deleting Rows and Columns
The OpenPyXL package provides you with several methods that you can use to insert or delete rows and columns. These methods are a part of the Worksheet object.
You will learn about the following four methods:
.insert_rows().delete_rows().insert_cols().delete_cols()
Each of these methods can take these two arguments:
idx– The index to insert into (or delete from)amount– The number of rows or columns to add (or delete)
You can use the insert methods to insert rows or columns at the specified index.
Open up a new file and name it insert_demo.py. Then enter this code in your new file:
# insert_demo.py

from openpyxl import Workbook


def inserting_cols_rows(path):
    workbook = Workbook()
    sheet = workbook.active
    sheet["A1"] = "Hello"
    sheet["A2"] = "from"
    sheet["A3"] = "OpenPyXL"
    # insert a column before A
    sheet.insert_cols(idx=1)
    # insert 2 rows starting on the second row
    sheet.insert_rows(idx=2, amount=2)
    workbook.save(path)


if __name__ == "__main__":
    inserting_cols_rows("inserting.xlsx")
Here you create another new Spreadsheet. In this case, you add text to the first three cells in the “A” column. Then you insert one column at index one. That means you inserted a single column before “A”, which causes the cells in column “A” to shift to column “B”.
Next, you insert two new rows starting at index two. This code will insert two rows between the first and second rows.
You can see how this changes things by taking a look at the following screenshot:
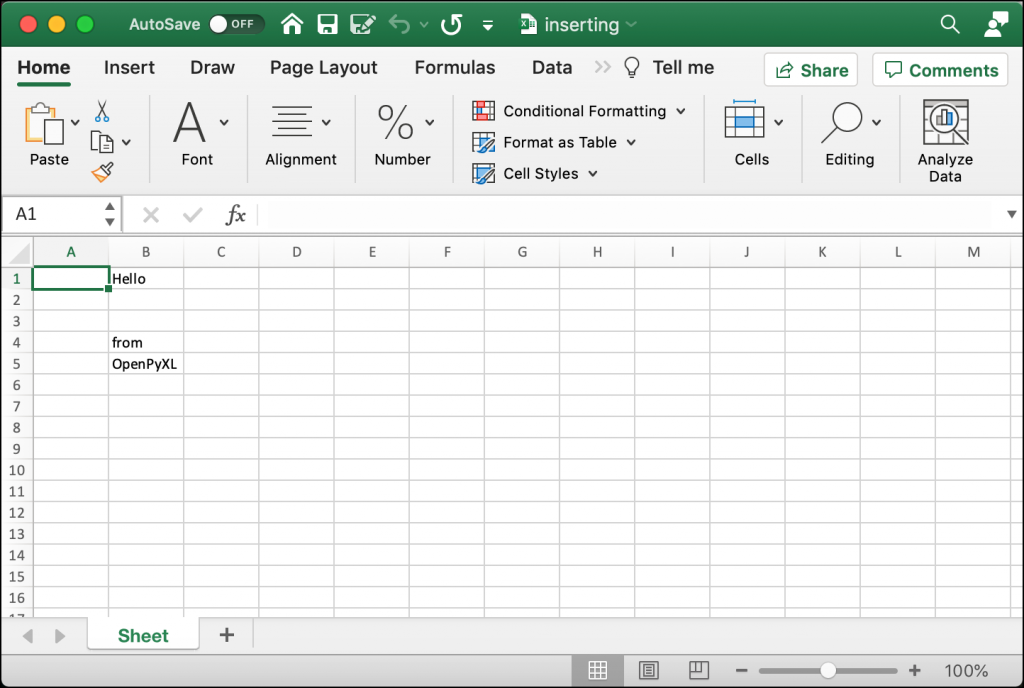
Try changing the indexes or number of rows and columns that you want to insert and see how it works.
You will also need to delete columns and rows from time to time. To do that you will use .delete_rows() and .delete_cols().
Open up a new file and name it delete_demo.py. Then add this code:
# delete_demo.py

from openpyxl import Workbook


def deleting_cols_rows(path):
    workbook = Workbook()
    sheet = workbook.active
    sheet["A1"] = "Hello"
    sheet["B1"] = "from"
    sheet["C1"] = "OpenPyXL"
    sheet["A2"] = "row 2"
    sheet["A3"] = "row 3"
    sheet["A4"] = "row 4"
    # Delete column A
    sheet.delete_cols(idx=1)
    # delete 2 rows starting on the second row
    sheet.delete_rows(idx=2, amount=2)
    workbook.save(path)


if __name__ == "__main__":
    deleting_cols_rows("deleting.xlsx")
In this example, you add text to six different cells. Four of those cells are in column “A”. Then you use delete_cols() to delete column “A”! That means you got rid of four values. Next, you delete two rows, starting at row number two.
When you run this code, your result should look like this:
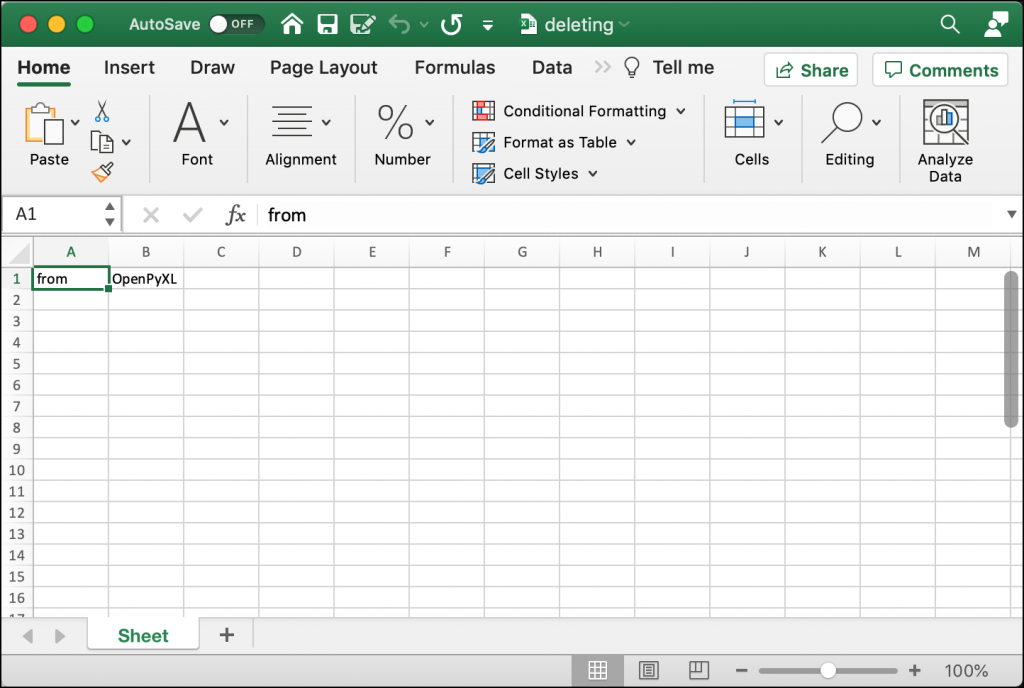
Try editing the index or amount values to get familiar with deleting rows and columns.
Now you are ready to learn about editing a spreadsheet’s values!
Editing Cell Data
You can use OpenPyXL to change the values in a pre-existing Excel spreadsheet. You can do that by specifying the cell you want to change and then setting it to a new value.
For this example, you will use the inserting.xlsx file you created in the previous section. Now create a new Python file named editing_demo.py. Then add the following code:
# editing_demo.py

from openpyxl import load_workbook


def edit(path, data):
    workbook = load_workbook(filename=path)
    sheet = workbook.active
    for cell in data:
        current_value = sheet[cell].value
        sheet[cell] = data[cell]
        print(f'Changing {cell} from {current_value} to {data[cell]}')
    workbook.save(path)

if __name__ == "__main__":
    data = {"B1": "Hi", "B5": "Python"}
    edit("inserting.xlsx", data)
This code loads up the Excel file that you created in the previous section. It then loops over each value in the data dictionary that you passed to the edit() function. You get the current value for the cell using a key in the dictionary. Then you change that cell’s value to match the value in the dictionary.
To make it more obvious what is going on, you print out the old and new values of the cell.
When you run this code, you will see the following output:
Changing B1 from Hello to Hi
Changing B5 from OpenPyXL to Python
Open up the new version of the inserting.xlsx file, and it should now look like this:

Here you can see how the cell values have changed to match the one specified in the data dictionary.
Now you can move on and learn how to create merged cells!
Creating Merged Cells
A merged cell is where two or more cells get merged into one. To set a MergedCell’s value, you have to use the top-left-most cell. For example, if you merge “A2:E2”, you would set the value of cell “A2” for the merged cells.
To see how this works in practice, create a file called merged_cells.py and add this code to it:
# merged_cells.py

from openpyxl import Workbook
from openpyxl.styles import Alignment


def create_merged_cells(path, value):
    workbook = Workbook()
    sheet = workbook.active
    sheet.merge_cells("A2:E2")
    top_left_cell = sheet["A2"]
    top_left_cell.alignment = Alignment(horizontal="center",
                                        vertical="center")
    sheet["A2"] = value
    workbook.save(path)


if __name__ == "__main__":
    create_merged_cells("merged.xlsx", "Hello World")
OpenPyXL has many ways to style cells. In this example, you import Alignment from openpyxl.styles. You will learn more about styles and formatting cells in a later chapter.
Here you merge the cells “A2:E2” and set the alignment to the center of the cell. Then you set the value of “A2” to a string that you passed to the create_merged_cells() function.
When you run this example, your new Excel spreadsheet will look like this:
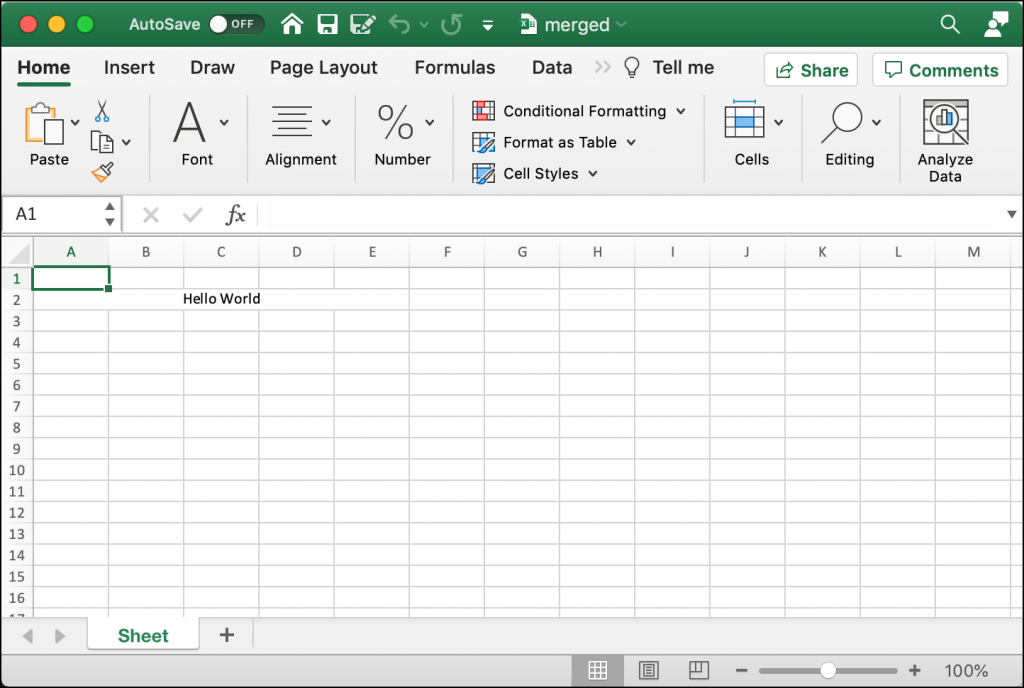
To get some hands-on experience, change the range of cells you want to merge and try it with and without the alignment set.
Now you are ready to learn about folding columns or rows!
Folding Rows and Columns
Microsoft Excel supports the folding of rows and columns. The term “folding” is also called “hiding” or creating an “outline”. The rows or columns that get folded can be unfolded (or expanded) to make them visible again. You can use this functionality to make a spreadsheet briefer. For example, you might want to only show the sub-totals or the results of equations rather than all of the data at once.
OpenPyXL supports folding too. To see how this works, create a new file named folding.py and enter the following code:
# folding.py

import openpyxl


def folding(path, rows=None, cols=None, hidden=True):
    workbook = openpyxl.Workbook()
    sheet = workbook.active

    if rows:
        begin_row, end_row = rows
        sheet.row_dimensions.group(begin_row, end_row, hidden=hidden)

    if cols:
        begin_col, end_col = cols
        sheet.column_dimensions.group(begin_col, end_col, hidden=hidden)

    workbook.save(path)


if __name__ == "__main__":
    folding("folded.xlsx", rows=(1, 5), cols=("C", "F"))
Your folding() function accepts a tuple of rows or columns or both. You can tell OpenPyXL whether or not you want those rows and columns to be hidden, or folded. In this example, you fold rows 1-5 and columns C-F. To cause the folding to occur, you need to call sheet.row_dimensions.group().
When you run this code, your spreadsheet will look like this:

You can see in this spreadsheet that some of the rows and columns are folded or hidden. There is a “+” symbol next to row 6 and another “+” symbol above column “G”. If you click on either of those buttons, it will expand the folded rows or columns.
Give this code a try. You can also experiment with different row or column ranges.
Now you are ready to learn how to freeze a pane!
Freezing Panes
Microsoft Excel allows you to freeze panes. What that means is that you can freeze one or more columns or rows. One popular use case is to freeze a row of headers so that the headers are always visible while scrolling through a lot of data.
OpenPyXL provides a freeze_panes attribute on the Worksheet object that you can set. You need to select a cell below and to the right of the columns that you want to freeze. For example, if you want to freeze the first row in your spreadsheet, then you would select cell at “A2” to apply the freeze to that row.
You can see how this works by writing some code. Open up a new file and name it freezing_panes.py. Then enter the following into it:
# freezing_panes.py

from openpyxl import Workbook


def freeze(path, row_to_freeze):
    workbook = Workbook()
    sheet = workbook.active
    sheet.title = "Freeze"
    sheet.freeze_panes = row_to_freeze
    headers = ["Name", "Address", "State", "Zip"]
    sheet["A1"] = headers[0]
    sheet["B1"] = headers[1]
    sheet["C1"] = headers[2]
    sheet["D1"] = headers[3]
    data = [dict(zip(headers, ("Mike", "123 Storm Dr", "IA", "50000"))),
            dict(zip(headers, ("Ted", "555 Tornado Alley", "OK", "90000")))]
    row = 2
    for d in data:
        sheet[f'A{row}'] = d["Name"]
        sheet[f'B{row}'] = d["Address"]
        sheet[f'C{row}'] = d["State"]
        sheet[f'D{row}'] = d["Zip"]
        row += 1
    workbook.save(path)


if __name__ == "__main__":
    freeze("freeze.xlsx", row_to_freeze="A2")
Here you create a new Workbook and set the active sheet’s title to “Freeze”. Then you set the freeze_panes attribute to “A2”. The rest of the code in the function adds a couple of rows of data to the Worksheet.
When you run this code, the spreadsheet that you create will look like this:
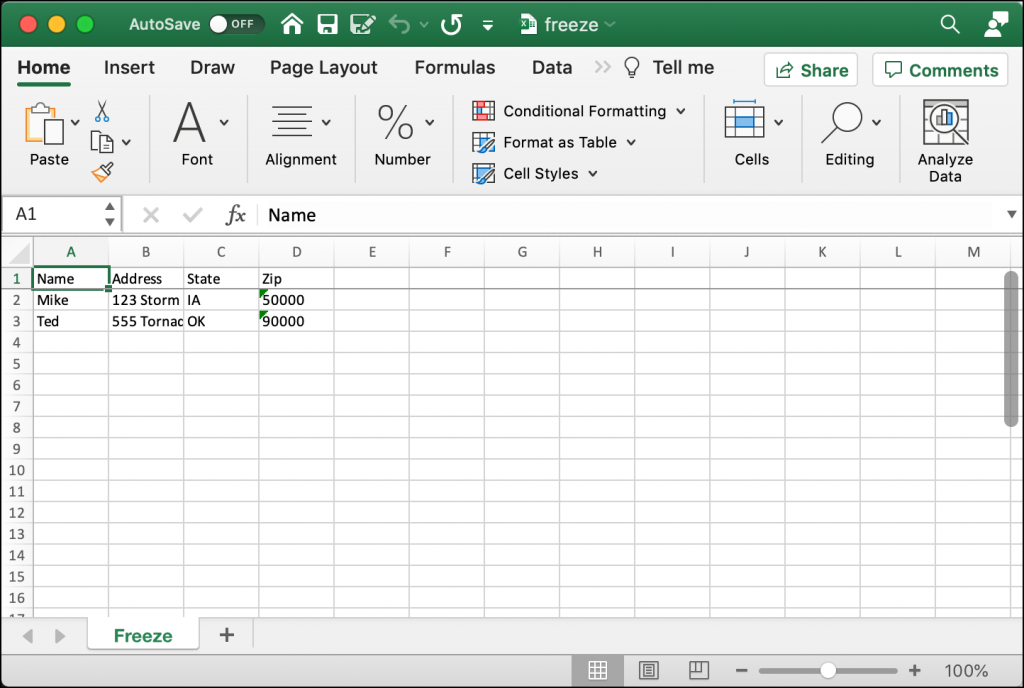
Try scrolling down through some rows in the spreadsheet. The top row should always remain visible because it has been “frozen”.
Wrapping Up
You can use OpenPyXL not only to create an Excel spreadsheet, but modify a pre-existing one. In this chapter, you learned how to do the following:
- Create a spreadsheet
- Write to a spreadsheet
- Add and remove sheets
- Insert and delete rows and columns
- Edit cell data
- Create merged cells
- Freeze panes
Give the examples in this chapter a try. Then modify them a bit to see what else you can do on your own.
В этом уроке я расскажу, как создать файл excel в Python с помощью библиотеки openpyxl.
Многие приложения, работающие с данными, нуждаются в экспорте этих данных в различные форматы. Очень распространенным и широко используемым форматом являются электронные таблицы.
В Python существуют различные библиотеки для создания файлов excel, одной из самых популярных является openpyxl благодаря простоте использования и тому, что она позволяет как читать, так и записывать электронные таблицы.
Содержание
- 1 Установка openpyxl
- 2 Создание файла excel в python
- 3 Создание листа
- 4 Доступ к листу
- 5 Доступ к ячейке
- 6 Запись значений в ячейку
- 7 Сохранение списка значений
- 8 Сохранение книги excel в Python
- 8.1 Похожие записи
Поскольку это внешняя библиотека, первое, что вы должны сделать для использования openpyxl, это установить ее.
Создайте новый каталог для вашего проекта, получите к нему доступ и запустите виртуальную среду.
После активации виртуальной среды выполните следующую команду из терминала для установки openpyxl:
$> pip install openpyxl
Создание файла excel в python
Как вы, возможно, знаете электронные таблицы группируются в книги. Книга – это родительская сущность электронной таблицы (обычно соответствующая файлу excel). В свою очередь, она состоит из одного или нескольких листов.
Книга Excel состоит как минимум из одного листа. Лист, с которым вы работаете, называется активным листом.
Для начала работы с openpyxl вам не нужно сохранять какой-либо файл в файловой системе. Вы просто создаете книгу.
В приведенном ниже коде вы узнаете, как создать книгу в openpyxl:
Code language: JavaScript (javascript)
import openpyxl wb = openpyxl.Workbook()
Переменная wb является экземпляром пустой книги. Вновь созданная книга содержит один лист, который является активным. Доступ к нему можно получить через активный атрибут.
Одним из основных свойств листа является его имя, поскольку, как мы увидим в следующем разделе, это позволяет нам обращаться к нему непосредственно через его имя.
В следующем примере показано, как получить доступ к имени активного листа и как его изменить:
Code language: PHP (php)
>>> import openpyxl >>> wb = openpyxl.Workbook() >>> hoja = wb.active >>> print(f'Active list: {list.title}') Active list: Sheet >>> list.title = "Values" >>> print(f'Active list: {wb.active.title}') Active list: Values
Создание листа
Помимо листа по умолчанию, с помощью openpyxl можно создать несколько листов в книге, используя метод create_sheet() у workbook как показано ниже (продолжение предыдущего примера):
Code language: PHP (php)
# Добавление листа 'Sheet' в конец (по умолчанию). >>> list1 = wb.create_sheet("List") # Добавим лист 'Sheet' в первую позицию. # Если "List" существует, добавим цифру 1 в конец имени >>> list2 = wb.create_sheet("List", 0) # Добавим лист "Another list" на позицию 1 >>> wb.create_sheet(index=1, title="Another list") # Вывод на экран названий листов >>> print(wb.sheetnames) ['List1', 'Another list', 'Values', 'List']
Также можно создать копию листа с помощью метода copy_worksheet():
Code language: JavaScript (javascript)
>>> sourse = wb.active >>> new = wb.copy_worksheet(sourse)
Доступ к листу
Как я уже говорил в предыдущем разделе, имена листов являются очень важным свойством, поскольку они позволяют нам обращаться к ним напрямую, рассматривая workbook как словарь. Продолжаем пример:
Code language: PHP (php)
>>> list = wb.active # Это лист, который находится в индексе 0 >>> print(f'Active list: {list.title}') Active list: list1 >>> list = wb['Another list'] >>> wb.active = list >>> print(f'Active list: {wb.active.title}') Active list: Another list
С другой стороны, как мы видели в предыдущем разделе, можно получить список с именами всех листов, обратившись к свойству sheetnames у workbook. Также можно перебирать все листы:
Code language: PHP (php)
>>> print(wb.sheetnames) ['List1', 'Another list', 'Values', 'List'] >>> for list in wb: ... print(list.title) List1 Another list Values List
Доступ к ячейке
До сих пор мы видели, как создать книгу, листы и как получить к ним доступ. Теперь перейдем к самому главному – как получить доступ к значению ячейки и как сохранить данные.
Можно получить доступ к ячейке, рассматривая лист как словарь, где имя ячейки используется в качестве ключа. Это происходит в результате комбинации имени столбца и номера строки.
Вот как получить доступ к ячейке в столбце A и строке 1:
Code language: PHP (php)
>>> wb = openpyxl.Workbook() >>> hoja = wb.active >>> a1 = list["A1"] >>> print(a1.value) None
Также можно получить доступ к ячейке, используя обозначения строк и столбцов, с помощью метода cell() следующим образом:
Code language: PHP (php)
>>> b2 = list.cell(row=2, column=2) >>> print(b2.value)
ВАЖНО: Когда создается книга, она не содержит ячеек. Ячейки создаются в памяти по мере обращения к ним, даже если они не содержат никакого значения.
Запись значений в ячейку
В предыдущем разделе вы могли заметить, что при выводе содержимого ячейки (print(a1.value)) всегда возвращалось None. Это происходит потому, что ячейка не содержит никакого значения.
Чтобы присвоить значение определенной ячейке, вы можете сделать это тремя различными способами:
Code language: PHP (php)
# 1.- Присвоение значения непосредственно ячейке >>> list["A1"] = 10 >>> a1 = list["A1"] >>> print(a1.value) 10 # 2.- Использование обозначения строки, столбца со значением аргумента >>> b1 = list.cell(row=1, column=2, value=20) >>> print(b1.value) 20 # 3.- Обновление свойства значения ячейки >>> c1 = list.cell(row=1, column=3) >>> c1.value = 30 >>> print(c1.value) 30
Сохранение списка значений
Присвоение значения ячейке может быть использовано в отдельных ситуациях. Однако в Python часто бывает так, что данные хранятся в списках или кортежах. Для таких случаев, когда вам нужно экспортировать такие данные, я покажу вам более оптимальный способ создания excel-файла с помощью openpyxl.
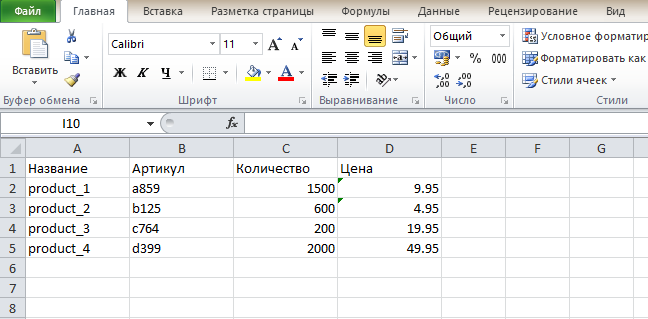
Представьте, что у вас есть список товаров с названием, артикулом, количеством и ценой, как показано ниже:
Code language: JavaScript (javascript)
products = [ ('product_1', 'a859', 1500, 9.95), ('product_2', 'b125', 600, 4.95), ('product_3', 'c764', 200, 19.95), ('product_4', 'd399', 2000, 49.95) ]
Как мы можем экспортировать эти данные в excel с помощью openpyxl? Самый простой способ – использовать метод append() объекта листа.
Вот как это можно сделать:
Code language: PHP (php)
products = [ ('product_1', 'a859', 1500, 9.95), ('product_2', 'b125', 600, 4.95), ('product_3', 'c764', 200, 19.95), ('product_4', 'd399', 2000, 49.95) ] wb = openpyxl.Workbook() list = wb.active # Создание строки с заголовками list.append(('Название', 'Артикул', 'Количество', 'Цена')) for product in products: # продукт - кортеж со значениями продукта list.append(product)
Сохранение книги excel в Python
В завершение этогй статьи я покажу вам, как сохранить файл excel в Python с помощью openpyxl.
Чтобы сохранить файл excel с помощью openpyxl, достаточно вызвать метод save() у workbook с именем файла. Это позволит сохранить рабочую книгу со всеми листами и данными в каждом из них.
Если мы сделаем это на предыдущем примере , то получим следующий результат:
Code language: JavaScript (javascript)
wb.save('products.xlsx')
Microsoft Excel is probably one of the highly used data storage applications. A huge proportion of small to medium size businesses fulfill their analytics requirement using Excel.
However, analyzing huge amount of data in Excel can become highly tedious and time-consuming. You could build customized data processing and analytics application using Visual Basic(VBA), the language that powers the Excel sheets. However, learning VBA could be difficult and perhaps, not worth it.
However, if you have a little knowledge of Python, you could build highly professional Business Intelligence using Excel data, without the need of a database. Using Python with Excel could be a game changer for your business.
Sections Covered
- Basic Information about Excel
- What is Openpyxl and how to install it?
- Reading data from Excel in Python
- Reading multiple cells from Excel in Python
- Find the max row and column number of an Excel sheet in Python
- How to iterate over Excel rows and columns in Python?
- Create a new Excel file with Python
- Writing data to Excel in Python
- Appending data to Excel in Python
- Manipulating Excel Sheets in Python
- Practical usage example of data analysis of Excel sheets in Python
Basic Information about Excel
Before beginning this Openpyxl tutorial, you need to keep the following details in mind.
- Excel files are called Workbooks.
- Each Workbook can contain multiple sheets.
- Every sheet consists of rows starting from 1 and columns starting from A.
- Rows and columns together make up a cell.
- Any type of data can be stored.
What is Openpyxl and how to install it?
The Openpyxl module in Python is used to handle Excel files without involving third-party Microsoft application software. It is arguably, the best python excel library that allows you to perform various Excel operations and automate excel reports using Python. You can perform all kinds of tasks using Openpyxl like:-
- Reading data
- Writing data
- Editing Excel files
- Drawing graphs and charts
- Working with multiple sheets
- Sheet Styling etc.
You can install Openpyxl module by typing pip install openpyxl in your command line.
pip install openpyxlReading data from Excel in Python
To import an excel file in Python, use the load_workbook method from Openpyxl library.
Let’s import an Excel file named wb1.xlsx in Python using Openpyxl module. It has the following data as shown in the image below.

Step 1 — Import the load_workbook method from Openpyxl.
from openpyxl import load_workbook
Step 2 — Provide the file location for the Excel file you want to open in Python.
wb = load_workbook('wb1.xlsx')If your Excel file is present in the same directory as the python file, you don’t need to provide to entire file location.
Step 3 — Choose the first active sheet present in the workbook using wb.active attribute.
sheet = wb.activeThe above points are a standard way of accessing Excel sheets using Python. You will see them being used multiple times through out this article.
Let’s read all the data present in Row 1 (header row).
Method 1 — Reading data through Excel cell name in Python
Code
from openpyxl import load_workbook

wb = load_workbook('wb1.xlsx')

sheet = wb.active

print(sheet["A1"].value)
print(sheet["B1"].value)
print(sheet["C1"].value)
print(sheet["D1"].value)
Output
ProductId
ProductName
Cost per Unit
Quantity
Method 2 — Reading data from Excel using cell() method in Python
Code
from openpyxl import load_workbook

wb = load_workbook('wb1.xlsx')

sheet = wb.active

print(sheet.cell(row=1, column=1).value)
print(sheet.cell(row=1, column=2).value)
print(sheet.cell(row=1, column=3).value)
print(sheet.cell(row=1, column=4).value)
Output
ProductId
ProductName
Cost per Unit
Quantity
Reading Multiple Cells from Excel in Python
You can also read multiple cells from an Excel workbook. Let’s understand this through various examples. Refer to the image of the wb1.xlsx file above for clarity.
Method 1 — Reading a range of cells in Excel using cell names
To read the data from a specific range of cells in your Excel sheet, you need to slice your sheet object through both the cells.
Code
from openpyxl import load_workbook

wb = load_workbook('wb1.xlsx')

sheet = wb.active

# Access all cells from A1 to D11
print(sheet["A1:D11"])
Output
((<Cell 'Sheet1'.A1>, <Cell 'Sheet1'.B1>, <Cell 'Sheet1'.C1>, <Cell 'Sheet1'.D1>),
 (<Cell 'Sheet1'.A2>, <Cell 'Sheet1'.B2>, <Cell 'Sheet1'.C2>, <Cell 'Sheet1'.D2>),
 (<Cell 'Sheet1'.A3>, <Cell 'Sheet1'.B3>, <Cell 'Sheet1'.C3>, <Cell 'Sheet1'.D3>),
 (<Cell 'Sheet1'.A4>, <Cell 'Sheet1'.B4>, <Cell 'Sheet1'.C4>, <Cell 'Sheet1'.D4>),
 (<Cell 'Sheet1'.A5>, <Cell 'Sheet1'.B5>, <Cell 'Sheet1'.C5>, <Cell 'Sheet1'.D5>),
 (<Cell 'Sheet1'.A6>, <Cell 'Sheet1'.B6>, <Cell 'Sheet1'.C6>, <Cell 'Sheet1'.D6>),
 (<Cell 'Sheet1'.A7>, <Cell 'Sheet1'.B7>, <Cell 'Sheet1'.C7>, <Cell 'Sheet1'.D7>),
 (<Cell 'Sheet1'.A8>, <Cell 'Sheet1'.B8>, <Cell 'Sheet1'.C8>, <Cell 'Sheet1'.D8>),
 (<Cell 'Sheet1'.A9>, <Cell 'Sheet1'.B9>, <Cell 'Sheet1'.C9>, <Cell 'Sheet1'.D9>),
 (<Cell 'Sheet1'.A10>, <Cell 'Sheet1'.B10>, <Cell 'Sheet1'.C10>, <Cell 'Sheet1'.D10>),
 (<Cell 'Sheet1'.A11>, <Cell 'Sheet1'.B11>, <Cell 'Sheet1'.C11>, <Cell 'Sheet1'.D11>))
You can see that by slicing the sheet data from A1:D11, it returned us tuples of row data inside a tuple. In order to read the values of every cell returned, you can iterate over each row and use .value.
Code
from openpyxl import load_workbook

wb = load_workbook('wb1.xlsx')

sheet = wb.active

# Access all cells from A1 to D11
for row in sheet["A1:D11"]:
    print ([x.value for x in row])
Output
['ProductId', 'ProductName', 'Cost per Unit', 'Quantity']
[1, 'Pencil', '$0.5', 200]
[2, 'Pen', '$1', 500]
[3, 'Eraser', '$0.25', 100]
[4, 'Sharpner', '$0.75', 100]
[5, 'Files', '$3', 50]
[6, 'A4 Size Paper', '$9', 10]
[7, 'Pencil Box', '$12', 20]
[8, 'Pen Stand', '$5.5', 10]
[9, 'Notebook', '$2', 50]
[10, 'Marker', '$1', 75]
Method 2 — Reading a single row in Excel using cell name
To read a single row in your Excel sheet, just access the single row number from your sheet object.
Code
from openpyxl import load_workbook

wb = load_workbook('wb1.xlsx')

sheet = wb.active

# Access all cells in row 1
for data in sheet["1"]:
    print(data.value)
Output
ProductId
ProductName
Cost per Unit
Quantity
Method 3 — Reading all rows in Excel using rows attribute
To read all the rows, use sheet.rows to iterate over rows with Openpyxl. You receive a tuple element per row by using the sheet.rows attribute.
Code
from openpyxl import load_workbook

wb = load_workbook('wb1.xlsx')

sheet = wb.active

# Access all cells in row 1
for row in sheet.rows:
    print([data.value for data in row])
Output
['ProductId', 'ProductName', 'Cost per Unit', 'Quantity']
[1, 'Pencil', '$0.5', 200]
[2, 'Pen', '$1', 500]
[3, 'Eraser', '$0.25', 100]
[4, 'Sharpner', '$0.75', 100]
[5, 'Files', '$3', 50]
[6, 'A4 Size Paper', '$9', 10]
[7, 'Pencil Box', '$12', 20]
[8, 'Pen Stand', '$5.5', 10]
[9, 'Notebook', '$2', 50]
[10, 'Marker', '$1', 75]
Method 4 — Reading a single column in Excel using cell name
Similar to reading a single row, you can read the data in a single column of your Excel sheet by its alphabet.
Code
from openpyxl import load_workbook

wb = load_workbook('wb1.xlsx')

sheet = wb.active

# Access all cells in column A
for data in sheet["A"]:
    print(data.value)
Output
ProductId
1
2
3
4
5
6
7
8
9
10
Method 5 — Reading all the columns in Excel using columns attribute
To read all the data as a tuple of the columns in your Excel sheet, use sheet.columns attribute to iterate over all columns with Openpyxl.
Code
from openpyxl import load_workbook

wb = load_workbook('wb1.xlsx')

sheet = wb.active

# Access all columns
for col in sheet.columns:
    print([data.value for data in col])
Output
['ProductId', 1, 2, 3, 4, 5, 6, 7, 8, 9, 10]
['ProductName', 'Pencil', 'Pen', 'Eraser', 'Sharpner', 'Files', 'A4 Size Paper', 'Pencil Box', 'Pen Stand', 'Notebook', 'Marker']
['Cost per Unit', '$0.5', '$1', '$0.25', '$0.75', '$3', '$9', '$12', '$5.5', '$2', '$1']
['Quantity', 200, 500, 100, 100, 50, 10, 20, 10, 50, 75]
Method 6 — Reading all the data in Excel
To read all the data present in your Excel sheet, you don’t need to index the sheet object. You can just iterate over it.
Code
from openpyxl import load_workbook

wb = load_workbook('wb1.xlsx')

sheet = wb.active

# Access all cells in Excel
for row in sheet:
    print([data.value for data in row])
Output
['ProductId', 'ProductName', 'Cost per Unit', 'Quantity']
[1, 'Pencil', '$0.5', 200]
[2, 'Pen', '$1', 500]
[3, 'Eraser', '$0.25', 100]
[4, 'Sharpner', '$0.75', 100]
[5, 'Files', '$3', 50]
[6, 'A4 Size Paper', '$9', 10]
[7, 'Pencil Box', '$12', 20]
[8, 'Pen Stand', '$5.5', 10]
[9, 'Notebook', '$2', 50]
[10, 'Marker', '$1', 75]
Find the max row and column number of an Excel Sheet in Python
To find the max row and column number from your Excel sheet in Python, use sheet.max_row and sheet.max_column attributes in Openpyxl.
Code
from openpyxl import load_workbook

wb = load_workbook('wb1.xlsx')

sheet = wb.active

print(f"Max row in the active sheet is {sheet.max_row}")
print(f"Max column in the active sheet is {sheet.max_column}")
Output
Max row in the active sheet is 11
Max column in the active sheet is 4
Note — If you update a cell with a value, the sheet.max_row and sheet.max_column values also change, even though you haven’t saved your changes.
Code
from openpyxl import load_workbook

wb = load_workbook('pylenin.xlsx')

sheet = wb.active

sheet["A1"].value = "Lenin"
print(sheet.max_row)

sheet["A2"].value = "Mishra"
print(sheet.max_row)

# wb.save('pylenin.xlsx')
Output
1
2
How to iterate over Excel rows and columns in Python?
Openpyxl offers two commonly used methods called iter_rows and iter_cols to iterate over Excel rows and columns in Python.
iter_rows()— Returns one tuple element per row selected.iter_cols()— Returns one tuple element per column selected.
Both the above mentioned methods can receive the following arguments for setting boundaries for iteration:
- min_row
- max_row
- min_col
- max_col
Example 1 — iter_rows()
Code
from openpyxl import load_workbook

wb = load_workbook('wb1.xlsx')

sheet = wb.active

# Access all cells from between
# "Row 1 and Row 2" and "Column 1 and Column 3"
for row in sheet.iter_rows(min_row=1,
                           max_row=2,
                           min_col=1,
                           max_col=3):
    print([data.value for data in row])
Output
['ProductId', 'ProductName', 'Cost per Unit']
[1, 'Pencil', '$0.5']
As you can see, only the first 3 columns of the first 2 rows are returned. The tuples are row based.
You can also choose to not pass in some or any arguments in iter_rows method.
Code — Not passing min_col and max_col
from openpyxl import load_workbook

wb = load_workbook('wb1.xlsx')

sheet = wb.active

# min_col and max_col arguments are not provided
for row in sheet.iter_rows(min_row=1,
                           max_row=2):
    print([data.value for data in row])
Output
['ProductId', 'ProductName', 'Cost per Unit', 'Quantity']
[1, 'Pencil', '$0.5', 200]
All the columns from the first 2 rows are being printed.
Example 2 — iter_cols()
Code
from openpyxl import load_workbook

wb = load_workbook('wb1.xlsx')

sheet = wb.active

# Access all cells from A1 to D11
for row in sheet.iter_cols(min_row=1,
                           max_row=2,
                           min_col=1,
                           max_col=3):
    print([data.value for data in row])
Output
['ProductId', 1]
['ProductName', 'Pencil']
['Cost per Unit', '$0.5']
The tuples returned are column based on using iter_cols() method.
You can also choose to not pass in some or any arguments in iter_cols() method.
Code — Not passing any argument
from openpyxl import load_workbook

wb = load_workbook('wb1.xlsx')

sheet = wb.active

# min_col and max_col arguments are not provided
for row in sheet.iter_cols():
    print([data.value for data in row])
Output
['ProductId', 1, 2, 3, 4, 5, 6, 7, 8, 9, 10]
['ProductName', 'Pencil', 'Pen', 'Eraser', 'Sharpner', 'Files', 'A4 Size Paper', 'Pencil Box', 'Pen Stand', 'Notebook', 'Marker']
['Cost per Unit', '$0.5', '$1', '$0.25', '$0.75', '$3', '$9', '$12', '$5.5', '$2', '$1']
['Quantity', 200, 500, 100, 100, 50, 10, 20, 10, 50, 75]
Create a new Excel file with Python
To create a new Excel file in Python, you need to import the Workbook class from Openpyxl library.
Code
from openpyxl import Workbook

wb = Workbook()
sheet = wb.active

sheet['A1'] = "Pylenin"
sheet['B1'] = "loves"
sheet['C1'] = "Python"

wb.save("pylenin.xlsx")
This should create a new Excel workbook called pylenin.xlsx with the provided data.

Writing data to Excel in Python
There are multiple ways to write data to an Excel file in Python.
Method 1 — Writing data to Excel using cell names
Code
from openpyxl import Workbook

wb = Workbook()
sheet = wb.active

sheet['A1'] = "Pylenin"
sheet['B1'] = "loves"
sheet['C1'] = "Python"

wb.save("pylenin.xlsx")
Output

Method 2 — Writing data to Excel using the cell() method
Code
from openpyxl import Workbook

wb = Workbook()
sheet = wb.active

sheet.cell(row=1, column=1).value = "Pylenin"
sheet.cell(row=1, column=2).value = "loves"
sheet.cell(row=1, column=3).value = "Python"

wb.save("pylenin.xlsx")
Output

Method 3 — Writing data to Excel by iterating over rows
Code — Example 1
from openpyxl import Workbook

wb = Workbook()
sheet = wb.active

for row in sheet["A1:D3"]:
    row[0].value = "Pylenin"
    row[1].value = "loves"
    row[2].value = "Python"

wb.save("pylenin.xlsx")
Output

You can also use methods like iter_rows() and iter_cols() to write data to Excel.
Code — Example 2 — using iter_rows() method
from openpyxl import Workbook

wb = Workbook()
sheet = wb.active

for row in sheet.iter_rows(min_row=1,
                           max_row=3,
                           min_col=1,
                           max_col=3):
    row[0].value = "Pylenin"
    row[1].value = "loves"
    row[2].value = "Python"

wb.save("pylenin.xlsx")
Output

Code — Example 3 — using iter_cols() method
from openpyxl import Workbook

wb = Workbook()
sheet = wb.active

for col in sheet.iter_cols(min_row=1,
                           max_row=3,
                           min_col=1,
                           max_col=3):
    col[0].value = "Pylenin"
    col[1].value = "loves"
    col[2].value = "Python"

wb.save("pylenin.xlsx")
Output

Appending data to Excel in Python
Openpyxl provides an append() method, which is used to append values to an existing Excel sheet in Python.
Code
from openpyxl import load_workbook

wb = load_workbook('pylenin.xlsx')
sheet = wb.active

data = (
    ("Pylenin", "likes", "icecream"),
    ("Pylenin", "likes", "Cricket")
)

for row in data:
    sheet.append(row)
wb.save('pylenin.xlsx')
Output

Manipulating Excel Sheets in Python
Each Excel workbook can contain multiple sheets. To get a list of all the sheet names in an Excel workbook, you can use the wb.sheetnames.
Code
from openpyxl import load_workbook

wb = load_workbook('pylenin.xlsx')
print(wb.sheetnames)
Output
['Sheet']As you can see, pylenin.xlsx has only one sheet.
To create a new sheet in Python, use the create_sheet() method from the Openpyxl library.
Code
from openpyxl import load_workbook

wb = load_workbook('pylenin.xlsx')
wb.create_sheet('Pylenin')

wb.save('pylenin.xlsx')
Output

You can also create sheets at different positions in the Excel Workbook.
Code
from openpyxl import load_workbook

wb = load_workbook('pylenin.xlsx')

# insert sheet at 2nd to last position
wb.create_sheet('Lenin Mishra', -1)

wb.save('pylenin.xlsx')
Output

If your Excel workbook contains multiple sheets and you want to work with a particular sheet, you can refer the title of that sheet in your workbook object.
Code
from openpyxl import load_workbook

wb = load_workbook('pylenin.xlsx')
ws = wb["Pylenin"]

ws["A1"].value = "Pylenin"
ws["A2"].value = "loves"
ws["A3"].value = "Python"

wb.save('pylenin.xlsx')
Output

Practical usage example of data analysis of Excel sheets in Python
Let’s perform some data analysis with wb1.xlsx file as shown in the first image.
Objective
- Add a new column showing
Total Price per Product. - Calculate the
Total Costof all the items bought.
The resulting Excel sheet should look like the below image.

Step 1 — Find the max row and max column of the Excel sheet
As mentioned before, you can use the sheet.max_row and sheet.max_column attributes to find the max row and max column for any Excel sheet with Openpyxl.
Code
from openpyxl import load_workbook

wb = load_workbook('wb1.xlsx')

sheet = wb.active

print(f"Max row in the active sheet is {sheet.max_row}")
print(f"Max column in the active sheet is {sheet.max_column}")
Output
Max row in the active sheet is 11
Max column in the active sheet is 4
Step 2 — Add an extra column in Excel with Python

To add an extra column in the active Excel sheet, with calculations, you need to first create a new column header in the first empty cell and then iterate over all rows to multiply Quantity with Cost per Unit.
Code
from openpyxl import load_workbook

wb = load_workbook('wb1.xlsx')

sheet = wb.active

# Add new column header

sheet.cell(row=1, column=sheet.max_column+1).value = "Total Price per Product"

wb.save("wb1.xlsx")
Output

Now that an extra column header has been created, the sheet.max_column value will change to 5.
Now you can calculate the Total Price per Product using iter_rows() method.
Code
from openpyxl import load_workbook

wb = load_workbook('wb1.xlsx')

sheet = wb.active

# Calculate Total Price per Product

for id, row in enumerate(sheet.iter_rows(min_row=2,
                                         max_row = sheet.max_row)):

    row_number = id + 2 # index for enumerate will start at 0
    product_name = row[1].value
    cost_per_unit = row[2].value
    quantity = row[3].value
    print(f"Total cost for {product_name} is {cost_per_unit*quantity}")

    # Update cell value in the last column
    current_cell = sheet.cell(row=row_number, column=sheet.max_column)
    current_cell.value = cost_per_unit*quantity

    # Format cell from number to $ currency
    current_cell.number_format = '$#,#0.0'

print("nSuccesfully updated Excel")
wb.save('wb1.xlsx')
Output
Total cost for Pencil is 100.0
Total cost for Pen is 500
Total cost for Eraser is 25.0
Total cost for Sharpner is 75.0
Total cost for Files is 150
Total cost for A4 Size Paper is 90
Total cost for Pencil Box is 240
Total cost for Pen Stand is 55.0
Total cost for Notebook is 100
Total cost for Marker is 75

Succesfully updated Excel
Step 3 — Calculate sum of a column in Excel with Python
The last step is to calculate the Total Cost of the last column in the Excel file.
Access the last column and add up all the cost.
You can read the last column by accessing the sheet.columns attribute. Since it returns a generator, you first convert it to a python list and access the last column.
last_column_data = list(sheet.columns)[-1]
# Ignore header cell
total_cost = sum([x.value for x in last_column_data[1:]])
Create a new row 2 places down from the max_row and fill in Total Cost.
max_row = sheet.max_row

total_cost_descr_cell = sheet.cell(row = max_row +2, column = sheet.max_column -1)
total_cost_descr_cell.value = "Total Cost"

total_cost_cell =  sheet.cell(row = max_row +2, column = sheet.max_column)
total_cost_cell.value = total_cost
Import Font class from openpyxl.styles to make the last row Bold.
# Import the Font class from Openpyxl
from openpyxl.styles import Font

bold_font = Font(bold=True)
total_cost_descr_cell.font = bold_font
total_cost_cell.font = bold_font

total_cost_cell.number_format = "$#,#0.0"
Final Code
Code
from openpyxl import load_workbook

wb = load_workbook('wb1.xlsx')

sheet = wb.active

last_column_data = list(sheet.columns)[-1]
# Ignore header cell
total_cost = sum([x.value for x in last_column_data[1:]])

max_row = sheet.max_row

total_cost_descr_cell = sheet.cell(row = max_row + 2, column = sheet.max_column -1)
total_cost_descr_cell.value = "Total Cost"

total_cost_cell =  sheet.cell(row = max_row + 2, column = sheet.max_column)
total_cost_cell.value = total_cost

# Import the Font class from Openpyxl
from openpyxl.styles import Font

bold_font = Font(bold=True)
total_cost_descr_cell.font = bold_font
total_cost_cell.font = bold_font

total_cost_cell.number_format = "$#,#0.0"

print("nSuccesfully updated Excel")
wb.save('wb1.xlsx')
When you run the above code, you should see all the relevant updates to your Excel sheet.
