
Summary
When you quit Word, you may be prompted to always save the changes to your global template, Normal.dot. or Normal.dotm
You can turn off the prompt and Word will automatically save the changes, but you may still have a problem. because your Normal.dot or Normal.dotm template may be infected with a macro virus. To resolve this problem, you may need to update your virus protection software.
Another possibility is that you could have an add-in that is causing this problem. To resolve this problem, you may need to determine what add-in is causing the problem and remove it from the Office or Word startup folders.
Symptoms
Every time that you quit Word, you receive the following message:
Changes have been made that affect the global template, Normal.dotm. Do you want to save those changes?
Cause
This problem may occur for the following reasons.
Cause 1: An installed add-in or an installed macro is changing the global template Normal.dot or Normal.dotm
You may receive the message that is listed in the «Symptoms» section if an add-in or a macro on your computer modified the Normal.dotm template. Add-ins that are known to cause this behavior include the following:
-
Stamps.com Internet postage
-
Works Suite add-in for Microsoft Word
An add-in installed in Word may add one or more of the following items to your computer:
-
WLL file
-
Templates
-
COM add-in
-
Auto macros
Workaround
When you start Word, Word automatically loads templates and add-ins that are located in the startup folder. Problems in Word may be the result of conflicts or of problems with an add-in. To determine whether an item in a startup folder is causing the problem, temporarily empty the folder.
To remove items from the startup folder, follow these steps:
-
Quit all instances of Word and Outlook (Outlook uses Word as its email editor).
-
On your Windows desktop, open File Explorer and look for your startup folders. The default is C:Users<username>AppDataRoamingMicrosoftWordSTARTUP
Tip: You can find the exact path to your Word startup folder by going to File > Options > Advanced and under the General section select File Locations.
-
Drag each item from the startup folder to the desktop. (Or create a folder on your desktop and drag each item to this new folder.)
Note: To create a new folder on the desktop, right-click a blank area on the desktop, point to New, and then click Folder.
-
Start Word.
If you can no longer reproduce the problem, and you removed multiple items from the Startup folder or folders, you can try to isolate the problem by adding the files back to the appropriate Startup folder, one by one. Try to reproduce the problem after each addition to determine which file causes the problem.
How to remove COM Add-ins
COM add-ins can be installed in any location. COM add-ins are installed by programs that interact with Word. To view the list of installed COM add-ins, follow these steps:
-
In Word, go to File > Options > Add-ins
-
Towards the bottom of the window you’ll see Manage COM add-ins. Select the Go button next to it.

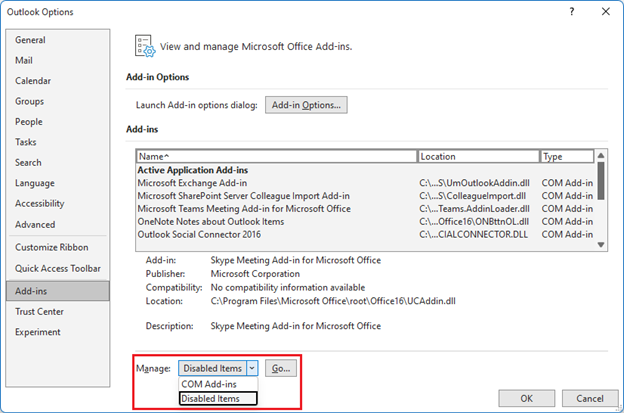
If add-ins are listed in the COM Add-Ins dialog box, temporarily turn off each of the add-ins. To do this, click to clear the check box for each COM add-in that is listed, and then click OK. When you restart Word, Word starts without loading the COM add-ins that you turned off.

If the problem is resolved after you turn off the COM add-ins, one of the listed COM add-ins is the cause of the problem. If you have multiple COM add-ins listed, you may want to determine which one is causing the specific problem. To determine this, turn the COM add-ins back on one at a time, and then restart Word.
How to remove Word auto macros
Some macros are named «auto» macros. These auto macros run automatically when Word is started. The following table lists these auto macros. To start Microsoft Word without running the auto macros, start Word in Safe mode by holding the CTRL key while you start Word.
|
Macro |
Storage location |
Automatically runs |
|
AutoExec |
In the Normal template or in a global add-in |
When you start Word |
|
AutoNew |
In a template |
When a new document that is based on the template is created |
|
AutoOpen |
In document or template |
When a document that is based on the template or that contains the macro is opened |
|
AutoClose |
In document or template |
When a document that is based on the template or that contains the macro is closed |
|
AutoExit |
In the Normal template or a global add-in |
When you quit Word |
Word recognizes a macro with a name that begins with «Auto» as a macro that automatically runs when the situation to which it applies occurs.
If the problem is resolved by holding the SHIFT key when you start Word or when you perform an action in Word such as opening a document, an auto macro is the problem. To work around this problem, follow these steps:
-
In Word, go to the Search box at the top of the app and type Macros.
-
Select View macros from the options that appear.
In the Macros dialog box, a list of macros may appear. If any macro listed begins with «Auto,» you may want to remove this macro. To remove an auto macro, click the macro, and then click
Delete.
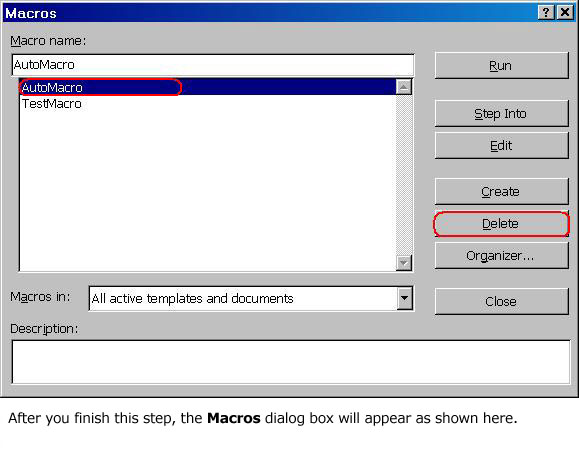
Note: A macro may have been added by a Word add-in. To determine what template contains the macro, change the Macros in box to a listed template. After you determine which template contains the macro, you may want to remove that template from your computer. Removing a template that was added by a Word add-in may reduce or stop the add-in’s functionality.
Cause 2: Word is infected with a macro virus
This problem may occur if your computer is infected with a virus that changes the global template. To help avoid virus infection, keep your antivirus software and your virus definitions updated with the latest versions. Ask your antivirus software vendor for the latest information.
For additional information, see Protect yourself from macro viruses.
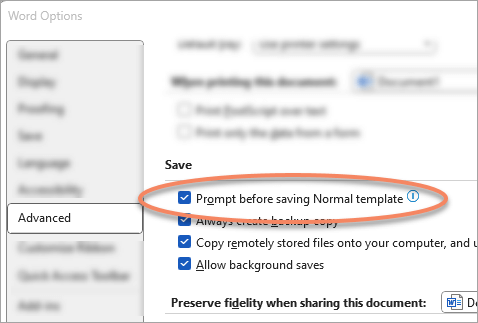
You receive this message if the Prompt before saving Normal template check box is selected.
To turn off this message, follow these steps.
Important: Turning off this message in Word doesn’t resolve whatever is causing the changes to your template to begin with, Word just stops asking you before saving it. You may still have to perform the other steps listed in this article.
-
In Word go to File > Options > Advanced
-
Under the Save group unselect Prompt before saving Normal template.
Need more help?
Want more options?
Explore subscription benefits, browse training courses, learn how to secure your device, and more.
Communities help you ask and answer questions, give feedback, and hear from experts with rich knowledge.
If you want to keep a record of changes made to a document, you can save different versions within the same document. To save the current state of a document, select File – Versions. Click on Save Now, enter a description of the version and click OK.
https://www.youtube.com/watch?v=-5cxSye4YbQ
Contents
- 1 Why can’t I save changes to a Word document?
- 2 How do I permanently edit changes in Word?
- 3 Are changes to a Word document automatically saved?
- 4 When I click save File nothing happens?
- 5 How do I save a Word document in Windows 10?
- 6 How do I save a clean copy after track changes?
- 7 How do I save a Word document without markups?
- 8 How do I permanently remove markup in Word?
- 9 How do I set up AutoSave in Word?
- 10 Where does AutoSave save to?
- 11 How do I make AutoSave default?
- 12 Why is my computer not letting me save as?
- 13 How do I turn Track Changes off in Word?
- 14 How do I save a file that is not responding?
- 15 How do you save a already saved file with modification done in it?
- 16 How do I save as docx?
- 17 How do you save a document in Microsoft Office?
- 18 How do I accept all changes but keep comments?
- 19 Why won’t my track changes turn off?
- 20 What is the difference between simple markup and all markup when tracking changes?
Why can’t I save changes to a Word document?
If you’ve turned on AutoSave, turn it off. If you’ve used Track Changes, then turn it off and resolve all the changes in the document. Then use Save As to save out the document under a new file name. If you still can’t save your edited document, then there is a good chance that the document is corrupted in some way.
How do I permanently edit changes in Word?
Accept or reject changes one at a time
- Click or tap at the beginning of the document.
- On the Review tab, go to Changes.
- Select Accept or Reject. As you accept or reject changes, Word will move to the next change.
- Repeat until you’ve reviewed all changes in your document.
Are changes to a Word document automatically saved?
Word can automatically create a backup of your document every time you save it. However, you can also have Word automatically save your document for you at regular intervals using the AutoRecover feature and use this feature to recover any changes lost in your documents.
When I click save File nothing happens?
You may encounter a situation where nothing happens after you click on the Save button when you are saving a file. This will happen if the file name contains an asterisk character. Answer: Remove the asterisk character in the filename.
How do I save a Word document in Windows 10?
Saving Files in Windows 10
- Click File on the top menu, click Save, and save your document in your Documents folder or to your desktop for easy retrieval later.
- The Save As command gives you a chance to save your work with a different name and in a different location.
How do I save a clean copy after track changes?
Revise the document, and save it by going to File and clicking on Save. Print out a copy of the revised document showing the tracked changes. Hide the tracked changes by going to View and clicking on Markup. Print a “clean” copy of the document.
How do I save a Word document without markups?
Follow these steps:
- Display the Word Options dialog box.
- Click the Trust Center option at the left of the dialog box.
- Click the Trust Center Settings button.
- Click Privacy Options at the left of the dialog box.
- Clear the Make Hidden Markup Visible when Opening or Saving check box.
How do I permanently remove markup in Word?
In order to remove the markup, you have to click the bottom of the Accept split button and choose Accept All Changes in Document. If there are comments, click the bottom of the Delete split button and choose Delete All Comments in Document. Turn off tracking and save the document.
How do I set up AutoSave in Word?
To set the automatic saving feature, follow these steps:
- Display the Word Options dialog box.
- Click on Save at the left side of the dialog box.
- Click on the Save AutoRecover Information Every check box.
- Adjust the Minutes box to reflect how often you want Word to save your document.
- Click on OK.
Where does AutoSave save to?
By default,Word autosave location is AppData folder. There are several locations where Microsoft Word can save your files.
How do I make AutoSave default?
Click on the File menu. Click on Options. Click on Save. Under the “Save documents” section, check the AutoSave OneDrive and SharePoint Online files by default on Word option.
Why is my computer not letting me save as?
If the “Save” option is not available (grayed out in the file menu), this usually indicates the file is unmodified, so saving it would have no effect. Make changes to the file and try again. In the file menu, use the Save As option to save the file as a new file name or to another folder.
How do I turn Track Changes off in Word?
Click the Review tab on the Ribbon. Click the down arrow on Track Changes > Track Changes to turn it on or off. Track Changes: On or Track Changes: Off will display on the status bar (bottom bar in the document.)
How do I save a file that is not responding?
These can be found via File, Open and clicking the Recover Unsaved Documents button found at the very bottom of the Recent File List. Open Word and select File, Options. In the Options dialog box select Save from the left hand menu. Note the AutoRecover files location.
How do you save a already saved file with modification done in it?
Most of the time you’ll just want to save your existing document in its existing location, and Word provides three quick ways to do so. You can click the Save button on the Standard toolbar, use the Ctrl+S or Shift+F12 keyboard shortcut, or choose File, Save.
How do I save as docx?
Converting a .doc to .docx
- Open the .
- Click the ‘File’ tab at the top-left followed by ‘Save As’ from the left-hand menu.
- Once you have chosen an appropriate location, enter a file name in the ‘File name’ field.
- From the ‘Save as type’ dropdown, ensure ‘Word Document (*.
- Click ‘Save’ to confirm and save the file.
How do you save a document in Microsoft Office?
To save Office documents to your local folders by default, use these steps:
- Open an Office app, such as Word.
- Create a new blank document.
- Click on File.
- Click on Options.
- Click on Save.
- Under the “Save documents” section, check the Save to Computer by default option.
- Click the OK button.
Word 2007, 2010, 2013, 2016
- Open the Review tab on the ribbon.
- Click Show Markup in the Review tab.
- Turn off Insertions and Deletions, Comments, and any other options that you use — just leave Formatting turned on.
- Click the arrow immediately below the Accept icon.
- Select the Accept All Changes Shown option.
Why won’t my track changes turn off?
While Word normally lets you turn off the Track Changes feature by clicking its icon in the Ribbon, the program may prevent you from doing so if either you or a third party locked the feature with a password. Unlock Track Changes by clicking Lock Tracking and entering the password.
What is the difference between simple markup and all markup when tracking changes?
Simple Markup points out where changes are made with a red line in the margin. All Markup shows all edits with different colors of text and lines.
by Matthew Adams
Matthew is a freelancer who has produced a variety of articles on various topics related to technology. His main focus is the Windows OS and all the things… read more
Updated on June 5, 2020
XINSTALL BY CLICKING THE DOWNLOAD FILE
This software will keep your drivers up and running, thus keeping you safe from common computer errors and hardware failure. Check all your drivers now in 3 easy steps:
- Download DriverFix (verified download file).
- Click Start Scan to find all problematic drivers.
- Click Update Drivers to get new versions and avoid system malfunctionings.
- DriverFix has been downloaded by 0 readers this month.
Lots of MS Word users set up documents with templates. However, the application has one template issue that prompts users to save changes even when they’ve made no modifications. A dialog box window opens stating, “Do you also want to save changes to the document template?” Of course, you don’t need to save any changes when you haven’t made any adjustments to the document. This is how you can fix the “save changes to the…” issue in Word.
Do you also want to save changes to the document template?
Switch off MS Word’s Add-ins
This issue is largely due to Word’s add-ins. Some of the application’s add-ins temporarily modify the document templates. As such, switching the add-ins off is the best way to resolve this issue.
- To disable add-ins, open MS Word, click the File tab and select Options to open the software’s settings window.
- Click Add-ins on the left of the Word Options window. That will open a list of your active and inactive application add-ins.
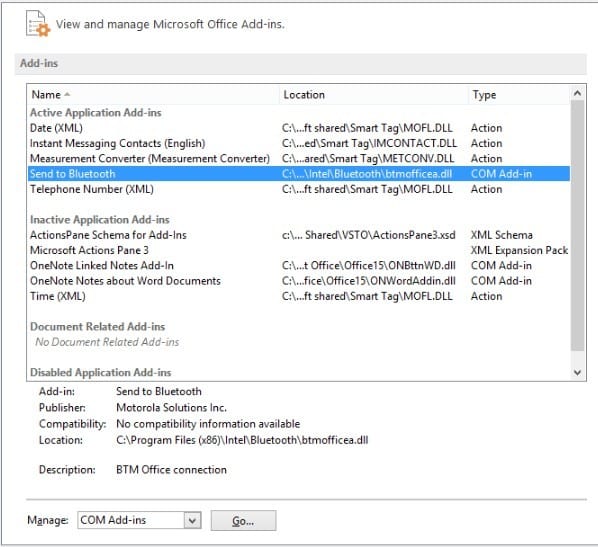
- Each add-in has a type category, such as COM, Template and Action. Click the Manage drop-down menu and select a type from there.
- Press the Go button to open a window that displays all the add-ins which fit within the type selected from the drop-down menu.
Now you can deselect the check boxes for the active add-ins to disable them. - Press the OK button to close the window.
Switch the Send to Bluetooth Add-in off
Switching all active add-ins off as outlined above will probably fix the “save changes to the…” issue. However, this template issue is usually due to the Send to Bluetooth add-in. That sends files to any Bluetooth device paired with a desktop or laptop. If that’s one of your active add-ins, disable it before the others. Select COM Add-ins from the Manage drop-down menu, and then deselect the Send to Bluetooth check box. Press the OK button to close the COM window.
Add-ins are the primary factor behind save changes dialog box errors in MS Word. Switching them off will ensure that the “save changes to the…” dialog box prompt only opens when it’s supposed to. That can also fix Word’s save changes to global template dialog box, which might also pop up when you’ve made no adjustments to a template.
RELATED STORIES YOU NEED TO CHECK OUT:
- Fix: “Microsoft Word has stopped working” error
- How to fix ActiveX error 429 in Windows 10, 8 or 7
- Blank page when printing from Internet Explorer [FIX]
Still having issues? Fix them with this tool:
SPONSORED
If the advices above haven’t solved your issue, your PC may experience deeper Windows problems. We recommend downloading this PC Repair tool (rated Great on TrustPilot.com) to easily address them. After installation, simply click the Start Scan button and then press on Repair All.
![]()
Newsletter
- Remove From My Forums
-
Вопрос
-
I have observed the following behavior for Word 2007.
- Word is closed and not running.
- Open a document in Word 2007.
- Close Microsoft Word 2007 — no changes have been made to the document.
- The prompt ‘Do you want to save the changes to «<document name>»?’ appears with the buttons, «Yes,» «No,» and «Cancel.»
My expectation is that I should only be prompted to save changes when changes have actually been made. Instead, the prompt is given for all documents, even those for which no changes have been made.
Any suggestions for debugging this?
Test System: Microsoft Office Word 2007 (12.0.6545.5000) SP2 MSO (12.0.6562.5003), Part of Microsoft Office Professional Plus 2007. Microsoft Windows 7 Enterprise 32-bit.
Ответы
-
There is an Options setting (Office Button > Word Options > Advanced > Save) and that might be marked to prompt for changes being made to the Normal template. You can uncheck it and the prompt should go away. But why is it happening
in the first place?One way that this can happen is if there are styles in the Normal template that are set for Auto Updating. Open a new blank document and used the Styles group on the Home tab to look at the setting of the various styles in the template. Right click
and select modify and a dialog like below will appear. The marked area is where to look and see if the style is marked to Auto Update.Hope this helps
Kind Regards, Rich … http://greatcirclelearning.com
-
Изменено
12 января 2012 г. 23:02
-
Помечено в качестве ответа
William Zhou CHN
20 января 2012 г. 6:18
-
Изменено

Templates in Word are like ready-made documents. They store formatting, styles, and page layout settings, default text, etc., that allow you to quickly create various types of documents. The default template applied to new, blank documents is the Normal template.
If you make changes to the Normal template, by default, Word saves those changes without notifying you. However, if you want to choose whether to save the changes to the Normal template, there is a setting that causes Word to ask if you want to save the changes. We’ll show you how to turn this setting on.
NOTE: We used Word 2013 to illustrate this feature.
To access this setting, click the “File” tab.

On the backstage screen, click “Options” in the list of items on the left.
On the “Word Options” dialog box, click “Advanced” in the list of items on the left.
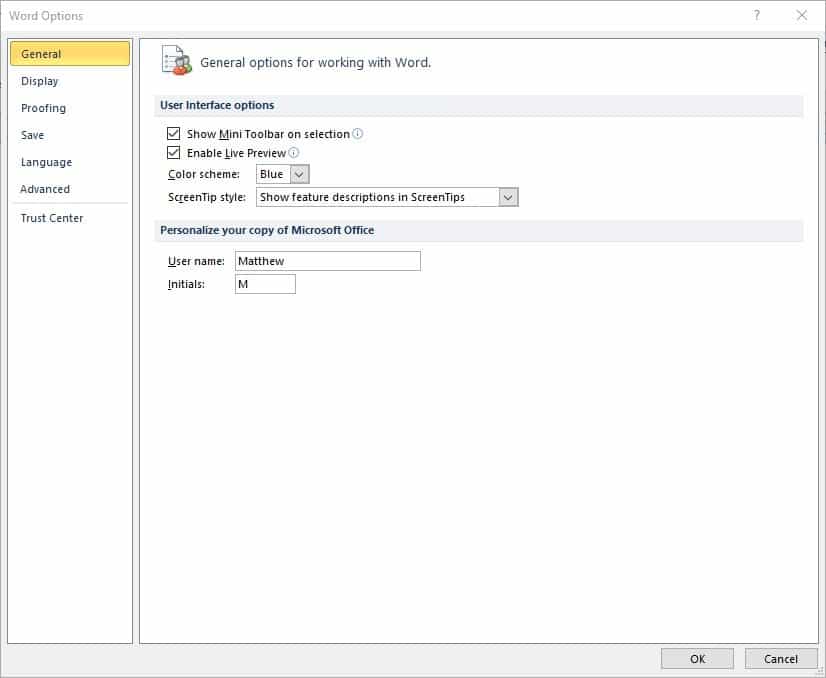
In the “Save” section, select the “Prompt before saving Normal template” check box so there is a check mark in the box.
Click “OK” to save the change and close the “Word Options” dialog box.
Now, you’ll see a confirmation dialog box when you exit Word (not when you close a document) asking if you want to save the Normal template, as shown in the image at the beginning of this article.
READ NEXT
- › How to Quickly Insert Blocks of Text in Microsoft Word with AutoText
- › HoloLens Now Has Windows 11 and Incredible 3D Ink Features
- › This New Google TV Streaming Device Costs Just $20
- › BLUETTI Slashed Hundreds off Its Best Power Stations for Easter Sale
- › The New NVIDIA GeForce RTX 4070 Is Like an RTX 3080 for $599
- › How to Adjust and Change Discord Fonts
- › Google Chrome Is Getting Faster
How-To Geek is where you turn when you want experts to explain technology. Since we launched in 2006, our articles have been read billions of times. Want to know more?