
You are here
Tables in Microsoft Word are great, but the default settings for tables are sometimes not what you want. In particular, Word will split individual rows across two pages if it needs to. If you’d rather have Word break tables up between pages so that each row is kept intact and not split across two pages (i.e. force Word to insert a page break before the row rather than in the middle of the row), this lesson will show you how to do it.
Note that this lesson covers Microsoft Word 2007, 2010 and 2013 for Windows, and Microsoft Word 2011 for Mac.
Tell Microsoft Word not to split table rows across pages
This lesson assumes you have already created a table that spans two or more pages (or will do by the time you’ve finished creating it). Once you’ve done this, follow these steps:
Word will automatically repaginate the document to split the table so that each row is kept intact.
- This means that a row which was previously split between two pages will move onto the following page.
- Note that you can also use this technique to format just one row in your table. Simply right-click in the row inside the table that you want to stop from splitting across pages and follow the steps above.
Make your row settings the default for all future tables (the quick way)
Whilst the techniques described are useful, it’s a nuisance to have to set these options every time you create a new table in a document. In this section, we’ll look at how to make these settings the defaults.
At this point, you have now changed the table settings to match the settings of the current table; you should test it with a new document to ensure that the settings have indeed been set as the default.
Make your row settings the default for all future tables (more options)
It may be that you want more control over how the defaults are set for your tables. The following steps allow you control everything about your default table settings.
If you have any feedback on this lesson on stopping rows from breaking across pages, or you have a question about what was covered in this lesson, please leave us a comment below.
Join our mailing list
Our Comment Policy.
We welcome your comments and questions about this lesson. We don’t welcome spam. Our readers get a lot of value out of the comments and answers on our lessons and spam hurts that experience. Our spam filter is pretty good at stopping bots from posting spam, and our admins are quick to delete spam that does get through. We know that bots don’t read messages like this, but there are people out there who manually post spam. I repeat — we delete all spam, and if we see repeated posts from a given IP address, we’ll block the IP address. So don’t waste your time, or ours. One other point to note — if you post a link in your comment, it will automatically be deleted.
Add a comment to this lesson
Are you having trouble with your Word Table splitting?
Are you wanting to prevent your Table breaking in between sentences and paragraphs in the same row?
If this sounds like you then you have come to the right place.
Having your Table break onto multiple pages is a common issue but there are easy ways to solve it.
In this blog I’ll cover several ways to keep your Word Table from splitting across pages along with a super tip on how you can repeat the Header Row when a Table breaks on to another page, AND tips on how to distribute rows when you are left with a large gap when a Table split is unavoidable.
- Fix #1: Stop a Table row breaking across pages
- Fix #2: Keep external paragraphs and selected rows on the same page as the Table
- Fix #3: Prevent a page break from separating a row from the next row
- Repeating the Header Row on every page of the Table
- Tips for balanced Table rows
When a Word Table breaks across pages
Below is an example of a Table splitting in Word, where you can see the second row of the Table is splitting and continuing on page 2.
Not only can the break make it difficult to read the information in the Table, but it doesn’t look that great either.
In our example the row holding information about ‘Option 1’ has been split over 2 pages. Additionally, the Table headings have remained on page 1, leaving the rows on the following pages with no headings at all.
Let’s look at how we can easily stop Word from splitting a Table across pages.
1. Stop a Table row breaking across pages
It’s common for a Table row to split across pages.
You can try resizing your columns to see if a wider column allows the row to stay on one page, or you can tell Word that the row must not be split.
To prevent your Word Table row splitting across pages follow these steps.
Step 1: Click into the Table row that is breaking on to the next page.
Step 2: Right-click and select Table Properties from the list.
Step 3: In the Table Properties dialogue box, select the Table tab.
Step 4: Under Text Wrapping, check that the option is set to None.
Step 5: Go to the Rows tab and uncheck the Allow row to break across pages option.
Important: if you skip to Step 4 without checking Step 3 you may find your Word Table row will still be breaking across pages.
Note: Removing Allow row to break across pages means you don’t want the row of your Table to break on to a new page.
Step 6: Click OK.
The entire row should now be on the new page.
This option is great when you are wanting to stop a single row from splitting on to the next page.
However, when you need to keep paragraphs outside of the Table, like captions, or certain rows together on the same page you may like to use fixes 2 & 3 below.
2. Keep external paragraphs and selected rows on the same page as the Table
In our example, the Table caption and the Heading Row are still left on the previous page.
This can make it more difficult for others to read the information in the Table and understand what it relates to.
It also will result in any cross-references to the Table caption incorrectly referencing the page that the caption is on when most of the Table is on the following page.
If this is happening to you and you want certain paragraphs and headings on the same page as the Table, follow the steps below.
Step 1: Select everything that needs to stay together. In our example we will select the paragraph that holds the caption, along with row 1 and row 2.
Step 2: On the Home tab, select the dialogue box launcher for the Paragraph Settings which is shown as a little arrow at the bottom right of the Paragraph area.
This will open the Paragraph Settings dialogue box.
Step 3: Select the Line and Page Breaks tab.
Step 4: Click the option Keep with next.
Note: Keep with next means the caption and Header Row will travel with the next paragraph of information.
Step 5: Select OK.
The selected information will now travel together and stay on the same page.
In our example the caption paragraph, the Header Row and the 2nd row of the Table are now on the same page.
Tip:
Show/Hide characters are good to have turned on if you are trying to identify where parts of your Table have a pagination setting, such as Keep with Next.
If you want to turn these on go to the Home tab and select Show/Hide.
In our example, with Show/Hide turned on you can see little black squares to the left of our paragraphs.
These symbols show we have applied a pagination setting. In this case, the Keep with next setting.
3. Prevent a page break from separating a row from the next row
When you want to keep related rows together on the same page do the following:
Step 1: Select the rows you want to keep together on the same page .
Step 2: On the Home tab, select the dialogue box launcher for the Paragraph Settings which is shown as a little arrow at the bottom right of the Paragraph area.
Step 3: Select the Line and Page Breaks tab.
Step 4: Click the option Keep with next.
Step 5: Select OK.
The selected rows will now travel together and stay on the same page.
Repeating the Header Row on every page of the Table
In our example we now have an orphaned row on a new page without a Header Row.
This makes it very difficult for readers to understand what the information within the orphaned row represents.
To fix this we can tell Word to repeat the Header row from the following page on to any new pages the Table travels on to.
There are two different options that we can use to repeat the Header row of a Table.
Option #1 Repeat Header row on every page setting in Table Properties
In this option we will use the Table Properties to repeat the Header Row on each page.
To do this, follow the steps below.
Step 1: Click into Header Row.
Step 2: Right-click and select Table Properties.
Step 3: Go to the Row tab and select Repeat as header row at the top of each page.
Step 4: Select OK.
The header should now be repeated at the top every page that contains the Table.
Option #2 Repeat Header row on every page button on the Layout tab
In this option we use the Layout tab to repeat the Header Row on each page.
You can do this following the steps outlined below.
Step 1: Click the Header Row.
Step 2: Go to Layout tab.
Step 3: Select Repeat Header Rows.
The header should now be repeating on all pages that contain the Table.
You can also turn it off by selecting Repeat Header Rows again.
Tips for balancing Table rows
In our example for fix number 2, the bottom row of our Table split on to the next page due to the Title row and caption being moved onto the same page as the Table.
To ensure the entire row is included on the page we can repeat the steps we have already covered in fix number 1 and then balance the row height.
Step 1: Click into the row.
Step 2: Right-click and select Table Properties.
Step 3: Go to the Row tab.
Step 4: Unselect Allow row to break across page.
Step 5: Select OK.
The entire row will now be pushed onto the next page.
However, the Table rows are now unbalanced and there is a large gap at the bottom of Table on the previous page.
If you don’t like the gap that is left between rows, you can play around with line and paragraph spacing to see if you can fit it onto one page or minimise the gap size.
Here are some helpful tips to get your Table rows more balanced on the page.
Tip #1 Use Distribute Rows
To balance the Table rows so that they are equal height select the Table rows you want to distribute evenly and then from the Layout tab click Distribute Rows.
The rows of your Table will distribute equally.
Tip #2 Change the Line and Paragraph spacing within the rows
You can also increase the Line and Paragraph spacing options to increase the amount of space used inside a Table row.
When more space is needed the height of the row will increase, therefore filling up the gap at the bottom of the page.
To try this option, follow the steps below.
Step 1: Select the rows that you would like to balance.
Step 2: On the Home tab, select the dialogue box launcher for the Paragraph Settings which is shown as a little arrow at the bottom right of the Paragraph area.
This will open the Paragraph Settings dialogue box.
Step 3: Increase the Paragraph Spacing options for Before and After the paragraph, and/or increase the Line Spacing setting.
Step 4: Click OK.
The Table rows will now be more balanced on the page.
Tip #3 Click and drag to increase the height of each row
Place the mouse pointer over the bottom border of any row.
The pointer will change to include vertical arrows pointing up and down.
Click and drag the row border to give it the height you require.
Using this method, you can manually adjust the Table rows to fill up the white space at the bottom of the page.
To Sum up
I hope these steps have helped you to stop a Table from splitting across two pages and helped you control splits if they are unavoidable.
Preventing your Word Table rows from splitting and repeating the Header row on each page not only makes your document look great, it also improves the document flow for the reader.
If you want to follow along these steps with me, check out my YouTube video Word Table Do Not Split Across Pages.
If you want more information on how to work with split Tables in Word, check out our article, Word Tables allow rows to break across page which covers how to deal with your entire Word Table or row moving to a new page and leaving an unwanted gap.
Was this blog helpful? Let us know in the Comments below.
If you enjoyed this post check out the related posts below.
Do you ever run into an awkward situation in Word that a table is too large to stay in the same page? It’s automatically divided into two parts in two different pages which looks hideous and do affect the coherence of the content. So, how could we prevent a table from breaking across pages in Word?
Take this table as an example. It’s large enough to break across two pages.

To avoid this kind of situation, you can try this method:
1. Right click it and choose Table Properties in the list.

2. Unable the Allow row to break across pages option in Row tab and hit OK.

3. Then select the table and click the small arrow (Paragraph Settings) in the lower right corner of Paragraph in Home tab.

4. Check Keep with next in Line in Line and Page Break and hit OK.

5. The whole table has been moved to the next page, and it won’t be split any more.

Copyright Statement: Regarding all of the posts by this website, any copy or use shall get the written permission or authorization from Myofficetricks.
Last Update: Jan 03, 2023
This is a question our experts keep getting from time to time. Now, we have got the complete detailed explanation and answer for everyone, who is interested!
Asked by: Prof. Lukas Walker
Score: 4.5/5
(39 votes)
Stop a table from breaking across two pages in Word
- Select the table which breaks across two pages, and then click Layout (under Table Tools) > Properties. …
- In the popping out Table Properties dialog box, (1) enable the Row tab, (2) uncheck the Allow row to break across pages option, and (3) click the OK button.
Why does my table keep splitting in Word?
You may have the need to make sure that entire rows of your table stay together. … Choose Cell Height and Width from the Table menu. Word displays the Cell Height and Width dialog box with the Row tab selected. Make sure the Allow Row to Break Across Pages check box is cleared.
How do I stop table jumping to next page?
Select Table Properties and then the Row tab. Uncheck «Allow row to break across pages.» See if that fixes it. 2. If it is checked, have a look at the paragraph settings for the text in the table; keep lines together, page break before, and/or keep with next may affect this.
How do I keep a table together in Word?
Keeping Tables on One Page
- Select all the rows in the table.
- Choose Format | Paragraph. Word displays the Paragraph dialog box.
- Make sure the Line and Page Breaks tab is selected. (See Figure 1.)
- Make sure the Keep Lines Together check box is selected.
- Click on OK.
How do I get a table to continue over 2 pages?
To change the option:
- Select the whole table by clicking once in the table and then on the table selector.
- From the Table Tools, Layout tab, Table group, click the Properties icon.
- From the Table Properties dialog box, select the Row tab;
- Select the option ‘Allow Row to break across pages’
- Click OK.
35 related questions found
How do I keep a table on the same page?
Keeping Tables on One Page
- Select all the rows in the table.
- Display the Home tab of the ribbon.
- Click the small icon at the bottom-right of the Paragraph group. …
- Make sure the Line and Page Breaks tab is selected. …
- Make sure the Keep Lines Together check box is selected.
- Click on OK.
Why does my table jump to next page in Word?
There are three main reasons for a table row to start on a new page: Table setting for ‘Allow row to break across pages’: Select the table row, right-click and select Table properties. Go to the Row tab, and see if Allow row to break across pages is checked or not.
When I press enter in Word it goes to the next page?
Does that fix the problem? If Ctrl+Q doesn’t work, click in a paragraph that appears at the top of a page, and then right-click and choose Paragraph on the context menu. On the Line and Page Breaks tab, clear «Page break before» and click OK.
How do I unsplit a table?
First, click to place your insertion point in the cell where you would like your table split to begin. The cell that contains the insertion point will become the top row of the second table. Head to Table Tools > Layout, and then click the “Split Table” button. Your table is now split into two tables.
How do you split a table vertically in Word?
Split table cells
- Click the table cell that you want to split.
- Under Table Tools, on the Layout tab, in the Merge group, click Split Cells, and then do one or more of the following: To divide a cell vertically, in the Number of columns box, enter the number of new cells that you want.
How do I split a column in a table in Word?
Splitting Cells: Quick Menu Option
- Select the cell you want to split.
- Right click within the selected cell » select Split Cells… The Split Cells dialog box appears.
- In the Number of columns and/or Number of rows boxes, type or use the nudge buttons to select the desired number of rows and/or columns.
- Click OK.
Why is my header row not repeating in Word table?
Make sure that your long table is actually a single table. If it is not, then the header row won’t repeat because the table doesn’t really extend beyond a single page. … multiple tables is to click somewhere within the table. Then, from the Layout tab of the ribbon, use the Select drop-down list to choose Table.
How do I join two tables together?
Click at anywhere of the table you want to drag, then the cross sign will be appeared, then select the cross sign to select the whole table. 2. Press Ctrl + X to cut the table, then put the cursor at the place of the table you want to insert the cut table, right click to select Merge table from the context menu.
How do I remove page breaks?
How to Remove a Page Break in Word
- Open your Word document.
- Go to Home > Click the Show/Hide button to display all non-printable hidden marks like page breaks, spaces, and non-breaking spaces in the document.
- Double-click to select a page break and press Delete to remove it.
Why does my Word document keep scrolling?
Scrolling issues might be experienced due to mouse or touchpad issues? If this issue occurs on a laptop computer check if you are accidentally touching the touchpad which causes the scrolling issue. If not, check if the issue happens in Windows Safe Mode. Check if the issue occurs in Safe Mode.
How do I stop words breaking onto new lines?
To stop words from splitting across lines in a paragraph or paragraphs by turning off automatic hyphenation:
- Select the paragraph or paragraphs.
- Click the Home tab in the Ribbon.
- Click the dialog box launcher on the bottom right corner of the Paragraph group. …
- Click Line and Page Breaks.
- Select or check Don’t Hyphenate.
How do I stop a table from going to the next page in Word?
Stop a table from breaking across two pages in Word
- Select the table which breaks across two pages, and then click Layout (under Table Tools) > Properties. …
- In the popping out Table Properties dialog box, (1) enable the Row tab, (2) uncheck the Allow row to break across pages option, and (3) click the OK button.
How do I stop a table from starting on a new page in Word?
In Modify Style dialog press Format at the bottom left, and select Paragraph… from popup. Switch to Line and Page Breaks tab and uncheck Keep with next.
How do I fix a table in Word that is off page?
Make sure your cursor is inside the table so you can see the Table Tools tab on the ribbon. Click the Layout tab and select the AutoFit icon from the Cell Size group. Select AutoFit Window from the drop down menu. Your table will fit on the page between the left and right margins.
How do I stop a table row from splitting over two pages in Word?
685 How do I stop a row of a table splitting over two pages in Word?
- Click into a cell in the row.
- Open the Layout tab under Table Tools and from the Table group select the Properties icon.
- Select the Row tab.
- Turn off the option to ‘Allow row to break across pages’
- Repeat for any other rows in the table.
- Click on OK.
How do you stop a table from wobbling?
All you have to do is rotate the table until it stops wobbling. Yep, that simple technique has been proven by mathematicians using complex geometry and algebra, and the proof is known (no joke) as the Wobbly Table Theorem. For this fix to be successful, all four legs have to be the same length.
Can we join two tables without any relation?
The answer to this question is yes, you can join two unrelated tables in SQL, and in fact, there are multiple ways to do this, particularly in the Microsoft SQL Server database. The most common way to join two unrelated tables is by using CROSS join, which produces a cartesian product of two tables.
How can I merge two tables in SQL query?
Key learnings
- use the keyword UNION to stack datasets without duplicate values.
- use the keyword UNION ALL to stack datasets with duplicate values.
- use the keyword INNER JOIN to join two tables together and only get the overlapping values.
How do I stop a table header from repeating in Word?
Repeating Table Headings
- Click anywhere in the table to display the Table sub-tabs.
- Select the Table-Layout tab.
- Select the Properties icon within the Table Group.
- The Table Properties dialog box will be displayed.
- The Text wrapping option, “Around” prevents the heading from repeating.
 Please Note:
This article is written for users of the following Microsoft Word versions: 97, 2000, 2002, and 2003. If you are using a later version (Word 2007 or later), this tip may not work for you. For a version of this tip written specifically for later versions of Word, click here: How to Stop a Table Row from Splitting Over Two Pages.
![]()
Written by Allen Wyatt (last updated July 25, 2020)
This tip applies to Word 97, 2000, 2002, and 2003
For some documents, it is par for the course to have tables extend from one page to another. As your tables get larger, Word automatically breaks tables so the most information can get on each page. This may mean that a row of your table may start on one page and end on the following page. Obviously, this is not acceptable for some tables. You may have the need to make sure that entire rows of your table stay together.
To make sure that Word doesn’t break a particular row of your table, follow these steps if you are using Word 97:
- Select the row (or rows) that you want to keep together.
- Choose Cell Height and Width from the Table menu. Word displays the Cell Height and Width dialog box with the Row tab selected.
- Make sure the Allow Row to Break Across Pages check box is cleared.
- Click your mouse on OK.
If you are using Word 2000, Word 2002, or Word 2003 the process is slightly different. Follow these steps, instead:
- Select the row (or rows) that you want to keep together.
- Choose Table Properties from the Table menu. Word displays the Table Properties dialog box; you should make sure the Row tab is selected. (See Figure 1.)
- Make sure the Allow Row to Break Across Pages check box is cleared.
- Click your mouse on OK.
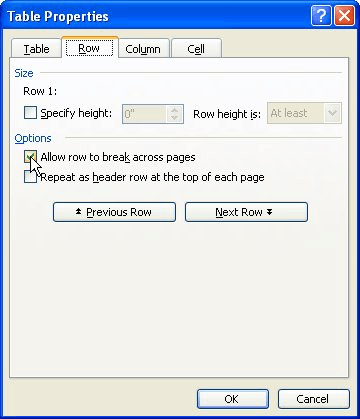
Figure 1. The Row tab of the Table Properties dialog box.
If you are not sure about where a table may break (or even if it will), but you want to make sure that no row of the table is divided, you simply need to select the entire table in step 1 rather than selecting a single row.
Remember that these steps won’t stop a table from splitting across two pages; it only stops individual rows from splitting across pages.
WordTips is your source for cost-effective Microsoft Word training.
(Microsoft Word is the most popular word processing software in the world.)
This tip (1827) applies to Microsoft Word 97, 2000, 2002, and 2003. You can find a version of this tip for the ribbon interface of Word (Word 2007 and later) here: How to Stop a Table Row from Splitting Over Two Pages.
Author Bio
With more than 50 non-fiction books and numerous magazine articles to his credit, Allen Wyatt is an internationally recognized author. He is president of Sharon Parq Associates, a computer and publishing services company. Learn more about Allen…
MORE FROM ALLEN
Assigning a Macro to a Button in Your Text
One way you can access macros is through the use of a button, added directly into the text of your document. This is done …
Discover More
Understanding the Gutter Margin
Most everyone knows that Word allows you to set top, bottom, left, and right margins for your document. There is another …
Discover More
Linking Word Documents
Want to add one document to another document? You can do it by adding links, described in this tip.
Discover More
More WordTips (menu)
Aligning Positive and Negative Whole Numbers in a Column
When you use a table to present numeric information, you may want to have Word align the numbers in the table. This can …
Discover More
Finding an Optimal Table Height
Word can adjust the height of individual rows in a table based on the information you put in each row. This may not …
Discover More
Changing Cell Alignment
Individual cells in a table can be aligned any way you desire. As pointed out here, just select the cell and apply the …
Discover More