Track changes in Word
Note: If a document has been shared with you for review, you may not be able to turn off Track Changes. If you want to edit the document without tracking changes, you’ll need to either save a copy or ask the person who sent it to you to share it again with review mode turned off.
Turn Track Changes on and off
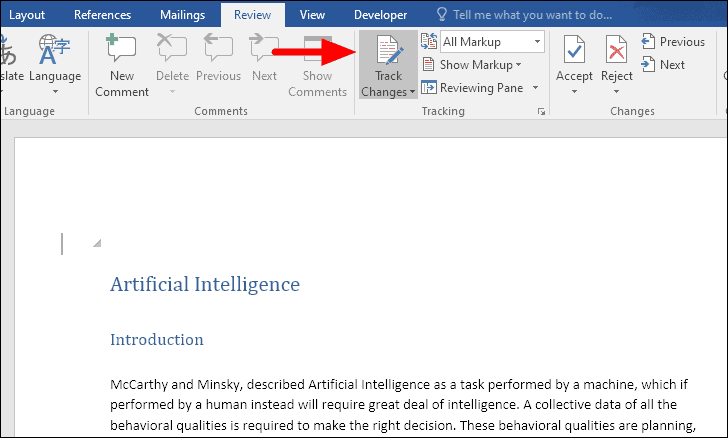
On the Review tab, select Track Changes.
-
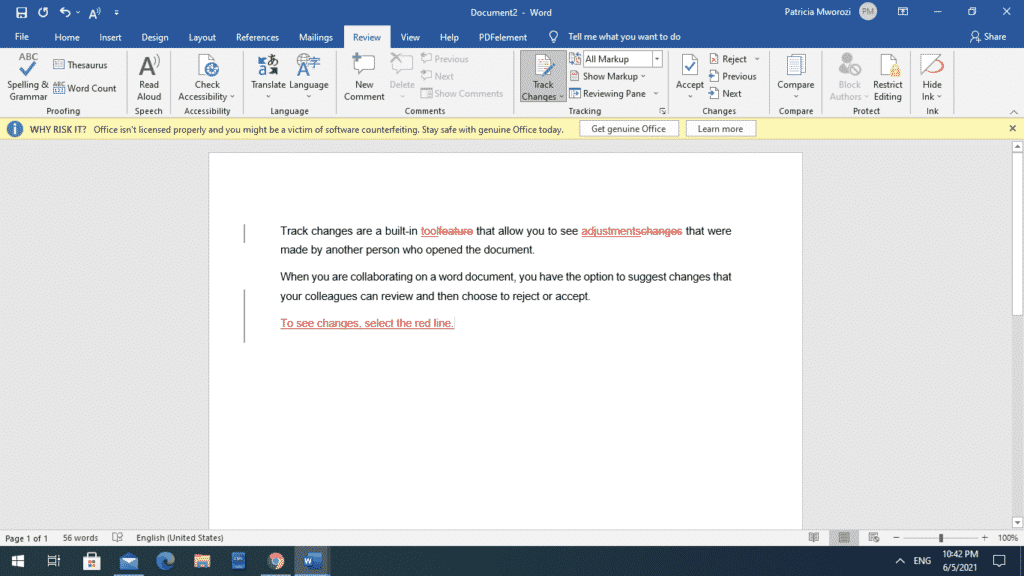
When Track Changes is on, the section is highlighted. Deletions are marked with a strikethrough, and additions are marked with an underline. Different authors’ changes are indicated with different colors.
-
When Track Changes is off, the section is not highlighted. Word stops marking changes, but the colored underlines and strikethroughs are still in the document.
Tip: You also can add a Track Changes indicator to the status bar. Right-click the status bar and select Track Changes.
View tracked changes
Note: When a document is in Editing or Reviewing mode, you can select a tracked change to view a collaborator’s full, suggested change in a card that displays. Hover over the Accept or Reject button to see a preview of what that action would do to your final document.
Choose whose changes to track
You can choose to track only your own changes or everyone’s changes.
-
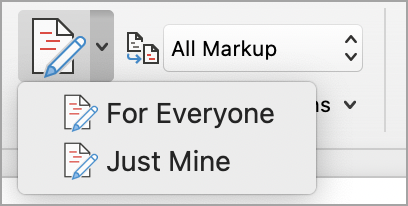
To track only your own changes — On the Review tab, select Track Changes > Just Mine.
-
To track everyone’s changes — On the Review tab, select Track Changes > For Everyone.
Tip: to use a password to keep others from turning off Track Changes — On the Review tab, select Track Changes > Lock Tracking.
Choose how you would like to see the changes in the document
You can choose the type of markup you want to see.
-
On the Review tab, select Tracking.
-
Select All Markup for the drop-down list to display.
-
Select one of the following options.
-
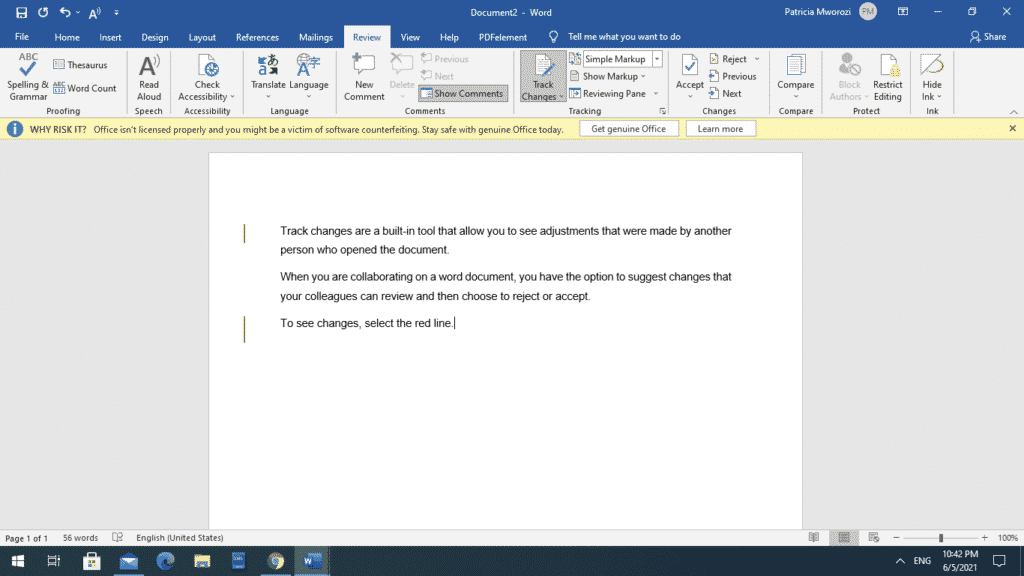
Simple Markup displays tracked changes with a red line in the margin.
-
All Markup displays tracked changes with different colors of text and lines for each reviewer
-
No Markup hides the markup to show the document with changes incorporated
-
Original displays the original document without tracked changes and comments showing. However, any tracked changes or comments in the document that have not been accepted, rejected, or deleted remain in the document.
Choose the way track changes display
You can choose the types of revisions that display and the way they display. If you choose to show revisions as balloons, they display in the margins of the document. If you choose to display them directly within the document in line. In line revisions display all deletions with strikethroughs instead of inside balloons.
-
On the Review tab, select Track > Show Markup.
-
Select Balloons and then select the type of display you want.
-
Show Revisions in Balloons
-
Show All Revisions Inline
-
Show Only Formatting in Balloons
Note: If you want to see tracked changes in balloons, you must be in Print Layout view or Web Layout view.
Display changes by type of edit
-
On the Review tab, select Track Changes > Show Markup.
-
Select the type of edit.
-
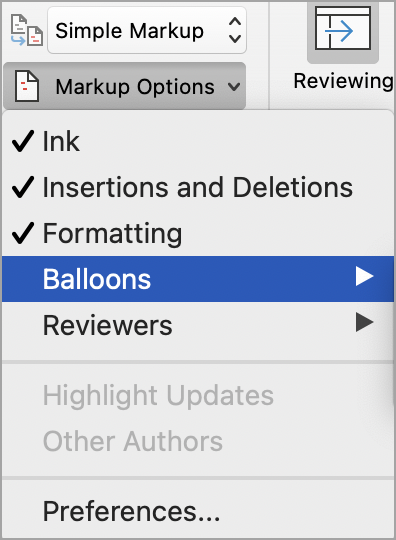
Insertions and Deletions
-
Formatting
The check mark next to the item indicates that it’s selected.
Note: Even if you hide a type of markup by clearing it on the Show Markup menu, the markup automatically displays each time the document is opened by you or a reviewer.
Display changes by reviewer(s)
-
In Review > Tracking, select Show Markup.
-
Select Specific People.
-
Select to clear all check boxes except the ones next to the names of the reviewers whose changes you want to show.
Note: To select or clear all check boxes for all reviewers in the list, select All Reviewers.
Navigate tracked changes in Changes menu section
You can navigate from one tracked change to another.
-
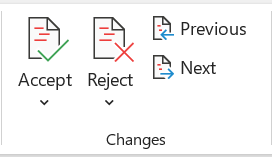
In Review > Changes, select Next to view the next tracked change.
-
In Review > Changes, select Previous to view the previous tracked change.
Accept or Reject tracked changes
There are multiple ways to address tracked changes. The most proficient method is to identify the commentor and respond to the tracked change is through the card display when you click the marked change. The card displays the commentor name and the option to accept or reject the suggestion.

Accept or reject tracked changes in sequence using the main menu
You can resolve teach tracked change from the beginning of the document to the end of the document in sequence.
-
Select Review > Changes > Next.
-
Select Accept or Reject. The next sequential tracked change is highlighted for your review and action.
Note: You can also accept or reject individual tracked changes using the main menus’ drop-down menus. This method is often used as a methodical approach to reviewing tracked changes.
Accept changes using the main menu
-
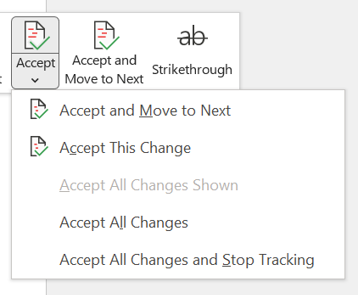
In Review > Changes, select Accept.
-
Select one of the options.
-
Accept and Move to Next
-
Accept This Change
-
Accept All Changes
-
Accept All Changes and Stop Tracking
Reject changes using the main menu
-
In Review > Changes, select > Reject.
-
Select one of the options.
-
Reject and Move to Next
-
Reject This Change
-
Reject All Changes
-
Reject All Changes and Stop Tracking
Accept or reject changes within a document with a right click
Working within a document, you can right-click on a tracked change to accept or reject the change. Using the right-click method displays a banner menu option and a drop-down menu option.
Accept changes in-line with the right-click banner option
-
Right-click a tracked change in the document to review a single suggestion.
-
On the banner, select one of the following.
-
Accept > Accept and Move to Next
-
Accept > Accept This Change
-
Accept > Accept All Changes
-
Accept > Accept All Changes and Stop Tracking
-
Accept and Move to Next
Accept changes in-line with the right-click drop-down menu option
-
Right-click a tracked change in the document to review a single suggestion.
-
In the drop-down menu, select one of the following.
-
Accept Insertion (or Accept Deletion)
-
Reject Insertion (or Reject Deletion)

Accept or reject all tracked changes at once on the main menu
Accept all tracked changes
-
In Review > Changes, select Accept.
-
Select one of the options.
-
Accept All Changes Shown
-
Accept All Changes
-
Accept All Changes and Stop Tracking
Reject all tracked changes
-
In Review > Changes, select Reject.
-
Select one of the options.
-
Reject All Changes Shown
-
Reject All Changes
-
Reject All Changes and Stop Tracking
Note: When Review>Tracking>Show Markup>Specific People>All Reviewers is selected, the Accept All Changes Shown and Reject All Changes Shown options do not display.
Hide tracked changes and comments when printing
Hiding changes doesn’t remove them from the document. You must use the Accept and Reject commands in the Changes group to remove markup from your document.
-
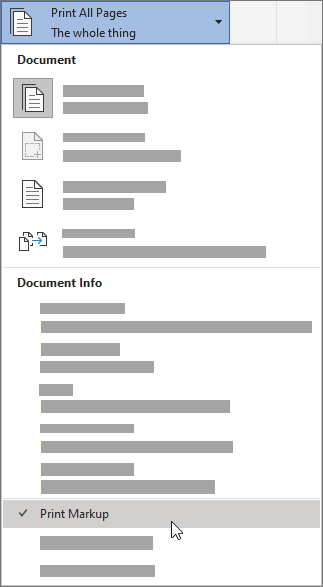
Go to File > Print > Settings > Print All Pages.
-
Under Document Info, select Print Markup to clear the check mark.
View all your changes in a summary list on the Reviewing Pane
-
In Review > Tracking, select Reviewing Pane.
-
Choose if you want to see the Reviewing Pane next to or below your document.
-
Select Reviewing Pane Vertical to see a list of all changes next to your document.
-
Select Reviewing Pane Horizontal to see a list of all changes below your document.
You can use the Reviewing Pane as a handy tool for to check that all tracked changes have been removed from your document so that they show up to others who might view your document. The summary section at the top of the Reviewing Pane displays the exact number of visible tracked changes and comments that remain in your document.
The Reviewing Pane also allows you to review long comments that don’t fit within a comment bubble.
Note: The Reviewing Pane, unlike the document or the comment balloons, is not the best tool for making changes to your document. Instead of deleting text or comments or making other changes in the Reviewing Pane, make all editorial changes in the document. The changes will then be visible in the Reviewing Pane.
Important: Comments are no longer part of the Track Changes function.
Turn on Track Changes
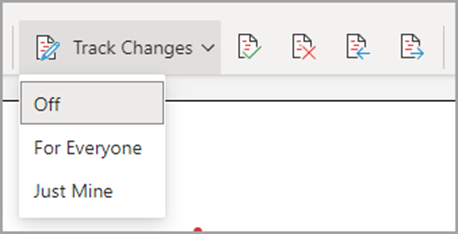
You can set Word for the Web to track changes for all users who are collaborating on the document or to track only your changes.
-
On the Review tab, select Track Changes.
-
In the Track Changes drop-down list, select one of the following:
-
To track only the changes that you make to the document, select Just Mine.
-
To track changes to the document made by all users, select For Everyone.
-
Turn off Track Changes
-
On the Review tab, select Track Changes.
-
In the Track Changes drop-down list, select Off.
Select the Markup view
-
On the Review tab, select Markup view.
-
Select one of the markup options.
-
Markup in margin (Simple Markup) — See suggestions in the margin
-
Markup on page (All Markup) — See suggestions on the page
Review, accept, or reject changes
Accept or reject tracked changes in sequence
You can review each tracked change in sequence and decide whether to accept or reject the change.
-
Click or tap at the beginning of the document.
-
On the Review tab, select Track Changes.
-
Select Accept or Reject. As you accept or reject changes, Word will move to the next change.
Tip: To move through changes in the document without accepting or rejecting them, select Next or Previous.
-
Repeat until you’ve reviewed all of the changes in your document.
Accept or reject a single change
Rather than move through changes in sequence, you can accept or reject a single change. When you accept or reject the change, Word will not move to the next change in the document.
-
Click the change.
-
Select the option to accept or reject it.
When tracked changes are turned on, Word marks any changes made by any authors of the document. This is useful when you’re collaborating with other authors because you can see which authors made a particular change.
Turn Track Changes on
-
On the Review tab, select Track Changes.
-
Select to track only your own changes or everyone’s change.
-
To track only your own changes — On the Review tab, select Track Changes > Just Mine.
-
To track everyone’s changes — On the Review tab, select Track Changes > For Everyone.
Note: To turn Track Changes off, select Track Changes again.
Accept or reject all tracked changes at once on the main menu
Accept all tracked changes
-
Select Reviewing > Accept.
-
Select one of the options.
-
Accept All Changes Shown
-
Accept All Changes
-
Accept All Changes and Stop Tracking
Reject all tracked changes
-
Select Reviewing > Reject.
-
Select one of the options.
-
Reject All Changes Shown
-
Reject All Changes
-
Reject All Changes and Stop Tracking
Word shows changes in the document by displaying a line in the margin. If you switch to All Markup view, you’ll see changes inline and in balloons.

Anytime someone adds a comment, it’ll show up in a balloon.

Review changes inline
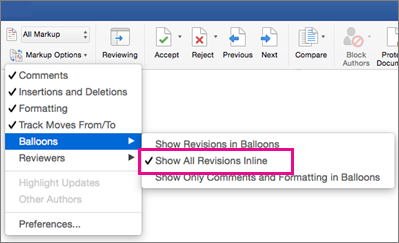
To see changes inline instead of in balloons, do the following:
-
On the Review Tab, select Markup Options
-
Point to Balloons and select Show All Revisions Inline.
Keep Track Changes on
To prevent others from turning off Track Changes, lock Track Changes on with a password.
Important: Be sure to remember the password so you can turn Track Changes off when you’re ready to accept or reject the changes.
Lock Track Changes with a password
-
On the Review tab, select Protect > Protect Document.
-
In the Password box, enter a password.
-
Re-enter your password and select OK.
While tracked changes are locked, you can’t turn off change tracking, and you can’t accept or reject changes.
Unlock Track Changes
-
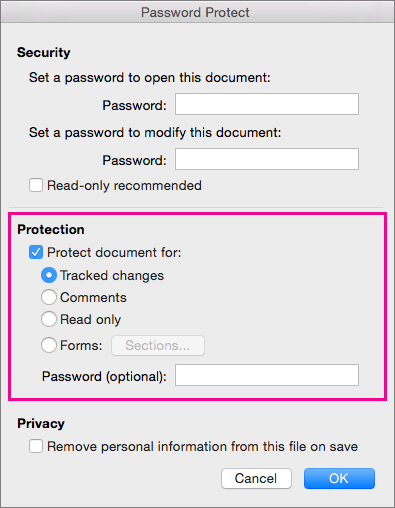
On the Review tab, select Protect > Protect Document.
-
Under Protection, uncheck Protect document for.
-
Enter your password and select OK.
For more info, see
remove the tracked changes and comments.
Turn Track Changes on or off (Word for iPad)
-
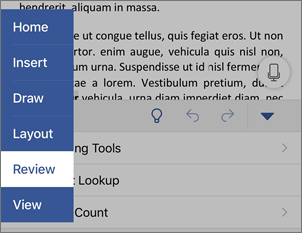
Tap the Review tab.
-
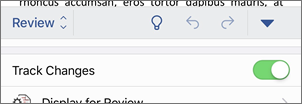
Tap the control next to Track Changes to turn Track Changes on or off.
Show or hide markup (Word for iPad)
-
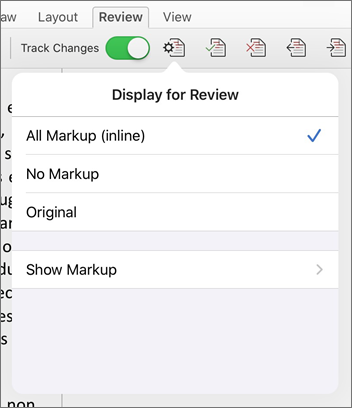
On the Review tab, tap the Display for Review icon.
-
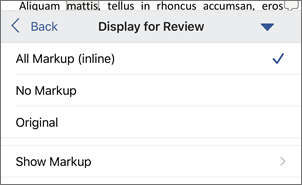
In the Display for Review list, tap the option you want:
-
All Markup (inline) shows the final document with tracked changes visible inline
-
No markup shows the final document without tracked changed
-
Original shows the original document with no tracked changes
-
Show tracked changes by type (Word for iPad)
-
On the Review tab, tap the Display for Review icon.
-
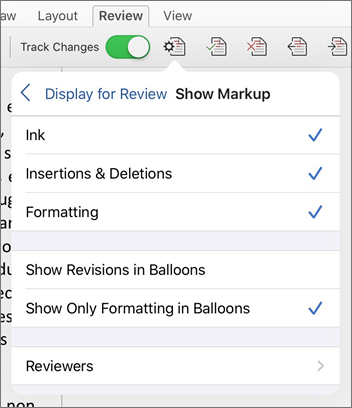
In the Display for Review list, tap Show Markup.
-
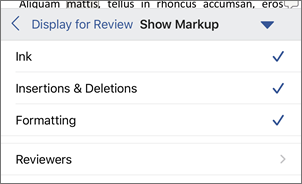
In the Show Markup list, tap the option you want:
-
Ink shows or hides any marks made by digital inking in the document.
-
Insertions & Deletions shows or hides inserted or deleted text.
-
Formatting shows or hides formatting changes.
-
Show Revisions in Balloons shows changes in balloons in the right margin.
-
Show Only Formatting in Balloons shows only formatting changes in balloons and keeps the other changes as inline tracking.
-
Show tracked changes by reviewer (Word for iPad)
If there are multiple reviewers for the document, Word will show all changes by default. However, you can choose to show only changes made by specific viewers.
-
On the Review tab, tap the Display for Review icon.
-
In the Display for Review list, tap Show Markup.
-
In the Show Markup list, tap Reviewers.
-
In the Other Authors list, tap the names of the reviewers whose changes you want to see or tap All Reviewers.
Accept changes (Word for iPad)
-
Tap twice on a change in the document to select it.
-
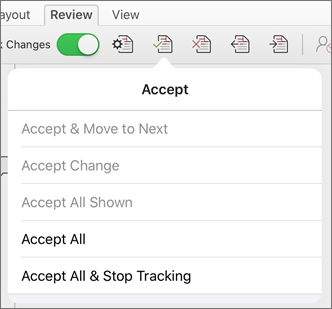
On the Review tab, tap the Accept icon.
-
Do one of the following:
-
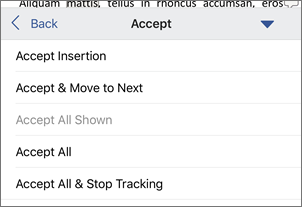
Tap Accept & Move to Next to accept the change and move to the next change in the document.
-
Tap Accept Deletion, Accept Insertion, or Accept Change to accept the selected change, identified contextually by type, and not move to the next change in the document.
-
Tap Accept All Shown to accept all changes that are visible, but not changes that are hidden. For example, if you’re viewing only changes made by a specific reviewer, tapping Accept All Shown accepts only the changes made by that reviewer.
-
Tap Accept All to accept all changes in the document.
-
Tap Accept All & Stop Tracking to accept all changes in the document and turn off Track Changes.
-
-
To move to another change without accepting or rejecting it, tap the Previous or Next icon.
Reject changes (Word for iPad)
-
Tap twice on a change in the document to select it.
-
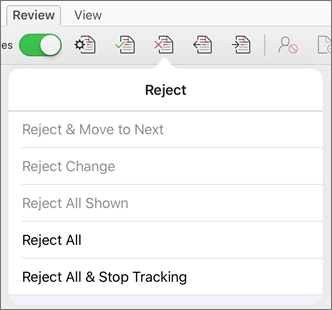
On the Review tab, tap the Reject icon.
-
Do one of the following:
-
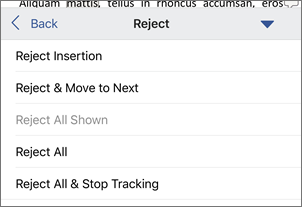
Tap Reject & Move to Next to reject the change and move to the next change in the document.
-
Tap Reject Deletion, Reject Insertion, or Reject Change to reject the selected change, identified contextually by type, and not move to the next change in the document.
-
Tap Reject All Shown to reject all changes that are visible, but not changes that are hidden. For example, if you’re viewing only changes made by a specific reviewer, tapping Reject All Shown rejects only the changes made by that reviewer.
-
Tap Reject All to reject all changes in the document.
-
Tap Rejects All & Stop Tracking to reject all changes in the document and turn off Track Changes.
-
-
To move to another change without accepting or rejecting it, tap the Previous or Next icon.
Delete comments (Word for iPad)
-
Tap twice on a comment in the document to select it.
-
Tap the Review tab.
-
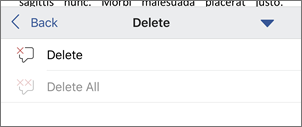
Tap the Delete icon to delete the comment or press and hold the Delete icon until the Delete list appears, and then do one of the following:
-
Tap Delete to delete only the selected comment.
-
Tap Delete All to delete all comments in the document.
-
-
To move to another comment without deleting it, tap the Previous or Next icon.
Turn Track Changes on or off (Word for iPhone)
-
Tap the pen icon at the top to open the ribbon.
-
Tap the Review tab.
-
Tap the control next to Track Changes to turn Track Changes on or off.
Show or hide markup (Word for iPhone)
-
On the Review tab, tap Display for Review.
-
Tap the option you want:
-
All Markup (inline) shows the final document with tracked changes visible inline
-
No markup shows the final document without tracked changed
-
Original shows the original document with no tracked changes
-
Show tracked changes by type (Word for iPhone)
-
On the Review tab, tap Display for Review.
-
Tap Show Markup.
-
In the Show Markup list, tap the option you want:
-
Ink shows or hides any marks made by digital inking in the document.
-
Insertions & Deletions shows or hides inserted or deleted text.
-
Formatting shows or hides formatting changes.
-
Show tracked changes by reviewer (Word for iPhone)
If there are multiple reviewers for the document, Word will show all changes by default. However, you can choose to show only changes made by specific viewers.
-
On the Review tab, tap Display for Review.
-
Tap Show Markup.
-
Tap Reviewers.
-
In the Other Authors list, tap the names of the reviewers whose changes you want to see or tap All Reviewers.
Accept changes (Word for iPhone)
-
Tap twice on a change in the document to select it.
-
On the Review tab, tap Accept.
-
Do one of the following:
-
Tap Accept & Move to Next to accept the change and move to the next change in the document.
-
Tap Accept Deletion, Accept Insertion, or Accept Change to accept the selected change, identified contextually by type, and not move to the next change in the document.
-
Tap Accept All Shown to accept all changes that are visible, but not changes that are hidden. For example, if you’re viewing only changes made by a specific reviewer, tapping Accept All Shown accepts only the changes made by that reviewer.
-
Tap Accept All to accept all changes in the document.
-
Tap Accept All & Stop Tracking to accept all changes in the document and turn off Track Changes.
-
Reject changes (Word for iPhone)
-
Tap twice on a change in the document to select it.
-
On the Review tab, tap Reject.
-
Do one of the following:
-
Tap Reject & Move to Next to reject the change and move to the next change in the document.
-
Tap Reject Deletion, Reject Insertion, or Reject Change to reject the selected change, identified contextually by type, and not move to the next change in the document.
-
Tap Reject All Shown to reject all changes that are visible, but not changes that are hidden. For example, if you’re viewing only changes made by a specific reviewer, tapping Reject All Shown rejects only the changes made by that reviewer.
-
Tap Reject All to reject all changes in the document.
-
Tap Reject All & Stop Tracking to reject all changes in the document and turn off Track Changes.
-
Delete comments (Word for iPhone)
-
Tap twice on a comment in the document to select it.
-
One the Review tab, tap Delete, and then do one of the following:
-
Tap Delete to delete only the selected comment.
-
Tap Delete All to delete all comments in the document.
-
-
To move to another comment without deleting it, tap the Previous or Next icon
Need more help?
На чтение 3 мин Просмотров 853 Обновлено 12.04.2021
Без сомнения, отслеживание изменений в Microsoft Word — прекрасная функция. Если вы работаете в многопользовательской среде, где многие пользователи редактируют один файл Word, отслеживание изменений в Word 2016/2019 или Office365 является полезным инструментом для отслеживания изменений / модификаций, сделанных конкретными пользователями. Здесь мы покажем, как включить и отключить отслеживание изменений в Microsoft Word 2016/2019 / Office 365 и правильно его использовать.
Поскольку Microsoft продолжает улучшать функцию отслеживания изменений во всех версиях продуктов Office, вы можете увидеть другую и улучшенную версию, отличную от той, которая описана в этом руководстве. Ранее мы упоминали об удалении прерывателя строки в документе Word здесь. Если вам нужно изменить формат системного времени, который отображается при редактировании Word, вы можете выполнить этот шаг.
Как включить отслеживание изменений в Word 2016/2019 / Office 365
1) Когда есть какой-то контент для редактирования в MS Word, нажмите «Обзор» и «Отследить изменения», как показано ниже. Нажмите «Отслеживать изменения» в меню, чтобы включить эту функцию. После включения изменения, внесенные одним или несколькими пользователями, будут записаны.
2) Несмотря на то, что отслеживание изменений в Word активировано, вы все равно не сможете увидеть изменения, внесенные другими пользователями, пока не активируете «Панель просмотра». После включения вы можете видеть, что делают другие авторы или какие изменения они уже внесли в конкретный документ.
3) Дополнительные параметры.
Вы можете найти другие варианты разметки, чтобы увидеть оригинал или изменения в документе. Щелчок по раскрывающейся кнопке «Вся разметка» предоставит опцию. По умолчанию выбрана «Вся разметка», и вы можете видеть все изменения в текстовом документе.
Помните — изменения все еще не сохраняются в исходном документе. Владелец документа может принять или отклонить изменения.
4) Вы можете принять изменения в документе по одному или все одновременно. Также вы можете заблокировать авторов для редактирования документа.
Еще одна замечательная функция — «Сравнить». Вы можете сравнить исходный документ с измененным документом разных авторов в одном представлении для лучшего понимания, прежде чем принимать изменения. Нажатие на кнопку «Сравнить» приведет к сравнению параметров.
5) Область комментариев в отслеживании изменений полезна, когда документ редактируют более одного пользователя. Это позволяет оставлять комментарии к каждому изменению или абзацу и отображать их в панели обзора. Обоснования и рекомендации по изменению конкретного содержания могут быть опубликованы в Интернете через это поле для комментариев.
Чтобы отключить отслеживание изменений, просто отключите этот параметр на вкладке «Обзор» в Word 2019. Я надеюсь, что это руководство поможет понять основы отслеживания изменений в Microsoft Word 2016 (и аналогичных 2019 / Office 365) и эффективно использовать его.
Irked with Word tracking the changes you make to a document? Learn how to turn off ‘Track Changes’ in easy steps.
‘Track changes’ in Microsoft Word allows the user to trace any changes that are made to the article by others. Say, you have created a document and want someone to edit it, however, you also want to track the changes made by the editor. This is where ‘Track changes’ comes to your aid.
But the ‘Track Changes’ feature can sometimes be a real pain. For instance, you don’t want others to view the changes made to the document or the original content of the document. It also allows the viewer to see all the mistakes that were initially made, which can affect your credibility in some cases. Therefore, a vast section of Word users prefers to not have ‘Track Changes’ enabled.
Disabling Track Changes in Microsoft Word
It is fairly easy to disable ‘Track Changes’ in Word. There’s even a keyboard shortcut for it which disables the feature in a jiffy. To turn off ‘Track Changes’, press CTRL + SHIFT + E. The same keyboard shortcut can also be used to enable the feature, in case it is turned off.
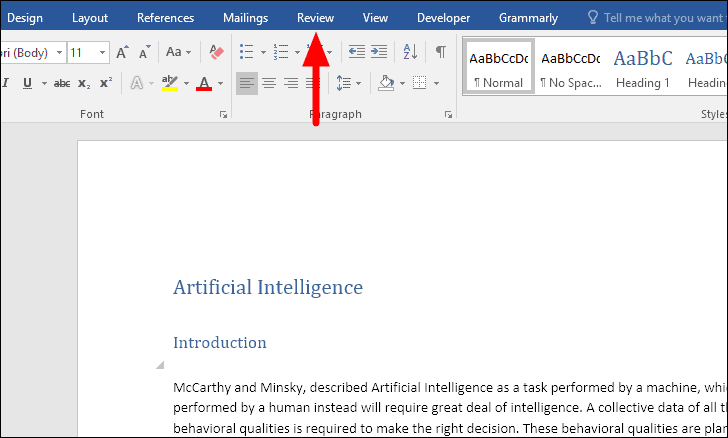
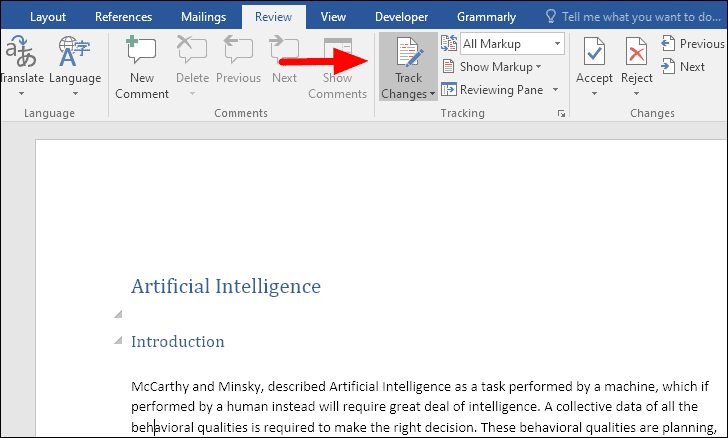
You can also disable ‘Track Changes’ from the review tab at the top. Open the document where ‘Track Changes’ is currently enabled and go to the ‘Review’ tab from the ribbon bar.
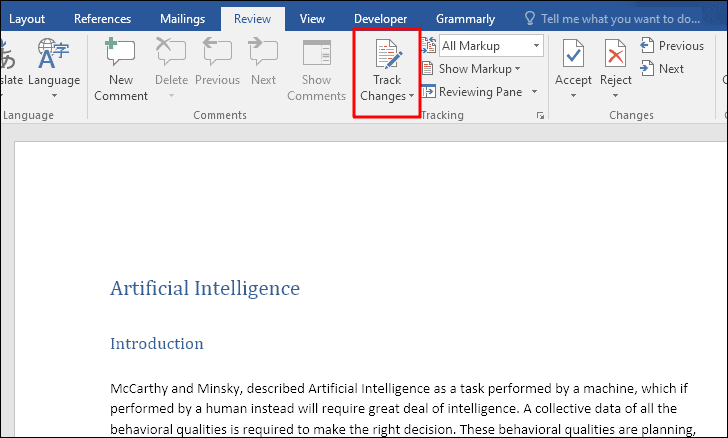
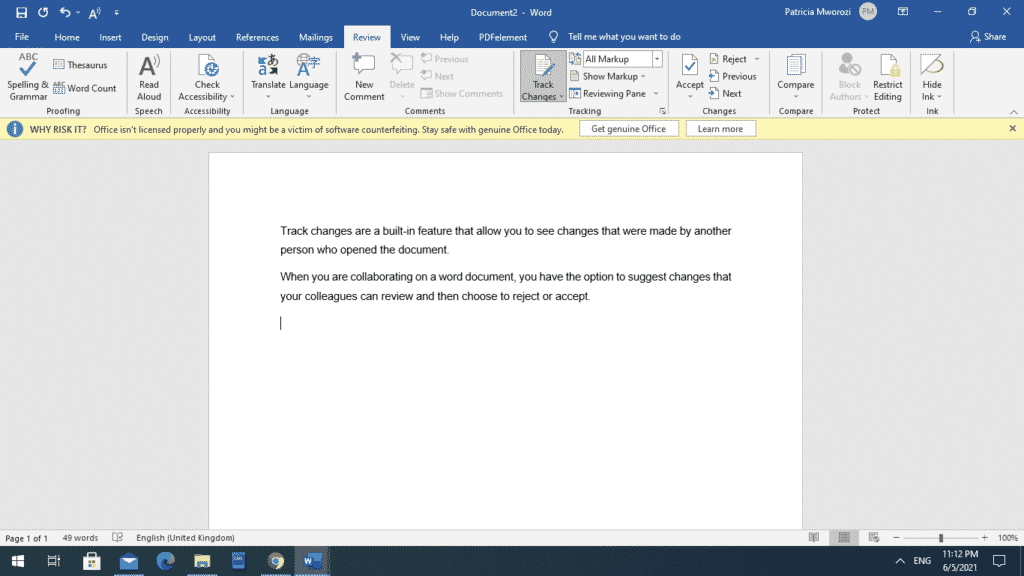
You will now find the icon for ‘Tracking Changes’ in the ‘Tracking’ section of the review tab. If the feature is enabled, the icon will be darker than those others around it. Click on the top half of the ‘Track Changes’ icon to turn off the feature.
After the ‘Track Changes’ feature is disabled, the color of the icon has turned lighter and now matches with the surroundings.
Why am I Unable to Turn Off Track Changes?
Were you trying to disable the ‘Track Changes’ feature but the options are greyed out and clicking on it does no good? This happens when the ‘Lock Tracking’ feature is enabled on the document.
With ‘Lock Tracking’ enabled, you cannot turn off ‘Track Changes’ unless you enter the password, which was set initially. If you have the password, follow the steps below to disable the lock and turn off ‘Track Changes’.
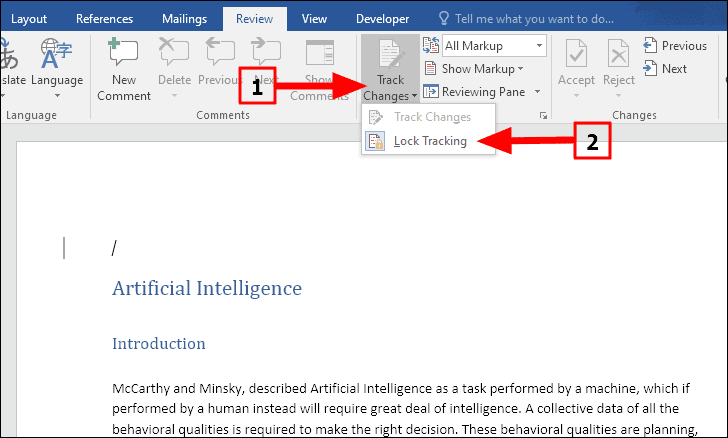
In the ‘Review’ tab of Microsoft Word, click on the bottom part of the ‘Track Changes’ icon with an arrow, and then select ‘Lock Tracking’ from the drop-down menu.
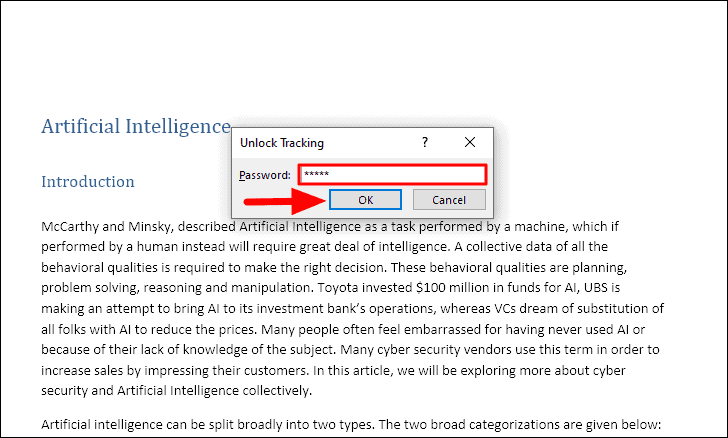
The ‘Unlock Tracking’ box will now open, enter the password in the text box and then click on ‘OK’ on the box.
The ‘Lock Tracking’ feature has now been disabled but the ‘Track Changes’ is still enabled and has to be turned off like we did earlier. Simply click on the top-half of the ‘Track Changes’ icon to turn it off or use the CTRL + SHIFT + E keyboard shortcut.
You can now easily disable ‘Track Changes’ in Word documents when you don’t want others to view the changes that you have made. Also, if you are unable to disable the feature, you know the reason and can ask for the password from the person who shared the document.
При совместной работе над документом в Microsoft Word вы увидите изменения, внесенные соавторами. Возможно, вы захотите сохранить некоторые изменения, но отклонить другие. Наилучший подход — использовать отслеживание изменений, чтобы вы могли просматривать изменения и решать, как с ними обращаться.
Здесь мы расскажем, как отображать изменения в Word, а также принимать, отклонять и скрывать эти изменения. Это вы охватывали на протяжении всего процесса отслеживания изменений.
Включить отслеживание изменений
Чтобы отслеживать все изменения в документе, вы можете включить функцию отслеживания изменений для всех или даже только для себя. Это полезный способ убедиться, что никакие изменения не останутся незамеченными.
- Откройте документ Word и перейдите на вкладку «Рецензирование».
- Нажмите кнопку «Отслеживание изменений» в разделе «Отслеживание» на ленте.
- Выберите «Для всех», чтобы отслеживать изменения, внесенные вами и вашей командой, или «Только мои», чтобы отслеживать только ваши изменения.
Как только функция включена, вы можете заблокировать ее, чтобы никто другой не мог ее отключить. Выберите Блокировать отслеживание в раскрывающемся меню Отслеживание изменений и следуйте инструкциям.
Как показать изменения в Word
Когда вы будете готовы проверить документ и увидеть изменения, у вас есть несколько способов.
- Перейдите на вкладку «Обзор» и раздел «Отслеживание» на ленте.
- В раскрывающемся списке вверху выберите «Вся разметка» или «Простая разметка». All Markup отображает индикатор изменения в документе и редакции. Простая разметка показывает только индикатор.
- Затем выберите стрелку раскрывающегося списка «Показать разметку». Здесь вы можете настроить то, что вы видите и как это отображается.
- Вставки и удаления: установите этот флажок, чтобы отображать добавление и удаление элементов.
- Форматирование: отметьте эту опцию, чтобы показать изменения форматирования.
- Выноски: выберите способ отображения изменений. Вы можете выбрать «Показать исправления во всплывающих подсказках», чтобы отобразить их во всплывающем окне справа, «Показать все исправления в строке», чтобы отобразить изменения в самом документе, или «Показать только форматирование во всплывающих подсказках», чтобы сделать именно это.
- Конкретные люди: выберите «Все рецензенты», чтобы увидеть все изменения, или свое имя, чтобы увидеть только свои.
В дополнение к вышеперечисленному у вас есть возможность отобразить панель просмотра. Это полезно, если вы решите использовать простую разметку, потому что вместо этого вы увидите изменения на панели.
Выберите стрелку раскрывающегося списка «Панель просмотра» и выберите вертикальный (левая панель) или горизонтальный (нижняя панель) параметр.
Кроме того, вы можете просматривать изменения, переходя непосредственно к каждому из них, а не выискивая их в документе.
В разделе «Изменения» на ленте используйте кнопки «Предыдущее изменение» и «Следующее изменение», чтобы просмотреть их по одному.
Как принять изменения в Word
Теперь, когда вы знаете, как отображать изменения в Word, следующим шагом будет принятие этих изменений. Вы можете принять отдельные изменения или все изменения сразу.
Принять индивидуальные правки
Чтобы принять изменения по отдельности, начните с выбора первого. Затем откройте раскрывающееся меню «Принять» в разделе «Изменения» на ленте.
Выберите «Принять и перейти к следующему», чтобы просмотреть и принять по одному, или «Принять это изменение», чтобы принять его, а затем остановить процесс проверки.
Кроме того, вы можете щелкнуть правой кнопкой мыши изменение и выбрать «Принять» для вставки, удаления или изменения формата.
Принять все изменения
Если вы хотите принять все изменения в документе, откройте раскрывающийся список «Принять» на ленте. Выберите «Принять все изменения» или «Принять все изменения и остановить отслеживание» в зависимости от ваших предпочтений.
Как отклонить правки в Word
Отклонить изменения в Word так же просто, как и принять их, и следует тому же основному процессу. Вы можете отклонить одно или все в документе.
Выберите изменение, щелкните стрелку раскрывающегося списка «Отклонить» на ленте и выберите «Отклонить и перейти к следующему» или «Отклонить изменение». Вы также можете щелкнуть правой кнопкой мыши и выбрать «Отклонить» для вставки, удаления или изменения формата в контекстном меню.
Чтобы отклонить все изменения в документе, выберите стрелку раскрывающегося списка «Отклонить» и выберите «Отклонить все изменения» или «Отклонить все изменения и остановить отслеживание» в соответствии с вашими предпочтениями.
Как скрыть правки в Word
Не все при совместной работе над документом связано с просмотром, принятием или отклонением изменений. Если вы хотите скрыть изменения, чтобы сосредоточиться на содержимом, вы можете сделать это, не отключая функцию отслеживания изменений.
- Перейдите на вкладку «Обзор» и раздел «Отслеживание» на ленте.
- Выберите верхний раскрывающийся список и выберите «Без пометок» или «Исходный». Без разметки — лучший вариант, чтобы увидеть документ без индикаторов редактирования. Оригинал показывает именно это — исходный документ, каким он был до каких-либо изменений.
- Если вы включили панель просмотра, описанную выше, вы можете закрыть ее, нажав X в правом верхнем углу или сняв флажок с кнопки «Панель просмотра» на ленте.
Вернитесь в тот же раскрывающийся список, чтобы снова отобразить изменения, как описано ранее.
Дополнительные способы совместной работы над документами Word см. в статье о добавлении и удалении комментариев. Если вы также используете Microsoft Excel, узнайте, как поделиться файлом, а затем также узнать, как отслеживать изменения.
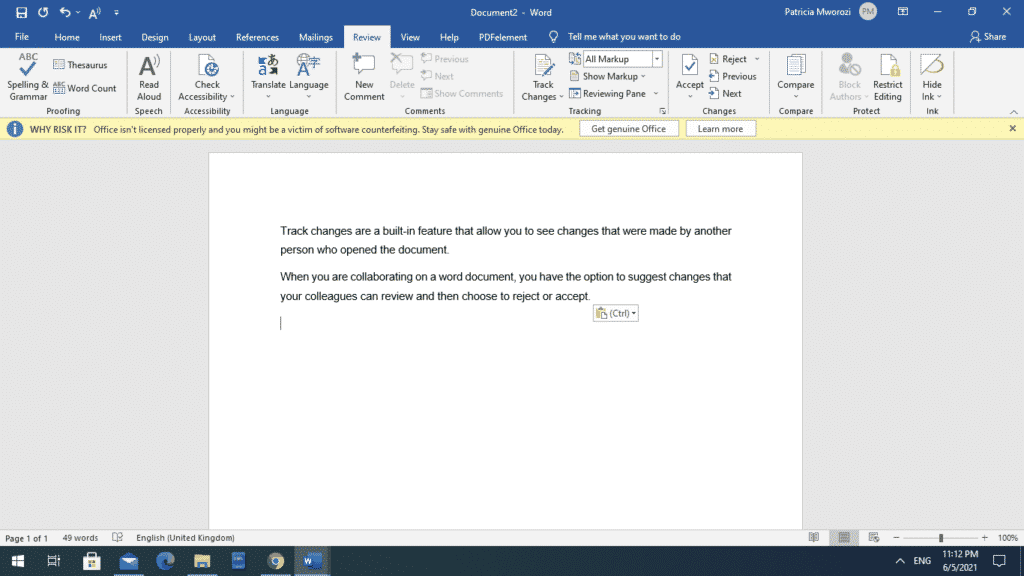
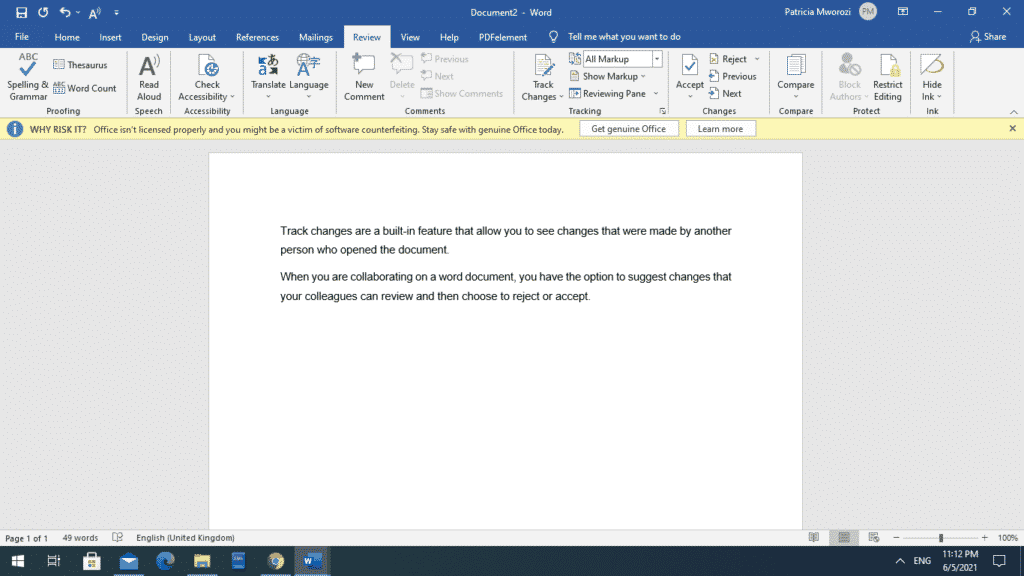
Track changes are a built-in feature that allow you to see changes that were made by another person who opened the document.
When you are collaborating on a word document, you have the option to suggest changes that your colleagues can review and then choose to reject or accept.
When are track changes useful
- When a professor wants to give feedback to students on their work
- When an editing team is working on a piece or article or research paper.
- When students are given a written group project.
You can also decide to turn off the track changes so that Microsoft Word stops highlighting where deletions or additions were made. This may be because you are done making changes and are ready to submit the paper or document.
You can turn off trac changes by following these simple steps.
Turning off track changes
1. Open Word
Open the Word document whose changes you want to track.
2. Go to review
Go to the ‘Review’ tab on the ribbon.
Select ‘Track Changes’ from the list that appears. The ‘Track Changes’ option should be blue to show that its on so that selecting it turs it off, like a switch.
On
Off
How a document appears when track changes is turned on
If you want to hide these comments, you can click on the now grey line.
Save the document to make these changes permanent.
When track changes are off, as you make additions and corrections, the red line to the right of your document stops appearing whenever you make a change.
Are you a professor who is unable to meet students physically so you can talk them through corrections in their essays or areas they need to focus on?
Simul Docs is here to help.
With Simul Docs, you can read their essays, and even leave comments on key areas that they need to review. You can talk them through an entire essay without meeting them physically, or emailing the document back and forth.
Imagine having to email forty documents from forty students back and forth. That is a hurdle no one needs to endure.
With Simul Docs, all edits are made under one ‘roof.’
The first step is downloading Simul Docs then you can get started.
After your student writes their first draft in Microsoft Word, they can upload it to Simul Docs. This will automatically make it the first version. Now, you can open it and make your edits. This will create another version different from the first.
Whenever another person opens a version and makes edits, a new version is created with the latest changes.
Sometimes, you might be in a rush and forget to turn on tracked changes so your modifications can be updated. You have nothing to worry about. Simul Docs automatically records these edits regardless of your online or offline status.
Since it is a collaboration, a bonus feature is the ability to add comments to the document. If you want a student to review the changes by a specific time, or any other instructions, you can let them know in the comment section.
Later on, these comments can be removed after everyone has seen and executed the instructions.
They have the option of accepting or rejecting these changes.
Additionally, your students can work on the document at the same time, assuming this is a group assignment. there’s no need to sit around waiting for someone else to make edits. You can save time by working on a document at once, and Simul Docs keeps each version separately.
Suppose another student is supposed to include their input, but they do not have Simul Docs. Maybe they are not tech-savvy. All you have to do is download the document or forward it by email. Alternatively, you can upload it to any storage software like one drive, and once their changes have been made, they can forward it to you once again, and you can open it in Simul Docs.
Simul Docs keeps every single version of the document so in case you want to go back to earlier edits, you have that option.
Once all the necessary edits have been made, you can save the final version containing all the modifications with one click.
Simul is the most convenient collaborative tool yet. Centralising your written project avoids mishaps like losing your work or losing its original format.
Visit simuldocs.com and prepare your group projects without the usual hassle and bustle.


