
Do you spend a lot of time changing the column width in Excel? On the one hand, you’d like to see as many columns as possible for having a good overview. On the other hand, you want to see as much content as possible within a column. In the worst case, you’d only see ### instead of values. Let’s have a look at how to adjust the rows and columns of an Excel sheet.
Method 1: Distribute rows and columns manually
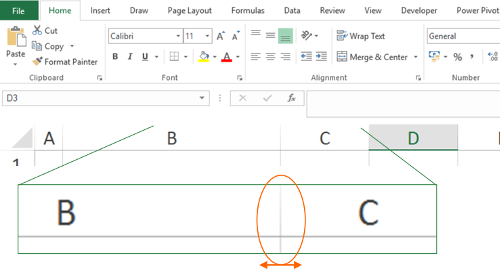
The first method is the most intuitive one: Manually per drag and drop to adjust the width of each column.
Just click on the small column (or row) divider as shown in the image on the right side. Hold the mouse down and move it in the direction you want.
This way also works if you select many columns (or rows) at the same time. All columns get the same width then.
Tip: If there are hidden columns in between, you can unhide them by selecting all columns from the left to right column of the hidden column. Then change the column width for just one column and all of them (also the previously hidden column) get the same width.
Method 2: Double click for automatic sizing the whole column
A faster way is to double click on the divider between columns (or rows). Double click on the line between the column letters on the top of the window can find the smallest possible width.
There is a keyboard shortcut combination for adjusting the column width:
- Select the complete column with Ctrl + Space on the keyboard.
- Press the following keys after each other: Alt –> H –> O –> I.
The keyboard shortcut for rows is quite similar:
- Select the row with Shift + Space.
- Press Alt –> H –> O –> A after each other.
Alternatively you can go to “Home” –> “Format” (under “Cells”) –> “AutoFit Column Width” or “AutoFit Row Height”.
Please note: That way, the column width (or row height) will adapt to the contents of the complete column (or row).
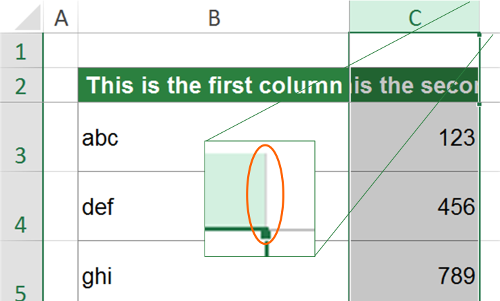
Method 3: Adjust the column width for only the selected cell content
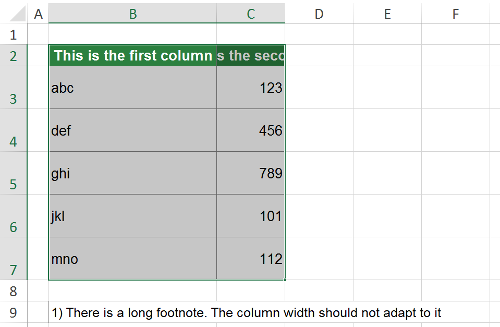
Please take a look at the example on the right side. You got a table in the cell range B2 to C7. Below, in cell B9 is a footnote, which is quite long.
You want to adjust the column width to fit the upper table, B2 to C7 in it.
It’s quite similar to our method 2 above. The only exeption: Instead of adjusting the entire column, just select the cell range B2:C7.
Now apply the keyboard shortcut from above: Alt –> H –> O –> I. Alternatively, click “Home” –> “Format” (under “Cells”) –> “AutoFit Column Width”.
If you want to do the same for the row it, use the following methods after selecting all the rows:
- Press Alt –> H –> O –> A on the keyboard after each other.
- Go to “Home” –> “Format” (under “Cells”) –> “AutoFit Row Height”
Do you want to boost your productivity in Excel?
Get the Professor Excel ribbon!

Add more than 120 great features to Excel!
Method 4: Adjust the column or row width with a fixed value
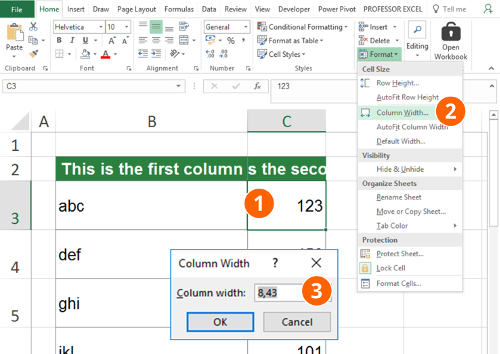
The previous methods aren’t exact enough for you? Then please consider this way.
You can set a specific column width (or row).
- Select a cell within the column (or row) you want to adjust.
- Click on “Format” on the “Home” ribbon and then on “Column Width…” (or “Row Height…”).
- Type your desired value and confirm with OK.
Please note: The value you type represents the number of characters shown in the standard font. “0” means, that the column (or row) is hidden.
Troubleshooting
How to deal with a column width larger than the screen?
This might happen, if you automatically distribute columns. The easiest way to solve this: Set a specific column width (e.g. “8”) according to the steps in method 4.
What if you can’t change the column width?
There are several possible reasons if you can’t change the column width. Please check the following:
- Another window is open (maybe in the background).
- The sheet is locked for editing. If yes, click on unlock.
- The workbook is not enabled for editing (is there s yellow bar on top of the rows?).
- You are editing a cell content (also in another window of Excel possible). Press Enter of Esc for leaving the cell.
The column is not shown (e.g. column A) and you can’t scroll to it?
Does your worksheet have frozen panes? If yes, unfreeze them by clicking “View” –> “Freeze Panes” –> “Unfreeze Panes”.
How do I distribute rows in Excel evenly?
Make multiple columns or rows the same size
- Select the columns or rows you want to make the same size. You can press CTRL while you select to choose several sections that are not next to each other.
- On the Layout tab, in the Cell Size group, click Distribute Columns . or Distribute Rows .
How do I distribute cells evenly in Excel?
To space the sheet’s rows equally , assign them all a single height.
- Click the row number of the array’s top row.
- Drag your cursor to select every row in the array.
- Right-click the selected cells to open a context menu.
- Click «Row height» to open the Row Height dialog box.
- Type a height into the box.
How do I make all the rows the same width in Excel?
Change the default width for all columns on a worksheet or workbook
- Do one of the following: …
- On the Home tab, in the Cells group, click Format.
- Under Cell Size, click Default Width .
- In the Standard column width box, type a new measurement, and then click OK.
How do I make Excel cells the same width and height?
With the Excel’s Row Height and Column Width functions, you can quickly format all the column width or row height have the same size .
- Click the. …
- Then click Home > Format > Row Height to set all the rows have the same height , see screenshot:
How do I sort rows in Excel without mixing data?
General Sort
- Click into any cell in the COLUMN you want to sort by within your list. (DO NOT highlight that column as this will sort that column only and leave the rest of your data where it is.)
- Click on the DATA tab.
- Click on either the Sort Ascending or Sort Descending. button.
How do I distribute rows evenly in Powerpoint?
To distribute columns evenly in Google Sheets , follow these steps:
- Select the columns that you want to evenly space .
- Right-click on the top of one of the selected columns , then click «Resize column …»
- Enter the new column width in pixels (Defaults is 100), then click «OK»
How do you Uncollapse rows in Excel?
How to expand all collapsed columns or rows in Excel ?
- Select the whole sheet, click Data > Ungroup > Clear Outline to display all collapse columns and rows which are grounded by the Group function.
- Select the data range you want to expand the data, click Data > Filter to disable the Filter function, then all cells have been displayed at once.
Why does excel not AutoFit row height?
Cause. In Excel , you cannot use the AutoFit feature on a column that contains a cell merged with cells in other columns. Likewise, you cannot use AutoFit on a row that contains a cell merged with cells in other rows .
How do you lock rows when filtering?
To freeze rows :
- Select the row below the row (s) you want to freeze . In our example, we want to freeze rows 1 and 2, so we’ll select row 3.
- Click the View tab on the Ribbon.
- Select the Freeze Panes command, then choose Freeze Panes from the drop-down menu.
- The rows will be frozen in place, as indicated by the gray line.
How do I sort data with multiple header rows?
An easy way to accomplish the sort function using multiple header rows is to insert a blank row just above the row you want to sort by (ideally, it is bottom-most in your header . If not, make it so.). Then click on the ‘ row ‘ number highlighting the empty row . Right click that row and select «Hide’.
I have created an Excel sheet that I could remotely remove access to if a monthly subscription payment failed. Here is how to accomplish this:
-
Create and HTML table and upload it to your website
-
Within your Excel doc go to the data tab and select get from web — import your table into a sheet called «Verify» — make sure your table has 3 columns. Serial Number is in the first column, description of user in 2nd, and your error message in the top of col 3. The error message stored here is what every user that isn’t registered will see. The first serial number should appear in cell A2 of the sheet Verify.
Within your Visual Basic editor paste this code into a Module — This code will return an 8 digit serial number based on a PC’s Hard Drive serial number:
Function HDSerialNumber() As String
     Dim fsObj   As Object
    Dim drv     As Object
    Set fsObj = CreateObject("Scripting.FileSystemObject")
     Set drv = fsObj.Drives("C")

    HDSerialNumber = Left(Hex(drv.SerialNumber), 4) _
         & "-" & Right(Hex(drv.SerialNumber), 4)
End Function
Also in another module I make sure the Internet is connected. If no Internet then the sheet closes. If you don’t do this then if someone disconnects from the Internet your serials won’t be loaded.
Option Explicit
#If VBA7 And Win64 Then
    Private Declare PtrSafe Function InternetGetConnectedStateEx Lib "wininet.dll" (ByRef lpdwFlags As Long, ByVal lpszConnectionName As String, ByVal dwNameLen As Integer, ByVal dwReserved As Long) As Long
#Else
    Private Declare Function InternetGetConnectedStateEx Lib "wininet.dll" (ByRef lpdwFlags As Long, ByVal lpszConnectionName As String, ByVal dwNameLen As Integer, ByVal dwReserved As Long) As Long
#End If


Function IsInternetConnected() As Boolean

Dim strConnType As String, lngReturnStatus As Long, MyScript As String

    If Application.OperatingSystem Like "*Macintosh*" Then
        MyScript = "repeat with i from 1 to 2" & vbNewLine
        MyScript = MyScript & "try" & vbNewLine
        MyScript = MyScript & "do shell script ""ping -o -t 2 www.apple.com""" & vbNewLine
        MyScript = MyScript & "set mystatus to 1" & vbNewLine
        MyScript = MyScript & "exit repeat" & vbNewLine
        MyScript = MyScript & "on error" & vbNewLine
        MyScript = MyScript & "If i = 2 Then set mystatus to 0" & vbNewLine
        MyScript = MyScript & "end try" & vbNewLine
        MyScript = MyScript & "end repeat" & vbNewLine
        MyScript = MyScript & "return mystatus"
        If MacScript(MyScript) Then IsInternetConnected = True
    Else
        lngReturnStatus = InternetGetConnectedStateEx(lngReturnStatus, strConnType, 254, 0)
        If lngReturnStatus = 1 Then IsInternetConnected = True
    End If
End Function
Then inside the Workbook_Open area paste this:
Private Sub Workbook_Open()

If IsInternetConnected Then

Dim objFSO As Object
Dim MyFolder As String
Dim sFileName As String
Dim iFileNum As Integer
Dim sBuf As String
Dim trialstartdate As String
Dim z As String

Dim fsoFSO
Set fsoFSO = CreateObject("Scripting.FileSystemObject")


'UNCOMMENT below to SHOW the serials sheet when the workbook is opened
ActiveWorkbook.Sheets("Verify").Visible = xlSheetVisible

'UNCOMMENT below to hide the serials sheet when the workbook is opened
'ActiveWorkbook.Sheets("Verify").Visible = xlSheetVeryHidden

Refresh_Serials
    z = 2
    'loop here for valid hard drive serial number
    Do Until IsEmpty(Worksheets("Verify").Cells(z, 1).Value)
        If Worksheets("Verify").Cells(z, 1).Value = HDSerialNumber Then
        'verified and let pass

        GoTo SerialVerified
        End If
        z = z + 1

        Loop

Dim custommessage As String

custommessage = Worksheets("Verify").Cells(2, 3)

MsgBox custommessage + " Your serial number is: " + HDSerialNumber

            Dim wsh1, MyKey1
            Set wsh1 = CreateObject("Wscript.Shell")
            MyKey1 = "%{TAB}"
            wsh1.SendKeys MyKey1


             MsgBox "The Commission Tracker will not open without a valid serial number. It will now close. uncomment this in workbook->open to close the workbook if the serial isn't found"
            Application.DisplayAlerts = False
            'uncomment this to close the workbook if the serial isn't found
             'ActiveWorkbook.Close
            Application.DisplayAlerts = True

SerialVerified:

' does the end user agree to not use this tool for mailicous purposes?

MsgAgree = MsgBox("Your PC's serial number is " & HDSerialNumber & ". By clicking 'Yes' you agree to use our software as described in our end user agreement. - the URL to your terms here", vbYesNo, "Final Agreement")

    If MsgAgree = vbNo Then
    'close program
    MsgBox "This program will now close since you do not agree to our end user agreement"
        Application.DisplayAlerts = False
    ActiveWorkbook.Close
    Application.DisplayAlerts = True

    Else
    'continue to open the program

    End If

Else
   MsgBox "No Network Connection Detected - You must have an internet connection to run the commission tracker."
    Application.DisplayAlerts = False
    ActiveWorkbook.Close
    Application.DisplayAlerts = True
End If


End Sub
That should do it….
Excel for Microsoft 365 Excel for Microsoft 365 for Mac Excel 2021 Excel 2021 for Mac Excel 2019 Excel 2019 for Mac Excel 2016 Excel 2016 for Mac Excel 2013 Excel 2010 Excel 2007 More…Less
Excel gives you the ability to protect your work, whether it’s to prevent someone from opening a workbook without a password, granting Read-Only access to a workbook, or even just protecting a worksheet so you don’t inadvertently delete any formulas. In this topic we’ll discuss the various ways you can utilize the primary options to protect and distribute your Excel files.
Warning:
-
If you forget or lose your password, Microsoft can’t retrieve it for you.
-
You should not assume that just because you protect a workbook or worksheet with a password that it is secure — you should always think twice before distributing Excel workbooks that could contain sensitive personal information like credit card numbers, Social Security Number, employee identification, to name a few.
-
Worksheet level protection is not intended as a security feature. It simply prevents users from modifying locked cells within the worksheet.
Following are the different options available for protecting your Excel data:
-
File-level: This refers to the ability to lock down your Excel file by specifying a password so that users can’t open or modify it. You have two choices here:
-
File encryption: When you choose this option, you specify a password and lock the Excel file. This prevents other users from opening the file. For more information, see Protect an Excel file.
-
Setting a password to open or modify a file: You specify a password to open or modify a file. Use this option when you need to give Read-only or edit access to different users. For more information, see Protect an Excel file.
-
Mark as Final: Use this option if you want to mark your Excel file as the final version and want to prevent any further changes by other users. For more information, see Add or remove protection in your document, workbook, or presentation.
-
Restrict Access: If your organization has permissions set up using Information Rights Management (IRM), you can apply any of the available IRM permissions to your document. For more information, see Add or remove protection in your document, workbook, or presentation.
-
Digital signature: You can add digital signatures to your Excel file. For more information, see Add or remove a digital signature in Office files.
Note: To add a digital signature, you need a valid certificate from a certificate authority (CA).
-
-
Workbook-level: You can lock the structure of your workbook by specifying a password. Locking the workbook structure prevents other users from adding, moving, deleting, hiding, and renaming worksheets. For more information on protecting workbooks, see Protect a workbook.
-
Worksheet-level: With sheet protection, you can control how a user can work within worksheets. You can specify what exactly a user can do within a sheet, thereby making sure that none of the important data in your worksheet are affected. For example, you might want a user to only add rows and columns, or only sort and use AutoFilter. Once sheet protection is enabled, you can protect other elements such as cells, ranges, formulas, and ActiveX or Form controls. For more information on protecting worksheets, see Protect a worksheet.
Which level of protection should I use?
-
To control the level of access users should have to an Excel file, use file-level protection. Let’s say you have a weekly status report of your team members in an Excel file. You don’t want anyone outside your team to be even able to open the file. There are two options available:
-
If you don’t want others to open your file: You can encrypt the Excel file, which is the most common technique used. This basically means you lock it with a password and nobody except you can open it.
-
If you want to enable Read-only or editing access to different users: Maybe, you want the managers in your team to be able to edit the weekly status report, but team members should only have Read-only access. You can protect the Excel file by specifying two passwords: one to open, and the other to modify. You can later share the appropriate passwords with the team depending on the access they should be given.
-
-
To control how users should work with worksheets inside a your workbook’s structure, use workbook-level protection. Let’s say your status report workbook has multiple worksheets, and each worksheet is named after a team member. You want to make sure each team member can add data to their own worksheet, but not be able to modify any of the worksheets in the workbook, whether it be adding a new worksheet, or moving worksheets around within the workbook.
-
To control how users should work within an individual worksheet, use worksheet-level protection. Let’s say each worksheet in your status report workbook contains data that is common to all worksheets, like header rows or a specific report layout, and you really don’t want anyone to change it. By protecting your worksheet, you can specify that users can only perform specific functions in a sheet. For example, you can give users the ability to enter data, but keep them from deleting rows or columns, or only insert hyperlinks or sort data.
You can use one or more levels of protection for your Excel data depending on your/your organization’s needs. You can choose to use all of the available options or a combination of options—it’s completely up to the level of security you want for your Excel data. For example, you may choose to encrypt a shared Excel file, as well as enable workbook and worksheet protection, while only using worksheet protection on a personal workbook just so you don’t accidentally delete any formulas.
Need more help?
You can always ask an expert in the Excel Tech Community or get support in the Answers community.
See Also
Protect an Excel file
Protect a workbook
Protect a worksheet
Need more help?
Want more options?
Explore subscription benefits, browse training courses, learn how to secure your device, and more.
Communities help you ask and answer questions, give feedback, and hear from experts with rich knowledge.
INTELLIGENT WORK FORUMS
FOR COMPUTER PROFESSIONALS
Contact US
Thanks. We have received your request and will respond promptly.
Log In
Come Join Us!
Are you a
Computer / IT professional?
Join Tek-Tips Forums!
- Talk With Other Members
- Be Notified Of Responses
To Your Posts - Keyword Search
- One-Click Access To Your
Favorite Forums - Automated Signatures
On Your Posts - Best Of All, It’s Free!
*Tek-Tips’s functionality depends on members receiving e-mail. By joining you are opting in to receive e-mail.
Posting Guidelines
Promoting, selling, recruiting, coursework and thesis posting is forbidden.
Students Click Here
May I really distribute EXCEL.EXE?May I really distribute EXCEL.EXE?(OP) 7 Oct 04 14:40 Hello, I prepared an OCX control that creates a XLS file. It uses Excel and works fine. However, when I check for the files that I must include on the setup, EXCEL.EXE appears to be one of them. My question is if I am allowed to include that file in my package or I will be violating copyrights. Thanks in advance. Diego Red Flag SubmittedThank you for helping keep Tek-Tips Forums free from inappropriate posts. |
Join Tek-Tips® Today!
Join your peers on the Internet’s largest technical computer professional community.
It’s easy to join and it’s free.
Here’s Why Members Love Tek-Tips Forums:
 Talk To Other Members
- Notification Of Responses To Questions
- Favorite Forums One Click Access
- Keyword Search Of All Posts, And More…
 Talk To Other Members
Register now while it’s still free!
Already a member? Close this window and log in.
Join Us Close