
| title | keywords | f1_keywords | ms.prod | ms.assetid | ms.date | ms.localizationpriority |
|---|---|---|---|---|---|---|
|
Do…Loop statement (VBA) |
vblr6.chm1008790 |
vblr6.chm1008790 |
office |
f1ac3901-238d-3e38-45dc-f659fd88c23b |
12/03/2018 |
medium |
Do…Loop statement
Repeats a block of statements while a condition is True or until a condition becomes True.
Syntax
Do [{ While | Until } condition ]
[ statements ]
[ Exit Do ]
[ statements ]
Loop
Or, you can use this syntax:
Do
[ statements ]
[ Exit Do ]
[ statements ]
Loop [{ While | Until } condition ]
The Do Loop statement syntax has these parts:
| Part | Description |
|---|---|
| condition | Optional. Numeric expression or string expression that is True or False. If condition is Null, condition is treated as False. |
| statements | One or more statements that are repeated while, or until, condition is True. |
Remarks
Any number of Exit Do statements may be placed anywhere in the Do…Loop as an alternate way to exit a Do…Loop. Exit Do is often used after evaluating some condition, for example, If…Then, in which case the Exit Do statement transfers control to the statement immediately following the Loop.
When used within nested Do…Loop statements, Exit Do transfers control to the loop that is one nested level above the loop where Exit Do occurs.
Example
This example shows how Do…Loop statements can be used. The inner Do…Loop statement loops 10 times, asks the user if it should keep going, sets the value of the flag to False when they select No, and exits prematurely by using the Exit Do statement. The outer loop exits immediately upon checking the value of the flag.
Public Sub LoopExample()
    Dim Check As Boolean, Counter As Long, Total As Long
    Check = True: Counter = 0: Total = 0 ' Initialize variables.
    Do ' Outer loop.
        Do While Counter < 20 ' Inner Loop
            Counter = Counter + 1 ' Increment Counter.
            If Counter Mod 10 = 0 Then ' Check in with the user on every multiple of 10.
                Check = (MsgBox("Keep going?", vbYesNo) = vbYes) ' Stop when user click's on No
                If Not Check Then Exit Do ' Exit inner loop.
            End If
        Loop
        Total = Total + Counter ' Exit Do Lands here.
        Counter = 0
    Loop Until Check = False ' Exit outer loop immediately.
    MsgBox "Counted to: " & Total
End Sub
See also
- Using Do…Loop statements
- Data types
- Statements
[!includeSupport and feedback]
И так, мы уже познакомились с циклами for next и for each next, а в этой статье рассмотрим цикл do loop vba языка. Данный цикл vba в отличии от двух предыдущих работает не по принципу перебора, а по принципу условия, то есть… Вы задаете условие выхода или выполнения цикла, а не количество итераций. Фактически, цикл do loop это гибрид цикла for next с выражением exit for.
В зависимости от синтаксиса можно задавать условие как в начале, так и в конце…
Содержание
- Do while Loop VBA
- Do Loop While
- Do Until … Loop
- Do Loop Until
Do while Loop VBA
Общий синтаксис:
Do While условие
Операторы
Loop
В данном случае поверка условия идет в начале, тут задается условие выполнения VBA цикла, если условие равно True, выполнение операторов продолжается. Если условие будет равно False, произойдет выполнение операторов, следующих после ключевого слова Loop. Так как проверка условия происходит до выполнения первого оператора в теле цикла, то может возникнуть ситуация, когда условие будет ложным изначально и ничего не выполнится.
Do Loop While
Общий синтаксис:
Do
Операторы
Loop While условие
Как видим, проверка условия выполнении происходит в конце, поэтому как минимум один раз произойдет выполнение оператора в теле цикла.
Do Until … Loop
Общий синтаксис:
Do Until условие
Операторы
Loop
В данном случае ключевое слово Until определяет, что происходит проверка условии не на выполнение (как в предыдущих вариантах), а на завершение VBA цикла. То есть, если условие равно TRUE, произойдет выход, иначе, продолжится выполнение операторов цикла VBA.
Do Loop Until
Общий синтаксис:
Do
Операторы
Loop Until условие
Тут происходит поверка условия выхода из цикла в конце.
Вполне возможна ситуация, когда нужно задать дополнительное условие выхода из оператора цикла VBA, для таких ситуаций служит выражение Exit Do, аналог Exit For.
Хорошо, теперь давайте напишем небольшой пример. В редакторе VBA создайте новую форму (меню Insert пункт UserForm), на ее поверхность добавьте четыре текстовые метки (класс Label) и одну кнопку (класс CommandButton). Теперь в редакторе кода для формы пропишите:
Private Sub GetSumm()
Dim summ As Integer
    Do While summ <= 1000
        summ = summ + 1
    Loop
    Label1.Caption = summ & " - do while loop vba"

    summ = 0
    Do
        summ = summ + 1
    Loop While summ <= 1000
    Label2.Caption = summ & " - do loop while vba"

    summ = 0
    Do Until summ >= 1000
        summ = summ + 1
    Loop
    Label3.Caption = summ & " - do until loop vba"

    summ = 0
    Do
        summ = summ + 1
    Loop Until summ >= 1000
    Label4.Caption = summ & " - do loop until vba"

End Sub
Private Sub CommandButton1_Click()
    'Вызываем процедуру
    Call GetSumm
End Sub

Private Sub UserForm_Initialize()
    Label1.Caption = ""
    Label1.FontSize = 15
    Label1.ForeColor = vbBlue

    Label2.Caption = ""
    Label2.FontSize = 15
    Label2.ForeColor = vbGreen

    Label3.Caption = ""
    Label3.FontSize = 15
    Label3.ForeColor = vbRed

    Label4.Caption = ""
    Label4.FontSize = 15
    Label4.ForeColor = vbYellow

    CommandButton1.Caption = "Сумма"
End Sub

Процедура GetSumm отвечает за выполнение операторов цикла VBA, в которых происходит процесс суммирования чисел. Как видим, мы не задаем начального значения, а просто прибавляем число 1. Первые два цикла задают условие выполнения – значение переменной summ должно быть меньше или ровно 1000. Во вторых двух циклах мы задали условие выхода – значение переменной sum должно быть больше или равно 1000. Как видим, в первых двух случаях нам вывело число 1001, а во вторых – 1000. Фактически, при использовании ключевого слова while, количество выполнений оператора в блоке цикла было на один раз больше, чем при использовании ключевого слова Until.
И так, в этой статье мы рассмотрели использование цикла do while loop vba и do until loop vba, который может использоваться на ряду с циклами for next и for each. Однако, тут можно задавать или условие выполнения или условие завершения работы цикла. Также, для выхода из блока применяется выражение exit for. Цикл VBA do loop часто используется для создания зацикливания, например – прослушивание системы на запуск заданной программы.
Для общего развития, можете посмотреть примеры использования цикла Do Loop в языке VBScript сервера сценариев Windows Script Host, который, как уже упоминалось, является сородичем языка Visual Basic for Applications.
Типы операторов Do.. .Loop
В VBA несколько видов циклов Do… Loop, но все они работают очень похоже.
Do. . .Loop Повторяет выполнение блока программного кода, пока некоторый условный оператор внутри цикла не выполнит команду End Do
Do While. . .Loop Начинает и повторяет выполнение блока программного кода, только если заданное условие принимает значение True
Do. . .Loop While Выполняет блок программного кода один раз, а затем повторяет выполнение, пока заданное условие принимает значение True
Do Until. . . Loop Начинает и повторяет выполнение блока программного кода, только если заданное условие принимает значение False
Do. . .Loop Until Выполняет блок программного кода один раз, а затем повторяет выполнение, пока заданное условие принимает значение False
Оператор Do While. . . Loop можно считать прототипом структуры Do. Вот его синтаксис:
Do While условие
(операторы, выполняющиеся, когда условие — True)
Loop
Обнаружив оператор Do While, VBA начинает проверять условие. Если представляющее условие выражение оказывается равным False, VBA игнорирует остальную часть цикла и переходит сразу к операторам программы, следующим за оператором Loop. Если же условие принимает значение True, VBA выполняет операторы в блоке. Достигнув оператора Loop, VBA возвращается опять к оператору Do While, чтобы проверить условие снова.
Как правило, один или несколько операторов в теле цикла могут изменить значение выражения, представляющего условие, поэтому условие может стать равным False. В этом случае VBA прерывает выполнение цикла и, пропустив все его операторы, переходит к выполнению операторов, следующих за оператором Loop. Но если условие все еще равно True, операторы цикла будут выполнены еще раз.
Весь процесс повторяется до тех пор, пока в некоторый момент условие не станет равным False. Другими словами, нет ограничений на число повторений выполнения блока программного кода в цикле. В предположении, что подача энергии не прекратится и компьютер не отключается, цикл будет продолжаться вечно, если условие никогда не примет значение False.
Следующий пример, основанный на использовании двух операторов Do While . . . Loop, переставляет в обратном порядке цифры в числе, предложенном пользователем. Наверное, этот пример не имеет никакой практической ценности, но он эффектный, работает в любом VBA-приложении и достаточно компактный, чтобы иллюстрировать работу циклов Do;
Sub ReverseTheDigits()
Dim intOriginalNumber As Integer
Dim intOneDigit As Integer, strBackwardsNumber As String
Do While intOriginal Number < 10
intOriginal Number = _
InputBox(«Напечатайте число, большее 9.»)
Loop
Do While intOriginalNumber
intOneDigit = intOriginalNumber Mod 10
strBackwardsNumber = strBackwardsNumber & intOneDigit
intOriginalNumber = Int(intOriginalNumber / 10)
Loop
MsgBox strBackwardsNumber
End Sub
В первом цикле Do проверяется, что значение, введенное пользователем, неотрицательно и что во введенном числе не меньше двух знаков (а иначе, что же в нем переставлять?). Когда программа выполняет этот цикл впервые, значением переменной intOriginalNumber будет 0, поскольку до этого переменной не присваивалось никакого значения. Нуль меньше 10, поэтому условие принимает значение True, и VBA начинает выполнение цикла.
Цикл содержит один оператор, отображающий окно ввода, в котором пользователя просят ввести подходящее число. После того как число введено, оператор Loop отсылает процесс выполнения к началу цикла, где введенное число проверяется. Цикл завершит свою работу только тогда, когда проверка покажет, что было введено подходящее число. (Обратите внимание на то, что в данном примере опущены некоторые важные пункты проверки правильности вводимых данных, наподобие проверки того, является ли число целым и не является ли больше максимально допустимого для переменных типа Integer.)
После подтверждения правильности введенного значения VBA переходит к следующему циклу. Условием выполнения этого цикла является положительное значение, содержащееся в переменной. Поскольку ненулевые числа порождают True, можно вместо Do While intOricinalNumbe r > 0 писать просто Do While intOriginalNumber — оба варианта работают одинаково.
В самом цикле простая процедура в три строки разбирает цифры исходного числа, начиная справа налево, и использует их в обратном порядке для построения новой строки. Чтобы понять, как работает цикл, не обязательно разбираться в программном коде внутри цикла, но, я думаю, следующие пояснения вам не помешают.
* В первой строке используется операция Mod, чтобы присвоить переменной intOneDigit остаток от деления числа на 10. Поскольку число делится на 10, остатком будет однозначное число, представленное последней (справа) цифрой исходного числа.
* Во втором операторе цифра, полученная в первой строке, добавляется в конец создающейся новой строковой величины.
* В третьем операторе число снова делится на 10, но на этот раз результат сохраняется f в исходной переменной. При таком делении просто отбрасывается правый знак числа. v Заметим, однако, что перед тем, как результат присваивается переменной, он обрабатывается функцией Int. Использование функции intздесь необходимо, поскольку в противном случае результат был бы округлен и это изменило бы знаки числа по сравнению с введенными изначально.
* В процессе прохода цикла значение intOriginalNumber уменьшается и наконец становится равным 0 после того, как все цифры будут обработаны (любая цифра задает число, меньшее 10, а функция intотбрасывает дробную часть числа). В стране VBA нуль означает False, поэтому цикл завершится, и программа покажет число с обратным расположением цифр.
Читайте также
Использование операторов
Использование операторов
Процедуры состоят из операторов — наименьших жизнеспособных единиц программного кода. Как правило, операторы занимают по одной строке программного кода, и в каждой строке обычно содержится только один оператор, но, как будет показано немного
Do… Loop While
Do… Loop While
Разница между операторами Do While. , .Loop и Do. . .Loop While очень простая: Do While. . . Loop имеет условие в самом начале цикла, а в Do… Loop While условие идет в самом конце.В структуре Do While . . . Loop вход в цикл происходит вообще, только если условие принимает значение True, когда программа
Do Until…Loop
Do Until…Loop
Операторы Do While. . .Loop и Do Until. . .Loop функционально эквивалентны, т.е. с помощью любого из них будут выполняться одни и те же операторы, если используемые в них условные выражения представляют противоположные условия. Подобным образом дополняют один другой и
27. Отдавайте предпочтение каноническим формам арифметических операторов и операторов присваивания
27. Отдавайте предпочтение каноническим формам арифметических операторов и операторов присваивания
РезюмеЕсли можно записать а+b, то необходимо, чтобы можно было записать и a+=b. При определении бинарных арифметических операторов одновременно предоставляйте и их
Группировка операторов
Группировка операторов
Операторы можно группировать, заключая их в круглые скобки.
Типы, характеризуемые значениями, ссылочные типы и оператор присваивания
Типы, характеризуемые значениями, ссылочные типы и оператор присваивания
Теперь изучите следующий метод Main() и рассмотрите его вывод, показанный на рис. 3.12.static void Main(string[] args) { Console.WriteLine(«*** Типы, характеризуемые значением / Ссылочные типы ***»); Console.WriteLine(-› Создание p1″); MyPoint
Типы, характеризуемые значениями и содержащие ссылочные типы
Типы, характеризуемые значениями и содержащие ссылочные типы
Теперь, когда вы чувствуете разницу между типами, характеризуемыми значением, и ссылочными типами, давайте рассмотрим более сложный пример. Предположим, что имеется следующий ссылочный тип (класс),
Типы, характеризуемые значениями, и ссылочные типы: заключительные замечания
Типы, характеризуемые значениями, и ссылочные типы: заключительные замечания
Чтобы завершить обсуждение данной темы, изучите информацию табл. 3.8, в которой приводится краткая сводка основных отличий между типами, характеризуемыми значением, и ссылочными типами.Таблица
5.2.10.3. Инструкция LOOP [begin_label:]
5.2.10.3. Инструкция LOOP [begin_label:]
LOOP statement_listEND LOOP [end_label]LOOP осуществляет простую конструкцию цикла, допуская повторенное выполнение операторного списка, который состоит из одной или большего количества инструкций. Инструкции внутри цикла повторены, пока цикл не покидается.
Типы операторов, не поддерживаемых в PSQL
Типы операторов, не поддерживаемых в PSQL
Следующие типы операторов не поддерживаются в триггерах и хранимых процедурах:* операторы языка определения данных (т. е. операторы, начинающиеся с ключевых слов CREATE, RECREATE, ALTER или DROP; SET GENERATOR; DECLARE EXTERNAL FUNCTION: DECLARE FILTER);* операторы
3.3 Сводка операторов
3.3 Сводка операторов
Операторы С++ систематически и полностью изложены в #с.9, прочитайте, пожалуйста, этот раздел. А здесь приводится краткая сводка и некоторые примеры.Синтаксис оператора – оператор: описание (*список_операторов opt*) выражение optif оператор if ( выражение )
Loops are used in VBA for repeating a set of statements multiple times. Loops form an essential part of any programming language, and VBA is no exception. There are five different types of loops that can be used in VBA. These are as follows:
- For Loop
- For Each Loop
- Do While Loop
- Do Until Loop
- Wend Loop (obsolete)
In this post, I will explain all these VBA Loops with examples. But before jumping into the topic, let’s understand what a loop is and why it is used.
What is a loop, and what are its uses?
Loop is an instruction that can continually repeat a set of statements until a particular condition is reached.
Loops can serve the following purposes:
- It helps in iterating a set of statements.
- It helps in checking a particular condition multiple times.
- It can also help in developing custom sleep and wait logic in code.

VBA FOR LOOP
For loop is one of the most important and frequently used loop in VBA. For Loop is sometimes also called ‘For Next Loop’.
For Loops allow you to iterate a set of statements for a specified number of times.
Syntax of VBA For Loop
The basic syntax of a VBA For loop or structure of For Loop is as follows:
For loop_ctr = start_num To end_num [step_increment]
'Statements to be executed inside the loop
Next loop_ctr
Here, ‘loop_ctr’ stands for the loop counter. It is the backbone of the ‘For Next Loop,’ and hence it is also called ‘loop timekeeper’. This variable gets incremented after each iteration until the loop ends.
‘start_num’ is the number from which the loop should begin.
‘end_num’ is the number till which the loop should continue.
‘step_increment’ is an optional parameter. It denotes by how much value the ‘loop_ctr’ should be incremented after each iteration. By default, the value of ‘step_increment’ is 1. This means that with each iteration, the ‘loop_ctr’ value is incremented by 1.
How does a VBA For Loop Work?
Let’s say we have a simple For Loop in VBA as shown below:
For loop_ctr = 1 To 100
'Statements to be executed inside the loop
Next loop_ctr
- When the program control reaches the statement ‘For loop_ctr = 1 To 100’, it reserves a space for the variable ‘loop_ctr’ in the memory and initializes it to 1.
- After this, it executes the statements inside the For Loop sequentially.
- Finally, the program control reaches the statement ‘Next loop_ctr’, here it increments the variable ‘loop_ctr’ by 1. And the control again goes to the statement ‘For loop_ctr = 1 To 100’, where it checks if the value of ‘loop_ctr’ has reached 100 or not. If the value is less than 100, then it continues the next iteration; otherwise, the loop stops.
Still not clear with the working of a For Loop? No Worries. Let’s try to understand this with the help of a flow diagram.
VBA For Next Loop Flow Diagram

Let’s try to understand the control flow as depicted in the above flow chart:
- First of all, the FOR statement is executed. This step allows the ‘loop_ctr’ and ‘step_increment’ values to be initialized.
- After this, the condition is evaluated. If the condition is TRUE, all the statements inside the loop ‘Code Block’ are executed. However, If the condition evaluates to FALSE, then the control flow jumps to the next statement outside the For loop.
- When the ‘code block’ inside the For Loop executes, the loop starts to get ready for the next iteration and increments the ‘loop_ctr’ value.
- Finally, the condition is again evaluated with the incremented ‘loop_ctr,’ and the process repeats itself.
Few Simple Examples of For Loop In VBA
Let’s see some simple examples of For Loop in VBA.
Example 1: Use VBA For Loop to print numbers from 1 to 10 in excel.
In this example, we have a range «A1:A10”, and we have to fill this range with numbers from 1-10.
To accomplish this, we can use the below code:
Sub ForLoopPrintNumbers()
Dim loop_ctr As Integer
For loop_ctr = 1 To 10
ActiveSheet.Range("A1").Offset(loop_ctr - 1, 0).Value = loop_ctr
Next loop_ctr
MsgBox "For Loop Completed!"
End Sub
Explanation:
In the above code, first of all, we have declared the loop counter ‘loop_ctr’ for our For loop. Next, along with the For statement, we have initialized the ‘loop_ctr’ to 1 and set the ‘end_num’ as 10.
Inside the For Loop body, we have written the code to write the loop_ctr value on the excel sheet in the A column. After this, there is a statement that increments the ‘loop_ctr’ for the next iteration.
Note that since we have not specified an explicit ‘step_increment’ value, so every iteration, the ‘loop_ctr’ will be incremented by 1. The For loop in the above code iterates 10 times and populates the cells in the range A1:A10 with numbers from 1-10 serially.
Example 2: Use For Loop in VBA to find the sum of all the numbers between 1 to 10.
In this example, we will loop through all the numbers between 1 to 10 and sum them. Finally, we will be displaying the sum of the numbers from 1 to 10 on the screen.
To do this we can use the following code:
Sub ForLoopSumNumbers()
Dim loop_ctr As Integer
Dim result As Integer
result = 0
For loop_ctr = 1 To 10
result = result + loop_ctr
Next loop_ctr
MsgBox "Sum of numbers from 1-10 is : " & result
End Sub
Explanation:
In the above code, first of all, we have declared the loop counter ‘loop_ctr’ for our For loop. Next, we have declared another integer variable as ‘result’ for storing the sum of numbers from 1 to 10.
After this, along with the For statement, we have initialized the ‘loop_ctr’ to 1 and set the ‘end_num’ as 10.
Inside the For Loop body, we have added the value of ‘loop_ctr’ along with the result. This means that in the first iteration, the result will be: 1, and in the second iteration, it will be : (1+2) = 3. Similarly, in the third iteration, the value will be: (3 + 3) = 6 and so on.
After the For loop body, there is a statement that increments the ‘loop_ctr’ for the next iteration.
Note that since we have not specified an explicit ‘step_increment’ value, hence with every iteration, the ‘loop_ctr’ will be incremented by 1.
The For loop in the above code iterates 10 times and sums all the numbers from 1 to 10, and finally displays the sum of these numbers in msgbox.
Example 3: Use VBA For Loop to print numbers, all even numbers from 1 to 10.
In this example, we will fill all the even numbers between 1 and 10 into cells A1 to A5.
To do this, we can use the below code:
Sub ForLoopToPrintEvenNumbers()
Dim loop_ctr As Integer
Dim cell As Integer
cell = 1For loop_ctr = 1 To 10
If loop_ctr Mod 2 = 0 Then
ActiveSheet.Range("A1").Offset(cell - 1, 0).Value = loop_ctr
cell = cell + 1
End If
Next loop_ctrMsgBox "For Loop Completed!"
End Sub
Explanation:
In the above code, first of all, we have declared the loop counter ‘loop_ctr’ for our For loop. After that, we have declared another variable ‘cell’. This variable is initialized with a value of 1.
Next, along with the For statement, we have initialized the ‘loop_ctr’ to 1 and set the ‘end_num’ as 10.
Inside the For Loop body, we have used an IF statement to check if the ‘loop_ctr’ value is even or not.
If the ‘loop_ctr’ value is Even then, we have written a statement to print the value out to the spreadsheet in the A column.
After this, we are incrementing the cell variable by 1. We have used the cell variable in our loop to print the values in the appropriate cell in the A column.
Next, there is a statement that increments the ‘loop_ctr’ for the next iteration.
Note that since we have not specified an explicit ‘step_increment’ value, after every iteration, the ‘loop_ctr’ will be incremented by 1.
The For loop in the above code iterates 10 times and populates the cells in the range A1:A5 with even numbers from 2-10.
Alternate Logic
There is another better way to accomplish the same, let’s see how.
Sub ForLoopToPrintEvenNumbers()
Dim loop_ctr As Integer
Dim cell As Integer
cell = 1For loop_ctr = 2 To 10 Step 2
ActiveSheet.Range("A1").Offset(cell - 1, 0).Value = loop_ctr
cell = cell + 1
Next loop_ctrMsgBox "For Loop Completed!"
End Sub
Explanation:
In the above code, we have looped through all the numbers between 2 to 10. Instead of the default ‘step_increment’ of 1, we are using an explicit ‘step_increment’ of 2.
In the first iteration of the for loop, the ‘loop_ctr’ value is 2, which is what gets printed in cell A1. In the second iteration, the ‘loop_ctr’ value becomes 4 (earlier value : 2 + step_increment : 2) and this number gets printed on cell A2.
Similarly, in the third iteration, the ‘loop_ctr’ value is 6 (earlier value: 4 + step_increment: 2) and it gets printed on the cell A3 and so on.
Writing a Nested For Loop
There are times when you might need to use a for loop within another for loop; this is called nesting of for loops.
VBA For loops can be nested within one another to perform complex tasks in excel. Let’s understand a nested loop with an example:
Example 4: Print numbers from 1 to 10 in all the worksheets in an excel spreadsheet using a For Loop.
In this example, we need to print numbers from 1 to 10 in all the worksheets in an excel workbook.
To do this, we can make use of the following code:
Sub ForLoopPrintNumbers()
Dim loop_ctr As Integer
Dim sheet As IntegerFor sheet = 1 To Worksheets.Count
For loop_ctr = 1 To 10
Worksheets(sheet).Range("A1").Offset(loop_ctr - 1, 0).Value = loop_ctr
Next loop_ctr
Next sheetMsgBox "For Loop Completed!"
End Sub
Explanation:
In this example, there are two For Loops, one inside another. The Outer For Loop iterates over the variable ‘sheet’, and the Inner For Loop iterates over ‘loop_ctr’ that determines the cell position.
Inside the body of the Inner For loop, we have a statement that prints the numbers between 1 to 10 in each worksheet (as per the outer loop).
The outer loop iterates over all the available sheets in the spreadsheet, whereas the inner loop iterates over the A1 to A10 for the current sheet. This makes it possible to print numbers from 1 – 10 in all the available worksheets.
Reverse For Loop in VBA
In all our previous examples, we have only seen those For loops in which the loop counter variable gets incremented from a lower value to a higher value (with each iteration).
But this is not necessary, you can also have a For Loop where the loop counter moves from a higher value to a lower value (with each iteration).
Example 5: Use a Reverse For Loop to print numbers from 1 to 10 in descending order.
Sub ReverseForLoop()
Dim loop_ctr As Integer
Dim cell As Integer
cell = 1For loop_ctr = 10 To 1 Step -1
ActiveSheet.Range("A1").Offset(cell - 1, 0).Value = loop_ctr
cell = cell + 1
Next loop_ctrMsgBox "For Loop Completed!"
End Sub
Explanation:
In this example, the loop starts with the value of ‘loop_ctr’ as 10. And then, with each iteration, the value of the loop counter is decremented by 1 (since the ‘step_increment’ is -1).
Inside the For Loop body, we print the value of the loop counter variable in the active sheet from A1:A10.
Infinite Loop Using a For Loop
An infinite loop is also sometimes called an Endless Loop. An Infinite Loop is a loop whose ending condition (often due to a logic error by the programmer) never becomes true. The loop iterates an infinite number of times or until halted by programmer/user action.
Although in the case of FOR loop, generally due to the clear start and end conditions, it is not easy to make an endless loop by logical mistake. However, there can be cases where you can by mistake reset the loop counter variable inside the loop, thereby making the loop infinite.
Below is an example of an endless for loop:
'Do not run this code
Sub InfiniteForLoop()
Dim loop_ctr As Integer
Dim cell As IntegerFor loop_ctr = 1 To 10
ActiveSheet.Range("A1").Offset(loop_ctr - 1, 0).Value = loop_ctr
loop_ctr = loop_ctr - 1
Next loop_ctrMsgBox "For Loop Completed!"
End Sub
The statement ‘loop_ctr = loop_ctr – 1’ makes the above VBA loop infinite since it resets the value of the loop_ctr with every iteration, and hence the end condition is never reached.
Tip: It is always good to not make any changes to the loop counter variable value inside the loop body.
How to Break Out or Exit of a For Loop
I believe many of you will wonder, «Why do we need to break a loop during execution»? The answer is simple: Breaking or exiting a loop can sometimes optimize the code and reduce the resource overhead.
To break a For Loop we can use the ‘Exit For’ statement.
Let’s try to see this in action with an example:
Example 6: Use a FOR loop in VBA to find the sum of the first 20 odd numbers between 1 to 100.
In this example, we have to find the first 20 odd numbers from 1 to 100 and then calculate their sum. Below is the code to do this:
Sub SumFirst20OddNumbers()
Dim loop_ctr As Integer
Dim odd_number_counter As Integer
Dim sum As IntegerFor loop_ctr = 1 To 100
If (loop_ctr Mod 2 <> 0) Then
sum = sum + loop_ctr
odd_number_counter = odd_number_counter + 1
End IfIf (odd_number_counter = 20) Then
Exit For
End If
Next loop_ctrMsgBox "Sum of top 20 odd numbers is : " & sum
End Sub
Explanation:
In this example, we have three variables – ‘loop_ctr’, ‘odd_number_counter’, and ‘sum’. The variable ‘loop_ctr’ is used as a loop counter, the ‘odd_number_counter’ variable holds the count of odd numbers that have been summed (because we only need to sum the first 20 odd numbers), and the ‘sum’ variable holds the sum of the first 20 odd numbers.
Inside the loop, we iterate all the numbers from 1 to 100, one by one (step_increment is 1 as default), and check if the number is odd. If the number is odd, we sum it and increment the ‘odd_number_counter’ by 1.
After the first IF block, another IF condition checks if the ‘odd_number_counter’ variable value is 20. If the value of ‘odd_number_counter’ is 20, then using the ‘Exit For’ statement, we are exiting out of the loop as there is no point in continuing the loop further.
Few Practical Examples of VBA For Loop
Now let’s have a look at some of the practical examples where For Loop can be used:
Example 7: Highlight alternate rows on a spreadsheet using the VBA For Loop.
In this example, we need to highlight alternate rows in a spreadsheet. To do this we can use the below code:
Sub HighlightAlternateRows()
Dim loop_ctr As Integer
Dim Max As Integer
Dim clm As Integer
Max = ActiveSheet.UsedRange.Rows.Count
clm = ActiveSheet.UsedRange.Columns.CountFor loop_ctr = 1 To Max
If loop_ctr Mod 2 = 0 Then
ActiveSheet.Range(Cells(loop_ctr, 1), Cells(loop_ctr, clm)).Interior.ColorIndex = 28
End If
Next loop_ctrMsgBox "For Loop Completed!"
End Sub
Explanation:
In the above code, we have started the loop from 1 to the number of rows in our sheet. We are then using the if statement to find the even-numbered rows for highlighting them.
Example 8: Use VBA For Loop Protect all sheets in Workbook.
In this example, we will try to create a VBA macro that loops through all the worksheets in the active workbook and protects all the worksheets.
Below is the code to do this:
Sub ProtectWorksheets()
Dim loop_ctr As Integer
For loop_ctr = 1 To ActiveWorkbook.Worksheets.Count
Worksheets(loop_ctr).Protect
Next loop_ctr
End Sub
Explanation:
In the above code, we are using a VBA for loop and iterating over all the worksheets in the open workbook. Inside the For Loop, we are trying to protect the current instance of the worksheet.
The above code can also be used to unprotect the sheets as well. Just replace the ‘Worksheets(loop_ctr).Protect’ with ‘Worksheets(loop_ctr).UnProtect’.
Example 9: Loop Over an Array of Numbers and Find the Largest and Smallest Numbers from the Array.
In this example, we have an array of numbers, and using a FOR Loop we have to iterate the array and find the smallest and the Largest numbers from the array. Below is the code to do this:
Sub ForLoopWithArrays()
Dim arr() As Variant
arr = Array(10, 12, 8, 19, 21, 5, 16)Dim min_number As Integer
Dim max_number As Integermin_number = arr(0)
max_number = arr(0)Dim loop_ctr As Integer
For loop_ctr = LBound(arr) To UBound(arr)
If arr(loop_ctr) > max_number Then
max_number = arr(loop_ctr)
End IfIf arr(loop_ctr) < min_number Then
min_number = arr(loop_ctr)
End IfNext loop_ctr
MsgBox "Largest Number: " & max_number _
& " Smallest Number: " & min_number
End Sub
Explanation:
In the above code, we have an array of numbers declared as ‘arr’ variable. In addition to that, we have two variables, ‘min_number’ and ‘max_number’, that are used for holding the minimum and maximum numbers from the array.
We initialize both the ‘min_number’ and ‘max_number’ variables to the array’s first element. Next, inside the For loop, we loop through all the array elements and check –
If the current number is greater than the ‘max_number’, then set the ‘max_number’ value equal to the current number. The next condition that we check is – If the current number is less than the ‘min_number’, then set the ‘min_number’ value equal to the current number.
Finally, we are showing the largest and the smallest numbers inside the array with the help of a msgbox.
VBA For Each Loop
For each is a more sophisticated type of For Loop. It can be used for iterating a collection of objects.
Here you don’t have to worry about the loop counter, your job is to simply pass a collection of objects, and the loop itself identifies the objects and iterates them.
Syntax of a VBA For Each Loop
The syntax of For Each Loop resembles closely to For Loop. Below is the syntax:
For Each item In collection_of_items
'Statements to be executed inside the loop
Next item
Here, ‘collection_of_items’ refers to a group of objects that you need to iterate. If you supply a single object to this parameter, it throws a «run-time error 438».
‘item’ specifies the objects inside the ‘collection_of_items’. At any particular instant inside the loop, ‘item’ contains a single object from the ‘collection_of_items’.
How a For Each Loop Works
Let’s say we have a For Each Loop as:
For Each cl In ActiveSheet.Range("A1:A10")
'Statements to be executed inside the loop
Next cl
- When the program control reaches the statement ‘For Each cl In ActiveSheet.Range(«A1:A10»)’ it evaluates the object collection and then initializes the variable ‘cl’ with the first object in the collection, i.e., cell $A$1.
- After this, it executes the statements inside the loop.
- Next, it fetches the second object from the collection and dumps it in the variable ‘cl’. And the process continues till it has fetched all objects from the collection.
Flow Diagram of a For Each Loop In VBA

Let’s try to understand the control flow as depicted in the above flow chart:
- First of all, the FOR EACH statement is executed and checks if there are any elements in the collection.
- If there are any elements present in the collection, the ‘item’ variable is initialized to the first element of the collection, and the statements inside the loop ‘Code Block’ is executed. However, If the condition evaluates to FALSE, then the control flow jumps to the next statement outside the For Each loop.
- When the ‘code block’ inside the For Each Loop executes, the loop starts to get ready for the next iteration. The ‘item’ variable is re-initialized to the next element in the collection, and the loop continues.
Few Simple Examples of VBA For Each Loop
Now let’s move to some simple examples of For Each loop.
Example 1 – Use VBA For Each Loop to display the names of all the Active Worksheets.
In this example, we will use a For Each loop to iterate through all the worksheets in the ActiveWorkbook and display the names of all the sheets using a msg box.
Sub ForEachDisplaySheetNames()
Dim sheetNames As String
For Each sht In ActiveWorkbook.Sheets
sheetNames = sheetNames & vbNewLine & sht.Name
Next shtMsgBox "The Sheet names are : " & vbNewLine & sheetNames
End Sub
Explanation:
In this example, the For Each loop takes the collection of sheets from ‘ActiveWorkbook.Sheets’ it then iterates the sheets one by one and initializes the ‘sht’ variable with the current sheet instance.
Inside the For Each block, the sheet name for each worksheet is appended to a string, and finally, outside the loop, all the sheet names are displayed using a message box.
Example 2: Use VBA For Each Loop to Sum all the Elements of an Array.
In this example, with the help of a VBA For Each loop, we will be iterating an array of numbers and find the sum of all of its elements. Below is the code to do this:
Sub ForEachSumArrayElements()
Dim arr As Variant
Dim sum As Integer
arr = Array(1, 10, 15, 17, 19, 21, 23, 27)For Each element In arr
sum = sum + element
Next elementMsgBox "The Sum is : " & sum
End Sub
Explanation:
In the above code, we have declared two variables, ‘arr’ and ‘sum’. The ‘arr’ variable is used for storing the array of numbers, and the ‘sum’ variable represents the sum of the array elements.
Inside the For Each loop, we are iterating the array elements one by one, summing them up, and storing the total in the ‘sum’ variable.
Finally, outside the For Each loop, we show the sum of the array elements using a message box.
Example 3: Use VBA For Each Loop to display the names of all the Open Workbooks.
In this example, using a For Each loop, we will loop through all the open workbooks and display their name using a message box.
Below is the code to do this:
Sub ForEachDisplayWorkbookNames()
Dim workBookNames As StringFor Each wrkbook In Workbooks
workBookNames = workBookNames & vbNewLine & wrkbook.Name
Next wrkbookMsgBox "The Workbook names are : " & vbNewLine & workBookNames
End Sub
Explanation:
In this example, the For Each loop takes the collection of workbooks, then iterates the workbooks one by one and initializes the ‘wrkbook’ variable with the current workbook instance.
Inside the For Each block, the workbook name for each workbook is appended to a string, and finally, outside the loop, all the workbook names are displayed using a message box.
Nested VBA For Each Loop
Two For Each loops can be nested within one another to perform complex tasks. Let’s understand For Each nested loop with an example:
Example 4: Display the names of all open workbooks along with their corresponding worksheets.
In this example, we will be iterating through all the open workbooks and then iterate through each workbook’s worksheets and finally display them using a message box.
Below is the code to do this:
Sub ForEachLoopNesting()
Dim result As String
For Each wrkbook In Workbooks
For Each sht In wrkbook.Sheets
result = result & vbNewLine & " Workbook : " & wrkbook.Name & " Worksheet : " & sht.Name
Next sht
Next wrkbookMsgBox result
End Sub
Explanation:
In the above code, we have used two For Each loops, one inside another. The outer For Each loop iterates through the workbooks, and the inner For Each loop iterates through the worksheets.
Inside the inner For Each block, a statement concatenates the names of the workbooks and the worksheets and stores them in a variable called ‘result’.
With each iteration, the ‘result’ variable’s new value is appended to the existing value. Finally, the value of the ‘result’ variable is displayed inside a msgbox.
How to Break Out or Exit of a For Each Loop
To break out of a For Each loop, we can use the ‘Exit For’ statement. So, ‘Exit For’ statement can break both a For loop as well as a For Each loop.
Let’s see this with an example:
Example 5: Use VBA For Each Loop to display the names of the first 3 sheets in the active workbook.
In this example, we will loop through the worksheets inside the active workbook and only display the first 3 worksheet names. Below is the code to do this:
Sub ForEachDisplayFirstThreeSheetNames()
Dim sheetNames As String
Dim sheetCounter As IntegerFor Each sht In ActiveWorkbook.Sheets
sheetNames = sheetNames & vbNewLine & sht.Name
sheetCounter = sheetCounter + 1If sheetCounter >= 3 Then
Exit For
End If
Next shtMsgBox "The Sheet names are : " & vbNewLine & sheetNames
End Sub
Explanation:
In the above code, we have a For Each loop that iterates over the worksheets inside the active workbook. Inside the loop, we are appending and storing the sheet names within the ‘sheetNames’ variable. Also, we have a ‘sheetCounter’ variable that gets incremented on each iteration.
After that, inside the loop, we also check if the value of the ‘sheetCounter’ variable has reached 3 (because we only want to display 3 sheet names).
If the ‘sheetCounter’ variable’s value has reached 3, we exit the loop using the ‘Exit For’ statement. Finally, we are displaying the value of the ‘sheetNames’ variable using a msgbox.
VBA Do While Loop
VBA Do While is another type of loop that repeatedly executes a set of statements while a condition continues to be True. The loop ends when the condition becomes false.
Syntax of Do While Loop In VBA
Do while loop has two syntaxes in VBA, these are as follows:
Syntax 1:
Do While condition
'Statements to be executed inside the loop
Loop
Or
Syntax 2:
Do
'Statements to be executed inside the loop
Loop While condition
In both the syntaxes, ‘condition’ is used as the loop backbone. On each iteration ‘While’ statement checks if the ‘condition’ evaluates to True or False. If the ‘condition’ is True, then the loop continues; otherwise, the loop terminates.
Before everything else, let’s try to understand the difference between these two syntaxes.
Difference Between the two Do While Syntaxes
As we can see in the first, do-while loop syntax, the ‘condition’ is checked as the first statement. This means if the condition is false, the do-while loop in syntax 1 will not perform any iterations.
Whereas in the second syntax, the ‘condition’ is checked as the last statement inside the loop. This means that even if the condition is false, the do-while loop in syntax 2 will perform at least 1 iteration. Only after that, the condition will be evaluated, and the next iteration will not happen.
So, syntax 2 guarantees to have at least 1 iteration irrespective of the condition being true or false.
Now, let’s try to understand how a do-while loop works.
How Does a Do While Loop Work
Syntax 1 –
Let’s say we have a Do While loop as follows:
Dim loop_ctr as Integer
loop_ctr = 1
Do While loop_ctr < 10
'Statements to be executed inside the loop
loop_ctr = loop_ctr + 1
Loop
- In the first two statements, the variable ‘loop_ctr’ is declared and initialized as 1.
- When the program control reaches the statement «Do While loop_ctr < 10», it checks if the value of the ‘loop_ctr’ is less than 10.
- If the ‘loop_ctr’ value is less than 10, the statements inside the body of the loop get executed sequentially, and finally, the ‘loop_ctr’ is incremented by 1.
- After this, the control again moves to the loop «Do While loop_ctr < 10», and the loop continues till the value of ‘loop_ctr’ becomes equal to 10.
- When the value of ‘loop_ctr’ becomes equal to 10, then the do while condition fails, and the control moves to the next statement after the do-while loop.
Syntax 2 –
Let’s say we have a Do While loop as follows:
Dim loop_ctr as Integer
loop_ctr = 1
Do
'Statements to be executed inside the loop</em>
loop_ctr = loop_ctr + 1
Loop While loop_ctr < 10
- In the first two statements, the variable ‘loop_ctr’ is declared and initialized as 1.
- When the program control reaches the «Do» statement, as there are no checks (like syntax 1), it just comes inside the loop and starts executing the statements inside the loop one by one and increments the ‘loop_ctr’ by 1.
- After executing the statements inside the loop body, it checks if the ‘loop_ctr’ is less than 10. If the ‘loop_ctr’ value is less than 10, another iteration starts.
- If the value of ‘loop_ctr’ becomes equal to 10, then the do while condition fails, and the control moves to the next statement after the do-while loop.
Note: In the second syntax, the Do-While Loop always iterates at-least-once since the condition to be checked is placed at the end of the loop.
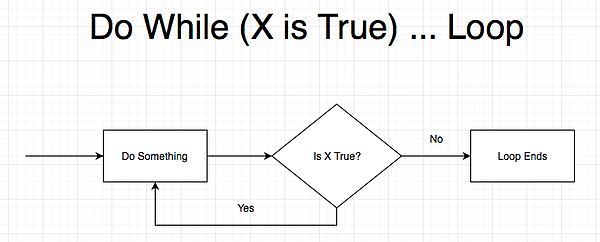
Flow Diagram of a Do While Loop In VBA:

Let’s try to understand the control flow as depicted in the above flow chart:
Syntax 1 –
- In this Do-While syntax, the loop condition is checked along with the Do statement.
- If the condition is true, then the ‘code block’ inside the do-while loop is executed, and the next iteration begins. Each iteration before beginning checks the loop condition, and the ‘code block’ inside the do-while loop is only executed when the condition evaluates to true.
- When the loop condition becomes false, then no more loop iterations occur, and the control flow jumps to the next statement outside the Do While loop.
Syntax 2 –
- In this Do-While syntax, the loop condition is not checked along with the Do statement.
- Since for the first iteration, no condition is checked. Hence the code block inside the do-while body gets executed.
- After the first iteration, each subsequent iteration, before beginning, checks the loop condition, and the ‘code block’ inside the do-while loop is only executed when the condition evaluates to true.
- When the loop condition becomes false, then no more loop iterations occur, and the control flow jumps to the next statement outside the Do While loop.
Few Simple Examples of Do While Loop In VBA
Example 1: Use VBA Do While Loop to print numbers from 1 to 10 in excel.
In this example, we have a range «A1:A10,» and we have to fill this range with numbers from 1-10. To do this we can use the below code:
Sub DoWhileLoopPrintNumbers()
Dim loop_ctr As Integer
loop_ctr = 1Do While loop_ctr <= 10
ActiveSheet.Range("A1").Offset(loop_ctr - 1, 0).Value = loop_ctr
loop_ctr = loop_ctr + 1
LoopMsgBox ("Loop Ends")
End Sub
Explanation:
In the above code, we have declared and initialized the ‘loop_ctr’ variable for our Do While loop. Next, along with the Do while statement, we have a condition to run the loop till the ‘loop_ctr’ value is less than or equal to 10.
Inside the Do While Loop body, we have written the code to write the ‘loop_ctr’ value on the excel sheet in the A column.
After this, there is a statement that increments the ‘loop_ctr’ for the next iteration.
Example 2: Use Do While Loop in VBA to find the sum of all the numbers between 1 to 20.
In this example, we will loop through all the numbers between 1 to 20 and sum them. Finally, we will be displaying the sum of the numbers from 1 to 20 on the screen.
To do this we can use the following code:
Sub WhileLoopSumNumbers()
Dim loop_ctr As Integer
Dim result As Integer
loop_ctr = 1
result = 0Do While loop_ctr <= 20
result = result + loop_ctr
loop_ctr = loop_ctr + 1
LoopMsgBox "Sum of numbers from 1-20 is : " & result
End Sub
Explanation:
In the above code, we have declared the loop counter ‘loop_ctr’ for our Do While loop. Next, we have declared another integer variable as ‘result’ for storing the sum of numbers from 1 to 20.
After this, along with the Do while statement, we have a condition to run the loop till the ‘loop_ctr’ value is less than or equal to 20.
Inside the Do While Loop body, we have added the value of ‘loop_ctr’ along with the result. This means that in the first iteration, the result’s value will be: 1, and in the second iteration, it will be : (1+2) = 3. Similarly, in the third iteration, the value will be: (3 + 3) = 6 and so on.
After this, there is a statement that increments the ‘loop_ctr’ for the next iteration.
The Do While loop in the above code iterates 20 times, sums all the numbers from 1 to 20, and finally displays the sum of these numbers in msgbox.
Example 3: Show the unique behavior of Do While Loop (In Syntax 2) to execute at-least-once even if the condition to be checked is False.
Sub DoWhileLoopTest()
Dim loop_ctr As Integer
loop_ctr = 100Do
MsgBox "Loop Counter : " & loop_ctr
loop_ctr = loop_ctr + 1
Loop While loop_ctr <= 10End Sub
Explanation:
In the above example, we have initialized the ‘loop_ctr’ as 100 and inside the loop condition we are checking ‘loop_ctr < 10’. This means the loop is only designed to iterate when the value of ‘loop_ctr’ is less than 10. But you will notice that despite the condition this do-while loop executes once.
The reason for this is: because according to syntax 2 of the Do While loop, there is no way to check conditions at the beginning of the loop. You can only check conditions at the end of the loop.
Note: We can fix this issue by simply using the Do While loop in Syntax 1 as shown:
Sub DoWhileLoopTest()
Dim loop_ctr As Integer
loop_ctr = 100Do While loop_ctr <= 10
MsgBox "Loop Counter : " & loop_ctr
loop_ctr = loop_ctr + 1
LoopEnd Sub
Writing a Nested Do While Loop
Similar to other loops, nesting is very much possible in Do While Loops. Let’s understand nested Do While loops this with an example.
Example 4: Print numbers from 1 to 10 in all the worksheets in an excel spreadsheet using a Do While Loop.
In this example, we need to print numbers from 1 to 10 in all the worksheets in an excel workbook using a do-while loop. To do this, we can make use of the following code:
Sub NestedDoWhileLoop()
Dim loop_ctr As Integer
Dim sheet As Integer
sheet = 1Do While sheet <= Worksheets.Count
loop_ctr = 1
Do While loop_ctr <= 10
Worksheets(sheet).Range("A1").Offset(loop_ctr - 1, 0).Value = loop_ctr
loop_ctr = loop_ctr + 1
Loop
sheet = sheet + 1
LoopMsgBox "Nested While Loop Completed!"
End Sub
Explanation:
In this example, there are two Do While Loops, one inside another. The Outer Do While Loop iterates over the variable ‘sheet’ and iterates till the value of the ‘sheet’ variable is less than or equal to ‘Worksheets.Count’ (i.e., the total count of worksheets in a workbook).
Inner Do While Loop iterates over the variable ‘loop_ctr’ and iterates till the value of ‘loop_ctr’ is less than or equal to 10. This helps us to print the numbers in a sequence.
Inside the body of the Inner Do While loop, we have a statement that prints the numbers between 1 to 10 in each worksheet (as per the outer loop).
The outer loop iterates over all the available worksheets sheets in the spreadsheet, whereas the inner loop iterates over the numbers from 1 to 10 for the current sheet.
This makes it possible to print numbers from 1 – 10 in all the available worksheets.
Infinite Loop Using a Do While Loop
Unlike a For Loop, a Do While Loop does not have a clear ‘start’, ‘end’ or ‘step_increments’, so it is very easy to make logical errors resulting in an infinite or an endless loop. Below is an example of a Do While endless loop:
'Do not run this code
Sub InfiniteDoWhileLoop()
Dim loop_ctr As Integer
loop_ctr = 1Do While loop_ctr <= 10
ActiveSheet.Range("A1").Offset(loop_ctr - 1, 0).Value = loop_ctr
LoopMsgBox ("Loop Ends")
End Sub
In the above code, we have simply missed the line to increment the loop counter i.e. ‘loop_ctr = loop_ctr + 1’ and this has made the loop infinite because the value of ‘loop_ctr’ will always be 1 (since it is never incremented) and hence the loop condition ‘While loop_ctr <= 10’ will always evaluate to true.
Tip: It is always a good idea to use a For Each or For Next loop over a Do While or Do Until loop (whenever possible).
How to Break Out or Exit of a Do While Loop
To break out of a Do While loop, we can use the ‘Exit Do’ statement. As soon as the VBA engine executes the ‘Exit Do’ statement, it exits the loop and takes the control to the next statement after the Do while loop.
Let’s see this with an example:
Example 5: Use a Do While loop in VBA to find the sum of the first 15 odd numbers between 1 to 100.
In this example, we have to find the first 15 odd numbers from 1 to 100 and then calculate their sum. Below is the code to do this:
Sub SumFirst15OddNumbers()
Dim loop_ctr As Integer
Dim odd_number_counter As Integer
Dim sum As Integerloop_ctr = 1
Do While loop_ctr <= 100
If (loop_ctr Mod 2 <> 0) Then
sum = sum + loop_ctr
odd_number_counter = odd_number_counter + 1
End IfIf (odd_number_counter = 15) Then
Exit Do
End Ifloop_ctr = loop_ctr + 1
LoopMsgBox "Sum of top 15 odd numbers is : " & sum
End Sub
Explanation:
In this example, we have three variables – ‘loop_ctr’, ‘odd_number_counter’, and ‘sum’. ‘loop_ctr’ is the loop counter variable, ‘odd_number_counter’ variable holds the count of odd numbers that have been summed and the ‘sum’ variable holds the sum of the first 15 odd numbers.
Inside the Do While loop, we loop through all the numbers from 1 to 100, one by one, and check if the number is odd. If the number is odd, we sum it and increment the ‘odd_number_counter’ by 1.
After the first IF block, another IF condition checks if the ‘odd_number_counter’ variable value is 15. If the value of ‘odd_number_counter’ is 15, then using the ‘Exit Do’ statement, we are breaking the loop as there is no point in continuing the loop further.
Finally, we are displaying the value of the ‘sum’ variable using a msgbox.
VBA Do Until Loop
Do Until loop is very similar to Do While loop; the only difference between them is that –
- A ‘do-while’ loop iterates as long as a certain condition is true.
- On the other hand, a ‘do-until’ loop iterates until a condition is no longer true.
Let’s try to understand this difference in simple terms:
For Instance: If we want to write a Do Loop that iterates from 1 to 10, with while keyword, the condition would be ‘Do While loop_ctr <= 10’ and with until keyword, the same condition can be written as ‘Do Until loop_ctr > 10’.
Which means:
- Until – repeat Until the count is greater than ten
- While – repeat While the count is less than or equal to ten
With these examples, you can clearly see – using Until and While is just the opposite way of writing the same condition.
Now, let’s have a look at the syntax of Do Until Loop.
Syntax of Do Until Loop In VBA
Similar to Do While loop, Do Until also has two syntaxes:
Syntax 1 –
Do Until condition
'Statements to be executed inside the loop
Loop
Or
Syntax 2 –
Do
'Statements to be executed inside the loop
Loop Until condition
Here, ‘condition’ is used as the loop backbone, the same as in the case of Do While Loop. On each iteration, Until statement checks, if the ‘condition’ evaluates to True or False. If the ‘condition’ is False, then the loop continues. Otherwise, the loop ends.
Now, let’s try to understand the difference between these two syntaxes.
Difference Between the two Do Until Syntaxes
As we can see in the first do until loop syntax, the ‘condition’ is checked as the first statement. This means if the condition is true, the do-until loop in syntax 1 will not perform any iterations.
Whereas in the second syntax, the ‘condition’ is checked as the last statement inside the loop. This means that even if the condition is true, the do-until loop in syntax 2 will perform at least 1 iteration. Only after that, the condition will be evaluated, and the next iteration will not happen.
So, syntax 2 guarantees to have at least 1 iteration irrespective of the condition being true or false.
How a Do Until Loop Works
Syntax 1 –
Let’s say we have a Do Until loop as follows:
Dim loop_ctr As Integer
loop_ctr = 1
Do Until loop_ctr > 10
'Statements to be executed inside the loop
loop_ctr = loop_ctr + 1
Loop
- In the first two statements, a variable ‘loop_ctr’ is declared and initialized as 1.
- When the program control reaches the statement «Do Until loop_ctr > 10», it checks if the value of the ‘loop_ctr’ is greater than 10.
- If the ‘loop_ctr’ value is less than or equal to 10, the statements inside the body of the loop get executed sequentially, and finally, the ‘loop_ctr’ is incremented by 1.
- After this, the control again moves to check the condition «Do Until loop_ctr > 10», and the loop continues till the value of ‘loop_ctr’ is less than or equal to 10.
Syntax 2 –
Dim loop_ctr As Integer
loop_ctr = 1
Do
'Statements to be executed inside the loop
loop_ctr = loop_ctr + 1
Loop Until loop_ctr > 10
- In the first two statements, a variable ‘loop_ctr’ is declared and initialized as 1.
- When the program control reaches the statement Do, it simply moves to the next statement as the Do statement doesn’t force the program to check any condition.
- After this, in the following statement, a variable ‘loop_ctr’ is incremented by 1.
- Next, ‘Loop Until loop_ctr > 10’ statement checks if the value of ‘loop_ctr’ is greater than 10 or not. If it is less than or equal to 10, then the program control again jumps to the Do statement, but if the value of ‘loop_ctr’ is greater than 10, it terminates the loop and the program control moves to the next statement.
Note: Syntax 2 of Do Until Loop always iterates at-least-once since the condition that is to be checked is placed at the end of the loop.
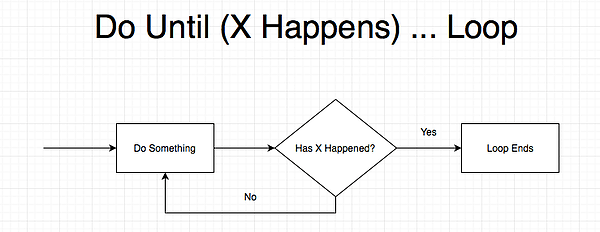
Flow Diagram of a Do Until Loop In VBA

Let’s try to understand the control flow as depicted in the above flow chart:
Syntax 1 –
- In this Do-Until syntax, the loop condition is checked along with the Do statement.
- If the condition is false, then the ‘code block’ inside the do-until loop is executed, and the next iteration begins. Each iteration before beginning checks the loop condition, and the ‘code block’ inside the do-until loop is only executed when the condition evaluates to false.
- When the loop condition becomes true, then no more loop iterations occur, and the control flow jumps to the next statement outside the Do Until loop.
Syntax 2 –
- In this Do-Until syntax, the loop condition is not checked along with the Do statement.
- Since for the first iteration, no condition is checked. Hence the code block inside the do-until body gets executed.
- After the first iteration, each subsequent iteration, before beginning, checks the loop condition, and the ‘code block’ inside the do-until loop is only executed when the condition evaluates to false.
- When the loop condition becomes true, then no more loop iterations occur, and the control flow jumps to the next statement outside the Do Until loop.
Few Simple Examples of Do Until Loop In VBA
Example 1: Print numbers from 1 to 10 in excel using a VBA Do Until Loop.
In this example, we have a range «A1:A10,» and we have to fill this range with numbers from 1-10. To do this we can use the below code:
Sub DoUntilLoopPrintNumbers()
Dim loop_ctr As Integer
loop_ctr = 1Do Until loop_ctr < 10
ActiveSheet.Range("A1").Offset(loop_ctr - 1, 0).Value = loop_ctr
loop_ctr = loop_ctr + 1
LoopMsgBox ("Loop Ends")
End Sub
Explanation:
In the above code, first of all, we have declared and initialized the ‘loop_ctr’ variable for our Do Until loop. Next, along with the Do until statement, we have a condition to run the loop till ‘loop_ctr’ value is greater than 10.
Inside the Do Until Loop body, we have written the code to write the ‘loop_ctr’ value on the excel sheet in the A column.
After this, there is a statement that increments the ‘loop_ctr’ for the next iteration. As soon as the value of the ‘loop_ctr’ variable becomes greater than 10, the loop ends.
Example 2: Use Do Until Loop in VBA to find the sum of all the numbers between 1 to 20.
In this example, using a do until loop, we will iterate all the numbers between 1 to 20 and sum them. Finally, we will be displaying the sum of the numbers from 1 to 20 on the screen. To do this we can use the following code:
Sub DoUntilLoopSumNumbers()
Dim loop_ctr As Integer
Dim result As Integer
loop_ctr = 1
result = 0Do Until loop_ctr > 20
result = result + loop_ctr
loop_ctr = loop_ctr + 1
LoopMsgBox "Sum of numbers from 1-20 is : " & result
End Sub
Explanation:
In the above code, we have declared the loop counter ‘loop_ctr’ for our Do Until loop. Next, we have declared another integer variable as ‘result’ for storing the sum of numbers from 1 to 20.
After this, along with the Do Until statement, we have a condition to run the loop until the ‘loop_ctr’ becomes greater than 20.
Inside the Do Until Loop body, we have added the value of ‘loop_ctr’ along with the result. This means in the first iteration, the value of the result will be: 1, and in the second iteration, it will be : (1+2) = 3; similarly, in the third iteration, the value will be: (3 + 3) = 6 and so on.
After this, there is a statement that increments the ‘loop_ctr’ for the next iteration.
The Do Until loop in the above code iterates 20 times and sums all the numbers from 1 to 20, and finally displays the sum of these numbers in msgbox.
Example 3: Show the unique behavior of Do Until Loop (In Syntax 2) to execute at-least-once even if the condition to be checked is True.
Sub DoUntilLoopTest()
Dim loop_ctr As Integer
loop_ctr = 100Do
MsgBox "Loop Counter : " & loop_ctr
loop_ctr = loop_ctr + 1
Loop Until loop_ctr > 10
End Sub
Explanation:
In the above example, we have initialized the ‘loop_ctr’ as 100 and inside the loop condition we are checking ‘loop_ctr > 10’. This means the loop is only designed to iterate when the value of ‘loop_ctr’ is less than 10. But you will notice that despite the condition this do-until loop executes once.
The reason for this is: because according to syntax 2 of the Do Until loop, there is no way to check conditions at the beginning of the loop. The condition can only be checked at the end of the loop.
Note: We can fix this issue by simply using the Do Until loop in Syntax 1 as shown:
Sub DoUntilLoopTest()
Dim loop_ctr As Integer
loop_ctr = 100Do Until loop_ctr > 10
MsgBox "Loop Counter : " & loop_ctr
loop_ctr = loop_ctr + 1
Loop
End Sub
Writing a Nested Do Until Loop
Similar to other loops nesting is very much possible in Do Until Loop. Let’s see how to write a nested Do Until loop:
Example 4: Print numbers from 1 to 5 in all the worksheets in an excel spreadsheet using a Do Until Loop.
In this example, we need to print numbers from 1 to 5 in all the worksheets in an excel workbook using a do until loop. To do this, we can make use of the following code:
Sub NestedDoUntilLoop()
Dim loop_ctr As Integer
Dim sheet As Integer
sheet = 1Do Until sheet > Worksheets.Count
loop_ctr = 1
Do Until loop_ctr > 5
Worksheets(sheet).Range("A1").Offset(loop_ctr - 1, 0).Value = loop_ctr
loop_ctr = loop_ctr + 1
Loop
sheet = sheet + 1
LoopMsgBox "Nested Do Until Loop Completed!"
End Sub
Explanation:
In this example, there are two Do Until Loops, one inside another. The Outer Do Until Loop iterates over the variable ‘sheet’ and iterates until the value of the ‘sheet’ variable becomes greater than ‘Worksheets.Count’ (i.e., the total count of worksheets in a workbook).
Inner Do Until Loop iterates over the variable ‘loop_ctr’ and iterates until the value of ‘loop_ctr’ becomes greater than 5. This helps us to print the numbers in a sequence.
Inside the body of the Inner Do Until loop, we have a statement that prints the numbers between 1 to 5 in each worksheet (as per the outer loop).
The outer loop iterates over all the available worksheets in the spreadsheet, whereas the inner loop iterates over the numbers from 1 to 5 for the current sheet.
This makes it possible to print numbers from 1 – 5 in all the available worksheets.
Infinite Loop Using a Do Until Loop
Syntactically, Do Until Loop is very different from a For Loop since it does not provide a clear ‘start’, ‘end’ or ‘step_increments’, so it is very easy to make logical errors resulting in an infinite or an endless loop.
Below is an example of a Do Until endless loop:
'Do not run this code
Sub InfiniteDoUntilLoop()
Dim loop_ctr As Integer
loop_ctr = 1Do Until loop_ctr > 10
ActiveSheet.Range("A1").Offset(loop_ctr - 1, 0).Value = loop_ctr
LoopMsgBox ("Loop Ends")
End Sub
In the above code, we have simply missed the line to increment the loop counter i.e. ‘loop_ctr = loop_ctr + 1’ and this has made the loop infinite because the value of ‘loop_ctr’ will always be 1 (since it is never incremented) and hence the loop condition ‘Until loop_ctr > 10’ will always evaluate to false.
Tip: It is always a good idea to use a For Each or For Next loop over a Do While or Do Until loop (whenever possible).
How to Break Out or Exit of a Do Until Loop
Similar to a Do While Loop, a Do Until loop can also be exited using an ‘Exit Do’ statement. As soon as the VBA engine executes the ‘Exit Do’ statement, it exits the loop and takes control to the next statement after the Do Until loop.
Let’s see this with an example:
Example 5: Use a Do Until loop in VBA to find the sum of the first 20 even numbers between 1 to 100.
In this example, we must find the first 20 even numbers from 1 to 100 and then calculate their sum.
Below is the code to do this:
Sub SumFirst20EvenNumbers()
Dim loop_ctr As Integer
Dim even_number_counter As Integer
Dim sum As Integerloop_ctr = 1
Do Until loop_ctr < 100
If (loop_ctr Mod 2 = 0) Then
sum = sum + loop_ctr
even_number_counter = even_number_counter + 1
End IfIf (even_number_counter = 20) Then
Exit Do
End Ifloop_ctr = loop_ctr + 1
LoopMsgBox "Sum of top 20 even numbers is : " & sum
End Sub
Explanation:
In this example, we have three variables – ‘loop_ctr’, ‘even_number_counter’, and ‘sum’. ‘loop_ctr’ is the loop counter variable, ‘even_number_counter’ variable holds the count of even numbers that have been summed (because we only need to sum the first 20 even numbers) and ‘sum’ variable holds the sum of the first 20 even numbers.
Inside the Do Until loop, we loop through all the numbers from 1 to 100, one by one, and check if the number is even. If the number is even, we sum it and increment the ‘even_number_counter’ by 1.
After the first IF block, another IF condition checks if the ‘even_number_counter’ variable value is 20. If the value of ‘even_number_counter’ is 20, then using the ‘Exit Do’ statement, we break the loop as there is no point in running the loop further.
While Wend Loop In VBA (Obsolete)
While Wend loop was added in VBA just to make it backward compatible, Microsoft recommends using Do While Loop in place of While Wend Loop.
While Wend Loop is not as structured and flexible like a Do While Loop, it also doesn’t support the idea of prematurely exiting out of the loop.
Tip: If you are learning loops in VBA, then you can skip this topic. However, if you are dealing with a legacy code with While Wend statements, I would recommend you change them and start using the Do while loops instead.
Syntax of While Wend Loops
The syntax of While Wend Loop is as follows:
While condition
'Statements to be executed inside the loop
Wend
‘condition’ is used as the loop backbone. On each iteration, the While statement checks if the ‘condition’ evaluates to True or False. If the ‘condition’ is True, then the loop continues; otherwise, the loop terminates.
Example: Write a While Wend loop to print numbers from 1 to 10.
To do this, we can write the below code:
Sub WhileWendExample()
Dim loop_ctr As Integer
loop_ctr = 1While loop_ctr <= 10
ActiveSheet.Range("A1").Offset(loop_ctr - 1, 0).Value = loop_ctr
loop_ctr = loop_ctr + 1
WendMsgBox "Loop Ends!"
End Sub
Explanation:
In the above code, first of all, we are declaring and initializing a loop counter variable ‘loop_ctr’ as 1. Next, there is a While statement along with the condition ‘While loop_ctr <= 10’.
This means that we need to iterate until the value of the ‘loop_ctr’ variable is less than or equal to 10. After this, we are printing the value of ‘loop_ctr’ in the active worksheet and then incrementing the loop counter. When the Wend statement is encountered, the next iteration starts.
The loop in the above example iterates 10 times, and after that, the value of ‘loop_ctr’ becomes 11, and hence the loop condition becomes false, and the control moves to the statement after the while when loop.
Finally, a message’ Loop Ends!’ is presented on the screen to notify the user that the loop has ended.
How To Write VBA Code In Excel
VBA code can be added to a spreadsheet using the Visual Basic Editor. To open the Visual Basic Editor in Excel, follow the below steps:
- If you are on Windows, press the keys (ALT + F11). If you are on MAC, press the keys (Opt + F11). This will open the Visual Basic Editor.

- After the Visual Basic Editor is opened. Go to «Insert» and click the «Module» option as shown in the image. This will insert a module object for your workbook.

- Now you can copy-paste the above codes in the module and run them using the execute button as shown.
Debugging Tips
- Use the F5 key to run the code.
- Use the F9 key to insert or remove a breakpoint.
- Use the F8 key to ‘step-into’ or run the code line by line. It can be used to debug the code and execute it line by line.
So, this was all about VBA Loops. Do let us know in case you have any queries related to the topic.
Do loops to improve the efficiency of their financial models
What is Do Loop in VBA?
A VBA Do Loop is a subsection within a macro that will “loop” or repeat until some specific criteria are met. The coder can set the loop to repeat a specified number of times until a certain variable exceeds a threshold value or until a specific cell is activated. In fact, loops are quite robust in that the user can get creative with the criteria that end the loop, as long as he or she understands how VBA loops work. This can become very useful in making a financial model more efficient.
A Do Loop statement will have a beginning statement and an ending statement, with the code to perform contained within these two statements. This is like the structure of a macro, where the entirety of a macro code is held inside the Sub statement that starts a macro and the End Sub statement that ends it. Macros can contain several separate loops, and loops can contain loops within themselves, indefinitely.
To learn more, launch our Excel VBA financial modeling course online!
Different Loop Types
There are several different types of loops, and each type performs differently.
- Do Until Loop
- Do While Loop
- For Loop
Do Until Loop
The Do Until Loop will continue repeating until the criteria is true. The criteriion is inserted right after the “do until” statement. The loop ends with the “Loop” statement. A simple example of this loop is to increase a counter until it reaches a specified number, as in the example below.
Dim n as Integer
N = 0
Do Until n = 10
n = n + 1
Loop
In this example, we’ve set an integer variable known as “n”. The macro initially stores a value of 0 in n. When it runs into the Do Until loop, the criteria n = 10 is not true, so the process within the loop is run. The first iteration adds 1 to n, turning the value into 1. Since n is still not 10, the process will repeat 10 times, until n is 10. Once n = 10, the macro will pass the loop and continue with the rest of the macro.
This type of loop using an integer is useful for running a process a specified number of times. For example, you may wish to fill the first ten rows in column A with the text “Company n.” This is done as follows:
Dim n as Integer
N = 0
Do Until n = 10
n = n + 1
Range(“A” & n).Value = “Company “ & n
Loop
Running this macro will fill Cell A1 with Company 1, Cell A2 with Company 2, and so on until Cell A10 is filled with Company 10. At Cell A10, the do until criteria n = 10 will have been met, and so the macro will end the loop and move on.
To learn more, launch our Excel VBA financial modeling course online!
Do While Loop
As opposed to the do until loop, the Do While loop will perform the loop until the criteria become false. In other words, the Do Loop will perform while the criteria are met. It looks to be the exact opposite of the do until loop.
If we were to use the exact same macro example above, but replace do until with do while, the macro will simply skip the loop. It is because n is 0 at the start of the process, and the loop will only perform while n = 10. Since n can only reach 10 through the loop process, it can never reach 10, and so the loop will be skipped over.
Instead, to perform the same process within the do while loop, we should use an inequality.
Dim n as Integer
N = 0
Do while n < 11
n = n + 1
Range(“A” & n).Value = “Company “ & n
Loop
Notice that the inequality uses 11 instead of 10. This is because the macro needs to execute until it reaches Company 10. If the loop criteria was set to n < 10, the loop would end at Company 9 since it will only perform while n is less than 10. Since 10 is not less than 10, it will end right before it reaches Company 10.
Multiple Criteria using AND and OR with Do Loop
With these loops, you can also include several criteria by including two expressions separated by the AND or OR operator. These operators are quite self-explanatory.
A do until loop with two criteria separated by AND will perform until both criteria are met. A do until loop with two criteria separated by OR will perform until either of the criteria are met.
A do while loop with two AND criteria will perform while both criteria are met.
A do while loop with two OR criteria will perform while at least one of the criteria is met.
Using multiple criteria may become very important in financial modeling. For example, a user may require that two leverage ratios are above certain values before a certain macro runs.
Non-Number Criteria in Do Loop
In a For Loop, the above process can actually be simplified. The for loop has the advantage over do loops because it automatically creates a variable in the place of n in one simple step. However, do loops have certain upsides compared to for loops.
While for loops can only be generally used with number variables, do loops can have criteria that use other data types, like strings and dates. A do loop can be set to run only until a certain data arrives. For example, perhaps the user would like the macro to only run for the year 2017, and to not run when the year passes. This can be accomplished with a date variable and setting the criteria as Do Until [DateVariable] = 1/1/2018.
Perhaps the user would, instead, like the macro only to run while a certain cell is empty, and not run when that cell is filled. This can be accomplished with the criteria as Do Until Range(“A5”).Value = “”. The “” refers to a blank cell. Note: a cell containing a space may seem blank, but is not deemed as a blank cell by VBA.
To learn more, launch our Excel VBA financial modeling course online!
Additional Resources
Thank you for reading this CFI guide on how to create a Do Loop in VBA. To continue advancing your skills, these additional CFI resources will be helpful:
- VBA Excel Example
- VBA If Else
- VBA Methods
- Advanced Excel formulas
- See all Excel resources