
Home / VBA / VBA AutoFit (Rows, Column, or the Entire Worksheet)
Key Points
- In VBA, you can use the AutoFit method to auto-fit rows, columns, and even an entire worksheet.
- You need to specify the range, and then you can use the AutoFit method.
Let’s say you want to autofit column A, the code would be something like below:
Range("A1").EntireColumn.AutoFit
In the above line of code, you have used the EntireColumn property to refer to the entire column of cell A1.
As you are within a worksheet so you can also use the columns property and write a code like the below.
Columns(1).AutoFit
AutoFit a Row
In the same way, you can write code to autofit a row. Let’s say you want to autofit row 5, the code would be:
Range("A5").EntireRow.AutoFit
And if you want to use the row property, then you can use the code like the following.
Rows(5).AutoFit
AutoFit UsedRange (Rows and Columns)
Now let’s say, you only want to autofit those columns and rows where you have data. In VBA, there is a property called used range that you can use. So the code would be.
ActiveSheet.UsedRange.EntireColumn.AutoFit

ActiveSheet.UsedRange.EntireRow.AutoFit
And if you want to use a specific worksheet then the code would be.
Worksheets("Sheet1").UsedRange.EntireColumn.AutoFit
Worksheets("Sheet1").UsedRange.EntireRow.AutoFit
AutoFit Entire Worksheet
And if you want to refer to all the columns and rows of the worksheet then you can use the “CELLS” property. Here’s the code.
Worksheets("Sheet1").Cells.EntireColumn.AutoFit
Worksheets("Sheet1").Cells.EntireRow.AutoFit
Or you can also use VBA’s WITH statement to write a code like the below.
With Worksheets("Sheet1").Cells
    .EntireColumn.AutoFit
    .EntireRow.AutoFit
End With
More Tutorials
- Count Rows using VBA in Excel
- Excel VBA Font (Color, Size, Type, and Bold)
- Excel VBA Hide and Unhide a Column or a Row
- Excel VBA Range – Working with Range and Cells in VBA
- Apply Borders on a Cell using VBA in Excel
- Find Last Row, Column, and Cell using VBA in Excel
- Insert a Row using VBA in Excel
- Merge Cells in Excel using a VBA Code
- Select a Range/Cell using VBA in Excel
- SELECT ALL the Cells in a Worksheet using a VBA Code
- ActiveCell in VBA in Excel
- Special Cells Method in VBA in Excel
- UsedRange Property in VBA in Excel
- VBA ClearContents (from a Cell, Range, or Entire Worksheet)
- VBA Copy Range to Another Sheet + Workbook
- VBA Enter Value in a Cell (Set, Get and Change)
- VBA Insert Column (Single and Multiple)
- VBA Named Range | (Static + from Selection + Dynamic)
- VBA Range Offset
- VBA Sort Range | (Descending, Multiple Columns, Sort Orientation
- VBA Wrap Text (Cell, Range, and Entire Worksheet)
- VBA Check IF a Cell is Empty + Multiple Cells
⇠ Back to What is VBA in Excel
Helpful Links – Developer Tab – Visual Basic Editor – Run a Macro – Personal Macro Workbook – Excel Macro Recorder – VBA Interview Questions – VBA Codes
| title | keywords | f1_keywords | ms.prod | api_name | ms.assetid | ms.date | ms.localizationpriority |
|---|---|---|---|---|---|---|---|
|
Range.AutoFit method (Excel) |
vbaxl10.chm144085 |
vbaxl10.chm144085 |
excel |
Excel.Range.AutoFit |
53a35cd3-00e7-f9f5-2cd2-8492d7814a11 |
05/10/2019 |
medium |
Range.AutoFit method (Excel)
Changes the width of the columns in the range or the height of the rows in the range to achieve the best fit.
Syntax
expression.AutoFit
expression A variable that represents a Range object.
Return value
Variant
Remarks
The Range object must be a row or a range of rows, or a column or a range of columns; otherwise, this method generates an error.
One unit of column width is equal to the width of one character in the Normal style.
Example
This example changes the width of columns A through I on Sheet1 to achieve the best fit.
Worksheets("Sheet1").Columns("A:I").AutoFit
This example changes the width of columns A through E on Sheet1 to achieve the best fit, based only on the contents of cells A1:E1.
Worksheets("Sheet1").Range("A1:E1").Columns.AutoFit
[!includeSupport and feedback]
Содержание
- VBA – Autofit Columns
- Autofit Column using VBA
- Autofit All Used Columns
- VBA Code Examples Add-in
- VBA Code Generator
- AutoMacro: VBA Add-in with Hundreds of Ready-To-Use VBA Code Examples & much more!
- What is AutoMacro?
- VBA Excel. Размер ячейки (высота строки, ширина столбца)
- Размер ячейки
- Высота строки
- Ширина столбца
- Автоподбор ширины
- VBA AutoFit (Rows, Column, or the Entire Worksheet)
- Key Points
- AutoFit a Column
- AutoFit a Row
- AutoFit UsedRange (Rows and Columns)
- AutoFit Entire Worksheet
- VBA Excel. Свойства ячейки (объекта Range)
- Ячейка и объект Range
- Свойства ячейки (объекта Range)
- Простые примеры для начинающих
- Форматирование ячеек
VBA – Autofit Columns
After you manipulate a worksheet with VBA it may be necessary to Autofit your columns to present the nicest end result possible. Here’s how to autofit columns using VBA.
Autofit Column using VBA
This code autofits columns A and B. The autofit is applied to the active sheet.
Autofit All Used Columns
What if you want to Autofit all of the used columns in a worksheet? Use the above method in combination with Count the Number of Used Columns, and a loop.
The following code autofits all used columns using VBA:

VBA Code Examples Add-in
Easily access all of the code examples found on our site.
Simply navigate to the menu, click, and the code will be inserted directly into your module. .xlam add-in.
(No installation required!)
VBA Code Generator

AutoMacro: VBA Add-in with Hundreds of Ready-To-Use VBA Code Examples & much more!
What is AutoMacro?
AutoMacro is an add-in for VBA that installs directly into the Visual Basic Editor. It comes loaded with code generators, an extensive code library, the ability to create your own code library, and many other time-saving tools and utilities that add much needed functionality to the outdated VBA Editor.
Источник
VBA Excel. Размер ячейки (высота строки, ширина столбца)
Изменение размера ячейки в VBA Excel. Высота строки, ширина столбца, автоподбор ширины ячейки. Свойства RowHeight и ColumnWidth объекта Range.
Размер ячейки
Размер ячейки по высоте и ширине определяется высотой строки и шириной столбца, на пересечении которых она находится. Если, в вашем случае, нежелательно изменять размеры всей строки или всего столбца, используйте объединенные ячейки нужной величины.
Обратите внимание, что высота строки задается в пунктах, а ширина столбца в символах, поэтому их числовые значения не соответствуют друг другу по фактическому размеру.
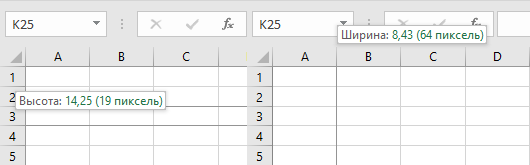
Высота строки и ширина столбца в Excel
Программно, без дополнительных макросов, можно изменять высоту строки только в пунктах, а ширину столбца только в символах.
На сайте поддержки офисных приложений Microsoft так написано об этих величинах:
- высота строки может принимать значение от 0 до 409 пунктов, причем 1 пункт приблизительно равен 1/72 дюйма или 0,035 см;
- ширина столбца может принимать значение от 0 до 255, причем это значение соответствует количеству символов, которые могут быть отображены в ячейке.
Смотрите, как сделать все ячейки рабочего листа квадратными.
Высота строки
Для изменения высоты строки используйте свойство RowHeight объекта Range. И не важно, будет объект Range представлять из себя выделенный произвольный диапазон, отдельную ячейку, целую строку или целый столбец — высота всех строк, пересекающихся с объектом Range будет изменена после присвоения свойству RowHeight этого объекта нового значения.
Примеры изменения высоты строк:
Пример 1
Изменение высоты отдельной ячейки:
в результате, строка, в которой находится активная ячейка, приобретает высоту, равную 10 пунктам.
Пример 2
Изменение высоты строки:
в результате, третья строка рабочего листа приобретает высоту, равную 30 пунктам.
Пример 3
Изменение высоты ячеек заданного диапазона:
в результате, каждой из первых шести строк рабочего листа будет задана высота, равная 20 пунктам.
Пример 4
Изменение высоты ячеек целого столбца:
в результате, всем строкам рабочего листа будет назначена высота, равная 15 пунктам.
Ширина столбца
Для изменения ширины столбца используйте свойство ColumnWidth объекта Range. Как и в случае с высотой строки, не важно, будет объект Range представлять из себя выделенный произвольный диапазон, отдельную ячейку, целую строку или целый столбец — ширина всех столбцов, пересекающихся с объектом Range будет изменена после присвоения свойству ColumnWidth этого объекта нового значения.
Примеры изменения ширины столбцов:
Пример 1
Изменение ширины отдельной ячейки:
в результате, столбец, в котором находится активная ячейка, приобретает ширину, равную 15 символам.
Пример 2
Изменение ширины столбца:
в результате, третий столбец рабочего листа (столбец «C») приобретает ширину, равную 50 символам.
Пример 3
Изменение ширины ячеек заданного диапазона:
в результате, каждому из первых четырех столбцов рабочего листа будет задана ширина, равная 25 символам.
Пример 4
Изменение ширины ячеек целой строки:
в результате, всем столбцам рабочего листа будет назначена ширина, равная 35 символам.
Автоподбор ширины
Для автоподбора ширины ячейки в соответствие с размером ее содержимого используйте следующий код:
Источник
VBA AutoFit (Rows, Column, or the Entire Worksheet)
Key Points
- In VBA, you can use the AutoFit method to auto-fit rows, columns, and even an entire worksheet.
- You need to specify the range, and then you can use the AutoFit method.
AutoFit a Column
Let’s say you want to autofit column A, the code would be something like below:

In the above line of code, you have used the EntireColumn property to refer to the entire column of cell A1.
As you are within a worksheet so you can also use the columns property and write a code like the below.

AutoFit a Row
In the same way, you can write code to autofit a row. Let’s say you want to autofit row 5, the code would be:

And if you want to use the row property, then you can use the code like the following.

AutoFit UsedRange (Rows and Columns)
Now let’s say, you only want to autofit those columns and rows where you have data. In VBA, there is a property called used range that you can use. So the code would be.

And if you want to use a specific worksheet then the code would be.

AutoFit Entire Worksheet
And if you want to refer to all the columns and rows of the worksheet then you can use the “CELLS” property. Here’s the code.

Or you can also use VBA’s WITH statement to write a code like the below.
Источник
VBA Excel. Свойства ячейки (объекта Range)
Свойства ячейки, часто используемые в коде VBA Excel. Демонстрация свойств ячейки, как структурной единицы объекта Range, на простых примерах.
Ячейка и объект Range
Объект Range в VBA Excel представляет диапазон ячеек. Он (объект Range) может описывать любой диапазон, начиная от одной ячейки и заканчивая сразу всеми ячейками рабочего листа.
- Одна ячейка – Range(«A1») .
- Девять ячеек – Range(«A1:С3») .
- Весь рабочий лист в Excel 2016 – Range(«1:1048576») .
В VBA Excel есть свойство Cells объекта Range, которое позволяет обратиться к одной ячейке в указанном диапазоне (возвращает объект Range в виде одной ячейки). Если в коде используется свойство Cells без указания диапазона, значит оно относится ко всему диапазону активного рабочего листа.
Примеры обращения к одной ячейке:
- Cells(1000) , где 1000 – порядковый номер ячейки на рабочем листе, возвращает ячейку «ALL1».
- Cells(50, 20) , где 50 – номер строки рабочего листа, а 20 – номер столбца, возвращает ячейку «T50».
- Range(«A1:C3»).Cells(6) , где «A1:C3» – заданный диапазон, а 6 – порядковый номер ячейки в этом диапазоне, возвращает ячейку «C2».
Подробнее о том, как обратиться к ячейке, смотрите в статье: Ячейки (обращение, запись, чтение, очистка).
В этой статье мы рассмотрим свойства объекта Range, применимые, в том числе, к диапазону, состоящему из одной ячейки.
Еще надо добавить, что свойства и методы объектов отделяются от объектов точкой, как в третьем примере обращения к одной ячейке: Range(«A1:C3»).Cells(6) .
Свойства ячейки (объекта Range)
| Свойство | Описание |
|---|---|
| Address | Возвращает адрес ячейки (диапазона). |
| Borders | Возвращает коллекцию Borders, представляющую границы ячейки (диапазона). Подробнее… |
| Cells | Возвращает объект Range, представляющий коллекцию всех ячеек заданного диапазона. Указав номер строки и номер столбца или порядковый номер ячейки в диапазоне, мы получаем конкретную ячейку. Подробнее… |
| Characters | Возвращает подстроку в размере указанного количества символов из текста, содержащегося в ячейке. Подробнее… |
| Column | Возвращает номер столбца ячейки (первого столбца диапазона). Подробнее… |
| ColumnWidth | Возвращает или задает ширину ячейки в пунктах (ширину всех столбцов в указанном диапазоне). |
| Comment | Возвращает комментарий, связанный с ячейкой (с левой верхней ячейкой диапазона). |
| CurrentRegion | Возвращает прямоугольный диапазон, ограниченный пустыми строками и столбцами. Очень полезное свойство для возвращения рабочей таблицы, а также определения номера последней заполненной строки. |
| EntireColumn | Возвращает весь столбец (столбцы), в котором содержится ячейка (диапазон). Диапазон может содержаться и в одном столбце, например, Range(«A1:A20») . |
| EntireRow | Возвращает всю строку (строки), в которой содержится ячейка (диапазон). Диапазон может содержаться и в одной строке, например, Range(«A2:H2») . |
| Font | Возвращает объект Font, представляющий шрифт указанного объекта. Подробнее о цвете шрифта… |
| HorizontalAlignment | Возвращает или задает значение горизонтального выравнивания содержимого ячейки (диапазона). Подробнее… |
| Interior | Возвращает объект Interior, представляющий внутреннюю область ячейки (диапазона). Применяется, главным образом, для возвращения или назначения цвета заливки (фона) ячейки (диапазона). Подробнее… |
| Name | Возвращает или задает имя ячейки (диапазона). |
| NumberFormat | Возвращает или задает код числового формата для ячейки (диапазона). Примеры кодов числовых форматов можно посмотреть, открыв для любой ячейки на рабочем листе Excel диалоговое окно «Формат ячеек», на вкладке «(все форматы)». Свойство NumberFormat диапазона возвращает значение NULL, за исключением тех случаев, когда все ячейки в диапазоне имеют одинаковый числовой формат. Если нужно присвоить ячейке текстовый формат, записывается так: Range(«A1»).NumberFormat = «@» . Общий формат: Range(«A1»).NumberFormat = «General» . |
| Offset | Возвращает объект Range, смещенный относительно первоначального диапазона на указанное количество строк и столбцов. Подробнее… |
| Resize | Изменяет размер первоначального диапазона до указанного количества строк и столбцов. Строки добавляются или удаляются снизу, столбцы – справа. Подробнее… |
| Row | Возвращает номер строки ячейки (первой строки диапазона). Подробнее… |
| RowHeight | Возвращает или задает высоту ячейки в пунктах (высоту всех строк в указанном диапазоне). |
| Text | Возвращает форматированный текст, содержащийся в ячейке. Свойство Text диапазона возвращает значение NULL, за исключением тех случаев, когда все ячейки в диапазоне имеют одинаковое содержимое и один формат. Предназначено только для чтения. Подробнее… |
| Value | Возвращает или задает значение ячейки, в том числе с отображением значений в формате Currency и Date. Тип данных Variant. Value является свойством ячейки по умолчанию, поэтому в коде его можно не указывать. |
| Value2 | Возвращает или задает значение ячейки. Тип данных Variant. Значения в формате Currency и Date будут отображены в виде чисел с типом данных Double. |
| VerticalAlignment | Возвращает или задает значение вертикального выравнивания содержимого ячейки (диапазона). Подробнее… |
В таблице представлены не все свойства объекта Range. С полным списком вы можете ознакомиться не сайте разработчика.
Простые примеры для начинающих
Вы можете скопировать примеры кода VBA Excel в стандартный модуль и запустить их на выполнение. Как создать стандартный модуль и запустить процедуру на выполнение, смотрите в статье VBA Excel. Начинаем программировать с нуля.
Учтите, что в одном программном модуле у всех процедур должны быть разные имена. Если вы уже копировали в модуль подпрограммы с именами Primer1, Primer2 и т.д., удалите их или создайте еще один стандартный модуль.
Форматирование ячеек
Заливка ячейки фоном, изменение высоты строки, запись в ячейки текста, автоподбор ширины столбца, выравнивание текста в ячейке и выделение его цветом, добавление границ к ячейкам, очистка содержимого и форматирования ячеек.
Если вы запустите эту процедуру, информационное окно MsgBox будет прерывать выполнение программы и сообщать о том, что произойдет дальше, после его закрытия.
Источник
Изменение размера ячейки в VBA Excel. Высота строки, ширина столбца, автоподбор ширины ячейки. Свойства RowHeight и ColumnWidth объекта Range.
Размер ячейки
Размер ячейки по высоте и ширине определяется высотой строки и шириной столбца, на пересечении которых она находится. Если, в вашем случае, нежелательно изменять размеры всей строки или всего столбца, используйте объединенные ячейки нужной величины.
Обратите внимание, что высота строки задается в пунктах, а ширина столбца в символах, поэтому их числовые значения не соответствуют друг другу по фактическому размеру.
Высота строки и ширина столбца в Excel
Программно, без дополнительных макросов, можно изменять высоту строки только в пунктах, а ширину столбца только в символах.
На сайте поддержки офисных приложений Microsoft так написано об этих величинах:
- высота строки может принимать значение от 0 до 409 пунктов, причем 1 пункт приблизительно равен 1/72 дюйма или 0,035 см;
- ширина столбца может принимать значение от 0 до 255, причем это значение соответствует количеству символов, которые могут быть отображены в ячейке.
Смотрите, как сделать все ячейки рабочего листа квадратными.
Высота строки
Для изменения высоты строки используйте свойство RowHeight объекта Range. И не важно, будет объект Range представлять из себя выделенный произвольный диапазон, отдельную ячейку, целую строку или целый столбец — высота всех строк, пересекающихся с объектом Range будет изменена после присвоения свойству RowHeight этого объекта нового значения.
Примеры изменения высоты строк:
Пример 1
Изменение высоты отдельной ячейки:
|
ActiveCell.RowHeight = 10 |
в результате, строка, в которой находится активная ячейка, приобретает высоту, равную 10 пунктам.
Пример 2
Изменение высоты строки:
в результате, третья строка рабочего листа приобретает высоту, равную 30 пунктам.
Пример 3
Изменение высоты ячеек заданного диапазона:
|
Range(«A1:D6»).RowHeight = 20 |
в результате, каждой из первых шести строк рабочего листа будет задана высота, равная 20 пунктам.
Пример 4
Изменение высоты ячеек целого столбца:
|
Columns(5).RowHeight = 15 |
в результате, всем строкам рабочего листа будет назначена высота, равная 15 пунктам.
Ширина столбца
Для изменения ширины столбца используйте свойство ColumnWidth объекта Range. Как и в случае с высотой строки, не важно, будет объект Range представлять из себя выделенный произвольный диапазон, отдельную ячейку, целую строку или целый столбец — ширина всех столбцов, пересекающихся с объектом Range будет изменена после присвоения свойству ColumnWidth этого объекта нового значения.
Примеры изменения ширины столбцов:
Пример 1
Изменение ширины отдельной ячейки:
|
ActiveCell.ColumnWidth = 15 |
в результате, столбец, в котором находится активная ячейка, приобретает ширину, равную 15 символам.
Пример 2
Изменение ширины столбца:
|
Columns(3).ColumnWidth = 50 |
в результате, третий столбец рабочего листа (столбец «C») приобретает ширину, равную 50 символам.
Пример 3
Изменение ширины ячеек заданного диапазона:
|
Range(«A1:D6»).ColumnWidth = 25 |
в результате, каждому из первых четырех столбцов рабочего листа будет задана ширина, равная 25 символам.
Пример 4
Изменение ширины ячеек целой строки:
в результате, всем столбцам рабочего листа будет назначена ширина, равная 35 символам.
Автоподбор ширины
Для автоподбора ширины ячейки в соответствие с размером ее содержимого используйте следующий код:
|
‘запишем для примера в любую ячейку рабочего ‘листа какой-нибудь текст, например, такой: Cells(5, 5) = «Автоподбор ширины ячейки» ‘теперь подгоним ширину ячейки, а точнее ‘столбца, в котором эта ячейка находится: Cells(5, 5).EntireColumn.AutoFit |
Имейте в виду, что ширина столбца будет подогнана по расположенной в этом столбце ячейке с самым длинным содержимым. Например, если длина содержимого ячейки Cells(7, 5) будет превышать длину содержимого ячейки Cells(5, 5), то автоподбор ширины пятого столбца произойдет по содержимому ячейки Cells(7, 5), несмотря на то, что в строке кода указана другая ячейка.
Как осуществить автоподбор ширины объединенной ячейки, в которой метод AutoFit не работает, смотрите в следующей статье.
In this Article
- Ranges and Cells in VBA
- Cell Address
- Range of Cells
- Writing to Cells
- Reading from Cells
- Non Contiguous Cells
- Intersection of Cells
- Offset from a Cell or Range
- Setting Reference to a Range
- Resize a Range
- OFFSET vs Resize
- All Cells in Sheet
- UsedRange
- CurrentRegion
- Range Properties
- Last Cell in Sheet
- Last Used Row Number in a Column
- Last Used Column Number in a Row
- Cell Properties
- Copy and Paste
- AutoFit Contents
- More Range Examples
- For Each
- Sort
- Find
- Range Address
- Range to Array
- Array to Range
- Sum Range
- Count Range
Ranges and Cells in VBA
Excel spreadsheets store data in Cells. Cells are arranged into Rows and Columns. Each cell can be identified by the intersection point of it’s row and column (Exs. B3 or R3C2).
An Excel Range refers to one or more cells (ex. A3:B4)
Cell Address
A1 Notation
In A1 notation, a cell is referred to by it’s column letter (from A to XFD) followed by it’s row number(from 1 to 1,048,576). This is called a cell address.
In VBA you can refer to any cell using the Range Object.
' Refer to cell B4 on the currently active sheet
MsgBox Range("B4")

' Refer to cell B4 on the sheet named 'Data'
MsgBox Worksheets("Data").Range("B4")

' Refer to cell B4 on the sheet named 'Data' in another OPEN workbook
' named 'My Data'
MsgBox Workbooks("My Data").Worksheets("Data").Range("B4")
R1C1 Notation
In R1C1 Notation a cell is referred by R followed by Row Number then letter ‘C’ followed by the Column Number. eg B4 in R1C1 notation will be referred by R4C2. In VBA you use the Cells Object to use R1C1 notation:
' Refer to cell R[6]C[4] i.e D6
Cells(6, 4) = "D6"
Range of Cells
A1 Notation
To refer to a more than one cell use a “:” between the starting cell address and last cell address. The following will refer to all the cells from A1 to D10:
Range("A1:D10")
R1C1 Notation
To refer to a more than one cell use a “,” between the starting cell address and last cell address. The following will refer to all the cells from A1 to D10:
Range(Cells(1, 1), Cells(10, 4))Writing to Cells
To write values to a cell or contiguous group of cells, simple refer to the range, put an = sign and then write the value to be stored:
' Store F5 in cell with Address F6
Range("F6") = "F6"

' Store E6 in cell with Address R[6]C[5] i.e E6
Cells(6, 5) = "E6"

' Store A1:D10 in the range A1:D10
Range("A1:D10") = "A1:D10"
' or
Range(Cells(1, 1), Cells(10, 4)) = "A1:D10"
Reading from Cells
To read values from cells, simple refer to the variable to store the values, put an = sign and then refer to the range to be read:
Dim val1
Dim val2

' Read from cell F6
val1 = Range("F6")

' Read from cell E6
val2 = Cells(6, 5)

MsgBox val1
Msgbox val2
Note: To store values from a range of cells, you need to use an Array instead of a simple variable.
Non Contiguous Cells
To refer to non contiguous cells use a comma between the cell addresses:
' Store 10 in cells A1, A3, and A5
Range("A1,A3,A5") = 10


' Store 10 in cells A1:A3 and D1:D3)
Range("A1:A3, D1:D3") = 10
VBA Coding Made Easy
Stop searching for VBA code online. Learn more about AutoMacro — A VBA Code Builder that allows beginners to code procedures from scratch with minimal coding knowledge and with many time-saving features for all users!

Learn More
Intersection of Cells
To refer to non contiguous cells use a space between the cell addresses:
' Store 'Col D' in D1:D10
' which is Common between A1:D10 and D1:F10
Range("A1:D10 D1:G10") = "Col D"
Offset from a Cell or Range
Using the Offset function, you can move the reference from a given Range (cell or group of cells) by the specified number_of_rows, and number_of_columns.
Offset Syntax
Range.Offset(number_of_rows, number_of_columns)
Offset from a cell
' OFFSET from a cell A1
' Refer to cell itself
' Move 0 rows and 0 columns
Range("A1").Offset(0, 0) = "A1"

' Move 1 rows and 0 columns
Range("A1").Offset(1, 0) = "A2"

' Move 0 rows and 1 columns
Range("A1").Offset(0, 1) = "B1"

' Move 1 rows and 1 columns
Range("A1").Offset(1, 1) = "B2"

' Move 10 rows and 5 columns
Range("A1").Offset(10, 5) = "F11"
Offset from a Range
' Move Reference to Range A1:D4 by 4 rows and 4 columns
' New Reference is E5:H8
Range("A1:D4").Offset(4,4) = "E5:H8"
Setting Reference to a Range
To assign a range to a range variable: declare a variable of type Range then use the Set command to set it to a range. Please note that you must use the SET command as RANGE is an object:
' Declare a Range variable
Dim myRange as Range

' Set the variable to the range A1:D4
Set myRange = Range("A1:D4")

' Prints $A$1:$D$4
MsgBox myRange.Address
VBA Programming | Code Generator does work for you!
Resize a Range
Resize method of Range object changes the dimension of the reference range:
Dim myRange As Range

' Range to Resize
Set myRange = Range("A1:F4")

' Prints $A$1:$E$10
Debug.Print myRange.Resize(10, 5).Address
Top-left cell of the Resized range is same as the top-left cell of the original range
Resize Syntax
Range.Resize(number_of_rows, number_of_columns)
OFFSET vs Resize
Offset does not change the dimensions of the range but moves it by the specified number of rows and columns. Resize does not change the position of the original range but changes the dimensions to the specified number of rows and columns.
All Cells in Sheet
The Cells object refers to all the cells in the sheet (1048576 rows and 16384 columns).
' Clear All Cells in Worksheets
Cells.Clear
UsedRange
UsedRange property gives you the rectangular range from the top-left cell used cell to the right-bottom used cell of the active sheet.
Dim ws As Worksheet
Set ws = ActiveSheet

' $B$2:$L$14 if L2 is the first cell with any value
' and L14 is the last cell with any value on the
' active sheet
Debug.Print ws.UsedRange.Address
CurrentRegion
CurrentRegion property gives you the contiguous rectangular range from the top-left cell to the right-bottom used cell containing the referenced cell/range.
Dim myRange As Range

Set myRange = Range("D4:F6")

' Prints $B$2:$L$14
' If there is a filled path from D4:F16 to B2 AND L14
Debug.Print myRange.CurrentRegion.Address

' You can refer to a single starting cell also

Set myRange = Range("D4") ' Prints $B$2:$L$14
AutoMacro | Ultimate VBA Add-in | Click for Free Trial!
Range Properties
You can get Address, row/column number of a cell, and number of rows/columns in a range as given below:
Dim myRange As Range

Set myRange = Range("A1:F10")

' Prints $A$1:$F$10
Debug.Print myRange.Address

Set myRange = Range("F10")

' Prints 10 for Row 10
Debug.Print myRange.Row

' Prints 6 for Column F
Debug.Print myRange.Column

Set myRange = Range("E1:F5")
' Prints 5 for number of Rows in range
Debug.Print myRange.Rows.Count

' Prints 2 for number of Columns in range
Debug.Print myRange.Columns.Count
Last Cell in Sheet
You can use Rows.Count and Columns.Count properties with Cells object to get the last cell on the sheet:
' Print the last row number
' Prints 1048576
Debug.Print "Rows in the sheet: " & Rows.Count

' Print the last column number
' Prints 16384
Debug.Print "Columns in the sheet: " & Columns.Count

' Print the address of the last cell
' Prints $XFD$1048576
Debug.Print "Address of Last Cell in the sheet: " & Cells(Rows.Count, Columns.Count)
Last Used Row Number in a Column
END property takes you the last cell in the range, and End(xlUp) takes you up to the first used cell from that cell.
Dim lastRow As Long

lastRow = Cells(Rows.Count, "A").End(xlUp).Row
Last Used Column Number in a Row
Dim lastCol As Long

lastCol = Cells(1, Columns.Count).End(xlToLeft).Column
END property takes you the last cell in the range, and End(xlToLeft) takes you left to the first used cell from that cell.
You can also use xlDown and xlToRight properties to navigate to the first bottom or right used cells of the current cell.
AutoMacro | Ultimate VBA Add-in | Click for Free Trial!
Cell Properties
Common Properties
Here is code to display commonly used Cell Properties
Dim cell As Range
Set cell = Range("A1")

cell.Activate
Debug.Print cell.Address
' Print $A$1

Debug.Print cell.Value
' Prints 456
' Address

Debug.Print cell.Formula
' Prints =SUM(C2:C3)

' Comment
Debug.Print cell.Comment.Text

' Style
Debug.Print cell.Style

' Cell Format
Debug.Print cell.DisplayFormat.NumberFormat
Cell Font
Cell.Font object contains properties of the Cell Font:
Dim cell As Range

Set cell = Range("A1")

' Regular, Italic, Bold, and Bold Italic
cell.Font.FontStyle = "Bold Italic"
' Same as
cell.Font.Bold = True
cell.Font.Italic = True

' Set font to Courier
cell.Font.FontStyle = "Courier"

' Set Font Color
cell.Font.Color = vbBlue
' or
cell.Font.Color = RGB(255, 0, 0)

' Set Font Size
cell.Font.Size = 20
Copy and Paste
Paste All
Ranges/Cells can be copied and pasted from one location to another. The following code copies all the properties of source range to destination range (equivalent to CTRL-C and CTRL-V)
'Simple Copy
Range("A1:D20").Copy
Worksheets("Sheet2").Range("B10").Paste

'or
' Copy from Current Sheet to sheet named 'Sheet2'
Range("A1:D20").Copy destination:=Worksheets("Sheet2").Range("B10")
Paste Special
Selected properties of the source range can be copied to the destination by using PASTESPECIAL option:
' Paste the range as Values only
Range("A1:D20").Copy
Worksheets("Sheet2").Range("B10").PasteSpecial Paste:=xlPasteValues
Here are the possible options for the Paste option:
' Paste Special Types
xlPasteAll
xlPasteAllExceptBorders
xlPasteAllMergingConditionalFormats
xlPasteAllUsingSourceTheme
xlPasteColumnWidths
xlPasteComments
xlPasteFormats
xlPasteFormulas
xlPasteFormulasAndNumberFormats
xlPasteValidation
xlPasteValues
xlPasteValuesAndNumberFormats
AutoFit Contents
Size of rows and columns can be changed to fit the contents using AutoFit:
' Change size of rows 1 to 5 to fit contents
Rows("1:5").AutoFit

' Change size of Columns A to B to fit contents
Columns("A:B").AutoFit
More Range Examples
It is recommended that you use Macro Recorder while performing the required action through the GUI. It will help you understand the various options available and how to use them.
AutoMacro | Ultimate VBA Add-in | Click for Free Trial!
For Each
It is easy to loop through a range using For Each construct as show below:
For Each cell In Range("A1:B100")
    ' Do something with the cell
Next cell
At each iteration of the loop one cell in the range is assigned to the variable cell and statements in the For loop are executed for that cell. Loop exits when all the cells are processed.
Sort
Sort is a method of Range object. You can sort a range by specifying options for sorting to Range.Sort. The code below will sort the columns A:C based on key in cell C2. Sort Order can be xlAscending or xlDescending. Header:= xlYes should be used if first row is the header row.
   Columns("A:C").Sort key1:=Range("C2"), _
      order1:=xlAscending, Header:=xlYes
Find
Find is also a method of Range Object. It find the first cell having content matching the search criteria and returns the cell as a Range object. It return Nothing if there is no match.
Use FindNext method (or FindPrevious) to find next(previous) occurrence.
Following code will change the font to “Arial Black” for all cells in the range which start with “John”:
For Each c In Range("A1:A100")
    If c Like "John*" Then
        c.Font.Name = "Arial Black"
    End If
Next c
Following code will replace all occurrences of “To Test” to “Passed” in the range specified:
With Range("a1:a500")
    Set c = .Find("To Test", LookIn:=xlValues)
    If Not c Is Nothing Then
        firstaddress = c.Address
        Do
            c.Value = "Passed"
            Set c = .FindNext(c)
        Loop While Not c Is Nothing And c.Address <> firstaddress
    End If
End With
It is important to note that you must specify a range to use FindNext. Also you must provide a stopping condition otherwise the loop will execute forever. Normally address of the first cell which is found is stored in a variable and loop is stopped when you reach that cell again. You must also check for the case when nothing is found to stop the loop.
Range Address
Use Range.Address to get the address in A1 Style
MsgBox Range("A1:D10").Address
' or
Debug.Print Range("A1:D10").Address
Use xlReferenceStyle (default is xlA1) to get addres in R1C1 style
MsgBox Range("A1:D10").Address(ReferenceStyle:=xlR1C1)
' or
Debug.Print Range("A1:D10").Address(ReferenceStyle:=xlR1C1)
This is useful when you deal with ranges stored in variables and want to process for certain addresses only.
AutoMacro | Ultimate VBA Add-in | Click for Free Trial!
Range to Array
It is faster and easier to transfer a range to an array and then process the values. You should declare the array as Variant to avoid calculating the size required to populate the range in the array. Array’s dimensions are set to match number of values in the range.
Dim DirArray As Variant
' Store the values in the range to the Array

DirArray = Range("a1:a5").Value

' Loop to process the values
For Each c In DirArray
    Debug.Print c
Next
Array to Range
After processing you can write the Array back to a Range. To write the Array in the example above to a Range you must specify a Range whose size matches the number of elements in the Array.
Use the code below to write the Array to the range D1:D5:
Range("D1:D5").Value = DirArray

Range("D1:H1").Value = Application.Transpose(DirArray)
Please note that you must Transpose the Array if you write it to a row.
Sum Range
SumOfRange = Application.WorksheetFunction.Sum(Range("A1:A10"))
Debug.Print SumOfRange
You can use many functions available in Excel in your VBA code by specifying Application.WorkSheetFunction. before the Function Name as in the example above.
Count Range
' Count Number of Cells with Numbers in the Range
CountOfCells = Application.WorksheetFunction.Count(Range("A1:A10"))
Debug.Print CountOfCells

' Count Number of Non Blank Cells in the Range
CountOfNonBlankCells = Application.WorksheetFunction.CountA(Range("A1:A10"))
Debug.Print CountOfNonBlankCells
Written by: Vinamra Chandra
In this guide, we’re going to show you how to autofit rows using macros in Excel.
Download Workbook
Autofit Method
You can use the AutoFit feature by calling the method with same name: AutoFit. The AutoFit method is defined under Range object which represents a cell, row, column, or selection of cells. To AutoFit rows using macros, you need to express the rows you want to autofit as the range object. Below are some examples.
| Worksheets(«Sheet1»).Rows(«1:10»).AutoFit | AutoFits rows through 1st to 10th in Sheet1. |
| Worksheets(«Sheet1»).Range(«A5:A20»).Rows.AutoFit | AutoFits rows through 5th to 20th in Sheet1. |
| Worksheets(«Sheet1»).Rows(5).AutoFit | AutoFits the row 5 in Sheet1. |
| Worksheets(«Sheet1»).Cells.EntireRow.AutoFit | AutoFits all the row in Sheet1. |

Each command above ends with the AutoFit method. Note that the Rows method can return a range object you need to run the AutoFit method.
How to create a macro autofit rows using macros
Let’s review the basics of creating macros. To start, you need to open the VBA (Visual Basic for Applications) window and add a module. A module is where you write code.
- Press Alt + F11 to open the VBA window.
- In the VBA window, click Insert on the toolbar.
- Click the Module option.
- Create a subroutine by typing in Sub MyAutoFit and pressing Enter (MyAutoFit is just a placeholder, feel free to change it).
- Enter your code between Sub MyAutoFit and End Sub (End Sub will be created automatically upon Enter key.).


Remember to save your workbook as an XSLM (Macro enabled workbook) after entering your code. Otherwise, your code will not be saved.
 In this VBA Tutorial, you learn how to use Excel VBA to set or autofit the width of columns in a variety of circumstances.
This VBA Tutorial is accompanied by Excel workbooks containing the data and macros I use in the examples below. You can get immediate free access to these example workbooks by subscribing to the Power Spreadsheets Newsletter.
Use the following Table of Contents to navigate to the section you’re interested in.
Related VBA and Macro Tutorials
The following VBA and Macro Tutorials may help you better understand and implement the contents below:
- General VBA constructs and structures:
- Learn about using variables here.
- Learn about VBA data types here.
- Learn about R1C1 and A1 style references here.
- Practical VBA applications and macro examples:
- Learn how to work with worksheets here.
- Learn how to delete columns here.
- Learn how to hide or unhide rows and columns here.
You can find additional VBA and Macro Tutorials in the Archives.
#1: Set Column Width
VBA Code to Set Column Width
To set the width of a column with VBA, use a statement with the following structure:
Worksheet.Range("A1CellReference").ColumnWidth = ColumnWidthUnits
Process Followed by VBA Code
 Specify column width in units” width=”316″ height=”102″>
VBA Statement Explanation
- Item: Worksheet.
- VBA Construct: Workbook.Worksheets property.
- Description: Returns a Worksheet object representing the worksheet you work with.
- Item: Range(“A1CellReference”).
- VBA Construct: Worksheet.Range property.
- Description: Returns a Range object representing a cell within the column whose width you set. You specify the cell using an A1-style cell reference (A1CellReference) enclosed within quotations (“”).
- Item: ColumnWidth.
- VBA Construct: Range.ColumnWidth property.
- Description: Sets the width of the column containing the Range object returned by item #2 above.
- Item: ColumnWidthUnits.
- VBA Construct: New value of the Range.ColumnWidth property.
- Description: Specifies the width, in units, of the column containing the Range object returned by item #2 above.
- Column width isn’t measured in points, centimeters or inches. Excel measures column width units based on the size (width) of the font you use in the Normal style (for example, Calibri 11).
- Therefore, 1 unit of column width is equal to 1 character of the Normal style font. Consider the following:
- If your Normal style font is a fixed-width font, such as Courier New or Consolas, all characters have the same width.
- If your Normal style font is a proportional font, Excel considers the width of the character “0” (the number zero).
- If you explicitly declare a variable to represent ColumnWidthUnits, use a numeric data type that can handle the value you use to specify the column width in the appropriate units.
Macro Example
The following macro sets the width of column A of the worksheet named “Column width” to 15 units.
Sub columnWidth()

    'Source: https://powerspreadsheets.com/
    'For further information: https://powerspreadsheets.com/excel-vba-column-width/

    Worksheets("Column width").Range("A5").columnWidth = 15

End Sub
Effects of Executing Macro Example
The following GIF illustrates the results of executing this macro example. As expected, VBA sets the width of column A to 15 units.

#2: Set Column Width for Multiple Contiguous Columns
VBA Code to Set Column Width for Multiple Contiguous Columns
To set the width of multiple contiguous columns with VBA, use a statement with the following structure:
Worksheet.Range("FirstColumnLetter:LastColumnLetter").ColumnWidth = ColumnWidthUnits
Process Followed by VBA Code
 Specify column width in units” width=”312″ height=”105″>
VBA Statement Explanation
- Item: Worksheet.
- VBA Construct: Workbook.Worksheets property.
- Description: Returns a Worksheet object representing the worksheet you work with.
- Item: Range(“FirstColumnLetter:LastColumnLetter”).
- VBA Construct: Worksheet.Range property.
- Description: Returns a Range object representing the columns whose width you set. Under this syntax:
- You identify columns by the letters of their headers (FirstColumnLetter and LastColumnLetter).
- The column letters are:
- Separated by a colon (:), which allows you to set up an array.
- Enclosed within quotations (“”).
- Item: ColumnWidth.
- VBA Construct: Range.ColumnWidth property.
- Description: Sets the width of the columns returned by item #2 above.
- Item: ColumnWidthUnits.
- VBA Construct: New value of the Range.ColumnWidth property.
- Description: Specifies the width, in units, of the columns returned by item #2 above.
- Column width isn’t measured in points, centimeters or inches. Excel measures column width units based on the size (width) of the font you use in the Normal style (for example, Calibri 11).
- Therefore, 1 unit of column width is equal to 1 character of the Normal style font. Consider the following:
- If your Normal style font is a fixed-width font, such as Courier New or Consolas, all characters have the same width.
- If your Normal style font is a proportional font, Excel considers the width of the character “0” (the number zero).
- If you explicitly declare a variable to represent ColumnWidthUnits, use a numeric data type that can handle the value you use to specify the column width in the appropriate units.
Macro Example
The following macro sets the width of columns C through E (C, D and E) of the worksheet named “Column width” to 10 units.
Sub columnWidthMultipleColumns()

    'Source: https://powerspreadsheets.com/
    'For further information: https://powerspreadsheets.com/excel-vba-column-width/

    Worksheets("Column width").Range("C:E").columnWidth = 10

End Sub
Effects of Executing Macro Example
The following GIF illustrates the results of executing this macro example. As expected, VBA sets the width of columns C through E to 10 units.

#3: Set Column Width for Multiple Non-Contiguous Columns
VBA Code to Set Column Width for Multiple Non-Contiguous Columns
To set the width of multiple non-contiguous columns with VBA, use a statement with the following structure:
Worksheet.Range("Column1Area1Letter:ColumnLastArea1Letter,Column1Area2Letter:ColumnLastArea2Letter, ... , Column1AreaLastLetter:ColumnLastAreaLastLetter").ColumnWidth = ColumnWidthUnits
Process Followed by VBA Code
 Specify column width in units” width=”312″ height=”105″>
VBA Statement Explanation
- Item: Worksheet.
- VBA Construct: Workbook.Worksheets property.
- Description: Returns a Worksheet object representing the worksheet you work with.
- Item: Range(“Column1Area1Letter:ColumnLastArea1Letter,Column1Area2Letter:ColumnLastArea2Letter, … , Column1AreaLastLetter:ColumnLastAreaLastLetter”).
- VBA Construct: Worksheet.Range property.
- Description: Returns a Range object representing the columns whose width you set. Under this syntax:
- You identify columns by the letters of their headers (Column1Area1Letter, ColumnLastArea1Letter, Column1Area2Letter, ColumnLastArea2Letter, … , Column1AreaLastLetter and ColumnLastAreaLastLetter”).
- The column letters identifying contiguous columns (within the same data area) are separated by a colon (:), which allows you to set up an array. If you’re only referring to a single column (for example, column B), include the letter reference twice and separate them with a colon (:) (for example “B:B”).
- The column letters identifying non-contiguous columns (in separate data areas) are separated by the union operator, a comma (,).
- The complete column reference is enclosed within quotations (“”).
- Item: ColumnWidth.
- VBA Construct: Range.ColumnWidth property.
- Description: Sets the width of the columns returned by item #2 above.
- Item: ColumnWidthUnits.
- VBA Construct: New value of the Range.ColumnWidth property.
- Description: Specifies the width, in units, of the columns returned by item #2 above.
- Column width isn’t measured in points, centimeters or inches. Excel measures column width units based on the size (width) of the font you use in the Normal style (for example, Calibri 11).
- Therefore, 1 unit of column width is equal to 1 character of the Normal style font. Consider the following:
- If your Normal style font is a fixed-width font, such as Courier New or Consolas, all characters have the same width.
- If your Normal style font is a proportional font, Excel considers the width of the character “0” (the number zero).
- If you explicitly declare a variable to represent ColumnWidthUnits, use a numeric data type that can handle the value you use to specify the column width in the appropriate units.
Macro Example
The following macro sets the width of columns B, F and H of the worksheet named “Column width” to 20 units.
Sub columnWidthMultipleNonAdjacentColumns()

    'Source: https://powerspreadsheets.com/
    'For further information: https://powerspreadsheets.com/excel-vba-column-width/

    Worksheets("Column width").Range("B:B,F:F,H:H").columnWidth = 20

End Sub
Effects of Executing Macro Example
The following GIF illustrates the results of executing this macro example. As expected, VBA sets the width of columns B, F and H to 20 units.

#4: AutoFit Column Width Based on Entire Column
VBA Code to AutoFit Column Width Based on Entire Column
To autofit the width of a column with VBA, considering the contents of the entire column, use a statement with the following structure:
Worksheet.Range("A1CellReference").EntireColumn.AutoFit
Process Followed by VBA Code
 return entire column > autofit entire column width” width=”497″ height=”107″>
VBA Statement Explanation
- Item: Worksheet.
- VBA Construct: Workbook.Worksheets property.
- Description: Returns a Worksheet object representing the worksheet you work with.
- Item: Range(“A1CellReference”).
- VBA Construct: Worksheet.Range property.
- Description: Returns a Range object representing a cell within the column you autofit. You specify the cell using an A1-style cell reference (A1CellReference) enclosed within quotations (“”).
- Item: EntireColumn.
- VBA Construct: Range.EntireColumn property.
- Description: Returns a Range object representing the entire column containing the Range object returned by item #2 above.
- Item: AutoFit.
- VBA Construct: Range.AutoFit method.
- Description: Modifies the width of the column represented by the Range object returned by item #3 above to achieve the best fit (autofits).
Macro Example
The following macro autofits the width of column G of the worksheet named “Column width” based on the contents of all the cells in the entire column.
Sub columnWidthAutoFitEntireColumn()

    'Source: https://powerspreadsheets.com/
    'For further information: https://powerspreadsheets.com/excel-vba-column-width/

    Worksheets("Column width").Range("G5").EntireColumn.AutoFit

End Sub
Effects of Executing Macro Example
The following GIF illustrates the results of executing this macro example. As expected, VBA autofits the width of column G based on the contents of all the cells in the entire column. Notice the contents in cell G10 (Autofit based on entire column), which are used as the basis for the autofitting operation.

#5: AutoFit Column Width Based on Specific Cell
VBA Code to AutoFit Column Width Based on Specific Cell
To autofit the width of a column with VBA, considering the contents of a specific cell or row, use a statement with the following structure:
Worksheet.Range("A1CellReference").Columns.AutoFit
Process Followed by VBA Code
 return column > autofit entire column width to contents of cell” width=”493″ height=”105″>
VBA Statement Explanation
- Item: Worksheet.
- VBA Construct: Workbook.Worksheets property.
- Description: Returns a Worksheet object representing the worksheet you work with.
- Item: Range(“A1CellReference”).
- VBA Construct: Worksheet.Range property.
- Description: Returns a Range object representing a cell.
- This cell:
- Is within the column you autofit.
- Is the cell whose contents Excel considers for purposes of achieving the best fit (autofitting).
- You specify the cell using an A1-style cell reference (A1CellReference) enclosed within quotations (“”).
- This cell:
- Item: Columns.
- VBA Construct: Range.Columns property.
- Description: Returns a Range object representing the column containing the Range object returned by item #2 above.
- Item: AutoFit.
- VBA Construct: Range.AutoFit method.
- Description: Modifies the width of the column represented by the Range object returned by item #3 above to achieve the best fit (autofits) based on the contents within the cell represented by the Range object returned by item #2 above.
Macro Example
The following macro autofits the width of column I of the worksheet named “Column width” based on the contents of cell I5.
Sub columnWidthAutoFitRow()

    'Source: https://powerspreadsheets.com/
    'For further information: https://powerspreadsheets.com/excel-vba-column-width/

    Worksheets("Column width").Range("I5").Columns.AutoFit

End Sub
Effects of Executing Macro Example
The following GIF illustrates the results of executing this macro example. As expected, VBA sets autofits the width of column I based on the contents of cell I5. Notice the contents in cell I10 (Autofit based on specific cell), which aren’t used as the basis for the autofitting operation.

#6: Set Column Width in Points
VBA Code to Set Column Width in Points
To set the width of a column in points with VBA, use a macro with the following statement structure:
With Worksheet.Range("A1CellReference")
    For Counter = 1 To 3
        .ColumnWidth = ColumnWidthPoints * (.ColumnWidth / .Width)
    Next Counter
End With
Process Followed by VBA Code
 specify column width in points 3 times” width=”689″ height=”192″>
VBA Statement Explanation
Lines #1 and #5: With Worksheet.Range(“A1CellReference”) | End With
- Item: With… End With.
- VBA Construct: With… End With statement.
- Description: Statements within the With… End With statement (lines # through #4 below) are executed on the Range object returned by item #3 below.
- Item: Worksheet.
- VBA Construct: Workbook.Worksheets property.
- Description: Returns a Worksheet object representing the worksheet you work with.
- Item: Range(“A1CellReference”).
- VBA Construct: Worksheet.Range property.
- Description: Returns a Range object representing a cell within the column whose width you set. You specify the cell using an A1-style cell reference (A1CellReference) enclosed within quotations (“”).
Lines #2 and #4: For Counter = 1 To 3 | Next Counter
- Item: For… Next Counter.
- VBA Construct: For… Next statement.
- Description: Repeats the statement within the loop (line #3 below) 3 times, as required by item #3 below.
- Item: Counter.
- VBA Construct: Counter of For… Next statement.
- Description: Loop counter. If you explicitly declare a variable to represent the loop counter, use the Long data type.
- Item: 1 To 3.
- VBA Construct: Counter Start (1) and Counter End (3) of For… Next statement.
- Description: The statement within the loop (line #3 below) is executed 3 times (1 To 3).
- Theoretically, line #3 below should be enough to set the column width in points without requiring the loop specified by these lines #2 and #4. In practice, this may not be the case. Some tests suggest that repeating line #3 below (or similar) 3 times generally gets you the closest to the specified column width.
Line #3: .ColumnWidth = ColumnWidthPoints * (.ColumnWidth / .Width)
- Item: .ColumnWidth.
- VBA Construct: Range.ColumnWidth property.
- Description:
- Sets the width of the column containing the Range object within the opening statement of the With… End With block (line #1, item #3 above).
- .ColumnWidth is included twice in the statement. In this first mention, (.ColumnWidth = …), ColumnWidth is the property to which a value is assigned. The value assigned to the ColumnWidth property is the value returned by the other items within this statement.
- Item: ColumnWidthPoints.
- VBA Construct: Numeric (for example, Double) variable.
- Description: Specifies the width (in points) of the columns containing the Range object within the opening statement of the With… End With block (line #1, item #3 above).
- If you explicitly declare a variable to represent ColumnWidthPoints, use a numeric data type that can handle the value you use to specify the column width in points.
- Item: .ColumnWidth.
- VBA Construct: Range.ColumnWidth property.
- Description:
- Returns the width of the column containing the Range object within the opening statement of the With… End With block (line #1, item #3 above).
- .ColumnWidth is included twice in the statement. In this second mention, (.ColumnWidth), ColumnWidth returns the current value of the property.
- The ColumnWidth property returns the column width in units based on the size (width) of the font you use in the Normal style (for example, Calibri 11). Therefore, 1 unit of column width is equal to 1 character of the Normal style font. If your Normal style font is a proportional (not fixed-width) font, Excel considers the width of the character “0” (the number zero).
- Item: .Width.
- VBA Construct: Range.Width property.
- Description:
- Returns the width of the column containing the Range object within the opening statement of the With… End With block (line #1, item #3 above).
- The Width property returns the column width in points.
- Item: (.ColumnWidth / .Width).
- VBA Construct: Numeric expression.
- Description:
- Both ColumnWidth (item #3 above) and Width (item #4 above) return the width of the column containing the Range object within the opening statement of the With… End With block (line #1, item #3 above).
- The units in which ColumnWidth and Width return the column width differ.
- ColumnWidth expresses the column width in units based on the size (width) of the font you use in the Normal style.
- Width expresses the column width in points.
- ColumnWidth divided by Width (.ColumnWidth / .Width) returns the factor by which you must multiply the desired column width expressed in points (item #2 above) to obtain the appropriate column width in units based on the size (width) of the font you use in the Normal style. In other words, this expression converts ColumnWidthPoints from points to the units required by the ColumnWidth property.
Macro Example
The following macro sets the width of column J of the worksheet named “Column width” to 80 points.
Sub columnWidthPoints()

    'Source: https://powerspreadsheets.com/
    'For further information: https://powerspreadsheets.com/excel-vba-column-width/

    Dim iCounter As Long

    With Worksheets("Column width").Range("J5")
        For iCounter = 1 To 3
            .columnWidth = 80 * (.columnWidth / .Width)
        Next iCounter
    End With

End Sub
Effects of Executing Macro Example
The following GIF illustrates the results of executing this macro example. As expected, VBA sets the width of column J to 80 points.

#7: Set Column Width in Inches
VBA Code to Set Column Width in Inches
To set the width of a column in inches with VBA, use a macro with the following statement structure:
With Worksheet.Range("A1CellReference")
    For Counter = 1 To 3
        .ColumnWidth = Application.InchesToPoints(ColumnWidthInches) * (.ColumnWidth / .Width)
    Next Counter
End With
Process Followed by VBA Code
 specify column width in inches 3 times” width=”686″ height=”191″>
VBA Statement Explanation
Lines #1 and #5: With Worksheet.Range(“A1CellReference”) | End With
- Item: With… End With.
- VBA Construct: With… End With statement.
- Description: Statements within the With… End With statement (lines # through #4 below) are executed on the Range object returned by item #3 below.
- Item: Worksheet.
- VBA Construct: Workbook.Worksheets property.
- Description: Returns a Worksheet object representing the worksheet you work with.
- Item: Range(“A1CellReference”).
- VBA Construct: Worksheet.Range property.
- Description: Returns a Range object representing a cell within the column whose width you set. You specify the cell using an A1-style cell reference (A1CellReference) enclosed within quotations (“”).
Lines #2 and #4: For Counter = 1 To 3 | Next Counter
- Item: For… Next Counter.
- VBA Construct: For… Next statement.
- Description: Repeats the statement within the loop (line #3 below) 3 times, as required by item #3 below.
- Item: Counter.
- VBA Construct: Counter of For… Next statement.
- Description: Loop counter. If you explicitly declare a variable to represent the loop counter, use the Long data type.
- Item: 1 To 3.
- VBA Construct: Counter Start (1) and Counter End (3) of For… Next statement.
- Description: The statement within the loop (line #3 below) is executed 3 times (1 To 3).
- Theoretically, line #3 below should be enough to set the column width in inches without requiring the loop specified by these lines #2 and #4. In practice, this may not be the case. Some tests suggest that repeating line #3 below (or similar) 3 times generally gets you the closest to the specified column width.
Line #3: .ColumnWidth = Application.InchesToPoints(ColumnWidthInches) * (.ColumnWidth / .Width)
- Item: .ColumnWidth.
- VBA Construct: Range.ColumnWidth property.
- Description:
- Sets the width of the column containing the Range object within the opening statement of the With… End With block (line #1, item #3 above).
- .ColumnWidth is included twice in the statement. In this first mention, (.ColumnWidth = …), ColumnWidth is the property to which a value is assigned. The value assigned to the ColumnWidth property is the value returned by the other items within this statement.
- Item: Application.InchesToPoints.
- VBA Construct: Application.InchesToPoints method.
- Description: Converts the measurement specified by item #3 below from inches to points.
- Item: ColumnWidthInches.
- VBA Construct: Inches parameter of Application.InchesToPoints method.
- Description: Specifies the width (in inches) of the columns containing the Range object within the opening statement of the With… End With block (line #1, item #3 above).
- If you explicitly declare a variable to represent ColumnWidthInches, use a numeric data type that can handle the value you use to specify the column width in inches.
- Item: .ColumnWidth.
- VBA Construct: Range.ColumnWidth property.
- Description:
- Returns the width of the column containing the Range object within the opening statement of the With… End With block (line #1, item #3 above).
- .ColumnWidth is included twice in the statement. In this second mention, (.ColumnWidth), ColumnWidth returns the current value of the property.
- The ColumnWidth property returns the column width in units based on the size (width) of the font you use in the Normal style (for example, Calibri 11). Therefore, 1 unit of column width is equal to 1 character of the Normal style font. If your Normal style font is a proportional (not fixed-width) font, Excel considers the width of the character “0” (the number zero).
- Item: .Width.
- VBA Construct: Range.Width property.
- Description:
- Returns the width of the column containing the Range object within the opening statement of the With… End With block (line #1, item #3 above).
- The Width property returns the column width in points.
- Item: (.ColumnWidth / .Width).
- VBA Construct: Numeric expression.
- Description:
- Both ColumnWidth (item #4 above) and Width (item #5 above) return the width of the column containing the Range object within the opening statement of the With… End With block (line #1, item #3 above).
- The units in which ColumnWidth and Width return the column width differ.
- ColumnWidth expresses the column width in units based on the size (width) of the font you use in the Normal style.
- Width expresses the column width in points.
- ColumnWidth divided by Width (.ColumnWidth / .Width) returns the factor by which you must multiply the desired column width expressed in inches/points (items #2 and #3 above) to obtain the appropriate column width in units based on the size (width) of the font you use in the Normal style. In other words, this expression converts Application.InchesToPoints(ColumnWidthInches) from points to the units required by the ColumnWidth property.
Macro Example
The following macro sets the width of column K of the worksheet named “Column width” to 1 inch.
Sub columnWidthInches()

    'Source: https://powerspreadsheets.com/
    'For further information: https://powerspreadsheets.com/excel-vba-column-width/

    Dim iCounter As Long

    With Worksheets("Column width").Range("K5")
        For iCounter = 1 To 3
            .columnWidth = Application.InchesToPoints(1) * (.columnWidth / .Width)
        Next iCounter
    End With

End Sub
Effects of Executing Macro Example
The following GIF illustrates the results of executing this macro example. As expected, VBA sets the width of column K to 1 inch.

#8: Set Column Width in Centimeters
VBA Code to Set Column Width in Centimeters
To set the width of a column in centimeters with VBA, use a macro with the following statement structure:
With Worksheet.Range("A1CellReference")
    For Counter = 1 To 3
        .ColumnWidth = Application.CentimetersToPoints(ColumnWidthCentimeters) * (.ColumnWidth / .Width)
    Next Counter
End With
Process Followed by VBA Code
 specify column width in centimeters 3 times” width=”683″ height=”192″>
VBA Statement Explanation
Lines #1 and #5: With Worksheet.Range(“A1CellReference”) | End With
- Item: With… End With.
- VBA Construct: With… End With statement.
- Description: Statements within the With… End With statement (lines # through #4 below) are executed on the Range object returned by item #3 below.
- Item: Worksheet.
- VBA Construct: Workbook.Worksheets property.
- Description: Returns a Worksheet object representing the worksheet you work with.
- Item: Range(“A1CellReference”).
- VBA Construct: Worksheet.Range property.
- Description: Returns a Range object representing a cell within the column whose width you set. You specify the cell using an A1-style cell reference (A1CellReference) enclosed within quotations (“”).
Lines #2 and #4: For Counter = 1 To 3 | Next Counter
- Item: For… Next Counter.
- VBA Construct: For… Next statement.
- Description: Repeats the statement within the loop (line #3 below) 3 times, as required by item #3 below.
- Item: Counter.
- VBA Construct: Counter of For… Next statement.
- Description: Loop counter. If you explicitly declare a variable to represent the loop counter, use the Long data type.
- Item: 1 To 3.
- VBA Construct: Counter Start (1) and Counter End (3) of For… Next statement.
- Description: The statement within the loop (line #3 below) is executed 3 times (1 To 3).
- Theoretically, line #3 below should be enough to set the column width in centimeters without requiring the loop specified by these lines #2 and #4. In practice, this may not be the case. Some tests suggest that repeating line #3 below (or similar) 3 times generally gets you the closest to the specified column width.
Line #3: .ColumnWidth = Application.CentimetersToPoints(ColumnWidthCentimeters) * (.ColumnWidth / .Width)
- Item: .ColumnWidth.
- VBA Construct: Range.ColumnWidth property.
- Description:
- Sets the width of the column containing the Range object within the opening statement of the With… End With block (line #1, item #3 above).
- .ColumnWidth is included twice in the statement. In this first mention, (.ColumnWidth = …), ColumnWidth is the property to which a value is assigned. The value assigned to the ColumnWidth property is the value returned by the other items within this statement.
- Item: Application.CentimetersToPoints.
- VBA Construct: Application.CentimetersToPoints method.
- Description: Converts the measurement specified by item #3 below from centimeters to points.
- Item: ColumnWidthCentimeters.
- VBA Construct: Centimeters parameter of Application.CentimetersToPoints method.
- Description: Specifies the width (in centimeters) of the columns containing the Range object within the opening statement of the With… End With block (line #1, item #3 above).
- If you explicitly declare a variable to represent ColumnWidthCentimeters, use a numeric data type that can handle the value you use to specify the column width in centimeters.
- Item: .ColumnWidth.
- VBA Construct: Range.ColumnWidth property.
- Description:
- Returns the width of the column containing the Range object within the opening statement of the With… End With block (line #1, item #3 above).
- .ColumnWidth is included twice in the statement. In this second mention, (.ColumnWidth), ColumnWidth returns the current value of the property.
- The ColumnWidth property returns the column width in units based on the size (width) of the font you use in the Normal style (for example, Calibri 11). Therefore, 1 unit of column width is equal to 1 character of the Normal style font. If your Normal style font is a proportional (not fixed-width) font, Excel considers the width of the character “0” (the number zero).
- Item: .Width.
- VBA Construct: Range.Width property.
- Description:
- Returns the width of the column containing the Range object within the opening statement of the With… End With block (line #1, item #3 above).
- The Width property returns the column width in points.
- Item: (.ColumnWidth / .Width).
- VBA Construct: Numeric expression.
- Description:
- Both ColumnWidth (item #4 above) and Width (item #5 above) return the width of the column containing the Range object within the opening statement of the With… End With block (line #1, item #3 above).
- The units in which ColumnWidth and Width return the column width differ.
- ColumnWidth expresses the column width in units based on the size (width) of the font you use in the Normal style.
- Width expresses the column width in points.
- ColumnWidth divided by Width (.ColumnWidth / .Width) returns the factor by which you must multiply the desired column width expressed in centimeters/points (items #2 and #3 above) to obtain the appropriate column width in units based on the size (width) of the font you use in the Normal style. In other words, this expression converts Application.CentimetersToPoints(ColumnWidthCentimeters) from points to the units required by the ColumnWidth property.
Macro Example
The following macro sets the width of column L of the worksheet named “Column width” to 1 centimeter.
Sub columnWidthCentimeters()

    'Source: https://powerspreadsheets.com/
    'For further information: https://powerspreadsheets.com/excel-vba-column-width/

    Dim iCounter As Long

    With Worksheets("Column width").Range("L5")
        For iCounter = 1 To 3
            .columnWidth = Application.CentimetersToPoints(1) * (.columnWidth / .Width)
        Next iCounter
    End With

End Sub
Effects of Executing Macro Example
The following GIF illustrates the results of executing this macro example. As expected, VBA sets the width of column L to 1 centimeter.
