
In this tutorial, you will learn how to Export Excel Spreadsheet with Django. You will learn how to do read-write operations on excel sheets. Styling Excel spreadsheet with XLWT Library. And writing to Existing Excel Workbook using XLWT.
From this tutorial, you will learn how to – export to excel, excel export, django download excel file, django-excel tutorial, export data to excel,create excel file, generate excel file. From this tutorial you will learn how to –
Exporting Data to Excel is a very common task for many web applications. We can export the data from the database to an Excel Spreadsheet. Python uses the in-built CSV Library, which makes exporting CSV files very easy. But for export Excel Sheet, we will be using the XLWT library. It is the library to generate spreadsheet files compatible with Microsoft Excel versions 95 to 2019.
Following tutorial you will learn:
- Simple Excel Write Operation
- Styling your Excel Sheet with XLWT
- Writing to Existing Workbook using XLWT, XLRD, XLUTILS
Installing Required Libraries for Django Excel Export:
pip install xlwt
pip install xlutils    # Required when reading excel file
pip install xlrd       # Required when reading excel file
Quick Django Application Setup for Django Export to Excel
mkdir django_excel
cd django_excel
virtualenv env
. env/bin/activate
pip install django
django-admin startproject django_excel .
django-admin startapp excel_app
Open your settings.py file and add app name, which we have created with the name excel_app
INSTALLED_APPS = [
    ...,

    'excel_app', # <- this
]
Create a View to display all html code
from django.views.generic.base import TemplateView

class CSVPageView(TemplateView):
    template_name = "excel_home.html"
excel_app/templates/excel_home.html
<!DOCTYPE html>
<html>
<head><title>Excel Examples</title></head>
<body>
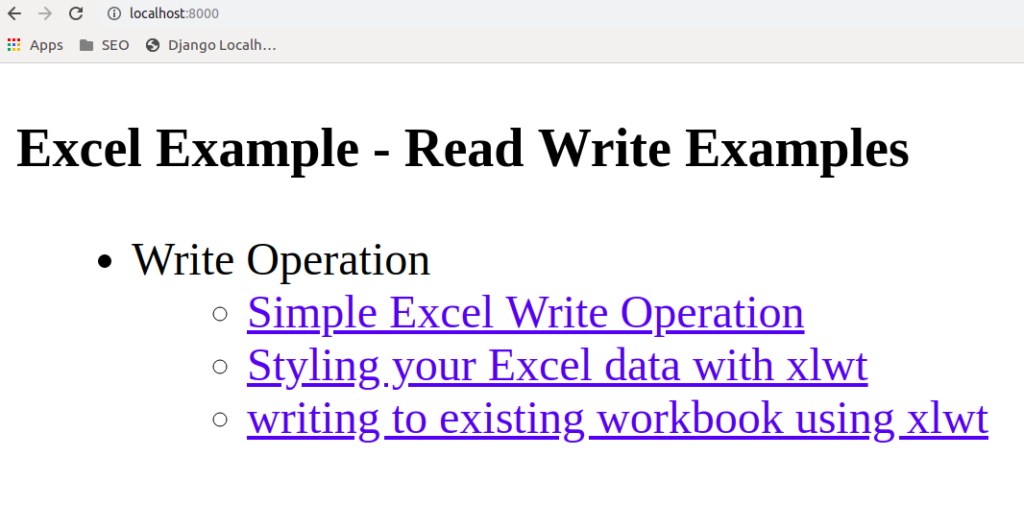
<h3>Excel Example - Read Write Examples</h3>
<ul>
<li>Write Operation
<ul>
<li>
<a href="{% url 'export_excel' %}">Simple Excel Write Operation</a>
</li>
<li>
<a href="{% url 'export_styling_excel' %}">Styling your Excel data with xlwt</a>
</li>
<li>
<a href="{% url 'export_write_xls' %}">writing to existing workbook using xlwt </a>
</li>
</ul>
</li>
</ul>
</body>
</html>
Note: if you run the above file it will give an error because we have not created URLs. We are going to create those URLs below in Read/Write operation code.
Create a file named urls.py in your excel_app folder and the code. Note the URLs of these apps can be created here.
# django_excel/urls.py
from django.contrib import admin
from django.urls import path

from excel_app import views

urlpatterns = [
    path('admin/', admin.site.urls),

    path('', views.ExcelPageView.as_view(), name='home'),
]
Before getting started, learn some code explanation of XLWT Library.
Python XLWT Library Code Explanation
HttpResponse(content_type='application/ms-excel')– This tells browsers that the document is an MS-EXCEL file, instead of an HTML file.response['Content-Disposition'] = 'attachment; filename="users.xls"'– This contains CSV filename and downloads files with that name.wb = xlwt.Workbook(encoding='utf-8')– Creating a Workbook of encoding utf-8ws = wb.add_sheet('Users Data')– Creating a Sheet named “Users Data” and all the data will be written inside this sheet.wb.save(response)– Saving the workbook and Excel file will automatically get downloaded.
Export Django QuerySet to Excel Spreadsheet
The code will export User Model Data like username, first last name, email to Excel Sheet.
# excel_app/views.py

import xlwt
from django.http import HttpResponse
from django.contrib.auth.models import User

def export_users_xls(request):
    response = HttpResponse(content_type='application/ms-excel')
    response['Content-Disposition'] = 'attachment; filename="users.xls"'

    wb = xlwt.Workbook(encoding='utf-8')
    ws = wb.add_sheet('Users Data') # this will make a sheet named Users Data

    # Sheet header, first row
    row_num = 0

    font_style = xlwt.XFStyle()
    font_style.font.bold = True

    columns = ['Username', 'First Name', 'Last Name', 'Email Address', ]

    for col_num in range(len(columns)):
        ws.write(row_num, col_num, columns[col_num], font_style) # at 0 row 0 column

    # Sheet body, remaining rows
    font_style = xlwt.XFStyle()

    rows = User.objects.all().values_list('username', 'first_name', 'last_name', 'email')
    for row in rows:
        row_num += 1
        for col_num in range(len(row)):
            ws.write(row_num, col_num, row[col_num], font_style)

    wb.save(response)

    return response
 # django_excel/urls.py
...
urlpatterns = [
    ...,
    path('export/excel', views.export_users_xls, name='export_excel'),
]
Export XLS File using XLWT Library With Styling
The code will explain how to Style your Excel File. The bellow code will explain Wrap text in the cell, background color, border, and text color.
# excel_app/views.py
import xlwt
from django.http import HttpResponse

def export_styling_xls(request):
    response = HttpResponse(content_type='application/ms-excel')
    response['Content-Disposition'] = 'attachment; filename="users.xls"'

    wb = xlwt.Workbook(encoding='utf-8')
    ws = wb.add_sheet('Styling Data') # this will make a sheet named Users Data - First Sheet
    styles = dict(
        bold = 'font: bold 1',
        italic = 'font: italic 1',
        # Wrap text in the cell
        wrap_bold = 'font: bold 1; align: wrap 1;',
        # White text on a blue background
        reversed = 'pattern: pattern solid, fore_color blue; font: color white;',
        # Light orange checkered background
        light_orange_bg = 'pattern: pattern fine_dots, fore_color white, back_color orange;',
        # Heavy borders
        bordered = 'border: top thick, right thick, bottom thick, left thick;',
        # 16 pt red text
        big_red = 'font: height 320, color red;',
    )

    for idx, k in enumerate(sorted(styles)):
        style = xlwt.easyxf(styles[k])
        ws.write(idx, 0, k)
        ws.write(idx, 1, styles[k], style)

    wb.save(response)

    return response
 # django_excel/urls.py
...
urlpatterns = [
    ...,
    path('export/excel-styling', views.export_styling_xls, name='export_styling_excel'),
]
Writing to existing Excel workbook using XLWT
The bellow code will explain how to write data in Exisiting excel file and the content inside it.
# excel_app/views.py

from xlutils.copy import copy # http://pypi.python.org/pypi/xlutils
from xlrd import open_workbook # http://pypi.python.org/pypi/xlrd
import xlwt
from django.http import HttpResponse
import os

def export_write_xls(request):
    response = HttpResponse(content_type='application/ms-excel')
    response['Content-Disposition'] = 'attachment; filename="users.xls"'

    # EG: path = excel_app/sample.xls
    path = os.path.dirname(__file__)
    file = os.path.join(path, 'sample.xls')

    rb = open_workbook(file, formatting_info=True)
    r_sheet = rb.sheet_by_index(0)

    wb = copy(rb)
    ws = wb.get_sheet(0)

    row_num = 2 # index start from 0
    rows = User.objects.all().values_list('username', 'first_name', 'last_name', 'email')
    for row in rows:
        row_num += 1
        for col_num in range(len(row)):
            ws.write(row_num, col_num, row[col_num])

    # wb.save(file) # will replace original file
    # wb.save(file + '.out' + os.path.splitext(file)[-1]) # will save file where the excel file is
    wb.save(response)
    return response
 # django_excel/urls.py
...
urlpatterns = [
    ...,
    path('export/export-write-xls', views.export_write_xls, name='export_write_xls'),
]
GitHub Code Django Export to Excel – Run Example Locally
It is also available on GitHub – https://github.com/studygyaan/How-to-Export-Excel-File-With-Django
Clone the Repository –
git clone https://github.com/studygyaan/How-to-Export-Excel-File-With-Django.git
Change Directory
cd How-to-Export-Excel-File-With-Django
Create Virtual Environment – VirtualENV
virtualenv env
Activate Virtual Environment
source env/bin/activate
Run requirement.txt file to install libraries using Pip3
pip3 install -r requirements.txt
Run the server
python3 manage.py runserver
And open http://localhost:8000/ in your browser.
Motivation
As business requirements evolve, certain features are expected to evolve as well. That was the case for me few days ago when I had to implement a feature where Django model’s data are converted to .xlsx excel format and sent, as attachment, to a provided email address literally. It was a big problem for me to figure out how to do this with that file extension as most available solutions were using the old .xls excel file extension and none really talked about sending excel file as attachments of an email sent via Django. To solve this problem, I looked at a similar solution by Vitor Freitas who used xlwt to export Django model’s data to .xls excel file format and served it as response data to the user for download. Though a great companion, I needed a different file extension and was solving a slightly different problem. From further research, I came across Working with Excel Files in Python, from Working with Spreadsheets using Python, which recommended openpyxl for «reading and writing Excel 2010 files (ie: .xlsx)» so I decided to try the package out. This experience birthed this article where I utilized coingecko’s api to periodically fetch cryptocurrency’s coin’s data, store the data in a database, and then display as well as allow users to extract the data to excel files sent to any email address provided. It’s my deepest hope that you will find it helpful.
Assumptions
-
It is assummed that readers are pretty familiar with Django and JavaScript as well as the typed extension of Python using mypy,
typingbuilt-in module, and the rules by PEP8. -
You should also be familiar with writing tests for Django models, methods, views, celery tasks, and functions. You don’t have to be militant at that though.
-
Knowledge of HTML, and CSS (and its frameworks — Bootstrap for this project) is also assumed.
Source code
The entire source code for this article can be accessed via:
Sirneij
/
django_excel
Exporting Django model data as excel file (.xlsx) using openpyxl library
django_excel
![]()

This repository accompanies this tutorial on dev.to. It has been deployed to heroku and can be accessed live via this link.
Run locally
It can be run locally by creating a virtual environment using any of venv, poetry, virtualenv, and pipenv. I used virtualenv while developing the app. Having created the virtual environment, activate it and install the project’s dependencies by issuing the following command in your terminal:
(env) sirneij@pop-os ~/D/P/T/django_excel (main)> pip install -r requirements.txt
Enter fullscreen mode
Exit fullscreen mode
Then, migrate the database:
(env) sirneij@pop-os ~/D/P/T/django_excel (main)> python manage.py migrate
Enter fullscreen mode
Exit fullscreen mode
Thereafter, run the project:
(env) sirneij@pop-os ~/D/P/T/django_excel (main)> python manage.py run
Enter fullscreen mode
Exit fullscreen mode
Run tests locally
To run the tests, run the following in your terminal:
(env) sirneij@pop-os ~/D/P/T/django_excel (main)> py.test --nomigrations --reuse-db -W error::RuntimeWarning --cov=core --cov-report=html tests/
Enter fullscreen mode
Exit fullscreen mode
Aside this, the application is live and can be accessed via https://django-excel-export.herokuapp.com/.
Implementation
Step 1: Start a project, an application, and configure settings
To incept building out the project, create a directory for it — mine was django_excel — start a virtual environment, start a django project — called mine django_excel as well — and create a django application — my app was named core. Then proceed to opening your project’s settings in your preferred IDE/text editor. Add the following configurations:
# django_excel -> settings.py
...
from pathlib import Path
from typing import Any

# add these lines for python-decouple and celery.
from celery.schedules import crontab
from decouple import Csv, config
...

INSTALLED_APPS: list[str] = [
    'django.contrib.admin',
    'django.contrib.auth',
    'django.contrib.contenttypes',
    'django.contrib.sessions',
    'django.contrib.messages',
    'django.contrib.staticfiles',
    'core.apps.CoreConfig', # add your app
]
...

TEMPLATES: list[dict[str, Any]] = [
    {
        'BACKEND': 'django.template.backends.django.DjangoTemplates',
        'DIRS': [BASE_DIR / 'templates'], # configure your templates
        'APP_DIRS': True,
        'OPTIONS': {
            'context_processors': [
                'django.template.context_processors.debug',
                'django.template.context_processors.request',
                'django.contrib.auth.context_processors.auth',
                'django.contrib.messages.context_processors.messages',
            ],
        },
    },
]
...

STATIC_ROOT: str = BASE_DIR / 'staticfiles' # add static_root for deployment purposes

...

# Configure celery broker_url and other configurations
CELERY_BROKER_URL: str = config('REDIS_URL', default='amqp://localhost')
CELERY_RESULT_BACKEND: str = config('REDIS_URL', default='')
CELERY_ACCEPT_CONTENT: list[str] = ['application/json']
CELERY_TASK_SERIALIZER: str = 'json'
CELERY_RESULT_SERIALIZER: str = 'json'


# From celery 5.0, this is how to schedule tasks. Though we have not created them yet but it will come in handy
CELERY_BEAT_SCHEDULE: dict[str, dict[str, Any]] = {
    'get_coins_data_from_coingecko_and_store': {
        'task': 'core.tasks.get_coins_data_from_coingecko_and_store',
        'schedule': crontab(minute='*/1'),
    },
}

# For testing purposes, we need to set these.
CELERY_ALWAYS_EAGER = True
CELERY_EAGER_PROPAGATES = True
BROKER_BACKEND = 'memory'

# Email configuration
ADMINS = (('Admin', config('EMAIL_HOST_USER', default='no-reply@django_excel.herokuapp.com')),)

# We use the console to send emails during development and real email in production
if DEBUG:
    EMAIL_BACKEND = 'django.core.mail.backends.console.EmailBackend'
else:
    EMAIL_BACKEND = 'django.core.mail.backends.smtp.EmailBackend'
    EMAIL_HOST_USER = config('EMAIL_HOST_USER', default='')
    EMAIL_HOST = 'smtp.gmail.com'
    EMAIL_PORT = 587
    EMAIL_USE_TLS = True
    EMAIL_HOST_PASSWORD = config('EMAIL_HOST_PASSWORD', default='')

# Basic security and database settings for production ready applications
if not DEBUG:
    import dj_database_url

    # ==============================================================================
    # SECURITY SETTINGS
    # ==============================================================================

    CSRF_COOKIE_SECURE = True
    CSRF_COOKIE_HTTPONLY = True

    SECURE_HSTS_SECONDS = 60 * 60 * 24 * 7 * 52  # one year
    SECURE_HSTS_INCLUDE_SUBDOMAINS = True
    SECURE_SSL_REDIRECT = True
    SECURE_BROWSER_XSS_FILTER = True
    SECURE_CONTENT_TYPE_NOSNIFF = True
    SECURE_PROXY_SSL_HEADER = ('HTTP_X_FORWARDED_PROTO', 'https')

    SESSION_COOKIE_SECURE = True

    db_from_env = dj_database_url.config(conn_max_age=500)
    DATABASES['default'].update(db_from_env)
Enter fullscreen mode
Exit fullscreen mode
Though the snippets above tend to be handful, they are just some basic configurations to set up our system for development and production environments. Comments are appended to shed light on what they do. If you ain’t familiar with typed python, no worries. We specify the type of a variable in python using the following pattern:
# variable_name: variable_type = default_value, for example

ALLOWED_HOSTS: list[str] = config('ALLOWED_HOSTS', default='127.0.0.1,localhost', cast=Csv())
Enter fullscreen mode
Exit fullscreen mode
Since our ALLOWED_HOSTS variable is a list of strings, we specified this by using list[str]. One of the generic types in python.
Moving forward, let’s bring in celery. In the same directory as your settings.py file, create a file named celery.py and make it look like:
# django_excel -> celery.py
import os

from celery import Celery
from django.conf import settings

# Set the default Django settings module for the 'celery' program.
os.environ.setdefault('DJANGO_SETTINGS_MODULE', 'django_excel.settings')

app = Celery('django_excel')
app.config_from_object('django.conf:settings', namespace='CELERY')

# Load task modules from all registered Django apps.
app.autodiscover_tasks()

if settings.DEBUG:

    @app.task(bind=True)
    def debug_task(self):
        """Debug method."""
        print(f'Request: {self.request!r}')
Enter fullscreen mode
Exit fullscreen mode
That was lifted from django celery documentation with few modifications to suit our project. Then proceed to the __init__.py file in that same directory and turn it into:
# django_excel -> __init__.py

# This will make sure the app is always imported when
# Django starts so that shared_task will use this app.
from .celery import app as celery_app

__all__ = ('celery_app',)
Enter fullscreen mode
Exit fullscreen mode
Also lifted from the same source. The comments on top say it all.
Before taking a break from configurations, let’s visit our root urls.py file:
...
# django_excel -> urls.py

from django.contrib import admin
from django.urls import include, path # add include

urlpatterns = [
    path('admin/', admin.site.urls),
    path('', include('core.urls', namespace='core')), # include our app's urls.py file
]
Enter fullscreen mode
Exit fullscreen mode
Ensure you create a urls.py file in your core app. That’s it with configurations. Now to the next step.
Step 2: Define your model, views and write your tasks.
Let’s go on to create our model. Open your app’s models.py file in your editor and fill it with:
# core -> models.py

from django.db import models


class Coins(models.Model):
    name = models.CharField(max_length=200, null=True)
    symbol = models.CharField(max_length=200, null=True)
    image_url = models.URLField(null=True)
    current_price = models.DecimalField(decimal_places=2, max_digits=50, null=True)
    price_change_within_24_hours = models.DecimalField(decimal_places=2, max_digits=50, null=True)
    rank = models.IntegerField(null=True)
    market_cap = models.DecimalField(decimal_places=2, max_digits=50, null=True)
    total_supply = models.DecimalField(decimal_places=2, max_digits=50, null=True)

    def __str__(self) -> str:
        """Return model string representation."""
        return f'{self.name} - {self.symbol}'
Enter fullscreen mode
Exit fullscreen mode
We are interested in the coins’s name, symbol, image, current_price, price_change_within_24_hours, rank, market_cap, and total_supply. Coingecko’s api provides more fields but those are our current interests. You can now makemigrations and migrate but ensure you install all the dependencies we have introduced. This project’s repository has a requirements.txt file with all of them.
Now, create a tasks.py file in your app’s directory and make it look like:
# core -> tasks.py

from io import BytesIO

import requests
from celery import shared_task
from decouple import config
from django.conf import settings
from django.core.mail import EmailMessage
from django.utils import timezone
from openpyxl import Workbook
from openpyxl.styles import Alignment, Font, Protection

from core.models import Coins
from core.templatetags.custom_tags import currency


@shared_task
def get_coins_data_from_coingecko_and_store() -> None:
    """Fetch data from coingecko api and store."""
    base_url = 'https://api.coingecko.com/api/v3/coins/'
    market_currency_order = 'markets?vs_currency=ngn&order=market_cap_desc&'
    per_page = 'per_page=250&page=1&sparkline=false'
    final_url = f'{base_url}{market_currency_order}{per_page}'

    coin_data = requests.get(final_url).json()

    for data in coin_data:
        coin, _ = Coins.objects.get_or_create(name=data['name'], symbol=data['symbol'])
        coin.image_url = data['image']
        coin.current_price = data['current_price']
        coin.price_change_within_24_hours = data['price_change_24h']
        coin.rank = data['market_cap_rank']
        coin.market_cap = data['market_cap']
        coin.total_supply = data['total_supply']
        coin.save()


@shared_task
def export_data_to_excel(user_email: str) -> None:
    """Send extracted model data and save in excel and send to email."""
    excelfile = BytesIO()
    workbook = Workbook()
    workbook.remove(workbook.active)
    worksheet = workbook.create_sheet(title='Latest Cryptocurrency Coins Data', index=1)
    workbook.security.workbookPassword = config('PASSWORD', default='12345data')
    workbook.security.lockStructure = config('PROTECT', default=True, cast=bool)
    workbook.security.revisionsPassword = config('PASSWORD', default='12345data')
    worksheet.protection.sheet = config('PROTECT', default=True, cast=bool)
    worksheet.protection.formatCells = config('PROTECT', default=False, cast=bool)

    worksheet.sheet_properties.tabColor = '1072BA'
    worksheet.freeze_panes = 'I2'

    coin_queryset = Coins.objects.all().order_by('rank')
    columns = ['Name', 'Symbol', 'Rank', 'Current price', 'Price change', 'Market cap', 'Total supply']
    row_num = 1

    # Assign the titles for each cell of the header
    for col_num, column_title in enumerate(columns, 1):
        cell = worksheet.cell(row=row_num, column=col_num)
        cell.value = column_title
        cell.alignment = Alignment(horizontal='center', vertical='center', wrap_text=True)
        cell.font = Font(bold=True)
    # Iterate through all coins
    for _, coin in enumerate(coin_queryset, 1):
        row_num += 1

        # Define the data for each cell in the row
        row = [
            coin.name,
            f'{coin.symbol}'.upper(),
            coin.rank,
            currency(coin.current_price),
            currency(coin.price_change_within_24_hours),
            currency(coin.market_cap),
            coin.total_supply,
        ]

        # Assign the data for each cell of the row
        for col_num, cell_value in enumerate(row, 1):
            cell = worksheet.cell(row=row_num, column=col_num)
            cell.value = cell_value
            cell.protection = Protection(locked=True)
    workbook.save(excelfile)
    now = timezone.now()
    message = EmailMessage(
        f'Coin data as of {now.date().isoformat()}',
        f'Generated at: {now.isoformat()}',
        settings.DEFAULT_FROM_EMAIL,
        [user_email],
    )
    message.attach('latest-coin-list.xlsx', excelfile.getvalue(), 'application/vnd.ms-excel')
    message.send()
Enter fullscreen mode
Exit fullscreen mode
The first task, get_coins_data_from_coingecko_and_store, does exactly what its name implies — get coin’s data from coingecko api and store them in our database. It uses the requests library to achieve this. After getting the data, it loops through them and uses Django’s get_or_create QuerySet api to get a coin data from the database using it’s name and symbol. If such data doesn’t exist, it creates it and update the created intance with other data from the api. Since this task is periodic — we want it to run automatically at a specified time — it was appended to our CELERY_BEAT_SCHEDULE earlier:
# django_excel -> settings.py
...
CELERY_BEAT_SCHEDULE: dict[str, dict[str, Any]] = {
    'get_coins_data_from_coingecko_and_store': {
        'task': 'core.tasks.get_coins_data_from_coingecko_and_store',
        'schedule': crontab(minute='*/1'),
    },
}
...
Enter fullscreen mode
Exit fullscreen mode
We gave it a name, which is the normal name we defined it as, and gave the thorough path where it can be found 'core.tasks.get_coins_data_from_coingecko_and_store'. Then it was scheduled to run every 1 minute.
Pretty simple huh?!
The next and major task — export_data_to_excel — does the extraction of data to excel format. First, it instantiated a temporary memory to hold the excel file before sending using BytesIO. You could use StringIO as well but I favour the former. Then, an openpyxl Workbook was created. By default, after this initialization, a woorksheet instance active is created but since I just didn’t want to work with that, I removed it and created mine using workbook.create_sheet(title='Latest Cryptocurrency Coins Data', index=1). create_sheet takes a compulsory argument title but I also included the index I want the wooksheet to occupy. Since I am security conscious and don’t want anyone to fiddle with my excel data anyhow without my permission, I decided to lock the workbook and provided password incase some changes are inevitable. From experience, immediately worksheet.protection.sheet is set to True, your Microsoft excel toolbar will be grayed out. To prevent this, we set worksheet.protection.formatCells to True. Also, since we will be working with hundreds of coins and scrolling downwards might make us lose focus on the columns being investigated, I decided to make the colum headers fixed so that even when scrolling, you still see them. To achieve this, you go one cell more than the total header colum’s row and column. Take for instance, if your headers have four colums, ['A', 'B', 'C', 'D'], to fix them, I will stop at the fifth column, 'E', and second row, '2'. So that my worksheet.freeze_panes will be set to E2. Got it? Cool 😎! Next, we defined our queryset and the colums we are interested in. Then, we start from row number one since openpyxl starts its row number from 1 unlike xlwt. We then iterate through these colums and populate the worksheet cell at each combination of row and column (row 1 and dynamic columns in this case since our row remains at 1). We also align the texts and bold them as well. You can do so much than those. Thanks to openpyxl 👏! After that, we iterated through the entire QuerySet previously defined. In each iteration, we first increment the row number so that previous rows won’t be overriden and then populate each cell (a combination of row and colum) with their respective value. Double for loop 😨. There is a more nifty way to do this but I settled for this nonetheless. After populating the cells, I saved the workbook in the artificial memory created earlier and then sent the mail with the excel file as attachment. To get the excel file from the temporary memory, we used the .getvalue() method shipped with BytesIO. It’s also available for StringIO. We also gave the file a name, latest-coin-list.xlsx and a type application/vnd.ms-excel. As far as I know, they are important for easy encoding and decoding by your e-mail service provider. That was mouthful 🤤!
Next is our views.py file.
# core -> views.py

import json

from django.http import HttpRequest, HttpResponse, JsonResponse
from django.shortcuts import render

from core.models import Coins
from core.tasks import export_data_to_excel


def index(request: HttpRequest) -> HttpResponse:
    """Index view."""
    coins = Coins.objects.all().order_by('rank')
    context: dict[str, str] = {
        'coin_data': coins,
    }
    return render(request, 'coin_data.html', context)


def extract_and_send_coin_data_via_email(request: HttpRequest) -> JsonResponse:
    """Handle the post requests for sending emails."""
    if request.method == 'POST':
        request_data = json.loads(request.body)
        email = request_data['userEmail']
        export_data_to_excel.delay(email)
        return JsonResponse({'message': 'Coins data successfully extracted 💃!'}, status=200)

    return JsonResponse({'message': 'Coins data failed to be extracted 😔!'}, status=500)
Enter fullscreen mode
Exit fullscreen mode
Nothing much, just the normal function-based views. The first serves our templates and the other handles any export requests. It’s basically an API endpoint that utilizes the export_data_to_excel task we discussed above. Notice that I didn’t get my request data from request.POST.get(). This is because I used pure asynchronous fetch API to send post requests and data was passed via body option of the Request object as shown in the template:
<!--teamplates -> coin_data.html-->
{% load custom_tags %}
<!DOCTYPE html>
<html lang="en">
<head>
<meta charset="UTF-8" />
<meta http-equiv="X-UA-Compatible" content="IE=edge" />
<meta name="viewport" content="width=device-width, initial-scale=1.0" />
<title>Cryptocurrency Coins Data</title>
<link
href="https://cdn.jsdelivr.net/npm/bootstrap@5.1.3/dist/css/bootstrap.min.css"
rel="stylesheet"
integrity="sha384-1BmE4kWBq78iYhFldvKuhfTAU6auU8tT94WrHftjDbrCEXSU1oBoqyl2QvZ6jIW3"
crossorigin="anonymous"
/>
<style>
.header {
position: sticky;
top: 0;
}
.table-wrapper {
width: 100%;
height: 80vh;
overflow: auto;
}
.form {
margin: auto;
width: 50%;
}
@media (max-width: 990px) {
.form {
width: 100%;
}
}
</style>
</head>
<body>
<div class="container">
<form class="row mt-3 mb-2 form">
{% csrf_token %}
<div class="input-group">
<input
class="form-control"
type="email"
name="email"
id="email"
placeholder="Email address, e.g. django_excel@johnspeaks.com"
required
/>
<div class="input-group-append">
<button
title="Export data and send to my email address."
class="btn btn-success"
type="submit"
>
Export data
</button>
</div>
</div>
</form>
{% if coin_data %}
<div class="table-wrapper table-responsive">
<table class="table table-striped table-hover">
<thead style="position: sticky; top: 0" class="table-dark">
<tr>
<th class="header" scope="col">Logo</th>
<th class="header" scope="col">Name</th>
<th class="header" scope="col">Symbol</th>
<th class="header" scope="col">Rank</th>
<th class="header" scope="col">Current price</th>
<th class="header" scope="col">Price change</th>
<th class="header" scope="col">Market cap</th>
<th class="header" scope="col">Total supply</th>
</tr>
</thead>
<tbody>
{% for coin in coin_data %}
<tr>
<td><img src="{{coin.image_url}}" height="50" /></td>
<td class="align-middle">{{coin.name}}</td>
<td class="align-middle">{{coin.symbol | upper}}</td>
<td class="align-middle">{{coin.rank}}</td>
<td class="align-middle">{{coin.current_price | currency}}</td>
<td class="align-middle">
{{coin.price_change_within_24_hours | currency}}
</td>
<td class="align-middle">{{coin.market_cap | currency}}</td>
<td class="align-middle">{{coin.total_supply}}</td>
</tr>
{% endfor %}
</tbody>
</table>
</div>
{% else %}
<h3 class="text-center justify-content-center">
No coin data currently...
</h3>
{% endif %}
<footer class="py-1 my-2 d-flex justify-content-center">
<p class="text-center text-muted">
© <span id="year"></span>
<a
href="http://github.com/sirneij"
target="_blank"
rel="noopener noreferrer"
>
Idogun, John owolabi
</a>
</p>
.
</footer>
</div>
<script
src="https://cdn.jsdelivr.net/npm/bootstrap@5.1.3/dist/js/bootstrap.bundle.min.js"
integrity="sha384-ka7Sk0Gln4gmtz2MlQnikT1wXgYsOg+OMhuP+IlRH9sENBO0LRn5q+8nbTov4+1p"
crossorigin="anonymous"
></script>
<script>
document.getElementById('year').innerHTML = new Date().getFullYear();
document
.querySelector('.form')
.addEventListener('submit', async (event) => {
await event.preventDefault();
if (
!window.confirm(
'Are you sure you want to extract this data and send to the email provided?'
)
) {
return;
}
const csrftoken = await document.querySelector(
'[name=csrfmiddlewaretoken]'
).value;
const userEmail = await document.querySelector('[name=email]').value;
const data = await JSON.stringify({
userEmail: userEmail,
});
const response = await fetch("{% url 'core:extract_data' %}", {
method: 'POST',
headers: {
'X-CSRFToken': csrftoken,
'Content-Type': 'application/json',
charset: 'utf-8',
},
mode: 'same-origin',
body: data,
});
const responseData = await response.json();
if (response.ok) {
alert(responseData.message);
window.location = location.href;
} else {
alert(responseData.message);
}
});
</script>
</body>
</html>
Enter fullscreen mode
Exit fullscreen mode
Edit your app’s urls.py to reflect these changes:
# core -> urls.py

from django.urls import path

from core import views

app_name: str = 'core'

urlpatterns = [
    path('', views.index, name='index'),
    path('extract-data-to-excel/', views.extract_and_send_coin_data_via_email, name='extract_data'),
]
Enter fullscreen mode
Exit fullscreen mode
Run your server now and navigate to 127.0.0.1:8000 in your browser. Did you see something? Yeah, you must see No coin data currently... That’s because you don’t have any data currently in your database. To have data, you need to run our celery task which is responsible for fetching data from coingecko API. To run it, open another terminal which has your virtual environment activated and issue this command:
(virtualenv) sirneij@pop-os ~/D/P/T/django_excel (main)> celery -A django_excel worker -l info -B
Enter fullscreen mode
Exit fullscreen mode
If your project name isn’t django_excel, please modify that command appropriately. Now, you should see some streams of request and response 😊. If you now visit your browser after 1 minute, you should see something 💃!!!
Step 3: Testing, testing, and testing.
For almost a year now, I have been a strong proponent of TDD. That’s because I struggled to adjust to that style initially but it’s proved kinda awesome now. Try it out, it’s worth the stress sometimes! From the foregoing, let’s write some tests 😂! In your root directory, create a new folder named tests and make the folder look like:
tests/
├── core
│   ├── __init__.py
│   ├── test_models.py
│   ├── test_tasks.py
│   └── test_views.py
└── __init__.py
Enter fullscreen mode
Exit fullscreen mode
We will be using pytest and it’s django package to run our tests. You can delete core/tests.py. In tests/core/test_models.py, let have something like:
# tests -> core -> test_models.py
from django.test import TestCase

from core.models import Coins


class CoinsModelTests(TestCase):
    def setUp(self) -> None:
        """Create the setup of the test."""
        self.coin = Coins.objects.create(name='bitcoin', symbol='btc')

    def test_unicode(self) -> None:
        """Test the model's __str__ method"""
        self.assertEqual(str(self.coin), f'{self.coin.name} - {self.coin.symbol}')
Enter fullscreen mode
Exit fullscreen mode
We are just checking if our unicode or string representation is correctly formatted. If we’d had bigger application structure, factory would have been great for this.
Also, populate tests/core/test_tasks.py with:
# tests -> core -> test_tasks.py
from unittest.mock import patch

from django.core import mail
from django.test import TestCase

from core.models import Coins
from core.tasks import export_data_to_excel, get_coins_data_from_coingecko_and_store


class CoinTasksTests(TestCase):
    def test_get_coins_data_from_coingecko_and_store(self):
        '''Test get_coins_data_from_coingecko_and_store.'''

        with patch('core.tasks.requests.get') as mock_get:
            mock_get.return_value.coin_data = [
                {
                    'symbol': 'btc',
                    'name': 'Bitcoin',
                    'image': 'https://assets.coingecko.com/coins/images/1/large/bitcoin.png?1547033579',
                    'current_price': 12644080,
                    'market_cap': 240714282203755,
                    'market_cap_rank': 1,
                    'price_change_24h': 197155,
                    'total_supply': 21000000.0,
                }
            ]

            get_coins_data_from_coingecko_and_store()

        mock_get.assert_called_once()

    def test_export_data_to_excel(self):
        '''Test export_data_to_excel task.'''
        Coins.objects.create(
            name='bitcoin', symbol='btc', current_price=12000000, price_change_within_24_hours=500, market_cap=210000000
        )
        Coins.objects.create(
            name='etherum', symbol='eth', current_price=12000000, price_change_within_24_hours=500, market_cap=210000000
        )
        Coins.objects.create(
            name='xrp', symbol='xrp', current_price=12000000, price_change_within_24_hours=500, market_cap=210000000
        )

        export_data_to_excel('admin@django_excel.com')

        self.assertEqual(len(mail.outbox), 1)
        self.assertEqual(mail.outbox[0].to, ['admin@django_excel.com'])
Enter fullscreen mode
Exit fullscreen mode
In these tests, we introduced the concept of mocking. It’s used to ‘mock’ some behaviour that might otherwise be dependent on network calls or availability of the external API being called. Though this test doesn’t guarantee 100% test coverage as I would have wanted but it does well above 80%. And finally, tests/core/test_views.py:
# tests -> core -> test_views.py

from unittest.mock import patch

from django.test import Client, TestCase
from django.urls import reverse


class IndexViewTests(TestCase):
    def setUp(self) -> None:
        """Create the setup of the test."""
        self.client = Client()

    def test_context(self) -> None:
        """Test index context and template."""
        response = self.client.get(reverse('core:index'))
        self.assertEqual(response.templates[0].name, 'coin_data.html')


class ExtractAndSendCoinDataViaEmailTests(TestCase):
    def setUp(self) -> None:
        """Create the setup of the test."""
        self.client = Client()
        self.data = {'userEmail': 'django_excel@django.com'}

    def test_extract_and_send_coin_data_via_email_success(self):
        """Test extract and send extracted data."""

        with patch('core.views.export_data_to_excel.delay') as mock_export_data_to_excel:
            response = self.client.post(reverse('core:extract_data'), self.data, content_type='application/json')

        self.assertEqual(response.status_code, 200)
        mock_export_data_to_excel.assert_called_once()

    def test_extract_and_send_coin_data_via_email_failure(self):
        response = self.client.get(reverse('core:extract_data'), self.data, content_type='application/json')
        self.assertEqual(response.status_code, 500)
Enter fullscreen mode
Exit fullscreen mode
We also used mocking to mimick our export_data_to_excel task. It should be noted that setting the following is important to really test celery tasks:
# django_excel -> settings.py
...
CELERY_ALWAYS_EAGER = True
CELERY_EAGER_PROPAGATES = True
BROKER_BACKEND = 'memory'
...
Enter fullscreen mode
Exit fullscreen mode
That brings us to the end of this surjourn 😎! Thanks for sticking around.
Bonus point
This article’s repository has some other files to provide a more complete project. There are codes for currency custom filter, pytest configurations, some CI/CD using GitHub actions, code inspection to ensure all best practices are taken into consideration. You can go through them when you are opportune to.
Outro
Enjoyed this article? Consider contacting me for a job, something worthwhile or buying a coffee ☕. You can also connect with/follow me on LinkedIn. Also, it isn’t bad if you help share it for wider coverage. I will appreciate…
i have this in my template :
<table>
<tr><td>book_id</td><td>book name</td><td>book_author</td></tr>
{% for book in books %}
<tr><td>{{ book.book_id }}</td><td>{{ book.book_name }}</td><td>{{ book.book_author }}</td></tr>
{% endfor %}
</table>
<a href="/export">Export to Excel !</a>
my view seems to be like this:
def export_excel(request):
    books = Book.objects.all()
    response = HttpResponse(books , content_type='application/vnd.ms-excel;charset=utf-8')
    response['Content-Disposition'] = 'attachment; filename="books.xls"'
    return response
And here is mu url in urls.py:
url(r'^export$', 'export_excel', name='export_excel'),
It export books in file that named books.xls and the probleme here is that it export them as «Book objects» in the first square (A1)
what should i do if i want to make every «book_attribute» in separate square and every «book» in separate line ?
asked Apr 12, 2013 at 14:08
![]()
You’re sending something called «books.xls», and correctly signalling that it’s an Excel spreadsheet… but it isn’t. You’ve completely missed the step of actually creating an Excel spreadsheet containing your data (which is probably 80% of the work here).
Try searching the web for how to create an excel spreadsheet in Python.
answered Apr 12, 2013 at 14:20
![]()
user9876user9876
10.9k6 gold badges44 silver badges66 bronze badges
Working Example using tablib, an excellent tabular dataset library.
    from django.http import HttpResponse
    import tablib

            headers = ('Book', 'Author')
            data = []
            data = tablib.Dataset(*data, headers=headers)
            books = Book.objects.all()
            for book in books:
                data.append((book.book_name, book.author))
            response = HttpResponse(data.xls, content_type='application/vnd.ms-excel;charset=utf-8')
            response['Content-Disposition'] = "attachment; filename=export.xls"

        return response
answered Aug 26, 2013 at 7:41
![]()
Ryu_hayabusaRyu_hayabusa
3,6162 gold badges29 silver badges32 bronze badges
I think the problem is that you just simply pass a list of Book object to your export file.
books = Book.objects.all()
This line just returns a list of objects.
I think you may want to iterate each property of Book object.
Replace each Book Object with a tuple with all field displayed.
The hard way is to do something like
books_list = map(lambda x: (x.book_id, x.book_name, ….all the field of Book), books)
And you pass the books_list to export file instead of books.
answered Apr 12, 2013 at 14:16
![]()
Jerry MengJerry Meng
1,4463 gold badges21 silver badges40 bronze badges
def export_excel(request):
    books = Book.objects.all()
    response = HttpResponse(books , content_type='application/vnd.ms-excel;charset=utf-8')
    response['Content-Disposition'] = 'attachment; filename="books.xls"'

    writer = csv.writer(response)
    writer.writerow(['Book', 'Author'])
    for book in books:
        writer.writerow([book.book_name, book.author])

    return response
answered Apr 12, 2013 at 14:37
![]()
catherinecatherine
22.4k12 gold badges61 silver badges84 bronze badges
A solution using my plugin: django_excel
import djang_excel as excel
import pyexcel.ext.xls # in order to handle 'xls' format
# import pyexcel.ext.xlsx # in order to handle 'xlsx' format
# import pyexcel.ext.ods # in order to handle 'ods' format


def export_excel(self, request):
    # Book as django model, 'xls' as file format
    response = excel.make_response_from_a_table(Book, 'xls')
    response['Content-Disposition'] = 'attachment; filename="books.xls"'
    return response
answered Feb 16, 2015 at 10:39
![]()
chfwchfw
4,4822 gold badges27 silver badges31 bronze badges
Contents
- Introduction
- Creating a working environment
- How to serve a file for download
- How to create an Excel file
- How to add title and headers
- How to write data
- How to resize rows and columns
- How to add formulas
- How to add charts
- Line charts
- Column charts
- Pie charts
- Conclusions

Web Developer at ASSIST
The computing scientist’s main challenge is not to get confused by the complexities of his own making. — E. W. Dijkstra
Introduction
When creating a web management application, many clients require pages which display statistics. Usually this feature comes along with the option to download the data in an Excel and/or PDF format. Therefore, this tutorial will show you how to create an Excel document and make it available for download in a Python/Django application.
Creating a working environment
First of all, when working with Django applications it is advised to create an environment (with virualenv) and install all the modules in that environment. This practice is very useful when you’re working on different websites that don’t use the same versions.
Speaking of modules, in this example we will be using:
- Python 2.7
- Django 1.8.2
- XlsxWriter 0.7.3
In order to expose the features brought by the XlsxWriter module, we created a simple Python/Django application, which is available for download on Github. It consists of saving weather data for multiple towns. The user can add towns and weather information through the Django Admin interface, which is generated automatically. The front page for this website displays the current weather for the available towns. Moreover, the site contains a page that presents the weather history data:
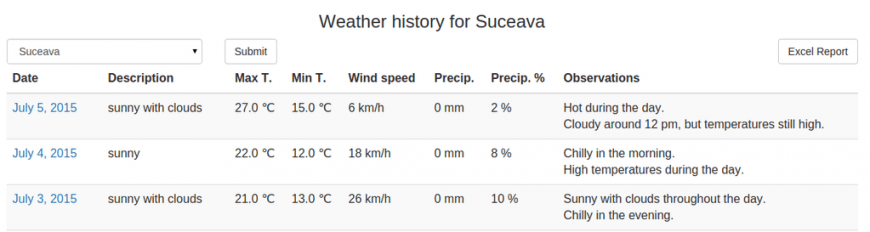
The user can filter the data by town, like in the above image, or select the default option which shows the history for all the towns. You can notice that there is an “Excel Report” button, hence, that is the button that will trigger the Excel file download.
How to serve a file for download
To begin with, in the HTML file there is a form that contains the “Excel Report” button. Therefore, in the corresponding Django view we receive the request to download ‘excel’. Thus, we have to send the file to the user and we can do this through the following code. The result is that the user receives a file named “Report.xlsx”:
if 'excel' in request.POST:
    response = HttpResponse(content_type='application/vnd.ms-excel')
    response['Content-Disposition'] = 'attachment; filename=Report.xlsx'
    xlsx_data = WriteToExcel(weather_period, town)
    response.write(xlsx_data)
    return response
The “WriteToExcel” function is responsible for creating the Excel file. It has two parameters:
- weather_period, that represents the data after the filtering, we will utilize it for writing information in the file;
- town, its default value is None and is used in case the user selects a town for filtering.
There are two options for writing the excel logic: either in the view or, like in this example, in a different file (named “excel_utils.py”). The second option offers a more clean and modular code.
How to create an Excel file
The next step is to add code to the “WriteToExcel” function and we will be doing that by using the XlsxWriter module. The following code will create a blank Excel file.
import StringIO
import xlsxwriter

def WriteToExcel(weather_data, town=None):
    output = StringIO.StringIO()
    workbook = xlsxwriter.Workbook(output)

    # Here we will adding the code to add data

    workbook.close()
    xlsx_data = output.getvalue()
    # xlsx_data contains the Excel file
    return xlsx_data
How to add title and headers
Before adding any actual data to the file, we can create a table in the Excel, which includes a title and some headers. The code associated with this implementation consists of:
- Adding a working Sheet:
worksheet_s = workbook.add_worksheet("Summary")
- Creating styles which can be used later when we will be adding the data. For example, we may want a bigger font size for the title, to make it to bold or we can add a color background for the headers:
title = workbook.add_format({
    'bold': True,
    'font_size': 14,
    'align': 'center',
    'valign': 'vcenter'
})
header = workbook.add_format({
    'bg_color': '#F7F7F7',
    'color': 'black',
    'align': 'center',
    'valign': 'top',
    'border': 1
})
- Adding a title that is written along more columns. In order to implement this you can use the merge_range function, along with serving the columns, the text and the title style already defined:
title_text = u"{0} {1}".format(ugettext("Weather History for"), town_text)
worksheet_s.merge_range('B2:H2', title_text, title)
- Adding the headers which actually means writing text to some cells:
worksheet_s.write(4, 0, ugettext("No"), header)
worksheet_s.write(4, 1, ugettext("Town"), header)
worksheet_s.write(4, 3, ugettext(u"Max T. (℃)"), header)
# the rest of the headers from the HTML file
Please note that the code in this article will use ugettext function when defining the texts. This is useful if you will add internationalization to the application. Moreover, keep in mind if you want to use unicode characters (such as “℃” or diacritical marks) you have to add u before the string and also define the encoding at the beginning of the file:
#!/usr/bin/python
# -*- coding: utf-8 -*-
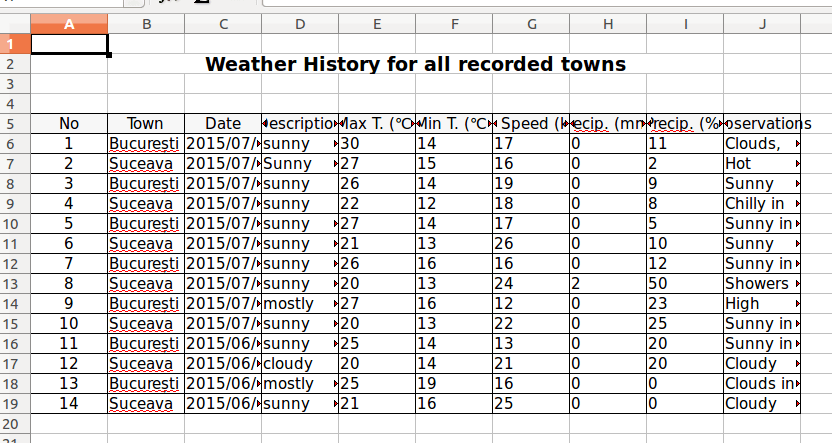
The result for the code added up till now is:

But there is a problem, some texts do not fit the columns, thus are not completely visible. The article will tackle this issue in the “How to resize rows and columns” section.
How to write data
After adding a new style for the cells, the data can be added through a simple loop which will write it to the corresponding columns:
for idx, data in enumerate(weather_data):
    row = 5 + idx
    worksheet_s.write_number(row, 0, idx + 1, cell_center)
    worksheet_s.write_string(row, 1, data.town.name, cell)
    worksheet_s.write(row, 2, data.date.strftime('%d/%m/%Y'), cell_center)
    # the rest of the data
In order to avoid creating an additional variable that would be incremented on each loop, we can use the python enumerate feature which automatically returns the index and the object from the list. You can observe that the idx variable is used for writing the value in the Number column. Furthermore, it is used to define a row variable, which along with a column value, determines where the data is written in the Excel file.
Following these modifications the file looks like:
How to resize rows and columns
In previous sections, there was an issue with the width of the rows. This problem can have multiple solutions, depending on the desired results:
1. The columns can have a constant width. Suitable examples for this case are Date, Temperature, Wind and Precipitation columns. Thus, the code from below displays the change for Wind column. This line can be added after or even before the loop that adds the data.
worksheet_s.set_column('G:G', 10)
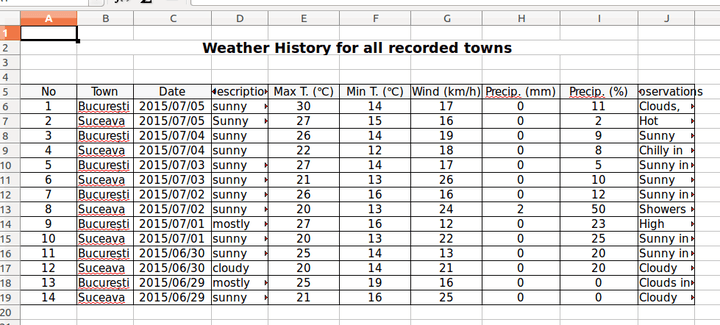
Adding this setting to all the columns that suit this solution, modifies the Excel file as follows:
2. The columns can adapt their width according to the data that they contain, in this instance: Town and Description. These values have a maximum length constraint in the database. Therefore, we can set a column width according to the biggest length of all the data:
description_col_width = 10
# ...
for idx, data in enumerate(weather_data):
    # ...
    worksheet_s.write_string(row, 3, data.description, cell)
    if len(data.description) > description_col_width:
        description_col_width = len(data.description)
    # ...
worksheet_s.set_column('D:D', description_col_width)
In this situation it is paramount to set the column options after the loop. Below is an image depicting how the Excel file changed:

3. The column can have a constant width, but the row height can vary. The last column, Observations, is where we can apply this condition. In this exercise, the width will be 25, meaning that we will consider that one row cannot have more than 25 characters:
observations_col_width = 25
# ...
for idx, data in enumerate(weather_data):
    # ...
    observations = data.observations.replace('r', '')
    worksheet_s.write_string(row, 9, observations, cell)
    observations_rows = compute_rows(observations, observations_col_width)
    worksheet_s.set_row(row, 15 * observations_rows)
# ...
worksheet_s.set_column('J:J', observations_col_width)
You can notice that the number of rows is computed using a function, named “compute_rows” (its parameters are the text and the column width):
def compute_rows(text, width):
    if len(text) < width:
        return 1
    phrases = text.replace('r', '').split('n')

    rows = 0
    for phrase in phrases:
        if len(phrase) < width:
            rows = rows + 1
        else:
            words = phrase.split(' ')
            temp = ''
            for idx, word in enumerate(words):
                temp = temp + word + ' '
                # check if column width exceeded
                if len(temp) > width:
                    rows = rows + 1
                    temp = '' + word + ' '
                # check if it is not the last word
                if idx == len(words) - 1 and len(temp) > 0:
                    rows = rows + 1
    return rows
Now, the Excel file looks like:

As you can observe, there are cells that have extra rows. This happens due to the fact that the letters do not have the same width; so even though the number of characters exceeds the set maximum, the text fits in less than the expected space. This solution only simulates an Auto Fit option. As a result, some extra rows may appear when the text has a large number of characters.
How to add formulas
Formulas are very useful when presenting statistical data. For instance, in this example, we could compute averages or sums for the suitable columns. The following code implements the average for Max temperatures:
from django.db.models import Avg, Sum

def WriteToExcel(weather_data, town=None):
    # ...
    max_temp_avg = Weather.objects.all().aggregate(Avg('max_temperature'))
    worksheet_s.write_formula(
        row, 4, '=average({0}{1}:{0}{2})'.format('E', 6, row),
        cell_center, max_temp_avg['max_temperature__avg'])
The formula is added using the write_formula functions which has 5 parameters, three of them are mandatory: row, column, a string defining the formula and the other two are optional: cell style and the computed value (it is useful to add this because when opening the file with an Excel Viewer it will display 0 instead of the expected result).
The file now has another row of data at the end of the table:

How to add charts
Prior to adding code regarding to the charts, we are going to add 2 new working sheets: one for the charts and one where we will be adding the data used for them:
worksheet_c = workbook.add_worksheet("Charts")
worksheet_d = workbook.add_worksheet("Chart Data")
Secondly, we require a purpose for each one of the charts.
Line charts
In this case, we could use a line chart in order to show temperature data for the towns along a certain amount of time.
First step is to add a chart object:
line_chart = workbook.add_chart({'type': 'line'})
Afterwards we have to add the data on the “Charts Data” sheet and read it in order to add series to the chart:
line_chart.add_series({
    'categories': '=Chart Data!$A1:$A${0}'.format(len(dates)),
    'values': '=Chart Data!${0}${1}:${0}${2}'
    .format(letter_max_t, 1, len(data)),
    'marker': {'type': 'square'},
    'name': u"{0} {1}".format(ugettext("Max T."), t.name)
})
The code from above can be written in a loop which would add this line for all the towns. Also, you can notice the fact that the values for categories and values will be read from the “Chart Data” sheet.
Further steps include:
- setting a title
line_chart.set_title({'name': ugettext("Maximum and Minimum Temperatures")})
- adding options for the x axis, for instance, the labels can contain strings instead of numbers:
line_chart.set_x_axis({
    'text_axis': True,
    'date_axis': False
})
- adding options for the y axis, for example, we can add measuring units for the temperature values:
line_chart.set_y_axis({
    'num_format': u'## ℃'
})
- including the chart on the “Charts” Sheet, where we have the option to change the scale. This can be considered as the last step.
worksheet_c.insert_chart('B2', line_chart, {'x_scale': 2, 'y_scale': 1})
The visible changes in the Excel files:
- a new sheet containing the chart

- a new sheet containing data

Column charts
In order to expose the usability of the column charts we are going to display the maximum and minimum value for wind speed for each of the available towns.
The workflow is identical to the previous chart, however, when creating the new chart object we have to change its type:
bar_chart = workbook.add_chart({'type': 'column'})
Next step is to make aggregations on the data, add it onto the data sheet and then create the series. For example the series for the maximum values is:
bar_chart.add_series({
    'name': 'Max Speed',
    'values': '=Chart Data!${0}${1}:${0}${2}'
    .format(chr(ord('A') + cell_index + 1), 1, len(towns)),
    'categories': '=Chart Data!${0}${1}:${0}${2}'
    .format(chr(ord('A') + cell_index), 1, len(towns)),
    'data_labels': {'value': True, 'num_format': u'#0 "km/h"'}
})
You can notice that we added some formatting to the data labels as well. After adding the title and inserting it into the charts sheet, we can observe the result:

Pie charts
This time, we will create a pie chart object, which present the percentage of hot, warm and cold days:
pie_chart = workbook.add_chart({'type': 'pie'})
Like in the previous examples, we have to aggregate the data, write it in the Excel and add the corresponding series:
pie_chart.add_series({
    'name': ugettext('Temperature statistics'),
    'values': '=Chart Data!${0}${1}:${0}${2}'
    .format(chr(ord('A') + cell_index), 1, 3),
    'categories': '=Chart Data!${0}${1}:${0}${2}'
    .format(chr(ord('A') + cell_index + 1), 1, 3),
    'data_labels': {'percentage': True}
})
The main difference from the other charts is that the values are automatically calculated as percentages.
After inserting the chart on the worksheet we have the following result:

Conclusions
In conclusion, when creating a Python/Django application that requires to export Excel files, XlsxWriter is a very useful module. You can access the official docs for this module where you will find further features and options to add.
Moreover, you can access the whole code for this application on Github. Hopefully it will help many developers learn how to export Excel files in a Python/Django properly.
In this article, the main subject was creating an Excel file in a Python/Django application. In a future article the attention will be drawn to PDF, another way to export data.
* The Excel files from the screenshots were opened with LibreOffice
UPDATE: In this article, the main subject was creating an Excel file in a Python/Django application. If you want to export PDF files check this article written by our colleague Petru.
In this tutorial, we will learn how to Export Data from the Database into Excel using Django. In this Django application, I used the pandas library.
Let’s start
Install pandas library
First create a Django project, then create models
models.py
from django.db import models
from django import forms

class tbl_Employee(models.Model):
  #  Id = models.IntegerField()
    Empcode = models.CharField(max_length=10, default='')
    firstName = models.CharField(max_length=150,null=True)
    middleName = models.CharField(max_length=100,null=True)
    lastName = models.CharField(max_length=100,null=True)
    email = models.CharField(max_length=30,null=True)
    phoneNo = models.CharField(max_length=12, default='',null=True)
    address = models.CharField(max_length=500, default='',null=True)
    exprience = models.CharField(max_length=50, default='',null=True)
    DOB = models.DateField(null=True, blank=True)
    gender = models.CharField(max_length=10, default='',null=True)
    qualification = models.CharField(max_length=50,default='',null=True)


    def __str__(self):
        return self.firstName

    objects = models.Manager()
let's migrate model
python manage.py makemigrations
python manage.py migrate
forms.py
from django import forms

from crispy_forms.helper import FormHelper
from crispy_forms.layout import Layout, Div, Submit, Row, Column, Field

from .models import  tbl_Employee

class EmployeeRegistration(forms.ModelForm):
    class Meta:
        model = tbl_Employee
        fields =[ 'Empcode','firstName','middleName','lastName','email','phoneNo' ,'address','exprience',
                  'DOB','gender','qualification'
        ]
Then let’s write a code in views.py to create function Export data from database into excel .
Views.py
from .models import tbl_Employee
import datetime as dt
import pandas as pd
import os
from django.conf import settings
from django.core.files.storage import FileSystemStorage

import csv

def export_users_csv(request):


    if request.method == 'POST':
        response = HttpResponse(content_type='text/csv')
        response['Content-Disposition'] = 'attachment; filename="EmployeeData.csv"'
        writer = csv.writer(response)
        writer.writerow(['Employee Detail'])


        writer.writerow(['Employee Code','Employee Name','Relation Name','Last Name','gender','DOB','e-mail','Contact No' ,'Address' ,'exprience','Qualification'])

        users = tbl_Employee.objects.all().values_list('Empcode','firstName' , 'middleName' , 'lastName','gender','DOB','email','phoneNo' ,'address','exprience','qualification')

        for user in users:
            writer.writerow(user)
        return response

    return render(request, 'exportexcel.html')
then add the path to the urls file
urls.py
from django.urls import path
from . import views

urlpatterns = [
    path("",views.base,name="base"),
    path("user_login/",views.user_login,name="user_login"),


    path('export_users_csv/', views.export_users_csv,name="export_users_csv"),


]
Create a template folder in the root directory or app directory and a create html file named exportexcel.html
<link rel="stylesheet" href="https://stackpath.bootstrapcdn.com/bootstrap/4.1.3/css/bootstrap.min.css" integrity="sha384-MCw98/SFnGE8fJT3GXwEOngsV7Zt27NXFoaoApmYm81iuXoPkFOJwJ8ERdknLPMO" crossorigin="anonymous">
{% block content %}
<div class="shadow-lg continer">
<form method="post" enctype="multipart/form-data">
    {% csrf_token %}

    <div class="row">
        <div class="col-md-6 col-xs-12">
          <div class="x_panel">
            <div class="x_title">
              <h2>Data Export</h2>

              <div class="clearfix"></div>
            </div>
            <div class="x_content">
<div class="row">
              <div class="col-md-8 col-sm-12 col-xs-12 form-group">
                <label class="control-label col-md-3 col-sm-3 col-xs-6" for="name">Company<span class="required">*</span>
                </label>

              </div>
            </div>
              <button type="submit" class="btn btn-success" >Export</button>
                            </div>
                        </div>
                    </div>
                </div>
  </form>
  </div>

{% endblock %}
Then execute command
Python manage.py runserver

Django package for exporting data to Excel file with included admin integration.
Note that this is not a django app.
class UserTable(Table):
    id = Column(header_name="ID", width=20)
    name = Column(header_name="Name", width=20)
    birth_date = Column(width=20)
    favorite_songs = Column(width=50, attr="get_favorite_songs")

    class Meta(TableMeta):
        model = User
        columns = [
            "id",
            "name",
            "birth_date",
            "favorite_songs"
        ]
        header_style = Style(bold=True, font_size=20, height=50, background_color=colors.SEA_GREEN,
                             font_color=colors.WHITE)
        row_style = Style(bold=False, font_size=20, height=20)
        none_text = "-"
class UserExcelExporter(ModelExcelExporter):
    table_class = UserTable
    file_name = "users"
    sheet_name = "main"
    style_compression = 2
    include_row_number = True
exporter = UserExcelExporter()
exporter.generate(queryset=User.objects.all())
exporter.save()