
I have a django app in which excel file is generated at server side and I want that to be downloaded at client.
I am sending request through Ajax call in JavaScript that goes to server generates excel which needs to be downloaded.
The view should generate http response that sends excel file to html that could be downloaded to a file at client
asked May 21, 2017 at 18:09
![]()
INDERINDER
3431 gold badge4 silver badges15 bronze badges
It’s not as complicated as you may think. In fact, as I understand, you have a Django model and you need to export some instances’ data in an .xlsx file for example.
I’d suggest the following simple solution:
import openpyxl
from openpyxl.utils import get_column_letter
from django.http.response import HttpResponse

def method(request, **kwargs):
    queryset = ModelName.objects.filter()   # adjust accordingly

    response = HttpResponse(content_type='application/vnd.openxmlformats-officedocument.spreadsheetml.sheet')
    response['Content-Disposition'] = 'attachment; filename=this-is-your-filename.xlsx'
    wb = openpyxl.Workbook()
    ws = wb.get_active_sheet()
    ws.title = "Your Title"

    row_num = 0

    columns = [
        ("ID", 5),
        (u'Name', 20),
    ]

    for col_num in range(len(columns)):
        c = ws.cell(row=row_num + 1, column=col_num + 1)
        c.value = columns[col_num][0]
        ws.column_dimensions[get_column_letter(col_num + 1)].width = columns[col_num][1]

    for obj in queryset:
        row_num += 1
        row = [
            obj.pk,
            obj.name,
        ]
        for col_num in range(len(row)):
            c = ws.cell(row=row_num + 1, column=col_num + 1)
            c.value = row[col_num]

    wb.save(response)
    return response
Please keep in mind that you need to install with pip install openpyxl the openpyxl lib first.
answered May 21, 2017 at 18:23
![]()
6
I had to complete this exact task and ended up using the following method. Instead of using an AJAX call, I just do
window.location.pathname = "/relative/path/to/url/"
within Javascript click handler for the button.
Within Django, I am using the following code (I am using XlsxWriter but you could use whatever you wish for creating XLSX file):
    excel_file = BytesIO()
    workbook = xlsxwriter.Workbook(excel_file)

    # Code to populate the workbook

    # Here comes the magic
    workbook.close()
    excel_file.seek(0)
    response = HttpResponse(excel_file.read(),
                            content_type='application/vnd.openxmlformats-officedocument.spreadsheetml.sheet')
    response['Content-Disposition'] = 'attachment; filename=somename.xlsx'
    return response
When called this way, the created Excel file is downloaded and the user remains on the calling page, which is the exact behavior I wanted.
answered Feb 25, 2020 at 23:28
![]()
LNILNI
2,8532 gold badges21 silver badges23 bronze badges
Contents
- Introduction
- Creating a working environment
- How to serve a file for download
- How to create an Excel file
- How to add title and headers
- How to write data
- How to resize rows and columns
- How to add formulas
- How to add charts
- Line charts
- Column charts
- Pie charts
- Conclusions

Web Developer at ASSIST
The computing scientist’s main challenge is not to get confused by the complexities of his own making. — E. W. Dijkstra
Introduction
When creating a web management application, many clients require pages which display statistics. Usually this feature comes along with the option to download the data in an Excel and/or PDF format. Therefore, this tutorial will show you how to create an Excel document and make it available for download in a Python/Django application.
Creating a working environment
First of all, when working with Django applications it is advised to create an environment (with virualenv) and install all the modules in that environment. This practice is very useful when you’re working on different websites that don’t use the same versions.
Speaking of modules, in this example we will be using:
- Python 2.7
- Django 1.8.2
- XlsxWriter 0.7.3
In order to expose the features brought by the XlsxWriter module, we created a simple Python/Django application, which is available for download on Github. It consists of saving weather data for multiple towns. The user can add towns and weather information through the Django Admin interface, which is generated automatically. The front page for this website displays the current weather for the available towns. Moreover, the site contains a page that presents the weather history data:
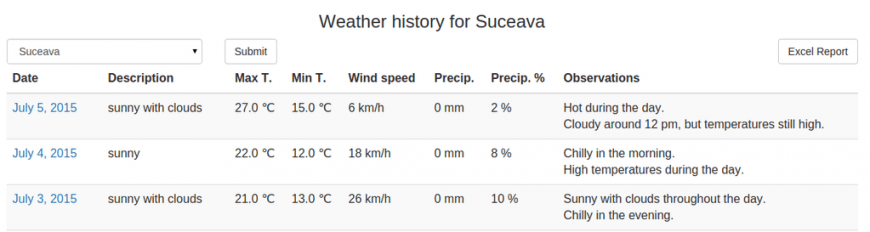
The user can filter the data by town, like in the above image, or select the default option which shows the history for all the towns. You can notice that there is an “Excel Report” button, hence, that is the button that will trigger the Excel file download.
How to serve a file for download
To begin with, in the HTML file there is a form that contains the “Excel Report” button. Therefore, in the corresponding Django view we receive the request to download ‘excel’. Thus, we have to send the file to the user and we can do this through the following code. The result is that the user receives a file named “Report.xlsx”:
if 'excel' in request.POST:
    response = HttpResponse(content_type='application/vnd.ms-excel')
    response['Content-Disposition'] = 'attachment; filename=Report.xlsx'
    xlsx_data = WriteToExcel(weather_period, town)
    response.write(xlsx_data)
    return response
The “WriteToExcel” function is responsible for creating the Excel file. It has two parameters:
- weather_period, that represents the data after the filtering, we will utilize it for writing information in the file;
- town, its default value is None and is used in case the user selects a town for filtering.
There are two options for writing the excel logic: either in the view or, like in this example, in a different file (named “excel_utils.py”). The second option offers a more clean and modular code.
How to create an Excel file
The next step is to add code to the “WriteToExcel” function and we will be doing that by using the XlsxWriter module. The following code will create a blank Excel file.
import StringIO
import xlsxwriter

def WriteToExcel(weather_data, town=None):
    output = StringIO.StringIO()
    workbook = xlsxwriter.Workbook(output)

    # Here we will adding the code to add data

    workbook.close()
    xlsx_data = output.getvalue()
    # xlsx_data contains the Excel file
    return xlsx_data
How to add title and headers
Before adding any actual data to the file, we can create a table in the Excel, which includes a title and some headers. The code associated with this implementation consists of:
- Adding a working Sheet:
worksheet_s = workbook.add_worksheet("Summary")
- Creating styles which can be used later when we will be adding the data. For example, we may want a bigger font size for the title, to make it to bold or we can add a color background for the headers:
title = workbook.add_format({
    'bold': True,
    'font_size': 14,
    'align': 'center',
    'valign': 'vcenter'
})
header = workbook.add_format({
    'bg_color': '#F7F7F7',
    'color': 'black',
    'align': 'center',
    'valign': 'top',
    'border': 1
})
- Adding a title that is written along more columns. In order to implement this you can use the merge_range function, along with serving the columns, the text and the title style already defined:
title_text = u"{0} {1}".format(ugettext("Weather History for"), town_text)
worksheet_s.merge_range('B2:H2', title_text, title)
- Adding the headers which actually means writing text to some cells:
worksheet_s.write(4, 0, ugettext("No"), header)
worksheet_s.write(4, 1, ugettext("Town"), header)
worksheet_s.write(4, 3, ugettext(u"Max T. (℃)"), header)
# the rest of the headers from the HTML file
Please note that the code in this article will use ugettext function when defining the texts. This is useful if you will add internationalization to the application. Moreover, keep in mind if you want to use unicode characters (such as “℃” or diacritical marks) you have to add u before the string and also define the encoding at the beginning of the file:
#!/usr/bin/python
# -*- coding: utf-8 -*-
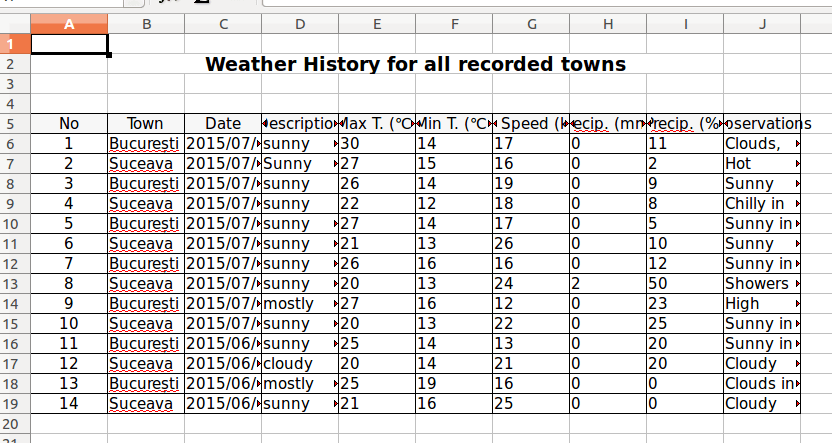
The result for the code added up till now is:

But there is a problem, some texts do not fit the columns, thus are not completely visible. The article will tackle this issue in the “How to resize rows and columns” section.
How to write data
After adding a new style for the cells, the data can be added through a simple loop which will write it to the corresponding columns:
for idx, data in enumerate(weather_data):
    row = 5 + idx
    worksheet_s.write_number(row, 0, idx + 1, cell_center)
    worksheet_s.write_string(row, 1, data.town.name, cell)
    worksheet_s.write(row, 2, data.date.strftime('%d/%m/%Y'), cell_center)
    # the rest of the data
In order to avoid creating an additional variable that would be incremented on each loop, we can use the python enumerate feature which automatically returns the index and the object from the list. You can observe that the idx variable is used for writing the value in the Number column. Furthermore, it is used to define a row variable, which along with a column value, determines where the data is written in the Excel file.
Following these modifications the file looks like:
How to resize rows and columns
In previous sections, there was an issue with the width of the rows. This problem can have multiple solutions, depending on the desired results:
1. The columns can have a constant width. Suitable examples for this case are Date, Temperature, Wind and Precipitation columns. Thus, the code from below displays the change for Wind column. This line can be added after or even before the loop that adds the data.
worksheet_s.set_column('G:G', 10)
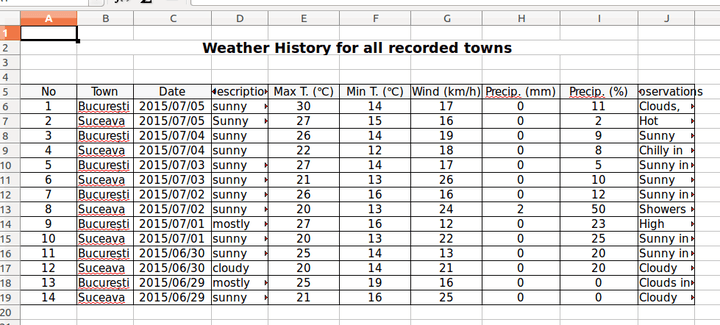
Adding this setting to all the columns that suit this solution, modifies the Excel file as follows:
2. The columns can adapt their width according to the data that they contain, in this instance: Town and Description. These values have a maximum length constraint in the database. Therefore, we can set a column width according to the biggest length of all the data:
description_col_width = 10
# ...
for idx, data in enumerate(weather_data):
    # ...
    worksheet_s.write_string(row, 3, data.description, cell)
    if len(data.description) > description_col_width:
        description_col_width = len(data.description)
    # ...
worksheet_s.set_column('D:D', description_col_width)
In this situation it is paramount to set the column options after the loop. Below is an image depicting how the Excel file changed:

3. The column can have a constant width, but the row height can vary. The last column, Observations, is where we can apply this condition. In this exercise, the width will be 25, meaning that we will consider that one row cannot have more than 25 characters:
observations_col_width = 25
# ...
for idx, data in enumerate(weather_data):
    # ...
    observations = data.observations.replace('r', '')
    worksheet_s.write_string(row, 9, observations, cell)
    observations_rows = compute_rows(observations, observations_col_width)
    worksheet_s.set_row(row, 15 * observations_rows)
# ...
worksheet_s.set_column('J:J', observations_col_width)
You can notice that the number of rows is computed using a function, named “compute_rows” (its parameters are the text and the column width):
def compute_rows(text, width):
    if len(text) < width:
        return 1
    phrases = text.replace('r', '').split('n')

    rows = 0
    for phrase in phrases:
        if len(phrase) < width:
            rows = rows + 1
        else:
            words = phrase.split(' ')
            temp = ''
            for idx, word in enumerate(words):
                temp = temp + word + ' '
                # check if column width exceeded
                if len(temp) > width:
                    rows = rows + 1
                    temp = '' + word + ' '
                # check if it is not the last word
                if idx == len(words) - 1 and len(temp) > 0:
                    rows = rows + 1
    return rows
Now, the Excel file looks like:

As you can observe, there are cells that have extra rows. This happens due to the fact that the letters do not have the same width; so even though the number of characters exceeds the set maximum, the text fits in less than the expected space. This solution only simulates an Auto Fit option. As a result, some extra rows may appear when the text has a large number of characters.
How to add formulas
Formulas are very useful when presenting statistical data. For instance, in this example, we could compute averages or sums for the suitable columns. The following code implements the average for Max temperatures:
from django.db.models import Avg, Sum

def WriteToExcel(weather_data, town=None):
    # ...
    max_temp_avg = Weather.objects.all().aggregate(Avg('max_temperature'))
    worksheet_s.write_formula(
        row, 4, '=average({0}{1}:{0}{2})'.format('E', 6, row),
        cell_center, max_temp_avg['max_temperature__avg'])
The formula is added using the write_formula functions which has 5 parameters, three of them are mandatory: row, column, a string defining the formula and the other two are optional: cell style and the computed value (it is useful to add this because when opening the file with an Excel Viewer it will display 0 instead of the expected result).
The file now has another row of data at the end of the table:

How to add charts
Prior to adding code regarding to the charts, we are going to add 2 new working sheets: one for the charts and one where we will be adding the data used for them:
worksheet_c = workbook.add_worksheet("Charts")
worksheet_d = workbook.add_worksheet("Chart Data")
Secondly, we require a purpose for each one of the charts.
Line charts
In this case, we could use a line chart in order to show temperature data for the towns along a certain amount of time.
First step is to add a chart object:
line_chart = workbook.add_chart({'type': 'line'})
Afterwards we have to add the data on the “Charts Data” sheet and read it in order to add series to the chart:
line_chart.add_series({
    'categories': '=Chart Data!$A1:$A${0}'.format(len(dates)),
    'values': '=Chart Data!${0}${1}:${0}${2}'
    .format(letter_max_t, 1, len(data)),
    'marker': {'type': 'square'},
    'name': u"{0} {1}".format(ugettext("Max T."), t.name)
})
The code from above can be written in a loop which would add this line for all the towns. Also, you can notice the fact that the values for categories and values will be read from the “Chart Data” sheet.
Further steps include:
- setting a title
line_chart.set_title({'name': ugettext("Maximum and Minimum Temperatures")})
- adding options for the x axis, for instance, the labels can contain strings instead of numbers:
line_chart.set_x_axis({
    'text_axis': True,
    'date_axis': False
})
- adding options for the y axis, for example, we can add measuring units for the temperature values:
line_chart.set_y_axis({
    'num_format': u'## ℃'
})
- including the chart on the “Charts” Sheet, where we have the option to change the scale. This can be considered as the last step.
worksheet_c.insert_chart('B2', line_chart, {'x_scale': 2, 'y_scale': 1})
The visible changes in the Excel files:
- a new sheet containing the chart

- a new sheet containing data

Column charts
In order to expose the usability of the column charts we are going to display the maximum and minimum value for wind speed for each of the available towns.
The workflow is identical to the previous chart, however, when creating the new chart object we have to change its type:
bar_chart = workbook.add_chart({'type': 'column'})
Next step is to make aggregations on the data, add it onto the data sheet and then create the series. For example the series for the maximum values is:
bar_chart.add_series({
    'name': 'Max Speed',
    'values': '=Chart Data!${0}${1}:${0}${2}'
    .format(chr(ord('A') + cell_index + 1), 1, len(towns)),
    'categories': '=Chart Data!${0}${1}:${0}${2}'
    .format(chr(ord('A') + cell_index), 1, len(towns)),
    'data_labels': {'value': True, 'num_format': u'#0 "km/h"'}
})
You can notice that we added some formatting to the data labels as well. After adding the title and inserting it into the charts sheet, we can observe the result:

Pie charts
This time, we will create a pie chart object, which present the percentage of hot, warm and cold days:
pie_chart = workbook.add_chart({'type': 'pie'})
Like in the previous examples, we have to aggregate the data, write it in the Excel and add the corresponding series:
pie_chart.add_series({
    'name': ugettext('Temperature statistics'),
    'values': '=Chart Data!${0}${1}:${0}${2}'
    .format(chr(ord('A') + cell_index), 1, 3),
    'categories': '=Chart Data!${0}${1}:${0}${2}'
    .format(chr(ord('A') + cell_index + 1), 1, 3),
    'data_labels': {'percentage': True}
})
The main difference from the other charts is that the values are automatically calculated as percentages.
After inserting the chart on the worksheet we have the following result:

Conclusions
In conclusion, when creating a Python/Django application that requires to export Excel files, XlsxWriter is a very useful module. You can access the official docs for this module where you will find further features and options to add.
Moreover, you can access the whole code for this application on Github. Hopefully it will help many developers learn how to export Excel files in a Python/Django properly.
In this article, the main subject was creating an Excel file in a Python/Django application. In a future article the attention will be drawn to PDF, another way to export data.
* The Excel files from the screenshots were opened with LibreOffice
UPDATE: In this article, the main subject was creating an Excel file in a Python/Django application. If you want to export PDF files check this article written by our colleague Petru.
django-excel — Let you focus on data, instead of file formats
| Author: | C.W. |
|---|---|
| Source code: | http://github.com/pyexcel-webwares/django-excel.git |
| Issues: | http://github.com/pyexcel-webwares/django-excel/issues |
| License: | New BSD License |
| Released: | |version| |
| Generated: | |today| |
Here is a typical conversation between the developer and the user:
User: "I have uploaded an excel file"
      "but your application says un-supported file format"
Developer: "Did you upload an xlsx file or a csv file?"
User: "Well, I am not sure. I saved the data using "
      "Microsoft Excel. Surely, it must be in an excel format."
Developer: "OK. Here is the thing. I were not told to support"
           "all available excel formats in day 1. Live with it"
           "or delay the project x number of days."
django-excel is based on pyexcel and makes
it easy to consume/produce information stored in excel files over HTTP protocol as
well as on file system. This library can turn the excel data into a list of lists,
a list of records(dictionaries), dictionaries of lists. And vice versa. Hence it
lets you focus on data in Django based web development, instead of file formats.
The idea originated from the common usability problem: when an excel file
driven web application is delivered for non-developer users (ie: team assistant,
human resource administrator etc). The fact is that not everyone knows (or cares)
about the differences between various excel formats: csv, xls, xlsx are all
the same to them. Instead of training those users about file formats, this
library helps web developers to handle most of the excel file
formats by providing a common programming interface. To add a specific excel
file format type to you application, all you need is to install an extra pyexcel
plugin. Hence no code changes to your application and no issues with excel file
formats any more. Looking at the community, this library and its associated ones
try to become a small and easy to install alternative to Pandas.
The highlighted features are:
- excel data import into and export from databases
- turn uploaded excel file directly into Python data structure
- pass Python data structures as an excel file download
- provide data persistence as an excel file in server side
- supports csv, tsv, csvz, tsvz by default and other formats are supported via
the following plugins:
A list of file formats supported by external plugins
| Package name | Supported file formats | Dependencies |
|---|---|---|
| pyexcel-io | csv, csvz [1], tsv, tsvz [2] |
|
| pyexcel-xls | xls, xlsx(read only), xlsm(read only) |
xlrd, xlwt |
| pyexcel-xlsx | xlsx | openpyxl |
| pyexcel-ods3 | ods | pyexcel-ezodf, lxml |
| pyexcel-ods | ods | odfpy |
Dedicated file reader and writers
| Package name | Supported file formats | Dependencies |
|---|---|---|
| pyexcel-xlsxw | xlsx(write only) | XlsxWriter |
| pyexcel-libxlsxw | xlsx(write only) | libxlsxwriter |
| pyexcel-xlsxr | xlsx(read only) | lxml |
| pyexcel-xlsbr | xlsb(read only) | pyxlsb |
| pyexcel-odsr | read only for ods, fods | lxml |
| pyexcel-odsw | write only for ods | loxun |
| pyexcel-htmlr | html(read only) | lxml,html5lib |
| pyexcel-pdfr | pdf(read only) | camelot |
Plugin shopping guide
Since 2020, all pyexcel-io plugins have dropped the support for python version
lower than 3.6. If you want to use any python verions, please use pyexcel-io
and its plugins version lower than 0.6.0.
Except csv files, xls, xlsx and ods files are a zip of a folder containing a lot of
xml files
The dedicated readers for excel files can stream read
In order to manage the list of plugins installed, you need to use pip to add or remove
a plugin. When you use virtualenv, you can have different plugins per virtual
environment. In the situation where you have multiple plugins that does the same thing
in your environment, you need to tell pyexcel which plugin to use per function call.
For example, pyexcel-ods and pyexcel-odsr, and you want to get_array to use pyexcel-odsr.
You need to append get_array(…, library=’pyexcel-odsr’).
Other data renderers
| Package name | Supported file formats | Dependencies | Python versions |
|---|---|---|---|
| pyexcel-text | write only:rst, mediawiki, html, latex, grid, pipe, orgtbl, plain simple read only: ndjson r/w: json |
tabulate | 2.6, 2.7, 3.3, 3.4 3.5, 3.6, pypy |
| pyexcel-handsontable | handsontable in html | handsontable | same as above |
| pyexcel-pygal | svg chart | pygal | 2.7, 3.3, 3.4, 3.5 3.6, pypy |
| pyexcel-sortable | sortable table in html | csvtotable | same as above |
| pyexcel-gantt | gantt chart in html | frappe-gantt | except pypy, same as above |
Footnotes
This library makes information processing involving various excel files as easy as
processing array, dictionary when processing file upload/download, data import into
and export from SQL databases, information analysis and persistence. It uses
pyexcel and its plugins:
- to provide one uniform programming interface to handle csv, tsv, xls, xlsx, xlsm and ods formats.
- to provide one-stop utility to import the data in uploaded file into a database and to export tables in a database as excel files for file download.
- to provide the same interface for information persistence at server side: saving a uploaded excel file to and loading a saved excel file from file system.
Given the existence of pyexcel, what is the reason for django-excel?
1. Speedy file uploads. django-excel help you access the uploaded excel file directly using ExcelMemoryFileUploadHandler and TemporaryExcelFileUploadHandler. MemoryFileUploadHandler holds the uploaded file in memory and django-excel reads the excel data from this memory buffer without caching it onto file system. Meanwhile, TemporaryExcelFileUploadHandler holds the uploaded file in file system and django-excel reads directly from this stream-to-file without extra function calls.
2. Import excel data into database. django-excel uses bulk_insert to import your excel
data into your django Model, which is very efficient.
Installation
You can install django-excel via pip:
$ pip install django-excel
or clone it and install it:
$ git clone https://github.com/pyexcel-webwares/django-excel.git
$ cd django-excel
$ python setup.py install
Installation of individual plugins , please refer to individual plugin page. For example, if you need xlsx file support, please install pyexcel-xlsx:
$ pip install pyexcel-xlsx
Contrary to Django’s philosophy of ‘battery included’, django-excel does not
come with all batteries due to the size of the dependency(xlwt, openpyxl, odfpy). Hence,
Django developer is left with the choice to install and load the excel file formats.
Setup
You will need to update your settings.py:
FILE_UPLOAD_HANDLERS = ("django_excel.ExcelMemoryFileUploadHandler",
                        "django_excel.TemporaryExcelFileUploadHandler")
Tested Django Versions
2.1, 2.08, 1.11.15, 1.10.8, 1.9.13, 1.8.18, 1.7.11, 1.6.11
Since 15 March 2015, python 2.6 are no longer tested via travis-ci.
Support the project
If your company has embedded pyexcel and its components into a revenue generating
product, please support me on github, patreon
or bounty source to maintain
the project and develop it further.
If you are an individual, you are welcome to support me too and for however long
you feel like. As my backer, you will receive
early access to pyexcel related contents.
And your issues will get prioritized if you would like to become my patreon as pyexcel pro user.
With your financial support, I will be able to invest
a little bit more time in coding, documentation and writing interesting posts.
More excel file formats
The example application understands csv, tsv and its zipped variants: csvz and tsvz. If you would like to expand the list of supported excel file formats (see :ref:`file-format-list`) for your own application, you could install one or all of the following:
pip install pyexcel-xls
pip install pyexcel-xlsx
pip install pyexcel-ods
Warning
If you are using pyexcel <=0.2.1, you still need to import each plugin manually, e.g. import pyexcel.ext.xls and
Your IDE or pyflakes may highlight it as un-used but it is used. The registration of
the extra file format support happens when the import action is performed
Tutorial
In order to dive in django-excel and get hands-on experience quickly, the test
application for django-excel will be introduced here. So, it is advisable that
you should check out the code from
github
git clone https://github.com/pyexcel/django-excel.git
The test application is written according
to Part 1,
Part 2 and
Part 3 of django
tutorial. If you should wonder how the test application was written, please
visit django documentation and come back.
Once you have the code, please change to django-excel directory and then
install all dependencies:
$ cd django-excel
$ pip install -r requirements.txt
$ pip install -r tests/requirements.txt
Then run the test application:
$ python manage.py runserver
Performing system checks...

System check identified no issues (0 silenced).

You have 9 unapplied migration(s). Your project may not work properly until you apply the migrations for app(s): admin, auth, contenttypes.
Run 'python manage.py migrate' to apply them.

July 06, 2017 - 08:29:10
Django version 1.11.3, using settings 'mysite.settings'
Starting development server at http://127.0.0.1:8000/
Quit the server with CONTROL-C.
Note
The 9 unapplied migration(s) were ignored because migrations are out of scope in this
tutorial.
Handle excel file upload and download
This example shows how to process uploaded excel file and how to make data
download as an excel file. Open your browser
and visit http://localhost:8000/polls/, you shall see this upload form:

Choose an excel sheet, for example an xls file, and press «Submit». You will get a csv file for download.

Please open the file
polls/views.py
and focus on the following code section:
.. literalinclude:: ../../polls/views.py
   :lines: 14-36
UploadFileForm is html widget for file upload form in the html page. Then
look down at filehandle. It is an instance of either ExcelInMemoryUploadedFile
or TemporaryUploadedExcelFile, which inherit ExcelMixin and hence have a list of
conversion methods to call, such as get_sheet, get_array, etc.
For the response, :meth:`~django_excel.make_response` converts
:class:`pyexcel.Sheet` instance obtained via
:meth:`~django_excel.ExcelMixin.get_sheet` into a csv file for download.
Please feel free to change those functions according to :ref:`the mapping table <data-types-and-its-conversion-funcs>`.
Handle data import
This example shows how to import uploaded excel file into django models. We are
going to import
sample-data.xls
.. pyexcel-table:: ../../sample-data.xls
into the following data models:
.. literalinclude:: ../../polls/models.py
   :lines: 4-
Note
Except the added «slug» field, Question and Choice are copied from Django tutorial part 1.
Note
Please also pay attention to ‘choice’ sheet. There exists an arbitrary column: «Noise», which
exists to show case skipping column feature using mapdicts later.
Please visit this link http://localhost:8000/polls/import/, you shall see this upload form:

Please then select
sample-data.xls
and upload. And you get the following excel-alike table in response to confirm all were imported.


Note
pyexcel-handsontable along with pyexcel v0.5.0 brings excel-alie table rendering feature.
Let me explain how this view is done a few paragraphs later.
Then visit the admin page http://localhost:8000/admin/polls/question,
you shall see questions have been populated:

Note
The admin user credentials are: user name: admin, password: admin
And choices too:

You may use admin interface to delete all those objects and try again.
Now please open polls/views.py
and focus on this part of code:
.. literalinclude:: ../../polls/views.py
   :lines: 72-92
The star is :meth:`~django_excel.save_book_to_database`. The parameter models
should be a list of django models. initializers is a list of initialization
functions for each model. In the example, we do not have init function for Question
so ‘None’ is given and choice_func is given to Choice. mapdicts is a list of
column names for each model and the member of the mapdicts can be a dictionary:
{
  "Question Text": "question_text",
  "Publish Date": "pub_date",
  "Unique Identifier": "slug"
}
As a dictionary, it can be used to skip columns in the incoming sheets. For example,
‘Noise’ column is skipped because it was not mentioned in the mapdict.
The custom initialization function is needed when the data from the excel sheet
needs translation before data import. For example, Choice has a foreign
key to Question. When choice data are to be imported, «Question» column
needs to be translated to a question instance. In our example, «Question» column
in «Sheet 2» contains the values appeared in «Unique Identifier» column in
«Sheet 1».
Handle data export
This section shows how to export the data in your models as an excel file. After
you have completed the previous section, you can visit
http://localhost:8000/polls/export/book and you shall get a file download dialog:

Please save and open it. You shall see these data in your window:


Now let’s examine the code behind this in
polls/views.py:
.. literalinclude:: ../../polls/views.py
   :lines: 49-56
:meth:`~django_excel.make_response_from_tables` does all what is needed: read out
the data, convert them into xls and give it the browser. And what you need to do
is to give a list of models to be exported and a file type. As you have noticed,
you can visit http://localhost:8000/polls/export/sheet and will get Question
exported as a single sheet file.
Render an excel-alike html in a browser
In previous section, you have seen the rendering of the excel-alike table. First of
all, the credits goes to handsontable developers.
pyexcel-handsontable as renderer plugin to pyexcel v0.5.0 bring it to
pyexcel developers.
Here is how it is done. Simply put in ‘handsontable.html’ instead of ‘xls’ as
file type.
.. literalinclude:: ../../polls/views.py
   :lines: 153-155
It is understood that you will want to embed it into your django templates.
Here are the sample embedding code:
.. literalinclude:: ../../polls/views.py
   :lines: 158-189
Those views can be accessed as http://localhost:8000/polls/embedded_handson_view/
and http://localhost:8000/polls/embedded_handson_view_single/.

How to import one sheet instead of multi-sheet book
Previous example shows how to import a multi-sheet book. However, what exactly is
needed to import only one sheet instead? Before you proceed, please empty question
and choice data using django admin.
Let’s visit this url first http://localhost:8000/polls/imports_sheet/, where you
see a similar file upload form. This time please choose
sample-sheet.xls
instead. Then look at django admin and see if the question data have been
imported or not.
Now let’s look at the code:
.. literalinclude:: ../../polls/views.py
   :lines: 104-116
Because it is a single sheet, the function to call is
:meth:`~django_excel.ExcelMixin.save_to_database` where you specify a model and
its mapping dictionary.
Have you noticed the extra parameter ‘name_columns_by_row’? Why is this needed?
Well, normally you will not need that if you have column names in the first row.
In this example, the column names appears in the second row. Please open
sample-sheet.xls
and have a look. The straight answer is because the column names in the data
appears in the 2nd row of the data matrix.
Note
If you have imported earlier excel sheet «sample-data.xls», you will get the
following warning in your console output:
Warning: Bulk insertion got below exception. Trying to do it one by one slowly.
column slug is not unique <- reason
One row is ignored <- action
column slug is not unique
What is your favourite programming language?
One row is ignored
column slug is not unique
What is your favourite IDE?
This is because question data have been imported before. Django is raising
IntegrityError. For more details please read
this part of code in pyexcel-io,
and django-excel issue 2
In order to remove those warnings, what you can do is to empty all data using
django admin and redo this single sheet import again.
What to do if import data overlaps existing data in the database
With new version pyexcel-io v0.1.0, you could provide the row initialization
function that returns None in order to skip a row in your import data. Inside
the initialization function, you could also do database update. As long as it
returns None, django-excel will try to do bulk create the import data.
Handle custom data export
It is also quite common to download a portion of the data in a database table,
for example the result of a search query. With version 0.0.2, you can pass on a
query sets to to :meth:`~django_excel.make_response_from_query_sets` and generate
an excel sheet from it:
.. literalinclude:: ../../polls/views.py
   :lines: 49, 56-65
You can visit http://localhost:8000/polls/export/custom and will get the query
set exported as a single sheet file as:

Visualize your data
Let’s go to the admin page and update some votes for the choices.

In my case, I have updated all of them and have gotten something like this:

Now, let’s look at the survey result(http://localhost:8000/polls/survey_result/)
for «What’s your favorite IDE?»:

pyexcel-pygal provide you the common data visualization capability to show
your data intuitively. Here is the code to achieve that:
.. literalinclude:: ../../polls/views.py
   :lines: 192-217
All supported data types
The example application likes to have array but it is not just about arrays. Here is table of functions for all supported data types:
| data structure | from file to data structures | from data structures to response |
|---|---|---|
| dict | :meth:`~django_excel.ExcelMixin.get_dict` | :meth:`~django_excel.make_response_from_dict` |
| records | :meth:`~django_excel.ExcelMixin.get_records` | :meth:`~django_excel.make_response_from_records` |
| a list of lists | :meth:`~django_excel.ExcelMixin.get_array` | :meth:`~django_excel.make_response_from_array` |
| dict of a list of lists | :meth:`~django_excel.ExcelMixin.get_book_dict` | :meth:`~django_excel.make_response_from_book_dict` |
| :class:`pyexcel.Sheet` | :meth:`~django_excel.ExcelMixin.get_sheet` | :meth:`~django_excel.make_response` |
| :class:`pyexcel.Book` | :meth:`~django_excel.ExcelMixin.get_book` | :meth:`~django_excel.make_response` |
| database table | :meth:`~django_excel.ExcelMixin.save_to_database` :meth:`~django_excel.ExcelMixin.isave_to_database` |
:meth:`~django_excel.make_response_from_a_table` |
| a list of database tables | :meth:`~django_excel.ExcelMixin.save_book_to_database` :meth:`~django_excel.ExcelMixin.isave_book_to_database` |
:meth:`~django_excel.make_response_from_tables` |
| a database query sets | :meth:`~django_excel.make_response_from_query_sets` | |
| a generator for records | :meth:`~django_excel.ExcelMixin.iget_records` | |
| a generator of lists | :meth:`~django_excel.ExcelMixin.iget_array` |
See more examples of the data structures in :ref:`pyexcel documentation<pyexcel:a-list-of-data-structures>`
API Reference
django-excel attaches pyexcel functions to InMemoryUploadedFile and TemporaryUploadedFile. Hence, the following functions are available for the uploaded files, e.g. request.FILES[‘your_uploaded_file’].
.. module:: django_excel.ExcelMixin
.. method:: get_sheet(sheet_name=None, **keywords)

   :param sheet_name: For an excel book, there could be multiple sheets. If it is left
                      unspecified, the sheet at index 0 is loaded. For 'csv', 'tsv' file,
                      *sheet_name* should be None anyway.
   :param keywords: additional keywords to :func:`pyexcel.get_sheet`
   :returns: A sheet object
.. method:: get_array(sheet_name=None, **keywords)

   :param sheet_name: same as :meth:`~django_excel.ExcelMixin.get_sheet`
   :param keywords: additional keywords to :func:`pyexcel.get_array`
   :returns: a two dimensional array, a list of lists
.. method:: iget_array(sheet_name=None, **keywords)

   :param sheet_name: same as :meth:`~django_excel.ExcelMixin.get_sheet`
   :param keywords: additional keywords to :func:`pyexcel.iget_array`
   :returns: a generator for a two dimensional array, a list of lists
.. method:: get_dict(sheet_name=None, name_columns_by_row=0, **keywords)

   :param sheet_name: same as :meth:`~django_excel.ExcelMixin.get_sheet`
   :param name_columns_by_row: uses the first row of the sheet to be column headers by default.
   :param keywords: additional keywords to :func:`pyexcel.get_dict`
   :returns: a dictionary of the file content
.. method:: get_records(sheet_name=None, name_columns_by_row=0, **keywords)

   :param sheet_name: same as :meth:`~django_excel.ExcelMixin.get_sheet`
   :param name_columns_by_row: uses the first row of the sheet to be record field names by default.
   :param keywords: additional keywords to :func:`pyexcel.get_records`
   :returns: a list of dictionary of the file content
.. method:: iget_records(sheet_name=None, name_columns_by_row=0, **keywords)

   :param sheet_name: same as :meth:`~django_excel.ExcelMixin.get_sheet`
   :param name_columns_by_row: uses the first row of the sheet to be record field names by default.
   :param keywords: additional keywords to :func:`pyexcel.iget_records`
   :returns: a generator for a list of dictionary of the file content
.. method:: get_book(**keywords)

   :param keywords: additional keywords to :func:`pyexcel.get_book`
   :returns: a two dimensional array, a list of lists
.. method:: get_book_dict(**keywords)

   :param keywords: additional keywords to :func:`pyexcel.get_book_dict`
   :returns: a two dimensional array, a list of lists
.. method:: save_to_database(model=None, initializer=None, mapdict=None, **keywords)

   :param model: a django model
   :param initializer: a custom table initialization function if you have one
   :param mapdict: the explicit table column names if your excel data do not have the exact column names
   :param keywords: additional keywords to :meth:`pyexcel.Sheet.save_to_django_model`
.. method:: isave_to_database(model=None, initializer=None, mapdict=None, **keywords)

   similar to :meth:`~django_excel.ExcelMixin.save_to_database`. But it requires
   less memory.

   This requires column names must be at the first row.
.. method:: save_book_to_database(models=None, initializers=None, mapdicts=None, **keywords)

   :param models: a list of django models
   :param initializers: a list of model initialization functions.
   :param mapdicts: a list of explicit table column names if your excel data sheets do not have the exact column names
   :param keywords: additional keywords to :meth:`pyexcel.Book.save_to_django_models`
.. method:: isave_book_to_database(models=None, initializers=None, mapdicts=None, **keywords)

   similar to :meth:`~django_excel.ExcelMixin.save_book_to_database`. But it requires
   less memory.

   This requires column names must be at the first row in each sheets.
.. method:: free_resources()

   It should be called after iget_array and iget_records were used
Response methods
.. module:: django_excel
.. method:: make_response(pyexcel_instance, file_type, status=200)

   :param pyexcel_instance: :class:`pyexcel.Sheet` or :class:`pyexcel.Book`
   :param file_type: one of the following strings:

                     * 'csv'
                     * 'tsv'
                     * 'csvz'
                     * 'tsvz'
                     * 'xls'
                     * 'xlsx'
                     * 'xlsm'
                     * 'ods'

   :param status: unless a different status is to be returned.
.. method:: make_response_from_array(array, file_type, status=200)

   :param array: a list of lists
   :param file_type: same as :meth:`~django_excel.make_response`
   :param status: same as :meth:`~django_excel.make_response`
.. method:: make_response_from_dict(dict, file_type, status=200)

   :param dict: a dictionary of lists
   :param file_type: same as :meth:`~django_excel.make_response`
   :param status: same as :meth:`~django_excel.make_response`
.. method:: make_response_from_records(records, file_type, status=200)

   :param records: a list of dictionaries
   :param file_type: same as :meth:`~django_excel.make_response`
   :param status: same as :meth:`~django_excel.make_response`
.. method:: make_response_from_book_dict(book_dict, file_type, status=200)

   :param book_dict: a dictionary of two dimensional arrays
   :param file_type: same as :meth:`~django_excel.make_response`
   :param status: same as :meth:`~django_excel.make_response`
.. method:: make_response_from_a_table(model, file_type status=200)
   Produce a single sheet Excel book of *file_type*

   :param model: a Django model
   :param file_type: same as :meth:`~django_excel.make_response`
   :param status: same as :meth:`~django_excel.make_response`
.. method:: make_response_from_query_sets(query_sets, column_names, file_type status=200)

   Produce a single sheet Excel book of *file_type* from your custom database queries

   :param query_sets: a query set
   :param column_names: a nominated column names. It could not be None, otherwise no data is returned.
   :param file_type: same as :meth:`~django_excel.make_response`
   :param status: same as :meth:`~django_excel.make_response`
.. method:: make_response_from_tables(models, file_type status=200)

   Produce a multiple sheet Excel book of *file_type*. It becomes the same
   as :meth:`~django_excel.make_response_from_a_table` if you pass *tables*
   with an array that has a single table

   :param models: a list of Django models
   :param file_type: same as :meth:`~django_excel.make_response`
   :param status: same as :meth:`~django_excel.make_response`
renderers.py
Before a TemplateResponse instance can be returned to the client, it must be rendered. The rendering process takes the intermediate representation of template and context, and turns it into the final byte stream that can be served to the client.
— Django documentation
REST framework includes a number of built in Renderer classes, that allow you to return responses with various media types. There is also support for defining your own custom renderers, which gives you the flexibility to design your own media types.
How the renderer is determined
The set of valid renderers for a view is always defined as a list of classes. When a view is entered REST framework will perform content negotiation on the incoming request, and determine the most appropriate renderer to satisfy the request.
The basic process of content negotiation involves examining the request’s Accept header, to determine which media types it expects in the response. Optionally, format suffixes on the URL may be used to explicitly request a particular representation. For example the URL http://example.com/api/users_count.json might be an endpoint that always returns JSON data.
For more information see the documentation on content negotiation.
Setting the renderers
The default set of renderers may be set globally, using the DEFAULT_RENDERER_CLASSES setting. For example, the following settings would use JSON as the main media type and also include the self describing API.
REST_FRAMEWORK = {
    'DEFAULT_RENDERER_CLASSES': [
        'rest_framework.renderers.JSONRenderer',
        'rest_framework.renderers.BrowsableAPIRenderer',
    ]
}
You can also set the renderers used for an individual view, or viewset,
using the APIView class-based views.
from django.contrib.auth.models import User
from rest_framework.renderers import JSONRenderer
from rest_framework.response import Response
from rest_framework.views import APIView

class UserCountView(APIView):
    """
    A view that returns the count of active users in JSON.
    """
    renderer_classes = [JSONRenderer]

    def get(self, request, format=None):
        user_count = User.objects.filter(active=True).count()
        content = {'user_count': user_count}
        return Response(content)
Or, if you’re using the @api_view decorator with function based views.
@api_view(['GET'])
@renderer_classes([JSONRenderer])
def user_count_view(request, format=None):
    """
    A view that returns the count of active users in JSON.
    """
    user_count = User.objects.filter(active=True).count()
    content = {'user_count': user_count}
    return Response(content)
Ordering of renderer classes
It’s important when specifying the renderer classes for your API to think about what priority you want to assign to each media type. If a client underspecifies the representations it can accept, such as sending an Accept: */* header, or not including an Accept header at all, then REST framework will select the first renderer in the list to use for the response.
For example if your API serves JSON responses and the HTML browsable API, you might want to make JSONRenderer your default renderer, in order to send JSON responses to clients that do not specify an Accept header.
If your API includes views that can serve both regular webpages and API responses depending on the request, then you might consider making TemplateHTMLRenderer your default renderer, in order to play nicely with older browsers that send broken accept headers.
API Reference
JSONRenderer
Renders the request data into JSON, using utf-8 encoding.
Note that the default style is to include unicode characters, and render the response using a compact style with no unnecessary whitespace:
{"unicode black star":"★","value":999}
The client may additionally include an 'indent' media type parameter, in which case the returned JSON will be indented. For example Accept: application/json; indent=4.
{
    "unicode black star": "★",
    "value": 999
}
The default JSON encoding style can be altered using the UNICODE_JSON and COMPACT_JSON settings keys.
.media_type: application/json
.format: 'json'
.charset: None
TemplateHTMLRenderer
Renders data to HTML, using Django’s standard template rendering.
Unlike other renderers, the data passed to the Response does not need to be serialized. Also, unlike other renderers, you may want to include a template_name argument when creating the Response.
The TemplateHTMLRenderer will create a RequestContext, using the response.data as the context dict, and determine a template name to use to render the context.
Note: When used with a view that makes use of a serializer the Response sent for rendering may not be a dictionary and will need to be wrapped in a dict before returning to allow the TemplateHTMLRenderer to render it. For example:
response.data = {'results': response.data}
The template name is determined by (in order of preference):
- An explicit
template_nameargument passed to the response. - An explicit
.template_nameattribute set on this class. - The return result of calling
view.get_template_names().
An example of a view that uses TemplateHTMLRenderer:
class UserDetail(generics.RetrieveAPIView):
    """
    A view that returns a templated HTML representation of a given user.
    """
    queryset = User.objects.all()
    renderer_classes = [TemplateHTMLRenderer]

    def get(self, request, *args, **kwargs):
        self.object = self.get_object()
        return Response({'user': self.object}, template_name='user_detail.html')
You can use TemplateHTMLRenderer either to return regular HTML pages using REST framework, or to return both HTML and API responses from a single endpoint.
If you’re building websites that use TemplateHTMLRenderer along with other renderer classes, you should consider listing TemplateHTMLRenderer as the first class in the renderer_classes list, so that it will be prioritised first even for browsers that send poorly formed ACCEPT: headers.
See the HTML & Forms Topic Page for further examples of TemplateHTMLRenderer usage.
.media_type: text/html
.format: 'html'
.charset: utf-8
See also: StaticHTMLRenderer
StaticHTMLRenderer
A simple renderer that simply returns pre-rendered HTML. Unlike other renderers, the data passed to the response object should be a string representing the content to be returned.
An example of a view that uses StaticHTMLRenderer:
@api_view(['GET'])
@renderer_classes([StaticHTMLRenderer])
def simple_html_view(request):
    data = '<html><body><h1>Hello, world</h1></body></html>'
    return Response(data)
You can use StaticHTMLRenderer either to return regular HTML pages using REST framework, or to return both HTML and API responses from a single endpoint.
.media_type: text/html
.format: 'html'
.charset: utf-8
See also: TemplateHTMLRenderer
BrowsableAPIRenderer
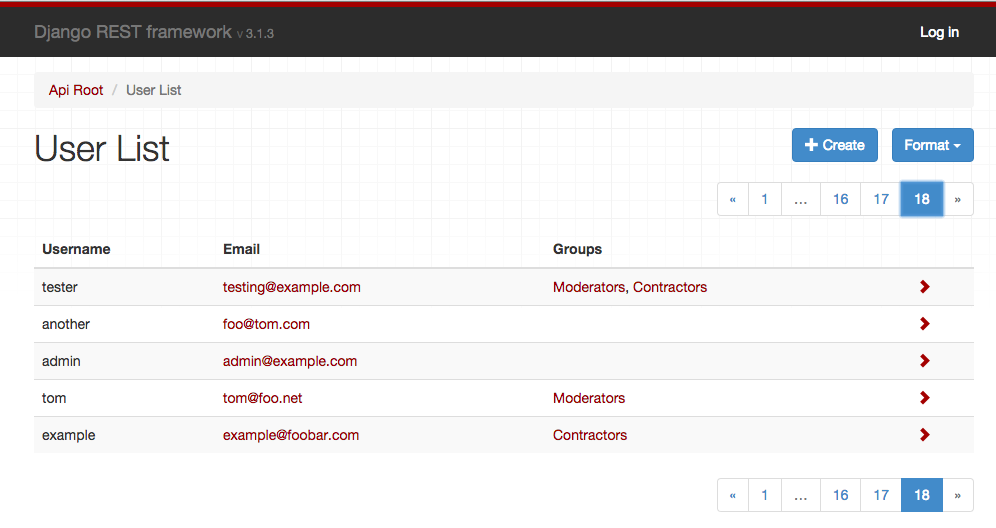
Renders data into HTML for the Browsable API:
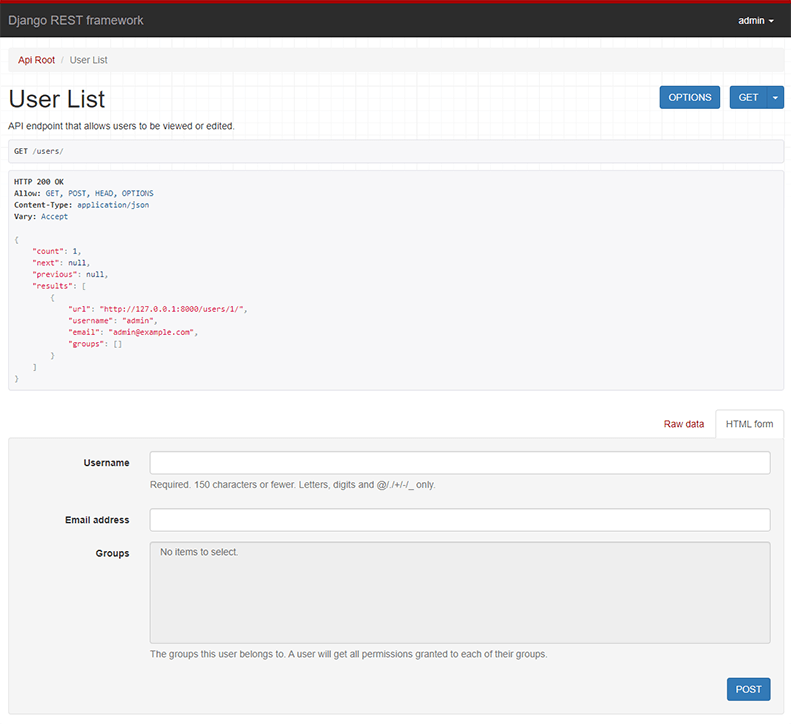
This renderer will determine which other renderer would have been given highest priority, and use that to display an API style response within the HTML page.
.media_type: text/html
.format: 'api'
.charset: utf-8
.template: 'rest_framework/api.html'
Customizing BrowsableAPIRenderer
By default the response content will be rendered with the highest priority renderer apart from BrowsableAPIRenderer. If you need to customize this behavior, for example to use HTML as the default return format, but use JSON in the browsable API, you can do so by overriding the get_default_renderer() method. For example:
class CustomBrowsableAPIRenderer(BrowsableAPIRenderer):
    def get_default_renderer(self, view):
        return JSONRenderer()
AdminRenderer
Renders data into HTML for an admin-like display:
This renderer is suitable for CRUD-style web APIs that should also present a user-friendly interface for managing the data.
Note that views that have nested or list serializers for their input won’t work well with the AdminRenderer, as the HTML forms are unable to properly support them.
Note: The AdminRenderer is only able to include links to detail pages when a properly configured URL_FIELD_NAME (url by default) attribute is present in the data. For HyperlinkedModelSerializer this will be the case, but for ModelSerializer or plain Serializer classes you’ll need to make sure to include the field explicitly. For example here we use models get_absolute_url method:
class AccountSerializer(serializers.ModelSerializer):
    url = serializers.CharField(source='get_absolute_url', read_only=True)

    class Meta:
        model = Account
.media_type: text/html
.format: 'admin'
.charset: utf-8
.template: 'rest_framework/admin.html'
HTMLFormRenderer
Renders data returned by a serializer into an HTML form. The output of this renderer does not include the enclosing <form> tags, a hidden CSRF input or any submit buttons.
This renderer is not intended to be used directly, but can instead be used in templates by passing a serializer instance to the render_form template tag.
{% load rest_framework %}

<form action="/submit-report/" method="post">
    {% csrf_token %}
    {% render_form serializer %}
    <input type="submit" value="Save" />
</form>
For more information see the HTML & Forms documentation.
.media_type: text/html
.format: 'form'
.charset: utf-8
.template: 'rest_framework/horizontal/form.html'
MultiPartRenderer
This renderer is used for rendering HTML multipart form data. It is not suitable as a response renderer, but is instead used for creating test requests, using REST framework’s test client and test request factory.
.media_type: multipart/form-data; boundary=BoUnDaRyStRiNg
.format: 'multipart'
.charset: utf-8
Custom renderers
To implement a custom renderer, you should override BaseRenderer, set the .media_type and .format properties, and implement the .render(self, data, accepted_media_type=None, renderer_context=None) method.
The method should return a bytestring, which will be used as the body of the HTTP response.
The arguments passed to the .render() method are:
data
The request data, as set by the Response() instantiation.
accepted_media_type=None
Optional. If provided, this is the accepted media type, as determined by the content negotiation stage.
Depending on the client’s Accept: header, this may be more specific than the renderer’s media_type attribute, and may include media type parameters. For example "application/json; nested=true".
renderer_context=None
Optional. If provided, this is a dictionary of contextual information provided by the view.
By default this will include the following keys: view, request, response, args, kwargs.
Example
The following is an example plaintext renderer that will return a response with the data parameter as the content of the response.
from django.utils.encoding import smart_text
from rest_framework import renderers


class PlainTextRenderer(renderers.BaseRenderer):
    media_type = 'text/plain'
    format = 'txt'

    def render(self, data, accepted_media_type=None, renderer_context=None):
        return smart_text(data, encoding=self.charset)
Setting the character set
By default renderer classes are assumed to be using the UTF-8 encoding. To use a different encoding, set the charset attribute on the renderer.
class PlainTextRenderer(renderers.BaseRenderer):
    media_type = 'text/plain'
    format = 'txt'
    charset = 'iso-8859-1'

    def render(self, data, accepted_media_type=None, renderer_context=None):
        return data.encode(self.charset)
Note that if a renderer class returns a unicode string, then the response content will be coerced into a bytestring by the Response class, with the charset attribute set on the renderer used to determine the encoding.
If the renderer returns a bytestring representing raw binary content, you should set a charset value of None, which will ensure the Content-Type header of the response will not have a charset value set.
In some cases you may also want to set the render_style attribute to 'binary'. Doing so will also ensure that the browsable API will not attempt to display the binary content as a string.
class JPEGRenderer(renderers.BaseRenderer):
    media_type = 'image/jpeg'
    format = 'jpg'
    charset = None
    render_style = 'binary'

    def render(self, data, accepted_media_type=None, renderer_context=None):
        return data
Advanced renderer usage
You can do some pretty flexible things using REST framework’s renderers. Some examples…
- Provide either flat or nested representations from the same endpoint, depending on the requested media type.
- Serve both regular HTML webpages, and JSON based API responses from the same endpoints.
- Specify multiple types of HTML representation for API clients to use.
- Underspecify a renderer’s media type, such as using
media_type = 'image/*', and use theAcceptheader to vary the encoding of the response.
In some cases you might want your view to use different serialization styles depending on the accepted media type. If you need to do this you can access request.accepted_renderer to determine the negotiated renderer that will be used for the response.
For example:
@api_view(['GET'])
@renderer_classes([TemplateHTMLRenderer, JSONRenderer])
def list_users(request):
    """
    A view that can return JSON or HTML representations
    of the users in the system.
    """
    queryset = Users.objects.filter(active=True)

    if request.accepted_renderer.format == 'html':
        # TemplateHTMLRenderer takes a context dict,
        # and additionally requires a 'template_name'.
        # It does not require serialization.
        data = {'users': queryset}
        return Response(data, template_name='list_users.html')

    # JSONRenderer requires serialized data as normal.
    serializer = UserSerializer(instance=queryset)
    data = serializer.data
    return Response(data)
In some cases you might want a renderer to serve a range of media types.
In this case you can underspecify the media types it should respond to, by using a media_type value such as image/*, or */*.
If you underspecify the renderer’s media type, you should make sure to specify the media type explicitly when you return the response, using the content_type attribute. For example:
return Response(data, content_type='image/png')
For the purposes of many Web APIs, simple JSON responses with hyperlinked relations may be sufficient. If you want to fully embrace RESTful design and HATEOAS you’ll need to consider the design and usage of your media types in more detail.
In the words of Roy Fielding, «A REST API should spend almost all of its descriptive effort in defining the media type(s) used for representing resources and driving application state, or in defining extended relation names and/or hypertext-enabled mark-up for existing standard media types.».
For good examples of custom media types, see GitHub’s use of a custom application/vnd.github+json media type, and Mike Amundsen’s IANA approved application/vnd.collection+json JSON-based hypermedia.
HTML error views
Typically a renderer will behave the same regardless of if it’s dealing with a regular response, or with a response caused by an exception being raised, such as an Http404 or PermissionDenied exception, or a subclass of APIException.
If you’re using either the TemplateHTMLRenderer or the StaticHTMLRenderer and an exception is raised, the behavior is slightly different, and mirrors Django’s default handling of error views.
Exceptions raised and handled by an HTML renderer will attempt to render using one of the following methods, by order of precedence.
- Load and render a template named
{status_code}.html. - Load and render a template named
api_exception.html. - Render the HTTP status code and text, for example «404 Not Found».
Templates will render with a RequestContext which includes the status_code and details keys.
Note: If DEBUG=True, Django’s standard traceback error page will be displayed instead of rendering the HTTP status code and text.
Third party packages
The following third party packages are also available.
YAML
REST framework YAML provides YAML parsing and rendering support. It was previously included directly in the REST framework package, and is now instead supported as a third-party package.
Installation & configuration
Install using pip.
$ pip install djangorestframework-yaml
Modify your REST framework settings.
REST_FRAMEWORK = {
    'DEFAULT_PARSER_CLASSES': [
        'rest_framework_yaml.parsers.YAMLParser',
    ],
    'DEFAULT_RENDERER_CLASSES': [
        'rest_framework_yaml.renderers.YAMLRenderer',
    ],
}
XML
REST Framework XML provides a simple informal XML format. It was previously included directly in the REST framework package, and is now instead supported as a third-party package.
Installation & configuration
Install using pip.
$ pip install djangorestframework-xml
Modify your REST framework settings.
REST_FRAMEWORK = {
    'DEFAULT_PARSER_CLASSES': [
        'rest_framework_xml.parsers.XMLParser',
    ],
    'DEFAULT_RENDERER_CLASSES': [
        'rest_framework_xml.renderers.XMLRenderer',
    ],
}
JSONP
REST framework JSONP provides JSONP rendering support. It was previously included directly in the REST framework package, and is now instead supported as a third-party package.
Warning: If you require cross-domain AJAX requests, you should generally be using the more modern approach of CORS as an alternative to JSONP. See the CORS documentation for more details.
The jsonp approach is essentially a browser hack, and is only appropriate for globally readable API endpoints, where GET requests are unauthenticated and do not require any user permissions.
Installation & configuration
Install using pip.
$ pip install djangorestframework-jsonp
Modify your REST framework settings.
REST_FRAMEWORK = {
    'DEFAULT_RENDERER_CLASSES': [
        'rest_framework_jsonp.renderers.JSONPRenderer',
    ],
}
MessagePack
MessagePack is a fast, efficient binary serialization format. Juan Riaza maintains the djangorestframework-msgpack package which provides MessagePack renderer and parser support for REST framework.
Microsoft Excel: XLSX (Binary Spreadsheet Endpoints)
XLSX is the world’s most popular binary spreadsheet format. Tim Allen of The Wharton School maintains drf-excel, which renders an endpoint as an XLSX spreadsheet using OpenPyXL, and allows the client to download it. Spreadsheets can be styled on a per-view basis.
Installation & configuration
Install using pip.
$ pip install drf-excel
Modify your REST framework settings.
REST_FRAMEWORK = {
    ...

    'DEFAULT_RENDERER_CLASSES': [
        'rest_framework.renderers.JSONRenderer',
        'rest_framework.renderers.BrowsableAPIRenderer',
        'drf_excel.renderers.XLSXRenderer',
    ],
}
To avoid having a file streamed without a filename (which the browser will often default to the filename «download», with no extension), we need to use a mixin to override the Content-Disposition header. If no filename is provided, it will default to export.xlsx. For example:
from rest_framework.viewsets import ReadOnlyModelViewSet
from drf_excel.mixins import XLSXFileMixin
from drf_excel.renderers import XLSXRenderer

from .models import MyExampleModel
from .serializers import MyExampleSerializer

class MyExampleViewSet(XLSXFileMixin, ReadOnlyModelViewSet):
    queryset = MyExampleModel.objects.all()
    serializer_class = MyExampleSerializer
    renderer_classes = [XLSXRenderer]
    filename = 'my_export.xlsx'
CSV
Comma-separated values are a plain-text tabular data format, that can be easily imported into spreadsheet applications. Mjumbe Poe maintains the djangorestframework-csv package which provides CSV renderer support for REST framework.
UltraJSON
UltraJSON is an optimized C JSON encoder which can give significantly faster JSON rendering. Adam Mertz maintains drf_ujson2, a fork of the now unmaintained drf-ujson-renderer, which implements JSON rendering using the UJSON package.
CamelCase JSON
djangorestframework-camel-case provides camel case JSON renderers and parsers for REST framework. This allows serializers to use Python-style underscored field names, but be exposed in the API as Javascript-style camel case field names. It is maintained by Vitaly Babiy.
Pandas (CSV, Excel, PNG)
Django REST Pandas provides a serializer and renderers that support additional data processing and output via the Pandas DataFrame API. Django REST Pandas includes renderers for Pandas-style CSV files, Excel workbooks (both .xls and .xlsx), and a number of other formats. It is maintained by S. Andrew Sheppard as part of the wq Project.
LaTeX
Rest Framework Latex provides a renderer that outputs PDFs using Laulatex. It is maintained by Pebble (S/F Software).
preface
When we are working, we have the requirement that a user uploads a fixed excel form to the website, and then the program takes the debt to parse the content and process it. Recently, I met them in my work, so I want to share the summary of the solution process for your reference and study. Let’s start with a detailed introduction.
Take a simple chestnut. Let’s say we have an HTML:
<!DOCTYPE html>
<html>
 <head>
 <meta charset="utf-8">
 </head>
 <body>
 <p> upload EXCEL form </p>
 <form class="" action="" method="post" enctype="multipart/form-data" >
  {% csrf_token %}
  <input type="file" name="excel">
  <input type="submit" value=" upload ">
 </form>
 </body>
</html>
forms. py file content is as follows, prepare 1 simple judgment suffix verification:
# coding=utf-8
from django import forms
from django.utils.translation import gettext as _
from django.core.exceptions import ValidationError
def validate_excel(value):
 if value.name.split('.')[-1] not in ['xls','xlsx']:
 raise ValidationError(_('Invalid File Type: %(value)s'),params={'value': value},)
class UploadExcelForm(forms.Form):
 excel = forms.FileField(validators=[validate_excel]) # Custom validation is used here
I’m using the xlrd library here to process the excel table. Just install it using pip. There are two ways to process an POST request at this point:
The excel uploaded by the user is stored on disk and read to xlrd for processing.
excel reads uploaded by the user are read directly in memory and handed over to xlrd.
I use the second option here — without changing the django default settings.py configuration, the user uploads a file of the InMemoryUploadedFile type, which has one
read()
views. py can read contents directly from memory without writing to disk:
def post(self, request, *args, **kwargs):
 form = UploadExcelForm(request.POST, request.FILES)
 if form.is_valid():
 wb = xlrd.open_workbook(
  filename=None, file_contents=request.FILES['excel'].read()) #  The key point is here
 table = wb.sheets()[0]
 row = table.nrows
 for i in xrange(1, row):
  col = table.row_values(i)
  print col
 return HttpResponse("ok")
The same can be said for any other file type if you don’t need to save the user’s uploaded files to your hard drive. Here are two resources related to django processing excel:
django-excel (local download) determines the user’s 3-square library in excel format
https: / / assist — software net blog/how — export — excel — files — python — django — application shows you how to export excel articles
conclusion
Loading
In this article we will discuss how to upload an Excel file and then process the content without storing file on server.
One approach could be uploading the file, storing it in upload directory and then reading the file.
Another approach could be uploading file and reading it directly from post data without storing it in memory and displaying the data.
We will work with the later approach here.
You may create a new project or work on existing code.
If you are setting up a new project then create a new virtual environment and install Django 2.0 and openpyxl modules in virtual environment using pip.
pip install Django==2.0.3 openpyxl==2.5.1
Assuming you are working on existing project, follow the below steps to upload and process the excel file in Django.
For this article, I have created a new small project using Django 2.0.3. Source code is available on Github.
Please go through README.md file to setup the project on your system.
We have an excel file user_data.xls with below data in it.

Uploading Excel file:
URLs:
Add a URL in urls.py file of app.
from django.urls import path

from . import views

app_name = "myapp"

urlpatterns = [
    path('', views.index, name='index'),
]
In Django 2.0 it is mandatory to define the app_name in urls.py file if we are going to use namespace in project urlconf.
Views:
Create a function in views with the name index . This view will be responsible to read the excel file.
from django.shortcuts import render
import openpyxl


def index(request):
    if "GET" == request.method:
        return render(request, 'myapp/index.html', {})
    else:
        excel_file = request.FILES["excel_file"]

        # you may put validations here to check extension or file size

        wb = openpyxl.load_workbook(excel_file)

        # getting a particular sheet by name out of many sheets
        worksheet = wb["Sheet1"]
        print(worksheet)

        excel_data = list()
        # iterating over the rows and
        # getting value from each cell in row
        for row in worksheet.iter_rows():
            row_data = list()
            for cell in row:
                row_data.append(str(cell.value))
            excel_data.append(row_data)

        return render(request, 'myapp/index.html', {"excel_data":excel_data})
Here we are using openpyxl module to read Excel file in Django.
First get the excel file from FILES in request and then get the desired worksheet from the workbook.
Now iterate over the rows in worksheet and for each row iterate over the cells and read the value in each cell.
We can get name of all sheets using below code.
# getting all sheets
sheets = wb.sheetnames
print(sheets)

# output. There is only one sheet in our excel file
# ['Sheet1']
You can either iterate over the sheet names or can get desired sheet by sheet name. To get the active sheet just use the wb.active.
# getting active sheet
active_sheet = wb.active
print(active_sheet)

# output
# <Worksheet "Sheet1">
You can get the value of any cell directly by using below method:
# reading a cell
print(worksheet["A1"].value)

# output
# name
Index.html
Now create HTML form to upload the Excel file and to show its content. Use below code for the same.
<html>
<head>
<title>
Excel file upload and processing : Django Example : ThePythonDjango.Com
</title>
</head>
<body style="margin-top: 30px;margin-left: 30px;">
<form action="{% url "myapp:index" %}" method="post" enctype="multipart/form-data">
{% csrf_token %}
<input type="file"
title="Upload excel file"
name="excel_file"
style="border: 1px solid black; padding: 5px;"
required="required">
<p>
<input type="submit"
value="Upload"
style="border: 1px solid green; padding:5px; border-radius: 2px; cursor: pointer;">
</form>
<p></p>
<hr>
{% for row in excel_data %}
{% for cell in row %}
{{ cell }}
{% endfor %}
<br>
{% endfor %}
</body>
</html>
Important: Do not forget to include enctype="multipart/form-data" in form.
Other settings:
— Include the myapp urlconf in project’s urlconf file.
from django.contrib import admin
from django.urls import path, include

urlpatterns = [
    path('admin/', admin.site.urls),
    path('', include('myapp.urls', namespace="myapp")),
]
— Add the myapp to the list of installed apps.
INSTALLED_APPS = [
    'django.contrib.admin',
    'django.contrib.auth',
    'django.contrib.contenttypes',
    'django.contrib.sessions',
    'django.contrib.messages',
    'django.contrib.staticfiles',
    'myapp',
]
Now restart the python server and go to localhost:8000 . You will see below screen.

Browse the excel file user_data.xls (available in source code on github) and upload it.
After index view read the data from worksheet and render the page again, screen will look like below:

You can add validations to check file extension or file size. Refer the csv upload article for same.
After reading the content you can save it to Database or display it on html page.
In case of any issue comment below.
Host you Django App for free on PythonAnyWhere.
Useful links:
https://www.pyxll.com/blog/tools-for-working-with-excel-and-python/

How to download large csv file in Django, streaming the response, streaming large csv file in django, downloading large data in django without timeout, using django.http.StreamingHttpResponse to stream response in Django, Generating and transmitting large CSV files in django…

Validating image before storing it in database or on file storage. Checking the size of uploaded image in python django. Checking the extension of uploaded image in python django. Checking the content size of uploaded image. Checking the mime-type of uploaded Image. Validating a malicious image before saving it. Using python-magic package…

This article explains the simple steps of uploading and storing an image in Django application, After storing the image, how to use it in Django template or emails, Uploading a file in Django, Storing image in Django model, Uploading and storing the image in Django model, HTML for multipart file upload…

Uploading files to FTP server using Python, Python script to connect to ftp server, Python code to login to FTP server and upload file, How to connect to FTP server using python code, ftplib in python, Get server file listing using ftplib in python…