
Click the “Insert” tab. Click the “Shapes” button on the ribbon and choose the “Line” option, the first one in the Lines subcategory. Press and hold down the “Ctrl” key, which keeps your divider line straight. Position the cursor near the left margin under the place you want to divide.
Contents
- 1 How do you insert a vertical dividing line in Word?
- 2 How do you insert a horizontal line in Word?
- 3 How do I insert a vertical line in text in Word?
- 4 How do you split a Word document into sections?
- 5 How do I type above a line in Word?
- 6 How do you type a pipe on a keyboard?
- 7 How do you type a horizontal line?
- 8 How do I divide my Word document into 4 sections?
- 9 How do I split a Word document into 3 sections?
- 10 How do I split a Word document into 6 sections?
- 11 What is the pipe symbol called?
- 12 How do you make a broken pipe symbol on Windows keyboard?
- 13 Where is pipe on Mac keyboard?
- 14 How do you make the vertical pipe symbol?
How do you insert a vertical dividing line in Word?
To add a vertical line using the shape tool, go to Insert | Shapes and select the Line tool. Place the cursor where you want the line to start, and drag to where you want the other end of the line to be. Holding the Shift key while you drag will ensure that the line is straight.
How do you insert a horizontal line in Word?
Use the Horizontal Line Tool to Insert a Line in Word
- Place the cursor where you want to insert a line.
- Go to the Home tab.
- In the Paragraph group, select the Borders drop-down arrow and choose Horizontal Line.
- To change the look of the line, double-click the line in the document.
How do I insert a vertical line in text in Word?
Click the Insert ribbon and then choose a line shape from the Lines section in the Shapes drop-down (in the Illustrations group). The mouse will change to a crosshair pointer. Click anywhere in the document. Hold down the Shift key and drag and click to create the line’s opposite point.
How do you split a Word document into sections?
Divide a Document into Sections
- Place the insertion point where you want the section break.
- Choose the Page Layout tab.
- Click the down-arrow next to the Breaks button. A menu appears.
- Click the type of section break you want. Word inserts the section break.
How do I type above a line in Word?
- Open the Word document and scroll to the section with the line.
- Click the Insert tab, then click the “Text Box” button.
- Click inside the text box to type any text you want above the line.
- Handwrite any text you want to appear above the line.
- Click the orange Text Box Tools tab, then click the “Shape Outline” menu.
How do you type a pipe on a keyboard?
On English PC and Mac keyboards, the pipe is on the same key as the backslash key. It is located above the Enter key (Return key) and below the Backspace key. Pressing and holding down the Shift while pressing the | creates a pipe.
How do you type a horizontal line?
Inserting a basic horizontal line the short way
Many users already know that easiest way to insert a plain horizontal line into a page is to use the keyboard shortcut of typing 3 dashes (—) then press ‘Enter’ – and voila! your line appears by magic!
How do I divide my Word document into 4 sections?
To split a page to 4 parts, you can insert a table to deal with the job.
- Place the cursor at left-top of the page, then click Insert > Table, select 2×2 Table.
- The table has been inserted, then drag right-corner of the table to resize it as you need.
- Insert texts into the columns and rows separately.
How do I split a Word document into 3 sections?
Follow the steps outlined in this tutorial.
- Highlight the text you wish to split into columns.
- Select the “Page Layout” tab.
- Choose “Columns” then select the type of columns you wish to apply. One. Two. Three. Left. Right.
How do I split a Word document into 6 sections?
Follow these general steps:
- Open a new document and set the paper orientation and margins the way you want.
- Insert a three-column, single-row table in your document.
- Remove the borders around the table, if desired.
- Format the second (center) column to be rather narrow.
- Adjust the width of the other columns as desired.
What is the pipe symbol called?
The vertical bar ( | ) is a computer character and glyph with various uses in mathematics, computing, and typography. It has many names, often related to particular meanings: Sheffer stroke (in logic), verti-bar, vbar, stick, vertical line, vertical slash, bar, pike, or pipe.
How do you make a broken pipe symbol on Windows keyboard?
Broken Vertical Bar Windows Shortcut
- Simple keyboard shortcut to make broken bar in windows is “0166”
- Press the “alt” key and hold it down while typing “0166” on the Windows keyboard.
- This is the simple page to learn how to type / make broken vertical bar on your windows keyboard.
Where is pipe on Mac keyboard?
As you can see in this image, the Pipe Key is located on the right side of the keyboard. To use it, you will need to hold shift and then press the key with the Pipe Symbol simultaneously.
How do you make the vertical pipe symbol?
“|”, How can I type it?
- Shift- (“backslash”).
- German keyboard it is on the left together with < and > and the Alt Gr modifier key must be pressed to get the pipe.
- Note that depending on the font used, this vertical bar can be displayed as a consecutive line or by a line with a small gap in the middle.
There are many word processing tools available but once worked in the comfort of Microsoft Word, you may not like any other software. It is pretty sure no one exactly knows the complete features Word offers. Adding dividers is one such hidden features and you can do this with shortcuts. In this article we will show how to add dividers in Microsoft Word documents quickly.
Related: How to fix slow Microsoft Word and speed up you productivity?
You can add dividers with different methods.
- Use hyphen and underscore
- Using other symbol shortcuts
- Insert image as divider
- Insert from the menu
1. Using Hyphens and Underscores
The simplest and most easy method is to use continuous hyphens and underscores. You can continuously press hyphen or underscore to insert the divider line between paragraphs. The advantage is that you can define the length and alignment of the divider as per your need.
- Divider using hyphens: —————–
- Divider using underscore: ____________
2. Quick Way to Add Dividers with Shortcuts
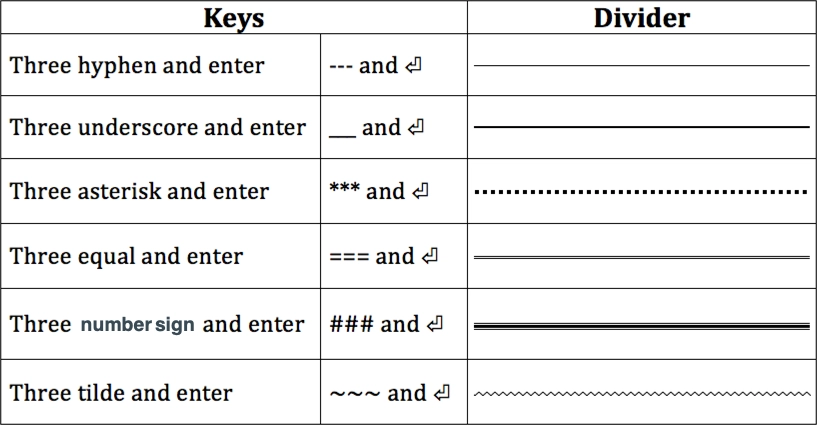
When you want to insert a full width divider between two sections or elements, you can use the following shortcuts.
- Press hyphens for three or more times and press the enter key (— and ⏎). This will create a full width divider as a thin continuous line.
- Press three asterisks and enter (*** and ⏎) to if you want a dotted line.
- Use three equal signs and enter (=== and ⏎) to add a double line.
- Use three underscores and enter (___ and ⏎) to make a divider with medium thickness.
- Type three number signs and enter key (### and ⏎) to create a thicker line with borders.
- And finally with three tildes and enter (~~~ and ⏎) to create a wavy divider line.
Below picture explains the shortcut keys and the display of the divider in Word document.
Deleting Dividers Inserted with Shortcuts
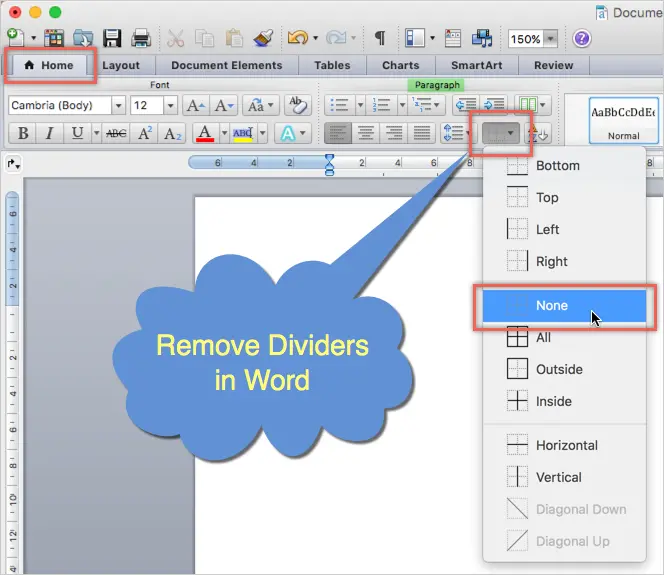
Well, you have created the dividers using the above shortcuts and now is the time to see how to delete them. You may find it difficult to delete since those dividers are not actually lines – they are bottom borders act like an underline. In fact, you can simply click on the “Borders” icon to insert divider in Word. Since “Borders” option by default uses “Bottom Border” clicking on it will insert a line similar to the above shortcuts. Follow the below instructions in order to delete the dividers.
- Position your cursor on the previous line of the divider. If you have an element like paragraph before the divider then select the paragraph.
- Click on the “Home” tab and then click the small arrow next to “Border” button in the “Paragraph” group.
- Select “No Border” or “None” option from the list.
This works on all Word versions like 2019, Microsoft 365, etc. on all platforms like Windows 10 / 11. This also works on Microsoft Word for Mac.
3. Using Images for Dividers
Using image is another option to insert divider image on your Word document. You can create suitable images and insert between elements as an object. Remember, not to copy image from website and paste on your document. Word will take long time to extract the image and also link the image to the webpage from where you are copying. The best option is to right click and save the image to your computer. After that, you can either copy paste from local computer or insert the image from menu.
4. Using Horizontal Line as Divider
The last option to insert divider in Word documents is using horizontal line menu option available. You can access this option under “Paragraph” group in “Home” tab. However, this option varies in Word 2016 onwards and earlier versions.
Word 2010 or Earlier
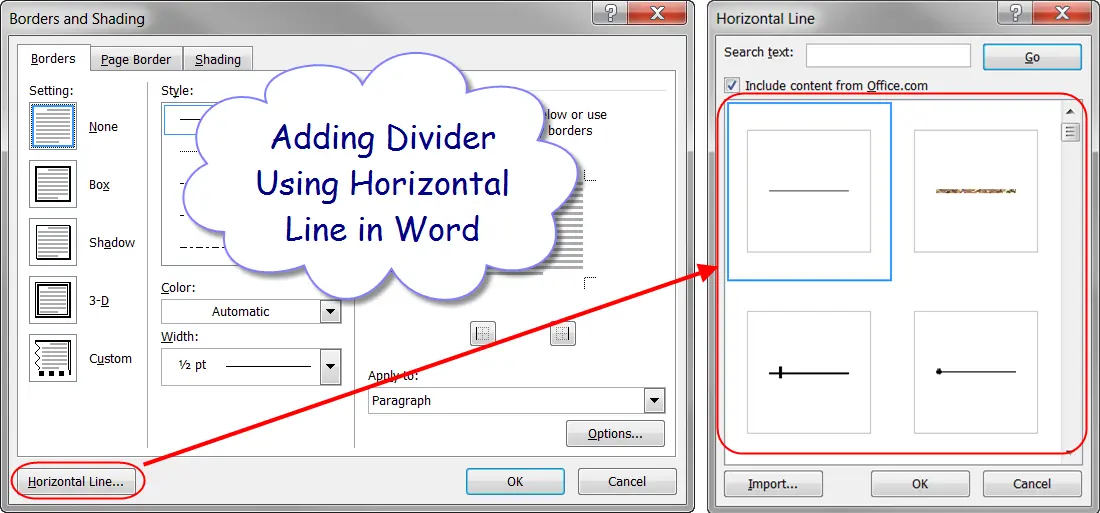
- Click on the “Borders and Shading” button and click on the “Horizontal Line” option to insert a divider on your document.
- If you want to insert a fancy divider, choose the menu option click on the “Horizontal Line…” button. On the popup box, select the divider style you want to insert.
Word 2016 or Later
- If you use Word 2016 or later versions like Microsoft 365, click on the small arrow next to “Border” icon. This is available in “Paragraph” group under “Home” menu.
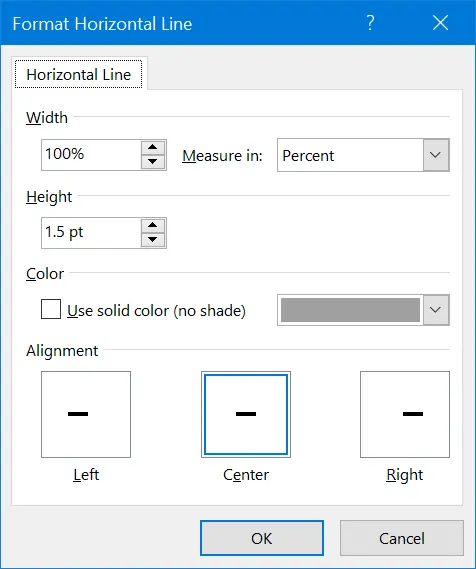
- Choose “Horizontal Line” option to insert a grey color divider line.
- Double click on the divider to open the “Format Horizontal Line” pop-up.
- Choose the color, alignment, width and height for your divider.
- Unlike dividers inserted with shortcuts, you can move the horizontal lines by dragging it to required place in your document.
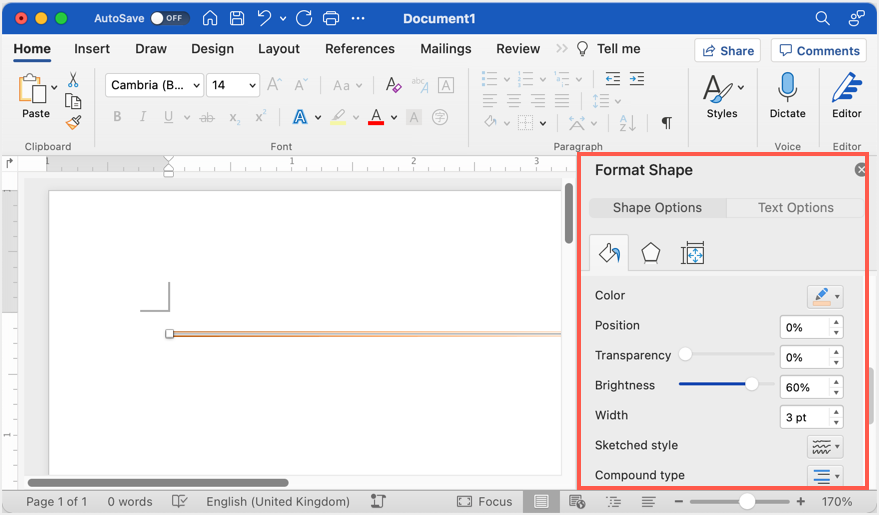
Horizontal line is a perfect option for inserting dividers in Word and it will also work on Word Microsoft 365 subscription in Mac also. However, double clicking on horizontal line in Mac Word will open “Format Shape” options in the sidebar. You can go to “Shape Options” tab and start customizing the color, thickness and other styles of the line.
Corralling information in a Microsoft Word document isn’t all about headers and paragraph formatting. You may find yourself needing to draw a line in the virtual sand, and with Word, all you need to do is tell it where and how. Word’s Shapes collection lets you make horizontal and vertical lines to separate content on your pages.
Using a Word Separator Symbol
Inserting a symbol between words is a great way to make a heading predominant or to keep words separate for readers who are quickly scanning a document. Instead of using hyphens or asterisks, try using an ASCII or Unicode (hex) symbol as a word divider, available inside Microsoft Word.
To do this, place the cursor where you want the symbol to appear click the «Insert» menu, then select «Symbols» and then «More Symbols.» Select the one you want from the table that appears. You can also filter the list by selecting the Unicode or ASCII options.
MS Word Separator Line
Drawing a horizontal line across the page to separate paragraphs is very straightforward if you’re not too fussy about how the line appears. Just place the cursor in a blank line between sentences and hit the hyphen key several times. When you press Return, the hyphens transform into a single long hyphen.
To draw a custom line in a document to separate words, use the Shapes option. Scroll to the place on the page to place the divider. To add extra space for the divider, press the “Enter” key. Click the “Insert” tab. Click the “Shapes” button on the ribbon and choose the “Line” option, the first one in the Lines subcategory.
Press and hold down the “Ctrl” key, which keeps your divider line straight. Position the cursor near the left margin under the place you want to divide. Press and hold down the left mouse button and drag the cursor to the right, drawing the divider. Release the mouse button and the “Ctrl” key.
Click the divider line once it appears. When the new Tools tab opens, click the “Shape Outline” menu on the ribbon. Here you can format the divider by making it thicker, changing its color and choosing a different line style.
Using Clip Art to Divide Content
Microsoft Word has an extensive collection of clip art you can use to separate content on a page, including bars and scrollwork, which can add a dash of elegance to a page. To find some clip art, select «Online Pictures» from the Insert tab.
Enter a word that describes the art you are looking for. Using words like «divider,» «scrollwork,» «border» or «flowers,» should help you find the perfect artwork to divide your content.
Click the “Insert” tab. Click the “Shapes” button on the ribbon and choose the “Line” option, the first one in the Lines subcategory. Press and hold down the “Ctrl” key, which keeps your divider line straight. Position the cursor near the left margin under the place you want to divide.
What does the vertical line mean in math?
The vertical line, also called the vertical slash or upright slash ( | ), is used in mathematical notation in place of the expression “such that” or “it is true that.” This symbol is commonly encountered in statements involving logic and sets. Also see Mathematical Symbols.
What causes lines on phone screen?
In short, it’s really hard to use a phone with these lines appearing on the screen. Typically, this issue is associated with the LCD, caused by a faulty hardware component in your device due to some accidental fall or water damage – and can only be sorted at a phone repair center.
What is the vertical line in the middle called in music?
Musical notes are written on a staff. A staff is made up of five horizontal lines and the four spaces between the lines. The vertical lines on the staff are called bars. The space between two bar lines is called a measure.
What are the 5 lines in music called?
Staff, also spelled stave, in the notation of Western music, five parallel horizontal lines that, with a clef, indicate the pitch of musical notes.
What is a barline?
Barlines are vertical lines that cross staves in order to show how music is divided into bars, according to the time signature. For single-line staves, the barline extends one space above and below the staff line by default. …
What are the horizontal lines on sheet music called?
In Western musical notation, the staff is a set of five horizontal lines and four spaces that each represent a different musical pitch—or, in the case of a percussion staff, different percussion instruments.
What is a line of music called?
In Western musical notation, the staff (US) or stave (UK) (plural for either: staves) is a set of five horizontal lines and four spaces that each represent a different musical pitch or in the case of a percussion staff, different percussion instruments.
What is one line of music called?
A staff (or stave) is the name given to the five horizontal lines on which we can write music. Musical notes can be placed either on a line (i.e. with a line going through the middle of the note head) or in a space.
What are the two lines at the end of music called?
End bar lines: Two vertical lines, the second line thicker than the first. This indicates the end of a musical movement or an entire composition.
What is a double barline?
A double bar line (or double bar) can consist of two single bar lines drawn close together, separating two sections within a piece, or a bar line followed by a thicker bar line, indicating the end of a piece or movement.
What is a repeat sign in music called?
Meaning of Repeat Barline A repeat bar is a musical symbol resembling a final barline with two dots in the middle spaces of the staff.
What does MF mean in music?
Mezzo forte
Is FF louder than MF?
More subtle degrees of loudness or softness are indicated by: mp, standing for mezzo-piano, meaning “moderately quiet”. mf, standing for mezzo-forte, meaning “moderately loud”….Dynamic markings.
| Name | Letters | Level |
|---|---|---|
| fortissimo | ff | very loud |
| forte | f | loud |
| mezzo-forte | mf | average |
| mezzo-piano | mp |
What does pp mean?
pages
What does P stand for in music?
The main dynamic levels are: p or piano, which means “soft” f or forte, which means “loud”
Table of Contents
- How do you use stripe in a sentence?
- How do I split a word page in two?
- How do you insert a double vertical line in Word?
- How do I insert a horizontal line in Word 2020?
- How do you insert a vertical line in typing?
- How do you insert a line in pages?
- What do 3 vertical lines mean?
- What are the 2 lines at the end called?
- What does a vertical line mean in a graph?
- What is an example of a vertical line?
- Is vertical line a function?
- Is I horizontal or vertical?
- Can a straight line be a function?
- How do you tell if a line on a graph is a function?
- How do you determine if a circle is a function?
- What are the difference between positive and negative slope?
- How do you write an equation for a line on a graph?
Click the “Insert” tab. Click the “Shapes” button on the ribbon and choose the “Line” option, the first one in the Lines subcategory. Press and hold down the “Ctrl” key, which keeps your divider line straight. Position the cursor near the left margin under the place you want to divide.
How do you use stripe in a sentence?
Use “stripe” in a sentence | “stripe” sentence examples
- The book has a diagonal black stripe on the cover.
- The plates have a blue stripe round the edge.
- His dark socks, I could see, had a stripe on them.
- The toad has a distinctive yellow stripe down its back.
- Each white petal had a stripe of red.
- The ribbon cable normally has a red stripe marking line 1.
How do I split a word page in two?
Word 2016 & 2013: Divide Page Into Columns
- Highlight the text you wish to split into columns.
- Select the “Page Layout” tab.
- Choose “Columns” then select the type of columns you wish to apply. One. Two. Three. Left. Right.
How do you insert a double vertical line in Word?
Vertical Lines in Word
- Display the Insert tab of the ribbon.
- Click the Shapes tool and then click one of the line shapes from the Line group.
- Click at one end of where you want your line, but don’t release the mouse button.
- Drag the mouse to where you want the other end of the line positioned.
- Release the mouse button.
How do I insert a horizontal line in Word 2020?
Insert a Horizontal Line From the Ribbon
- Place your cursor where you want to insert the line.
- Go to the Home tab and then click the dropdown arrow for the Borders option in the Paragraph group.
- Select Horizontal Line from the menu.
- To tweak the look of this horizontal line, double-click the line.
How do you insert a vertical line in typing?
You can type a straight vertical line, or “|,” on most modern keyboards dating back to some of the 1980s IBM PCs. It’s generally found above the backslash, so you can type a “|” by holding down the shift key and hitting the “” key.
Add borders and rules (lines) in Pages on Mac
- Click the line or paragraph (or select multiple paragraphs) where you want to add the border or rule.
- In the Format sidebar, click the Layout button near the top.
- Click the pop-up menu next to Borders & Rules, then choose a line type (solid, dashed, or dotted).
What do 3 vertical lines mean?
Tripundra Tattoo These three lines represent Shiva’s power that is threefold. These are action, knowledge and power of will. It is also said to symbolize Shiva’s trident or the divine trio of Shiva, Vishnu and Brahma.
What are the 2 lines at the end called?
A double bar line (or double bar) can consist of two single bar lines drawn close together, separating two sections within a piece, or a bar line followed by a thicker bar line, indicating the end of a piece or movement.
What does a vertical line mean in a graph?
A vertical line is one the goes straight up and down, parallel to the y-axis of the coordinate plane. All points on the line will have the same x-coordinate. A vertical line has no slope. Or put another way, for a vertical line the slope is undefined.
What is an example of a vertical line?
It is a straight line which goes from top to bottom and bottom to top. Any point in this line will have the same value for the x-coordinate. For example, (2,0), (3,0) (-4,0), etc. are the points of vertical lines.
Is vertical line a function?
For a relation to be a function, use the Vertical Line Test: Draw a vertical line anywhere on the graph, and if it never hits the graph more than once, it is a function. If your vertical line hits twice or more, it’s not a function.
Is I horizontal or vertical?
As vertical is the opposite of horizontal, anything that makes a 90-degree angle (right angle) with the horizontal or the horizon is called vertical. So, the horizontal line is one that runs across from left to right….What is Horizontal?
| Horizontal | Vertical |
|---|---|
| 24 + 33 = 57 | 24 + 33 = 57 |
Can a straight line be a function?
A linear function is a function whose graph is a straight line. The line can’t be vertical, since then we wouldn’t have a function, but any other sort of straight line is fine.
How do you tell if a line on a graph is a function?
Inspect the graph to see if any vertical line drawn would intersect the curve more than once. If there is any such line, the graph does not represent a function. If no vertical line can intersect the curve more than once, the graph does represent a function.
How do you determine if a circle is a function?
If you are looking at a function that describes a set of points in Cartesian space by mapping each x-coordinate to a y-coordinate, then a circle cannot be described by a function because it fails what is known in High School as the vertical line test. A function, by definition, has a unique output for every input.
What are the difference between positive and negative slope?
A higher positive slope means a steeper upward tilt to the line, while a smaller positive slope means a flatter upward tilt to the line. A negative slope that is larger in absolute value (that is, more negative) means a steeper downward tilt to the line. Suppose a line has a larger intercept.
How do you write an equation for a line on a graph?
The slope-intercept form of a linear equation is written as y = mx + b, where m is the slope and b is the value of y at the y-intercept, which can be written as (0, b). When you know the slope and the y-intercept of a line you can use the slope-intercept form to immediately write the equation of that line.
Microsoft 365, Microsoft Office, Microsoft Office for Mac, Microsoft Word, Office 2007, Office 2010, Office 2013, Office 2016, Office 2019, Office 365 /
6 March 2022
Word’s ‘Line Between’ option for multiple columns can replaced and formatted to a different color or other types of line.
The downside Word’s standard line between column setting is the lack of formatting. All you can do is choose ‘Line Between’ and no more. There’s no known way to change the look of the vertical line between columns. Like the old Model T cars, your choice is black or black.
There’s a workaround. We’ll be honest telling you there are downsides with the workarounds so we’ll explain the problems you might strike.
Paragraph formatting, borders
The most flexible one is changing the paragraph formatting to include a left-hand border to paragraphs on the right column (or right-border for the left column).
Do that from Borders and Shading | Borders | Options then increase the From text … Left (or right) so the line appears in the middle of the column.
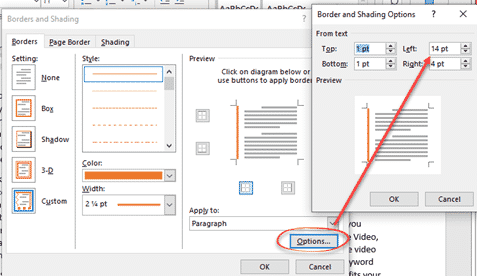
Try a setting about 14pt and adjust to suit you. Too small and the vertical line isn’t centered between the columns. Too high and the line is cut off by the adjoining column.
You’re not limited to single block lines. The Style and Width options allow a wide choice of line styles and thickness.

More than two columns
This workaround also works for more than two columns. The same border formatting applies to all paragraphs from the second column onwards.

Now, to the problems with this fix.
Paragraphs only problem and fix
Border settings work at the paragraph level. A paragraph split between two columns (like this example) adds the border line from the start of the paragraph not the top of the column.
The fix is to add a column break before a paragraph. Place the cursor at the start of a paragraph then choose Layout | Breaks | Page Breaks | Column

Adding a column break can mess up the balance of the columns, leaving white space at the bottom of a column. You might be exchanging one problem for another.

Needs constant manual adjustment
Because the border formatting isn’t linked to the column formatting, any change in the document is likely to mess up your line between / border formatting.
Adding more text, as in this example, pushed text to the column top.
Changing page size, margins, pagination and many other things could spoil the manual paragraph border formatting you set because Word rearranges the column wrapping.
If choosing this workaround, check that the border setting is correct immediately before printing or export to PDF.
Table workaround
Another workaround is to create a table with only the vertical internal lines visible. That has the same text wrapping problems as the paragraph formatting workaround, but might suit you better. See Word tables for formatting magic
See Five ways to add vertical lines in Word
Four more vertical formatting tricks in Word
Flowing column text in Word with break-out or sidebar
if you’re having trouble distinguishing content from one column to another, then it can make it difficult to read a document that has employed that type of layout.
Microsoft Word includes a variety of formatting options, including one specific to columns that can help to improve this situation.
Our tutorial below will show you how to find and apply the setting that puts a line between the columns in your document.
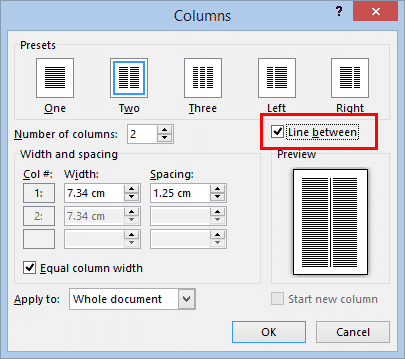
How to Add Column Lines in Microsoft Word
- Open your document.
- Select the Layout tab.
- Click the Columns button, then choose More Columns.
- Check the Lines between box, then click OK.
Our guide continues below with additional information on putting lines between columns in Word documents, including pictures of these steps.
There are a lot of different ways that you will reformat a document based on what you are creating.
We have previously written about adding columns in Word, which is important for people that are writing articles or generating newsletters.
But the design of your document might dictate that the columns aren’t enough and that there needs to be some kind of visual separation between those columns.
You may have experimented with accomplishing this via borders or text boxes, but that can be frustrating and probably won’t create the appearance that you want.
Fortunately, you can use a feature in Word that will simply add lines between your columns automatically.
Microsoft Word has a strikethrough option similar to many other applications. Our guide on how to draw a line through text in Word can show you how to use it.
How to Place a Line Between Columns in Word (Guide with Pictures)
The steps in this article were performed in the Word for Office 365 version of the application, but will also work in earlier versions of Word as well.
Note that this guide will assume that your document already has columns.
Once you’re done with this article, find out how you can hide comments when printing in Word if you’ve discovered that it’s occurring on documents where you’ve collaborated with others.
Step 1: Open your document in Word.
Step 2: Click the Layout tab at the top of the window.

Step 3: Click the Columns button, then choose the More Columns option.

Step 4: Check the box to the left of Lines between, then click the OK button.

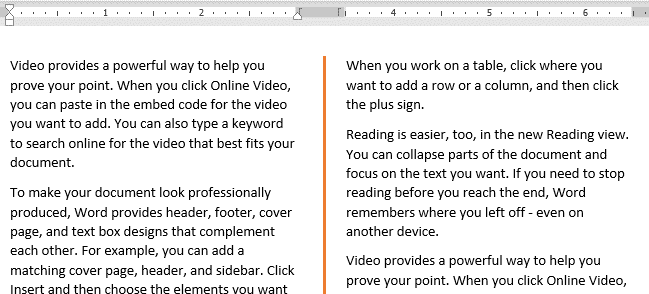
You should now have a document with lines between its columns, like the image shown above.
For additional information on working with columns in Microsoft Word documents, check out this how to make columns in Word Office 365 tutorial.

Matt Jacobs has been working as an IT consultant for small businesses since receiving his Master’s degree in 2003. While he still does some consulting work, his primary focus now is on creating technology support content for SupportYourTech.com.
His work can be found on many websites and focuses on topics such as Microsoft Office, Apple devices, Android devices, Photoshop, and more.
1. Quick visual separators using the keyboard
Type 3 dashes ( — ) to display a single line separator
![]()
Type 3 equals signs ( === ) to display a double line separator
![]()
Type 3 hashes ( ### ) to display a triple line separator
![]()
Type 3 underscores ( ___ ) to display a thick separator
![]()
Type 3 asterisks ( *** ) to display a dotted line separator
![]()
Type 3 tildes ( ~~~ ) to display a wavy line separator
![]()
2. Adding a paragraph border separator for lots more choice
There is also a Horizontal Line tool you can use.
1. Position the cursor where the line is to be inserted.
2. Select the Home tab | Paragraph group, or
Table Tools | Design tab (if you are working with a table).
3. Click the drop-down arrow on the Border icon.
4. Select Horizontal Line.

5. For more choices, click Borders and Shading instead of Horizontal LIne.
6. Choose a line style, line colour and line width.
7. Click the border icons around the preview so that only the top or bottom icon is on.

And that, my friend, is how you add some visual interest to an otherwise dull-looking document.
Here are some other advanced text effects you may be interested in.
I hope you found plenty of value in this post. I’d love to hear your biggest takeaway in the comments below together with any questions you may have.
Have a fantastic day.


About the author
Jason Morrell
Jason loves to simplify the hard stuff, cut the fluff and share what actually works. Things that make a difference. Things that slash hours from your daily work tasks. He runs a software training business in Queensland, Australia, lives on the Gold Coast with his wife and 4 kids and often talks about himself in the third person!
SHARE