
Most of the people know that Word is for writing texts sometimes containing tables, and Excel is
all about tables and calculations for them. But what if you need to create a Word table with
formula. Do you need to create a table in Excel and insert it into Word? No, you don’t. You can
create formulas in Word to perform simple arithmetic calculations, such as addition, subtraction,
multiplication, or division.
If you create the table in Excel and paste it into Word document, updates of the table data
become difficult because you need to launch embedded Excel for each change. Moreover, the
visual appearance of Word and Excel tables is different, and you will need a lot of time on
the styling of the Excel table. For some situations, this is not practical because it is
faster to insert and change simple formulas in the Word document (see
How to reference a cell of a Word table):

To add a formula into the Word table (see
How to calculate formulas in a Word document
if you need to use formulas without tables), do the following:
1. Position the cursor where you want to paste a
formula.
2. Under Table Tools, on the Layout tab,
in the Data group, click the Formula button:

3. In the Formula dialog box, enter the formula:

Unfortunately, Word proposes only simple operations and functions that can work without Excel
(see
Functions and formulas in Word).
However, you still can create many simple formulas instead of using the calculator. Cell
references in formulas are similar to Excel: A1, B12, etc.
Note: The Formula dialog box is not your only option, you can press
Ctrl+F9 to create a field and type a formula inside the field braces:
![]()
See also this tip in French:
Comment ajouter, soustraire, multiplier et diviser des cellules dans un tableau Word.
Содержание
- Способ 1: Контекстное меню
- Способ 2: Инструменты вкладки «Макет»
- Способ 3: Самостоятельное рисование
- Вопросы и ответы

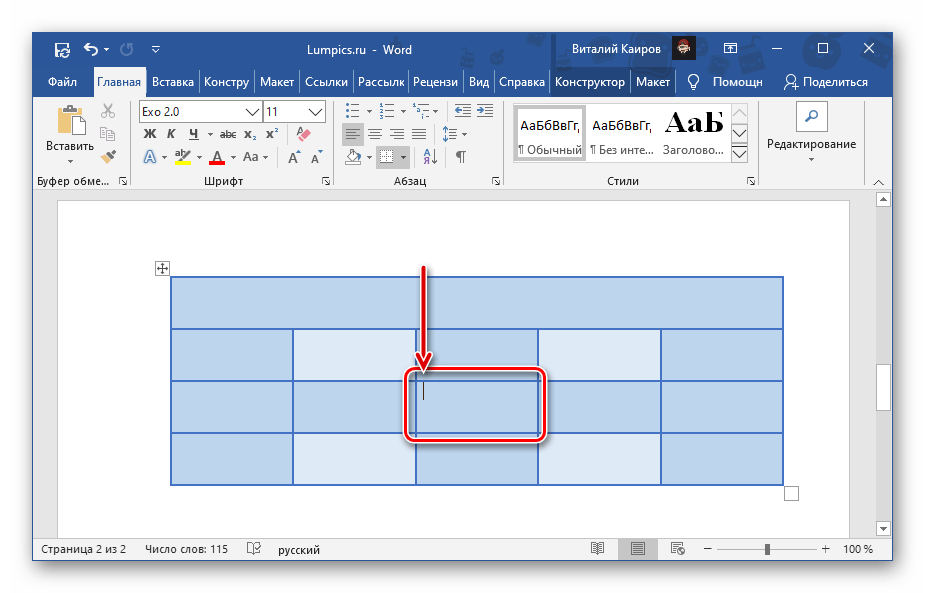
Способ 1: Контекстное меню
Наиболее простым способом разделения ячеек в таблице Ворд является обращение к контекстному меню, вызываемом на соответствующем элементе.
Важно! Если в ячейке содержатся данные, в результате они будут помещены в первую из них – левую, верхнюю или левую верхнюю, в зависимости от того, каким образом и на какое количество элементов осуществляется разделение.

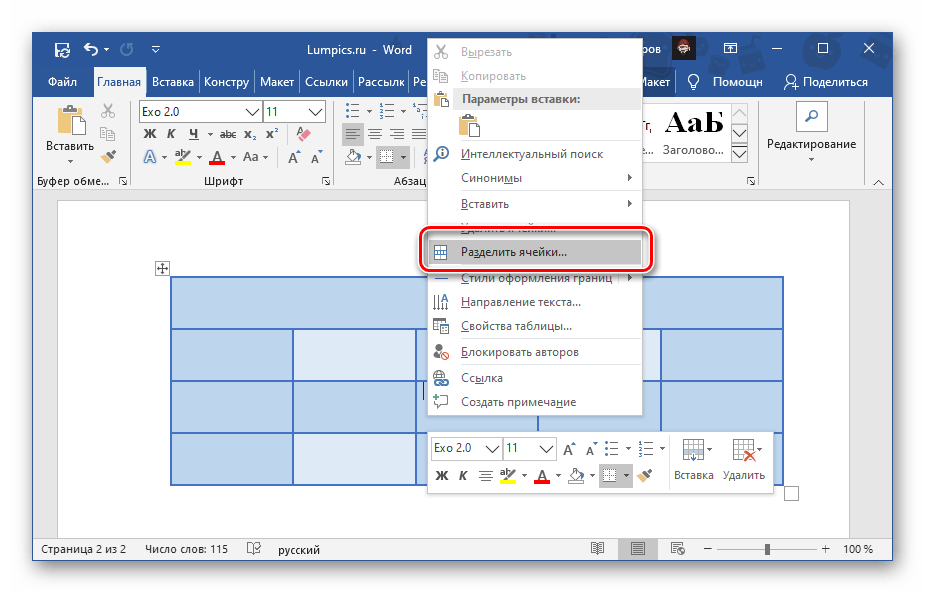
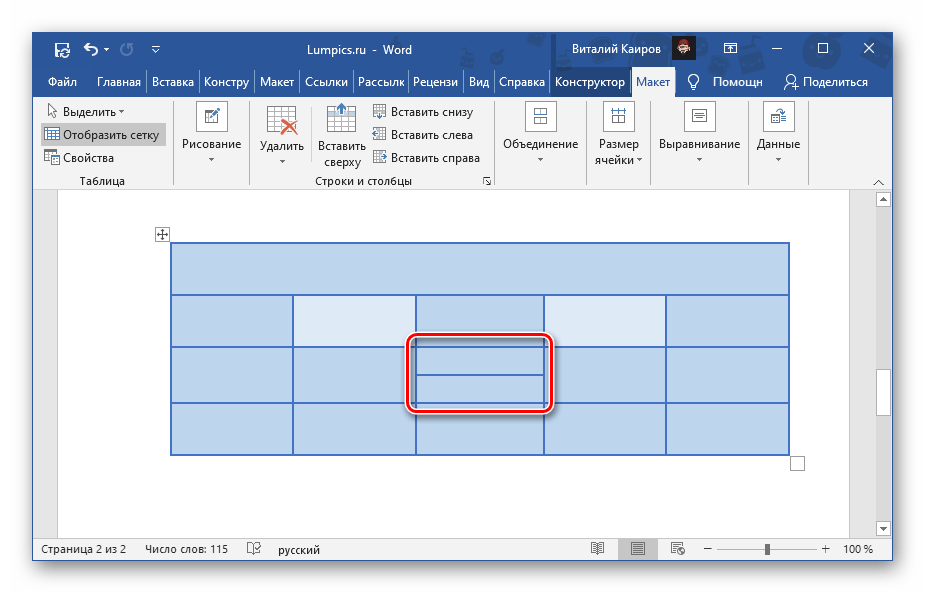
- Кликните правой кнопкой мышки (ПКМ) по той ячейке, которую требуется «разбить».
- Выберите пункт «Разделить ячейки».
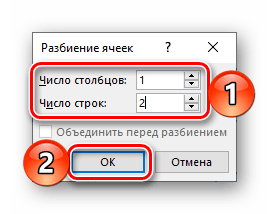
- В появившемся окошке укажите «Число столбцов» и «Число строк», которое вы хотите получить в данном элементе таблицы. Нажмите «ОК» для подтверждения.

Примечание: Для разбиения по вертикали необходимо указывать количество столбцов, по горизонтали – строк. В примере ниже показана одна ячейка, деленная на две вертикально, то есть теперь в ней две колонки. Количество получаемых в результате выполнения данного действия элементов не ограничено, однако стоит учитывать их будущий размер и объем данных, которые потребуется вводить.


Если при разделении ячеек вы допустили ошибку, либо воспользуйтесь клавишами «Ctrl+Z» для отмены действия, либо выделите полученные в результате деления элементы таблицы, вызовите контекстное меню и выберите пункт «Объединить ячейки».

Читайте также:
Как отменить последнее действие в Word
Как объединить ячейки в таблице Word
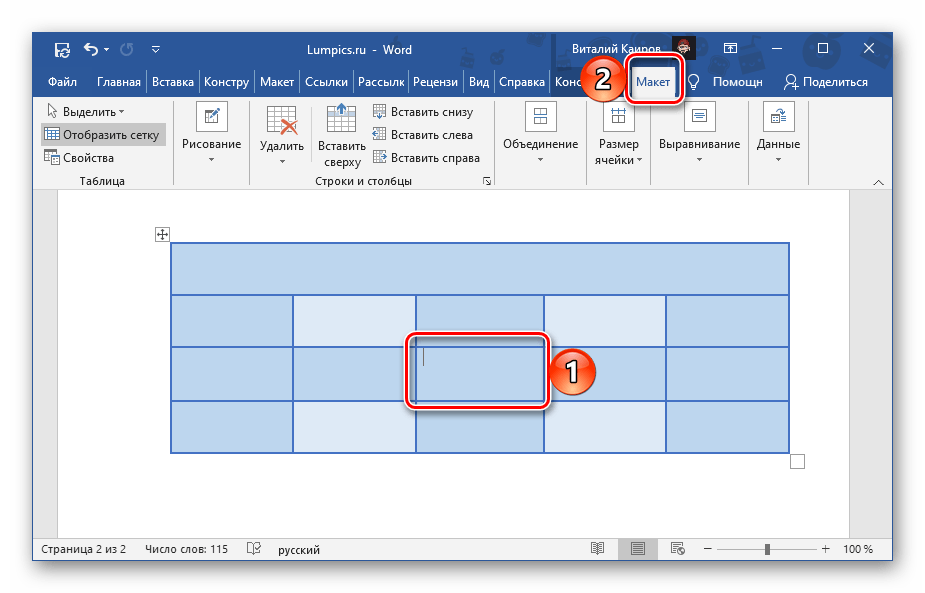
Способ 2: Инструменты вкладки «Макет»
Сразу после создания таблицы и/или ее выделения на панели инструментов Ворд появляется группа «Работа с таблицами», состоящая из двух вкладок – «Конструктор» и «Макет». Обратившись к последней, можно решить озвученную в заголовке статьи задачу, главное – не путайте ее с вкладкой, которая изначально представлена в панели инструментов.
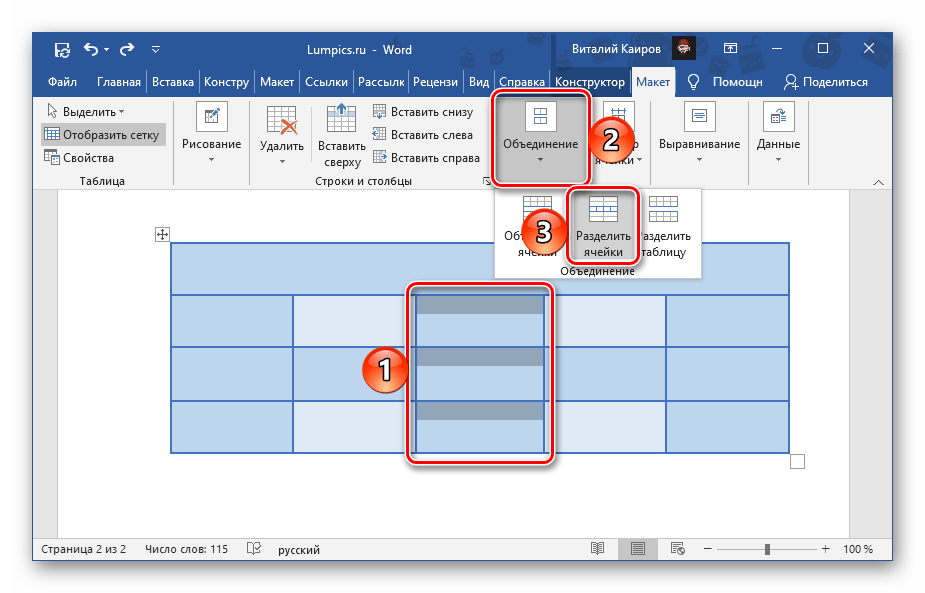
- Кликните левой кнопкой мышки (ЛКМ) по той ячейке, которую требуется разбить, и перейдите в показанную на изображении ниже вкладку «Макет».
- Нажмите на кнопку «Разделить ячейку», расположенную в группе «Объединение».
- Выполните те же действия, что и на последнем шаге предыдущей инструкции, то есть укажите нужное число столбцов и/или строк, на которые требуется разделить выбранный элемент, после чего кликните «ОК».


Ключевое различие между этим и рассмотренным выше методом заключается в том, что с помощью инструмента вкладки «Макет» можно разбить не только одну,
но и сразу две и более ячеек. Контекстное меню этого сделать не позволяет.
Способ 3: Самостоятельное рисование
Существует еще один метод разделения ячеек в таблице Ворд, который, в отличие от двух предыдущих, позволяет это сделать не только строго симметрично, а еще и произвольно, вручную нарисовав линию, которая поделит элемент на столбцы и/или строки.
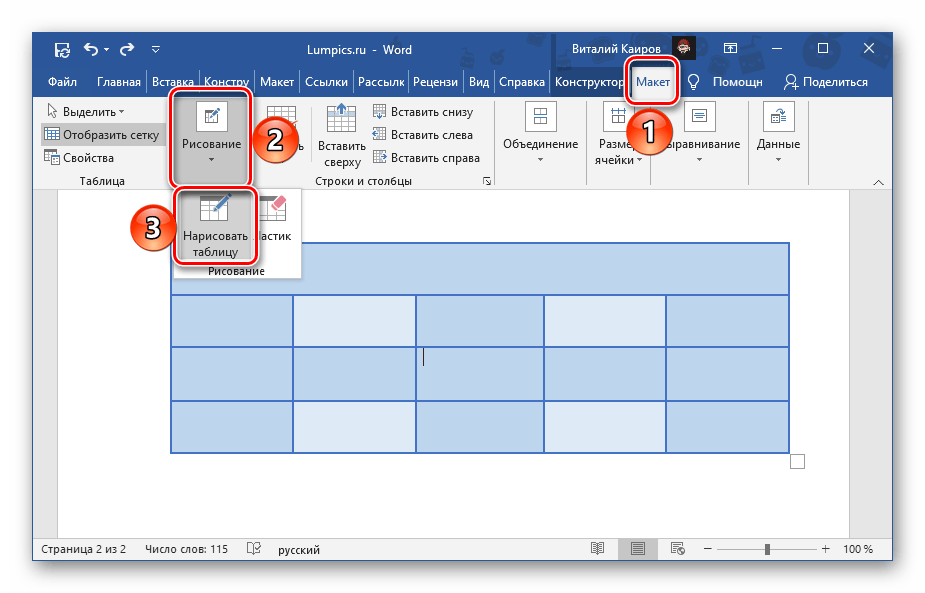
- Перейдите во вкладку «Вставка», нажмите на кнопку «Таблица» и выберите пункт «Нарисовать таблицу».

Примечание: Вызвать этот же инструмент можно через вкладку «Макет», предварительно выделив всю таблицу или кликнув по любой ее части.
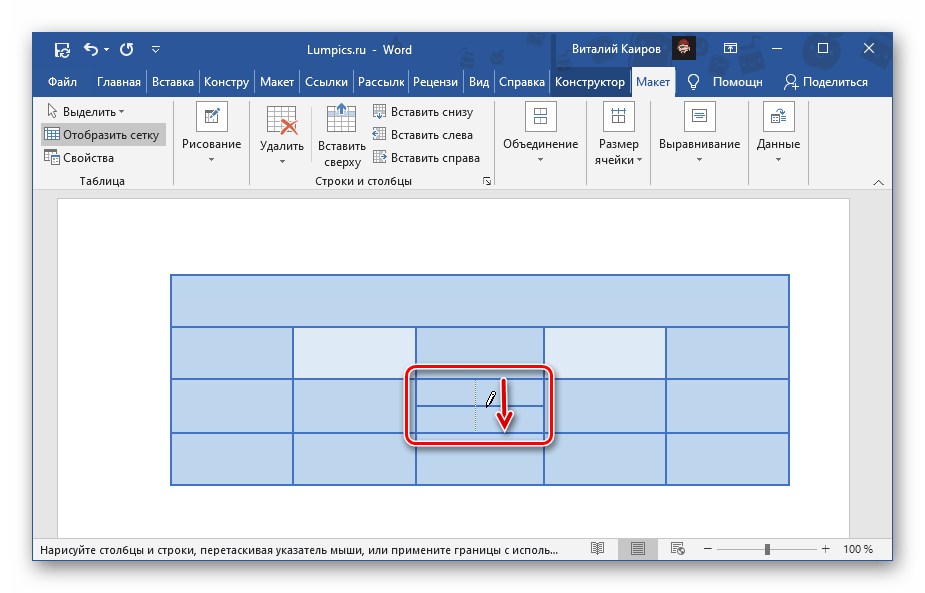
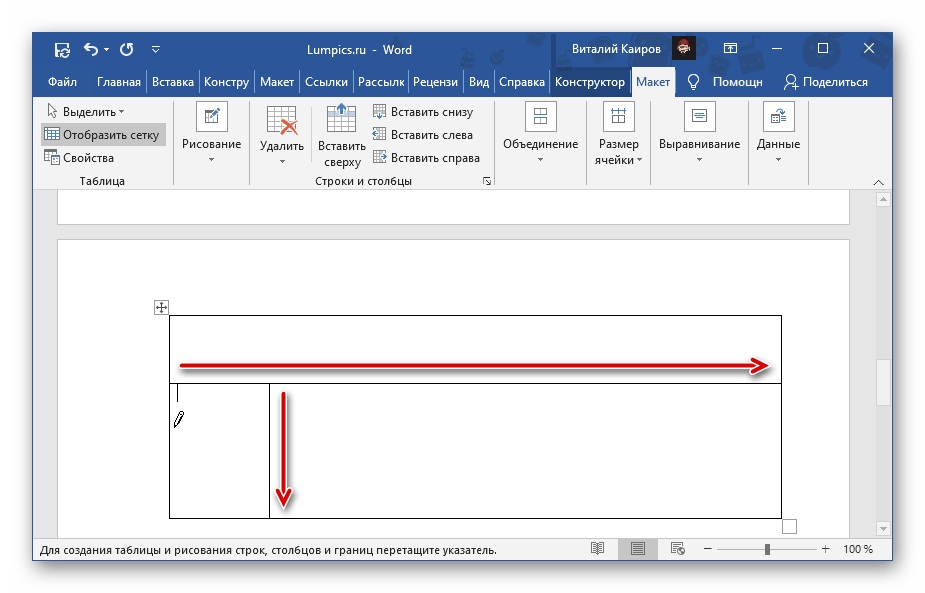
- Указатель курсора сменится на карандаш, с помощью которого мы с вами и разобьем ячейку.
Для этого достаточно провести в ней вертикальную или горизонтальную черту (обязательно делать это строго от границы до границы и максимально ровно), в зависимости от того, требуется ли сделать строки или столбцы.
При желании можно делить ячейку и на строки, и на столбцы.
- Несложно догадаться, что данный инструмент позволяет ячейку разделить на неограниченное число элементов.
К тому же, нарисовать границу можно не только в одной из них, но и сразу в нескольких.


Обо всех нюансах самостоятельного черчения таблиц мы ранее писали в отдельной статье.
Подробнее: Как начертить таблицу в Word
Еще статьи по данной теме:
Помогла ли Вам статья?
There are many word processing tools available but once worked in the comfort of Microsoft Word, you may not like any other software. It is pretty sure no one exactly knows the complete features Word offers. Adding dividers is one such hidden features and you can do this with shortcuts. In this article we will show how to add dividers in Microsoft Word documents quickly.
Related: How to fix slow Microsoft Word and speed up you productivity?
You can add dividers with different methods.
- Use hyphen and underscore
- Using other symbol shortcuts
- Insert image as divider
- Insert from the menu
1. Using Hyphens and Underscores
The simplest and most easy method is to use continuous hyphens and underscores. You can continuously press hyphen or underscore to insert the divider line between paragraphs. The advantage is that you can define the length and alignment of the divider as per your need.
- Divider using hyphens: —————–
- Divider using underscore: ____________
2. Quick Way to Add Dividers with Shortcuts
When you want to insert a full width divider between two sections or elements, you can use the following shortcuts.
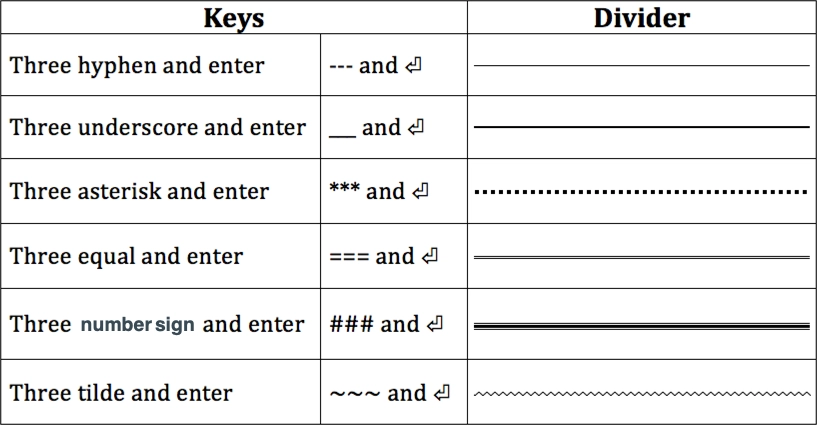
- Press hyphens for three or more times and press the enter key (— and ⏎). This will create a full width divider as a thin continuous line.
- Press three asterisks and enter (*** and ⏎) to if you want a dotted line.
- Use three equal signs and enter (=== and ⏎) to add a double line.
- Use three underscores and enter (___ and ⏎) to make a divider with medium thickness.
- Type three number signs and enter key (### and ⏎) to create a thicker line with borders.
- And finally with three tildes and enter (~~~ and ⏎) to create a wavy divider line.
Below picture explains the shortcut keys and the display of the divider in Word document.
Deleting Dividers Inserted with Shortcuts
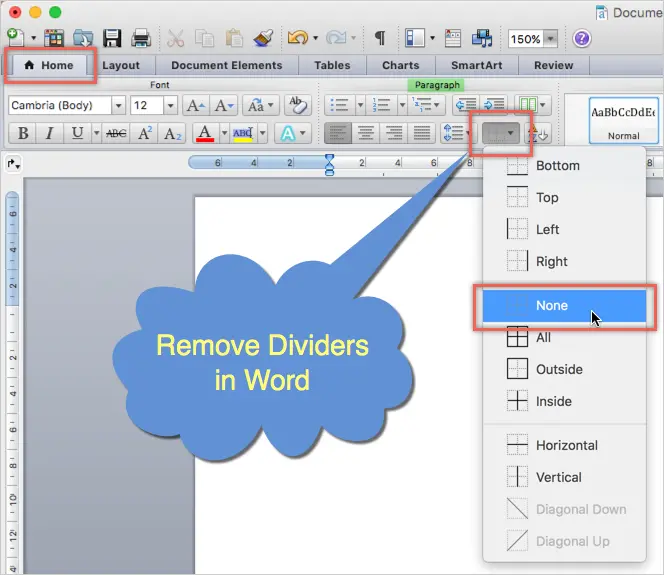
Well, you have created the dividers using the above shortcuts and now is the time to see how to delete them. You may find it difficult to delete since those dividers are not actually lines – they are bottom borders act like an underline. In fact, you can simply click on the “Borders” icon to insert divider in Word. Since “Borders” option by default uses “Bottom Border” clicking on it will insert a line similar to the above shortcuts. Follow the below instructions in order to delete the dividers.
- Position your cursor on the previous line of the divider. If you have an element like paragraph before the divider then select the paragraph.
- Click on the “Home” tab and then click the small arrow next to “Border” button in the “Paragraph” group.
- Select “No Border” or “None” option from the list.
This works on all Word versions like 2019, Microsoft 365, etc. on all platforms like Windows 10 / 11. This also works on Microsoft Word for Mac.
3. Using Images for Dividers
Using image is another option to insert divider image on your Word document. You can create suitable images and insert between elements as an object. Remember, not to copy image from website and paste on your document. Word will take long time to extract the image and also link the image to the webpage from where you are copying. The best option is to right click and save the image to your computer. After that, you can either copy paste from local computer or insert the image from menu.
4. Using Horizontal Line as Divider
The last option to insert divider in Word documents is using horizontal line menu option available. You can access this option under “Paragraph” group in “Home” tab. However, this option varies in Word 2016 onwards and earlier versions.
Word 2010 or Earlier
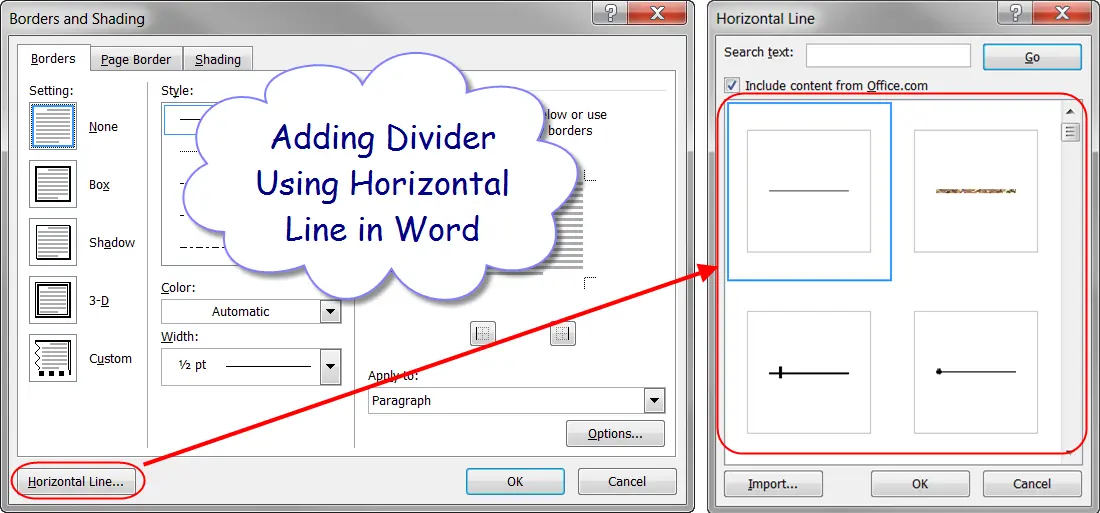
- Click on the “Borders and Shading” button and click on the “Horizontal Line” option to insert a divider on your document.
- If you want to insert a fancy divider, choose the menu option click on the “Horizontal Line…” button. On the popup box, select the divider style you want to insert.
Word 2016 or Later
- If you use Word 2016 or later versions like Microsoft 365, click on the small arrow next to “Border” icon. This is available in “Paragraph” group under “Home” menu.
- Choose “Horizontal Line” option to insert a grey color divider line.
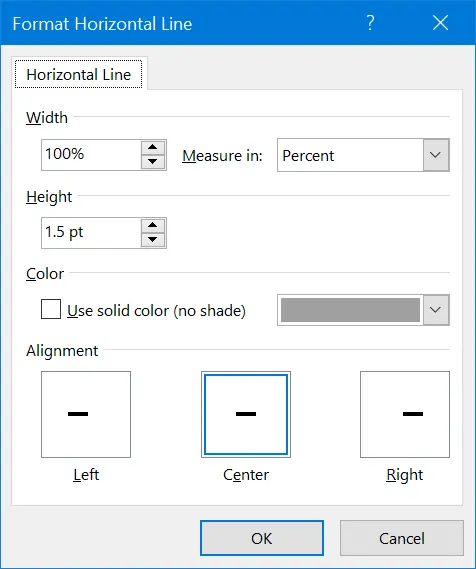
- Double click on the divider to open the “Format Horizontal Line” pop-up.
- Choose the color, alignment, width and height for your divider.
- Unlike dividers inserted with shortcuts, you can move the horizontal lines by dragging it to required place in your document.
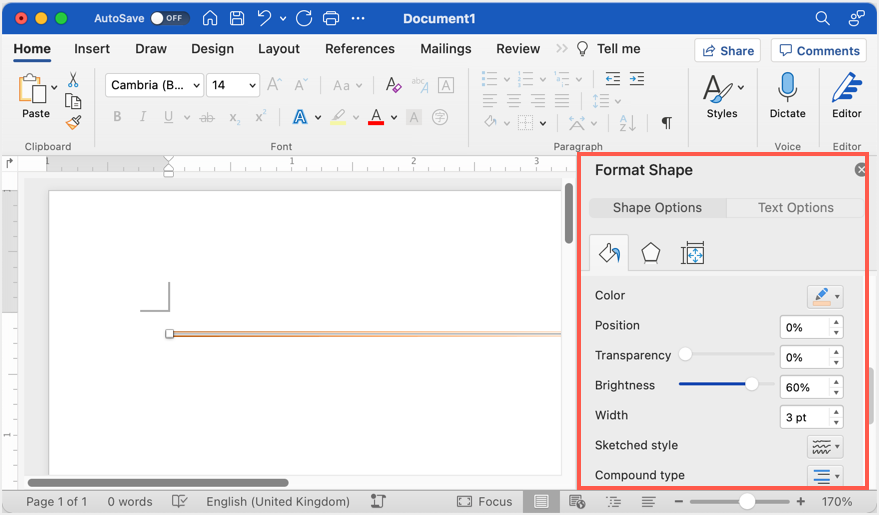
Horizontal line is a perfect option for inserting dividers in Word and it will also work on Word Microsoft 365 subscription in Mac also. However, double clicking on horizontal line in Mac Word will open “Format Shape” options in the sidebar. You can go to “Shape Options” tab and start customizing the color, thickness and other styles of the line.

You can easily merge and split cells in Microsoft Word to make your tables more interesting and more suited to the data you are trying to share. When you merge two or more cells, you are bringing them together in one cell. When you split a cell, you are dividing it from one cell into multiple cells.
You can merge and split tables on the individual cell level, as well as on the larger, table-wide level. In this article, I’ll show you how to merge and split table cells and tables in Word.
Merging cells in a table combines two or more adjacent cells of the same size into one larger cell.
First, select the cells you want to merge. They can be adjacent cells in a row or column.

Or they can be adjacent cells that span multiple rows and columns.
When you have your cells selected, right-click any of the selected cells, and then choose the “Merge Cells” command on the context menu.
If you prefer using Word’s menus, you can also head to the Table Tools “Layout” tab, and then click the “Merge Cells” button there.
Either way, your cells are now merged.
How to Split Cells In A Word Table
Splitting table cells in Word is only slightly more complicated than merging them. You can use the split command to one or more cells into a set number of rows and columns. Here’s how it works.
Let’s first say that we just one to split a single cell into two cells. First select the cell you want to split.
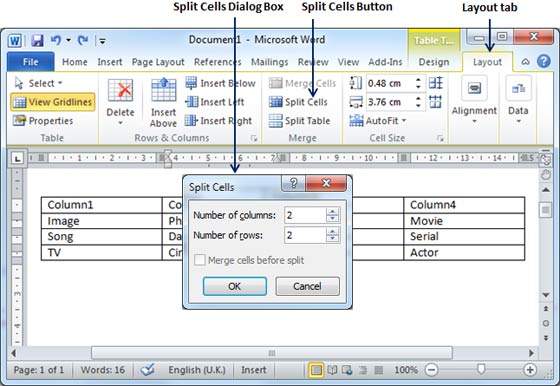
Then, right-click the selected cell and choose the “Split Cells” command from the context menu. (You can also head to Table Tools > Layout > Split Cells on the Word Ribbon if you prefer.)
This opens the Split Cells window. By default, it’s set up to split the selected cell(s) into two columns, which is exactly what we want. You can just go ahead and click the “OK” button to make the split. Input the number of rows and columns you would like to split your cell into.
And that cell we selected is now two cells.
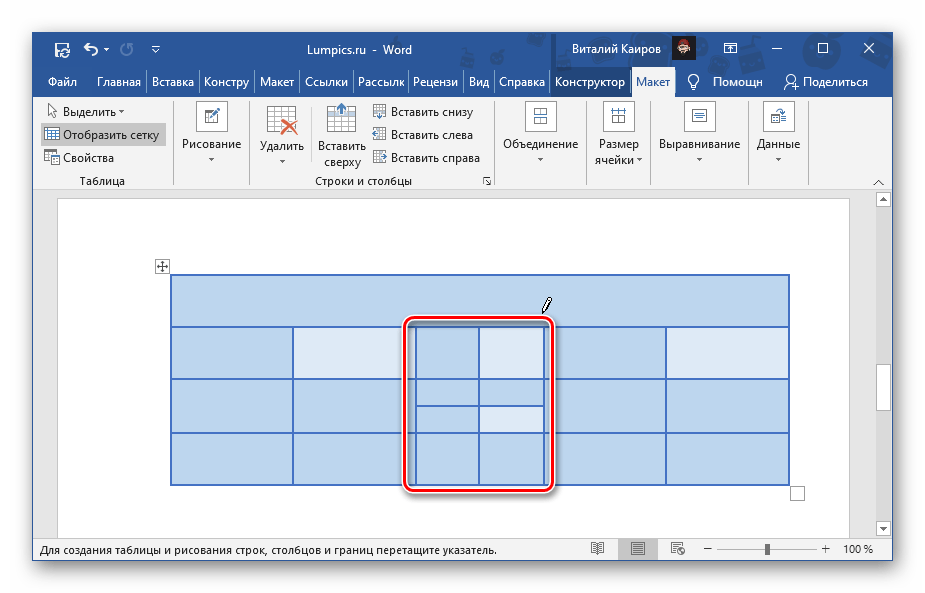
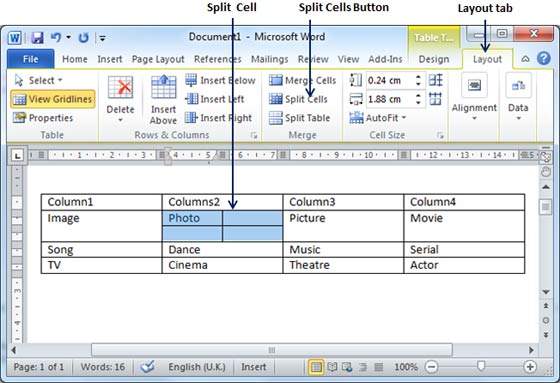
As you probably guessed from the options in that Split Cells window, you can also get a little more complex with cell splitting. Let’s say we had a table like the one shown below. And we want to take those selected cells (the ones in gray under the second column header) and turn them into two big rows of three columns each.
We’d head to Table Tools > Layout > Split Cells (a lot of times the Split Cells command doesn’t show up on the context menu when you have multiple cells selected, so it’s easier to use the Ribbon button). In the Split Cells window, we’d select three columns and two rows. We also want those cells merged before being split, so make sure that option is selected.
When we hit “OK” the table turns out just like you’d expect.
And obviously, this is just a quick look. You can get just about as complicated with your table layout as you’d want.
How to Split a Table in Word
You can split an entire table in Word. This can be useful for splitting long tables into two separate tables—mostly in hopes of dealing with formatting issues that multi-page tables can sometimes cause.
First, click to place your insertion point in the cell where you would like your table split to begin. The cell that contains the insertion point will become the top row of the second table.
Head to Table Tools > Layout, and then click the “Split Table” button.
Your table is now split into two tables.
How to Merge a Table in Word
And as you might expect, you can also merge tables together. There’s no button on the menu for this one, though. You have to do it by dragging and dropping.
Hover your pointer over the table you would like to merge until the table’s handle (the plus sign) appears at its top left corner. You can click and drag the table using that handle.
Drag the table until its top row aligns with the bottom row of the table you’re merging into.
When you release your mouse button, Word merges the two tables.
Now you know how to easily merge and split tables and table cells in Microsoft Word. Of course, like with any other Word feature, this one takes some playing with. Especially if you’re doing complex merges and splits (or merging together long tables), formatting can sometimes get a little weird.
READ NEXT
- › How to Merge and Split Tables in Google Docs
- › How to Make Your Word Document More Accessible to Everyone
- › How to Make a Calendar in Microsoft Word
- › Google Chrome Is Getting Faster
- › How to Adjust and Change Discord Fonts
- › This New Google TV Streaming Device Costs Just $20
- › The New NVIDIA GeForce RTX 4070 Is Like an RTX 3080 for $599
- › HoloLens Now Has Windows 11 and Incredible 3D Ink Features
In this chapter, we will discuss how to split table cells in Word 2010. Microsoft Word allows splitting a cell into multiple cells. We will understand how to split a cell into multiple smaller sub-cells.
Split a Cell
The following steps will help you split a cell into two sub-cells of a table available in word document.
Step 1 − Bring your mouse pointer position inside the cell that has to be divided into multiple cells.
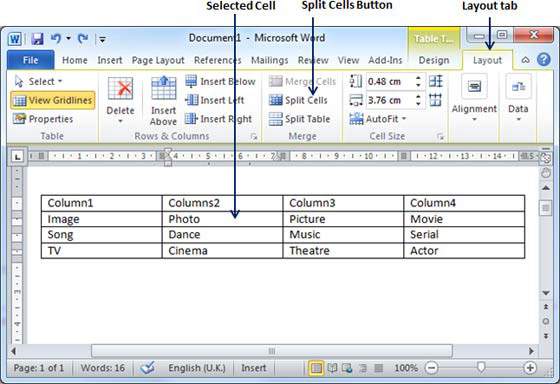
Step 2 − Now click the Layout tab and then click the Split Cells button; this will display a dialog box asking for the number of rows and columns to be created from the selected cell.
Step 3 − Select the desired number of rows and columns that have to go into the resultant cell and finally click the OK button to apply the result.
You can divide a cell into multiple cells either row-wise or column-wise or both.
To extend content across multiple rows or columns in a table, merge cells to create a larger cell. Or, split cells into smaller cells.
Merge cells
-
Select the cells that you want to merge.
-
Select Layout > Merge Cells.
To unmerge cells, select the cells and select Unmerge Cells.
Note: In Excel, select the cells you want and select Merge & Center. To unmerge cells, select the cells and select Unmerge Cells.
Split cells
-
Select the cell that you want to split.
-
Select Layout > Split Cells.
-
Enter the number of columns or rows that you want to split the selected cell into, and then select OK.
Want more?
Merge or split cells in a table
Word training
PowerPoint training
Excel training
Outlook training
You can merge or split table cells however you’d like, to better organize your table.
For example, to make Monthly Sales the header for all of the months rather than for a single column.
Select the cells you want to combine.
Select Layout, and then Merge Cells.
And center the heading, Monthly Sales.
To add a quarterly sales heading, select the header row, and then select Split Cells.
To have a column for quarter 1 and one for quarter 2, leave the number of columns as 2 and select OK.
And add your header text: «Q1 Sales» and «Q2 Sales»
In Excel, you can’t merge cells in tables, but you can in spreadsheets.
To make Monthly Sales the header for all of the months, select the cells you want to merge, and then in Home, select Merge & Center. When you merge cells, you lose any data in the second cell.
To unmerge them, select Unmerge Cells.
Microsoft 365, Microsoft Office for Mac, Microsoft Powerpoint, Microsoft Word, Office 2003, Office 2007, Office 2010, Office 2013, Office 2016, Office 2019, Office 2021 / Office LTSC, Office 365, Office for Mere Mortals /
18 October 2022
Combine or divide adjacent Microsoft Word or PowerPoint table cells into a merged single cell or split a cell in two.
Welcome to ‘Merge Cells’ where you can combine adjacent cells into a single cell. It’s very handy for table formatting tricks and other unusual situations like a longer than common text label.

Or a three row heading like this with various merged cells to create covering headings like ‘Crew’ and ‘Lunar Landing’ :

Word and PowerPoint
The same table merge/split cell features are in both Word and PowerPoint

Merge Cells
To merge cells, select them then click Table Tools | Layout | Merge Cells.

Cells to merge have to be entirely, not partially adjacent to each other. The Merge Cells button will be unavailable/greyed out if the selected cells can’t be merged.

Split cells in Word Tables
As you can see, on the ribbon there is also a ‘Split Cells’ option which can reverse an earlier Merge Cell or be used for a different type of special case.

Excel
Excel also has a Merge cell feature at Home | Alignment with some options not directly available elsewhere.

- Merge and Center
- Merge Across
- Merge Cells
- Unmerge Cells – the Excel version of Split cells
Combining more than two cells into one is called “merging cells,” and dividing one cell into more cells is referred to as “splitting cells.” Similarly, dividing a table into more tables is called a “split table.”
To merge and split cells of a table in a word document, follow the steps below.
Merging cells is the process of combining many cells into one. To unite the cells into one, take the following actions:
Hover over the gridlines with enough rows and columns and then click to insert a table.

Now select enough cells in a table

Click on the table tools Layout
After that, click the Merge Cells to merge all the selected cells into one cell as in the screenshot below.

2. Split Cells in Word
Splitting cells means dividing one cell into two or more two cells. To split the cells of a table, do the following:
Select or position the cursor in one of the cells in a table that you want to split
Click on the Split cells.

On the Split Cells pop-up, choose the number of columns and rows you want to add by splitting a cell
Note: The cells are splinted as in the screenshot below.

3. Split Table in MS-Word
Dividing a table into more tables is called a split table
After inserting the table, place the cursor under any cell in a row, rather than the table you want to divide.
On the Layout tab, in the Merge group, click on the Split Table.
Now your table is successfully divided as you wish.

Video Tutorial
What are the Merge and Split Cells of a Table in Word?
It is known as “splitting cells” when two cells are split into more than one and “merging cells” when more than two cells are combined into one. A “split table” is what you get when you divide a table into multiple tables.