
After you create a table, Microsoft Office Word 2007 offers you many ways to format that table. If you decide to use Table Styles, you can format your table all at once, and even see a preview of what your table will look like formatted in a particular style before you actually apply the style.
You can create a custom look for tables by splitting or merging cells, adding or deleting columns or rows, or adding borders. If you’re working with a long table, you can repeat the table headings on each page on which the table appears. To prevent awkward page breaks that disrupt the flow of your table, you can also specify just how and where the table should break across pages.
What do you want to do?
-
Use Table Styles to format an entire table
-
Add or remove borders
-
Display or hide gridlines
-
Add a cell, row, or column
-
Delete a cell, row, or column
-
Merge or split cells
-
Repeat a table heading on subsequent pages
-
Control where a table is divided
Use Table Styles to format an entire table
After you create a table, you can format the entire table by using Table Styles. By resting your pointer over each of the preformatted table styles, you can preview what the table will look like.
-
Click in the table that you want to format.
-
Under Table Tools, click the Design tab.
-
In the Table Styles group, rest the pointer over each table style until you find a style that you want to use.
Note: To see more styles, click the More arrow
 .
. -
Click the style to apply it to the table.
-
In the Table Style Options group, select or clear the check box next to each the table element to apply or remove the selected style.
 .
.Top of Page
Add or remove borders
You can add or remove borders to format a table the way that you want.
Add table borders
-
Under Table Tools, click the Layout tab.
-
In the Table group, click Select, and then click Select Table.
-
Under Table Tools, click the Design tab.
-
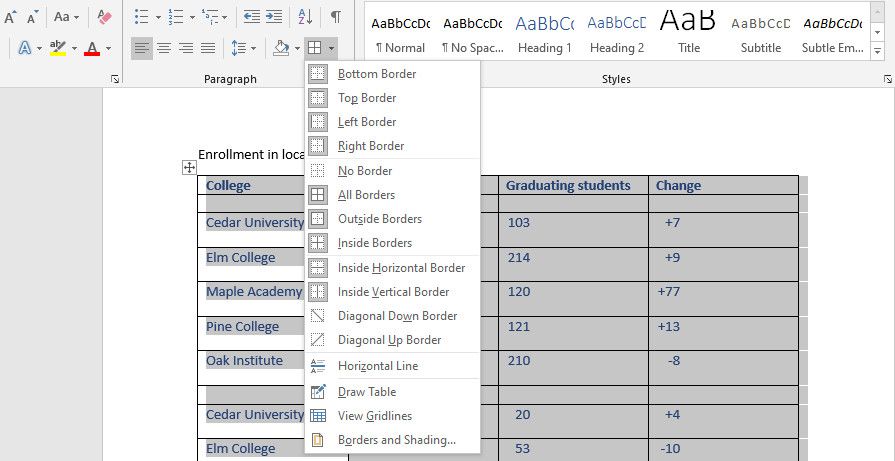
In the Table Styles group, click Borders, and then do one of
the following:-
Click one of the predefined border sets.
-
Click Borders and Shading, click the Borders tab, and then choose the options that you want.
-
Remove table borders from the whole table
-
Under Table Tools, click the Layout tab.
-
In the Table group, click Select, and then click Select Table.
-
Under Table Tools, click the Design tab.
-
In the Table Styles group, click Borders, and then click No Border.
Add table borders to specified cells only
-
On the Home tab, in the Paragraph group, click Show/Hide.
-
Select the cells that you want, including their end-of-cell marks.
-
Under Table Tools, click the Design tab.
-
In the Table Styles group, click Borders, and then click the border that you want to add.


Remove table borders from specified cells only
-
On the Home tab, in the Paragraph group, click Show/Hide.
-
Select the cells that you want, including their end-of-cell marks.
-
Under Table Tools, click the Design tab.
-
In the Table Styles group, click Borders, and then click No Border.
Top of Page
Display or hide gridlines
Gridlines show the cell boundaries of a table on the screen wherever the table doesn’t have borders applied. If you hide the gridlines in a table that has borders, you won’t see the change because the gridlines are behind the borders. To view the gridlines, remove the borders.
Unlike borders, gridlines appear only on the screen; they are never printed. If you turn off gridlines, the table is displayed as it will be printed.
Note: Gridlines are not visible when you view a document in a Web browser or in Print Preview.
Display or hide table gridlines in a document
-
Under Table Tools, on the Layout tab, in the Table group, click View Gridlines.
Top of Page
Add a cell, row, or column
Add a cell
-
Click in a cell that is located just to the right of or above where you
want to insert a cell. -
Under Table Tools, on the Layout tab, click the Rows & Columns Dialog Box Launcher.
-
Click one of the following options:
|
Click this |
To do this |
|
Shift cells right |
Insert a cell and move all other cells in that row to the right. Note: This option may result in a row that has more cells than the other rows. |
|
Shift cells down |
Insert a cell and move remaining existing cells in that column down one row each. A new row will be added at the bottom of the table to contain the last existing cell. |
|
Insert entire row |
Insert a row just above the cell that you clicked in. |
|
Insert entire column |
Insert a column just to the right of the cell that you clicked in. |
Add a row
-
Click in a cell that is located just below or above where you want to add a row.
-
Under Table Tools, click the Layout tab.
-
Do one of the following:
-
To add a row just above the cell that you clicked in, in the Rows and Columns group, click Insert Above.
-
To add a row just below the cell that you clicked in, in the Rows and Columns group, click Insert Below.
-
Add a column
-
Click in a cell that is located just to the right or left of where you want to add a column.
-
Under Table Tools, click the Layout tab.
-
Do one of the following:
-
To add a column just to the left of the cell that you clicked in, in the Rows and Columns group, click Insert Left.
-
To add a column just to the right of the cell that you clicked in, in the Rows and Columns group, click Insert Right.
-
Top of Page
Delete a cell, row, or column
-
Do one of the following:
To select
Do this
A cell
Click the left edge of the cell.
.A row
Click to the left of the row.
A column
Click the column’s top gridline or top border.
-
Under Table Tools, click the Layout tab.
-
In the Rows & Columns group, click Delete, and then click Delete Cells, Delete Rows, or Delete Columns, as appropriate.


Top of Page
Merge or split cells
Merge cells
You can combine two or more cells in the same row or column into a single cell. For example, you can merge several cells horizontally to create a table heading that spans several columns.
-
Select the cells that you want to merge by clicking the left edge of a cell and then dragging across the other cells that you want.
-
Under Table Tools, on the Layout tab, in the Merge group, click Merge Cells.
Split cells
-
Click in a cell, or select multiple cells that you want to split.
-
Under Table Tools, on the Layout tab, in the Merge group, click Split Cells.
-
Enter the number of columns or rows that you want to split the selected cells into.
Top of Page
Repeat a table heading on subsequent pages
When you work with a very long table, it will be divided wherever a page break occurs. You can make adjustments to the table so that the table headings are repeated on each page.
Repeated table headings are visible only in Print Layout view and when you print the document.
-
Select the heading row or rows. The selection must include the first row of the table.
-
Under Table Tools, on the Layout tab, in the Data group, click Repeat Header Rows.
Note: Word automatically repeats the table headings on each new page that results from an automatic page break. Word does not repeat a heading if you insert a manual page break within a table.
Top of Page
Control where a table is divided
When you work with a very long table, it must be divided wherever a page break occurs. By default, if a page break occurs within a large row, Microsoft Word allows a page break to divide the row between the two pages.
You can make adjustments to the table to make sure that the information appears as you want it to when the table spans multiple pages.
Prevent a
table row from breaking across pages
-
Click in the table.
-
Under Table Tools, click the Layout tab.
-
In the Table group, click Properties, and then click the Row tab.
-
Clear the Allow row to break across pages check box.
Force a table to break across pages at a particular row
-
Click in the row that you want to appear on the next page.
-
Press CTRL+ENTER.
Top of Page
Tables in Word are useful in so many situations. In this post you’ll discover how to create tables, then manipulate and design them in the quickest and easiest way to provide that visual punch.
Clickable Table of Contents
Enhance your Word tables with these advanced features
1. What are tables in Word good for?
Tables are useful for 2 distinct reasons.
- To show an actual table of data, or
- To organise and postion text, images and other elements on the page.
Many years ago, typewriters ruled the world. And a feature of a good typewriter was the tab stop, which was a device that essentially let you control indentation.
Over the years many people have continued to use tabs to indent text, because of its convenience, but they are hard work to set up properly.
Tables provide a much easier way to organise content on a page.
1. Select the Insert tab.
2. Click the Tables icon in the Tables group.
3. Move your mouse pointer into the table grid until the required number of rows and columns are highlighted orange, then left-click.

An empty table is inserted into the document.
Two new tabs, Design and Layout are also added to the ribbon area, under the banner of Table Tools.


3. MOVING AROUND A Word TABLE
- While the table is empty, you can use the cursor keys to move around the cells. However, when the cells contain information, using the cursor keys will move through the cell content first before moving to the next cell
- You can left-click in any cell to position the cursor.
- Press Tab to move to the next cell. The cursor will move across and then down the table.
- Press Shift + Tab to move to the previous cell.

NB. Using Tab is better than using the cursors as it will move to the next/previous cell regardless of whether there is information in the cells.
NB2. If you press Tab while you are in the last cell, a new row will be added to the bottom of your table
4. SELECTING A CELL, ROW, COLUMN OR THE ENTIRE TABLE
To select a cell:
1. Position the mouse pointer inside the cell on the bottom-left corner of the cell.
The pointer will change shape to a solid black arrow that points up and right.
2. Left-click.

To select a row of a table:
1. Position the mouse pointer in the left margin in line with the row you want to select.
The mouse pointer will change to a white arrow that points up and right.
2. Left-click.

To select a column
1. Position the mouse pointer so that it rests on the top border of the table, above the column you want to select.
The mouse pointer will change to a solid black arrow pointing down.
2. Left-click.

To select the entire table:
1. Position your mouse pointer over the 4-headed arrow icon situated at the top-left of the table.
2. Left-click.

5. INSERTING AN EXTRA ROW OR COLUMN
To insert an extra row:
1. Position the cursor in a cell.
2. Select the Layout tab, under the Table Tools banner.
3. Click Insert Above or Insert Below in the Rows and Columns group

Here is a quick way to insert new rows:
1. Position the cursor to the left of the table, but in close proximity.
2. A plus symbol will appear above or below the mouse pointer indicating where the new row will be added.

3. Nudge the mouse pointer up or down to move the plus sign above or below.
4. Left-click to insert the new row,
To insert an extra column:
1. Position the cursor in a cell.
2. Select the Layout tab, under the Table Tools banner.
3. Click Insert Left or Insert Right in the Rows and Columns group

Here is a quick way to insert a new column:
1. Position the cursor above a column, but in close proximity to the table.
2. A plus symbol will appear to the left or right of the mouse pointer indicating where the new column will be added.
3. Nudge the mouse pointer left or right to move the plus sign to the left or the right of the column.
4. Left-click to insert the new column,

6. DELETING A ROW OR COLUMN
To delete the current row or column:
1. Position the cursor in any cell of the row you want to delete.
2. Select the Layout tab, under the Table Tools banner.
3. Click the Delete icon in the Rows and Columns group.

4. Choose Delete Row or Delete Column from the drop-down menu.
7. Quickly fORMATTING tables in Word
Word provides you with a number of pre-set table designs. This means that it formats the headings and the data, applies a variety of borders and colours the cells in a way that makes it look like a professionally produced table. As a beginner this simple technique will give you a good-looking table.
1. Position the cursor in any cell in the table.
2. Select the Design tab under the Table Tools banner.
The Table Styles group lists a number of table designs. To get the full list, click the More button beneath the table styles scroll bar
The default table style is Table Grid in the Plain Tables category which adds simple gridlines but no shading to your table.
Live Preview allows you to hover over a design and see it applied to your table. If you like what you see, click to select the table design.

In the Table Style Options group of the Design tab, tick the components that you have in your table. For example, if your table has column headings, tick Header Row. In doing this, the various parts of your table are formatted accordingly

Header Row
This will emphasise the header row by making the text bold or applying a different cell colour (depending on the table style selected.
Total Row
This will emphasise the bottom table row by making the text bold or applying a different cell colour (depending on the table style selected.
First Column
This will emphasise the first column (for labels etc.) by making the text bold or applying a different cell colour (depending on the table style selected.
Last Column
This will emphasise the last column (for row totals etc.) by making the text bold or applying a different cell colour (depending on the table style selected.
Banded Rows
This will make odd rows one colour and even rows a different colour. This helps readability.
Banded Columns
This will make odd columns one colour and even columns a different colour. This helps readability.
8. SETTING THE BORDERS AND SHADING
The Table Styles Gallery allows you to completely format a table with one click. Whereas you used to need some nous, anybody can now create a professional looking design.
However, you will often still need to apply your own border and shading, and manually change a table design. With a little effort can add a lot of flavour to your page and dramatically enhance the overall appearance of the document.
To set the borders for tables in Word:
1. Select the portion of the table that you wish to set the borders for. This may be the entire table, a row or rows, a column or columns or a selection of cells.
2. Select the Design tab under the Table Tools banner.
3. Select the Borders icon. A drop-down list appears. This list shows every combination of border that can be turned on or off. The icons with a shaded background are currently switched on. The rest are switched off.
4. Click any icon to switch the border on or off. The border style that is applied is the default style (½ pt solid black line ) or the last style that was used.

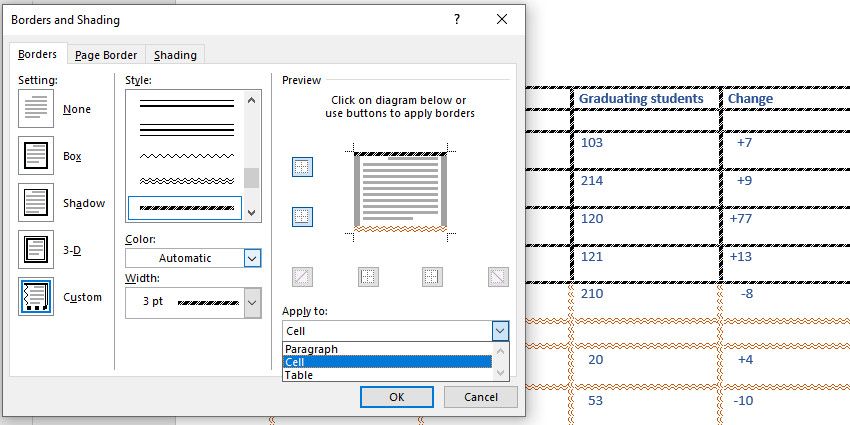
5. To apply customised borders, with different colours, styles and widths, click the Borders & Shading option at the bottom of the list to display the Borders and Shading dialog box.


Your selection will always have an outer border, and if you selected more than one cell, you will have some inside borders as well. The easiest way to use the dialog box is to start on the bottom-middle and work your way up and right.
1. Select the colour and width (thickness) that you would like for your border.

2. Choose a style (e.g. dotted, dashed, double, solid etc.)

3. Paint your borders. There are two ways to do this.
- The first way is to click directly on a border in the Preview itself.
- The second way is to click the appropriate icon around the edge of the Preview section that represents each border. Depending on which cells you selected in your table, some of these icons may not be available.

On the left-hand side of the dialog box, there are some pre-defined border combinations which you can use to save yourself some time. Depending on your selection of cells, the pre-defined options may differ. Here’s a run-down:

To shade the cells of tables in Word:
1. Select the portion of the table that you wish to shade. This may be the entire table, a row or rows, a column or columns or a selection of cells.
2. Select the Design tab under the Table Tools banner.
3. Click the Shading icon.
The colours that you see displayed match the current them of the document. Themes were discussed earlier in the course.
4. Click a colour in the palette.
While you can pick any colour, it is recommended to stick with the light colour shades, otherwise your tables will appear very loud and ugly, like they’re shouting in your face. Subtle is the order of the day. The exception to this is column headings or other cells that you wish to differentiate. Under these circumstances, you can use a dark colour, but use a light font with it.

If you cannot find the exact colour you need,
- Click the More Colours link underneath the palette. This displays a larger, more accurate colour palette.
- And if that’s not enough, click the Custom tab and you’ll get a really fine selection of colours (you can even enter your own RGB settings if you know them)

9. REPEATING table HEADINGS ON EVERY PAGE WHEN PRINTING
When you have large tables that occupy two or more pages, many people insert manual page breaks, then copy and paste their table header rows at the top of each page.
When rows are added or removed from tables in Word, the table headers end up half way down the page.
There is a simple tool that will eliminate this problem
1. Ensure that the table is a single table, with no manual page breaks in the middle, and one header at the top. The table header may occupy more than one row, it doesn’t affect the way this feature works.
2. Position the cursor somewhere in the top row of the table.
3. Select the Layout tab under the Table Tools banner.
4. Click the Repeat Header Rows icon ion the Data group.

Now, it doesn’t matter how many rows tables in Word contain, if the table ever spills across into another page, the header row (which normally displays the column headings) will always appear at the top of the table.
10. All the key points again
- Tables in Word serve 2 distinct purpose: to display a table of data and to organise and position items on the page
- To create table, select 2 tabs — Design and Layout under the Table Tools banner.
- There are 2 tabs — Design and Layout under the Table Tools banner.
- You can press the TAB key to move direct to the next cell and SHIFT and TAB together to move backwards through a table.
- The four elements of a table are cells, rows, columns and the whole table. Each can be selected.
- Rows can be inserted by selecting the Layout tab under Table Tools, then clicking the Insert Above or Insert Below icons. Alternatively, hover to the left of a row and click the plus symbol that appears above or below the mouse pointer.
- Columns can be inserted by selecting the Layout tab under Table Tools, then clicking the Insert
Left or Insert Right icons. Alternatively, hover above a table column and click the plus symbol that appears to the left or right of the mouse pointer. - Columns and rows and be removed from the table, by positioning the cursor in the row or column to be removed, then clicking the Delete icon on the Layout tab of Table Tools and choosing Delete
Row or Delete Column. - Tables can be formatted using the Table Style gallery or by manually setting the shading and borders manually. Both sets of tools are found on the Design ribbon of the Table Tools.
- When using the Microsoft Table Styles, you can control the behaviour of the formatting by setting the Table Style options – 6 tick boxes that define the structure of your table.
- For long tables that spill across onto subsequent pages, the top row, which normally contains the column headings can be set to repeat automatically. So there is no excuse for cutting and pasting headings midway through your table or taping pages together to make sense of the table!
I hope you found plenty of value in this post. I’d love to hear your biggest takeaway in the comments below together with any questions you may have.
Have a fantastic day.


About the author
Jason Morrell
Jason loves to simplify the hard stuff, cut the fluff and share what actually works. Things that make a difference. Things that slash hours from your daily work tasks. He runs a software training business in Queensland, Australia, lives on the Gold Coast with his wife and 4 kids and often talks about himself in the third person!
SHARE
Here’s how to add, remove, and customize the border lines in Microsoft Word tables.

Microsoft Word is an unavoidable productivity tool for a lot of people. But whether you’re a daily user or only need it for urgent editing, some common tasks can become confusing.
If you often work with tables, we’ll show you how to get a better hold on table border lines in Word.
Creating Tables in Microsoft Word
Depending on your choice, Microsoft Word lets you choose whether to customize your table or add it automatically. Each of these options has its own application and usefulness in various scenarios.
As expected, the automatic option offers limited initial control over your tables. But it’s useful if you want to get a table with several rows and columns working quickly.
The custom option comes in handy when you need to draft a more interactive table with personal twists.
Take Control of Your Table Border Lines
So you’ve created a Word document, then sorted and arranged your pages as needed. You’ve also inserted your tables, but now you want to get a hold on how their border lines come through. There are several ways you can do that.
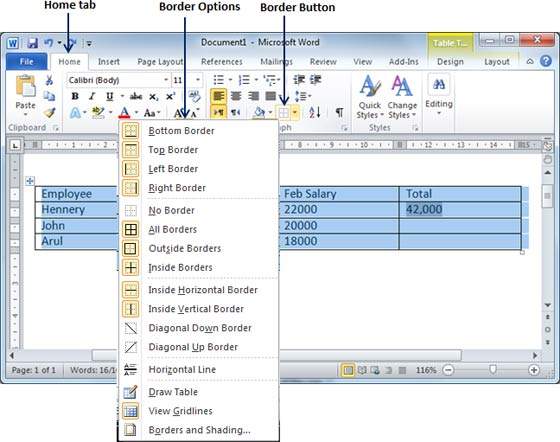
First off, the property that controls table border lines is the Borders option at the top Ribbon of Word. You’ll see this option under the Table Design tab when you highlight a table, but it’s always on the Home tab as well.
On the ribbon, go to Home > Paragraph and click the arrow-down button on the Borders button. Then select your preferred border line.
An alternative method is to right-click on the table you’ve created and click the arrow-down icon on the Borders button. Just like when using the Ribbon, use this to select a preferred border line option.
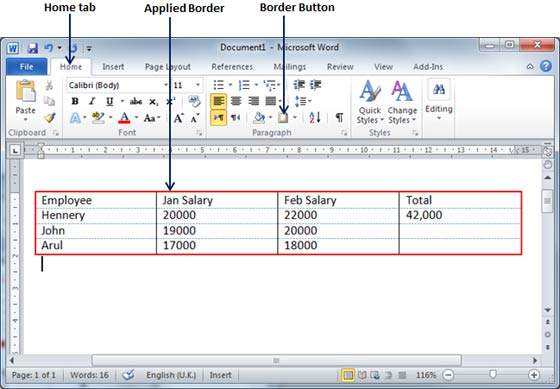
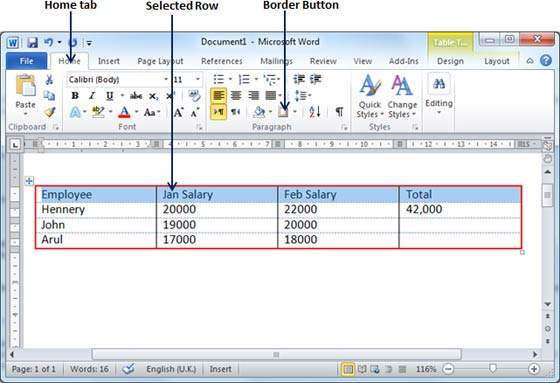
Note that if you highlight the whole table, any border line option you select applies to the entire table.
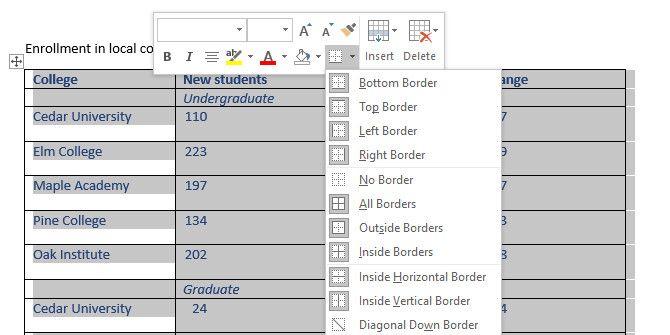
To apply the border line effect to a particular part of the table, highlight just that portion. Then repeat the process above to format the border lines to your preference.
Adding Border Colors and Styling Border Lines
You can also control how your border lines come through by adding border colors and thinning or thickening the lines.
To do that, click the Borders button followed by Borders and Shading. Here, select Colors or Width to change those elements.
You can also change the styling of the border lines by scrolling through the Style option in the Borders and Shading window.
If you want to apply these styles to particular cells in your table, highlight them first. At the bottom-right corner of the Borders and Shading window, click the Apply to dropdown and select Cell.
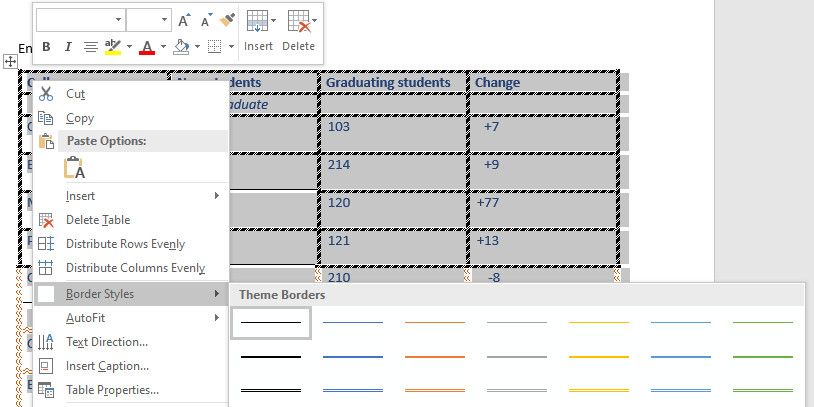
To style each border line manually without highlighting cells, right-click on the table. Next, go to Border Styles and select your preferred border option.
Merging and Splitting Cells
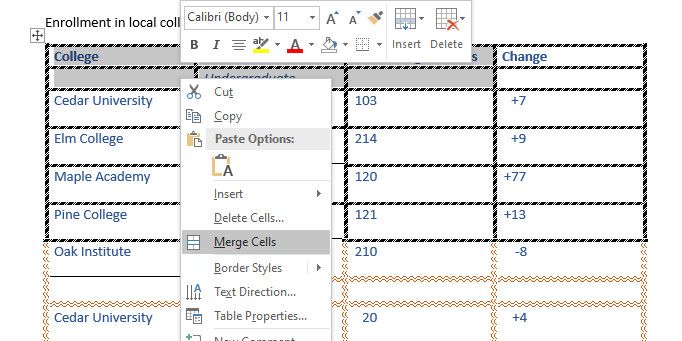
Another border control option is merging table cells. You can join two or more rows or columns by highlighting the ones you wish to join. Then, right-click on the table and click Merge Cells.
To split the merged cells into their default format, highlight the merged cells. Next, right-click on the table and click Split Cells.
Taking Control of Border Lines Is Easy
Manipulating table border lines in Microsoft Word isn’t difficult. But you’ll need a sharp eye to make your tables more professional and good-looking.
Play around with some of the available options, and you’ll find a suitable border style for your document before long.
![]()
Written by Allen Wyatt (last updated June 20, 2020)
This tip applies to Word 2007, 2010, 2013, 2016, 2019, and Word in Microsoft 365
When you add a table to your document, you may want to modify the borders that Word originally used for the table. You can do this by using any of the various methods that Word provides for modifying borders. Take your pick from the following:
- When you select a table or put the insertion point in a table, the Table Design (Design in earlier versions of Word) tab is available on the ribbon. In the Table Design tab, look in the Table Styles group to find the Borders tool.
- Another tab available when you select a table or put the insertion point in a table is the Layout tab. In the Layout tab, Table Group, click on the Properties command. Word displays the Table Properties dialog box. There is a Borders and Shading button on the dialog box.
- The Borders control on the Home tab of the ribbon, in the Paragraph group also works on tables.
- There is a Border Styles option on the context menu when you right click in a table.
- The Draw Table and Eraser controls found in the Layout tab, in the Draw group allow you to add and remove table lines one cell at a time.
Clicking on the arrow of the various Borders tools drops down a list of ways to apply border lines to the whole table and individual cells.
As with gridlines, if borders are applied to the table cell that the cursor is in, the Borders control will be highlighted.
Even more interesting, if the current cell does not have a border applied, but there are borders applied to any cell in the table then at least one of the lines in the «table» in the Borders control icon in the ribbon will be solid. (It is a very subtle indicator, but it is there if you look closely.)
Note that at the very bottom of the Borders drop-down list there are options to display the Borders and Shading dialog and to toggle View Gridlines.
The Draw Table and Eraser tools are good for adding and removing one or two lines at specific locations in a table. The Borders group is the very last group on the Table Design tab of the ribbon. It has controls to set line thickness, style, and color. Clicking the Draw Table tool converts the mouse pointer to a pencil. Clicking on any line in an existing table makes that line the color, thickness, and style selected in the tool. Clicking and dragging between any two lines in the table cell will split the cells along that line. Use the Esc key to cancel the drawing mode. Clicking on the Eraser tool changes the mouse pointer into an eraser that deletes any cell lines that it touches. Again, the Esc key will cancel the eraser mode.
Whatever method you choose to create your borders, a little experimentation is in order. Don’t be afraid to try out the numerous ways that Word provides to make your changes.
WordTips is your source for cost-effective Microsoft Word training.
(Microsoft Word is the most popular word processing software in the world.)
This tip (8616) applies to Microsoft Word 2007, 2010, 2013, 2016, 2019, and Word in Microsoft 365.
Author Bio
With more than 50 non-fiction books and numerous magazine articles to his credit, Allen Wyatt is an internationally recognized author. He is president of Sharon Parq Associates, a computer and publishing services company. Learn more about Allen…
MORE FROM ALLEN
Meaningless Text
The quick brown fox jumps over the lazy dog, or so the story goes. Here’s how to put this type of meaningless text into a …
Discover More
Word Won’t Take ‘No’ for an Answer
If you choose to exit Word and it asks you if you want to save changes to your Normal.dot template, it can be very …
Discover More
Counting Asterisks
For some operations and functions, Excel allows you to use wild card characters. One such character is an asterisk. What …
Discover More
In this chapter, we will discuss how to apply table borders and shades in Word 2010. Microsoft Word allows you to place a border on any or all of the four sides of a table very similar to text, paragraphs, and pages. You can also add shades to table rows and columns. This chapter will teach you how to add borders (left, right, top or bottom) around a table and how to add different shades to various rows and columns of the table.
Add Borders to Table
The following steps will help you add borders in a table cell available in Word document.
Step 1 − Select the table to which you want to add border. To select a table, click over the table anywhere which will make the Cross icon visible at the top-left corner of the table. Click this cross icon to select the table.
Step 2 − Click the Border button to display a list of options to put a border around the selected table. You can select any of the option available by simply clicking over it.
Step 3 − Try to add and remove different borders like left, right, top or bottom by selecting different options from the border options.

Step 4 − You can apply border to any of the selected row or column. You can try it yourself.
Step 5 − To delete the existing border, simply select the No Border option from the border options.
Using Border Options
You can add borders of your choice to word table by following the simple steps given below.
Step 1 − Click the Border button to display a list of options to put a border. Select the Border and Shading option available at the bottom of the list of options as shown in the above screenshot. This will display a Border and Shading dialog box. This dialog box can be used to set borders and shading around a selected table.

Step 2 − Click the Border tab; this will display a list of border settings, styles and options whether this border should be applied to the table or text or paragraph.
Step 3 − You can use the Preview section to disable or enable left, right, top or bottom borders of the selected table or row or column. Follow the given instructions in the preview section itself to design the border you like.
Step 4 − You can customize your border by setting its color, width by using different width thickness available under the style section.
Add Shades To Table
The following steps will help you add shades on a selected table or its rows or columns.
Step 1 − Select a row or column where you want to apply a shade of your choice.
Step 2 − Click the Border button to display a list of options to put a border. Select the Border and Shading option available at the bottom of the list of options. This will display a Border and Shading dialog box. This dialog box can be used to set borders and shading around selected row(s) or column(s).
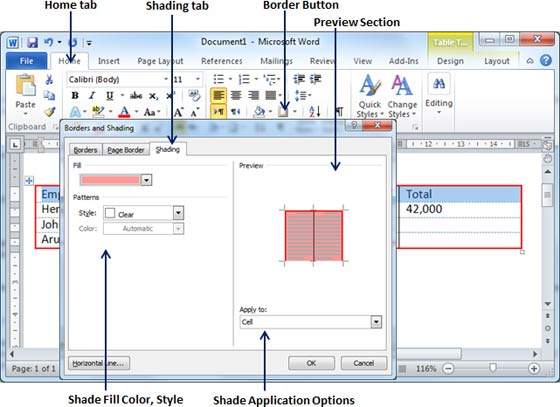
Step 2 − Click the Shading tab which will display options to select fill, color and style and whether this border should be applied to cell or table or selected portion of text.
Step 3 − You can use the Preview section to have an idea about the expected result. Once you are done, click the OK button to apply the result.