
Show or Hide White Space in Microsoft Word Documents
by Avantix Learning Team | Updated February 9, 2022
Applies to: Microsoft® Word® 2010, 2013, 2016, 2019 or 365 (Windows)
You can show or hide white space at the top and bottom of pages in Microsoft Word documents. If you hide white space, you won’t be able to see headers, footers or top and bottom margins in Print Layout View. The gray space that typically appears at the top and bottom of pages as you scroll through your document will also disappear. If you want to show or hide spaces between words, you’ll need to click Show/Hide ¶ on the Home tab in the Ribbon.
Print Layout View is the default view in Word. You can click the View tab in the Ribbon and select Print Layout in the Views group to go to this view if necessary.
In Word documents, margins are set for the top and bottom of pages by default and can be changed on the Layout tab in the Ribbon. Headers and footers appear in the top and bottom margin areas (with the exception of floating objects) so if white space is hidden, headers and footers may seem to be missing.
Recommended article: How to Hide Comments in Word (or Display Them)
Do you want to learn more about Microsoft Word? Check out our virtual classroom or live classroom Word courses >
Showing or hiding white space using a shortcut
To show or hide white space in Word using a shortcut:
- Position the cursor at the top of the document (you can press Ctrl + Home to move the cursor to the top of the document).
- Move the pointer into the gray area just above the first page (below the Ruler) until the pointer turns into an up and down arrow. A message appears to Double-click to show white space or Double-click to hide white space.
- Double-click. If you are hiding white space, you can also position the pointer in the gray area between pages and then double-click.
If you show or hide white space, this setting will continue in any new documents you create. When white space is hidden, the setting affects not just the white space between pages but anything that is part of the header or footer (including watermarks and other graphics anchored to the header or footer). When you save and close a document, the setting is retained in the document.
If you hide white space, page breaks are still visible in the document. If you print the document, the headers and footers will print even if white space is hidden.
Showing or hiding white space using the Options dialog box
To show or hide white space using the Word Options dialog box:
- Open a Word document where you want to show or hide white space.
- Click the File tab in the Ribbon.
- Select Options. A dialog box appears.
- In the categories on the left, select Display.
- In the pane on the right, check or uncheck Show whitespace between pages in Print Layout view.
- Click OK.
The Options dialog box, with the Display category selected, appears as follows:

Because this feature isn’t obvious, it can cause problems for users if areas in their document seem to be missing (such as headers or footers).
Subscribe to get more articles like this one
Did you find this article helpful? If you would like to receive new articles, join our email list.
More resources
14+ Word Selection Shortcuts to Quickly Select Text
How to Remove Hard Returns in Word Documents
How to Superscipt or Subscript in Word (with Shortcuts)
How to Insert the Not Equal Sign in Word (5 Ways to Type or Insert ≠)
How to Insert or Type the Degree Symbol in Word (5 Ways to Insert °)
Related courses
Microsoft Word: Intermediate / Advanced
Microsoft Excel: Intermediate / Advanced
Microsoft PowerPoint: Intermediate / Advanced
Microsoft Word: Long Documents Master Class
Microsoft Word: Styles, Templates and Tables of Contents
Microsoft Word: Designing Dynamic Word Documents Using Fields
VIEW MORE COURSES >
To request this page in an alternate format, contact us.
Our instructor-led courses are delivered in virtual classroom format or at our downtown Toronto location at 18 King Street East, Suite 1400, Toronto, Ontario, Canada (some in-person classroom courses may also be delivered at an alternate downtown Toronto location). Contact us at info@avantixlearning.ca if you’d like to arrange custom instructor-led virtual classroom or onsite training on a date that’s convenient for you.
Copyright 2023 Avantix® Learning
Microsoft, the Microsoft logo, Microsoft Office and related Microsoft applications and logos are registered trademarks of Microsoft Corporation in Canada, US and other countries. All other trademarks are the property of the registered owners.
Avantix Learning |18 King Street East, Suite 1400, Toronto, Ontario, Canada M5C 1C4 | Contact us at info@avantixlearning.ca
![]()
Written by Allen Wyatt (last updated June 1, 2020)
This tip applies to Word 2007, 2010, 2013, and 2016
Have you ever worked on a document that included multiple fonts and the printout didn’t quite match what you wanted? Sometimes there was more space between words or sentences than what seemed right, and you didn’t quite know what the problem was?
I have found that the culprit is often my own fault. I may have placed extra spaces between words or sentences in such a manner that the text looks fine on screen, but doesn’t quite fit the bill when finally printed. The solution, of course, is to remove the extra spaces and make sure there are a consistent number of them between both words and sentences. The problem with the solution is that it is often difficult to see how many spaces there really are.
Fortunately, Word allows you to easily see where spaces occur in your documents. All you need to do is follow these steps:
- Display the Word Options dialog box. (In Word 2007 click the Office button and then click Word Options. In Word 2010 and later versions display the File tab of the ribbon and then click Options.)
- Click Display at the left side of the dialog box. (See Figure 1.)
- Make sure the Spaces check box is selected.
- Click on OK.
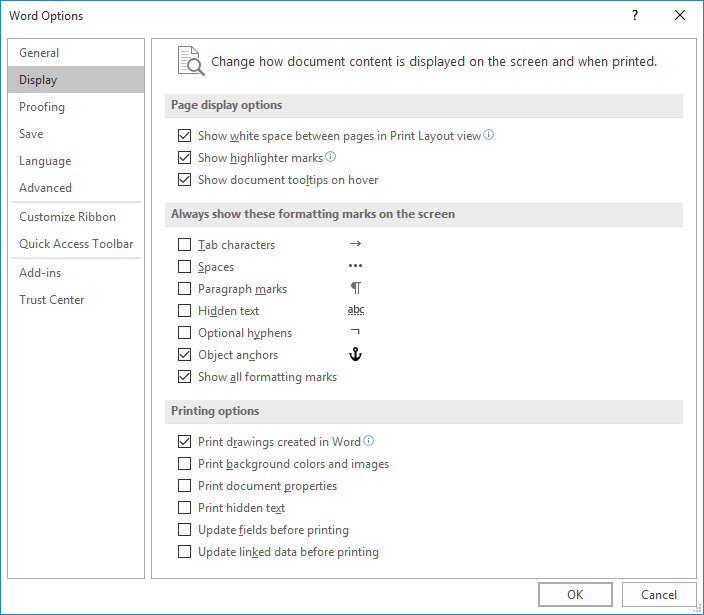
Figure 1. The Display options of the Word Options dialog box.
Now, all your spaces appear as small visible dots. It is very easy to tell where two visible dots appear, as opposed to two invisible spaces. Delete any extra spaces you want, as you would delete any other characters, and you will have your document cleaned up in no time.
WordTips is your source for cost-effective Microsoft Word training.
(Microsoft Word is the most popular word processing software in the world.)
This tip (6827) applies to Microsoft Word 2007, 2010, 2013, and 2016.
Author Bio
With more than 50 non-fiction books and numerous magazine articles to his credit, Allen Wyatt is an internationally recognized author. He is president of Sharon Parq Associates, a computer and publishing services company. Learn more about Allen…
MORE FROM ALLEN
Positioning a Column on the Screen
If you have static columns and dynamic columns on the screen, you may want the dynamic columns to always show a …
Discover More
Working with Document Links
Word makes it easy to establish links between documents. Here’s how to change and manage those links easily.
Discover More
Deleting All Fields
Fields can be a great way of adding small snippets of dynamic data to your documents. However, you may want to get rid of …
Discover More
More WordTips (ribbon)
Copying and Pasting without Affecting the Clipboard
Just about everyone knows the simple ways of copying and pasting using the Clipboard. What if you want to copy and paste, …
Discover More
Removing Breaks
Word allows you to add several types of «breaks» into your document. If you later want to remove any of them, you can use …
Discover More
Making Managerial Titles Lowercase
Your in-house document style may require that job titles be all lowercase. Applying such a rule across a long document or …
Discover More
Word for Microsoft 365 Word 2021 Word 2019 Word 2016 Word 2013 Word 2010 Word 2007 Word Starter 2010 More…Less
In Word, you can use the Backstage view to easily change Word options.
In this article
Page display options
Always show these formatting marks on the screen
Printing options
Page display options
Show white space between pages in Print Layout view
Select this option to display the top and bottom margins of the page, including the content of headers and footers.
Show highlighter marks
Select this option to display highlighted text on the screen and in printed documents.
Show document tooltips on hover
Select this option to display information such as URLs and reviewers’ comments in yellow pop-up boxes. The ToolTips, also called ScreenTips, appear when you rest your mouse pointer on a hyperlink, comment reference mark, or similar content.
Top of Page
Always show these formatting marks on the screen
Tab characters
Select this option to display tab characters as arrows.
Spaces
Select this option to display spaces between words as dots.
Paragraph marks
Select this option to display the ends of paragraphs with the paragraph symbol.
Hidden text
Select this option to display a dotted line under text that is formatted as hidden.
Optional hyphens
Select this option to display hyphens that indicate where to divide a word at the end of a line. Optional hyphens are not printed unless a word actually breaks at the end of a line. When a word breaks at the end of the line, the optional hyphen is printed as a regular hyphen.
Object anchors
Select this option to display object anchors, which indicate that an object is attached to a specific paragraph.
Optional breaks Select this option to control where a word or phrase breaks if it falls at the end of a line. If you use Microsoft Office Word with an East Asian language, this option prevents the incorrect breaking of text.
Note: This option is available only if an East Asian language is enabled for editing text.
Show all formatting marks
Select this option to display all the formatting characters that are listed in the Always show these formatting marks on the screen section, whether or not the check box associated with each one is selected. When you turn this option off, only the formatting characters that are indicated by the selected check boxes in the Always show these formatting marks on the screen section are displayed.
Tip: You can quickly turn this option on or off by clicking Show/Hide ¶ in the Paragraph group of the Home tab.

Top of Page
Printing options
Print drawings created in Word
Select this option to print all drawing objects, such as shapes and text boxes. Clearing this check box may speed your printing process, because Word prints a blank box in place of each drawing object.
Print background colors and images
Select this option to print all background colors and images. Clearing this check box may speed your printing process.
Print document properties
Select this option to print the document’s summary information on a separate page after the document is printed. Word stores summary information on the Document Information Panel.
Print hidden text
Select this option to print all text that is formatted as hidden. Word does not print the dotted underline that appears under the hidden text on the screen.
Update fields before printing
Select this option to update all the fields in a document before you print it.
Update linked data before printing
Select this option to update all linked information in a document before you print it.
Top of Page
More Read options
Read documents in Word
Need more help?
You may have noticed that there are more spaces between words or sentences than what they should be, sometimes they’re too subtle to be picked out by human eyes. When editing text, it’s hard to avoid placing extra spaces between words or sentences. Here I’ d like to share the tip about it, to solve the fault from the very beginning, you can display spaces in Microsoft Word.
1. First, go to File tab and click it in the Ribbon.

2. Select Options in the left pane.

3. Then Word Options dialog box appears, go to Display tab, and find Always show these formatting marks on the screen in the left pane. Simply check the box of Spaces and click OK to save the settings.

4. Here you can see that short dash will come out between each word and sentence, and you can easily find where extra spaces are, by comparing the number of short dash.
Note: if you want to remove those short dash, just repeat step1-3, and uncheck the box of Spaces in Word Options dialog box.


Copyright Statement: Regarding all of the posts by this website, any copy or use shall get the written permission or authorization from Myofficetricks.
In Microsoft Word, you can show whitespace characters, and so, for example, double spaces easy to identify. How this works exactly, read this tip.
Spaces in the Word show — so it goes
- Click the top left of the Word menu bar, click the «Office icon» and then click «Word options».
- In the Word options on the left, click the tab «View».
- To get the blank spaces as so-called «formatting characters» is displayed, put a check in front of the entry «spaces» (see image).
- Confirm the setting with «OK».
- Now, you will be shown for each space character by a single dot between the words.
Spaces in the Word show

For this practice tip Microsoft Word 2007 was used. In Word 2010, you can find the «Word options» under «file» > «options». In Word, you can also letters with circumflex (â) to enter, read more in this article.