
There was a point in the not-too-distant past where monitors were not nearly as high-resolution as they are now. While higher resolutions have enhanced the computing experience for the majority of people, not everything is for the better.
With more displayed at once, programs like Microsoft Word often attempt to make things “better.” Depending on who you ask, these changes aren’t always an improvement. Just like changing to the Ribbon UI, displaying two pages at once on high-resolution displays has been controversial. Many people want to display one page at a time in Microsoft Word instead.
Luckily, it is possible to change things to suit your own preferences.
1. Change the View Layout
1. Move across the Ribbon UI to the “View” options.

2. The first three buttons on the left include “Read Layout,” “Print Layout” and “Web Layout,” with Print showing the document across virtual A4 pages. Select Web Layout.

3. The change should be apparent, as the document is no longer parsed into virtual pages, and it will run for the entire width of the window.

4. Change back to “Print Layout.” For whatever reason, this will display the document one page at a time. It’s a simple, yet effective way to display one page at a time in Microsoft Word.
2. Change the Zoom Level
1. Observe the zoom level in the lower-right corner of the Word window. Click the zoom percentage, and another window will appear providing a few more options.
2. You can choose a variety of zoom options, but “Many Pages” on the right and the button below it should attract the most attention.

3. Click to expand the button below it and select an option; 1×1 and 1×2 show one page or two pages at a time respectively.

4. Once you’ve done this, you’ll see that Word’s zoom level is going to change. Go back to the left and change it to 100%. Confirm this change.
5. If the document is not already two or more pages long, such as what happens when you open Word to try this, add another page with Ctrl + Enter. It should either appear alongside the existing page or below it, depending on what you chose.
If you’re using the online version of Microsoft Word, this is the best way to display one page at a time in Microsoft Word. The web version doesn’t have the same view options as the desktop version. The good news is Word usually defaults to the Web View anyway since you’re using it online, which typically gets rid of this issue automatically.
If you’re just looking through a document, you can also set “Read Mode” or “Reading View” to set pages to scroll versus being side by side.
Conclusion
The ability to control Word’s display of pages is invaluable; a Google search results in numerous complaints about its default handling of high-resolution monitors. While we’ve covered a few ways to improve Word, such as reintroducing the 2003-era UI and tabs, this one requires no extensions or add-ons.
Should you wish to revert your changes, it’s as simple as following Solution 2 and adjusting the “Many Pages” section to suit. The simplicity of this tweak, coupled with the polarizing nature of Word’s default approach, makes it highly valuable.
Do you also know that you can merge documents in Microsoft Word and add offline videos? If not, check it out.
Image credit: Microsoft Word Under Magnifying Glass

Crystal Crowder
Crystal Crowder has spent over 15 years working in the tech industry, first as an IT technician and then as a writer. She works to help teach others how to get the most from their devices, systems, and apps. She stays on top of the latest trends and is always finding solutions to common tech problems.
Subscribe to our newsletter!
Our latest tutorials delivered straight to your inbox
 Please Note:
This article is written for users of the following Microsoft Word versions: 97, 2000, 2002, and 2003. If you are using a later version (Word 2007 or later), this tip may not work for you. For a version of this tip written specifically for later versions of Word, click here: Displaying a Single Page.
![]()
Written by Allen Wyatt (last updated January 28, 2023)
This tip applies to Word 97, 2000, 2002, and 2003
Walter’s screen shows two pages of his document, side by side. He only wants one page the full width of the screen, but he’s not sure how to change that.
As you adjust the zoom settings used by Word, you may notice that Word automatically displays multiple pages of your document at the same time. This is especially true if you are using a widescreen monitor at a high resolution. In that case, as you get your zoom factor down to near 50%, Word automatically switches to display two pages.
There are a few ways that you can get back to a single page. The first thing you’ll want to do, however, is to make sure you are not using one of Word’s non-standard views. For instance, if you are in Reading Layout view, it can affect what is on your screen. Try pressing the Esc key, using the view icons on the Status bar, or using the choices from the View menu to return to a regular view, such as Normal or Page Layout.
One easy way to display just a single page is to simply «zoom out» a bit by holding down the Ctrl key as you move the scroll wheel on your mouse. As you zoom in and Word discovers that it can no longer display two pages on the screen, it should switch automatically to show only a single page.
Another approach is to choose Zoom from the View menu in order to display the Zoom dialog box. (See Figure 1.)
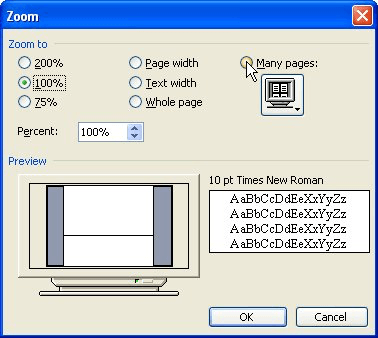
Figure 1. The Zoom dialog box.
Select the Page Width radio button and click OK. Word calculates the proper zoom percentage to show a single page at the width available on your screen. If you prefer, you can click one of the other single-page options—Whole Page or Text Width. (Pick the one that gives you the appearance you desire.)
If, for some reason, your zoom setting still doesn’t look right, you may be interested in the information provided at this page on the Word MVP site:
http://wordmvp.com/FAQs/General/SaveViewAndZoom.htm
WordTips is your source for cost-effective Microsoft Word training.
(Microsoft Word is the most popular word processing software in the world.)
This tip (966) applies to Microsoft Word 97, 2000, 2002, and 2003. You can find a version of this tip for the ribbon interface of Word (Word 2007 and later) here: Displaying a Single Page.
Author Bio
With more than 50 non-fiction books and numerous magazine articles to his credit, Allen Wyatt is an internationally recognized author. He is president of Sharon Parq Associates, a computer and publishing services company. Learn more about Allen…
MORE FROM ALLEN
Pointing PivotTables to Different Data
Changing the data source PivotTables go to can be a bit tricky. This tip explains what can happen when you re-point your …
Discover More
Counting Empty Colored Cells
There are a variety of ways that you might want to count the cells in your worksheet. One way is to figure out how many …
Discover More
Changes to Header Result in a Hung Computer
If you try to perform some actions in a document and those actions result in Word freezing, then your document may well …
Discover More
How to Make a Word Document Fit on One Page
- Click the top, left “Office” button, point to “Print” and select “Print Preview.”
- Click “Shrink One Page” in the Preview group.
- Click the “Close Print Preview” button in the Preview group to exit print preview and retain your changes.
Contents
- 1 How do I make 2 pages into 1 page in Word?
- 2 How do I stop Word from showing two pages?
- 3 Is there a fit to page option in Word?
- 4 How do you make a document fit on one page?
- 5 Why does my Word document have two pages?
- 6 How do you change the layout of just one page in Word?
- 7 How do I get Word to open on one page?
- 8 How do I make a Word document fit to one page?
- 9 How do I make my Word document fit to paper?
- 10 How do you shrink a Word document to one page on a Mac?
- 11 How do you fit to page in Word on a Mac?
- 12 How do I reduce the size of a Word document?
- 13 How do you separate pages in Word?
- 14 How do I put pages side by side in Word?
- 15 How do I make just one page landscape?
- 16 How do I make one page landscape in Word 2020?
- 17 How do I fit to page?
- 18 How do I set scaling in Word?
How do I make 2 pages into 1 page in Word?
Click the “1 Page Per Sheet” button to open a drop-down menu with more options. Click “2 Pages Per Sheet.”
How do I stop Word from showing two pages?
All replies
- Open a Word document.
- On the View tab, in the Document Views group, click Full Screen Reading. Tip using the keyboard: Press ALT+W, and then press F.
- click View Options, select Show one page.
- Press and hold CTRL while you rotate the Wheel button to Zoom In or Out.
Is there a fit to page option in Word?
“Shrink to Fit” changes the font size and margins to make the document fit on one page. In Microsoft Word 2007 and 2010, go to “Print,” “Print Preview” and then “Shrink to Fit” under the “Preview” option.
How do you make a document fit on one page?
Shrink Text in Word on the Web
- Open your document in Word on the web and select all of the text. You can use the keyboard shortcut Ctrl + A on Windows or Command + A on Mac.
- Go to the Home tab and click the Shrink Text Size button.
- You can click the button as many times as you need to shrink the text to fit one page.
Why does my Word document have two pages?
As you adjust the zoom settings used by Word, you may notice that Word automatically displays multiple pages of your document at the same time.In that case, as you get your zoom factor down to near 50%, Word automatically switches to display two pages.
How do you change the layout of just one page in Word?
To change the orientation of one page, or a few pages of the document, do the following:
- Select the text of the page or of the several pages for which you want to change the page orientation.
- On the Layout tab, in the Page Setup group, click Margins:
- In the Page Setup dialog box, on the Margins tab:
- Click OK.
- Notes:
How do I get Word to open on one page?
In Word 2016 (365), in the View Ribbon, select Print View. Then Words opens to just one page.
Click Page Layout. Select the Page tab in the Page Setup dialog box. Select Fit to under Scaling. To fit your document to print on one page, choose 1 page(s) wide by 1 tall in the Fit to boxes.
How do I make my Word document fit to paper?
Scaling Your Output
- Load the document you want to print.
- Press Ctrl+P. Word displays the Print dialog box.
- Use the Scale to Paper Size drop-down list (lower-right corner) to specify the paper on which your document will be printed.
- Specify any other printing options, as desired.
- Click on OK to print your document.
How do you shrink a Word document to one page on a Mac?
In the Word Options window, the “Quick Access Toolbar” category should already be selected on the left. On the right, click the “Choose Commands From” drop-down menu and select the “All Commands” option. On the long list of commands on the left, scroll down and select the “Shrink One Page” command.
How do you fit to page in Word on a Mac?
Word for Mac 2011 Toolbar: Adding the Fit to Window Command
- In Word, choose View→Toolbars→Customize Toolbars and Menus.
- Click the Commands tab.
- In the Categories list (on the left), select the View category.
- In the Commands list (on the right), scroll down to find the Fit to Window command, and then select it.
How do I reduce the size of a Word document?
When you’re ready to change the paper size of a Word file, open the document and navigate to the “Page Setup” group in the “Layout” tab. Here, click “Size.” A drop-down menu appears in which you see a generous list of paper sizes. Just select an option from this list to change the paper size of the entire document.
How do you separate pages in Word?
To view multiple pages at one time, keep the “View” tab active. Place your cursor in the text of the first page you want to view in the multiple-page view. In the “Zoom” section, click “Multiple Pages.” By default, two pages are shown side-by-side.
How do I put pages side by side in Word?
How to Enable Side to Side View in Word
- Click the View tab and in the Views section of the ribbon, select Print Layout.
- Next, on the View tab, go to the Page Movement section of the ribbon and select Side to Side.
- You’ll immediately see the window adjust to show two pages at the same time.
How do I make just one page landscape?
Word 2019 & 2016: How to Make a Single Page Landscape
- Place your cursor at the very beginning of the page that you would like to flip to landscape. (
- Select “Layout” or “Page Layout” > “Breaks” > “Next Page” to create a section.
- Select the “Page Layout” tab and select “Orientation” > “Landscape“.
How do I make one page landscape in Word 2020?
Change part of a document to landscape
- Select the content that you want on a landscape page.
- Go to Layout, and open the Page Setup dialog box.
- Select Landscape, and in the Apply to box, choose Selected text.
How do I fit to page?
Fit to one page
- Click Page Layout. Click the small Dialog Box Launcher on the bottom right.
- Select the Page tab in the Page Setup dialog box.
- Select Fit to under Scaling.
- To fit your document to print on one page, choose 1 page(s) wide by 1 tall in the Fit to boxes.
- Press OK at the bottom of the Page Setup dialog box.
How do I set scaling in Word?
To change the scale of a Word document without adjusting its formatting, open the “File” menu, click “Print” and open the zoom option, which by default reads “1 Page Per Sheet.” Choose “Scale to Paper Size” and pick a new size.
Remember the good old days when MS Word defaulted to single page view when you’d open a document? I do. I prefer that, because I want to focus on what I’m working on, not what’s 30 lines away from that.
I’m using MS Word 365, and whenever I open a document it defaults to 2-page view. I then have to sigh, squeeze a stress ball, and adjust the View setting to 1-page view to get the view I want. I’d like to set 1-page view as default. Is there a way to do that in MS Word 365?
asked Aug 5, 2020 at 12:45
![]()
Unfortunately, Word has no setting to specify a default «open» view for
all documents.
This means that documents open at the view mode that was used when the
document was originally saved.
To force the issue, a VBA macro is required. The macro, named AutoOpen,
needs to be saved in the Normal.dotm template.
Here is the macro:
Public Sub AutoOpen()
    ThisDocument.Application.ActiveWindow.View.Zoom.PageColumns = 1
End Sub
To always open at 100% zoom, add this line inside the macro:
ThisDocument.Application.ActiveWindow.View.Zoom.Percentage = 100
For more information see the article Writing a Macro from Scratch.
answered Aug 5, 2020 at 14:00
![]()
harrymcharrymc
439k30 gold badges506 silver badges885 bronze badges
Very late answer but I find it annoying when the question is either not answered correctly or stated that it can’t be done. No code needed here.
- Open Word and go to File > Open
- Navigate to
%appdata%MicrosoftTemplatesor%localappdata%MicrosoftTemplates(whichever exists) - Open Normal.dot or Normal.dotm, whichever exists
- Go to View and select «One Page» in the ribbon under the «Zoom» section
- This might change your zoom so make sure it is at 100% or whatever you wish
- Save
- Close
- Problem gone
![]()
answered Oct 13, 2021 at 12:07
![]()
GrantGrant
811 silver badge2 bronze badges
1
In Word 2016 (365), in the View Ribbon, select Print View.
Then Words opens to just one page. I have this set and always see just one page when opening Word.

I also disable the Start Screen for all Office 365 Apps, but I do not think this affects how Word opens the view. It does simplify things to uncheck Start Screen. Word, Options, General, near the bottom.
answered Aug 5, 2020 at 12:54
![]()
JohnJohn
43.6k3 gold badges31 silver badges53 bronze badges
These steps worked for me too, with the exception that I’m also using office 365 on one drive.
I had to navigate to a slightly differt folder;
C:Users(User name)AppDataRoamingMicrosoftTemplates
There I found Normal.dotm
I made a back up copy of it. Then I tinkered with it. It wouldn’t let me save over it. So I saved it with the name «Normal.dotm.docx» I then deleted the original file and deleted the Docx off the end of the new one I made.
It seems to be working now.
—original —
- Open word and go to file>open
- Navigate to c:/users/name/appdata/local/microsoft/templates
- Open the normal.dot or normal.dots depending on your version
- go to view and select «one page» in the ribbon under «zoom»
This might change your zoom so make sure it is a 100% or whatever you wish - Save
- close
Problem gone
![]()
Toto
16.5k50 gold badges29 silver badges41 bronze badges
answered Nov 30, 2022 at 18:16
![]()
I added the «one page» and «100% zoom» buttons to the quick access bar, this seems to be the best way of dealing with it besides using macros.
answered Mar 23, 2021 at 14:54
![]()
What is an IT support Service Level Agreement at Maple?

Our SLA is reasonable described as the maximum time our service team will take to respond to an incident which is covered by a support contract.
Our client arrangements can have SLA’s to suit a individual clients’ needs, but in most cases our London clients have opted for the standard 30 minute SLA. We feel this is unrivalled in the IT world! No sitting around for hours waiting for help with a problem.
We find that most incidents and requests can be fixed on the initial call. This is known as First Contact Resolution. Some may require detailed investigation and/or call-backs. Or in the case of change requests may need planning and scheduling.
Of course we cannot guarantee that every problem will be fixed within 30 minutes — IT just doesn’t work like that. But, someone will be working within the timelines.
On site visits will be scheduled at the earliest opportunity. Again, we cannot promise someone will be onsite in under 30 minutes if there is a short trek to your office, but in reality, our Central London office and closeness to our clients means that when needed, our technicians are available and onsite quicker than any other IT firm can be.
Here is a little more on our support offering
And here is a reminder of our location