
Word for Microsoft 365 Outlook for Microsoft 365 Word 2021 Outlook 2021 Word 2019 Outlook 2019 Word 2016 Outlook 2016 Word 2013 Outlook 2013 Word 2010 Outlook 2010 Word 2007 Outlook 2007 More…Less
You can add horizontal lines, sometimes called horizontal rules, to a document or email message to help separate sections of text and add visual appeal.
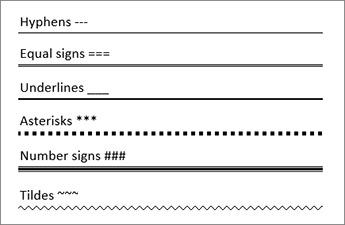
By default, Word and Outlook have a three-character shortcuts that inserts a full-width horizontal rule in your document or message. The appearance of that rule—thinner, thicker, double-line, dotted, wavy—depends on which shortcut you use, as illustrated in the image below.
If this automatic line feature doesn’t suit you, you can turn off this feature in Word or turn it off in Outlook.
If you want to draw a line for illustration purposes, see Draw a line in Word or Outlook instead.
Insert a horizontal line by typing a few characters
The fastest way to add a horizontal line or rule is to use the AutoFormat feature. When you type certain characters three times in their own paragraph and then press Enter, those characters instantly become a full-width horizontal line.
-
Place the cursor where you want to insert the horizontal line.
-
Type three of the characters illustrated below, and then press Enter.

The line is inserted for the full width of the page. When inserted into a column, the line is inserted to match the width of the column. To add text above the line, put your cursor where you want the text and begin typing.
Format the horizontal line after you create it
The shortcut described above creates an empty paragraph with a bottom border. You can change the look of that border line by using the Borders options:
-
In Word, on the Home tab of the ribbon, select the down arrow next to
Borders.In Outlook, on the Format Text tab of the ribbon, select the down arrow next to
Borders. -
At the bottom of the menu, select Borders and Shading.
-
In the dialog, you can change the line’s style (solid, dotted, wavy, double, and so on), color, or width as you see fit.
-
When you’re done formatting the line, select OK. Then, on the ribbon, select the
Borders button to apply your changes.
 Borders.
 Borders button to apply your changes.
 Word: Turn off the automatic line feature
To prevent Word or Outlook from automatically inserting a horizontal line when you type the three shortcut characters, do the following:
-
On the ribbon, select File > Options.
-
In the dialog box, select Proofing > AutoCorrect Options > AutoFormat As You Type.
-
Clear the Border Lines option.
-
Select OK.
Outlook: Turn off the automatic line feature
-
On the ribbon, select File > Options.
-
In the dialog box, select the Mail tab, then select Editor Options.
-
On the Proofing tab, select AutoCorrect Options > AutoFormat As You Type.
-
Under Apply as you type, clear the Border Lines option.
-
Select OK.
Want to draw a line?
See Draw a line in Word or Outlook.
See Also
Add a border to some text
Draw shapes
Need more help?
Want more options?
Explore subscription benefits, browse training courses, learn how to secure your device, and more.
Communities help you ask and answer questions, give feedback, and hear from experts with rich knowledge.
465
465 people found this article helpful
Use these three methods to quickly insert a line in your document
Updated on December 4, 2020
What to Know
- AutoFormat: Type the three characters for the desired line style > Enter.
- Horizontal Line tool: In Home tab, select Borders drop-down menu > Horizontal Line.
- Shapes menu: Go to Insert > Shapes. In Lines group, select and drag a line shape across the page.
This article covers three ways to insert horizontal lines in Word for Microsoft 365, Word 2019, Word 2016, Word 2013, and Word 2010.
Use AutoFormat to Insert a Line in Word
You can quickly insert a line into a Word document with the AutoFormat feature. To create a line, place the cursor in the location that you’d like to insert it, type the three characters for the desired line style, then press Enter.
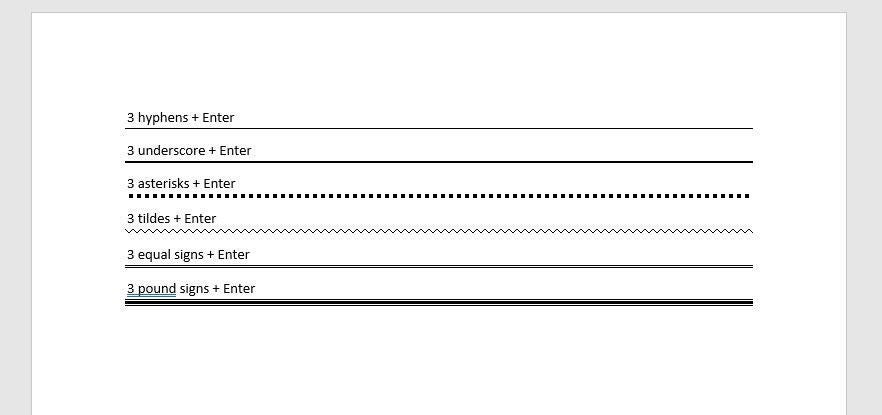
To create the different types of lines, press the associated keys on the keyboard:
- Plain single line: Three hyphens (—)
- Plain double line: Three equal signs (===)
- Broken or dotted line: Three asterisks (***)
- Bold single line: Three underline symbols (___)
- Wavy line: Three tildes (~~~)
- Triple line with a thick center: Three number signs (###)
Here’s what each of these line types looks like in Word:
Use the Horizontal Line Tool to Insert a Line in Word
To insert a line into a Word document using the built-in Horizontal Line tool:
-
Place the cursor where you want to insert a line.
-
Go to the Home tab.
By default, the Home tab is selected when you open a new or existing Word document.
-
In the Paragraph group, select the Borders drop-down arrow and choose Horizontal Line.
-
To change the look of the line, double-click the line in the document.
-
In the Format Horizontal Line dialog box, modify the width, height, color, and alignment of the line.
Use the Shapes Menu to Insert a Line in Word
A third way to add a line to a Word document is to draw it on the page. The Shapes menu contains several line options, including lines with arrow points on one or both ends. After you draw the line, customize the color and appearance.
-
Place the cursor in the spot where you want to insert a line.
-
Go to the Insert tab.
-
In the Illustrations group, select the Shapes drop-down arrow.
-
In the Lines group, choose a line shape.
-
In the Word document, drag across the location where you want the line to appear.
-
To change the look of the line, select the line to enable the Shape Format tab. (Some versions of Word call this Format.)
-
Go to the Shape Format tab and change the color, use a different line style, or apply effects.
FAQ
-
How do I change line spacing in Word?
To fix spacing in Word, highlight the text whose spacing you want to change and select the Home tab. Next to Paragraph, select the down arrow to expand the options. In the Spacing section, set the amount of space before and after line breaks or choose a preset line-spacing option.
-
How do I add a signature line in Word?
To insert a signature line in Word, go to the Insert tab and select Signature Line. Selecting few or no options leaves a blank line, and a signature line will appear in the document.
-
How do I add line numbers in Word?
To add line numbers in Word, go to Layout > Page Setup > Line Numbers and choose Continuous, Restart Each Page or Restart Each Section > Line Numbering Options.
Thanks for letting us know!
Get the Latest Tech News Delivered Every Day
Subscribe
Click the “Layout” table under “Table Tools”. In the “Table” section of the “Layout” tab, click “View Gridlines”. The gridlines now display on the table. To turn off the gridlines for the table, simply select the table and click “View Gridlines” again.
Contents
- 1 How do I add gridlines to a table in Word?
- 2 How do I make table lines invisible in Word?
- 3 How do you insert lines in Word?
- 4 How do I view border lines in Word?
- 5 How do you insert multiple lines in Word?
- 6 How do you put a line through text?
- 7 How do you put a line above text in Word?
- 8 What are grid lines?
- 9 How do I turn on automatic border lines in Word?
- 10 How do I insert a specific row in a table in Word?
- 11 How do you put a line above and below text in Word?
- 12 How do you put a line under a letter in Word?
- 13 How do you get a line above a letter on a keyboard?
- 14 What is grid line with example?
- 15 How do you set out grid lines?
- 16 How do you write a grid line?
- 17 How do I fix lines in Word?
- 18 Why do lines keep appearing on my Word document?
- 19 How do you insert rows in an existing table?
- 20 How do you insert multiple rows?
How do I add gridlines to a table in Word?
Show or hide gridlines for all tables in a document
- Click the table.
- Click the Table Layout tab, and then under Settings, click Gridlines.
How do I make table lines invisible in Word?
Hover your mouse over the table until the table move handle displays in the upper left corner and then click this handle to select the entire table. Click “Table Tools,” select “Design,” click the arrow on the “Borders” button and then select “No Borders.” This hides the borders for the entire table.
How do you insert lines in Word?
Insert a line
- On the Insert tab, select Shapes.
- Under Lines, select any line style you like.
- Select a location in the document, hold and drag your pointer to a different location, and then release the mouse button.
How do I view border lines in Word?
Click the “Layout” table under “Table Tools”. In the “Table” section of the “Layout” tab, click “View Gridlines”. The gridlines now display on the table. To turn off the gridlines for the table, simply select the table and click “View Gridlines” again.
How do you insert multiple lines in Word?
Hold down the “Shift” key and press the “Underline ( _ )” key three times. Release both keys then press “Enter” to place a heavier line across the Word document.
How do you put a line through text?
When you have your text selected, look on the “Home” tab of Word’s Ribbon. In the “Font” group, click the Strikethrough button (it’s the three letters with a line drawn through them). Now, any text you had selected should be struck through. You can also apply strikethrough formatting using the Font window.
How do you put a line above text in Word?
Learn the steps on how to put a line above a letter or text in Microsoft Word. The first step is to highlight the text you want to place the line over and navigate to the insert tab then equation and lastly accent. From here, select the option Overbar which can be found under the subheading ‘Overbars and Underbars’.
What are grid lines?
Definition of grid line
: any of a series of numbered horizontal and perpendicular lines that divide a map into squares to form a grid by means of which any point may be located by a system of rectangular coordinates.
How do I turn on automatic border lines in Word?
If you can’t automatically add lines on your system, follow these steps:
- Choose AutoCorrect (or AutoCorrect Options) from the Tools menu. Word displays the AutoCorrect Options dialog box.
- Make sure the AutoFormat As You Type tab is selected.
- Make sure the Border Lines (or Borders) check box is checked.
- Click on OK.
How do I insert a specific row in a table in Word?
Method 3: Add Multiple Rows with “Insert Table” Option
- To begin with, click “Layout” and check the column width in “Cell Size” group.
- Secondly, click “Insert” tab.
- Then click “Table” icon.
- Next, choose “Insert Table” option on the drop-down menu.
- In “Insert Table” dialog box, enter the number of columns and rows.
How do you put a line above and below text in Word?
To insert a line in Word above and / or below a paragraph using the Borders button:
- Select the paragraph(s) to which you want to add a line.
- Click the Home tab in the Ribbon.
- Click Borders in the Paragraph group. A drop-down menu appears.
- Select the line you want to use.
How do you put a line under a letter in Word?
Hold the “Ctrl” key and press “U” to put a line under the letter.
How do you get a line above a letter on a keyboard?
These keyboard shortcuts will help you display text more accurately in your business documents.
- Open a document in Microsoft Word.
- Press “Ctrl-Shift” and the caret (” ^ “) key and then the letter to insert a circumflex accent.
- Press “Ctrl-Shift” and the tilde (” ~ “) key and then the letter to insert a tilde accent.
What is grid line with example?
Alternatively referred to as a column separator or row separator, grid lines or gridlines divide each of the cells, rows, and columns in a spreadsheet.
How do you set out grid lines?
- Step 1: Establish a baseline.
- Step 2: Place pegs along your baseline.
- Step 3: Place further pegs using right-angled triangles.
- Step 1: Establish a baseline.
- Step 2: Place pegs along your baseline.
- Step 3: Place pegs along perpendicular lines.
- Step 4: Fill in any missing pegs.
How do you write a grid line?
Lines can be addressed using their line number. In a left-to-right language such as English, column line 1 will be on the left of the grid, row line 1 on the top. Lines numbers respect the writing mode of the document and so in a right-to-left language for example, column line 1 will be on the right of the grid.
How do I fix lines in Word?
Change the line spacing in a portion of the document
- Select one or more paragraphs to update.
- Go to Home > Line and Paragraph Spacing.
- Select Line Spacing Options and choose an option in the Line spacing box.
- Adjust the Before and After settings to change spacing between paragraphs.
- Select OK.
Why do lines keep appearing on my Word document?
The line you’re seeing across the page is a paragraph border that Word has automatically inserted using AutoFormat. To get rid of it:Go to Format, Borders and Shading (Word 2002-2003) or click the Border drop-down in the Paragraph section of the Home tab of the Ribbon (Word 2007 and up)
How do you insert rows in an existing table?
Add a row above or below
- Click in a cell above or below where you want to add a row.
- Under Table Tools, on the Layout tab, do one of the following: To add a row above the cell, click Insert Above in the Rows and Columns group. To add a row below the cell, click Insert Below in the Rows and Columns group.
How do you insert multiple rows?
To insert multiple rows, select the same number of rows that you want to insert. To select multiple rows hold down the “shift” key on your keyboard on a Mac or PC. For example, if you want to insert six rows, select six rows while holding the “shift” key.
Содержание
- Включение линейки в Ворде
- Линейка в Word 2007-2019 / MS Office 365
- Линейка в Word 2003
- Устранение возможных проблем
- Заключение
- Вопросы и ответы

Линейка в Microsoft Word — это вертикальная и горизонтальная полосы, расположенные на полях, то есть за пределами страницы. По умолчанию этот инструмент отключен в документе, по крайней мере, если говорить о последних версиях текстового редактора. В этой статье мы расскажем о том, как включить столь иногда необходимый элемент, обеспечивающий более удобную работу.
Включение линейки в Ворде
Прежде чем заняться решением озвученной в заголовке задачи, давайте разберемся, зачем вообще нужна линейка в Word. В первую очередь, этот инструмент необходим для выравнивания текста на странице по горизонтали и вертикали, а вместе с ним таблиц, диаграмм, фигур и графических элементов, если таковые имеются в документе. Само же выравнивание содержимого осуществляется относительно друг друга либо же относительно границ документа. Определившись с теорией, можем смело приступать к практике.
Линейка в Word 2007-2019 / MS Office 365
Несмотря на то что из года в год интерфейс приложений из пакета MS Office хоть и незначительно, но все же меняется, а вместе с этим переименовываются некоторые важные элементы и опции, интересующее нас включение линейки во всех версиях Word (за исключением 2003) выполняется одинаково.
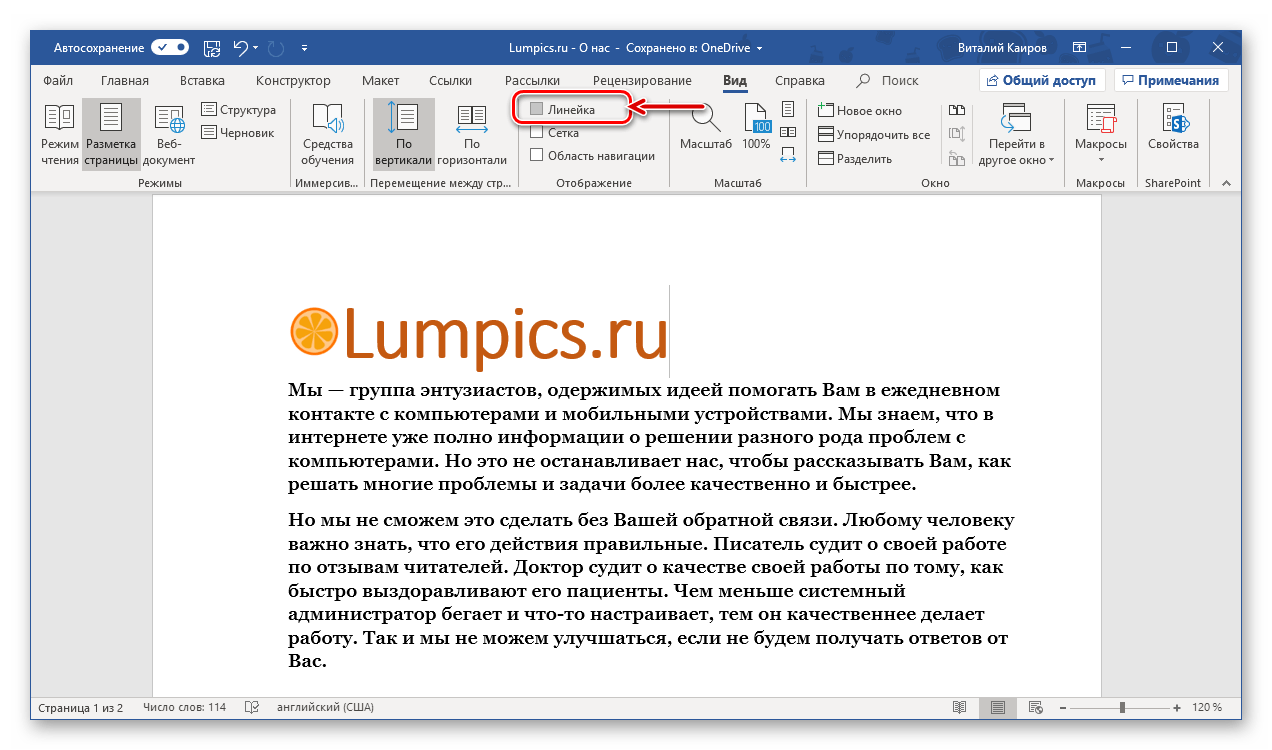
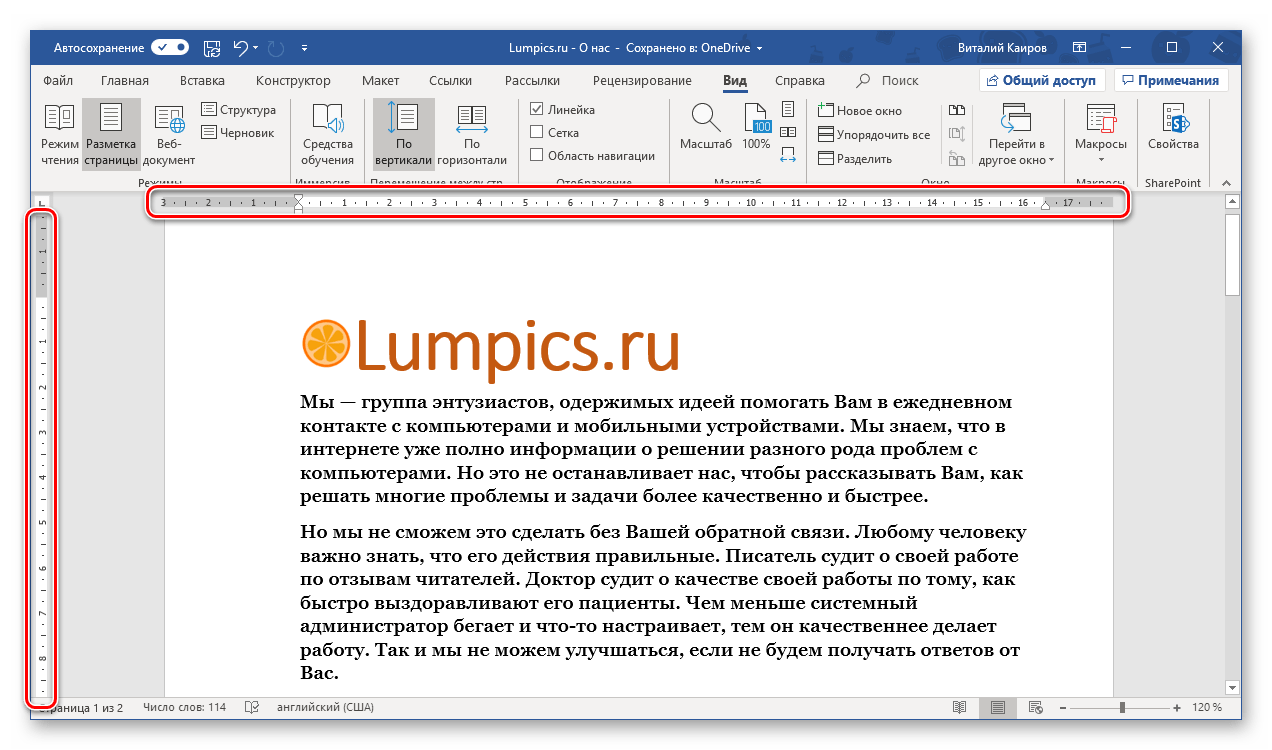
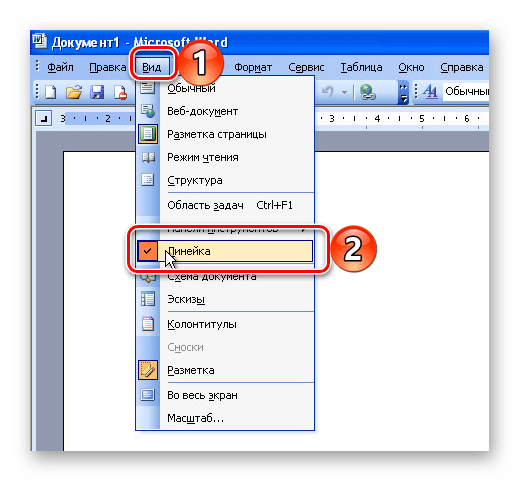
- В текстовом документе Ворд перейдите во вкладку «Вид».
- В блоке инструментов «Отображение» (ранее назывался «Показать», еще раньше – «Показать или скрыть») установите галочку напротив пункта «Линейка».
- Перед вами появится горизонтальная и вертикальная линейка, которую можно смело использовать для работы, например, выравнивания текста или таблицы, о чем мы ранее писали в отдельных статьях.
Читайте также:
Как в Word выровнять текст
Как выровнять таблицу в Word
Линейка в Word 2003
Если же вы по каким-то причинам все еще пользуетесь морально и, что более важно, функционально устаревшим Ворд 2003, для включения в нем линейки обратитесь к меню вкладки «Вид», в котором просто установите галочку напротив пункта «Линейка».
Читайте также: Как открыть документы DOCX в MS Word 2003
Устранение возможных проблем
Бывает и так, что с отображением линейки в текстовом документе Ворд возникают разного рода проблемы. К счастью, все они легко устранимы.
Линейка не отображается или отображается только горизонтально
По умолчанию, и чаще всего этот параметр не меняется пользователем, работа с документом Word осуществляется в «Режиме разметки». Это стандартное для программы представление, и если включить в нем «Линейку», она появится как в горизонтальной, так и в вертикальной плоскости. Во всех остальных режимах отображения будет показана либо только горизонтальная линейка, либо она будет отсутствовать вовсе. Наглядный пример:
Отображается только горизонтальная линейка (в «Разметке страницы»)
Если вы работаете с документом в режиме «Разметки страницы», но при этом видите только горизонтальную линейку, необходимо выполнить следующее:
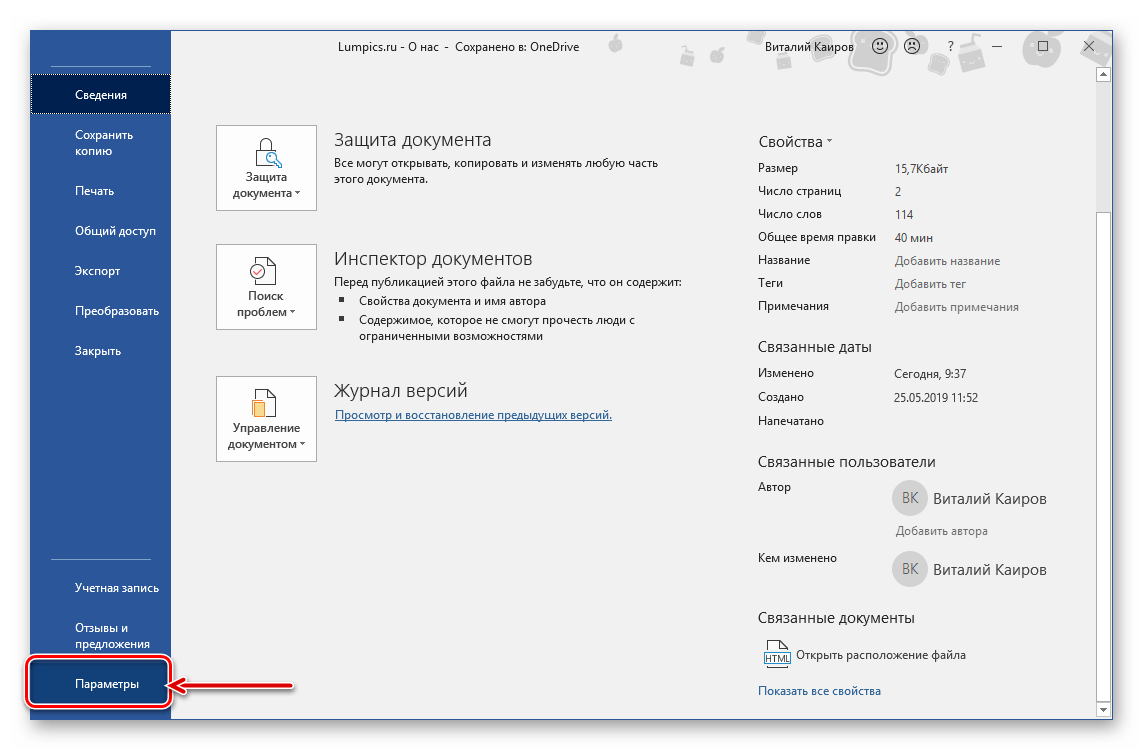
- Откройте меню «Файл» и перейдите к разделу «Параметры» (расположен в самом низу боковой панели. В старых версиях Word для этого необходимо нажать по расположенному в левом верхнем углу логотипу MS Office, а затем, когда будет открыто меню, по кнопке «Параметры Word».
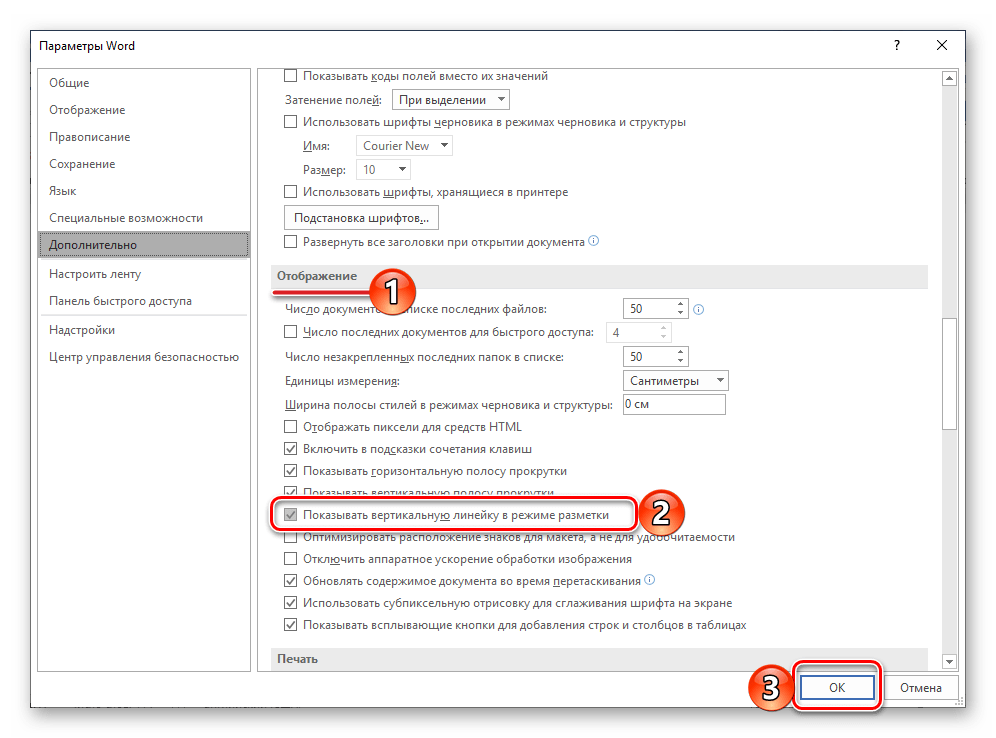
- В отобразившемся диалоговом окне перейдите во вкладку «Дополнительно».
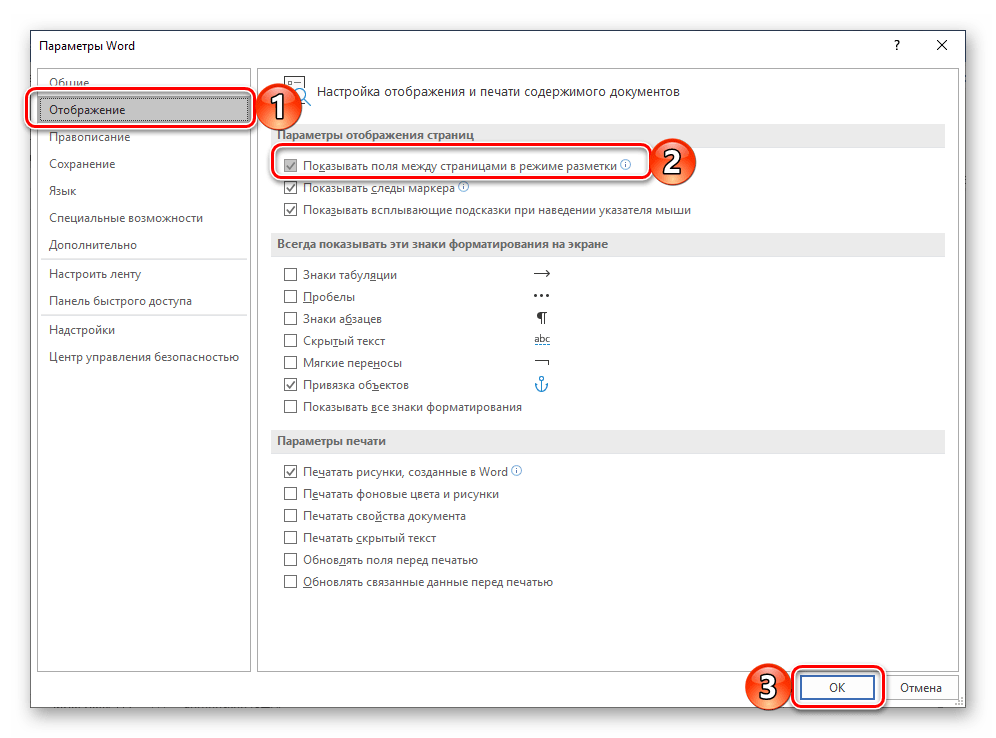
- Пролистайте перечень доступных в данном разделе опций до блока «Отображение» (ранее он назывался «Экран») и установите галочку напротив пункта «Показывать вертикальную линейку в режиме разметки». Для подтверждения внесенных изменений нажмите «ОК».

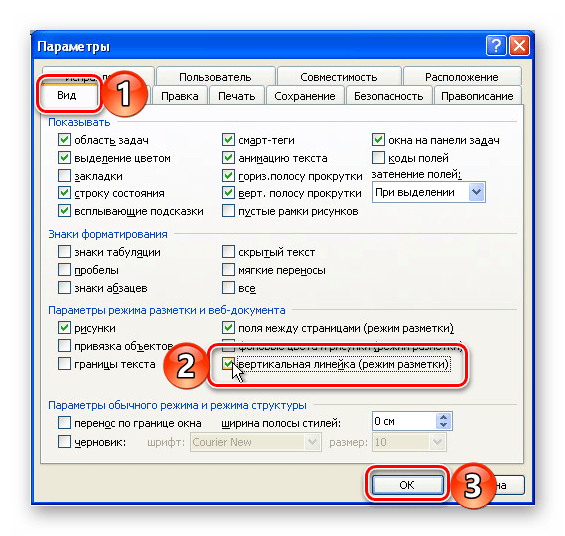
В Word 2003 для активации обозначенной выше опции необходимо открыть «Параметры» (меню «Сервис»), а затем во вкладке «Вид» открывшегося диалогового окна установить галочку напротив пункта «вертикальная линейка (режим разметки)», расположенного в блоке «Параметры режима разметки веб-документа». Сделав это, воспользуйтесь кнопкой «ОК» для подтверждения.
Есть у проблемы отображения вертикальной линейки в Ворде и еще одна причина – отключен показ полей в документе. Решение в данном случае тоже весьма простое:
- Откройте «Параметры» программы (через меню «Файл» или кнопку с лого MS Office, зависит от версии).
- В окне настроек перейдите во вкладку «Отображение» и установите галочку напротив пункта «Показывать поля между страницами в режиме разметки».

Так это делается в актуальных версиях Word, а в программе 2003 года нужно действовать по немного иному алгоритму:вкладка «Сервис» - пункт меню «Параметры» - «Вид» - галочка напротив пункта «Поля между страницами (режим разметки)» - После того как вы измените указанный выше параметр и нажмите «ОК» для подтверждения своих действий, в текстовом документе будет отображаться не только горизонтальная, но и вертикальная линейка.
Заключение
Вот так просто можно включить отображение горизонтальной и вертикальной линейки в текстовом документе Microsoft Word. Если же в процессе выполнения данной процедуры возникли какие-либо проблемы, теперь вы будете знать, как их устранить.
Еще статьи по данной теме:
Помогла ли Вам статья?

on
May 14, 2019, 6:51 AM PDT
How to add horizontal lines to a Word 2016 document
There’s not one, but two easy ways to insert a horizontal line into a Word document.
We may be compensated by vendors who appear on this page through methods such as affiliate links or sponsored partnerships. This may influence how and where their products appear on our site, but vendors cannot pay to influence the content of our reviews. For more info, visit our Terms of Use page.

Most of you already know that you can quickly add a horizontal line to a Word document by typing three hyphens and pressing Enter–but there’s more. There are several keyboard shortcuts and a built-in feature that lets you add a predefined line that you can copy, move, slant, and delete.
In this article, I’ll show you how to insert lines using both methods.
I’m using Office 365 Word (desktop) on a Windows 10 64-bit system, but you can use an older version of Word. The browser edition doesn’t support these features. There’s no demonstration file; you won’t need one.
SEE: Choosing your Windows 7 exit strategy: Four options (Tech Pro Research)
From the keyboard
Other than the three hyphens shortcut there are five others, for a total of six keyboard shortcuts for displaying a horizontal line in a Word document, as shown in Figure A.
Simply type the three characters and press Enter, and Word will convert the three characters into its corresponding line. This magic is made possible by the AutoCorrect feature.
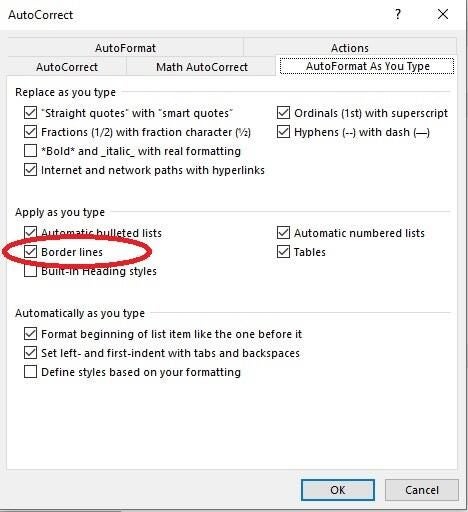
- To access this feature, click the File tab and click Options.
- In the left pane, click Proofing.
- To the right, click the AutoCorrect Options button.
- Then, click the AutoFormat As You Type tab.
- In the resulting dialog, check the Border lines in the Apply section (Figure B). This setting is in the same spot in all versions but finding it in older versions is a bit different: If you’re still using 2003, choose AutoCorrect from the Tools menu; 2007 users should click the Office button, and then click Word Options.
To disable this feature, uncheck the Border lines option in the Apply section. To temporarily usurp the feature, press Ctrl+z to undo the conversion. To remove the line, click the AutoCorrect Options dropdown (in the left margin) and choose Undo Border Line, as shown in Figure C. (But you must do so immediately.) You can also use this dropdown to disable the AutoCorrect feature. If the dropdown is no longer available, click the line (it won’t be apparent though; the cursor will appear to be above the line), and press Delete.

If you decide to disable the option, you can quickly insert a horizontal line as follows:
- Place your cursor where you want to insert the line.
- Click the Home tab and then click the dropdown arrow for the Borders option in the Paragraph group.
- From the resulting list, select Horizontal Line.
To remove the line, select it and press Delete. A few formatting options are available; simply double-click the line to see what’s available.
To learn more about the AutoCorrect feature, read Harness the power of Word’s AutoCorrect feature
Sticky border problem
Word converts your set of three characters into a paragraph format. It’s actually a border and not a shape (which we’ll discuss briefly below). If you enter the three hyphens directly under a line of text, Word will attach a border to the text (paragraph). If you move the text, the line goes with it. If there’s a blank line between the text and the hyphen-generated line, the line stands alone. You can move it and delete it.
Once a line is anchored to text as a border, you can’t select and remove the line. How do you get rid of it? Click anywhere inside the textual paragraph and then click the Borders dropdown. Choose No Border, as shown in Figure D, and the sticky border is gone

As a Lines shape
The lines produced by the keyboard shortcuts and AutoCorrect are certainly functional, but Word can draw lines at an angle too using a Lines shape. You’ll need to insert a true shape and not a paragraph-formatted border.
- To do so, click the Insert tab and click the Shapes dropdown (in the Illustrations group).
- Choose a line from the Lines section and click where you want the line to start.
- Drag a bit and click a second time where you want the line to end.
You can copy, move, or resize this line. To insert a straight line, hold down the Shift key. Either end point can be adjusted to be above or below the other point by dragging either point up or down. The point you aren’t moving will remain anchored to its position.
If you want both points to move, hold down the Ctrl key while you move one point or the other. The line responds similar to a child’s seesaw, as though the line were centered on a fulcrum, but only at first because you can drag the point a full 360 degrees.
Stay tuned
Adding a horizontal line can provide a visual line of demarcation between two sections. Adding a vertical line will do the same thing. In a future article, I’ll show you how to add a vertical line to a document.
Send me your question about Office
I answer readers’ questions when I can, but there’s no guarantee. Don’t send files unless requested; initial requests for help that arrive with attached files will be deleted unread. You can send screenshots of your data to help clarify your question. When contacting me, be as specific as possible. For example, “Please troubleshoot my workbook and fix what’s wrong” probably won’t get a response, but “Can you tell me why this formula isn’t returning the expected results?” might. Please mention the app and version that you’re using. I’m not reimbursed by TechRepublic for my time or expertise when helping readers, nor do I ask for a fee from readers I help. You can contact me at susansalesharkins@gmail.com.
See also
- How to combine Excel VLOOKUP() and PivotTable for simple solutions (TechRepublic)
- How to use conditional fields in a Word mail merge (TechRepublic)
- Office Q&A: Collapsible heading and delay send settings aren’t a cure all, but it’s close (TechRepublic)
- How to document Word AutoText and AutoCorrect entries (TechRepublic)
- How to document Word keyboard commands (TechRepublic)
- 10 free alternatives to Microsoft Word and Excel (TechRepublic download)
- Microsoft Office 365 for business: Everything you need to know (ZDNet)
- The 10 most important iPhone apps of all time (Download.com)
- It takes work to keep your data private online. These apps can help (CNET)
- Programming languages and developer career resources coverage (TechRepublic on Flipboard)
-
Software