
Excel for Microsoft 365 Excel 2021 Excel 2019 Excel 2016 Excel 2013 Excel 2010 More…Less
Let’s say you want to add information to a spreadsheet report that confirms the location of a workbook and worksheet so you can quickly track and identify it. There are several ways you can do this task.
Insert the current file name, its full path, and the name of the active worksheet
Type or paste the following formula in the cell in which you want to display the current file name with its full path and the name of the current worksheet:
=CELL(«filename»)
Insert the current file name and the name of the active worksheet
Type or paste the following formula as an array formula to display the current file name and active worksheet name:
=RIGHT(CELL(«filename»),LEN(CELL(«filename»))- MAX(IF(NOT(ISERR(SEARCH(«»,CELL(«filename»), ROW(1:255)))),SEARCH(«»,CELL(«filename»),ROW(1:255)))))
Notes:
-
To enter a formula as an array formula, press CTRL+SHIFT+ENTER.
-
The formula returns the name of the worksheet as long as the worksheet has been saved at least once. If you use this formula on an unsaved worksheet, the formula cell will remain blank until you save the worksheet.
Insert the current file name only
Type or paste the following formula to insert the name of the current file in a cell:
=MID(CELL(«filename»),SEARCH(«[«,CELL(«filename»))+1, SEARCH(«]»,CELL(«filename»))-SEARCH(«[«,CELL(«filename»))-1)
Note: If you use this formula in an unsaved worksheet, you will see the error #VALUE! in the cell. When you save the worksheet, the error is replaced by the file name.
Need more help?
You can always ask an expert in the Excel Tech Community or get support in the Answers community.
Need more help?
Want more options?
Explore subscription benefits, browse training courses, learn how to secure your device, and more.
Communities help you ask and answer questions, give feedback, and hear from experts with rich knowledge.
Many a time, it is good to Display the location of the file in Excel.
Not just the file name, but the entire path of the file. It is a good reference to make sure you are working on the correct file and is also good if you print out the Excel. With this option, the file path always gets printed on paper..
How to Write a Formula that will Display the File Path in Excel, automatically.
One useful formula that can assist us is the CELL formula. I bet you didn’t know about this in-built Excel Function…
The CELL function can help us to display the address, colour, format, type or width of any cell.
The CELL Function takes a maximum of 2 arguments, and only the first one is mandatory.
=CELL(info_type, [reference])
So, if you write =CELL(“filename”) in any cell, you will get the Full Pathname of this Excel file, along with the Sheet Name.
For example, I got the filename displayed as below:
| D:[email-blasting-migration.xlsx]Sheet1 |
According to the Excel Help, the CELL function has the following arguments:
- info_type Required. A text value that specifies what type of cell information you want to return. The following list shows some of the possible values of the info_type argument and the corresponding results.
info_type Returns “address” Reference of the first cell in reference, as text. “col” Column number of the cell in reference. “color” The value 1 if the cell is formatted in color for negative values; otherwise returns 0 (zero). “contents” Value of the upper-left cell in reference; not a formula. “filename” Filename (including full path) of the file that contains reference, as text. Returns empty text (“”) if the worksheet that contains reference has not yet been saved. “format” Text value corresponding to the number format of the cell. The text values for the various formats are shown in the following table. Returns “-” at the end of the text value if the cell is formatted in color for negative values. Returns “()” at the end of the text value if the cell is formatted with parentheses for positive or all values.
Display only the Excel File Name, without the Sheet Name
To only print the File name, you can use this long formula:
=MID(CELL("filename"),SEARCH("[",CELL("filename"))+1, SEARCH("]",CELL("filename"))-SEARCH("[",CELL("filename"))-1)
Keep in mind that the file should be saved somewhere. If you just open a new workbook, and try these formulas, you will get a #VALUE ERROR. This error will disappear automatically once the file is saved, and the error will be replaced with the correct full file path name, and file name.
This formula to display the filename in Excel also works on the Mac. Any Excel for Mac version, including Excel X for Mac, to Excel 2004, 2008, 2011 for Mac also work fine in displaying the filename.
For example, for a file on Mac with the path HD:Users:local:Desktop, the formula returns
HD:Users:local:Desktop:(filename)Sheet1
Displaying the FilePath only
While writing macros in Excel, you may need the file’s path only, to pick up other files, or for any other reason. Just use this to get only the file’s path in Excel
=LEFT(CELL(“filename”,A1),FIND(“[“,CELL(“filename”,A1),1)-1)
In this formula, we remove the Sheet Name, which starts with the [ character.
How To Display Filename & File Path in Excel Worksheet Header or Footer
If you wish to display the file name and/or file path in the Excel sheet’s header or footer, then it is extremely simple. Simply go to the Ribbon. Choose Insert > Header & Footer

All you need to do is click on the File Path, File Name icons.
Alternatively, if you want to type it yourself, simply type the following in the header or the footer in Excel:
&[Path]&[File]
Use &[Path] for only the File Path, and &[File] for only the File’s name.
Hope it helps you in your life with Excel.
Now you can confidently display the filename and the file path in Excel
With the File Name of Excel files visible in the header, with the File Path, you won’t lose a file in the wrong location & find what you are looking for easily!
Do let me know if you need any other functions in Excel, or if you are facing a problem in Excel. We can help you to solve everyday issues in Excel easily at ExcelChamp.Net.
And subscribe to the Excel Tips Newsletter for more such tips to improve productivity in Excel.
Cheers,
Vinai Prakash
Vinai is the founder and principal trainer for Microsoft Excel Tips and Techniques seminars all over the world. To book Vinai to conduct an Excel training at your office for your company, do email to vinai@excelchamp.net.
Содержание
- Insert File Path in Excel
- Get Path and File Name
- File Name, Path, and Worksheet
- FIND the File Name Position
- Remove the Worksheet Name
- SUBSTITUTE Function
- Get Path Only
- Insert the current Excel file name, path, or worksheet in a cell
- Insert the current file name, its full path, and the name of the active worksheet
- Insert the current file name and the name of the active worksheet
- Insert the current file name only
- Need more help?
- Insert the current Excel file name, path, or worksheet in a cell
- Insert the current file name, its full path, and the name of the active worksheet
- Insert the current file name and the name of the active worksheet
- Insert the current file name only
- Need more help?
- File Name, Sheet Name: Easily Insert File Data in Excel!
- Introduction: Get all the names you need
- The formulas for sheet name, file name, path etc.
- Copy these formulas for the current cell or sheet:
- Copy these formulas for any linked cell or sheet:
- Download an Excel file with all the formulas
- Display the File Name & File Path in Excel (PC & Mac)
- How to Write a Formula that will Display the File Path in Excel, automatically.
- Display only the Excel File Name, without the Sheet Name
Insert File Path in Excel
Download the example workbook
This tutorial will demonstrate how to get the path and file name using a formula in Excel.
Get Path and File Name
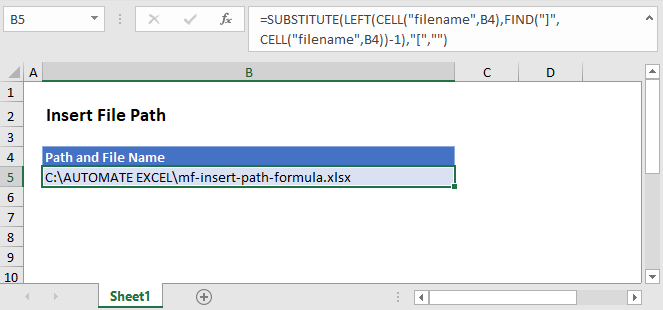
In Excel there isn’t a function to get the path and file name directly, but the CELL Function will return the file path, name, and sheet. Using the text functions FIND, LEFT, and SUBSTITUTE, we can isolate the path and file name.

Let’s step through the formula.
File Name, Path, and Worksheet
We use the CELL Function to return the file path, name, and sheet by entering “filename” as the info type.

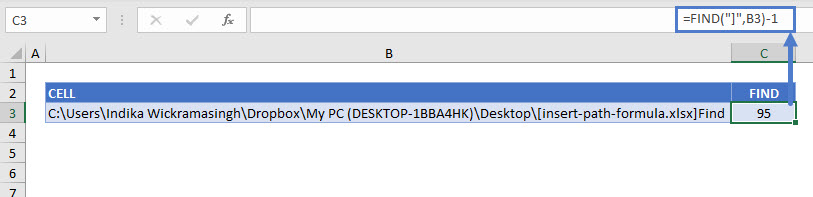
FIND the File Name Position
As shown above, the CELL Function returns the file path, name, and worksheet. We don’t need the worksheet or the square brackets, so we use the FIND function to determine the position of the last character (i.e. the one before “]”) of the file name.
Remove the Worksheet Name
Once we have the position of the file name’s last character, we use the LEFT Function to remove the name of the worksheet.

SUBSTITUTE Function
You can see above that there is still an open square bracket between the path and file names. Use the SUBSTITUTE function to replace the “[“ with an empty string.

Combining these steps into a single formula gives us:
Get Path Only
You might want to show the path only, without the file name. For this, we can stop at the LEFT Function with a little tweak. There’s no need to SUBSTITUTE since there won’t be any mid-string characters to delete. To return just the path, we find the position of the first character of the file name (“[“), instead of the last, and the path name is everything to the left.
Источник
Insert the current Excel file name, path, or worksheet in a cell
Let’s say you want to add information to a spreadsheet report that confirms the location of a workbook and worksheet so you can quickly track and identify it. There are several ways you can do this task.
Insert the current file name, its full path, and the name of the active worksheet
Type or paste the following formula in the cell in which you want to display the current file name with its full path and the name of the current worksheet:
Insert the current file name and the name of the active worksheet
Type or paste the following formula as an array formula to display the current file name and active worksheet name:
=RIGHT(CELL(«filename»),LEN(CELL(«filename»))- MAX(IF(NOT(ISERR(SEARCH(«»,CELL(«filename»), ROW(1:255)))),SEARCH(«»,CELL(«filename»),ROW(1:255)))))
To enter a formula as an array formula, press CTRL+SHIFT+ENTER.
The formula returns the name of the worksheet as long as the worksheet has been saved at least once. If you use this formula on an unsaved worksheet, the formula cell will remain blank until you save the worksheet.
Insert the current file name only
Type or paste the following formula to insert the name of the current file in a cell:
Note: If you use this formula in an unsaved worksheet, you will see the error #VALUE! in the cell. When you save the worksheet, the error is replaced by the file name.
Need more help?
You can always ask an expert in the Excel Tech Community or get support in the Answers community.
Источник
File Name, Sheet Name: Easily Insert File Data in Excel!

There are many cases, in which you want to show the sheet name or file name in an Excel cell. Don’t worry, you don’t have to use VBA and create a macro. Excel provides a (rough) formula for returning all the information you need. The bad news: In most cases it takes some complex modifications. The good news: Usually you can just copy and paste the formula you need.
Introduction: Get all the names you need
Fortunately, you don’t have to use VBA. There are formulas for each variation of the sheet name, file name and path. The main part of the formula is the =CELL() formula.
The CELL formula looks something like this: =CELL(“filename”,A1). That means that the CELL formula we have to use has two parts:
- The first part just says “filename”. It is important to add the quotation marks.
- The second part is optional and can link to any cell or workbook. If you leave it blank the current cell and workbook will be used.
The basic version of the CELL formula ( =CELL(“filename”,A1) ) returns the full path, file name and sheet name. You can use this formula and cut it into the parts you need. Therefore you use string formulas like LEFT, LEN and so on. We won’t go into detail now as those formulas are highly specific and complex but rather provide the formulas for you to copy.
Note: We’ve published an article about three methods of how to get the sheet name. Maybe this one is interesting for you as well.
The formulas for sheet name, file name, path etc.
The formulas for inserting file names, sheet names or the path (with and without the extension) are very different. This table gives you an overview. If you want to copy the formulas, you can find them underneath again.
Copy these formulas for the current cell or sheet:
- Worksheet name(example: “Formulas”):
=RIGHT(CELL(“filename”),LEN(CELL(“filename”))-SEARCH(“]”,CELL(“filename”, $A$2))) - Workbook name(example: “Formulas_SheetName_FileName”):
=TRIM(LEFT(SUBSTITUTE(MID(CELL(“filename”),FIND(“[“,CELL(“filename”))+1,255),”.xl”,REPT(” “,255)),255)) - Workbook name + extension(example: “Formulas_SheetName_FileName.xlsx”):
=MID(CELL(“filename”),SEARCH(“[“,CELL(“filename”))+1,SEARCH(“]”,CELL(“filename”))-SEARCH(“[“,CELL(“filename”))-1) - File path(example: “C:Desktop”):
=LEFT(CELL(“filename”),FIND(“[“,CELL(“filename”))-1) - File path + filename(example: “C:DesktopFormulas_SheetName_FileName”):
=LEFT(CELL(“filename”),FIND(“[“,CELL(“filename”))-1)&TRIM(LEFT(SUBSTITUTE(MID(CELL(“filename”),FIND(“[“,CELL(“filename”))+1,255),”.xl”,REPT(” “,255)),255)) - File path + filename + extension(example: “C:DesktopFormulas_SheetName_FileName.xlsx”):
=SUBSTITUTE(LEFT(CELL(“filename”),FIND(“]”,CELL(“filename”))-1),”[“,””) - File path + filename + extension + worksheet name(example: “C:Desktop[Formulas_SheetName_FileName]Formulas”):
=CELL(“filename”) - Folder name(example: “Desktop”):
=TRIM(RIGHT(SUBSTITUTE(LEFT(CELL(“filename”),FIND(“[“,CELL(“filename”),1)-2),””,REPT(” “,100)),100))
Copy these formulas for any linked cell or sheet:
If you want to get the file name, sheet name or path from another cell or workbook, you can use one of the following formulas. Instead of “A1” you insert your cell reference.
- Worksheet name(example: “Formulas”):
=RIGHT(CELL(“filename”,A1),LEN(CELL(“filename”,A1))-SEARCH(“]”,CELL(“filename”, A1))) - Workbook name(example: “Formulas_SheetName_FileName”):
=TRIM(LEFT(SUBSTITUTE(MID(CELL(“filename”,A1),FIND(“[“,CELL(“filename”,A1))+1,255),”.xl”,REPT(” “,255)),255)) - Workbook name + extension(example: “Formulas_SheetName_FileName.xlsx”):
=MID(CELL(“filename”,A1),SEARCH(“[“,CELL(“filename”,A1))+1,SEARCH(“]”,CELL(“filename”,A1))-SEARCH(“[“,CELL(“filename”,A1))-1) - File path(example: “C:Desktop”):
=LEFT(CELL(“filename”,A1),FIND(“[“,CELL(“filename”,A1))-1) - File path + filename(example: “C:DesktopFormulas_SheetName_FileName”):
=LEFT(CELL(“filename”,A1),FIND(“[“,CELL(“filename”,A1))-1)&TRIM(LEFT(SUBSTITUTE(MID(CELL(“filename”,A1),FIND(“[“,CELL(“filename”,A1))+1,255),”.xl”,REPT(” “,255)),255)) - File path + filename + extension(example: “C:DesktopFormulas_SheetName_FileName.xlsx”):
=SUBSTITUTE(LEFT(CELL(“filename”,A1),FIND(“]”,CELL(“filename”,A1))-1),”[“,””) - File path + filename + extension + worksheet name(example: “C:Desktop[Formulas_SheetName_FileName]Formulas”):
=CELL(“filename”,A1) - Folder name(example: “Desktop”):
=TRIM(RIGHT(SUBSTITUTE(LEFT(CELL(“filename”,A1),FIND(“[“,CELL(“filename”,A1),1)-2),””,REPT(” “,100)),100))
- The formulas are different for each language and regional settings. So you have to make sure to adapt it to your Excel version. Please check out the download below, it’s probably the easiest option for adapting the formulas to your settings.
- In order to insert the filename or path, you have to save your workbook first. It doesn’t work with a newly created Excel file.
Download an Excel file with all the formulas
In order to avoid any problems with language and regional settings, you can download all the above formulas with an Excel file.
Just open it and copy the complete cell to your desired location. The download starts instantly (no sign-up or any other annoyances…).
- Download link: Click here.
- File name: Formulas_SheetName_FileName.xlsx
- Size: 35 KB
- File type: XLSX
Anything missing? Suggestions for improvements? Please let us know and leave a comment.
Источник
Display the File Name & File Path in Excel (PC & Mac)
Many a time, it is good to Display the location of the file in Excel.
Not just the file name, but the entire path of the file. It is a good reference to make sure you are working on the correct file and is also good if you print out the Excel. With this option, the file path always gets printed on paper..
How to Write a Formula that will Display the File Path in Excel, automatically.
One useful formula that can assist us is the CELL formula. I bet you didn’t know about this in-built Excel Function…
The CELL function can help us to display the address, colour, format, type or width of any cell.
The CELL Function takes a maximum of 2 arguments, and only the first one is mandatory.
So, if you write =CELL(“filename”) in any cell, you will get the Full Pathname of this Excel file, along with the Sheet Name.
For example, I got the filename displayed as below:
D:[email-blasting-migration.xlsx]Sheet1
According to the Excel Help, the CELL function has the following arguments:
- info_type Required. A text value that specifies what type of cell information you want to return. The following list shows some of the possible values of theinfo_typeargument and the corresponding results.
info_type Returns “address” Reference of the first cell in reference, as text. “col” Column number of the cell in reference. “color” The value 1 if the cell is formatted in color for negative values; otherwise returns 0 (zero). “contents” Value of the upper-left cell in reference; not a formula. “filename” Filename (including full path) of the file that contains reference, as text. Returns empty text (“”) if the worksheet that contains reference has not yet been saved. “format” Text value corresponding to the number format of the cell. The text values for the various formats are shown in the following table. Returns “-” at the end of the text value if the cell is formatted in color for negative values. Returns “()” at the end of the text value if the cell is formatted with parentheses for positive or all values.
Display only the Excel File Name, without the Sheet Name
To only print the File name, you can use this long formula:
Keep in mind that the file should be saved somewhere. If you just open a new workbook, and try these formulas, you will get a #VALUE ERROR. This error will disappear automatically once the file is saved, and the error will be replaced with the correct full file path name, and file name.
This formula to display the filename in Excel also works on the Mac. Any Excel for Mac version, including Excel X for Mac, to Excel 2004, 2008, 2011 for Mac also work fine in displaying the filename.
For example, for a file on Mac with the path HD :Users:local:Desktop, the formula returns
HD :Users:local:Desktop:( filename )Sheet1
Источник
Return to Excel Formulas List
Download Example Workbook
Download the example workbook
This tutorial will demonstrate how to get the path and file name using a formula in Excel.
Get Path and File Name
In Excel there isn’t a function to get the path and file name directly, but the CELL Function will return the file path, name, and sheet. Using the text functions FIND, LEFT, and SUBSTITUTE, we can isolate the path and file name.
=SUBSTITUTE(LEFT(CELL("filename",B2),FIND("]",CELL("filename",B2))-1),"[","")
Let’s step through the formula.
File Name, Path, and Worksheet
We use the CELL Function to return the file path, name, and sheet by entering “filename” as the info type.
=CELL(“filename”,B2)
FIND the File Name Position
As shown above, the CELL Function returns the file path, name, and worksheet. We don’t need the worksheet or the square brackets, so we use the FIND function to determine the position of the last character (i.e. the one before “]”) of the file name.
=FIND("]",B3)-1
Remove the Worksheet Name
Once we have the position of the file name’s last character, we use the LEFT Function to remove the name of the worksheet.
=LEFT(B3,C3)
SUBSTITUTE Function
You can see above that there is still an open square bracket between the path and file names. Use the SUBSTITUTE function to replace the “[“ with an empty string.
=SUBSTITUTE(D3,"[","")
Combining these steps into a single formula gives us:
=SUBSTITUTE(LEFT(CELL("filename",B2),FIND("]",CELL("filename",B2))-1),"[","")Get Path Only
You might want to show the path only, without the file name. For this, we can stop at the LEFT Function with a little tweak. There’s no need to SUBSTITUTE since there won’t be any mid-string characters to delete. To return just the path, we find the position of the first character of the file name (“[“), instead of the last, and the path name is everything to the left.
=LEFT(CELL("filename",B2),FIND("[",CELL("filename",B2))-1)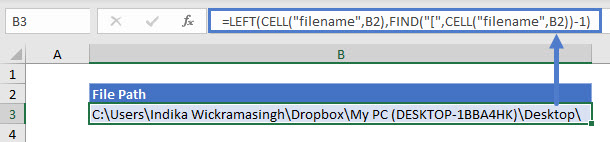
Home / Excel Formulas / How to Get File Name in Excel
In Excel, there is no direct function to get the name of the file, but you can use the CELL function to get the path of the file, and then we can use the MID function to extract the file name from it.
You can use the following steps:
- First, you need to enter the CELL function in a cell.
- After that, you need to specify the “filename” in the argument.
- Next, enter the closing parentheses
- In the end, hit enter.
=CELL("filename")At this point, you have the address path of the file. You can see in the following example that I have the path address in cell D1.

Now the next thing is to get the name of the file from this address, and for this, we will use the MID + SEARCH functions.
There’s one thing that you need to note down the name of the file is in the square brackets.
So, let’s create a formula to get the name of the file.
- First, use the SEARCH function to know the position of the starting square bracket by using the search function.

- Next, you need to find the position of the ending square brackets.

- After that, you need to use the MID function to get the fine name from the entire path.
- And for this, we need to use the following formula where you need to use the values that you have got from the search function.


Now let’s understand this formula that we have written with the MID function. In the MID function:
- In the first argument, you have referred to the cell where we have the full path of the file.
- In the second argument, you have used the position of starting square bracket which you have got from the SEARCH function and then added 1 into it.
- In the third argument, you used the position of the ending square bracket and deducted the position of the starting square bracket, and after that deducted 1 from it. This gives you the exact number of characters to get.
Here I have input all the functions in a single formula to get the result in a single cell.
=MID(CELL("filename"),SEARCH("[",CELL("filename"))+1,SEARCH("]",CELL("filename"))-SEARCH("[",CELL("filename"))-1)