
I’ve installed a load of fonts, but Word’s Font drop-down list and Font dialog box offer me only Device Font in three different sizes: 10cpi, 12cpi, and 17cpi. I figured out that «cpi» stands for «characters per inch,» but that doesn’t really help me. How can I introduce Word to my fonts?
Word has somehow been set to print with a Generic/Text Only printer. You’ll get similar effects (see Figure 4-8) if you’ve installed a very limited printer, such as a dot-matrix printer.
Figure 4-8. If most of your fonts disappear from the Font drop-down list, it usually means that you’ve got a Generic/Text Only printer installed.
Choose File » Print, click the Name drop-down list in the Print dialog box, select another printer, and click the Close button. Back in the document, check the Font drop-down list or the Font dialog box; your fonts should have flocked back, ready for use.
Unless you, another user, or a macro has selected the Generic/Text Only printer or the limited printer in Word, chances are that it’s set as your PC’s default printer. To change the default printer, go to Start » Printers and Faxes, right-click the appropriate printer, and choose Set as Default Printer.
If the Name drop-down list in the Print dialog box doesn’t contain any other printers, go to Start » Printers and Faxes and click the «Add a Printer» link in the Printer Tasks list. (If the Printers and Faxes item doesn’t appear on the Start menu, go to Start » Control Panel » Printers and Other Hardware » Printers and Faxes.) Follow the Add Printer Wizard to add whichever printer should be installed.
If your fonts still don’t show up, make sure they’re in your Fonts folder. The easiest way to get there is to choose Start » Control Panel » Appearance and Themes » Fonts. If your fonts are missing, you’ll need to reinstall them.
by updated Sep 03, 2017
Word does display a preview of each font. Just click the arrow on the Font drop down on the Home tab. Additionally, go to the Options dialog’s General page and check the box for Enable Live Preview.
Furthermore, How do I install a font in Word for Mac?
How to Add New Fonts to Microsoft Word on a Mac
- Open Finder on your Mac.
- Navigate to the location where your new font file is. …
- Double-click the font file you want to install.
- The font preview window opens. …
- This will install the font and open the Font Book. …
- Restart your computer for the changes to take effect.
Simply so How can I add a font to Microsoft Word?
Add a font
- Download the font files. …
- If the font files are zipped, unzip them by right-clicking the .zip folder and then clicking Extract. …
- Right-click the fonts you want, and click Install.
- If you’re prompted to allow the program to make changes to your computer, and if you trust the source of the font, click Yes.
Also, How do I find my font? Open Settings > Personalization > Fonts. Windows displays all your fonts already in preview mode.
How do I see glyphs of a font?
In the Character Map window, you can select the font whose glyphs you want to access and use. To do this, click the Font: drop-down list and select a font. You will see its Glyphs.
What is Apple’s system font? SF Pro. This neutral, flexible, sans-serif typeface is the system font for iOS, iPad OS, macOS and tvOS. SF Pro features nine weights, variable optical sizes for optimal legibility, and includes a rounded variant.
How do I get a font from Font Book to Word?
Tap Explore data and find the font directory by navigating to Files > Data > Fonts. Paste the font file inside the font directory by tapping the “1 copied” icon in the upper right of your screen and selecting Paste from the menu that appears. The font will now appear as an option in MS Word.
Where is the Font Book on a Mac?
Computer: Fonts are available to any user on this Mac and are located in the Fonts folder in the system Library (/Library/Fonts/). You must enter an administrator’s password to install fonts here.
What is the Harry Potter font called in Word?
Lumos. Lumos is a typeface inspired by the chapter titles in the US editions of the Harry Potter books. It also includes a number of Harry Potter symbols, including a broom and Golden Snitch.
What is Microsoft logo font?
Segoe (/ˈsiːɡoʊ/ SEE-goh) is a typeface, or family of fonts, that is best known for its use by Microsoft. The company uses Segoe in its online and printed marketing materials, including recent logos for a number of products.
How do I add Chinese fonts to Microsoft Word?
Add a language and associated fonts
- Click the Windows Start button, click Settings, and then click Time & language.
- Click Region & language, and then click Add a language.
- Click the language for the font you want to add. Any fonts associated with that language will be downloaded, and your text should display correctly.
What is the default font for Windows 10?
Windows 10’s default system font, Segoe UI, looks pretty nice. However, if you have something better to replace it with, you can change the default system font on your Windows 10 PC.
How do you get a font on your computer?
Installing a Font on Windows
- Download the font from Google Fonts, or another font website.
- Unzip the font by double-clicking on the . …
- Open the font folder, which will show the font or fonts you downloaded.
- Open the folder, then right-click on each font file and select Install. …
- Your font should now be installed!
How do I use a downloaded font?
To do this you need to mark either the OTF or the TTF file in the ZIP file, and click Settings> Extract to….
- Extract the font to Android SDcard> iFont> Custom. …
- The font will now be located in My Fonts as a custom font.
- Open it to preview the font and to install it on your device.
How do I use glyph fonts in Word?
To access the panel, select Type > Panels > Glyphs Panel or Window > Glyphs. This is also demonstrated in the video. You’re not limited to using unique Fonts in a word document or Photoshop.
How do I add glyphs to a font?
Create a custom glyph set
- Choose Type > Glyphs.
- Do one of the following: …
- Type the name of the glyph set.
- Choose the insert order in which glyphs will be added to the glyph set, and click OK:
What font did Steve Jobs use?
Chicago, a primitive, pixelated font, would be used by Apple on all of its menus through the release of the first-generation iPod. Other Jobs creations included the blackletter London and San Francisco, a ransom note-esque font that was composed of letters seemingly ripped from newspaper headlines.
What font does Apple use on their website 2020?
On Apple’s homepage and other web pages on the site, the San Francisco typeface is being used in many places where text is displayed, replacing the previous Myriad typeface. Bolder and easier to read, San Francisco has been used on iOS devices and Macs since iOS 9 and OS X 10.11 were introduced in 2015.
What font does Nike use?
Nike has nearly completed its transition to Trade Gothic as the primary typeface for the brand. There are still some areas of the site using Futura Extra Bold Condensed, but mostly it’s Trade Gothic Bold Condensed being used everywhere.
Why are my fonts not showing up in Word?
Click Start, point to Settings, and then click Control Panel. Double-click Fonts. On the File menu, click Fonts to place a check mark. … To verify that fonts are being displayed, look in a folder that contains font files (such as the WindowsFonts folder).
How do I use Calligrapher font in Word?
To use your font in external programs like MS Word or Adobe Illustrator you have to install it on your computer. In the result dialog of “Build font” there is a download link for a . ttf file. Download this font file to your computer and install it.
How do you use fonts on a Mac?
On your Mac, do any of the following:
- In the Font Book app , click the Add button in the Font Book toolbar, locate and select a font, then click Open.
- Drag the font file to the Font Book app icon in the Dock.
- Double-click the font file in the Finder, then click Install Font in the dialog that appears.
How do you turn on fonts on a Mac?
Enable fonts
- In the Font Book app on your Mac, select one or more disabled fonts or font families, or a disabled font collection.
- Do any of the following: Enable fonts or font families: Click the Enable button in the toolbar above the list of fonts. Enable a collection: Choose Edit > Enable [Collection].
What is the default font on Mac?
System fonts
The primary system font in OS X El Capitan and above is San Francisco. OS X Yosemite used Helvetica Neue, and preceding versions largely employed Lucida Grande.
Inject some personality into your words
What to Know
- Easiest option for Windows: Right-click the .ttf or .otf file and select Install.
- Next easiest: Go to Start > Control Panel > Fonts. In another window, drag the .ttf or .otf file into the font folder you just opened.
- For Word for Mac, double-click the font file to open a preview > Install Font.
This article explains how to install fonts in Windows, Word for macOS, Microsoft Word Online, Word for Android, and Word for iOS. Instructions in this article apply to all versions of Word going back to 2011 as well for Windows 10, 8, and 7, macOS, Android, and iOS.
How to Install a Font on Windows
Let’s learn how to install a font on Windows so we can then add it to Word. Installing a font on Windows is the same from Windows 10 all the way back to Windows 7. There are 2 ways to install.
Method 1
-
If you don’t see a .ttf or .otf file, you may have to extract it from a zip file.
-
Once you have a .ttf or .otf file, right-click the file and select Install.
-
You will briefly see an installation progress window as it installs.
Method 2
-
Select Start > Control Panel > Fonts to open your system’s font folder.
-
In another window, find the font you want to install. If you downloaded the font from a website, then the file is probably in your Downloads folder. The font file will likely have a .ttf or .otf extension.
-
Drag the desired font into your system’s font folder. You can drop it into any white space between the other font icons in the font control panel.
Font sets are often contained within .zip files, so you must extract them before dragging the actual font files into your system’s Fonts folder. For guidance on how to extract, or unzip, a .zip file, see Zip Files: Unzip Them With the Right Software. If a .zip file contains multiple variations of a font, you must install each one individually.
-
Once the font is in the correct folder, it should install automatically. If it doesn’t, double-click the font file to open the Font Previewer, and click the Install button in the upper-left corner. The next time you open Word, the new font should appear as an option in the font list.
How to Add Fonts to Word for Mac
Before you can use new Microsoft Word fonts on Mac, you must add them to the app for managing fonts on macOS, the Font Book:
-
Locate your font file and double-click it to open the font preview window. You may need to unzip the file first.
-
Click Install Font near the bottom of the font preview window, which should open the Font Book.
-
If you’re using the 2011 version of Office for Mac, then you must also drag and drop the font file into the Windows Office Compatible collection, which can be found in the left sidebar of the Font Book.
-
After restarting your Mac, the font should be available in Word and most other apps including PowerPoint and Excel.
Fonts will only display properly in Word if they are installed on the user’s device. Text formatted with unsupported fonts will usually appear in a default font such as Times New Roman. If you plan on sharing your Word files with others, you may need to embed some fonts. You can only embed fonts in the Windows versions of Word, and the specific font must allow embedding. Check the list of Microsoft fonts supported by each version of MS Office to determine which fonts you might need to embed.
How to Add Fonts to Word Online
If you’re using the Microsoft Word Online app as part of Microsoft 365, you can make use of any font installed on your system. Just type the name of the font file minus the extension into the Font Options box.
When you save the document, the font name will appear in the font options box and display properly for any user who has that font installed on their device. Unfortunately, Word Online doesn’t let you embed fonts.
If I Add Fonts in Word, Do They Transfer Over to Excel or PowerPoint?
Yes. Once you add a font to your operating system and ensure that it’s compatible with Word, then you should be able to use it in any MS Office application including Microsoft Excel and PowerPoint.
How to Add Fonts to Microsoft Word for Android
Unfortunately, adding fonts to the newest version of MS Word for Android is much more difficult than it used to be. Before you begin, you’ll need root access to your device. Lifewire has an in-depth guide explaining how to root any Android device.
Rooting your device could void the warranty and cause hardware malfunctions. Before you attempt rooting, back up your important data using an app like Helium.
-
With your rooted Android device, download FX File Explorer and install the root add-on.
-
Open FX File Explorer and locate your font file.
-
Select the font file by holding your finger on it for a few seconds, and then tap Copy in the upper right corner of the screen. If successful, you’ll see a new icon in the upper right corner that says «1 copied.»
Use the FX File Explorer app to locate your font and copy it.
-
Now, close out FX File Explorer, locate the MS Word app and hold your finger on the file icon to make a menu pop up. If your device has been rooted, you should see an Explore data option in addition to Open and Uninstall.
-
Tap Explore data and find the font directory by navigating to Files > Data > Fonts.
-
Paste the font file inside the font directory by tapping the «1 copied» icon in the upper right of your screen and selecting Paste from the menu that appears.
-
The font will now appear as an option in MS Word.
How to Add Fonts to Microsoft Word for iOS
To add a font to an iPhone or iPad, you’ll need a font installer app such as AnyFont, which you can download from the App Store.
-
Move the desired font file into your iCloud.
-
From iCloud, tap the font file, and then tap Share > More (ellipsis) in the upper right corner of your screen.
-
From the Apps menu, tap AnyFont.
-
Once AnyFont opens, you should see your font file. Tap > next to the font on the right side.
-
Tap Install on the next screen that appears.
-
Tap Allow if prompted to allow a configuration profile download.
-
Go to Settings > General > Profiles,
-
Under Downloaded Profile, select the font.
-
Select Install on the top right corner.
-
Select Next.
-
Select Install on the Unsigned Profile window.
-
When asked for confirmation, select Install.
-
Select Done.
-
Open Word and select font under iOS Fonts.
Download Fonts for Microsoft Word
You can install any font file on any OS. You can find fonts online at Creative Market, Dafont, FontSpace, MyFonts, FontShop, and Awwwards. Some fonts are free while others must be purchased. When you download a font, it typically goes to your system’s Downloads folder unless you specify otherwise.
FAQ
-
How do I embed my Word fonts into a PDF?
On a Mac, select File > Print > PDF > Save as PDF > Save to convert the document to a PDF and embed all fonts. Windows machines should also automatically embed fonts when you convert a Word document to a PDF. To check, open the PDF in Acrobat Reader then select File > Properties > Fonts tab and make sure your fonts are embedded.
-
Why aren’t the correct fonts appearing in my PDF?
You might need to adjust your Acrobat conversion settings. In Word, select Acrobat > Preferences > Advanced Settings. Select the Fonts section and check Embed all fonts.
-
How do I remove fonts from Word?
In Windows, open the Control Panel and enter fonts into the search, then choose the font you don’t want and select Delete. On a Mac, open Font Book and pick the font you want to get rid of, then select File > Remove.
Thanks for letting us know!
Get the Latest Tech News Delivered Every Day
Subscribe
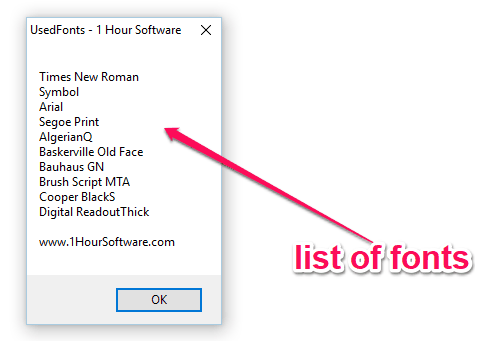
In this tutorial, you will learn about how to see list of fonts used in a Word document. By default, there is no option in MS Word that can help you know which fonts are exactly used in a word document. That means if you want to know the same, then the only option you have is to open the document and then manually check the fonts. But today, I came across a free tool which can help you see which fonts are used in any Word document.
For that, you would need to simply open this software, select a Word file, and voila you get the result instantly. Do note that it supports only the “DOC” files. There are also many font identifiers available which can help you find fonts from images and webpages. But, none of them has the option to find fonts used in a Word document.
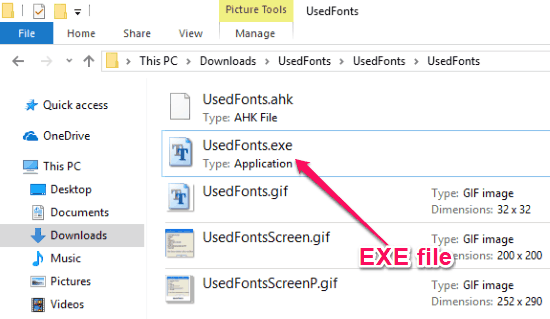
To get started, the first thing you need to do is download “UsedFonts” on your PC. The link is given at the end of this post. After that, extract the archive and then you can see a “UsedFonts.exe” file inside the extracted folder.
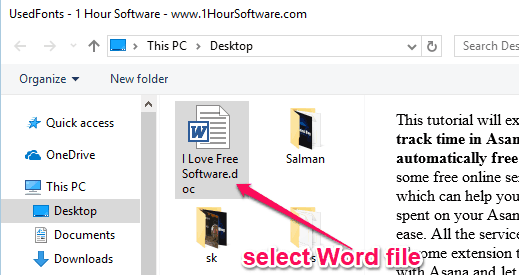
Now, to see the list of fonts used in a Word document, simply double-click on the EXE file. Then it will ask you to select the source Word document from your PC. Remember, it only supports DOC file.
As soon as you do that, it will automatically analyze the text in the Word document and generate a list of fonts used in the document. You can see the list of fonts in a small popup window, as shown below.
Closing Words:
So, if you have been looking for a way to find out which fonts are used in a Word document, then this tutorial can be helpful for you. UsedFonts makes it super easy for you to do that. No Rocket Science required, as all you gotta do is select a Word file in this tool and the rest is done automatically. Go ahead try it out for free.
Get “UsedFonts” from here.
|
Editor Ratings: |
|
|
User Ratings: [Total: 1 Average: 4] |
|
| Home Page URL: | Click Here |
| Works With: | Windows |
| Free/Paid: | Free |
|
Tags: fonts |
TheTechieSenior.com is reader supported. We may earn a commission if you buy through links on this site. As an Amazon Associate, we earn from qualifying purchases. Learn more here.
Microsoft Word users have access to dozens of fonts that can be used in our documents. But it frequently happens that we have a project in progress that calls for a font which is not available on our computers. We’ll show you how to add fonts in Microsoft Word.
Table of Contents
How to Add Fonts in Microsoft Word and Be Certain They’re Visible to Your Readers
In this article, I’ll be referring to Microsoft Word 365. I use that name for the version of MS Word that is part of the Microsoft 365 suite.
Fonts that you see in the font list in Microsoft Word 365 come from three likely sources:
- Several dozen are installed when Microsoft 365 is installed on your computer. Those are normally available for use in Word, Excel, Powerpoint, and Outlook.
- Microsoft Office 365 fonts that exist only in the cloud until you select one for use in your document.
- With a few possible exceptions, Microsoft Word has access to basically all of the additional fonts that are installed on your Windows or Mac computer.
How to use more cloud fonts in MS Word
Cloud fonts are fonts that are retrieved as needed from a server on the Internet. Standard fonts are stored on, and retrieved from, your computer.
You may have heard of Google fonts which are used on thousands of websites. In this article we’ll be referring to Microsoft cloud fonts which are only available to Microsoft 365 subscribers.
When you open the drop-down list of fonts in the text settings area of the Home tab, you see two groups of fonts comingled in one list—those that have a cloud icon before the font name and those that do not. (The cloud icon looks like a cloud with a downward pointing arrow through the bottom of it.)
Those that do not have the cloud icon preceding the font name are already in use on your computer. They are ready to use with or without an Internet connection, just by selecting them.
Those font names that do have the cloud icon preceding the name are also available for you to use in Microsoft 365 apps, but are not actually installed on your computer.
To use a font from the cloud, be sure your computer is connected to the Internet then select the font like any other on the list. That font will then be retrieved via the Internet and cached on your computer, ready for use in Word and other Microsoft 365 apps.
Download and add custom fonts
You can install additional fonts on your computer which will be available for most apps to use, including Microsoft Word.
There are many sources for fonts online, some offering them free of charge and others offering fonts that require you to purchase a license to use them.
Whether you download paid or free fonts, you will want to look for fonts in the OTF or TTF format. Many fonts will download as a .zip file that contains both versions. OTF is a newer format and will normally work fine. If you have an older app on your computer that does not seem to work with the OTF version, try installing the TTF version.
Fonts normally download in a zipped file (with a .zip file extension). Before you can install them, you’ll need to unzip them.
To unzip a file on a Mac computer, just double click it. A folder with the same name as the zipped file will appear in the same folder. The contents of the .zip file will be inside that folder.
To unzip a file on a Windows 10 computer, right-click the .zip file and choose Extract all. A folder containing the actual font files will be created in the same location as the .zip file.
Once the file is unzipped, follow the instructions below for Windows or Macs.
Install fonts in Windows 10
With the font unzipped, right-click the font file itself and choose to install. Remember, you are installing the font file with a .ttf or .otf extension, not the .zip file.
If the font doesn’t install correctly using the right-click method, you can use another method. In the search bar in the bottom left of your screen, type Fonts. The fonts tool should be the first item shown in the search results that appear.
- Click the Fonts tool.
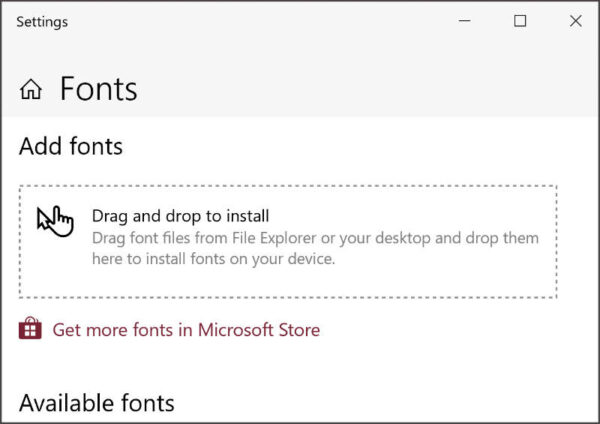
- The window that appears will probably be a small window with a box in the center where you can drag and drop your font tile to install it. Drag your unzipped font file into that box. The font will automatically install.
You can also reach the Fonts management area in Windows 10 by clicking the Start button in the bottom left of the screen. Then:
- Click Settings
- Click Personalization
- Click Fonts
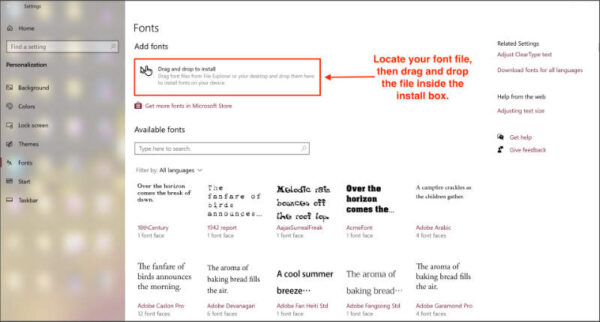
That should open the font settings page shown in the following image. If the smaller drag and drop panel described in the previous instruction is maximized, you will see the following page as well.
Install fonts on Mac computers
The easiest way to install fonts on Mac computers is to simply double click the unzipped font file. A box will open with your font listed and an install button in the lower right corner. Click the install button and you’ll be on your way.
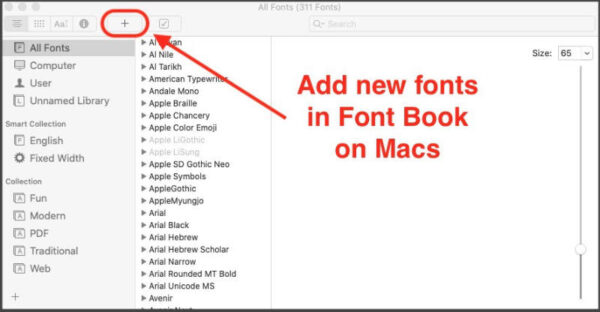
You can also add fonts using the Font Book app.
- Open Font Book.
- Locate the + icon.
- Locate the .ttf or .otf file and click Open.
If your Font Book app is pinned to the dock, you can simply drag the font file onto the Font Book icon.
Restart may be required
On both Windows and Mac computers you may have to restart your computer before Word or other apps will recognize the new fonts that you installed.
Be sure your recipient can view your document as you designed it
If you plan to send your Word document to another person, and it matters to you whether or not that person views your document exactly as you designed it, you may need to take an extra step when you save the file.
Whoever receives your document will need to have the same font available on his computer if he is to see the document exactly as you sent it. This is true whether you used only those that are available via Microsoft 365 or you used custom fonts that you bought and installed as instructed above.
If your document uses only cloud fonts that are available with recent versions of Word (Microsoft) 365, the fonts aren’t embedded into the document by default and will only be displayed on the recipient’s computer if that person also has Microsoft 365 installed on a computer that is connected to the internet.
If your recipient’s computer is not connected to the Internet or he uses an older version of Microsoft Word, or your document includes custom fonts that you installed, your recipient will not be able to view your document as you designed it unless you embed the fonts into the document.
Embedding the fonts into the document insures that the recipient will see the document as you intended, whether or not he has the included fonts available. Note that it is possible for font creators to make their fonts unembeddable. However, most commonly available OTF and TTF fonts can be embedded.
How to embed fonts into your Word document on Windows computers
With your document open, click the File tab, then:
- Near the bottom left corner of the window, click Options.
- In the Options panel, look for Save in the left column and click it.
- Near the bottom of the panel, look for “Preserve fidelity when sharing this presentation.”
- Check the first box labeled, “Embed fonts in the file.”
Be sure you save the document after you check the box to embed the fonts.
I recommend that you not check the box labeled, “Embed only the characters used in the presentation.” Leaving it unchecked helps to insure that your recipient sees the document as you intended and, if you intended that person to be able to edit the file in the same font, insures that will be possible.
How to embed fonts into your Word document on Mac computers
The ability to embed fonts in Word documents that were created on Mac computers is only available to Microsoft 365 subscribers as of the time this article was written.
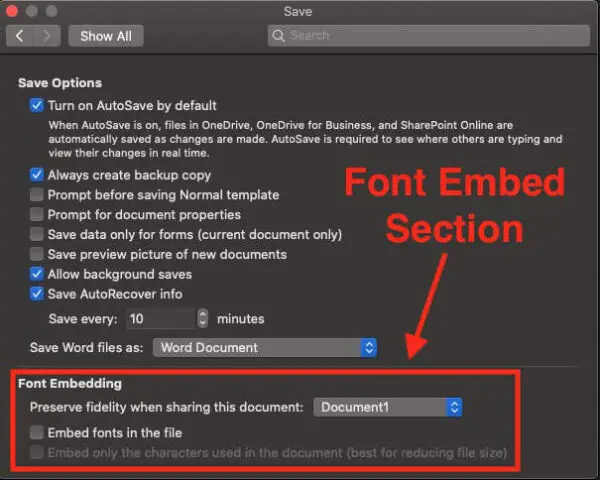
To embed fonts in Word documents that were created on Mac computers, first go to Preferences under the Word menu.
- Under the Output and Sharing section, click the Save icon.
- At the bottom of the Output and Sharing panel, under Font Embedding, check the box beside “Embed fonts in the file.”
- Be sure to do the preceding before you save your document for the last time.
What happens if you don’t embed your custom fonts
If the recipient of your document is using an older version of Microsoft Word, if she uses Microsoft 365 but her computer is not connected to the Internet, or if you do not embed the fonts into your document, your recipient’s computer will substitute a different font for your chosen ones. That may cause your document to be displayed in a undesirable manner.
A bonus tip
If it’s important to you that your Word document appears exactly as you created it, but it’s not important that the person who you send it to can read or edit it in MS Word, sending the file as a PDF may be just what you need.
In MS Word 365 for Macs and Windows, to create a PDF of your document with the fonts embedded, go to the File menu. Click Save As… and for the file type select PDF. Be sure you check the box to create a PDF for printing.
In MS Word 365 for Windows, you can also go to the File menu and select Export. Then choose PDF. That option will give you a PDF with fonts embedded.
Find more articles about using fonts and text here.
Learn more about Microsoft cloud fonts here.