
To view multiple pages at one time, keep the “View” tab active. Place your cursor in the text of the first page you want to view in the multiple-page view. In the “Zoom” section, click “Multiple Pages.” By default, two pages are shown side-by-side.
Contents
- 1 Can’t see all pages in Word?
- 2 Why are multiple pages showing in Word?
- 3 How do I view pages side by side in Word?
- 4 How do I make Microsoft Word my default page view?
- 5 How do I make 3 pages into 1 page in Word?
- 6 How do I get rid of 2 page view in Word?
- 7 How do you scroll a page in Word?
- 8 How do you get Word to not display pages side by side?
- 9 How do I view pages side by side in pages?
- 10 How do I put two pages side by side?
- 11 What is the quickest way to find how many paragraphs in Word?
- 12 What is the default layout in Word?
- 13 How do I make 2 pages into 1 page in Word?
- 14 How do I combine pages into one in Word?
- 15 Does 2 pages mean front and back?
- 16 How do I view only one page in Word?
- 17 Can we view multiple pages in page preview?
- 18 How do I open multiple pages in one document on a Mac?
- 19 How do I view documents side by side in Windows 10?
Can’t see all pages in Word?
Click the View tab and click Print Layout on the left side of the ribbon. Alternatively, you can click the Print Layout button if you have View Shortcuts enabled in your Status Bar. Remain on the View tab, go to the Zoom section of the ribbon, and click Multiple Pages.
Why are multiple pages showing in Word?
As you adjust the zoom settings used by Word, you may notice that Word automatically displays multiple pages of your document at the same time.In that case, as you get your zoom factor down to near 50%, Word automatically switches to display two pages.
How do I view pages side by side in Word?
How to Enable Side to Side View in Word
- Click the View tab and in the Views section of the ribbon, select Print Layout.
- Next, on the View tab, go to the Page Movement section of the ribbon and select Side to Side.
- You’ll immediately see the window adjust to show two pages at the same time.
How do I make Microsoft Word my default page view?
Try this:
- Go to Layout tab and click on Margins, select Custom Margins.
- Select Normal on Multiple pages and click Set As Default and OK.
How do I make 3 pages into 1 page in Word?
How to Merge Many Pages Into One Page in Microsoft Word
- Click “Start” from the lower-left of the desktop.
- Click the “Microsoft Office Button” at the top left of the screen and then click “Print.” The “Print” window launches.
- Click the number of pages you wish to fit on one page from the “Pages per sheet” drop-down box.
How do I get rid of 2 page view in Word?
- Open your word document.
- Click on View menu.
- You can see option like “One Page” in the ribbon under the view menu. Just click on it to get rid of a double page layout in Microsoft word.
- That’s it.
How do you scroll a page in Word?
To move page by page, you can hold down the Ctrl key and press Page Up or Page Down. You can also use View>Navigation Pane and click on the page icons to move a page at a time.
How do you get Word to not display pages side by side?
All replies
- Open a Word document.
- On the View tab, in the Document Views group, click Full Screen Reading. Tip using the keyboard: Press ALT+W, and then press F.
- click View Options, select Show one page.
- Press and hold CTRL while you rotate the Wheel button to Zoom In or Out.
How do I view pages side by side in pages?
View document pages side by side
- Click the Zoom pop-up menu in the toolbar and choose Two Pages.
- Do any of the following to adjust the page view: Fit the pages in the document window: Click the Zoom pop-up menu and choose Fit Spread.
How do I put two pages side by side?
Open the two documents and then click the “View” tab on the ribbon. Click “View Side by Side” in the Window group to resize the two document windows on one screen.
What is the quickest way to find how many paragraphs in Word?
If you want to quickly count the number of paragraphs in a document, here is a great way to do it:
- Make sure you save your document.
- Press Ctrl+Home to go to the beginning of your document.
- Press Ctrl+H.
- In the Find What box, enter ^p.
- In the Replace With box, enter ^p.
- Click on Replace All.
What is the default layout in Word?
In Microsoft Word, switches to normal view, which is the default document view for most word-processing tasks, such as typing, editing, and formatting.
How do I make 2 pages into 1 page in Word?
Click the “1 Page Per Sheet” button to open a drop-down menu with more options. Click “2 Pages Per Sheet.”
How do I combine pages into one in Word?
In this article
- Select the Insert tab.
- Select Object, and then select Text from File from the drop-down menu.
- Select the files to be merged into the current document. Press and hold Ctrl to select more than one document. Documents will be merged in the order in which they appear in the file list.
Does 2 pages mean front and back?
A sheet of paper has two sides — the front and the back. If you print on both sides of the sheet then you have TWO pages — the front is page one, the back is page two. In printing, a page is NEVER multi-sided, by definition it CAN’T be. A page is ALWAYS one side of a sheet.
How do I view only one page in Word?
One easy way to display just a single page is to simply “zoom out” a bit by holding down the Ctrl key as you move the scroll wheel on your mouse. As you zoom in and Word discovers that it can no longer display two pages on the screen, it should switch automatically to show only a single page.
Can we view multiple pages in page preview?
You can view multiple pages in a page preview is a true statement. Explanation: You can easily view multiple pages in a page preview by going to the view menu and from there going to the zoom section, there is a separate option for the viewing of multiple pages is available.
How do I open multiple pages in one document on a Mac?
Open a second document when one is already open
On the Dock, touch and hold the app icon, then drag it to the right or left edge of the screen to make a Split View. Tap a document to open it next to the first document in Split View, or tap the plus button to browse other documents in the document manager.
How do I view documents side by side in Windows 10?
View and compare documents side by side
- Open both of the files that you want to compare.
- On the View tab, in the Window group, click View Side by Side. Notes: To scroll both documents at the same time, click Synchronous Scrolling. in the Window group on the View tab.

When seeing two pages of your document is more efficient, you can view pages side by side in Microsoft Word and here’s how.
When you’re creating a document in Microsoft Word, you have helpful tools for using a view that works best for you. You can use a print, web, draft, or outline view as well as reading mode. But what you may not know is that you can view two pages in your document side-by-side, like a book.
This type of view is ideal when you want to see more than one page at a time. For example, you could have a school essay with many images, a business report with several charts, or a book where seeing more at once is beneficial. This also eliminates the need for scrolling.
The nice thing about the side-by-side view in Word is that this also presents you with a thumbnail view. So you can see all pages and then click to jump to the one you want. Here, we’ll show you how to use side to side view with the thumbnail feature.
To use Side to Side in Word, you’ll also need to use the Print Layout view. Open your document in Microsoft Word and then follow these steps.
- Click the View tab and in the Views section of the ribbon, select Print Layout. Alternatively, you can hit the Print Layout button if you display View Shortcuts in the Status Bar at the bottom.
- Next, on the View tab, go to the Page Movement section of the ribbon and select Side to Side.
- You’ll immediately see the window adjust to show two pages at the same time.

If your document only has one page, you obviously won’t see this until you have more than one page. But you can still enable it for when the time comes. You’ll simply see the page shrink to accommodate both its width and length in the window.

When you use Side to Side view, you can still scroll through your pages. However, scrolling will change the pages displayed rather than moving up and down a page. For instance, if you’re viewing pages one and two and scroll down, you’ll then see pages two and three.
To return to a one-page view in Word, select the View tab and in the Page Movement section of the ribbon, click Vertical.

Note: The Side to Side feature is currently only available in Microsoft Word on Windows, not Mac.
Use Thumbnail View
Only after you enable Side to Side in Word will you see the option for Thumbnails. Head back to the View tab and go to the Zoom section of the ribbon. Click Thumbnails.

You’ll then see a grid layout of all pages in your document. This is helpful for easily spotting a specific page. Simply click one to go directly to it. You can also exit Thumbnails by clicking its button in the ribbon to turn it off.

Cover More at Once, View Pages Side-by-Side in Word
There are plenty of document types where seeing two pages side-by-side can be more convenient than one page at a time. So remember this handy feature the next time you have a document with several pages.
For more help working with pages, check out how to rearrange pages in Word or how to make a one page in Word landscape view.
![]()

When laying out your document in Word, it’s sometimes helpful to view multiple pages on the screen at one time, especially if you have a large monitor. Seeing multiple pages at a time allows you to get a sense of how your overall layout looks.
NOTE: We used Word 2013 to illustrate this feature.
You must be in “Print Layout” view to view multiple pages at one time. If you are not in “Print Layout” view, or if you’re not sure which layout is currently active, click the “View” tab.

In the “Views” section of the “View” tab, click “Print Layout.”
To view multiple pages at one time, keep the “View” tab active. Place your cursor in the text of the first page you want to view in the multiple-page view. In the “Zoom” section, click “Multiple Pages.”
By default, two pages are shown side-by-side. The pages are shrunk so the full pages can be viewed. This is why viewing multiple pages at once is good for reviewing your layout, but not necessarily for reading your document.
To return to viewing one page at a time, click “One Page” in the “Zoom” section of the “View” tab.
The page in which you had placed the cursor displays, but smaller than 100 percent. To zoom back to regular size, click “100%” in the “Zoom” section.
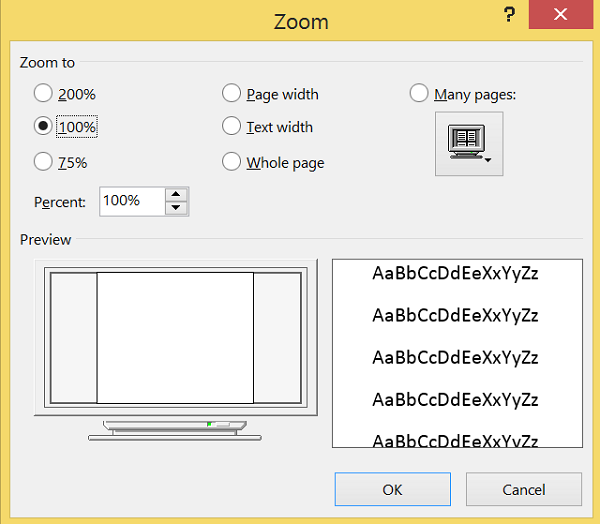
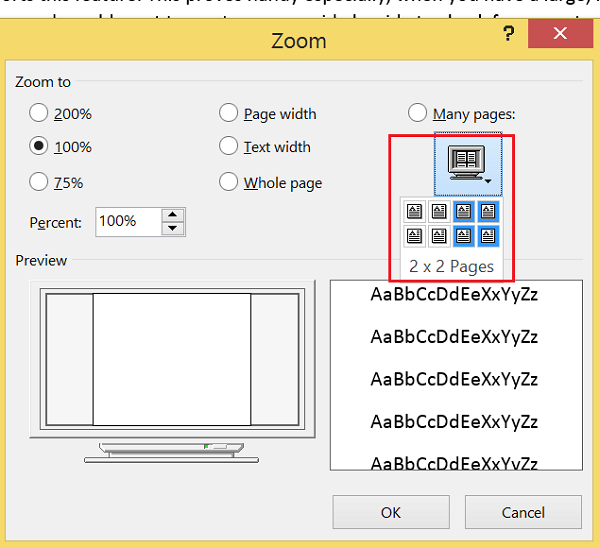
You can view more than two pages at a time. To do so, click the “Zoom” button in the “Zoom” section of the “View” tab.
The “Zoom” dialog box displays. You can zoom to various percentages (including a custom percent), widths, or the whole page. To view multiple pages, select the “Many pages” radio button. Then, click the monitor button below the radio button and select the number of pages you want to view at a time from the drop-down menu.
The “Preview” shows how the pages will be displayed. Click “OK” to accept the change and close the “Zoom” dialog box.
The view changes to show the number of pages at once that you specified.
Remember to go back to viewing one page at a time, click the “One Page” button. To go back to viewing your text at 100 percent, click the “100%” button.
READ NEXT
- › HoloLens Now Has Windows 11 and Incredible 3D Ink Features
- › This New Google TV Streaming Device Costs Just $20
- › Google Chrome Is Getting Faster
- › How to Adjust and Change Discord Fonts
- › The New NVIDIA GeForce RTX 4070 Is Like an RTX 3080 for $599
- › BLUETTI Slashed Hundreds off Its Best Power Stations for Easter Sale
How-To Geek is where you turn when you want experts to explain technology. Since we launched in 2006, our articles have been read billions of times. Want to know more?
Download PC Repair Tool to quickly find & fix Windows errors automatically
When working in Print Layout view, you can display & view multiple pages on the screen at the same time. Microsoft Word supports this feature. This proves handy especially when you have a large, high-resolution monitor and would want to see two pages side by side to check for correct spacing when printing out planner pages. Let us illustrate this feature in Word 2013.
Assuming you have a blank document page opened, switch to ‘View’ tab. It’s on the extreme right.
From the section, select ‘Print Layout’ option.

Now, keeping the View tab in an active state, place the mouse cursor in the text of the first page you want to view in the multiple-page view. Then, from the Zoom section chose ‘Multiple Pages’ option as shown in the screen-shot below

You should now find 2 pages displayed side-by-side. The pages will be reduced in size so as to offer multiple pages view. All though this view is good for viewing multiple pages in a single shot, it is not so for reading the document.

To switch back to a single page view, click “One Page” in the “Zoom section of the View tab. The page in which you had placed the cursor displays, but reduced in size display. To zoom back to regular size, click “100%” in the “Zoom” section.
Now, for viewing more than two pages at a time, click the “Zoom” button in the “Zoom” section of the “View” tab.
Instantly, the “Zoom” dialog box shows up. You can zoom to desired percentage, widths, or the whole page. For viewing multiple pages, select the “Many pages” radio button.
Next, click the monitor button below the radio button. Now, you are in a position to select the number of pages you would wish to view at a time from the drop-down menu.
To have a preview of the settings, hit the “Preview” button and it will show how the pages are displayed.
Finally, click “OK” to finalize the changes and close the “Zoom” dialog box.
To undo the changes made, click the “One Page” button. To go back to viewing your text at 100 percent, click the “100%” button.
How do I view multiple pages in Windows?
To view multiple pages in Word on Windows 11/10, you need to use the Print Layout option. What it does is that it reduces the zoom level to 75% so that multiple pages go side-by-side within moments. Having said that, you can also set the zoom level to 75% manually to get the same thing done.
How do I view pages side by side?
To view pages side by side in Word, you can follow the aforementioned steps in the article. That said, you can set the zoom level to 75%. Alternatively, you can switch to the View tab, click on the Print Layout option, and choose the Multiple Pages option.
I hope you find this tip useful.

A post-graduate in Biotechnology, Hemant switched gears to writing about Microsoft technologies and has been a contributor to TheWindowsClub since then. When he is not working, you can usually find him out traveling to different places or indulging himself in binge-watching.
By default, Word displays a document as scrolling pages in a single column. This is called the Print Layout.
But Word can display the document in other layouts as well.
- Display two pages side by side.
- Display the document on multiple pages.
- Use columns to split a page vertically in half.
- Use tables to split a page vertically in half.
We will show how to achieve the above in a few simple steps.
Let us begin.
Method #1: Display Two Pages Side by Side
Step #1: Open Word document
Open your Word document.
By default, Word displays the document in Print Layout in a single column.

Step #2: View two pages side by side
Click on the ‘View’ tab in the top menu bar to change the ribbon.

In the section ‘View’, click on the Read Mode icon.

Now Word will display two pages of the document side by side, as in a book.

Step #3: How to Return to Print Layout
If you wish to return to the default print layout, click on the ‘View’ tab in the top menu bar.

This opens a menu.
Click on the Edit Document icon.

Word displays the document in the default Print Layout.
Method #2: Display the Document in Multiple Pages
Step #1: Open Word document
Open your Word document.
By default, Word displays the document in Print Layout in a single column.

Step #2: View multiple pages
Click on the View tab in the top menu bar to change the ribbon.

In the section Zoom, click on the Multiple Pages icon.

Word displays two pages of the document side by side, as in a book.

Step #3: How to return to Print Layout
If you wish to return to the default print layout, click on ‘Zoom’.
Next, click on the ‘One Page’ icon.

Word displays the document in the default Print Layout.
Method #3: Use Columns to Split a Page Vertically in Half
Step #1: Open the Word document
Open your Word document.
By default, Word displays the document in Print Layout in a single column.

Step #2: Change page layout
Click on the ‘Layout’ tab in the top menu bar to change the ribbon.

In the section ‘Page Setup’, click on the Columns icon.

You will see this has a little downward pointing arrow – this will open a menu.
Click on More Columns at the bottom of this menu.

Now a Columns dialog box will appear.
Step #3: Split the page using preset columns
In the Columns dialog box, under Presets, you can select:
- One — for displaying a single column (default).
- Two — for displaying two columns (like an open book).
- Three — for displaying three columns.
- Left — for displaying two columns, with the right-hand side column wider than the left.
- Right — for displaying two columns, with the left-hand side column wider than the right.
Step #4: Control the number and size of columns
Enter the number of columns you want against ‘Number of Columns’.
Note: Word allows a maximum of 15 columns.
Click on ‘Line between’ to insert a line between the columns.
You can control the width of each column by selecting the column in Col#: and entering the dimension you want in the ‘Width:’ field.
You can control the spacing after any column by selecting the column in Col#: and entering the dimension you want in the ‘Spacing:’ field.
Place a tick-mark on Equal column width to set all columns to the same width as the first column.
Click on ‘Apply to:’ to apply the choices to either:
- Whole document — convert the entire document into columns.
- This point forward — Convert only the subsequent pages of the document from where you are in the document at the moment.

Once you have the settings to your liking, click on Ok to exit the dialog box.
Word will then apply your choices to the document.

Method #4: Use Tables to Split a Page Vertically in Half
Step #1: Open Word document
Open a new blank Word document.
Step #2: Insert a table
Click on the ‘Insert’ tab in the top menu bar to change the ribbon.

In the section ‘Tables’, click on the Table icon.

This opens the ‘Insert Table’ dialog box.
Click on the second square from left in the top row.

This will insert a table with a single row and two columns.

Step #3: Modify the table
Right-click on the table.
This will open a menu.
Click on ‘Table Properties’.

This will open a ‘Table Properties’ dialog box.
Click on the Row Tab.
Under Size, select the tick-box next to ‘Specify height:’.
Enter a zero in the box on the right of ‘Specify height:’.
Under Options, click on the tick-box next to ‘Allow row to break across pages’, and ensure there is no tick mark in the adjacent box.

Click on Ok to exit the dialog and return to the document.
Hover your cursor over the table.
A cross symbol appears in the top left corner.
Click on this cross symbol to select the entire table.

Step #4: Fix the column width
Right-click on the selected table.
This opens a menu.
Move your mouse down to ‘AutoFit’.

Another menu will appear to the right.
On that menu, click on Fixed Column Width.

Step #5: Enter contents in the table
Now you can enter your desired content into the table.

Step #6: Remove the borders
Click on the cross symbol in the top left corner of the table to select the entire table.
Right-click on the table to open a menu.
Click on the triangle beside the borders icon.

This will open another menu.
Click on No Border.

Word will now remove all borders from the table.
You now have a single page with two columns.

Conclusion
We have shown you four easy methods to split a page in half, like in an open book in MS Word. Feel free to use the one most suitable to your purpose!