
In this Article
- The Workbook Object
- Workbook Index Number
- Activate Workbook, ActiveWorkbook, and ThisWorkbook
- Activate Workbook
- ActiveWorkbook
- ThisWorkbook
- Open Workbook
- Open and Assign to Variable
- Open File Dialog
- Create New (Add) Workbook
- Add New Workbook to Variable
- Close Workbook
- Close & Save
- Close without Save
- Workbook Save As
- Other Workbook VBA Examples
- Workbook Name
- Protect Workbook
- Loop Through all Open Workbooks
- Workbook Activate Event
This guide will introduce you working with the Workbook Object in VBA.
The Workbook Object
First, in order to interact with workbooks in VBA, you must understand the Workbook Object.
With the workbook object, you can reference workbooks by their name like this:
Workbooks("Book2.xlsm").ActivateHowever, this code will only work if the workbook is open. If the workbook is closed, you will need to provide the full workbook path:
Workbooks.Open ("C:UsersStevePC2Downloadsbook2.xlsm")Instead of typing out the full path, if your desired workbook is in the same directory as the workbook where your code is stored, you could use this line code to open the workbook:
Workbooks.Open (ThisWorkbook.Path & "book2.xlsm")This makes use of the ThisWorkbook object that we will discuss in the next section.
Workbook Index Number
Last, you can reference workbooks by their “Index Number”. The index number of a workbook corresponds to the order that the workbook was opened (technically its the workbook’s position in the Workbooks Collection).
Workbooks(1).ActivateThis is useful if you want to do something like close the first (or last) opened workbook.
Activate Workbook, ActiveWorkbook, and ThisWorkbook
If a workbook is NOT ACTIVE, you can access the Workbook’s objects like this:
Workbooks("Book2.xlsm").Sheets("Sheet1").Range("A1").value = 1However, if the workbook is Active, you can omit the workbook object:
Sheets("Sheet1").Range("A1").value = 1And if you want to interact with the workbook’s active sheet, you can also ommit the sheets object:
Range("A1").value = 1Activate Workbook
To activate a workbook, use the Activate Method.
Workbooks("Book2.xlsm").ActivateNow you can interact with Book2’s object’s without explicitly stating the workbook name.
ActiveWorkbook
The ActiveWorkbook object always refer to the active workbook. This is useful if you’d like to assign the ActiveWorkbook to a variable to use later.
Dim wb As Workbook
Set wb = ActiveWorkbook
ThisWorkbook
The ThisWorkbook object always refers to the workbook where the running code is stored. To activate ThisWorkbook, use this line of code:
ThisWorkbook.ActivateVBA Coding Made Easy
Stop searching for VBA code online. Learn more about AutoMacro — A VBA Code Builder that allows beginners to code procedures from scratch with minimal coding knowledge and with many time-saving features for all users!

Learn More
Open Workbook
To open a workbook, use the Open Method:
Workbooks.Open ("C:UsersStevePC2Downloadsbook2.xlsm")The newly opened workbook will always become the ActiveWorkbook, allowing you to easily interact with it.
ActiveWorkbook.SaveThe Open Method has several other arguments, allowing you to open read-only, open a password-protected workbook, and more. It’s covered here in our article about Opening / Closing Workbooks.
Open and Assign to Variable
You can also open a workbook and assign it to a variable at the same time:
Dim wb As Workbook
Set wb = Workbooks.Open("C:UsersStevePC2Downloadsbook2.xlsm")
Open File Dialog
You can also trigger the Open File Dialog Box like this:
Sub OpenWorkbook ()

    Dim strFile As String

    strFile = Application.GetOpenFilename()
    Workbooks.Open (strFile)

End Sub
VBA Programming | Code Generator does work for you!
Create New (Add) Workbook
This line of code will create a new workbook:
Workbooks.AddThe new workbook now becomes the ActiveWorkbook, allowing you to interact with it (ex. save the new workbook).
Add New Workbook to Variable
You can also add a new workbook directly to a variable:
Dim wb As Workbook
Set wb = Workbooks.Add
Close Workbook
Close & Save
To close a workbook with saving, use the Close Method with SaveChanges set to TRUE:
ActiveWorkbook.Close SaveChanges:=TrueClose without Save
To close without saving, set SaveChanges equal to FALSE:
ActiveWorkbook.Close SaveChanges:=FalseAutoMacro | Ultimate VBA Add-in | Click for Free Trial!
Workbook Save As
The SaveAs Method is used to save a workbook as.
To save a workbook with a new name, in the same directory, you can imply use this:
ActiveWorkbook.SaveAs "new"where “new” is the new file name.
To save a workbook in a new directory with a specific file extension, simply specify the new directory and file name:
ActiveWorkbook.SaveAs "C:UsersStevePC2Downloadsnew.xlsm"Other Workbook VBA Examples
Workbook Name
To get the name of a workbook:
MsgBox ActiveWorkbook.NameProtect Workbook
To protect the workbook structure from editing, you can use the Protect Method (password optional):
Workbooks("book1.xlsm").Protect "password"To unprotect a workbook use the UnProtect Method:
Workbooks("book1.xlsm").Unprotect "password"AutoMacro | Ultimate VBA Add-in | Click for Free Trial!
Loop Through all Open Workbooks
To loop through all open workbooks:
Sub LoopThroughWBs()

    Dim wb As Workbook

    For Each wb In Workbooks
        MsgBox wb.Name
    Next wb

End Sub
Workbook Activate Event
You can run some code whenever a specific workbook is opened with the Workbook Open Event.
Place this procedure your workbook’s ThisWorkbook Module:
Private Sub Workbook_Open()
    Sheets("sheet1").Activate
End Sub
This procedure will activate Sheet1 every time the workbook is opened.
- Remove From My Forums
-
Question
-
Hello all,
I have tried numerous ways to modify the responses to «Openening an Excel file from within project» to open an existing Excel workbook and also select and activate a minimized workbook but have totally struck out, Can anyone give me some guidance? Also, where should I be looking for samples that answer such basic questions?
Thanks very much.
Noel Rietman
Answers
-
Imports Excel = Microsoft.Office.Interop.Excel
Dim XL As Excel.Application
‘Set to new instance of excel
XL = New Excel.Application
XL.Visible = True
XL.WindowState = Excel.XlWindowState.xlMaximized
‘Create(New WrokBook)
Dim wkbk As Excel.Workbook = XL.Workbooks.Add
‘add(worksheet)
wkbk.Worksheets.Add()
‘open existing workbook
Dim w2 As Excel.Workbook = XL.Workbooks.Open(«C:MyXL.xls»)
Creating a new Excel workbook as in:
Dim xl As Excel.Application
Dim wb As Excel.Workbook
Set xl = New Excel.Application
xl.Visible = False
Set wb = xl.Workbooks.Add
Is there an easy way to stop Excel automatically creating Sheet1, Sheet2, Sheet3?
I can always delete these unwanted sheets afterwards but that feels like a clunky solution.
![]()
asked Jul 27, 2010 at 9:56
![]()
xl.SheetsInNewWorkbook = 1
More Information on MSDN (Scroll down to Add method as it applies to the Workbooks object.)
Full Code:
Dim xl As Excel.Application
Dim wb As Excel.Workbook
Dim restoreSheetsInNewWorkbook As Long

Set xl =  New Excel.Application
restoreSheetsInNewWorkbook = xl.SheetsInNewWorkbook
xl.SheetsInNewWorkbook = 1

Set wb = xl.Workbooks.Add
xl.SheetsInNewWorkbook = restoreSheetsInNewWorkbook 'or just set it to 3'
answered Jul 27, 2010 at 10:08
![]()
margmarg
2,7871 gold badge32 silver badges33 bronze badges
6
Or you can:
Excel 2003
Tools>Options>General Tab and change the «Sheets in new workbook» to 1
Excel 2007
Office Button>Excel Options>Popular Section>When creating new workbooks…>Include this many sheets>1
answered Jul 27, 2010 at 15:28
![]()
MacnessMacness
1,2262 gold badges13 silver badges24 bronze badges
Can’t create one without any sheets (to the best of my knowledge), but you can create a workbook with a single sheet without messing around with the user’s settings.
dim wb as Workbook
Set wb = xl.Workbooks.Add(xlWBATWorksheet)
answered May 13, 2015 at 16:40
![]()
RubberDuckRubberDuck
11.7k4 gold badges50 silver badges95 bronze badges
Sub DeleteSheets()
Dim DeleteSheet As Variant
Dim ws              As Worksheet
DeleteSheet = Array("Sheet1", "Sheet2", "Sheet3")

Application.DisplayAlerts = False

For Each ws In Worksheets

   If IsInArray(ws.Name, DeleteSheet) Then ws.Delete

Next

End Sub


Function IsInArray(stringToBeFound As String, arr As Variant) As Boolean
Dim i As Integer
Dim Ret As Boolean
Ret = False
For i = LBound(arr) To UBound(arr)
    If VBA.UCase(stringToBeFound) = VBA.UCase(arr(i)) Then
       Ret = True
       Exit For
    End If
Next i
IsInArray = Ret
End Function
answered Sep 8, 2015 at 3:01
![]()
1
Содержание
- 1 Add a new workbook and save it
- 2 arranges the open workbooks in a tiled configuration
- 3 Center workbook
- 4 Check Whether a Sheet in an Open Workbook Exists
- 5 Check Whether a Workbook Is Open
- 6 Close a workbook and save it
- 7 Controlling Worksheet Visibility
- 8 Count the Number of Workbooks in a Directory
- 9 Create a new workbook
- 10 Create a workbook and save it as a new file
- 11 Creates a new workbook and adds it to the collection, reads the number of workbooks into a variable, and selects all worksheets in the active workbook:
- 12 Get workbook format
- 13 maximizes any workbook when it is activated
- 14 Open a workbook and then size it to fit just within the application window
- 15 Open workbook by name
- 16 places the username in the footer of each sheet printed:
- 17 Save workbook and close
- 18 The distinction between the Workbook and Window objects lies in an additional method that can be used to create a Window object
- 19 The Workbooks property is a member of the Application object and returns a reference to the Workbook object specified by the index value given in the parentheses.
- 20 To close all open workbooks, use the Close method of the Workbooks collection object.
- 21 To close a single workbook, use the Close method of the Workbook object. The Close method accepts three optional arguments (SaveChanges, FileName, and RouteWorkbook).
- 22 To save a workbook from a VBA program, use either the Save methods of the Workbook object.
- 23 To select the last Workbook object in the collection
- 24 Use Application object to save a workbook as a new file
- 25 Use a String rather than an index value to reference a workbook
Add a new workbook and save it
<source lang="vb">
Public Sub SaveActiveWorkbook()
 Application.Workbooks.Add
 Call Application.ActiveWorkbook.SaveAs("temp.xls")
End Sub
</source>
arranges the open workbooks in a tiled configuration
<source lang="vb">
Private Sub AppEvent_NewWorkbook(ByVal Wb As Workbook)
Application.Windows.Arrange xlArrangeStyleTiled
End Sub
</source>
Center workbook
<source lang="vb">
Sub CenterBook()
   Dim bookWidth As Integer
   Dim bookHeight As Integer
   bookWidth = Application.UsableWidth
   bookHeight = Application.UsableHeight
   ActiveWindow.WindowState = xlNormal
   Workbooks("Center.xls").Windows(1).Width = bookWidth
   Workbooks("Center.xls").Windows(1).Height = bookHeight
   Workbooks("Center.xls").Windows(1).Left = 0
   Workbooks("Center.xls").Windows(1).Top = 0
End Sub
</source>
Check Whether a Sheet in an Open Workbook Exists
<source lang="vb">
Function SheetExists(SName As String, Optional WB As workBook) As Boolean
   Dim WS As Worksheet
   If WB Is Nothing Then
       Set WB = ActiveWorkbook
   End If
   On Error Resume Next
       SheetExists = CBool(Not WB.Sheets(SName) Is Nothing)
   On Error GoTo 0
End Function
Sub CheckForSheet()
   Dim ShtExists As Boolean
   ShtExists = SheetExists("Sheet1")
   If ShtExists Then
       MsgBox "The worksheet exists!"
   Else
       MsgBox "The worksheet does NOT exist!"
   End If
End Sub
</source>
Check Whether a Workbook Is Open
<source lang="vb">
Function BookOpen(Bk As String) As Boolean
   Dim T As Excel.workBook
   Err.clear "clears any errors
   On Error Resume Next
   Set T = Application.Workbooks(Bk)
   BookOpen = Not T Is Nothing

   Err.clear
   On Error GoTo 0
End Function
Sub OpenAWorkbook()
   Dim IsOpen As Boolean
   Dim BookName As String
   BookName = "yourFile.xlsm"
   IsOpen = BookOpen(BookName)
   If IsOpen Then
       MsgBox BookName & " is already open!"
   Else
       Workbooks.Open (BookName)
   End If
End Sub
</source>
Close a workbook and save it
<source lang="vb">
Sub CloseWorkbook()
  Dim Workbook1 As Workbook

  Set Workbook1 = Workbooks.Open(FileName:=ThisWorkbook.Path & "Temp.xls")
  Range("A1").Value = Format(Date, "ddd mmm dd, yyyy")
  Range("A1").EntireColumn.AutoFit
  Workbook1.Close SaveChanges:=True
End Sub
</source>
Controlling Worksheet Visibility
<source lang="vb">
Sub SetWorksheetVisibility()
   Dim myWorksheet As Worksheet
   On Error Resume Next
   Set myWorksheet = ThisWorkbook.Worksheets("Checks and Options")
   Application.ScreenUpdating = False
   ThisWorkbook.Worksheets("Sheet1").Visible = True
   ThisWorkbook.Worksheets("Sheet2").Visible = True
   ThisWorkbook.Worksheets("Sheet3").Visible = True
   Application.ScreenUpdating = True
   Set myWorksheet = Nothing
End Sub
</source>
Count the Number of Workbooks in a Directory
<source lang="vb">
Function NumFilesInCurDir(Optional strInclude As String = «»)
   Dim myFileSystemObject As FileSystemObject
   Dim fld As folder
   Dim fil As file
   Dim subfld As folder
   Dim intFileCount As Integer
   Dim strExtension As String
     strExtension = "XLS"
     Set myFileSystemObject = New FileSystemObject
     Set fld = myFileSystemObject.GetFolder(ThisWorkbook.Path)
     For Each fil In fld.Files
       If UCase(fil.name) Like "*" & UCase(strInclude) & "*." & UCase(strExtension) Then
         intFileCount = intFileCount + 1
       End If
     Next fil
     For Each subfld In fld.SubFolders
         intFileCount = intFileCount + NumFilesInCurDir(strInclude)
     Next subfld
     NumFilesInCurDir = intFileCount
     Set myFileSystemObject = Nothing
End Function
Sub CountMyWkbks()
   Dim MyFiles As Integer
   MyFiles = NumFilesInCurDir("MrE*")
   MsgBox MyFiles & " file(s) found"
End Sub
</source>
Create a new workbook
<source lang="vb">
Sub NewWorkbooks()
  Dim myWorkbook1 As Workbook
  Dim myWorkbook2 As Workbook

  Set myWorkbook1 = Workbooks.Add
  Set myWorkbook2 = Workbooks.Add
  Application.DisplayAlerts = False
  myWorkbook1.SaveAs FileName:="E:SalesData1.xls"
End Sub
</source>
Create a workbook and save it as a new file
<source lang="vb">
Public Sub SaveSpecificWorkbook2()
 Dim W As Workbook
 Set W = Application.Workbooks.Add
 Call W.SaveAs("temp2.xls")
End Sub
</source>
Creates a new workbook and adds it to the collection, reads the number of workbooks into a variable, and selects all worksheets in the active workbook:
<source lang="vb">
Sub workbookAdd()
   Workbooks.Add
   numWorkbooks = Workbooks.Count
   Worksheets.Select
End Sub
</source>
Get workbook format
<source lang="vb">
Sub GetFileFormat()
   Dim lFormat As Long
   Dim sFormat As String
   Dim wb As Workbook
   Set wb = ActiveWorkbook

   lFormat = wb.FileFormat
   Select Case lFormat
       Case xlAddIn: sFormat = "Add-in"
       Case xlCSV: sFormat = "CSV"
       Case xlCSVMac: sFormat = "CSV Mac"
       Case xlCSVMSDOS: sFormat = "CSV MS DOS"
       Case xlCSVWindows: sFormat = "CSV Windows"
       Case xlCurrentPlatformText: sFormat = "Current Platform Text"
       Case xlDBF2: sFormat = "DBF 2"
       Case xlDBF3: sFormat = "DBF 3"
       Case xlDBF4: sFormat = "DBF 4"
       Case xlDIF: sFormat = "DIF"
       Case xlExcel2: sFormat = "Excel 2"
       Case xlExcel2FarEast: sFormat = "Excel 2 Far East"
       Case xlExcel3: sFormat = "Excel 3"
       Case xlExcel4: sFormat = "Excel 4"
       Case xlExcel4Workbook: sFormat = "Excel 4 Workbook"
       Case xlExcel5: sFormat = "Excel 5"
       Case xlExcel7: sFormat = "Excel 7"
       Case xlExcel9795: sFormat = "Excel 97/95"
       Case xlHtml: sFormat = "HTML"
       Case xlIntlAddIn: sFormat = "Int"l AddIn"
       Case xlIntlMacro: sFormat = "Int"l Macro"
       Case xlSYLK: sFormat = "SYLK"
       Case xlTemplate: sFormat = "Template"
       Case xlTextMac: sFormat = "Text Mac"
       Case xlTextMSDOS: sFormat = "Text MS DOS"
       Case xlTextPrinter: sFormat = "Text Printer"
       Case xlTextWindows: sFormat = "Text Windows"
       Case xlUnicodeText: sFormat = "Unicode Text"
       Case xlWebArchive: sFormat = "Web Archive"
       Case xlWJ2WD1: sFormat = "WJ2WD1"
       Case xlWJ3: sFormat = "WJ3"
       Case xlWJ3FJ3: sFormat = "WJ3FJ3"
       Case xlWK1: sFormat = "WK1"
       Case xlWK1ALL: sFormat = "WK1ALL"
       Case xlWK1FMT: sFormat = "WK1FMT"
       Case xlWK3: sFormat = "WK3"
       Case xlWK3FM3: sFormat = "WK3FM3"
       Case xlWK4: sFormat = "WK4"
       Case xlWKS: sFormat = "WKS"
       Case xlWorkbookNormal: sFormat = "Normal workbook"
       Case xlWorks2FarEast: sFormat = "Works 2 Far East"
       Case xlWQ1: sFormat = "WQ1"
       Case xlXMLSpreadsheet: sFormat = "XML Spreadsheet"
       Case Else: sFormat = "Unknown format code"
   End Select
   Debug.Print sFormat
End Sub
</source>
maximizes any workbook when it is activated
<source lang="vb">
Private Sub AppEvent_WorkbookActivate(ByVal Wb as Workbook)
Wb.WindowState = xlMaximized
End Sub
</source>
Open a workbook and then size it to fit just within the application window
<source lang="vb">
Public Sub OpenBook()
   Workbooks.Open ActiveWorkbook.Path & "MyWorkbook.xls"
   FitWindow
End Sub
Private Sub FitWindow()
   Dim winWidth As Integer
   Dim winHeight As Integer
   winWidth = Application.UsableWidth "Get the usable width of app window
   winHeight = Application.UsableHeight
End Sub
</source>
Open workbook by name
<source lang="vb">
Sub Array2()
 Dim Data As Variant, myWorkbook As Workbook
 Dim i As Integer
 Data = Array("A", "B", "C", "D")
 For i = LBound(Data) To UBound(Data)
   Set myWorkbook = Workbooks.Open(FileName:=Data(i) & ".xls")
   MsgBox myWorkbook.Name
   myWorkbook.Close SaveChanges:=True
 Next i
End Sub
</source>
<source lang="vb">
Private Sub AppEvent_WorkbookBeforePrint(ByVal Wb As Workbook,Cancel As Boolean)
Wb.ActiveSheet.PageSetup.LeftFooter = Application.UserName
End Sub
</source>
Save workbook and close
<source lang="vb">
Sub CloseWorkbook()
  Dim myWorkbook1 As workBook

  Set myWorkbook1 = Workbooks.Open(Filename:="E:SalesData.xls")
  Range("A1").Value = Format(Date, "ddd mmm dd, yyyy")
  Range("A1").EntireColumn.AutoFit
  myWorkbook1.Close SaveChanges:=True
End Sub
</source>
The distinction between the Workbook and Window objects lies in an additional method that can be used to create a Window object
<source lang="vb">
Sub newWindow()
Windows(1).newWindow
End Sub
</source>
The Workbooks property is a member of the Application object and returns a reference to the Workbook object specified by the index value given in the parentheses.
<source lang="vb">
Sub changePro()
   Workbooks(1).Windows(1).WindowState = xlNormal
   Workbooks(1).Windows(1).Width = 500
   Workbooks(1).Windows(1).Height = 300
End Sub
</source>
To close all open workbooks, use the Close method of the Workbooks collection object.
<source lang="vb">
Sub closeDemo()
Workbooks.Close
End Sub
</source>
To close a single workbook, use the Close method of the Workbook object. The Close method accepts three optional arguments (SaveChanges, FileName, and RouteWorkbook).
<source lang="vb">
Sub save()
Workbooks("MyWorkbook.xls").Close SaveChanges:=False
End Sub
</source>
To save a workbook from a VBA program, use either the Save methods of the Workbook object.
<source lang="vb">
Sub saveWorkBook()
Workbooks("MyWorkbook.xls").save
End Sub
</source>
To select the last Workbook object in the collection
<source lang="vb">
Sub workbookSelect()
Workbooks(Workbooks.Count).Activate
End Sub
</source>
Use Application object to save a workbook as a new file
<source lang="vb">
Public Sub SaveSpecificWorkbook1()
 Application.Workbooks.Add
 Call Application.ActiveWorkbook.SaveAs("temp1.xls")
 Application.Workbooks("temp1.xls").SaveAs ("copy of temp1.xls")
End Sub
</source>
Use a String rather than an index value to reference a workbook
<source lang="vb">
Sub workbookSelectName()
Workbooks("MyWorkbook.xls").Activate
End Sub
</source>
In this tutorial, I will cover the how to work with workbooks in Excel using VBA.
In Excel, a ‘Workbook’ is an object that is a part of the ‘Workbooks’ collection. Within a workbook, you have different objects such as worksheets, chart sheets, cells and ranges, chart objects, shapes, etc.
With VBA, you can do a lot of stuff with a workbook object – such as open a specific workbook, save and close workbooks, create new workbooks, change the workbook properties, etc.
So let’s get started.
If you’re interested in learning VBA the easy way, check out my Online Excel VBA Training.
Referencing a Workbook using VBA
There are different ways to refer to a Workbook object in VBA.
The method you choose would depend on what you want to get done.
In this section, I will cover the different ways to refer to a workbook along with some example codes.
Using Workbook Names
If you have the exact name of the workbook that you want to refer to, you can use the name in the code.
Let’s begin with a simple example.
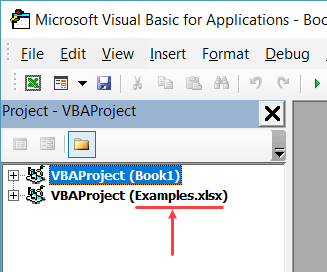
If you have two workbooks open, and you want to activate the workbook with the name – Examples.xlsx, you can use the below code:
Sub ActivateWorkbook()
Workbooks("Examples.xlsx").Activate
End Sub
Note that you need to use the file name along with the extension if the file has been saved. If it hasn’t been saved, then you can use the name without the file extension.
If you’re not sure what name to use, take help from the Project Explorer.
If you want to activate a workbook and select a specific cell in a worksheet in that workbook, you need to give the entire address of the cell (including the Workbook and the Worksheet name).
Sub ActivateWorkbook()
Workbooks("Examples.xlsx").Worksheets("Sheet1").Activate
Range("A1").Select
End Sub
The above code first activates Sheet1 in the Examples.xlsx workbook and then selects cell A1 in the sheet.
You will often see a code where a reference to a worksheet or a cell/range is made without referring to the workbook. This happens when you’re referring to the worksheet/ranges in the same workbook that has the code in it and is also the active workbook. However, in some cases, you do need to specify the workbook to make sure the code works (more on this in the ThisWorkbook section).
Using Index Numbers
You can also refer to the workbooks based on their index number.
For example, if you have three workbooks open, the following code would show you the names of the three workbooks in a message box (one at a time).
Sub WorkbookName()
MsgBox Workbooks(1).Name
MsgBox Workbooks(2).Name
MsgBox Workbooks(3).Name
End Sub
The above code uses MsgBox – which is a function that shows a message box with the specified text/value (which is the workbook name in this case).
One of the troubles I often have with using index numbers with Workbooks is that you never know which one is the first workbook and which one is the second and so on. To be sure, you would have to run the code as shown above or something similar to loop through the open workbooks and know their index number.
Excel treats the workbook opened first to have the index number as 1, and the next one as 2 and so on.
Despite this drawback, using index numbers can come in handy.
For example, if you want to loop through all the open workbooks and save all, you can use the index numbers.
In this case, since you want this to happen to all the workbooks, you’re not concerned about their individual index numbers.
The below code would loop through all the open workbooks and close all except the workbook that has this VBA code.
Sub CloseWorkbooks()
Dim WbCount As Integer
WbCount = Workbooks.Count
For i = WbCount To 1 Step -1
If Workbooks(i).Name <> ThisWorkbook.Name Then
Workbooks(i).Close
End If
Next i
End Sub
The above code counts the number of open workbooks and then goes through all the workbooks using the For Each loop.
It uses the IF condition to check if the name of the workbook is the same as that of the workbook where the code is being run.
If it’s not a match, it closes the workbook and moves to the next one.
Note that we have run the loop from WbCount to 1 with a Step of -1. This is done as with each loop, the number of open workbooks is decreasing.
ThisWorkbook is covered in detail in the later section.
Also read: How to Open Excel Files Using VBA (Examples)
Using ActiveWorkbook
ActiveWorkbook, as the name suggests, refers to the workbook that is active.
The below code would show you the name of the active workbook.
Sub ActiveWorkbookName()
MsgBox ActiveWorkbook.Name
End Sub
When you use VBA to activate another workbook, the ActiveWorkbook part in the VBA after that would start referring to the activated workbook.
Here is an example of this.
If you have a workbook active and you insert the following code into it and run it, it would first show the name of the workbook that has the code and then the name of Examples.xlsx (which gets activated by the code).
Sub ActiveWorkbookName()
MsgBox ActiveWorkbook.Name
Workbooks("Examples.xlsx").Activate
MsgBox ActiveWorkbook.Name
End Sub
Note that when you create a new workbook using VBA, that newly created workbook automatically becomes the active workbook.
Using ThisWorkbook
ThisWorkbook refers to the workbook where the code is being executed.
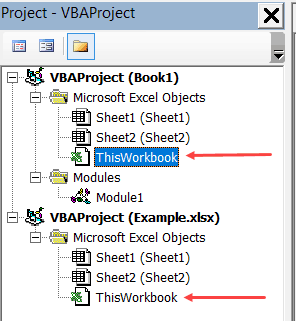
Every workbook would have a ThisWorkbook object as a part of it (visible in the Project Explorer).
‘ThisWorkbook’ can store regular macros (similar to the ones that we add-in modules) as well as event procedures. An event procedure is something that is triggered based on an event – such as double-clicking on a cell, or saving a workbook or activating a worksheet.
Any event procedure that you save in this ‘ThisWorkbook’ would be available in the entire workbook, as compared to the sheet level events which are restricted to the specific sheets only.
For example, if you double-click on the ThisWorkbook object in the Project Explorer and copy-paste the below code in it, it will show the cell address whenever you double-click on any of the cells in the entire workbook.
Private Sub Workbook_SheetBeforeDoubleClick(ByVal Sh As Object, ByVal Target As Range, Cancel As Boolean)
MsgBox Target.Address
End Sub
While ThisWorkbook’s main role is to store event procedure, you can also use it to refer to the workbook where the code is being executed.
The below code would return the name of the workbook in which the code is being executed.
Sub ThisWorkbookName()
MsgBox ThisWorkbook.Name
End Sub
The benefit of using ThisWorkbook (over ActiveWorkbook) is that it would refer to the same workbook (the one that has the code in it) in all the cases. So if you use a VBA code to add a new workbook, the ActiveWorkbook would change, but ThisWorkbook would still refer to the one that has the code.
Creating a New Workbook Object
The following code will create a new workbook.
Sub CreateNewWorkbook()
Workbooks.Add
End Sub
When you add a new workbook, it becomes the active workbook.
The following code will add a new workbook and then show you the name of that workbook (which would be the default Book1 type name).
Sub CreateNewWorkbook()
Workbooks.Add
MsgBox ActiveWorkbook.Name
End Sub
Open a Workbook using VBA
You can use VBA to open a specific workbook when you know the file path of the workbook.
The below code will open the workbook – Examples.xlsx which is in the Documents folder on my system.
Sub OpenWorkbook()
Workbooks.Open ("C:UserssumitDocumentsExamples.xlsx")
End Sub
In case the file exists in the default folder, which is the folder where VBA saves new files by default, then you can just specify the workbook name – without the entire path.
Sub OpenWorkbook()
Workbooks.Open ("Examples.xlsx")
End Sub
In case the workbook that you’re trying to open doesn’t exist, you’ll see an error.
To avoid this error, you can add a few lines to your code to first check whether the file exists or not and if it exists then try to open it.
The below code would check the file location and if it doesn’t exist, it will show a custom message (not the error message):
Sub OpenWorkbook()
If Dir("C:UserssumitDocumentsExamples.xlsx") <> "" Then
Workbooks.Open ("C:UserssumitDocumentsExamples.xlsx")
Else
MsgBox "The file doesn't exist"
End If
End Sub
You can also use the Open dialog box to select the file that you want to open.
Sub OpenWorkbook()
If Dir("C:UserssumitDocumentsExamples.xlsx") <> "" Then
Workbooks.Open ("C:UserssumitDocumentsExamples.xlsx")
Else
MsgBox "The file doesn't exist"
End If
End Sub
The above code opens the Open dialog box. When you select a file that you want to open, it assigns the file path to the FilePath variable. Workbooks.Open then uses the file path to open the file.
In case the user doesn’t open a file and clicks on Cancel button, FilePath becomes False. To avoid getting an error in this case, we have used the ‘On Error Resume Next’ statement.
Saving a Workbook
To save the active workbook, use the code below:
Sub SaveWorkbook()
ActiveWorkbook.Save
End Sub
This code works for the workbooks that have already been saved earlier. Also, since the workbook contains the above macro, if it hasn’t been saved as a .xlsm (or .xls) file, you will lose the macro when you open it next.
If you’re saving the workbook for the first time, it will show you a prompt as shown below:
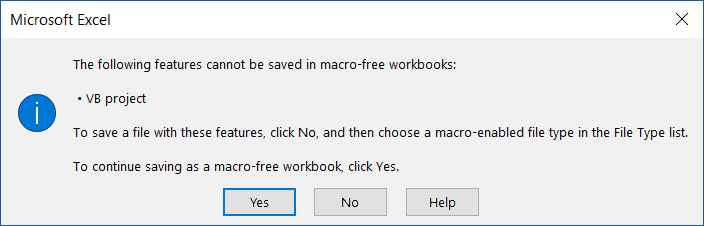
When saving for the first time, it’s better to use the ‘Saveas’ option.
The below code would save the active workbook as a .xlsm file in the default location (which is the document folder in my system).
Sub SaveWorkbook()
ActiveWorkbook.SaveAs Filename:="Test.xlsm", FileFormat:=xlOpenXMLWorkbookMacroEnabled
End Sub
If you want the file to be saved in a specific location, you need to mention that in the Filename value. The below code saves the file on my desktop.
Sub SaveWorkbook()
ActiveWorkbook.SaveAs Filename:="C:UserssumitDesktopTest.xlsm", FileFormat:=xlOpenXMLWorkbookMacroEnabled
End Sub
If you want the user to get the option to select the location to save the file, you can use call the Saveas dialog box. The below code shows the Saveas dialog box and allows the user to select the location where the file should be saved.
Sub SaveWorkbook()
Dim FilePath As String
FilePath = Application.GetSaveAsFilename
ActiveWorkbook.SaveAs Filename:=FilePath & ".xlsm", FileFormat:=xlOpenXMLWorkbookMacroEnabled
End Sub
Note that instead of using FileFormat:=xlOpenXMLWorkbookMacroEnabled, you can also use FileFormat:=52, where 52 is the code xlOpenXMLWorkbookMacroEnabled.
Saving All Open Workbooks
If you have more than one workbook open and you want to save all the workbooks, you can use the code below:
Sub SaveAllWorkbooks()
Dim wb As Workbook
For Each wb In Workbooks
wb.Save
Next wb
End Sub
The above saves all the workbooks, including the ones that have never been saved. The workbooks that have not been saved previously would get saved in the default location.
If you only want to save those workbooks that have previously been saved, you can use the below code:
Sub SaveAllWorkbooks()
Dim wb As Workbook
For Each wb In Workbooks
If wb.Path <> "" Then
wb.Save
End If
Next wb
End Sub
Saving and Closing All Workbooks
If you want to close all the workbooks, except the workbook that has the current code in it, you can use the code below:
Sub CloseandSaveWorkbooks()
Dim wb As Workbook
For Each wb In Workbooks
If wb.Name <> ThisWorkbook.Name Then
wb.Close SaveChanges:=True
End If
Next wb
End Sub
The above code would close all the workbooks (except the workbook that has the code – ThisWorkbook). In case there are changes in these workbooks, the changes would be saved. In case there is a workbook that has never been saved, it will show the save as dialog box.
Save a Copy of the Workbook (with Timestamp)
When I am working with complex data and dashboard in Excel workbooks, I often create different versions of my workbooks. This is helpful in case something goes wrong with my current workbook. I would at least have a copy of it saved with a different name (and I would only lose the work I did after creating a copy).
Here is the VBA code that will create a copy of your workbook and save it in the specified location.
Sub CreateaCopyofWorkbook()
ThisWorkbook.SaveCopyAs Filename:="C:UserssumitDesktopBackupCopy.xlsm"
End Sub
The above code would save a copy of your workbook every time you run this macro.
While this works great, I would feel more comfortable if I had different copies saved whenever I run this code. The reason this is important is that if I make an inadvertent mistake and run this macro, it will save the work with the mistakes. And I wouldn’t have access to the work before I made the mistake.
To handle such situations, you can use the below code that saves a new copy of the work each time you save it. And it also adds a date and timestamp as a part of the workbook name. This can help you track any mistake you did as you never lose any of the previously created backups.
Private Sub Workbook_BeforeSave(ByVal SaveAsUI As Boolean, Cancel As Boolean)
ThisWorkbook.SaveCopyAs Filename:="C:UserssumitDesktopBackupCopy" & Format(Now(), "dd-mm-yy-hh-mm-ss-AMPM") & ".xlsm"
End Sub
The above code would create a copy every time you run this macro and add a date/time stamp to the workbook name.
Create a New Workbook for Each Worksheet
In some cases, you may have a workbook that has multiple worksheets, and you want to create a workbook for each worksheet.
This could be the case when you have monthly/quarterly reports in a single workbook and you want to split these into one workbook for each worksheet.
Or, if you have department wise reports and you want to split these into individual workbooks so that you can send these individual workbooks to the department heads.
Here is the code that will create a workbook for each worksheet, give it the same name as that of the worksheet, and save it in the specified folder.
Sub CreateWorkbookforWorksheets()
Dim ws As Worksheet
Dim wb As Workbook
For Each ws In ThisWorkbook.Worksheets
Set wb = Workbooks.Add
ws.Copy Before:=wb.Sheets(1)
Application.DisplayAlerts = False
wb.Sheets(2).Delete
Application.DisplayAlerts = True
wb.SaveAs "C:UserssumitDesktopTest" & ws.Name & ".xlsx"
wb.Close
Next ws
End Sub
In the above code, we have used two variable ‘ws’ and ‘wb’.
The code goes through each worksheet (using the For Each Next loop) and creates a workbook for it. It also uses the copy method of the worksheet object to create a copy of the worksheet in the new workbook.
Note that I have used the SET statement to assign the ‘wb’ variable to any new workbook that is created by the code.
You can use this technique to assign a workbook object to a variable. This is covered in the next section.
Assign Workbook Object to a Variable
In VBA, you can assign an object to a variable, and then use the variable to refer to that object.
For example, in the below code, I use VBA to add a new workbook and then assign that workbook to the variable wb. To do this, I need to use the SET statement.
Once I have assigned the workbook to the variable, all the properties of the workbook are made available to the variable as well.
Sub AssigntoVariable()
Dim wb As Workbook
Set wb = Workbooks.Add
wb.SaveAs Filename:="C:UserssumitDesktopExamples.xlsx"
End Sub
Note that the first step in the code is to declare ‘wb’ as a workbook type variable. This tells VBA that this variable can hold the workbook object.
The next statement uses SET to assign the variable to the new workbook that we are adding. Once this assignment is done, we can use the wb variable to save the workbook (or do anything else with it).
Looping through Open Workbooks
We have already seen a few examples codes above that used looping in the code.
In this section, I will explain different ways to loop through open workbooks using VBA.
Suppose you want to save and close all the open workbooks, except the one with the code in it, then you can use the below code:
Sub CloseandSaveWorkbooks()
Dim wb As Workbook
For Each wb In Workbooks
If wb.Name <> ThisWorkbook.Name Then
wb.Close SaveChanges:=True
End If
Next wb
End Sub
The above code uses the For Each loop to go through each workbook in the Workbooks collection. To do this, we first need to declare ‘wb’ as the workbook type variable.
In every loop cycle, each workbook name is analyzed and if it doesn’t match the name of the workbook that has the code, it’s closed after saving its content.
The same can also be achieved with a different loop as shown below:
Sub CloseWorkbooks()
Dim WbCount As Integer
WbCount = Workbooks.Count
For i = WbCount To 1 Step -1
If Workbooks(i).Name <> ThisWorkbook.Name Then
Workbooks(i).Close SaveChanges:=True
End If
Next i
End Sub
The above code uses the For Next loop to close all the workbooks except the one that has the code in it. In this case, we don’t need to declare a workbook variable, but instead, we need to count the total number of open workbooks. When we have the count, we use the For Next loop to go through each workbook. Also, we use the index number to refer to the workbooks in this case.
Note that in the above code, we are looping from WbCount to 1 with Step -1. This is needed as with each loop, the workbook gets closed and the number of workbooks gets decreased by 1.
Error while Working with the Workbook Object (Run-time error ‘9’)
One of the most common error you may encounter when working with workbooks is – Run-time Error ‘9’ – Subscript out of range.
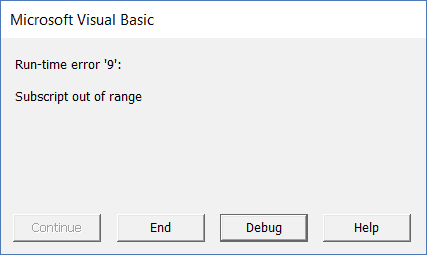
Generally, VBA errors are not very informative and often leave it to you to figure out what went wrong.
Here are some of the possible reasons that may lead to this error:
- The workbook that you’re trying to access does not exist. For example, if I am trying to access the fifth workbook using Workbooks(5), and there are only 4 workbooks open, then I will get this error.
- If you’re using a wrong name to refer to the workbook. For example, if your workbook name is Examples.xlsx and you use Example.xlsx. then it will show you this error.
- If you haven’t saved a workbook, and you use the extension, then you get this error. For example, if your workbook name is Book1, and you use the name Book1.xlsx without saving it, you will get this error.
- The workbook you’re trying to access is closed.
Get a List of All Open Workbooks
If you want to get a list of all the open workbooks in the current workbook (the workbook where you’re running the code), you can use the below code:
Sub GetWorkbookNames()
Dim wbcount As Integer
wbcount = Workbooks.Count
ThisWorkbook.Worksheets.Add
ActiveSheet.Range("A1").Activate
For i = 1 To wbcount
Range("A1").Offset(i - 1, 0).Value = Workbooks(i).Name
Next i
End Sub
The above code adds a new worksheet and then lists the name of all the open workbooks.
If you want to get their file path as well, you can use the below code:
Sub GetWorkbookNames()
Dim wbcount As Integer
wbcount = Workbooks.Count
ThisWorkbook.Worksheets.Add
ActiveSheet.Range("A1").Activate
For i = 1 To wbcount
Range("A1").Offset(i - 1, 0).Value = Workbooks(i).Path & "" & Workbooks(i).Name
Next i
End Sub
Open the Specified Workbook by Double-clicking on the Cell
If you have a list of file paths for Excel workbooks, you can use the below code to simply double-click on the cell with the file path and it will open that workbook.
Private Sub Workbook_SheetBeforeDoubleClick(ByVal Sh As Object, ByVal Target As Range, Cancel As Boolean)
Workbooks.Open Target.Value
End Sub
This code would be placed in the ThisWorkbook code window.
To do this:
- Double click on the ThisWorkbook object in the project explorer. Note that the ThisWorkbook object should be in the workbook where you want this functionality.
- Copy and paste the above code.
Now, if you have the exact path of the files that you want to open, you can do that by simply double-clicking on the file path and VBA would instantly open that workbook.
Where to Put the VBA Code
Wondering where the VBA code goes in your Excel workbook?
Excel has a VBA backend called the VBA editor. You need to copy and paste the code into the VB Editor module code window.
Here are the steps to do this:
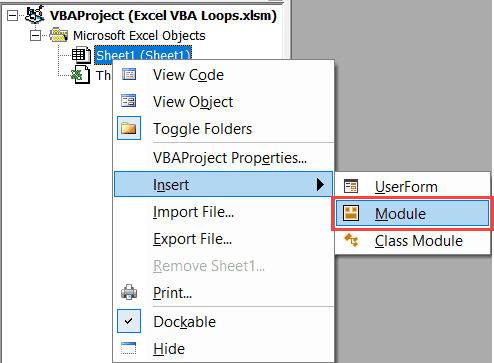
- Go to the Developer tab.

- Click on the Visual Basic option. This will open the VB editor in the backend.
- In the Project Explorer pane in the VB Editor, right-click on any object for the workbook in which you want to insert the code. If you don’t see the Project Explorer go to the View tab and click on Project Explorer.
- Go to Insert and click on Module. This will insert a module object for your workbook.

- Copy and paste the code in the module window.


You May Also Like the Following Excel VBA Tutorials:
- How to Record a Macro in Excel.
- Creating a User Defined Function in Excel.
- How to Create and Use Add-in in Excel.
- How to Resue Macros by placing it in the Personal Macro Workbook.
- Get the List of File Names from a Folder in Excel (with and without VBA).
- How to Use Excel VBA InStr Function (with practical EXAMPLES).
- How to Sort Data in Excel using VBA (A Step-by-Step Guide).
“We are drowning in information but starved for knowledge.” – John Naisbitt
This post provides a complete guide to using the VBA Workbook.
If you want to use VBA to Open a Workbook then check out Open Workbook
If you want to use VBA to create a new workbook go to Create New Workbook
For all other VBA Workbook tasks, check out the quick guide below.
A Quick Guide to the VBA Workbook
The following table provides a quick how-to guide on the main VBA workbook tasks
| Task | How to |
|---|---|
| Access open workbook using name | Workbooks(«Example.xlsx») |
| Access open workbook (the one opened first) | Workbooks(1) |
| Access open workbook (the one opened last) | Workbooks(Workbooks.Count) |
| Access the active workbook | ActiveWorkbook |
| Access workbook containing VBA code | ThisWorkbook |
| Declare a workbook variable | Dim wk As Workbook |
| Assign a workbook variable | Set wk = Workbooks(«Example.xlsx») Set wk = ThisWorkbook Set wk = Workbooks(1) |
| Activate workbook | wk.Activate |
| Close workbook without saving | wk.Close SaveChanges:=False |
| Close workbook and save | wk.Close SaveChanges:=True |
| Create new workbook | Set wk = Workbooks.Add |
| Open workbook | Set wk =Workbooks.Open («C:DocsExample.xlsx») |
| Open workbook as read only | Set wk = Workbooks.Open («C:DocsExample.xlsx», ReadOnly:=True) |
| Check Workbook exists | If Dir(«C:Docsbook1.xlsx») = «» Then MsgBox «File does not exist.» EndIf |
| Check Workbook is open | See Check Workbook Open section below |
| List all open workbooks | For Each wk In Application.Workbooks Debug.Print wk.FullName Next wk |
| Open workbook with the File Dialog | See File Dialog section below function below |
| Save workbook | wk.Save |
| Save workbook copy | wk.SaveCopyAs «C:Copy.xlsm» |
| Copy workbook if closed | FileCopy «C:file1.xlsx»,«C:Copy.xlsx» |
| SaveAs workbook | wk.SaveAs «Backup.xlsx» |
VBA Workbook Webinar
If you are a member of the website, click on the image below to access the webinar.
(Note: Website members have access to the full webinar archive.)

Getting Started with the VBA Workbook
We can access any open workbook using the code Workbooks(“Example.xlsm“). Simply replace Example.xlsm with the name of the workbook you wish to use.
The following example shows you how to write to a cell on a worksheet. You will notice we had to specify the workbook, worksheet and range of cells.
' https://excelmacromastery.com/
Public Sub WriteToA1()

    ' Writes 100 to cell A1 of worksheet "Sheet1" in MyVBA.xlsm
Workbooks("MyVBA.xlsm").Worksheets("Sheet1").Range("A1") = 100

End Sub
This example may look a little be confusing to a new user but it is actually quite simple.
The first part up to the decimal point is the Workbook, the second part is the Worksheet and the third is the Range. Here are some more examples of writing to a cell
' https://excelmacromastery.com/
Public Sub WriteToMulti()

' Writes 100 to cell A1 of worksheet "Sheet1" in MyVBA.xlsm
Workbooks("MyVBA.xlsm").Worksheets("Sheet1").Range("A1") = 100

' Writes "John" to cell B1 of worksheet "Sheet1" in MyVBA.xlsm
Workbooks("MyVBA.xlsm").Worksheets("Sheet1").Range("B1") = "John"

' Writes 100 to cell A1 of worksheet "Accounts" in MyVBA.xlsm
Workbooks("MyVBA.xlsm").Worksheets("Accounts").Range("A1") = 100

' Writes the date to cell D3 of worksheet "Sheet2" in Book.xlsc
Workbooks("Book.xlsx").Worksheets("Sheet2").Range("D3") = "112016"

End Sub
You can see the simple pattern here. You can write to any cell in any worksheet from any workbook. It is just a matter of changing the workbook name, worksheet name and the range to suit your needs.
Take a look at the workbook part
Workbooks("Example.xlsx")
The Workbooks keyword refers to a collection of all open workbooks. Supplying the workbook name to the collection gives us access to that workbook. When we have the object we can use it to perform tasks with the workbook.
Troubleshooting the Workbooks Collection
When you use the Workbooks collection to access a workbook, you may get the error message:
Run-time Error 9: Subscript out of Range.
This means that VBA cannot find the workbook you passed as a parameter.
This can happen for the following reasons
- The workbook is currently closed.
- You spelled the name wrong.
- You created e new workbook (e.g. Book1) and tried to access it using Workbooks(“Book1.xlsx”). It’s name is not Book1.xlsx until it is saved for the first time.
- (Excel 2007/2010 only) If you are running two instances of Excel then Workbooks() only refers to to the workbooks open in the current Excel instance.
- You passed a number as Index and it is greater than the number of workbooks open e.g. you used Workbooks(3) and only two workbooks are open.
If you cannot resolve the error then use either of the functions in the section Finding all open Workbooks. These will print the names of all open workbooks to the Immediate Window(Ctrl + G).
Examples of Using the VBA Workbook
The following examples show what you can do with the workbook.
Note: To try this example create two open workbooks called Test1.xlsx and Test2.xlsx.
' https://excelmacromastery.com/
Public Sub WorkbookProperties()

    ' Prints the number of open workbooks
    Debug.Print Workbooks.Count

    ' Prints the full workbook name
    Debug.Print Workbooks("Test1.xlsx").FullName

    ' Displays the full workbook name in a message dialog
    MsgBox Workbooks("Test1.xlsx").FullName

    ' Prints the number of worksheets in Test2.xlsx
    Debug.Print Workbooks("Test2.xlsx").Worksheets.Count

    ' Prints the name of currently active sheet of Test2.xlsx
    Debug.Print Workbooks("Test2.xlsx").ActiveSheet.Name

    ' Closes workbook called Test1.xlsx
    Workbooks("Test1.xlsx").Close

    ' Closes workbook Test2.xlsx and saves changes
    Workbooks("Test2.xlsx").Close SaveChanges:=True

End Sub
Note: In the code examples I use Debug.Print a lot. This function prints values to the Immediate Window. To view this window select View->Immediate Window from the menu( Shortcut is Ctrl + G)


Accessing the VBA Workbook by Index
You can also use an Index number with Workbooks(). The index refers to the order the Workbook was open or created.
Workbooks(1) refers to the workbook that was opened first. Workbooks(2) refers to the workbook that was opened second and so on.
' First workbook that was opened
Debug.Print Workbooks(1).Name

' Third workbook that was opened
Debug.Print Workbooks(3).Name

' The last workbook that was opened
Debug.Print Workbooks(Workbooks.Count).Name
In this example, we used Workbooks.Count. This is the number of workbooks that are currently in the Workbooks collection. That is, the number of workbooks currently open. So using it as the Index gives us the last workbook that was opened
Using the index is not really useful unless you really need to know the order. For this reason, you should avoid using it. You should use the workbook name with Workbooks() instead.
Finding all Open Workbooks
Sometimes you may want to access all the workbooks that are open. In other words, all the items in the Workbooks() collection.
You can do this using the For Each loop.
' https://excelmacromastery.com/
Public Sub PrintWrkFileName()

    ' Prints out the full filename of all open workbooks
    Dim wrk As Workbook
    For Each wrk In Workbooks
        Debug.Print wrk.FullName
    Next wrk

End Sub
You can also use the standard For loop to access all the open workbooks
' https://excelmacromastery.com/
Public Sub PrintWrkFileNameIdx()

    ' Prints out the full filename of all open workbooks
    Dim i As Long
    For i = 1 To Workbooks.Count
        Debug.Print Workbooks(i).FullName
    Next i

End Sub
For accessing workbooks, either of these Loops is fine. The standard For loop is useful if you want to use a different order or you need to use a counter.
Note: Both examples read in the order of the first opened to the last opened. If you want to read in reverse order(last to first) you can do this
' https://excelmacromastery.com/
Public Sub PrintWrkFileNameIdxRev()

    ' Prints out the full filename of all open workbooks
    ' in reverse order.
    Dim i As Long
    For i = Workbooks.Count To 1 Step -1
        Debug.Print Workbooks(i).FullName
    Next i

End Sub
Open Workbook
So far we have dealt with workbooks that are already open. Of course, having to manually open a workbook before running a Macro, defeats the purpose of automating tasks. The Open Workbook task should be performed by VBA.
The following VBA code opens the workbook “Book1.xlsm” in the “C:Docs” folder
' https://excelmacromastery.com/
Public Sub OpenWrk()

    ' Open the workbook and print the number of sheets it contains
    Workbooks.Open ("C:DocsBook1.xlsm")

    Debug.Print Workbooks("Book1.xlsm").Worksheets.Count

    ' Close the workbook without saving
    Workbooks("Book1.xlsm").Close saveChanges:=False

End Sub
It is a good idea to check a workbook actually exists before you try to open it. This will prevent you getting errors. The Dir function allows you to easily do this .
' https://excelmacromastery.com/
Public Sub OpenWrkDir()

    If Dir("C:DocsBook1.xlsm") = "" Then
        ' File does not exist - inform user
        MsgBox "Could not open the workbook. Please check it exists"
    Else
        ' open workbook and do something with it
        Workbooks.Open("C:DocsBook1.xlsm")
    End If

End Sub
Check For Open Workbook
If you are opening a workbook as Read-Only, it doesn’t matter if it is already open. However, if you’re going to update data in a workbook then it is a good idea to check if it is already open.
The function below can be used to check if the workbook is currently open. If not, then it will open the workbook. In either case you will end up with the workbook opened.
(The code below is taken from this StackOverFlow entry.)
' https://excelmacromastery.com/
Function GetWorkbook(ByVal sFullFilename As String) As Workbook

    Dim sFilename As String
    sFilename = Dir(sFullFilename)

    On Error Resume Next
    Dim wk As Workbook
    Set wk = Workbooks(sFilename)

    If wk Is Nothing Then
        Set wk = Workbooks.Open(sFullFilename)
    End If

    On Error Goto 0
    Set GetWorkbook = wk

End Function
You can use this function like this
' https://excelmacromastery.com/
Sub ExampleOpenWorkbook()

    Dim sFilename As String
    sFilename = "C:DocsBook2.xlsx"

    Dim wk As Workbook
    Set wk = GetWorkbook(sFilename)

End Sub
This code is fine is most situations. However, if the workbook could be currently open in read-only mode or could be currently opened by another user then you may want to use a slightly different approach.
An easy way to deal this with this scenario is to insist that the file must be closed for the application to run successfully. You can use the function below to simply check is the file already open and if so inform the user that it must be closed first.
(The code below is also taken from this StackOverFlow entry)
' https://excelmacromastery.com/
' Function to check if workbook is already open
Function IsWorkBookOpen(strBookName As String) As Boolean

    Dim oBk As Workbook

    On Error Resume Next
    Set oBk = Workbooks(strBookName)
    On Error GoTo 0

    If Not oBk Is Nothing Then
        IsWorkBookOpen = True
    End If

End Function
An example of using this function is shown below. In this case, if the workbook is already open then you inform the user that is must be closed for the macro to proceed.
' https://excelmacromastery.com/
Sub ExampleUse()

    Dim sFilename As String
    sFilename = "C:tempwritedata.xlsx"

    If IsWorkBookOpen(Dir(sFilename)) = True Then
        MsgBox "File is already open. Please close file and run macro again."
        Exit Sub
    End If

    ' Write to workbook here

End Sub
If you need to check if the workbook is open in another instance of Excel you can use the ReadOnly attribute of the workbook. It will be set to true if it is open in another instance.
Close Workbook
To Close a Workbook in Excel VBA is very simple. You simply call the Close method of the workbook.
wk.Close
Normally when you close a workbook in VBA, you don’t want to see messages from Excel asking if you want to save the file.
You can specify whether to save the workbook or not and then the Excel messages will not appear.
' Don't save changes
wk.Close SaveChanges:= False

' Do save changes
wk.Close SaveChanges:= True
Obviously, you cannot save changes to a workbook that is currently open as read-only.
Save Workbook
We have just seen that you can save a workbook when you close it. If you want to save it any other stage you can simply use the Save method
wk.Save
You can also use the SaveAs method
wk.SaveAs "C:Backupsaccounts.xlsx"
The Workbook SaveAs method comes with twelve parameters which allow you to add a password, set the file as read-only and so on. You can see the details here.
You can also use VBA to save the workbook as a copy using SaveCopyAs
wk.SaveCopyAs "C:DocsCopy.xlsm"
Copy Workbook
If the workbook is open you can use the two methods in the above section to create a copy i.e. SaveAs and SaveCopyAs.
If you want to copy a workbook without opening it then you can use FileCopy as the following example demonstrates
Public Sub CopyWorkbook()
    FileCopy "C:DocsDocs.xlsm", "C:DocsExample_Copy.xlsm"
End Sub
Using the File Dialog To Open a Workbook
The previous section shows you how to open a workbook with a given name. Sometimes you may want the user to select the workbook. You can easily use the Windows File Dialog shown here.

The Windows File Dialog
The FileDialog is configurable and you can use it to
- Select a file.
- Select a folder.
- Open a file.
- “Save As” a file.
If you just want the user to select the file you can use the GetOpenFilename function.
The following function opens a workbook using the File Dialog. The function returns the full file name if a file was selected. If the user cancels it displays a message and returns an empty string.
' https://excelmacromastery.com/
Public Function UserSelectWorkbook() As String

    On Error Goto ErrorHandler

    Dim sWorkbookName As String

    Dim FD As FileDialog
    Set FD = Application.FileDialog(msoFileDialogFilePicker)

    ' Open the file dialog
    With FD
        ' Set Dialog Title
        .Title = "Please Select File"

        ' Add filter
        .Filters.Add "Excel Files", "*.xls;*.xlsx;*.xlsm"

        ' Allow selection of one file only
        .AllowMultiSelect = False

        ' Display dialog
        .Show

        If .SelectedItems.Count > 0 Then
            UserSelectWorkbook = .SelectedItems(1)
        Else
            MsgBox "Selecting a file has been cancelled. "
            UserSelectWorkbook = ""
        End If
    End With

    ' Clean up
    Set FD = Nothing
Done:
    Exit Function
ErrorHandler:
    MsgBox "Error: " + Err.Description
End Function
When you call this function you have to check for the user cancelling the dialog. The following example shows you how to easily call the UserSelectWorkbook function and handle the case of the user cancelling
' https://excelmacromastery.com/
Public Sub TestUserSelect()

    Dim userBook As Workbook, sFilename As String

    ' Call the UserSelectworkbook function
    sFilename = UserSelectWorkbook()

    ' If the filename returns is blank the user cancelled
    If sFilename <> "" Then
        ' Open workbook and do something with it
        Set userBook = Workbooks.Open(sFilename)
    End If

End Sub
You can customise the dialog by changing the Title, Filters and AllowMultiSelect in the UserSelectWorkbook function.
Using ThisWorkbook
There is an easier way to access the current workbook than using Workbooks(). You can use the keyword ThisWorkbook. It refers to the current workbook i.e. the workbook that contains the VBA code.
If our code is in a workbook call MyVBA.xlsm then ThisWorkbook and Workbooks(“MyVBA.xlsm”) refer to the same workbook.
Using ThisWorkbook is more useful than using Workbooks(). With ThisWorkbook we do not need to worry about the name of the file. This gives us two advantages:
- Changing the file name will not affect the code
- Copying the code to another workbook will not require a code change
These may seem like very small advantages. The reality is your filenames will change all the time. Using ThisWorkbook means your code will still work fine.
The following example shows two lines of code. One using ThisWorkbook and one using Workbooks(). The one using Workbooks will no longer work if the name of MyVBA.xlsm changes.
' https://excelmacromastery.com/
Public Sub WriteToCellUsingThis()

    ' Both lines do the same thing.
    Debug.Print ThisWorkbook.FullName
    Debug.Print Workbooks("MyVBA.xlsm").FullName

End Sub
Using the ActiveWorkbook
ActiveWorkbook refers to the workbook that is currently active. This is the one that the user last clicked on.
This can seem useful at first. The problem is that any workbook can become active by a simple mouse click. This means you could easily write data to the wrong workbook.
Using ActiveWorkbook also makes the code hard to read. It may not be obvious from the code which workbook should be the active one.
I hope I made it clear that you should avoid using ActiveWorkbook unless you really have to. If you must then be very careful.
Examples of the Accessing the Workbook
We’ve looked at all the ways of accessing a workbook. The following code shows examples of these ways
' https://excelmacromastery.com/
Public Sub WorkbooksUse()

    ' This is a workbook that is already open and called MyVBA.xlsm
    Debug.Print Workbooks("MyVBA.xlsm").FullName

    ' The workbook that contains this code
    Debug.Print ThisWorkbook.FullName

    ' The open workbook that was opened first
    Debug.Print Workbooks(1).FullName

    ' The open workbook that was opened last
    Debug.Print Workbooks(Workbooks.Count).FullName

    ' The workbook that is the currently active one
    Debug.Print ActiveWorkbook.FullName

    ' No workbook mentioned - the active one will be used
    Debug.Print Worksheets("Sheet1").Name

    ' A closed workbook called Book1.xlsm in folder C:Docs
    Workbooks.Open ("C:DocsBook1.xlsm")
    Debug.Print Workbooks("Book1.xlsm").FullName
    Workbooks("Book1.xlsm").Close

End Sub
Declaring a VBA Workbook variable
The reason for declaring a workbook variable is to make your code easier to read and understand. It is easier to see the advantage of using an example
' https://excelmacromastery.com/
Public Sub OpenWrkObjects()

    Dim wrk As Workbook
    Set wrk = Workbooks.Open("C:DocsBook1.xlsm")

    ' Print number of sheets in each book
    Debug.Print wrk.Worksheets.Count
    Debug.Print wrk.Name

    wrk.Close

End Sub
You can set a workbook variable with any of the access methods we have seen.
The following shows you the same code without a workbook variable
' https://excelmacromastery.com/
Public Sub OpenWrkNoObjects()

   Workbooks.Open ("C:DocsBook1.xlsm")

   Debug.Print Workbooks("Book2.xlsm").Worksheets.Count
   Debug.Print Workbooks("Book2.xlsm").Name

    Workbooks("Book2.xlsm").Close

End Sub
In these examples the difference is not major. However, when you have a lot of code, using a variable is useful particularly for worksheet and ranges where the names tend to be long e.g. thisWorkbook.Worksheets(“Sheet1”).Range(“A1”).
You can name the workbook variable to be something like wrkRead or wrkWrite. Then at a glance you can see what this workbook is being used for.
Create New Workbook
To create a new workbook you use the Workbooks Add function. This function creates a new blank workbook. It is the same as selecting New Workbook from the Excel File menu.
When you create a new workbook you will generally want to save it. The following code shows you how to do this.
' https://excelmacromastery.com/
Public Sub AddWordbook()

    Dim wrk As Workbook
    Set wrk = Workbooks.Add

    ' Save as xlsx. This is the default.
    wrk.SaveAs "C:TempExample.xlsx"

    ' Save as a Macro enabled workbook
    wrk.SaveAs "C:TempExample.xlsm", xlOpenXMLWorkbookMacroEnabled

End Sub
When you create a new workbook it normally contains three sheets. This is determined by the property Application.SheetsInNewWorkbook.
If you want to have a different number of sheets in a new workbook then you change this property before you create the new workbook. The following example shows you how to create a new workbook with seven sheets.
' https://excelmacromastery.com/
Public Sub AddWordbookMultiSheets()

    ' Store SheetsInNewWorkbook value so we can reset it later
    Dim sheetCnt As Long
    sheetCnt = Application.SheetsInNewWorkbook

    ' Set sheets in a new workbook to be 7
    Application.SheetsInNewWorkbook = 7

    ' Workbook will be created with 7 sheets
    Dim wrk As Workbook
    Set wrk = Workbooks.Add

    ' Display sheet count
    Debug.Print "number of sheets: " & CStr(wrk.Worksheets.Count)

    ' Reset to original value
    Application.SheetsInNewWorkbook = sheetCnt

End Sub
The With keyword and the Workbook
The With keyword makes reading and writing VBA code easier. Using With means you only need to mention the item once. With is used with Objects. These are items such as Workbooks, Worksheets and Ranges.
The following example has two Subs. The first is similar to code we have seen so far. The second uses the With keyword. You can see the code is much clearer in the second Sub. The keywords End With mark the finish of a section code using With.
' https://excelmacromastery.com/
' Not using the With keyword
Public Sub NoUsingWith()

   Debug.Print Workbooks("Book2.xlsm").Worksheets.Count
   Debug.Print Workbooks("Book2.xlsm").Name
   Debug.Print Workbooks("Book2.xlsm").Worksheets(1).Range("A1")
   Workbooks("Book2.xlsm").Close

End Sub

' Using With makes the code easier to read
Public Sub UsingWith()

    With Workbooks("Book2.xlsm")
        Debug.Print .Worksheets.Count
        Debug.Print .Name
        Debug.Print .Worksheets(1).Range("A1")
        .Close
    End With

End Sub
Summary
The following is a brief summary of the main points of this post
- To get the workbook containing the code use ThisWorkbook.
- To get any open workbook use Workbooks(“Example.xlsx”).
- To open a workbook use Set Wrk = Workbooks.Open(“C:FolderExample.xlsx”).
- Allow the user to select a file using the UserSelectWorkbook function provided above.
- To create a copy of an open workbook use the SaveAs property with a filename.
- To create a copy of a workbook without opening use the FileCopy function.
- To make your code easier to read and write use the With keyword.
- Another way to make your code clear is to use a Workbook variables
- To run through all open Workbooks use For Each wk in Workbooks where wk is a workbook variable.
- Try to avoid using ActiveWorkbook and Workbooks(Index) as their reference to a workbook is temporary.
You can see a quick guide to the topic at the top of this post
Conclusion
This was an in-depth post about a very important element of VBA – the Workbook. I hope you found it beneficial. Excel is great at providing many ways to perform similar actions but the downside is it can lead to confusion at times.
To get the most benefit from this post I recommend you try out the examples. Create some workbooks and play around with the code. Make changes to the code and see how the changes affect the outcome. Practice is the best way to learn VBA.
If you found this post useful then feel free to share it with others using the bar at the side.
What’s Next?
Free VBA Tutorial If you are new to VBA or you want to sharpen your existing VBA skills then why not try out the The Ultimate VBA Tutorial.
Related Training: Get full access to the Excel VBA training webinars and all the tutorials.
(NOTE: Planning to build or manage a VBA Application? Learn how to build 10 Excel VBA applications from scratch.)

Posted on Monday, September 23rd, 2013 at 5:02 am by .
Today we start a new series to explain the basics (and more) of Excel add-in development. This is going to be serious fun because Excel rocks. Next to Outlook it might be the most popular target of Office add-ins.

If Outlook is for the productivity-obsessed…
And Word is for the word nerds…
Then Excel is for the number crunchers…
- Accountants,
- Financial analysts,
- Budget makers, and…
- elementary school math students
Excel is for lovers… of numbers. Let’s look at the base objects that are the primary building blocks of any Excel add-in.
- Excel base objects
- Application object
- Workbook object
- Worksheet object
- Range object
- Useful events
Excel base objects
Excel’s object model is similar to the other document-based applications:
- Application: The Excel application itself. This object sits at the top of the heap and provides access to all other objects in the Excel object model.
- Workbook: This is an Excel file. Workbooks contain many other objects… chief among them is the worksheet.
- Worksheet: This is a single spreadsheet (or tab) within a workbook. It contains rows, columns, and cells. These row, columns, and cells work together as range object.
- Range: A range can be a single cell or multiple cells. The key is the range contains a contiguous group of cells.
These are the main characters in this drama. Let’s cover a few basics for accessing them and making them do something.
Accessing Excel base objects with code
This is what we do. We are developers and we access base objects with code. Does it matter what the application is? No, not really. Just point me to the application and I’ll access its base objects… with code.
Let’s do this.
Application object
This sample shows how to access the Excel application object and change a few settings:
Private Sub SetExcelOptions()
    ExcelApp.DisplayStatusBar = False
    ExcelApp.DisplayFullScreen = True
    ExcelApp.DisplayAlerts = False
    ExcelApp.EnableAnimations = False
    ExcelApp.DefaultFilePath = "C:UsersTyrantDesktopSpreadsheets"
End Sub
The ExcelApp object is the Microsoft Excel application. By calling it, we have easy access to Excel’s settings and can change them to meet our needs.
Workbook object
I explained earlier that workbook is an Excel file. It is the container for all the file contents. Given its stature, you will want to master a few key strategies.
Enumerate workbooks
First up is the strategy for enumerating all open Excel workbooks. You achieve this by access the Workbooks collection residing under the ExcelApp object.
Private Sub EnumerateWorkbooks()
    Dim wbs As Excel.Workbooks = ExcelApp.Workbooks

    For i As Integer = wbs.Count To 1 Step -1
        Dim wb As Excel.Workbook = wbs(i)
        wb.Close(Excel.XlSaveAction.xlSaveChanges)
        Marshal.ReleaseComObject(wb)
    Next

    Marshal.ReleaseComObject(wbs)
End Sub
After we grab a reference to the Workbooks collection, enumerating is easy.
Create a new Excel workbook
You can create a new workbook in a few different ways. The code bellows creates a new workbook by adding new one to the Workbooks collection.
Private Sub CreateNewWorkbook(fileName As String)
    Dim newWb As Excel.Workbook = Nothing
    Dim wbs As Excel.Workbooks = ExcelApp.Workbooks
    newWb = wbs.Add()
    newWb.SaveAs(ExcelApp.DefaultFilePath & fileName)

    Marshal.ReleaseComObject(wbs)
    Marshal.ReleaseComObject(newWb)
End Sub
To beef-up the example, the code automatically saves the new file using the filename passed as a parameter.
Create a new workbook from a template
Another method for creating a workbook is to base the new file on a template.
Private Sub NewWorkBookFromTemplate(templatePath As String)
    Dim newWb As Excel.Workbook = Nothing
    Dim wbs As Excel.Workbooks = ExcelApp.Workbooks
    newWb = wbs.Add(templatePath)

    Marshal.ReleaseComObject(wbs)
    Marshal.ReleaseComObject(newWb)
End Sub
It works the same as the previous example… EXCEPT… you pass the path to the template file to the Add method.
Open an existing workbook
You can open an existing Excel file by calling the Workbooks collection’s Open method. Just call it and pass the file path to it.
Private Sub OpenExistingWorkbook(filePath As String)
    Dim wb As Excel.Workbook = Nothing
    Dim wbs As Excel.Workbooks = ExcelApp.Workbooks

    wb = wbs.Open(filePath)
    '---OR----
    'wb = wbs.Add(filePath)

    Marshal.ReleaseComObject(wbs)
    Marshal.ReleaseComObject(wb)
End Sub
You can also achieve the same result by calling the Add method and passing the file path (not the commented code).
Worksheet object
Enumerate sheets
The main of object of a Workbook is a Worksheet. Naturally, you will need to process all worksheets in a single operation… from time-to-time. Here is how you do it.
Private Sub EnumerateSheets(wb As Excel.Workbook)
    Dim i As Integer
    Dim sheets As Excel.Sheets = wb.Worksheets

    For i = 1 To sheets.Count
        Dim sheet As Excel.Worksheet = TryCast(sheets(i), Excel.Worksheet)
        If sheet IsNot Nothing Then
            sheet.Tab.Color = 255 - (i * 7)
            Marshal.ReleaseComObject(sheet)
        End If
    Next

    Marshal.ReleaseComObject(sheets)
End Sub
The Worksheets collection resides under a Workbook object. This procedure receives a workbook and the proceeds to enumerate all worksheets and change their tab color to red.
Add a new sheet
Adding a new sheet requires only that you call the Worksheets collection’s Add method.
Private Sub AddNewSheet(sheetName As String)
    Dim sheet As Excel.Worksheet = ExcelApp.ActiveWorkbook.Worksheets.Add()
    sheet.Name = sheetName

    Marshal.ReleaseComObject(sheet)
End Sub
This sample also changes the name of the worksheet to the string value passed to the procedure.
Delete a sheet
To delete an Excel sheet, you can access it and call its Delete method. This sample enumerates all sheets until it finds worksheet that matches the passed string. If found, it is deleted.
Private Sub DeleteSheet(sheetName As String)
    ExcelApp.DisplayAlerts = False

    Dim i As Integer
    Dim sheets As Excel.Sheets = ExcelApp.ActiveWorkbook.Worksheets

    For i = 1 To sheets.Count
        Dim sheet As Excel.Worksheet = TryCast(sheets(i), Excel.Worksheet)
        If sheet.Name = sheetName Then
            sheet.Delete()
            Exit For
        End If
        Marshal.ReleaseComObject(sheet)
    Next

    ExcelApp.DisplayAlerts = True
    Marshal.ReleaseComObject(sheets)
End Sub
Range object
The Range object contains cells… either a group or a single cell. This object is what you use when inserting data.
Access a cell and set a cell value: version 1
I like to include a header in all my worksheets. It helps me track what the worksheet contains. In this sample, we take the passed Worksheet and insert three rows.
Private Sub AddCompanyHeader(sheet As Excel.Worksheet)

    If Len(sheet.Range("A1").Text) Or Len(sheet.Range("A2").Text) Or Len(sheet.Range("A3").Text) Then
        'Insert 3 new rows
        sheet.Range("A1").EntireRow.Insert(Excel.XlInsertFormatOrigin.xlFormatFromLeftOrAbove)
        sheet.Range("A1").EntireRow.Insert(Excel.XlInsertFormatOrigin.xlFormatFromLeftOrAbove)
        sheet.Range("A1").EntireRow.Insert(Excel.XlInsertFormatOrigin.xlFormatFromLeftOrAbove)
    End If

    sheet.Range("A1").Value = "ADD-IN EXPRESS"
    sheet.Range("A2").Value = "[INSERT WORKSHEET TITLE HERE]"
    sheet.Range("A3").Value = DateTime.Now()
End Sub
If the any of the first three rows contain data in the first column, we insert three rows. If not, we use the existing rows. Either way, we then insert the company name, a title placeholder, and the current date.
Access a cell and set a cell value: version 2
There is more than one way to skin a cat. The version above rummages around the worksheet structure. This method calls specific cells by name (the names must already exist) and inserts data.
Private Sub AddCompanyHeaderUsingNamedRanges(sheet As Excel.Worksheet)
    Try
        sheet.Range("CompanyName").Value = "ADD-IN EXPRESS"
        sheet.Range("SheetTitle").Value = "[INSERT WORKSHEET TITLE HERE]"
        sheet.Range("SheetDate").Value = DateTime.Now()
    Catch ex As Exception
    End Try
End Sub
I like this method better but it does require a bit more planning.
Useful events
Manipulating object requires events to trigger the action. Let’s look at a few events that will prove useful in your Excel add-ins.
WorkbookOpen event
The WorkbookOpen event occurs when Excel opens a workbook. It is ideal for taking a quick look at the file and doing something with it.
Private Sub adxExcelEvents_WorkbookOpen(sender As Object, hostObj As Object) _
    Handles adxExcelEvents.WorkbookOpen

    Dim wb As Excel.Workbook = TryCast(hostObj, Excel.Workbook)
    Dim sheet As Excel.Worksheet = wb.Sheets(1)

    AddCompanyHeader(sheet)

    Marshal.ReleaseComObject(sheet)
    wb.Save()
End Sub
Something like adding a company header to it and saving it.
Workbook Activate event
This event triggers every time the Excel window containing the workbook receives the focus.
Private Sub adxExcelEvents_WorkbookActivate(sender As Object, hostObj As Object) _
    Handles adxExcelEvents.WorkbookActivate

    Dim sheet As Excel.Worksheet = ExcelApp.ActiveSheet

    Try
        'This will fail when creating a new Workbook
        sheet.Range("A1").Select()
    Catch ex As Exception
    End Try

    Marshal.ReleaseComObject(sheet)
End Sub
In this sample, I use the event to select cell A1. I bet you can think of a better example.
WorkbookBeforeSave event
The WorkbookBeforeSave event executes before the Excel saves the workbook. It’s useful for taking some last minute action before writing the file to disk.
Private Sub adxExcelEvents_WorkbookBeforeSave(sender As Object, e As ADXHostBeforeSaveEventArgs) _
    Handles adxExcelEvents.WorkbookBeforeSave

    Dim wb As Excel.Workbook = TryCast(e.HostObject, Excel.Workbook)
    Dim ws As Excel.Worksheets = TryCast(wb.Worksheets, Excel.Worksheets)
    Try
        Dim hasComments As Boolean = False

        For i = 1 To ws.Count
            Dim sheet As Excel.Worksheet = ws.Item(i)
            If sheet.Comments.Count > 1 Then
                hasComments = True
            End If
            Marshal.ReleaseComObject(sheet)
        Next
        If hasComments Then
            MsgBox("This document has comments")
            e.Cancel = True
        End If
    Catch ex As Exception
    End Try

    Marshal.ReleaseComObject(ws)
    Marshal.ReleaseComObject(wb)
End Sub
This sample loops through the worksheets collection. If it finds comments, it notifies the user and cancels the save action. I don’t know that this is a valid reason to cancel the save action but I have seen stranger business rules than this one.
SheetSelectionChange event
I’ll end with a sample that I think will actually be appreciated by users. I like to use comments in my Excel files. I have never liked how inconspicuous comments are in Excel. People that receive my files don’t always realize it contains comments.
So, I tend to force my comments to be visible. Making them visible is sometimes annoying. This sample solves the issue by keeping all comments hidden until the user selects a range containing a comment.
Private Sub adxExcelEvents_SheetSelectionChange(sender As Object, _
    sheet As Object, range As Object) Handles adxExcelEvents.SheetSelectionChange

    Dim ws As Excel.Worksheet = TryCast(sheet, Excel.Worksheet)
    Dim rng As Excel.Range = TryCast(range, Excel.Range)

    'First hide all comments
    For iComments = 1 To ws.Comments.Count
        ws.Comments(iComments).Visible = False
    Next

    'Now - Show all comments withing the newly selected range.
    For i = 1 To rng.Cells.Count
        Dim cell As Excel.Range = rng.Cells(i)
        If Len(cell.NoteText) Then
            cell.Comment.Visible = True
        End If
        Marshal.ReleaseComObject(cell)
    Next

    Marshal.ReleaseComObject(rng)
    Marshal.ReleaseComObject(ws)
End Sub
If the selected range contains comments, they instantly display. When the user moves to a different range that does not include the comments, they code hides the comments once again.
*****
Excel is a big topic and there is certainly more “101” topics to cover. We’ll do exactly that in this Beginning Excel Development series.
Available downloads:
This sample Excel add-in was developed using Add-in Express for Office and .net:
VB.NET Excel Base Objects add-in
Excel add-in development in Visual Studio for beginners
- Part 2: Customizing the Excel User Interface: What is and isn’t customizable
- Part 3: Customizing Excel ribbons and toolbars
- Part 4: Customizing Excel main menu, context menus, and Backstage view
- Part 5: Creating custom task panes for Excel 2013 – 2003
- Part 6: Working with Excel workbooks and worksheets: VB.NET examples
- Part 7: Working with Excel cell values, formulas and formatting: C# samples
- Part 8: Working with Excel charts
- Part 9: Working with Excel tables and ranges
- Part 10: Importing data from SQL databases and other sources to Excel
- Part 11: Working with Excel pivot tables: VB.NET code examples