
This article explains digital signatures (also known as digital ID), what they can be used for, and how you can use digital signatures in the following Microsoft 365 applications: Word, Excel, and PowerPoint.
In this article
-
What is a digital signature?
-
Signature lines in Word and Excel
-
Create a signature line in Word or Excel
-
Sign the signature line in Word or Excel
-
Remove digital signatures from Word or Excel
-
Invisible digital signatures in Word, Excel, or PowerPoint
-
Add invisible digital signatures in Word, Excel, or PowerPoint
-
Remove invisible digital signatures from Word, Excel, or PowerPoint
What is a digital signature?
A digital signature is an electronic, encrypted, stamp of authentication on digital information such as e-mail messages, macros, or electronic documents. A signature confirms that the information originated from the signer and has not been altered.
Signing certificate and certificate authority
Signing certificate To create a digital signature, you have to have a signing certificate, which proves identity. When you send a digitally-signed macro or document, you also send your certificate and public key. Certificates are issued by a certification authority, and like a driver’s license, can be revoked. A certificate is usually valid for a year, after which, the signer must renew, or get a new, a signing certificate to establish identity.
Certificate authority (CA) A certificate authority is an entity similar to a notary public. It issues digital certificates, signs certificates to verify their validity and tracks which certificates have been revoked or have expired.
What does a digital signature guarantee?
-
Authenticity The signer is confirmed as the signer.
-
Integrity The content has not been changed or tampered with since it was digitally signed.
-
Non-repudiation Proves to all parties the origin of the signed content. Repudiation refers to the act of a signer denying any association with the signed content.
-
Notarization Signatures in Word, Excel, or PowerPoint files, which are time stamped by a secure time-stamp server, under certain circumstances, have the validity of a notarization.
To make these assurances, the content creator must digitally sign the content by using a signature that satisfies the following criteria:
-
The digital signature is valid.
-
The certificate associated with the digital signature is current (not expired).
-
The signing person or organization, known as the publisher, is trusted.
Important: Signed documents, which have a valid time stamp, are considered to have valid signatures, regardless of the age, or revocation status, of the signing certificate.
-
The certificate associated with the digital signature is issued to the signing publisher by a reputable certificate authority (CA).
Top of Page
Signature lines in Word and Excel
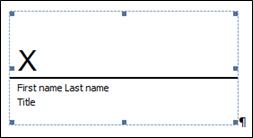
A signature line resembles a typical signature placeholder that might appear in a printed document. However, it works differently. When a signature line is inserted into a Microsoft 365 file, the author can specify information about the intended signer, and instructions for the signer. When an electronic copy of the file is sent to the intended signer, this person sees the signature line and a notification that their signature is requested. The signer can:
-
Type a signature, or
-
Select a picture of an inked signature, or
-
Write a signature by using the inking feature of a touch-screen PC
When the signer adds a visible representation of a signature to the document, a digital signature is added at the same time to authenticate the signer’s identity.

Important: A digitally-signed document becomes read-only to prevent modifications.
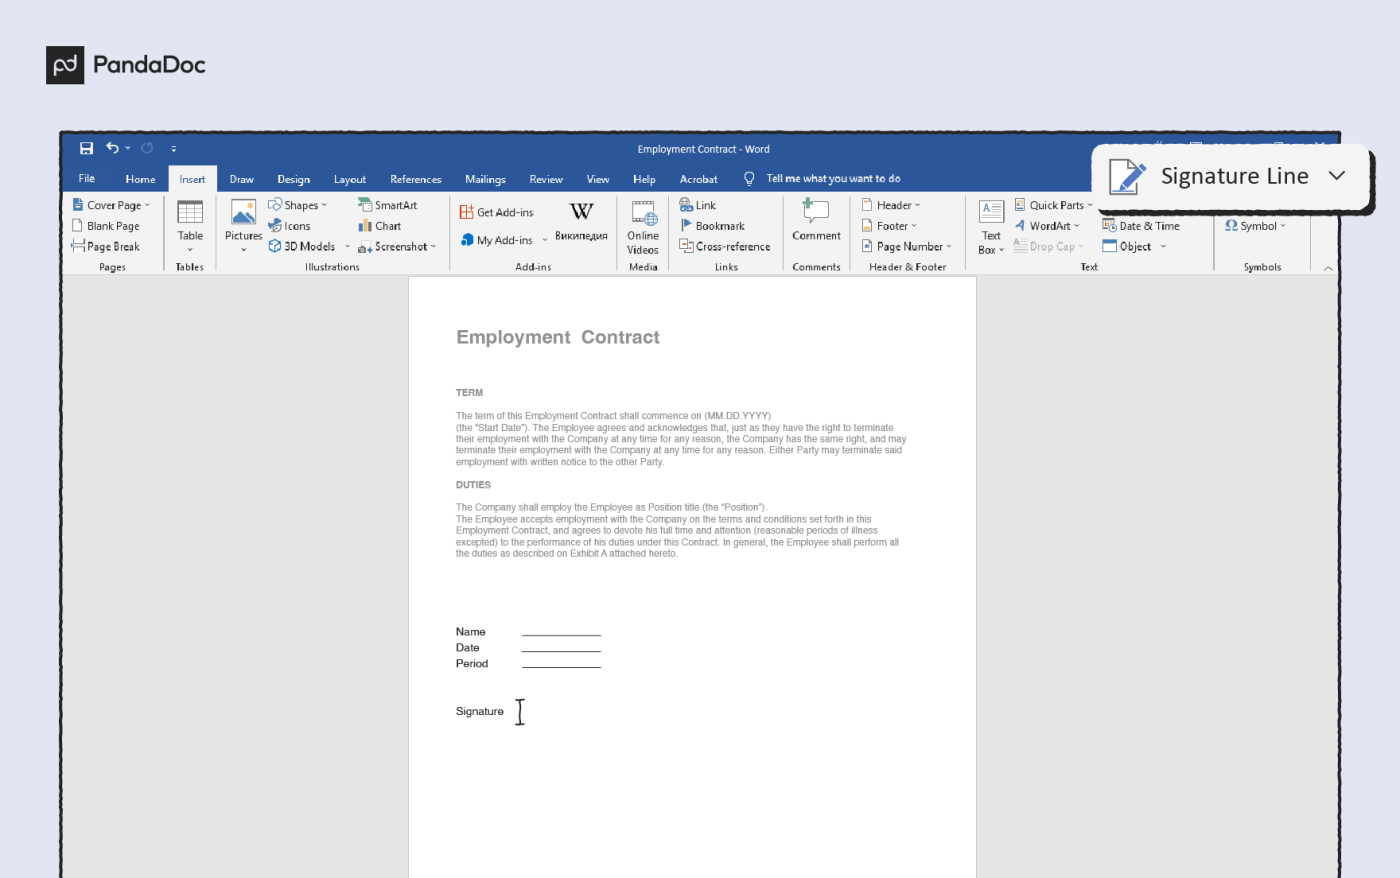
Create a signature line in Word or Excel
-
In the document or worksheet, place your pointer where you want to create a signature line.
-
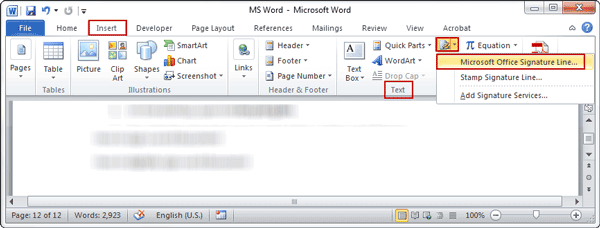
On the Insert tab, in the Text group, click the Signature Line list, and then click Microsoft Office Signature Line.
-
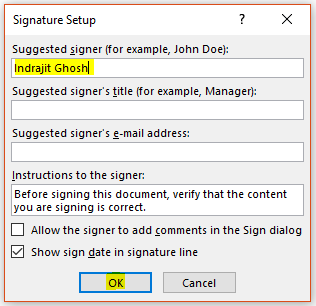
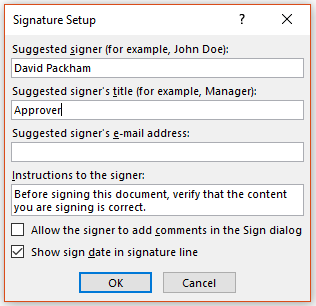
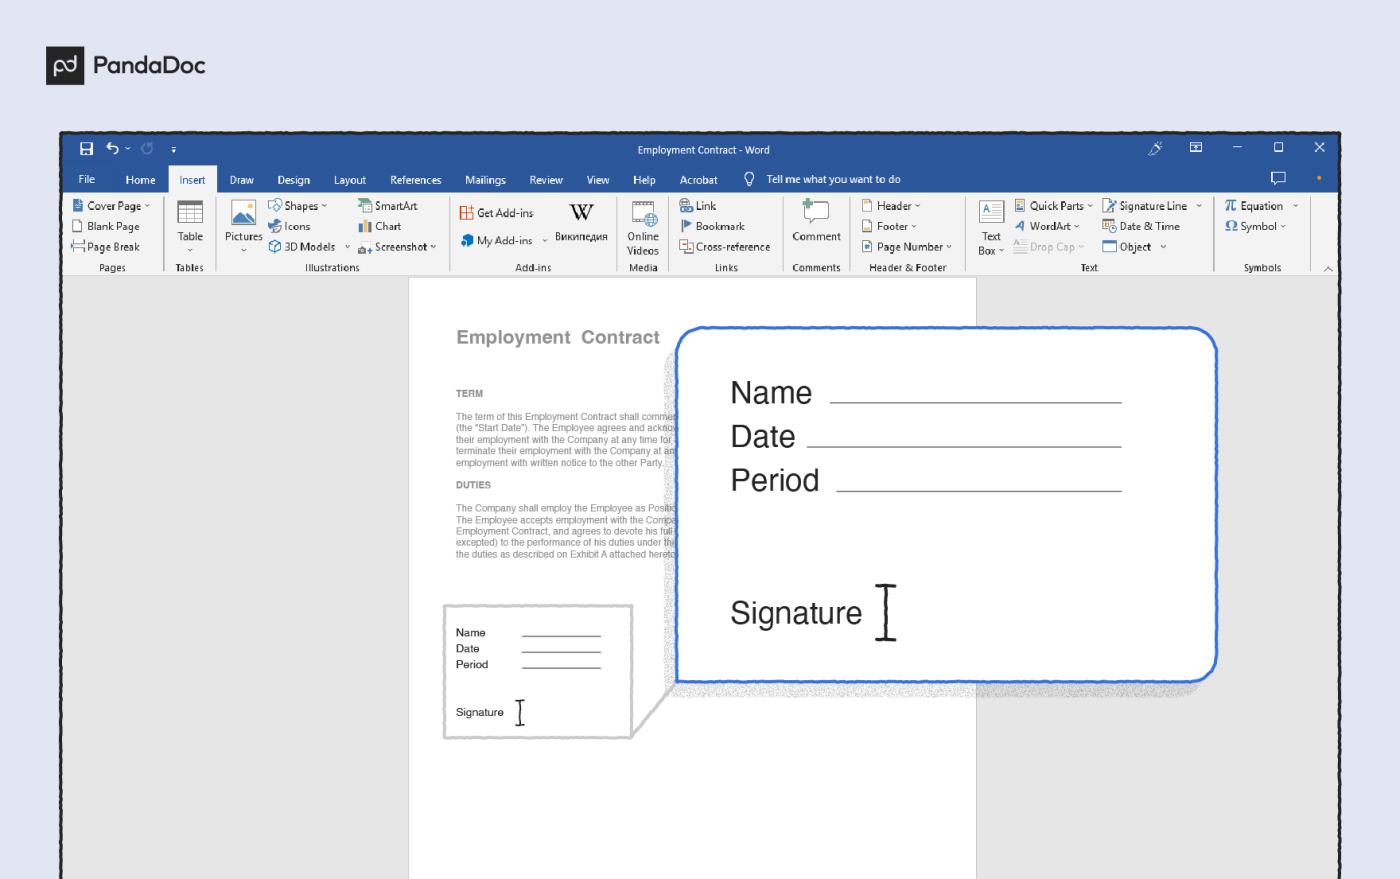
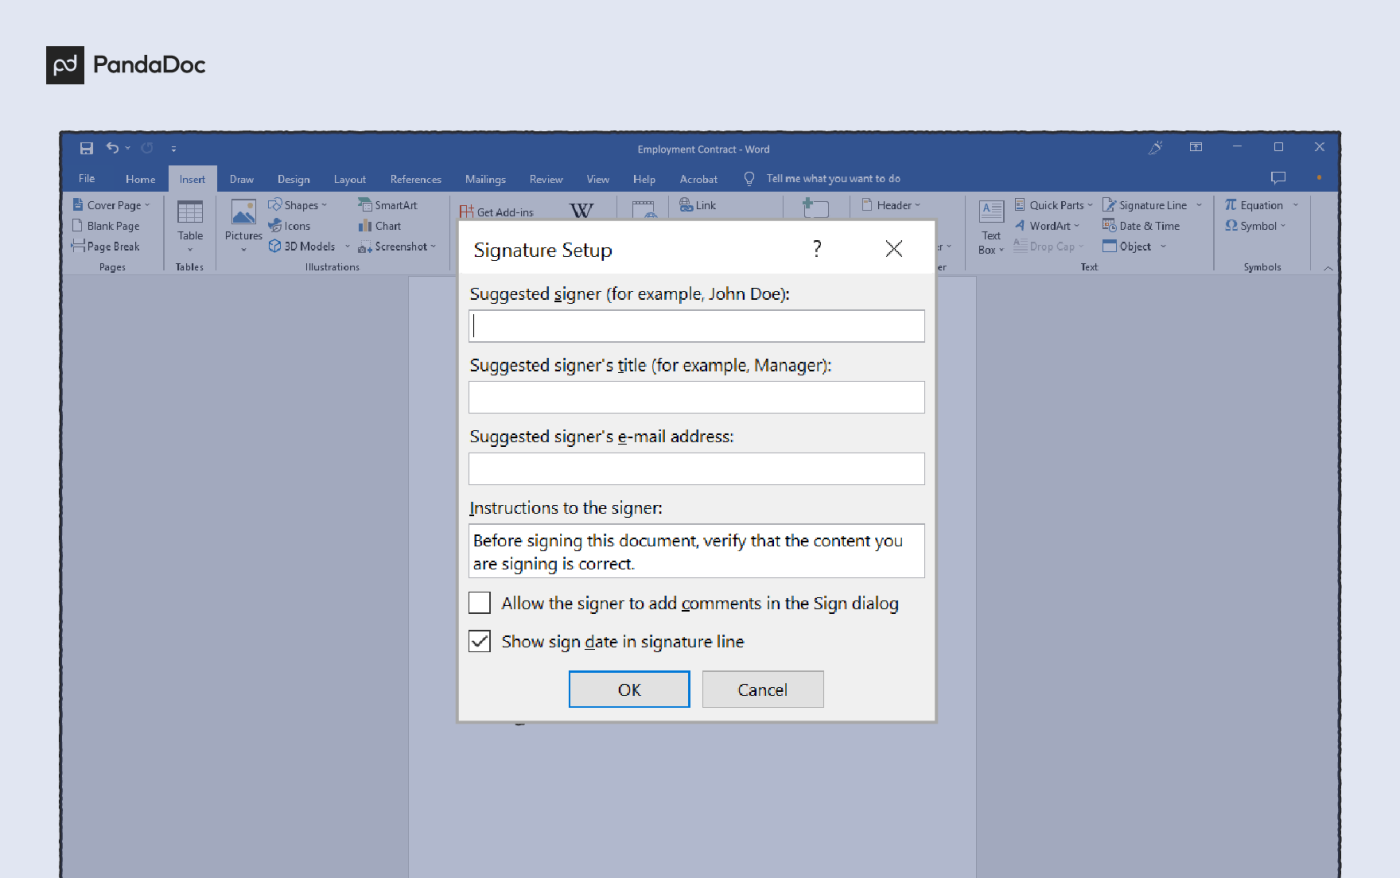
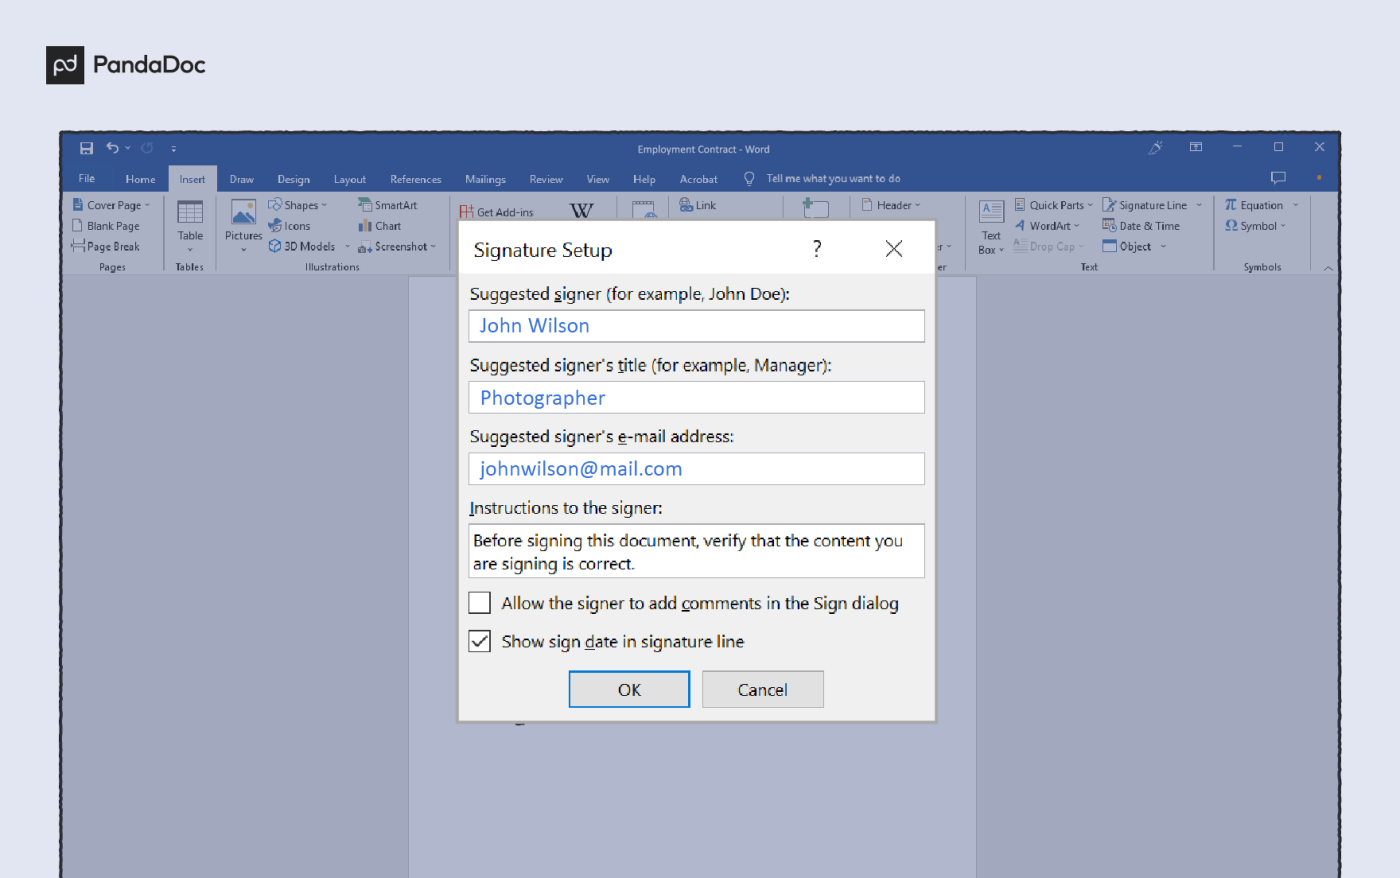
In the Signature Setup dialog box, type information that will appear beneath the signature line:

-
Suggested signer The signer’s full name.
-
Suggested signer’s title The signer’s title, if any.
-
Suggested signer’s e-mail address The signer’s e-mail address, if needed.
-
Instructions to the signer Add instructions for the signer, such as «Before signing the document, verify that the content is correct.»
-
-
Select one or both of the following check boxes:
-
Allow the signer to add comments in the Sign dialog box Allow the signer to type a purpose for signing.
-
Show sign date in signature line The date the document was signed will appear with the signature.
-

Tip: To add additional signature lines, repeat these steps.
Note: If the document remains unsigned, the Signatures Message Bar appears. Click View Signatures to complete the signature process.

Top of Page
Sign the signature line in Word or Excel
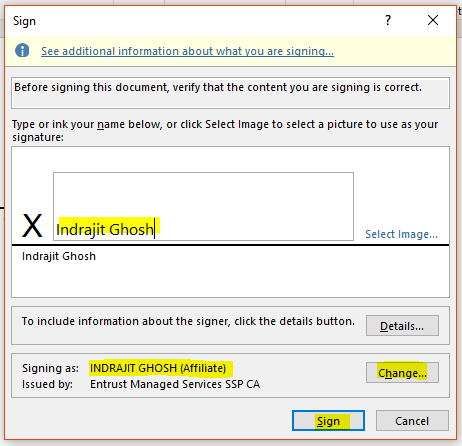
When you sign a signature line, you add a visible representation of your signature and a digital signature.
-
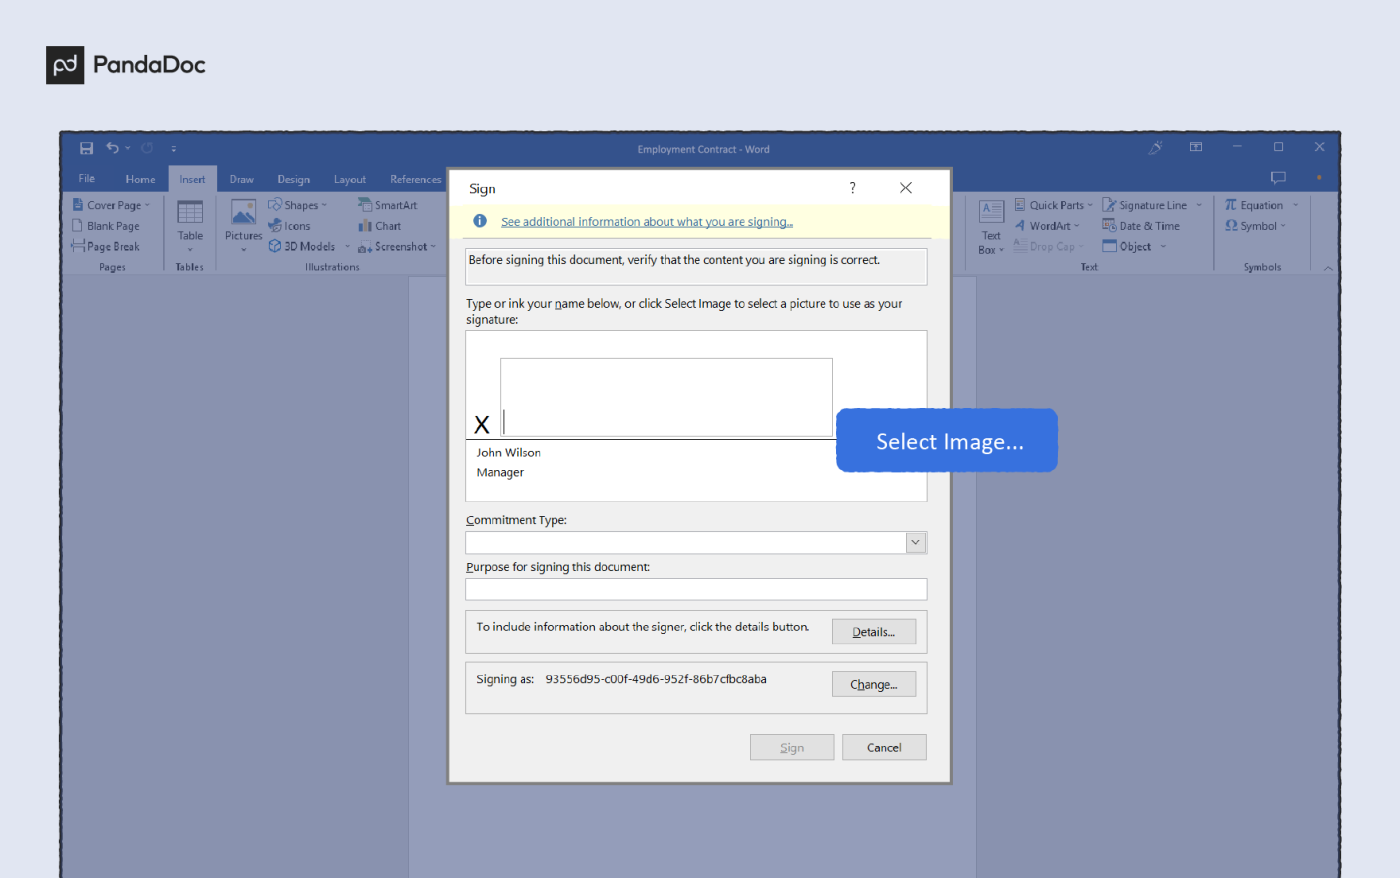
In the file, right-click the signature line.
Note: If the file opens in Protected View, click Edit Anyway, if the file is from a reliable source.
-
From the menu, select Sign.
-
To add a printed version of your signature, type your name in the box next to the X.
-
To select an image of your written signature, click Select Image. In the Select Signature Image dialog box, find the location of your signature image file, select the file that you want, and then click Select.
Notes:
-
For customers using Chinese- (Traditional or Simplified), Korean-, or Japanese-language versions, the Stamp Signature Line option appears.
-
In addition, you can sign a signature line by double-clicking the signature line. Type your name next to the X. Or, in the Signature Pane, in the Requested Signatures section, click the arrow next to the signature. From the menu, select Sign.
-
-
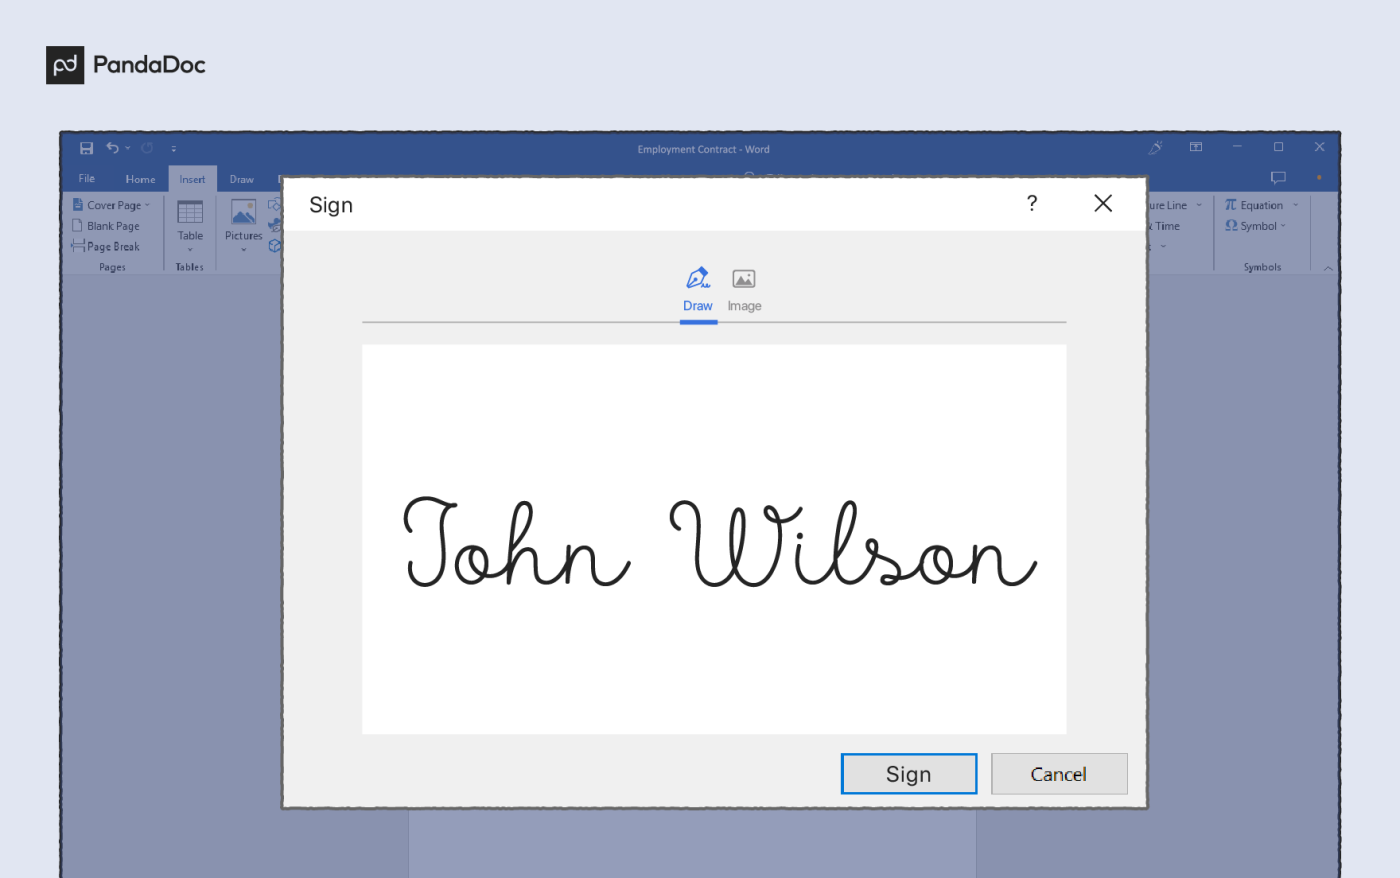
To add a handwritten signature (Tablet PC users only), sign your name in the box next to the X by using the inking feature.
-
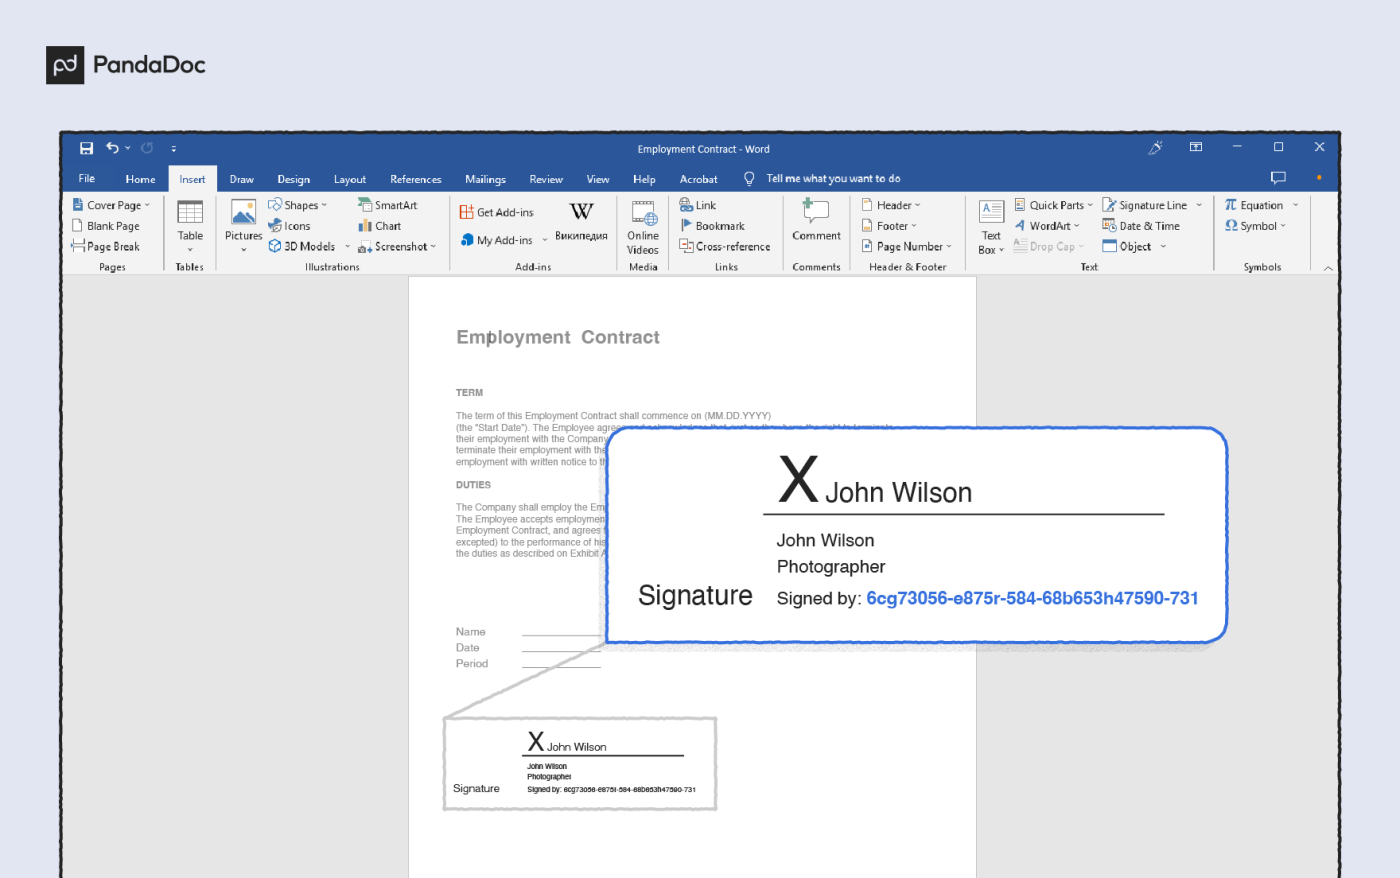
Click Sign.
-
The Signatures button appears at the bottom of the document or worksheet.
-
The following image shows the Signatures button.

Top of Page
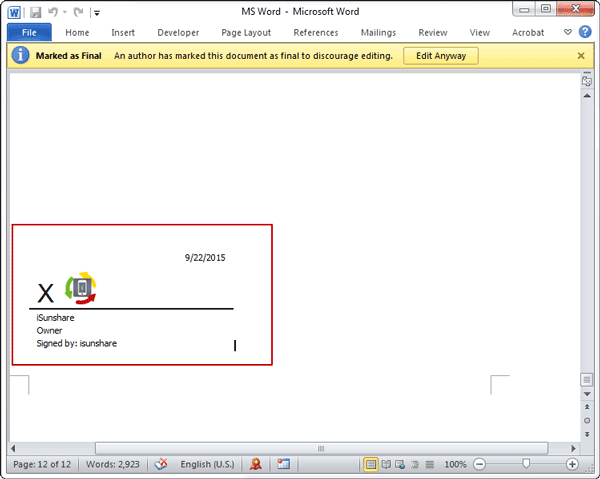
Remove digital signatures from Word or Excel
-
Open the document or worksheet that contains the visible signature you want to remove.
-
Right-click the signature line.
-
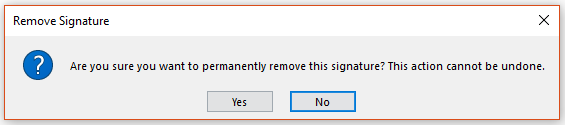
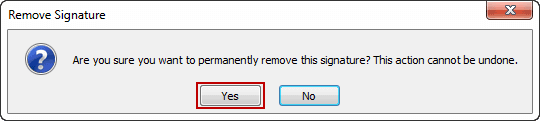
Click Remove Signature.
-
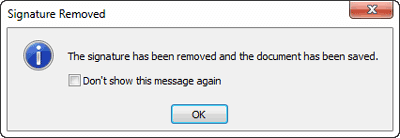
Click Yes.
Note: In addition, you can remove a signature by clicking the arrow next to the signature in the Signature Pane. Click Remove Signature.
Top of Page
Invisible digital signatures in Word, Excel, or PowerPoint
An invisible digital signature, such as a visible digital signature line, assures the authenticity, integrity, and origin of a document. You can add invisible digital signatures to Word documents, Excel workbooks, and PowerPoint presentations.
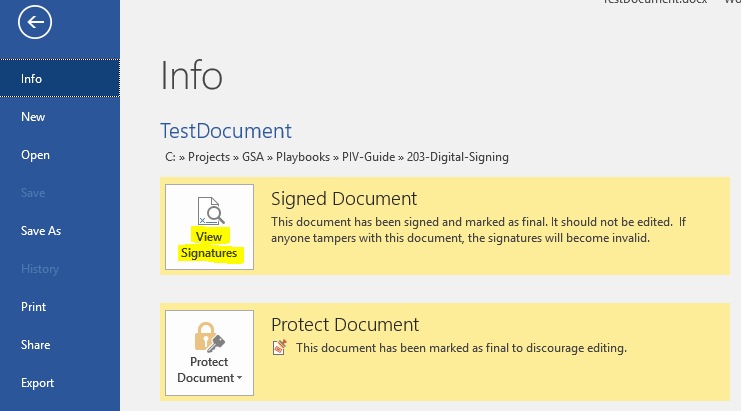
Signed documents will have the Signatures button at the bottom of the document. In addition, for signed documents, signature information appears in the Info section that you see after you click the File tab.
Top of Page
Add invisible digital signatures in Word, Excel, or PowerPoint
To protect the authenticity of a document’s content, you can add an invisible digital signature. Signed documents have the Signatures button at the bottom of the document.
-
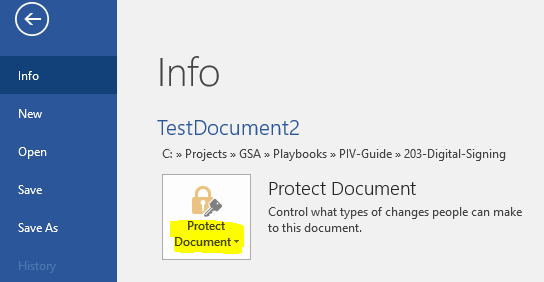
Click the File tab.
-
Click Info.
-
Click Protect Document, Protect Workbook or Protect Presentation.
-
Click Add a Digital Signature.
-
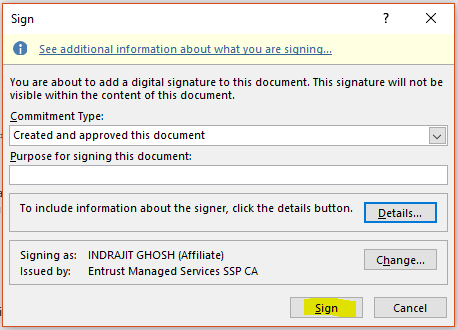
Read the Word, Excel, or PowerPoint message, and then click OK.
-
In the Sign dialog box, in the Purpose for signing this document box, type the purpose.
-
Click Sign.
After a file is digitally signed, the Signatures button appears, and the file becomes read-only to prevent modifications.
Top of Page
Remove invisible digital signatures from Word, Excel, or PowerPoint
-
Open the document, worksheet, or presentation that contains the invisible signature you want to remove.
-
Click the File tab.
-
Click Info.
-
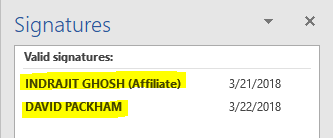
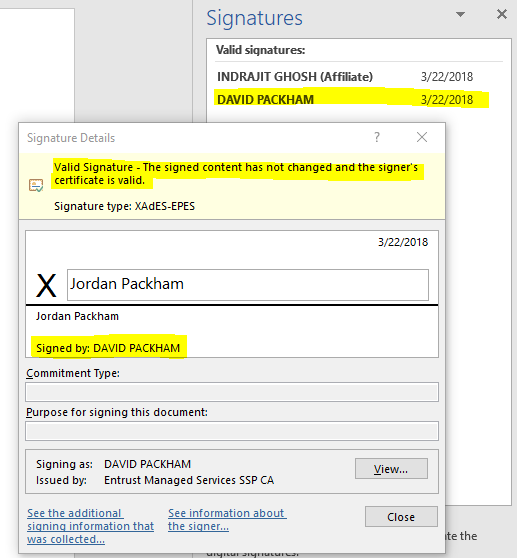
Click View Signatures.
-
The document, worksheet, or presentation view returns, and the Signatures pane appears.
-
Next to the signature name, click the arrow.
-
Click Remove Signature.
-
Click Yes.
Top of Page
![]()
Download Article
Digitally sign your Microsoft Word documents with this easy-to-use guide
![]()
Download Article
A digital signature can refer to two different things—using a simple electronic version of your regular hand-written signature, or using a digital signing certificate to add an encrypted stamp of authentication to a document. If you need to add your handwritten signature to a Microsoft Word document, we’ll show you the easiest ways to do so in Windows and macOS. We’ll also show you how to use your digital ID (issued by a certificate authority) to digitally sign a Word document in Windows.
-
1
Open the document in Microsoft Word. Double-click the Word document you want to sign digitally.
- DocuSign allows you to create and use a digital ID at no cost for personal use. Creating an account with DocuSign makes it easy to sign Word documents if you haven’t purchased a certificate from a certificate authority.
- When you sign a document with DocuSign, the signed version of the document will be converted to the PDF format.
-
2
Install the DocuSign add-in. To install DocuSign, do the following:
- Click the Insert tab.
- Click Get Add-ins on the toolbar. You may have to click Add-ins first.[1]
- On a Mac, you’ll click Store…
- Click the search bar in the upper-left side of the window.
- Search for docusign and click Add.
- Follow the on-screen instructions to add the DocuSign add-in.
Advertisement
-
3
Click the DocuSign tab. It’s at the top of the Word window.
-
4
Click Sign Document. You’ll find this in the DocuSign toolbar.
-
5
Click CREATE ACCOUNT. It’s in the DocuSign menu.
- If you already have a DocuSign account, click LOG IN to sign in.
-
6
Sign up for DocuSign. Follow the on-screen instructions to create a DocuSign account. Once you have an account, you’ll be able to use it to sign in.
- During the sign-up process, you’ll have to verify your email address. Click the link in the email from DocuSign and follow the on-screen instructions to verify.
-
7
Log into DocuSign in Microsoft Word. Once you have an account, click Sign Document again and log in with your new DocuSign account in the right panel.
-
8
Click Signature. It’s on the left side of the page. If you already have a DocuSign signature on file, this displays a thumbnail image of your signature next to your mouse cursor. If you do not have a signature on file, this displays a yellow image that says «Sign» next to your mouse cursor.
-
9
Click the spot into which you want to insert your signature. If you already have a signature on file through DocuSign, this places your signature where you clicked. If you do not have a signature on file, this displays a window you can use to create a new signature.
- If you need to create a new signature, follow the on-screen instructions and select Adopt and Sign when prompted.
-
10
Click FINISH. It’s a yellow button near the top of the page. A pop-up window will appear.
-
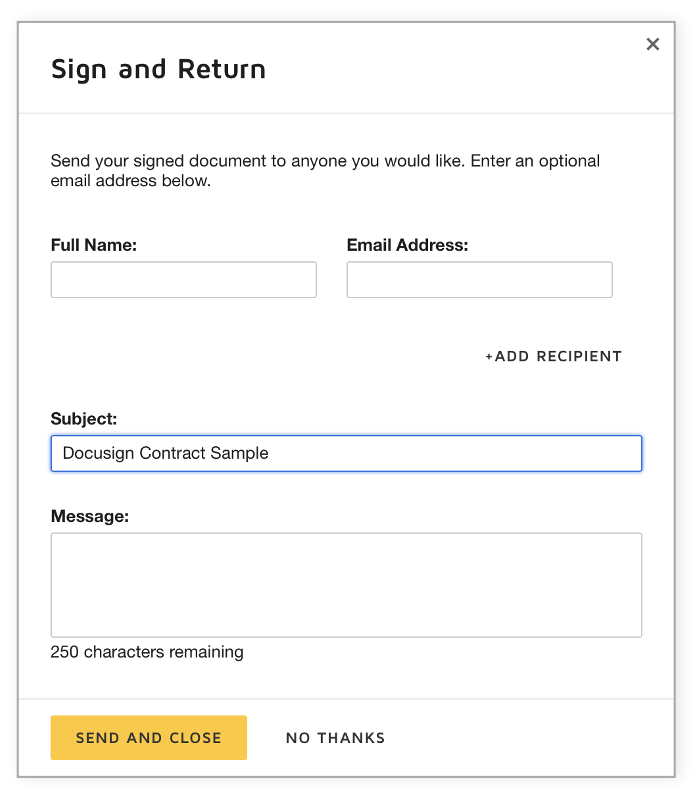
11
Send the document (optional). If you want to send the document to someone right now, use the first two bars at the top of the window to type the name and email address of the person you want to send the signed document to,
- You can also add recipients by clicking Add Recipient below the bar. Then type the name and email address of the new recipient.
- To skip this section, click NO THANKS. This will simply upload the document to your DocuSign account without emailing it to anyone.
-
12
Click Download document. It’s in the right panel. This redownloads the signed Word document as a PDF file that contains your signature. You can now share this signed version of your document with anyone you wish.


Advertisement
-
1
Create a digital certificate if you don’t already have one. Signing with a digital signature is different than typing or signing your name on a document. When you sign with a digital certificate, you’re including a unique encryption code that validates your identity. Digital certificates are usually assigned by certificate authorities and cost money, but you can create one yourself for personal use.[2]
If you don’t already have a digital certificate and just need a digital ID for personal use, here’s how to create one:- Right-click the Windows Start menu and select File Explorer.
- Navigate to C:Program FilesMicrosoft OfficerootOffice16. If that directory doesn’t exist, try C:Program Files (x86)Microsoft Officeroot instead.
- If Office is installed on another hard drive, replace «C» with the correct drive letter.
- Double-click the SELFCERT.EXE app.
- Type a name for your certificate (such as your full name) and click OK.
- Click OK to confirm.
-
2
Open the document you want to sign in Microsoft Word. Double-click the Word document to open it now.
- If you were sent a document that includes a signature line you need to sign, skip to step 8 to learn how to sign it with your digital certificate.
-
3
Click the Insert tab. It’s at the top of the window. If you need to add a signature line for yourself or someone else to sign, you’ll find the option(s) here.
-
4
Click Signature Line. You’ll see this on the «Text» panel on the right side of the toolbar.
- If you don’t see this, click the icon of a sheet of paper with a pencil instead.
- If your window is not maximized, you might have to click a menu called Text with a blue «A» on the toolbar to see the Signature Line option.
-
5
Add the signature details. The information you type here will vary depending on whether you’re signing the document or creating a signature line that someone else should sign.
- Check the «Show sign date in signature line» box if you’d like the date of the signature to be inserted automatically.
- Check the «Allow the signer to add a comment in the Sign dialog box» box if you’d like to enable comments from whoever signs the document.
-
6
Click OK. It’s at the bottom of the window. This will insert a signature box.
-
7
Right-click the signature line and select Sign. This opens a window you can use to sign on the signature line.
-
8
Type your name or select a signature image. If you want to use an image that contains your actual signature, you can select Select image and choose that image from your computer. Otherwise, just type your name on the line next to the «X.»
- If you’re using a tablet PC, you can use the inking feature to sign with your finger or stylus.
-
9
Click Sign. The «Signature» badge will appear at the bottom of the document next to the word count, indicating that the document has been signed.


Advertisement
-
1
Write your signature on a piece of white paper. If you want to add an image of your own signature to your document, the easiest way is to sign your name on a sheet of paper and scan it into your computer.[3]
Writing with dark ink on a white background will give you the best results. -
2
Scan your signature into your computer. When scanning your signature, save the photo in a common file format like JPG, PNG, or BMP.
-
3
Open the document you want to sign in Microsoft Word. You can do this by double-clicking the Word document on your computer.
-
4
Click the Insert tab. It’s at the top of Word.
-
5
Select Pictures on the toolbar. A brief menu will expand.
-
6
Click This Device (PC) or Picture from File (Mac). Now you’ll be able to browse for your scanned signature.
-
7
Select your signature image and click Insert. This imports your signature into the document.
-
8
Crop the image (optional). If the signature isn’t already cropped, click the image once to open the Picture Format tab, and then click the Crop tool on the toolbar. Drag the black guides in to select just the part of the image you want to keep, and then press Enter or Return to crop.
- After cropping, save the cropped version of the signature so you can easily reuse it in other documents. To do so, right-click the image, select Save as Picture and give the image a name you’ll remember.
-
9
Move your signature to the desired location. If your signature is too large or small, you can drag the corners in or out to resize it.
- Now that you’ve added your signature, click File > Save to save the file with your signature included.


Advertisement
-
1
Export the Word document as a PDF file. If you just want to add a signature to an existing Word document on your Mac, the easiest way to do so is to export the document to the PDF format so you can sign it in Preview. Here’s how:
- Open the document in Word and go to File > Save as.[4]
- Type a name for the file and chose PDF as the file format.
- Click Export.
- Open the document in Word and go to File > Save as.[4]
-
2
Open the PDF file in Preview. Now that you have a PDF version of your document, double-click the file to open it in Preview.
-
3
Click the marker icon to show the Markup toolbar. It’s the icon that looks like a felt tip marker at the top of the Preview window.[5]
-
4
Click the Signature icon. It’s the icon that looks like a cursive signature at the top of the window.
-
5
Choose an option for signing the document. You can create a signature in a few different ways:
- Click Trackpad to create a signature using the trackpad on your MacBook (if applicable). If you choose this option, you can use your finger to create your signature. Press any key after signing and then tap Done.
- Click Camera to take a photo of your actual signature on a sheet of paper. Sign a piece of white paper, align it in the camera when prompted, and then click Done.
- Click Select Device if you want to sign on your iPhone or iPad. This option lets you use your Apple Pencil (if using an iPad) or your finger to sign your phone or tablet. After signing, tap Done and it will magically appear on your Mac.
-
6
Click the signature you just created. It’s in the signature drop-down menu. This will place your signature into the center of the document.
- You may first have to click the «Signature» icon again.
-
7
Drag your signature to reposition it. Click and hold in the center of your signature and drag it to the area you want to place it in.
-
8
Save the file. Once you’ve signed the PDF, click the File menu and select Save to save the version that includes your signature. This saves the document with your electronic signature attached.


Advertisement
Add New Question
-
Question
When I try to save a copy of a digitally signed Word 2007 document, it invalidates the signature. Is there a way of saving without invalidating the signature?

You need to save the document first, and then sign digitally. There is no need to save it again.
-
Question
Our forms have sections with a signature required in each section. But when you complete the next section, it invalidates the signature for the previous section. Is there a way around that?
Then it’s some digital signature issue. You may need to seek technical assistance for that.
Ask a Question
200 characters left
Include your email address to get a message when this question is answered.
Submit
Advertisement
-
One way to add an informal signature to a Word document is by drawing your signature in a program such as Paint, saving it as an image, and then inserting it as image from the Word Insert menu.
Thanks for submitting a tip for review!
Advertisement
About This Article
Article SummaryX
1. Install the DocuSign add-in for Word.
2. Click the DocuSign tab.
3. Click Sign Document.
4. Create and activate your account.
5. Scroll to the place you must sign.
6. Click Signature.
7. Click Adopt and Sign.
8. Click Finish.
Did this summary help you?
Thanks to all authors for creating a page that has been read 782,924 times.
Is this article up to date?
Before you begin digitally signing documents, please ask your Technical Support team to verify the digital signature settings on your computer by following the steps in the Verify Digital Signature Settings section below.
This guide will walk you through the steps for digitally signing a document in Microsoft Word 2010, 2013, or 2016 using your PIV credential or digital certificate.
Add a Digital Signature Using a Signature Line
- To add a digital signature, open your Microsoft Word document and click where you’d like to add your signature line.
-
From the Word ribbon, select the Insert tab and then click Signature Line in the Text group.

-
A Signature Setup pop-up box appears. Enter your information in the text fields and click OK.

-
Double-click the signature line.

-
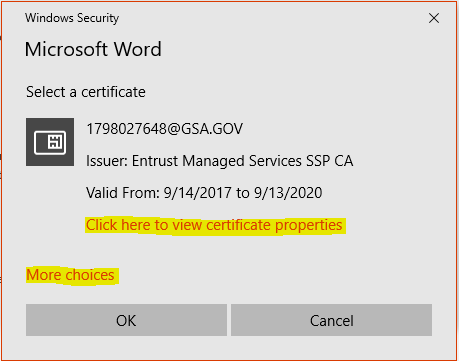
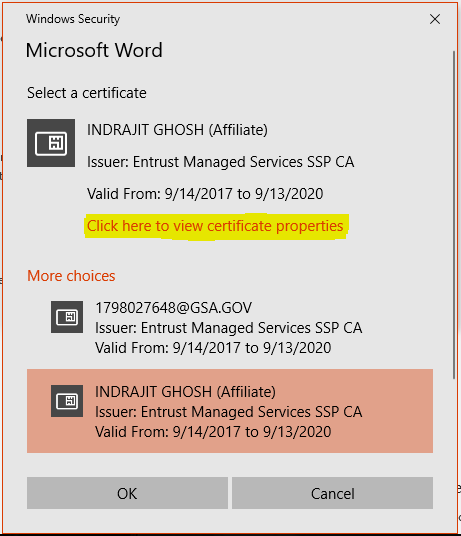
A Sign pop-up box appears. At the X, type your name. Next, look at the Signing as: field. Select the signing certificate. To ensure that this is the correct certificate, click the Change button.

-
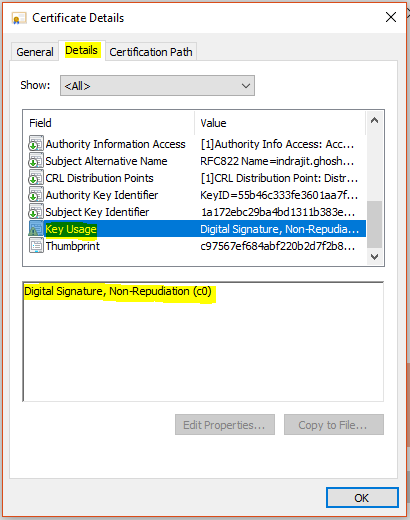
Click on Click here to view certificate properties.

-
The Certificate Details box appears. Go to the Details tab and scroll down to Key Usage. Single-click on it. The lower text box should now display Digital Signature, Non-Repudiation. If it does, then this is the right certificate. Click OK.

-
If this is the wrong certificate, click OK. Then click More Choices to see other certificates. Select another certificate and repeat these steps until you find the correct certificate.

-
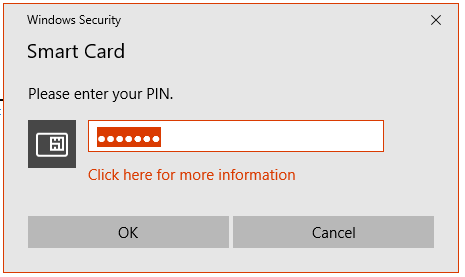
Click the Sign button to sign the document. Insert your PIV card into the card reader. Enter your smart card (PIV) PIN and click OK.

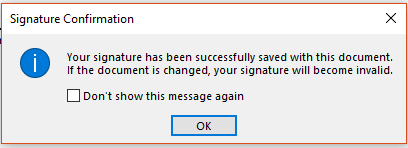
- The Signature Confirmation box tells you that Word saved your digital signature. Click OK.


![]()
Once you’ve digitally signed your document, if you edit it, Word will remove the digital signature. Don’t worry. You can always go back to Step 1 and digitally sign it again.
Add an Invisible Digital Signature
You can add an invisible digital signature to prevent your name from appearing in a document.
-
Open your document and click the File tab.
-
Click Info and then click Protect Document.

-
From the Protect Document drop-down menu, click Add a Digital Signature.
-
Select a Commitment Type, such as created and approved this document, and then click Sign.

-
Insert your PIV card into the card reader. Enter your smart card (PIV) PIN and click OK.
-
The Signature Confirmation box tells you that Word saved your digital signature. Click OK.
Add Multiple Digital Signatures Using Signature Lines
Once you digitally sign a document, you can have others also digitally sign it. (Note: If you are the first approver, you should create the signature lines for all of the approvers. Then send the document to the second approver.)
-
If you are the second (or other) approver, open the document you’ve received. Double-click your signature line to sign. Follow Steps 4 through 10 from Add a Digital Signature Using a Signature Line.
-
A Signature Setup pop-up box appears. Enter your information in the text fields and click OK.
-
Double-click your signature line.

-
A Sign pop-up box appears. At the X, type your name.
-
Next, look at the Signing as: field. You should see your name and certificate information. If you don’t, click the Change button to select a different certificate and click Sign.
-
Insert your PIV card and enter your smart card (PIV) PIN. Click OK.
-
The Signature Confirmation box tells you that Word saved your digital signature. Click OK.
-
Send the digitally signed document to the next approver.
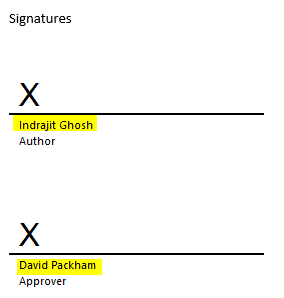
Each successive approver will be able to open the document and double-click the Signature Line with his/her name and complete the signing process.
Add Multiple Invisible Digital Signatures
Multiple approvers may digitally sign a document. Use the same procedures as you would to add one invisibile digital signature: Add an Invisible Digital Signature.
The final approver will see multiple “invisible” signatures in the document.
View Digital Signatures
If you use Word 2013 and open a digitally signed Word 2007 or 2010 document, you may have compatibility issues.
You can view digital signatures in an incompatible Word document in one of two ways:
Click the View Signatures button just below the Word ribbon.

OR
Click the File tab and select Info. Then click View Signatures.
For either option, you will be able to see the digital signature details in the Signatures box.
Remove a Digital Signature
- If you want to remove a digital signature, open your Word document and go to the signature line.
- If there is no signature line, click the View Signatures button just below the Word ribbon.
- From the Signatures box, select the signature you want to to delete.

- Right-click on the signature and then click Remove Signature.
- When prompted, click Yes.

Verify Digital Signature Settings
Please ask your Technical Support staff for help. Administrator privileges are required for these steps.
By default, Microsoft Word uses the SHA-1 hash algorithm to generate digital signatures. The SHA-1 hash algorithm is no longer considered secure. More secure hash algorithms, such as SHA-256, should be used. (See NIST’s guidance on hash functions)
You can use either option below to verify/change the hash algorithm settings for Microsoft Office:
- Group Policy settings: Use Digital Signatures with Office 2016. (For additional information, consult Microsoft’s technical documents.)
- Computer registry settings. Change the Microsoft Office signature algorithm, as follows:
Word 2010:  ComputerHKEY_CURRENT_USERSoftwarePoliciesMicrosoftOffice14.0commonsignatures
Word 2013:  ComputerHKEY_CURRENT_USERSoftwarePoliciesMicrosoftOffice15.0commonsignatures
Word 2016:  ComputerHKEY_CURRENT_USERSoftwarePoliciesMicrosoftOffice16.0commonsignatures
- Add or update these values:
| Value Name | signaturehashalg |
| Value Type | REG_SZ |
| Value | sha256 |
- Save the registry settings and restart the computer.
(For additional information, consult Microsoft’s technical documents.)
Additional Resources
- Add or Remove Digital Signature in Office Files
- XML Digital Signature
- Digital Signatures in Office 2010
- Use Digital Signatures with Office 2016
- NIST Policy on Hash Functions
Microsoft Word does indeed have a handy built-in feature that allows users to create and add electronic signatures to documents for free.
Despite its popularity, however, Word is somewhat limited concerning wider functionality when it comes to electronic signatures.
This makes Microsoft an outdated software choice for many organisations, those who would otherwise benefit by switching to more dedicated eSigning platforms.
On the bright side, there’s still a lot that can be done with Word. In this article, we’ll take you through the ins and outs of electronic signatures in Word, and we’ll teach you how to electronically sign a Word document.
What is an electronic signature?
An electronic signature, also known as an eSignature, is merely a digitised form of a traditional physical signature, making the document-signing process a fast-moving activity.
Like a standard handwritten signature, electronic signatures are mostly there to serve as proof that the signer has approved the document in question.
Why use electronic signatures?
Before we explore this subject further, it’s essential to know the what, why, and how of electronic signatures. Since we’re already done with the “what,” it’s about time we discover the “why.”
For starters, eSignatures are a lot faster to use than traditional signatures, since you don’t have to print, physically sign, scan the document, and then have it sent back to the sender.
Another handy feature of eSignatures is that they only need to be created once, and then the copy signature can be added quickly and easily to any future document.
For anyone needing to send out signed documents frequently, eSignatures can significantly improve their workflow. Teams like sales, admin, accounts, etc., as well as many business owners, can profoundly benefit from its use.
For the most part, an electronic signature is just as legally binding as a real signature (read: certain countries consider written signatures as taking higher precedence over eSignatures).
Oh, and before we forget: they are also encrypted — so rest assured, electronic signatures are safe to use even with critical and sensitive documents.
Leverage your business with electronic signatures
When partnering with a brand, you ideally need an application that is more than just an eSignature software.
At the same time, it should be a brand that understands the importance and benefits of using electronic signatures. These eSignature benefits should include:
- Getting instant updates.
- Being able to deploy automation for signature tracking.
- Easy accessibility of signing different file types.
- Access to enhanced security.
PandaDoc has all these features and then some. You can scan, view, and sign a document, all at the same time, and easily.
If you’re interested in exploring further, send yourself a (free) sample copy to view the eSignature journey from the eyes of your customers.
Does it make sense to add a digital signature in Word?
Microsoft Word is the universal word processing software used by businesses and individuals across the world to create documents.
Because it is so widely used, many people choose to add eSignatures to documents in Word to increase the speed of their document processes. (It often might do otherwise, but more on that later.)
The main advantage of adding digital signatures in Word documents is the very fact that most businesses already use the software to create and edit their documents.
However, while this may be the most obvious benefit, just make a note if your organisation can indeed support the use-case of electronic signatures before moving forward with a solution.
How to add an electronic signature to a Word document
At this step, perhaps you may ask, “How do I write my signature on a Word document?” Well then, you’ve come to the right place.
Follow these necessary steps to add a digital signature to a Word document (“word” of caution, no pun intended): these steps are only relevant on the Microsoft Word versions 2007, 2010, 2013, 2016, 2019, and Word in Office 365):
1. Place the cursor where you’d like to add a signature to a Word document.
2. Go to the Insert tab, and under “Text,” click “Signature List,” followed by “Microsoft Office Signature Line“.
3. Complete the fields about signature details in the setup box that pops up and select your preferences for the signature box.
4. Right-click on the signature box in the document.
5. After this, click “Select Image” to choose an image of a signature that you have already saved.
Alternatively, if you’re using a touch screen, you can hand draw your signature into the box. You can also type a printed version of your name directly into the box.
While it’s entirely possible to eSign documents using Word, the signature setup can be a convoluted process.
Every person who’s signing the document will need to download the document, open it in Word, and follow step 4 to add their signature.
Note: if digital signatures are not your thing, then you can print and hand-sign them as well. But with this method, you’ll need to save the document and send it back to the sender, which only wastes time and potentially opens up room for human error.
How to add a signature line in the Word doc
1. Place your cursor where you would like to add the signature line.
2. Go to the “Insert” tab, and select “Signature line.”
3. A dialogue box will pop up — fill in the required details (name of the signer, work title of the signer, and email ID of the signer).
4. Mention the instructions you would like the recipient to read.
5. Allow the recipient to add comments (if you’d like), and select “show sign date.”
6. Click “OK.”
Why switch from using Word for electronic signatures?
Microsoft Word is not designed to be used as electronic signature software, and while it can be used to add signatures digitally, there are some gaps in functionality that limit its potential benefits.
The biggest limitation of using Word is that it is not comprehensive in nature. Imagine your client sends you a PDF document or a ppt file. You can’t use Microsoft Word to sign those documents.
Apps like PandaDoc, that have an eSignature function, are compatible with multiple file types, including Word, ppt, pdf, xls, jpg, and more.
Another drawback is that you need to consider the client’s journey when they sign a document. Logically, these recipients need to read the document, decide if they’re interested, sign it themselves and then send it back.
As a business owner, your goal should be to make the signing process as easy as possible.
This can be done only when you have insights that tell you how and where did your recipient(s) interact with the documents you sent them. Unfortunately, this isn’t possible with Word.
Another big drawback of Word is that it is not the fastest way to eSign documents. The thing is, anytime you want to sign a document on Word, you’d have to create a digital ID.
When you click on the X to sign, a dialog box would appear. For some users, this dialog box redirects them to Microsoft support from where they can read the instructions to create a digital ID.
Whereas for others, you have to manually go to the Microsoft website to obtain a digital ID from one of Microsoft’s partners.
It’s important to note that the partners Microsoft mentions (GlobalSign and IdenTrust) require you to pay money to obtain a digital ID. So, overall, Microsoft is not the most effortless software when it comes to eSigning.
What can other platforms offer that Word can’t?
There are many other examples of software that are dedicated to creating, sending and signing business documents digitally, such as PandaDoc and DocuSign.
PandaDoc and DocuSign have both been consistently ranking as the top-performing eSignature softwares.
While DocuSign has made a name for itself by launching first, PandaDoc has been giving it some serious competition with the help of its product offerings (unlimited audit trail, 24/7 support, dynamic pricing, and more).
The comparisons are numerous, and very much worth evaluating for yourself. If you’re still interested in exploring further, you can compare both these softwares here.
The point that remains is both these softwares provide services that offer a much broader range of useful features, generally making it straightforward to create signature fields and eSignatures.
PandaDoc, for example, provides users with a vast database of templates tailored to a wide range of business use cases that can easily be signed at the click of a button, as well as different types of quotes, proposals, or legal documents, that can be quickly uploaded to keep all information in one place.
Overall, this speeds up the creation of high-quality, professional documents.
Adding an eSignature is painless on these dedicated platforms, with intuitive interfaces and one-click addition often supported.
Once signed, documents can be sent to a list of recipients quickly and easily, directly through the software itself, and a secure signing certificate may be created as soon as the recipient signs the document.
Once sent, documents can then be tracked. Viewer metrics like time spent on each page, how often the recipient viewed the document, the number of views, comments, and eSignatures on the document, and other similar data are gathered and presented to the sender automatically.

This information provides a microscopic view of what works and what doesn’t, allowing companies to fine-tune their sales documents and improve their effectiveness over time.
These powerful features mean that adopting a specialised eSignature and sales document platform can revolutionise the way you eSign. It also means that you can dramatically streamline your entire sales process.
PandaDoc has integrated with Word to make limitations a thing of the past
It could be that you’re a Word loyalist, or maybe you’re just not looking to fully switch to a new software (after all, who doesn’t love comfort?).
But there is one thing that we guarantee you’ll love more: a smoother eSigning process.
And for the very same reason, PandaDoc has integrated with Word, making limitations of digital signatures a problem of the past. You can now have the best of both worlds.
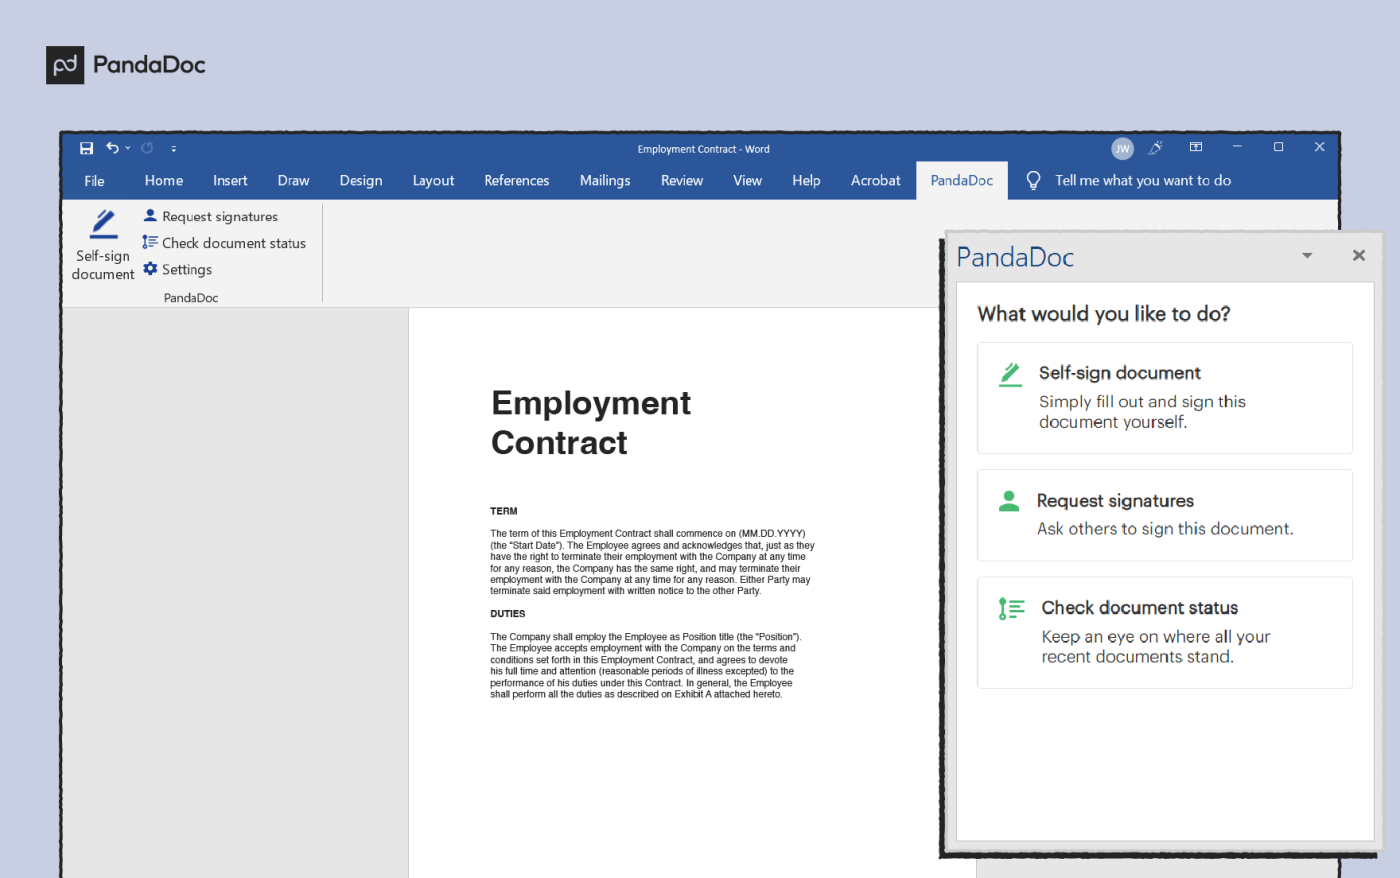
With this integration, you can send your document quickly to a list of prospects and/or internal team members (PandaDoc will open in a separate tab to not disturb your workflow).
You can also see if your recipient received your document with status updates letting you know whether they’ve signed or not.

This integration makes it possible to sign existing Word documents, request eSignatures from multiple recipients, and check the status of your document — all at the click of a button.
Even more, the integration is simple and uploads the documents directly to your PandaDoc account, making them easy to access from anywhere.
If interested, you can download the integration from Microsoft Marketplace.
How to add an eSignature to a Word document using PandaDoc
PandaDoc makes it a breeze to add electronic signatures to any document.
Just follow these steps:
1. Start a free trial account with PandaDoc and open your document (either by choosing a saved file from PandaDoc, or uploading a file from your computer or cloud storage app).
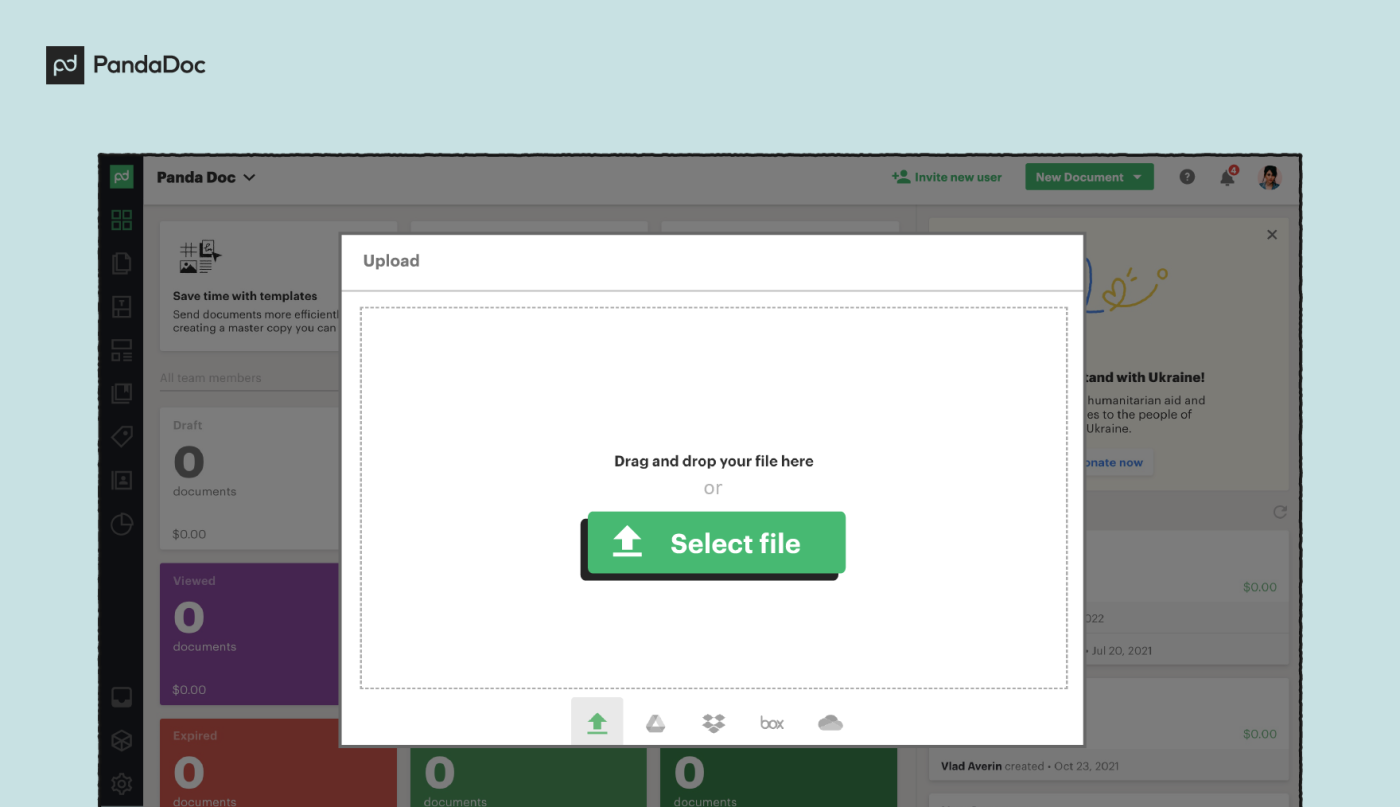
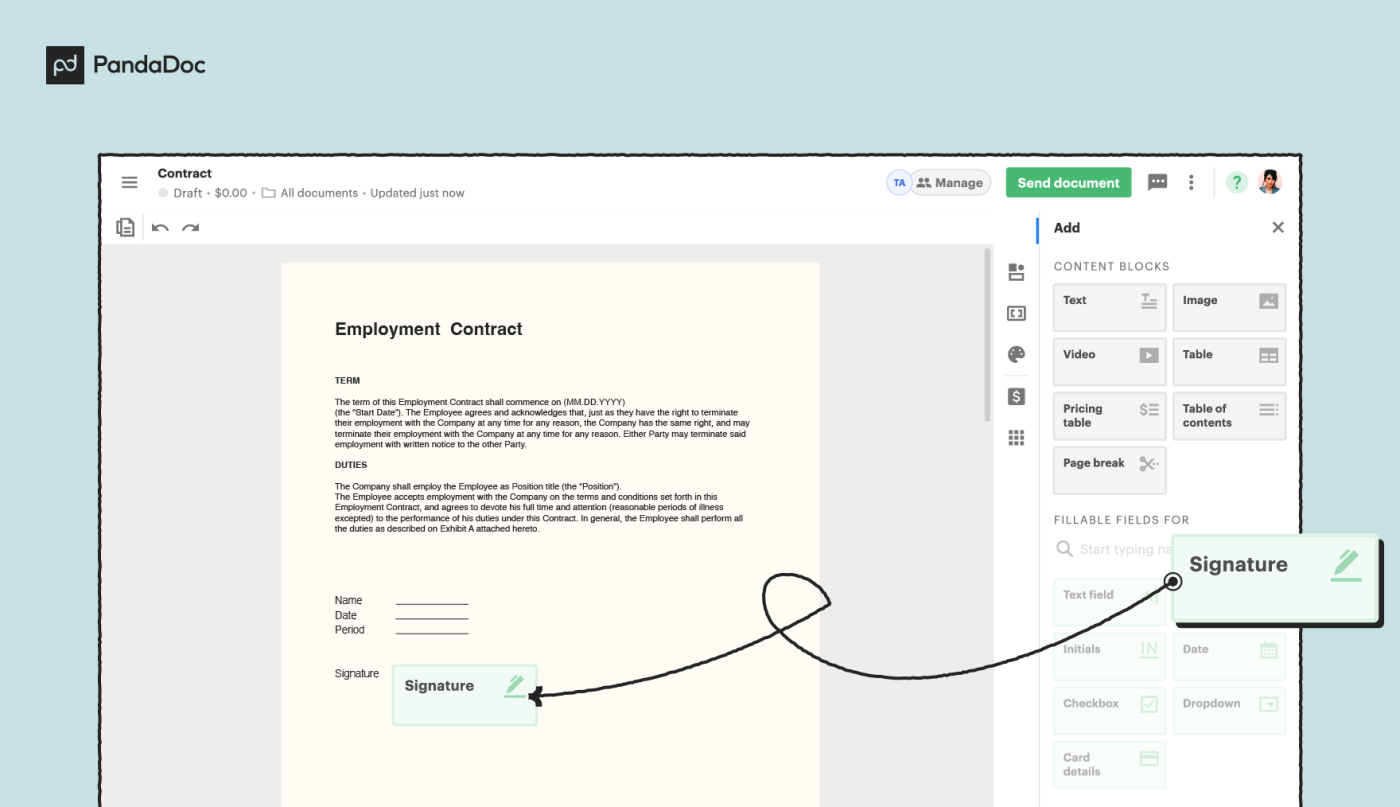
2. Drag and drop a signature field into the document and add any extra fields or text you want.
3. Choose your recipients and click send.
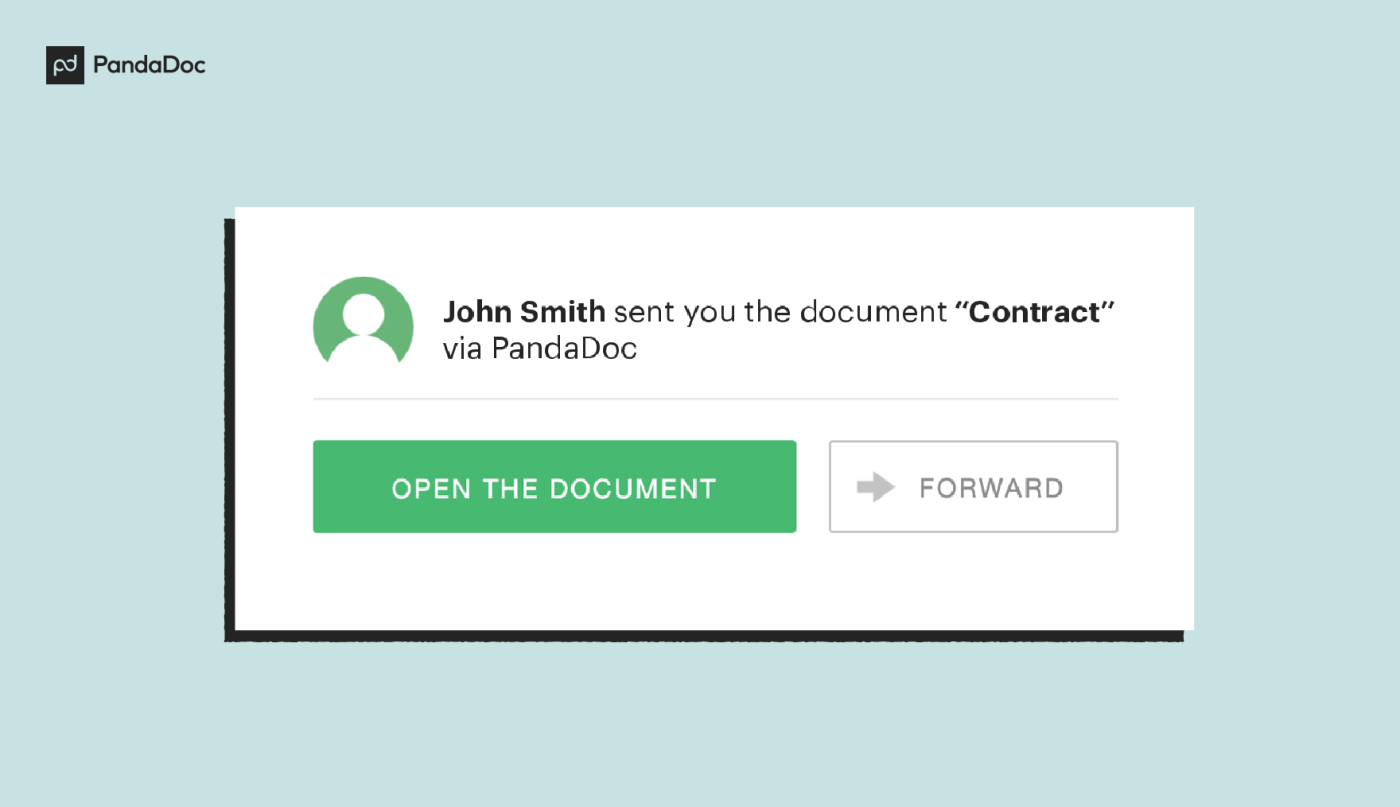
4. Recipients will get an email notification linking them directly to an online version of the document. They need to click the signature field and choose to draw, upload or type their electronic signature.
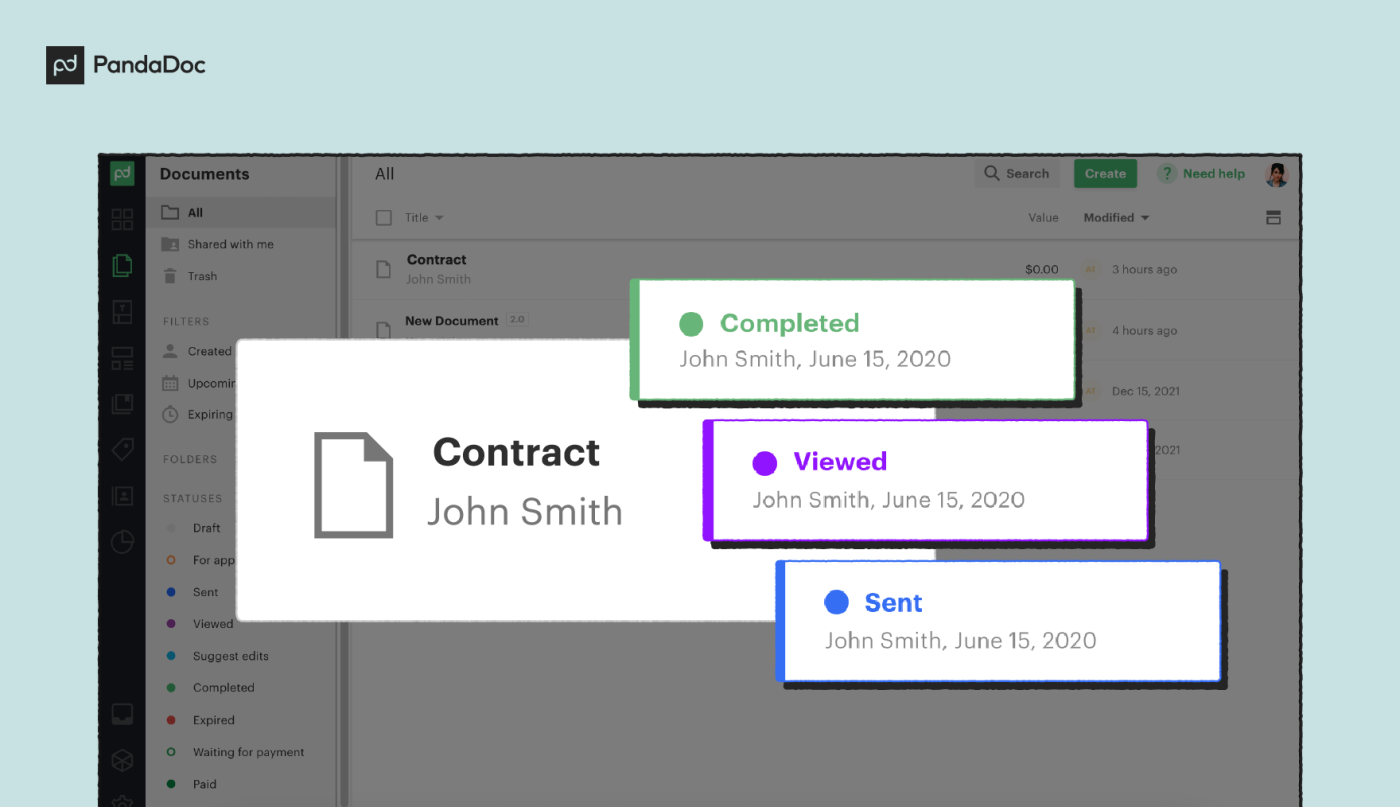
5. The sender’s copy of the document is automatically updated as signatures are added. Document activity can be tracked conveniently, and follow-ups are sent accordingly.
PandaDoc also creates a signature certificate that shows the signing date, IP address, location, and the time stamp ensuring the document’s legitimacy.
A better way to eSign your business and sales documents
Microsoft Word may be the most popular word processing software for both businesses and individuals, but that doesn’t always make it the best choice for electronic signatures.
There now exists a massive array of softwares dedicated to improving the document signing process.
Alternatives to Word like PandaDoc not only make the eSigning process incredibly simple, but they also come with a wide range of other tools that can enhance your ability to create, send, sign and track a large number of important business documents with ease.
So, what’s stopping you from hopping on the PandaDoc train and creating an illustrious document signing experience?
Need to add your electronic signature to a contract, offer letter or non disclosure agreement from a Word document? It’s easy to create an electronic signature on a Microsoft Word document without ever leaving the application.
How to sign a Word document
Read on to discover how to add an electronic signature to a Word document in just a few steps with this easy guide.
1. First, install the DocuSign add-in. Go to the Insert tab in the Menu bar and navigate to “Get Add-ins. This will open up the Office Store (or Store on Mac). Type “DocuSign” in the search bar. Click “Add” DocuSign for Word and confirm the installation. This is free.
2. Find DocuSign in your Menu tab. Once the add-in has loaded successfully, you will see a new menu option called “DocuSign.” Click on that and choose “Sign Document.”

3. Log into your DocuSign account or click “Create Account” for a free DocuSign account. Signing up for a free trial will allow you to create a free electronic signature in Word. You can also send forms and contracts to others for signature for 30 days — no credit card required.
4. Add Signature to your document. You can now drag and drop the Signature field to add your electronic signature to the Word document. Simply click “Signature” on the left side of the page, then click the spot in your document where you want to insert your signature. You’re also able to add your Initials, Date Signed, Name and other information if you choose.

5. Click the yellow “Adopt and Sign” button at the bottom of the window. Your signature will appear in the desired place on the document. Then click the “Finish” button at the top of the page.
Your signed document is ready to send and download.
If you need to send the document to another party, enter the recipient’s name and email address in the “Full Name” and “Email Address” fields in the pop-up menu, then click “Send and Close”.
And you’re done. You can then log in to your DocuSign account to see all the documents you’ve signed and sent.
Creating your own electronic signature
When adding an electronic signature to any document, you can choose to simply adopt a DocuSign pre-made signature using your name. If you love your unique autograph, you can also choose to upload or draw your own electronic signature:
1. Log in to your DocuSign account. Click the Profile Image, then click “Signatures.”
2. To change your signature, click “Edit” and select “Draw”.

3. To draw a signature in word, click and hold within the “Draw your signature” box, then draw the desired signature with your cursor or on your touch screen.
4. Click and hold within the “Draw your initials” box to draw the desired initials. Click “Create” to save your signature.
Try eSignature Now for Free
Ready to get started with DocuSign eSignature? Try now for free.
-
Try now
Related:
- How to Electronically Sign Documents in Google Docs
- What is a Wet Signature vs. an Electronic Signature?
- Are Electronic Signatures Legal?
Learn more about DocuSign eSignature and other ways to digitally transform how you do business with the DocuSign Agreement Cloud.
Electronically signing a document authenticates the signer, so all recipients can verify that the contents have not been modified since it was signed. When you go to add a digital signature to a Word document, or any document for that matter, it’s essential to follow the correct steps. Below, we go over how a digital signature works and the process to e-sign a Microsoft Word document.
How A Digital Signature In Microsoft Word Works
Unlike handwritten signatures, digital signatures enable secure electronic document exchange and workflows, ensure document integrity and authorship, and satisfy electronic document compliance requirements.
This type of electronic signature, or e-signature, is an encrypted stamp of authentication applied to digital information such as e-mail messages, macros, or electronic documents. Thus, when you sign a Word document digitally, you are confirming that the information in the document originated from the signer and has not been altered. This gives users confidence that the signed documents originate from the recognized source and have not been forged or tampered with.
Digital signatures can be applied to a variety of document types including Adobe PDF files, PNGs, image files, JPGs, and Word Documents.
To create a digital signature you have to have a signing certificate, which proves identity. (For documents in particular, you will need a document signing certificate.) When you send a digitally-signed file, you also send your certificate and public key. Digital certificates are issued by a certification authority (CA), like Sectigo.
Using signature fields in Microsoft Office files makes it possible for organizations to reduce risk when using electronic transactions and streamlining paper processes for contracts or other agreements. Digital signatures provide a record of exactly what was signed and can be verified in the future.
Signed documents have a Signatures button at the bottom. In addition, for signed documents, signature information appears in the Info section that can be viewed by clicking the File tab in Word.
To add a signature line, follow these steps:
- In Microsoft Word or Excel, open the document that you want to sign.
- In the word document or worksheet, place your cursor (pointer) where you want the signature line to appear.
- Click Insert.
- On the Insert tab, in the Text section, click Signature Line > Microsoft Office Signature Line in the drop-down menu.
There are two different signature setup methods, depending on the intended use.
Method 1: Adding An Invisible Digital Signature
You can add an invisible digital signature to a Word document, Excel workbook, or PowerPoint presentation. This does not appear in the document, but instead, a small signature icon appears at the bottom of the window to signify that it was signed. Recipients can click the icon to view information about the signer.
Method 2: Adding A Visible Digital Signature
You can also add a visible digital signature to a Word file or Excel workbook. This signature appears in the document along with a small signature icon at the bottom of the window to signify that the document was signed. Recipients can double-click the signature or click the icon to see information about the signer.
How Ao Add a Digital Signature In Microsoft Windows Using A Document Signing Certificate
To digitally sign a document using a Document Signing Certificate in the Microsoft Windows environment, follow these steps:
- Open the document that needs to be signed.
- Plug the USB smart card token with the certificate into the USB port of your computer. Microsoft will automatically copy the certificate to your computer’s cryptographic API (CAPI) certificate store.
- Click More Tools on the Tools pane. The Create & Edit page will appear.
- Select Certificates.
- On the Certificates toolbar, Select Digitally Sign. The Signature Area Selection dialog box will appear.
- Click OK in the Signature Area Selection dialog box.
- Using your mouse, click and drag to draw the area where you would like the signature to appear. The Sign with a Digital ID dialog box will appear.
- Click Continue. The Sign as <Your name> dialog box will appear.
- Click Sign. The Windows Explorer dialog box will open.
- Select the folder where to save the signed document.
- Type the document name.
- Click Save. You will be prompted to enter your PIN.
- Enter your PIN and click OK. Your signature will appear in the document.
Explore Sectigo’s Document Signing Certificate options for more information.
Organizations rely heavily on a remote workflow. Thanks to electronic and digital signatures, document approval can now be done more efficiently and are legally binding. Electronic signatures can be used in a variety of software, including Microsoft Word. The next segment will discuss how to create an e-signature in Word.
Click here to start signing with GMO Sign
How to create an electronic signature in Word
Most individuals and organizations use Word to create documents. Given the platform’s global popularity, the e-signature has become a more efficient form of getting approval and verification compared to wet ink signatures. Electronic signatures remove the requisite to print and send hardcopies before getting approvals.
Creating electronic signatures in Word is easy and can be applied in version 2007 up to the latest version, Office 365. Follow these steps to create e-signatures in Word:
- Place the cursor on your desired signature line or location.
- Go to the Insert Tab and click on “Signature Line.” Other versions of Word may require you to click “Signature List” under Text.
- Complete the necessary details such as Suggested Signer and Title. The signature line will appear.
- Right-click on the signature line and click “Sign.” You may:
- Select the image of your chosen signature;
- Type a printed version of the signature;
- Or draw a signature in a touchscreen device.

While electronic signatures promote efficiency and convenience in verifying documents and maintaining legal binding, the security and integrity of the document can still be questioned as validation is not performed on those signatures. These challenges are addressed by digital signatures.
For more secure signatures, click here
How do I create a digital signature?
A digital signature is a type of electronic signature that adds a security feature through encryption. It uses Public Key Infrastructure (PKI) that requires keys to be created and saved in a secure manner. Digital signatures also provide features such as timestamps to maintain the integrity of documents.
To digitally sign a Word document, the user must have a current digital certificate, typically issued by a Certificate Authority (CA). Certificate Authorities are third-party organizations that issue trusted certificates to other entities. GlobalSign is an example of a CA that makes digital signatures accessible to organizations via a seamless integration with Adobe Sign. After your organization accomplishes the identity verification processes, you may easily acquire certificates from GlobalSign and create signatures automatically within the trusted platform.
GlobalSign’s digital signatures can also be created using Microsoft Word. Follow these steps to create a visible digital signature in Word:
- Find where the signature is needed and insert a signature line.
- Add information about the signer (Name, Title, etc.).
- Right-click on the signature line and click “Sign.” You may upload an image of your signature.
- On the “Signing as” box, click change. Ensure that you choose the right digital certificate and populate the additional information required.
- Click “Sign” and fill in your password.
After successfully accomplishing these steps, the document is now saved with your visible digital signature. Any changes to the document will make sure your signature is invalid.
Cons of creating your own digital signature
Some organizations opt to create their own digital signatures by issuing personal certificates. However, choosing to create your own digital signature can potentially cause more harm than good to your business given the lack of security properties of personal certificates.
Personally-issued digital certificates may not serve the purpose of digital signatures. A digital signature is aimed to give the user and receiver an additional layer of security through encryption, making it easy to verify the identity of the sender. However, with own digital signatures, verification is a challenge.
Personally issued digital certificates are not automatically trusted by other users. Sharing digitally signed files require other people to manually trust the personal certificate. While CA-issued digital certificates follow a vetting process with different validation levels, own digital signatures lack this layer of authentication — making the organization susceptible to cyberattacks.
In addition, the expanding regulatory landscape is a challenge for users of unverified digital signatures. Unlike those issued by CAs, unverified digital signatures are not compliant with general and specific industry laws. Own digital signatures are also not members of AATL. Therefore, if you want your business to be fully secured and compliant, CA-issued digital signatures are best.
GMO Sign to digitally sign documents
Not all digital certificates are created equal. Your organization must choose the right platform that will make your workflow more secure and convenient. The main challenge in using digital signatures for organizations usually root from the huge volume of signatures necessary, which some providers cannot manage. On top of this, there are integration challenges to the applications your organizations use.
GlobalSign provides solutions for these challenges. We are a licensed Certificate Authority that issues Digital Signatures. With GMO Sign, businesses can enjoy a cloud-based electronic signing solution, that is easily scalable to organization requirements, whether you are a small enterprise or a global company. This product is also easily integrated to document signing applications, allowing you to sign relevant documents electronically and digitally, even in Word or PDF. The software will guide you every step of the way.
GMO Sign comes with various security features. Aside from standard encryption using public and private keys, GMO Sign offers timestamping, long-term validation, and a clientless interface that further verifies the integrity of the document. These digital signatures are also compliant with different legislations.
On top of digital signing, GMO Sign also offers cloud-based document management and storage – from registration, document search, contract renewal management, and browsing restrictions. GlobalSign is here to offer a solution that extends beyond document signing, ensuring an optimal workflow for your organization.
For a more convenient and secure flow, click here to speak to us today or send us an email at sales-apac@globalsign.com.
Microsoft Office digital signature provides users with ability to verify a document’s integrity. So the article is about to tell how to digitally sign a document in Microsoft Word.
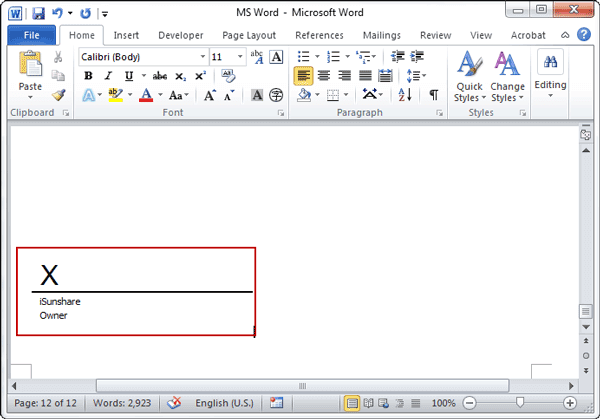
Step 1: Place your pointer in the location in your document where you want to add a signature line.
Step 2: On the Insert tab, in the Text group, point to the arrow text Signature Line, and then click Microsoft Office Signature Line.
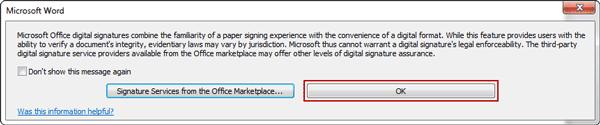
If there is a message popping up, click OK.
Step 3: In the Signature Setup dialog box, type information about the person who will be signing on this signature line. This information is displayed directly beneath the signature line in the document.
- Type the signer’s name in the Suggested signer box.
- Type the signer’s organizational title in the Suggested signer’s title box.
- Type the signer’s e-mail address in the Suggested signer’s e-mail address box.
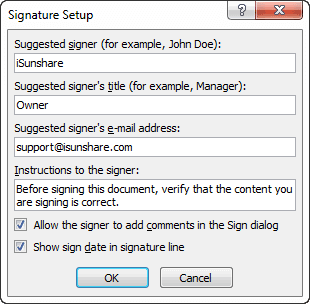
If you want to provide the signer with any other instructions, type these introductions in Instructions to the signer. These instructions are displayed in the Signature dialog box that the signer uses to sign the document.
If you want the signer to be able to add comments along with the signature, select the Allow the signer to add comments in the Sign dialog.
If you want to show the date when the signature is added in the signature line, select the Show sign date in signature line check box.
Step 4: Click OK.
Now you can see the signature you add in word document. Then you select a picture to use as your signature.
Step 5: Double click the signature line in document, and Sign dialog pops up.
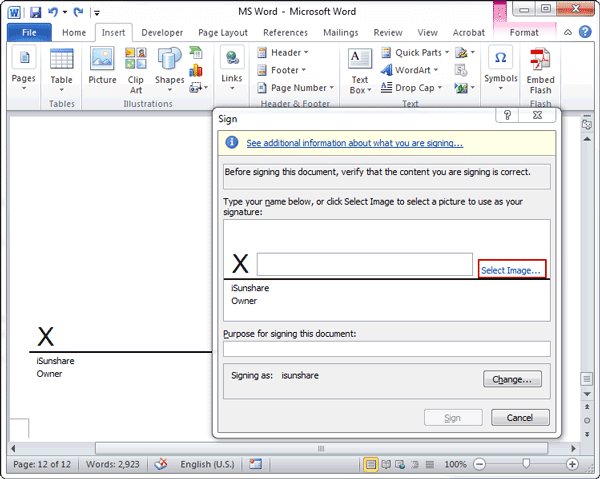
Step 6: In the Sign dialog box, click the Select Image next to empty box. And select a picture you want to use as signature. And then click Select.
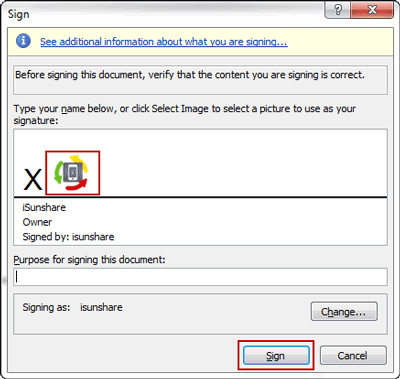
Step 7: The image will be shown in box. Click Sign in Sign dialog and click OK in Signature Confirmation dialog to complete the process to sign the signature line.
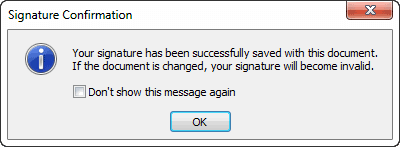
From then on and before removing signature, the document will be protected from editing.
Tips: If you want to remove signature from word document, you just need two steps.
1. Right click the signature on word document, and select “Remove Signature” in the context-menu. Signature image will be removed from signature.

2. Select the signature line on document, and delete it.
Related Articles:
- How to Sign a PDF File or Add Signature to PDF Document in Adobe Acrobat
- Remove Protection from Word 2013 Document
- How to Create Macros in MS Word 2010 and Run in New Document
Adding your signature or signing a document digitally is possible in different ways using Microsoft Word or other Office programs.
Before we start, let’s clarify some terminology because ‘signing a document’ can mean several things in the computer world:
- Adding a signature to a document. Inserting a copy of a human written signature into an electronic document. That’s what we’re covering in this article.
- Digitally signing or locking a document. A way of verifying that a document came from a specific source or author and has not been tampered with after sending. It’s possible to do that in Microsoft Word but most people don’t bother. And most people receiving a locked document would not understand either! It’s commonly used to verify VBA code and other digital media but not whole Office documents.
- Digital signing systems. There are various proprietary systems for ‘signing’ a document, the most common is Docusign. If a company wants you to ‘sign’ a document this way, they’ll send you a link and instructions.
- Email signature — the footer at the end of emails. That could include a picture of your ink signature.
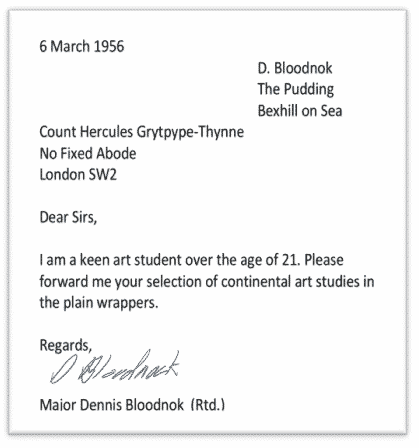
In this article we’ll explain your options for adding your human ‘ink’ signature to a letter like this:
- Word, Excel, PowerPoint and Outlook
- Add your signature directly
- Digital Ink
- Make a picture of your signature
- Write with a digital pen
- Take a photo
- More than one signature
- Cropping your signature image
Word, Excel, PowerPoint and Outlook
We’re going to focus on Microsoft Word since that’s where most signing happens. The same tools apply to Excel worksheets, Outlook emails and PowerPoint slides.
Add your signature directly
Let’s start with ways to write your signature directly into a Word document. This is possible in modern Word and Office with ‘digital ink’ features.
Digital Ink
If you have an iPad, tablet or smartphone with a ‘pen’ then it’s possible to write your signature onto a Word document.
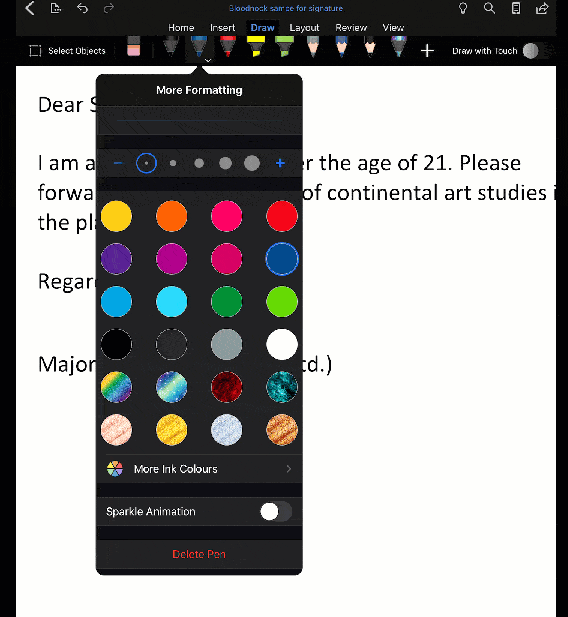
Open the document in the Word app, go to the Draw tab and choose a pen thickness and color. Then write your usual signature into the document.
If you have a touch screen, you can try ‘writing’ on the screen with your fingertip. It’s a little clumsy but might be enough.
Make a picture of your signature
You need a picture of your signature to paste into documents. There are a few ways to do that, depending on the devices and tools available.
Let’s look at the options in order of image clarity.
Write with a digital pen
Similar to writing into a document above. If you have a device with a digital pen (e.g. Apple Pencil or other drawing tool) write your signature, then take a picture of the screen.
Open the Word app or some other app which accepts drawing of some sort.
Write your signature on the screen, erase and try again until you’re happy with it. Remember this is a ‘keeper’ that you can use on any future documents.
Once you’re happy, take an image of the screen with your signature. See Taking screenshots – Windows, Mac and more which covers iPhone, iPad and Android screen image shortcuts too.
If necessary, transfer the screen image to another computer. Modern Camera Roll tools in OneDrive and Dropbox should do that for you automatically.
Or save the document or image from the app it was made in.
You’ll end up with an image showing the entire screen. It’ll need a little cropping, more on that below.
Take a photo
Write your signature on a piece of paper, preferably clean white paper for a good image. Then take a photo with your smartphone or camera.
Try to get a clean image on a plain white background with even lighting.
We suggest writing in blue ink, so your image is obvious and stands out a little from the black text in the letter or document. A digital signature in black doesn’t stand out as much as a real ink signature with a black pen.
Take the photo and transfer it to your computer for cropping.
More than one signature
While you’re preparing images of your signature, do you have multiple signatures to make images of?
Some people have a casual signature for informal occasions, personal letters, billet-doux etc. Another version for formal letters, contracts etc.
By all means, get signature images of both or all!
Cropping your signature image
However you made your signature image, it’ll need some cropping before it’s ready for use. This is a part of the process most ‘digital signing’ tips leave out.
Do it right and you’ll have a useable signature that’ll last you for years.
The main point here is to crop TIGHTLY. Leave very little white space around the sides of your signature. That will make it a lot easier to position later.
Insert the image into a Word document, other Office program or an image editor. Here’s our iPad screen shot from the Word app.

Use a cropping tool to trim all the excess around the signature. In Office, Picture Format | Crop.

See how closely we’re cropping around the signature?

Here’s our final signature image, with a border so you can see how tight the cropping is. Your signature image should be clean with no border.

How to become a doctor with Microsoft Word
Signatures for all occasions in Outlook
Outlook Signatures to be synced – at last!
In our world of remote offices and geographically-diverse teams, an eternal question rises above the rest: how do I sign a Word document without printing it first?
Signing a Word document digitally is an important skill to learn; signatures confirm the authenticity of your identity and make sealing the deal convenient for all parties involved. Signing Word documents is fairly easy, even without a tablet or stylus.
In this article, we’re going to show you how to sign a Word document electronically. You’ll first create an electronic signature and then add it to a Microsoft Word document.
1. How Do I Write My Signature on a Word Document?
If you prefer putting a personalized touch on your Word documents, opt for a handwritten signature. In this example, we’re going to learn how to sign a Word document electronically with a scanned version of your signature.
To sign a document in Word, you’ll first need to sign a white piece of paper. Then, scan the image and import it into your computer. Once the picture appears on your screen, you can adjust it or crop it with an image editor.
When you’re satisfied, save the image as a JPG, GIF, or PNG. Then, go to the Insert menu at the top of Microsoft Word and click Pictures.

Choose your scanned signature from your files and click Insert; the electronic signature appears in the Word document. Resize it as needed, then Save the document.
2. How to Sign in Word With an Extended Electronic Signature
We’ve all received email with an entire business card serving as the sender’s “signature”. Can you sign a Word document electronically with more information included in this style?
Signing in Microsoft Word hardly needs to stop at your handwritten signature, plain and simple. You can also add your job title, contact details, or similar information with a built-in Word feature, as well.
Using the method described above, insert your scanned signature into the document. Type the desired text underneath it.
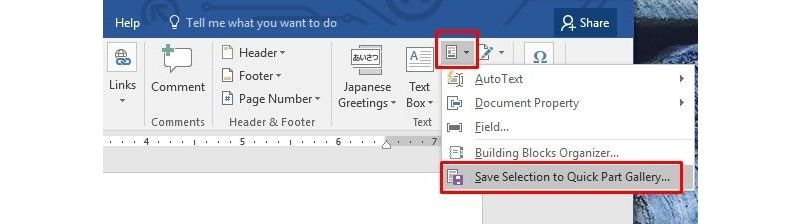
Use your mouse to select the added text and the signature. Then, click the Insert menu at the top of Microsoft Word and pick Quick Parts from the Text part of the panel.
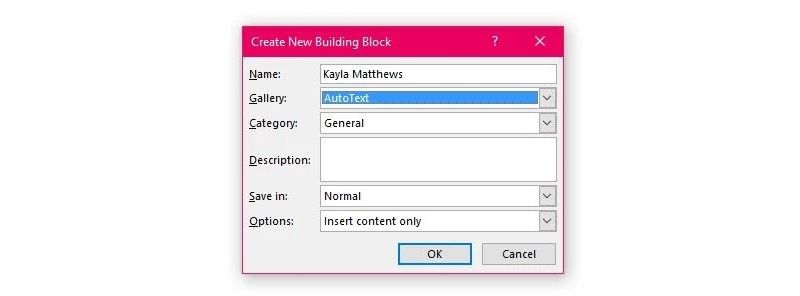
From there, choose Save Selection to Quick Part Gallery. This opens a Quick Part Gallery dialogue box that says Create New Building Block on top.
Enter the appropriate name in the first box. Choose AutoText from the Gallery dropdown box below it. Then, click OK. You can leave the other boxes as they appear.
How do I write my signature on a Word document? To use your newly-enhanced signature in Word, click your desired insertion point in the document, then go to the Insert menu. Choose Quick Parts, then AutoText. Clicking the AutoText option generates a menu of all of your custom electronic signature elements. Choose the one that you want by clicking on its name.
3. How to Sign on Microsoft Word With the HelloSign Application
HelloSign is an electronic signature application that makes signing a Word document easy. In addition to Word compatibility, it works with other kinds of Microsoft files, as well as PDFs.
How do I write my signature on a Word document with HelloSign? Is HelloSign free to use? There are pricing tiers, but there is also a free option available, too.

The complimentary version gives access to one document signer. It also lets you put a free electronic signature in Word on three documents per month. Google Drive integration and status notifications are other perks included with the free package.
4. How to Sign a Word Document With Google Docs Add-Ons
Another quick way to sign a Word document is to upload the document to Google. When you do so, you can use Google Docs to insert a signature into the file.
HelloSign can also work directly with Google Docs via an add-on for the program. To use the add-on, just download it from the add-ons store within Google Docs.
After activating it, you can draw a new signature or choose a saved version. Rest assured, all documents signed on Google Docs also show up in the website version of HelloSign.
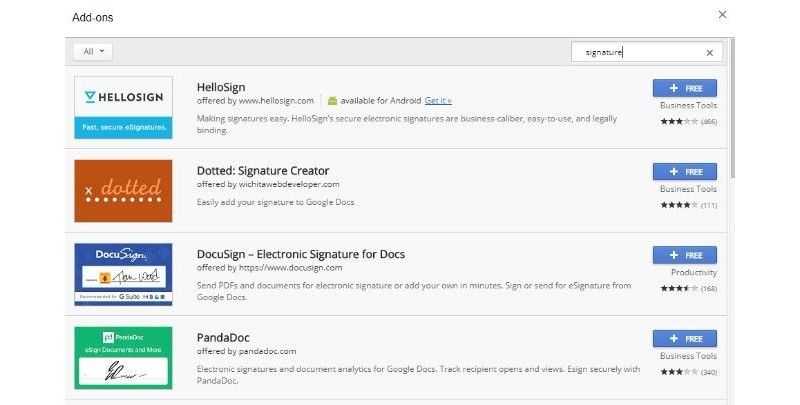
If you want to try a different digital signature add-on, there are plenty of others to choose from. To find them, just click the Add-ons tab in a Google Document and select Get add-ons.

Type the word “signature” or a related word in the search box of the add-ons store and hit Enter. Your options will be displayed.
5. How to Sign a Document in Word by Converting Your Word File to a PDF
You may be wondering: how do I add a signature to a Word document by converting it? You can unlock even more options for signing Word documents by saving your Word document as a PDF.
To do so, open your Word document, go to File > Save As. Click the Save as Type drop-down menu and select PDF. This process will be the same on either a Windows or on a Mac.
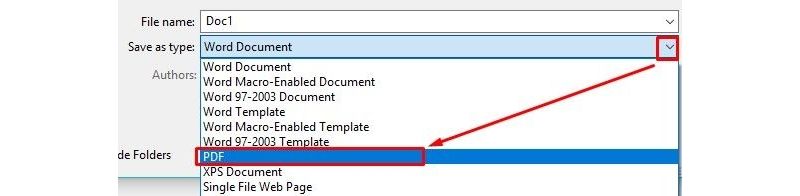
Now, you’re all set to sign a Word document electronically using the methods discussed below.
How to Sign Something in Word With DocHub
DocHub is an online signature service that works with PDF documents. If you’re interested in learning how to sign a Word doc electronically but need the signatures to carry some weight, DocHub supports legally binding electronic signatures.
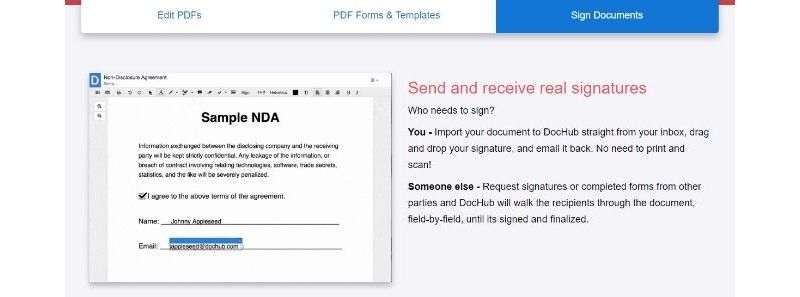
DocHub works on the Android and iOS platforms, but does not offer dedicated apps. To use the app on a mobile device, go to the DocHub website using the Safari or Chrome browser on your smartphone or tablet. Then, log into your account. From there, look for the Sign menu and tap it. Choose your digital signature from the list; touch any part of the document to insert it.
You can also make new signatures on a touchscreen device. Simply use your finger to draw the signature on the screen. It becomes part of the Sign menu, so you can easily insert it into a new document.
How Do I Sign a Word Document With Preview on a Mac?
If you’re a Mac user, Preview is an integrated application that allows you to sign documents electronically. Save your document as a PDF and open it in Preview.
Click the Toolbox icon, then the Signature icon. Next, click Create Signature, then Click Here to Begin. Click the Trackpad tab at the top of the box. You can also use the Camera tab for a picture of a signature, but that’s a less precise option.
With the Trackpad tab selected, use your finger to draw the signature on your trackpad. Then, click the Done button. Clicking on the signature inserts it into the document; you can resize or move it, too. Can you sign a document in Word any quicker? We think not, and we have only Apple to thank for that.
Add a Signature to a Word Document Professionally
When meeting up in person just isn’t feasible, signing a Word document digitally simply must suffice. Thankfully, signing in Microsoft Word has never been easier.
You now have several options for adding an electronic signature to a Microsoft Word document. Although some require saving it as a PDF first, all are easy to manage when there’s business to attend to.