
Word for Microsoft 365 Outlook for Microsoft 365 Word 2021 Outlook 2021 Word 2019 Outlook 2019 Word 2016 Outlook 2016 Word 2013 Outlook 2013 Word 2010 Outlook 2010 Word 2007 Outlook 2007 More…Less
You can change the spacing between characters of text for selected text or for particular characters. In addition, you can stretch or compress an entire paragraph to make it fit and look the way that you want it to.
Change the spacing between characters
Selecting Expanded or Condensed alters the spacing between all selected letters by the same amount. Kerning alters the spacing between particular pairs of letters — in some cases reducing and in other cases expanding the space depending upon the letters.
Expand or condense the space evenly between all the selected characters
-
Select the text that you want to change.
-
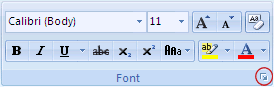
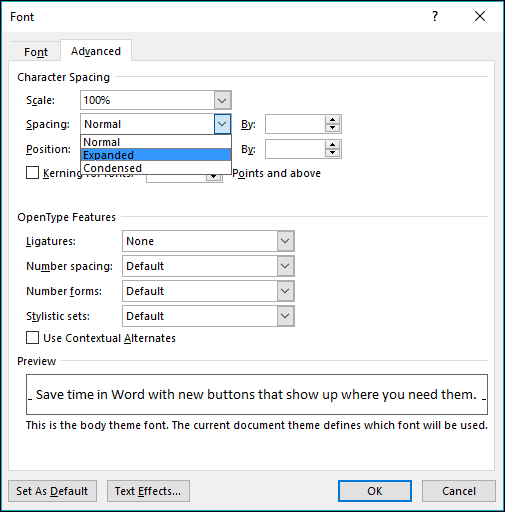
On the Home tab, click the Font Dialog Box Launcher, and then click the Advanced tab.

Note: If you’re using Word 2007 the tab is called Character Spacing.
-
In the Spacing box, click Expanded or Condensed, and then specify how much space you want in the By box.
Kern the characters that are above a particular size
Kerning refers to the way spacing between two specific characters is adjusted. The idea is to give a better looking result by reducing the spacing between characters that fit together nicely (such as «A» and «V») and increasing the spacing between characters that don’t.
-
Select the text that you want to change.
-
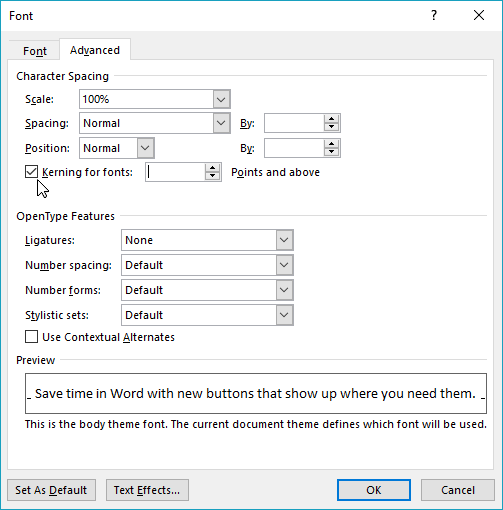
On the Home tab, click the Font Dialog Box Launcher, and then click the Advanced tab.
Note: If you’re using Word 2007 the tab is called Character Spacing.
-
Select the Kerning for fonts check box, and then enter the point size in the Points and above box.
Stretch or scale the text horizontally
When you scale the text, you change the shapes of the characters by percentages. You can scale text by stretching it or by compressing it.
-
Select the text that you want to stretch or compress.
-
On the Home tab, click the Font Dialog Box Launcher, and then click the Advanced tab.
Note: If you’re using Word 2007 the tab is called Character Spacing.
-
In the Scale box, enter the percentage that you want.
Percentages above 100 percent stretch the text. Percentages below 100 percent compress the text.
Change the line spacing
To increase or decrease the amount of vertical space between lines of text within a paragraph, the best method is to modify the style the paragraph uses.
-
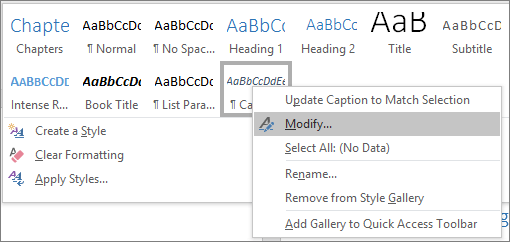
Find the style you’re using in the Styles gallery on the Home tab.
-
Right-click the style you want to change and select Modify.
-
Near the center of the dialog box you’ll find the line spacing buttons that let you select single, 1.5x or double spaced. Choose the spacing you want to apply and click OK.
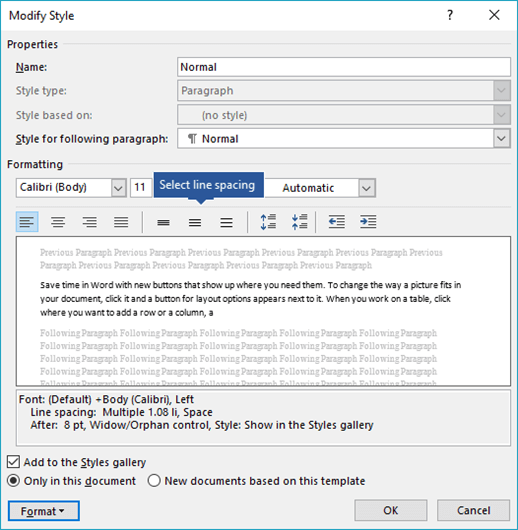
If you’d like to apply more specific line spacing to the style, clickthe Format button at the bottom left corner of the Modify Style dialog box and select Paragraph. The Line spacing drop-down lets you select or set more specific line spacing.
For more information on modifying styles in Word, see: Customize styles in Word.
See also
-
Using Styles in Word — a free, 10-minute video training course.
-
Change the font size
-
Set page margins
-
Align text left or right, center text, or justify text on a page
-
Change the line spacing in Word
Do you have a question about Word that we didn’t answer here?
Post a question in the Word Answers Community.
Help us improve Word
Do you have suggestions about how we can improve Word? Let us know by providing us feedback. See How do I give feedback on Microsoft 365? for more information.
Need more help?
While typing word documents, you usually separate words and sentences by pressing the Space key (also known as Spacebar), which inserts a regular general-purpose space character. However, some Microsoft Word documents may contain other kinds of spaces. You can discover those white-space symbols during editing the document but not on printing.
To show non-printable and white-space symbols in Microsoft Word, click the button button Show/Hide ¶ (or pressing Ctrl+* or Ctrl+Shift+8):

You will be able to see the following marks for white-space characters:
1) A little dot between words represents a normal space (also called word space):

A general rule of publishing is to use only one normal space between words (the only exception is a pre-formatted text, e.g., code listings). If you need to align text at fixed positions of the line, use
tabs and tab stops.
2) A degree symbols between word represents a nonbreaking space (also called non-breaking space, no-break space, non-breakable space (NBSP), hard space, or fixed space) that prevents text wrapping at the end of the line. A Nonbreaking space in the Word document looks like:
![]()
A general rule of publishing is to use non-breaking spaces between words of
organization and person names, postal addresses, etc.
Some popular rules:
- Insert a nonbreaking space between the copyright symbol and the following year(s) to ensure they will not end up on different lines or pages. For example:

- Insert a nonbreaking space before and after ellipses (also called a suspension point, points of ellipsis, periods of ellipsis, or even «dot-dot-dot» is a sequence of three dots used to indicate an omission in quoted material). For example:

3) A little dot with varying gaps before and after the dot represents Em Space and En Space. These spaces have different widths on printing:
- Em space is a space with the width of the lowercase m character.
- En space is a space with the width of the lowercase n character.
4) A vertical bar between words represents a ¼ Em space (also known as mid-space) is a space with the ¼ width of the lowercase m character:
![]()
If you want to see only space marks and no other non-printable symbols, do the following:
1. On the File tab, click the Options button:

2. In the Word Options dialog box, on the Display tab, under Always show these formatting marks on the screen, check or uncheck the Spaces option:

See also this tip in French:
Types d’espaces spéciaux dans les documents Word.
You can use Microsoft Word’s Find and Replace tool to delete extra spaces all at once. Or, you can find extra spaces in Word by customizing your proofing options and then deleting them individually as you type or during a Spelling & Grammar check. These three tasks are explained in this tutorial:
Customize Word’s Proofing Options to Find Extra Spaces
Delete Extra Spaces as You Type
Delete Extra Spaces during a Spelling & Grammar Check
This tutorial is also available as a YouTube video, which you can watch on my YouTube channel or in the video player at the bottom of this page.
The images below are from Word for Microsoft 365. The steps are the same for Word 2021, Word 2019, Word 2016, Word 2013, and Word 2010. However, your interface may look slightly different in those older versions of the software.
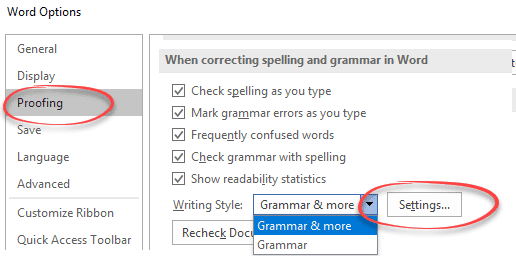
1. Select the File tab.

2. Select Options in the Backstage view.

3. Select Proofing in the Word Options dialog box.

4. Ensure that Mark grammar errors as you type and Check grammar with spelling are selected in the spelling and grammar section. (Note that Word for Office 365 no longer includes the “Check grammar with spelling” option and instead includes grammar by default.)

5. Select the Settings button in the spelling and grammar section.

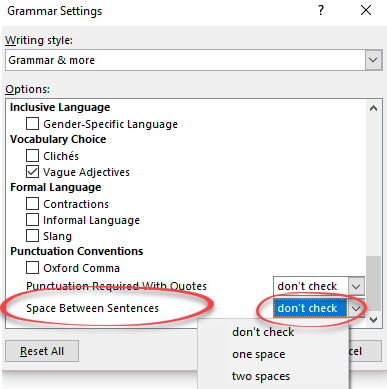
6. Select Spacing in the Grammar section of the Options menu in the Grammar Settings dialog box. (This option flags extra spaces between words, not between sentences.)

7. Select one space in the Space Between Sentences drop-down menu in the Punctuation Conventions section.

8. Select the OK button to close the Grammar Settings dialog box.

9. Select the OK button to close the Word Options dialog box.

Once you have customized your proofing options, Word will flag extra spaces as you type.
Extra spaces between sentences will be marked with a red dotted line. Extra spaces between words will be marked with blue double lines.
1. Right-click on the extra space mark (the red dotted line or blue double lines).

2. Select the correction from the pop-up menu.

Pro Tip: Select See More to open the Editor pane. Or, select Options for “Grammar” or Options for “Punctuation Conventions” to reopen the Grammar Settings dialog box.
Note that the Spelling & Grammar check won’t find extra spaces until you customize your proofing options.
1. Select the Review tab.

2. Select Spelling & Grammar in the Proofing group.

3. Select each spacing correction in the Suggestions section of the Editor pane.

Pro Tip: If Word finds an extra space that you want to keep, select Ignore Once at the bottom of the Editor pane.
Further Reading: How to Find and Replace Formatting in Microsoft Word
Updated November 09, 2021
Lesson 9: Line and Paragraph Spacing
/en/word/indents-and-tabs/content/
Introduction
As you design your document and make formatting decisions, you will need to consider line and paragraph spacing. You can increase spacing to improve readability and reduce it to fit more text on the page.
Optional: Download our practice document.
Watch the video below to learn how to adjust line and paragraph spacing in your document.
Line spacing
Line spacing is the space between each line in a paragraph. Word allows you to customize the line spacing to be single spaced (one line high), double spaced (two lines high), or any other amount you want. The default spacing in Word is 1.08 lines, which is slightly larger than single spaced.
In the images below, you can compare different types of line spacing. From left to right, these images show default line spacing, single spacing, and double spacing.

Line spacing is also known as leading (pronounced to rhyme with wedding).
To format line spacing:
- Select the text you want to format.

- On the Home tab, click the Line and Paragraph Spacing command, then select the desired line spacing.

- The line spacing will change in the document.


Adjusting line spacing
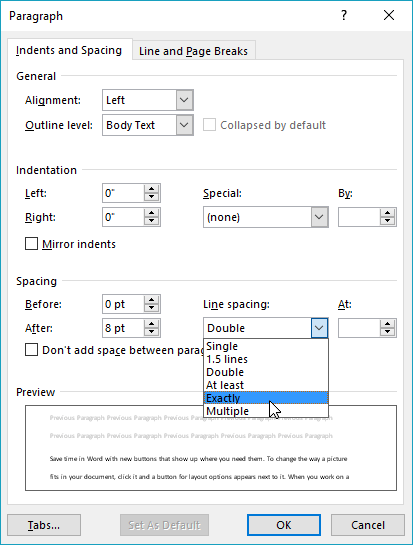
Your line spacing options aren’t limited to the ones in the Line and Paragraph Spacing menu. To adjust spacing with more precision, select Line Spacing Options from the menu to access the Paragraph dialog box. You’ll then have a few additional options you can use to customize spacing.
- Exactly: When you choose this option, the line spacing is measured in points, just like font size. For example, if you’re using 12-point text, you could use 15-point spacing.
- At least: Like the the Exactly option, this lets you choose how many points of spacing you want. However, if you have different sizes of text on the same line, the spacing will expand to fit the larger text.
- Multiple: This option lets you type the number of lines of spacing you want. For example, choosing Multiple and changing the spacing to 1.2 will make the text slightly more spread out than single-spaced text. If you want the lines to be closer together, you can choose a smaller value, like 0.9.


Paragraph spacing
Just as you can format spacing between lines in your document, you can adjust spacing before and after paragraphs. This is useful for separating paragraphs, headings, and subheadings.
To format paragraph spacing:
In our example, we’ll increase the space before each paragraph to separate them a bit more. This will make it a little easier to read.
- Select the paragraph or paragraphs you want to format.

- On the Home tab, click the Line and Paragraph Spacing command. Click Add Space Before Paragraph or Remove Space After Paragraph from the drop-down menu. In our example, we’ll select Add Space Before Paragraph.

- The paragraph spacing will change in the document.


From the drop-down menu, you can also select Line Spacing Options to open the Paragraph dialog box. From here, you can control how much space there is before and after the paragraph.

You can use Word’s convenient Set as Default feature to save all of the formatting changes you’ve made and automatically apply them to new documents. To learn how to do this, read our article on Changing Your Default Settings in Word.
Challenge!
- Open our practice document.
- Select the the date and the address block. This starts with April 13, 2016, and ends with Trenton, NJ 08601.
- Change the spacing before the paragraph to 12 pt and the spacing after the paragraph to 30 pt.
- Select the body of the letter. This starts with I am exceedingly and ends with your consideration.
- Change the line spacing to 1.15.
- When you’re finished, your page should look like this:


/en/word/lists/content/
Is there one space or two between sentences? Word lets you check the sentence spacing or ignore it completely.
It’s a useful option for those of us who learnt on manual typewriters where double sentence spacing was standard. Switching to single spacing is hard for your fingers to remember.
One Space or Two
People can get very exercised about sentence spacing. Maybe it depends on what you were taught at school?
The trend has been towards single spacing but many of us were double spacing when we were taught to type.
Most style guides including the Chicago Manual of Style and Oxford Style Manual recommend single spacing.
Whichever you choose, Word can check for you.
Global Setting
The setting for sentence spacing is a Word global setting. It applies to all documents opened in Word.
There’s no way to change the sentence spacing check at the document, style or paragraph level.
For most people that’s not a problem. However, some might have clients or specifications for different documents. Anyone in that situation has to change the Word setting manually each time.
Microsoft 365 / Office 365
In Word 365 if the spacing setting isn’t correct, there’s a brown dotted line.

Right-click on the dotted line to see the options under ‘Punctuation Conventions’.

Click on the fullstop/period, question mark or exclamation to change the spacing.
Ignore Once – will leave this spacing unchanged.
Don’t check for this issue – changes the sentence spacing for ALL documents, not just the current document. The global Word setting is returned to ‘Don’t Check’. This isn’t made clear at all.
Options for ‘Punctuation Conventions’ – takes you to the Grammar & more settings.
Settings
Go to Options | Proofing | Writing Styles. Select ‘Grammar & more’ then Settings.
Word for Mac: Preferences | Spelling & Grammar | Writing Style | Grammar and More | Setting.
Scroll down to the bottom of the settings to see ‘Space between sentences’.
Don’t Check – the default.
One space – a single space between sentences.
Two spaces – two spaces
Before you ask … we don’t know why the most commonly changed grammar settings (Oxford Comma, Punctuation Required with Quotes and Space Between Sentences) are at the very bottom of the list. They were at the top of the list in past versions of Word, so this must be a deliberate, though mysterious decision.
Word 2019, 2016, 2013, Word 2010 and before …
In earlier versions of Word the look is a little different but the result is the same.
The blue squiggly line marks an incorrect sentence spacing.

Right-click on the blue line to see the options which aren’t very clear.

You’re forgiven for wondering what caused the blue squiggly line.
Click on the period/fullstop, question mark, exclamation to change the sentence spacing.
Ignore Once – will leave this spacing unchanged.
Grammar … – opens the Grammar settings
The settings are the same but a little more accessible.
Go to Options | Proofing | Writing Styles. Select ‘Grammar & Style’ then Settings.

1 – a single space between sentences.
2 – two spaces
don’t check – the default.
Change single space after sentence to double space in Word
Change sentence space after fullstop/period in Word
Now Word wants to Rewrite your sentences