
This tutorial shows how to create headings in Microsoft Word. First, we’ll look at how to create headings using Word’s built-in styles. Then, we’ll look at how to customize Word’s built-in heading styles to your preferred font, font size, alignment, and color.
Table of Contents
- How to Create Headings Using Word’s Built-In Heading Styles
- How to Customize Word’s Built-In Heading Styles
Before jumping to the tutorial, let’s discuss the importance of using Word’s heading styles.
Why Are Heading Styles Important?
You can make any text in Word look like a heading by using a large font size. However, you won’t have access to several important features if you use a large font size rather than Word’s official heading styles. For example, Word’s heading styles help you perform the following tasks:
- Create an automatic or custom table of contents
- Create bookmarks in a PDF using Adobe Acrobat
- Use Word’s outline feature
- Use Word’s Navigation pane
Most importantly, screen reading software can identify your heading hierarchy based on Word’s styles. If you only use a large font size for headings, people who use screen readers will have less information about how your document is organized.*
This tutorial’s companion video shows all the steps in real time.
Watch more than 200 other writing-related software tutorials on my YouTube channel.
The images below are from Word for Microsoft 365. The steps are the same in Word for Microsoft 365 for Mac (a.k.a., Word for Mac), Word 2021, Word 2019, and Word 2016, and similar in Word 2013 (PC only).
How to Create Headings Using Word’s Built-In Heading Styles
The following steps show how to create headings using Word’s built-in styles.
- Select the text you want to turn into a heading. (Or, move your cursor to a blank line where you want to type your new heading during the next step.)

- Select the Home tab in the ribbon.

- Select the appropriate heading level in the Styles group. (If you didn’t select existing text during step 2, type your new heading text after making your selection.)

Pro Tip: Word includes nine heading levels, although only a few will appear in your Styles group when you open a new document. Additional heading levels will appear after you use higher-level headings. For example, Heading 3 will appear after you use Heading 2.
The selected text will be formatted with the new heading style immediately.

- Deselect the heading and then press Enter (PC) or Return (Mac) on your keyboard to move your cursor to the next line. The heading formatting will automatically turn off.
5. Save your file to save your new heading.
How to Customize Word’s Built-In Heading Styles
The following steps show how to customize the built-in heading styles in an individual Word document.
There are many ways to change styles in Word. For this tutorial, we’ll stick with the basics: font, font size, emphasis (i.e., bold, italic, or underlined), color, alignment, spacing, and indentation.
- Select the Home tab in the ribbon (see figure 1).
- Right-click (PC) or Control-click (Mac) the heading level in the Styles group, and then select Modify from the shortcut menu.

- Make all necessary formatting changes in the Modify Style dialog box. Here are the eight basic modifications:
A. Font
B. Font size
C. Emphasis
D. Font color
E. Alignment
F. Line spacing
G. Spacing before and after
H. Indentation

- (PC Users) Select Only in this document to ensure that your customized style is limited to your current document.

- (Mac Users) Ensure that Add to template is not selected to limit your customized style to your current document.

- Ensure that Automatically Update is not selected. (If Automatically Update is selected, you won’t be able to edit the styles of individual same-level headings.)

- Select the OK button.

Your changes will be applied to all existing text using the heading style you just customized.
- Save your file to save your changes.
Related Resources
How to Create Run-In Headings in Microsoft Word (Indented & Left-Aligned)
What Is Headline-Style Capitalization?
How to Capitalize Hyphenated Words in Titles and Headings
*Visit “Make Your Word Documents Accessible to People with Disabilities” from the Microsoft Office Support website for an in-depth list of ways to make your document accessible to the widest audience.
Updated March 18, 2023
Apply and Customize Headings in Word Documents
by Avantix Learning Team | Updated April 19, 2022
Applies to: Microsoft® Word® 2010, 2013, 2016, 2019, 2021 or 365 (Windows)
You can create headings in Microsoft Word documents by applying Word’s built-in heading styles (such as Heading 1 or Heading 2). After you have applied styles, you can modify them and change the font, size, color, and other formatting attributes so the entire document will update. Once you have applied heading styles, you’ll be able to navigate to the headings using the Navigation Pane and create a table of contents.
Recommended article: How to Hide Comments in Word (or Display Them)
Do you want to learn more about Microsoft Word? Check out our virtual classroom or in-person classroom Word courses >
Heading styles are very important because they create structure in your documents and are readable by screen readers or assistive technology programs used by people with vision impairments. They can also save you a lot of time formatting and reformatting documents.
In addition to creating structure, heading styles are also used to:
- Generate a table of contents
- Reformat a document using Style Sets
- Navigate using the Navigation Pane (select Navigation Pane on the View tab in the Ribbon)
- Rearrange a document using the Outline View
- Create a structured PDF (portable document format) file with heading tags
Note: Screenshots in this article are from Word 365 but are very similar in previous versions of Word.
Creating headings by applying Word heading styles
To create or designate headings, you will need to apply the built-in heading styles in order (Heading 1, Heading 2, Heading 3, and so) to paragraphs. There are 9 levels of headings available in Word.
Heading styles are technically available as paragraph and character styles, but it’s important to apply them as paragraph styles to entire paragraphs. A paragraph in Word is anything with a hard return after it (you have pressed Return or Enter).
Heading styles are affected by your theme choices (overall theme, color theme, and font theme). You can change theme options using the Design tab in the Ribbon.
To create headings by applying heading styles:
- Click in the paragraph (title or subheading) you want to designate or format as a heading.
- Click the Home tab in the Ribbon.
- Click the heading style you want in the Styles Gallery (such as Heading 1) in the Style group. You may need to click the More arrow on the bottom right of the Styles Gallery to view more styles and then click the style you want to use.
All available heading styles do not appear initially in the Styles Gallery. When you apply a heading level (such as Heading 3), an additional heading level should appear in the Gallery (such as Heading 4).
The Styles Gallery appears on the Home tab in the Ribbon and typically displays top level headings:

If you click the More arrow on the bottom right of the Styles Gallery, an expanded gallery appears:

Modifying or customizing heading styles using the Styles task pane
If you modify heading styles, every instance of the modified style will change in your document. Not only will this save time, but it will also ensure consistency. There are many ways to customize heading styles in Word. In this article, we will modify heading styles using the Styles task pane.
The Styles task pane appears with styles in the document (you can change this display by clicking Options at the bottom of the task pane):

To modify or customize a heading style:
- Click the Home tab in the Ribbon.
- Click the dialog box launcher (diagonal arrow) on the bottom right in the Styles group. You can also press Ctrl + Alt + Shift + S. The Styles task pane will appear. If the task pane is floating, double-click the title bar.
- Click in a paragraph using the style you want to modify.
- Click the arrow to the right of the heading you want to modify in the Styles task pane and then select Modify from the drop-down menu. You can also right-click the heading style in the task pane and select Modify. A dialog box appears.
- In the Modify Style dialog box, select the desired options such as font, font size, font color, alignment, and line spacing. Buttons in this dialog box are comparable to those in the Ribbon.
- If you want to change some other formatting options (such as paragraph formats), select Format at the bottom of the dialog box and select other options from the drop-down menu.
- Select Only in this document so that the style is modified in the current document only.
- Do not select Automatically Update unless you want the document styles to update when a user changes heading formatting in the document. It’s typically best to leave this option unchecked.
- Click OK or press Enter. The entire document will change unless a heading has been manually formatted (which overrides the style). You can simply reapply the style if this occurs.
The Modify Styles dialog box displays the style name, the type of style and options for modifying the style:

When you save the document, the modified styles are also saved.
Styles are the most important formatting feature in Word to automate formatting in longer documents. Heading styles also have the added benefit of creating structured documents and are integrated with several other Word features such as generated tables of contents.
This article was first published on May 15, 2021 and has been updated for clarity and content.
Subscribe to get more articles like this one
Did you find this article helpful? If you would like to receive new articles, join our email list.
More resources
How to Create a Table of Contents in Word
14+ Word Selection Shortcuts to Quickly Select Text
How to Copy Styles Between Microsoft Word Documents Using the Organizer
How to Insert Reusable Text Snippets in Word with Quick Parts (Great Timesaver)
How to Convert a PDF to Word in Microsoft Word (for Free – No Third Party Programs Needed)
Related courses
Microsoft Word: Intermediate / Advanced
Microsoft Excel: Intermediate / Advanced
Microsoft PowerPoint: Intermediate / Advanced
Microsoft Word: Long Documents Master Class
Microsoft Word: Styles, Templates and Tables of Contents
Microsoft Word: Designing Dynamic Word Documents Using Fields
VIEW MORE COURSES >
To request this page in an alternate format, contact us.
Our instructor-led courses are delivered in virtual classroom format or at our downtown Toronto location at 18 King Street East, Suite 1400, Toronto, Ontario, Canada (some in-person classroom courses may also be delivered at an alternate downtown Toronto location). Contact us at info@avantixlearning.ca if you’d like to arrange custom instructor-led virtual classroom or onsite training on a date that’s convenient for you.
Copyright 2023 Avantix® Learning
Microsoft, the Microsoft logo, Microsoft Office and related Microsoft applications and logos are registered trademarks of Microsoft Corporation in Canada, US and other countries. All other trademarks are the property of the registered owners.
Avantix Learning |18 King Street East, Suite 1400, Toronto, Ontario, Canada M5C 1C4 | Contact us at info@avantixlearning.ca
Style is essential to making a strong first impression. Admittedly, this usually applies to fashion rather than formatting. But in the academic realm, you’ll win more points for applying clear and consistent heading styles in a document than for wearing a fancy outfit.

And since a well-formatted document is vital for clarity as well as grabbing the reader’s attention, today we’re taking a look at how to apply heading styles in Microsoft Word.
Using Headings
The ‘Headings’ styles in Microsoft Word are formatting options for making headings and subheadings stand out from the other text in your essay. This will help your reader, particularly in longer essays, by clearly indicating where different sections begin and end.
Microsoft Word actually comes with a number of default heading styles (named ‘Heading 1’ through to ‘Heading 9’). You can use these as you find them, but you may also need to change them to fit with any specific requirements for headings set out in your style guide.
But how should you use these headings? Like so:
Find this useful?
Subscribe to our newsletter and get writing tips from our editors straight to your inbox.
- Go to the ‘Styles’ section of the ‘Home’ tab on the main ribbon
- Select the text you’re using as a heading and click on the appropriate ‘Heading’ style (e.g. ‘Heading 1’, ‘Heading 2’, etc.)

- If the required style is not visible in the ‘Styles’ tab, click the little arrow in the bottom right to open a side menu with further options
- If the required ‘Style’ still isn’t visible, click ‘Options…’ in the side menu and make sure ‘All styles’ is selected under ‘Select Styles to Show’, then click OK

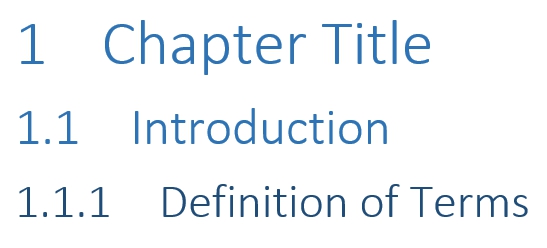
- Once the correct heading styles show in the menu, select the text you want to format and apply each heading and subheading accordinglyBe sure to use different styles to distinguish between different ‘levels’ of heading, since the formatting style of chapter titles should be distinct from those used for section or subsection headings: e.g. use ‘Heading 1’ for the main headings, then ‘Heading 2’ for the next level down, and ‘Heading 3’ for subsections, etc., being careful to apply each style consistently.


Numbered Headings
If you want to use numbered headings, Microsoft Word’s multilevel list options are very useful. This will apply numbering to titles and subtitles whenever a ‘Heading’ style is used, thereby ensuring clear and consistent numbering for all headings in your document.
 To do this, you’ll need to:
- Apply different heading styles to your document for each level of heading
- Click on the ‘Multilevel List’ button in the ‘Paragraph’ section of the ‘Home’ tab
- Select one of the list styles that refers to headings

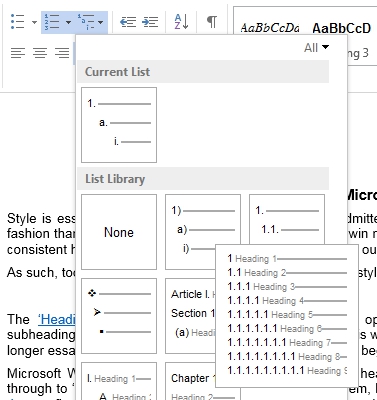
This will apply a different numbering level to each heading style, while you can also modify and create multilevel list styles via the ‘Multilevel List’ menu.
This numbering will also update automatically if you add or remove headings, saving you the effort of re-numbering headings manually.
 When I first wrote this blog post, Word 2003 was still the predominant version of the program, more commonly used than Word 2007. (And Word 2010 was just a gleam in some Microsoft programmer’s eye…) So I basically wrote the post for users of 2003 and then just posted a brief explanation where to find the same functions in 2007, which was the first version to use ribbons instead of dropdown menus. Over the years, this has been one of the most popular T4L posts but now that 2007 and 2010 are more widely used, I’ve decided to spell out the steps for those versions in full. You can still find the instructions for Word 2003 and earlier versions later in the post.
NOTE: I’ve never had Office 2013, so I can’t say if there are any differences for that version, but I now have Office 2016 and the process is exactly the same, so it’s a good bet that it is for 2013 as well. (If you have Word 2013 and there is any difference, please post a comment below and I’ll add that info here.)
Both sets of instructions are for creating different sections in an MS-Word document so you can change the header for each section. For example, you might want to have different headers with each chapter name to help readers find the section they’re looking for more quickly.
Note: The same techniques work for creating separate footers, which you might want to do to start Page 1 after a Table of Contents, for example.
Section Break vs. Page Break
You may already know that you can force a page break by placing your cursor in front of the text you want to start on the next page and pressing Ctrl + Enter on your keyboard. (And if you don’t know that, consider this a bonus tip!) 🙂
However, that won’t work for our purpose. We don’t want to just move the text to the next page; we want to start a new section so we can create a new header.
Instructions for Word 2007, 2010, 2013, and 2016
Put your cursor at the start of the text you want to start a new section.
On the Page Layout ribbon, click the down arrow beside the Breaks button. (In Word 2016, the ribbon is just called Layout. I don’t know which one it is in 2013.)

Select Section Breaks > Next Page.
Now the text is at the top of the next page.
Move your cursor near the top of the page and double-click to display the Header area.

NOTE: Some readers have reported that if they create a Header section using the Insert > Header command and choose anything other than the Blank option, the instructions don’t work. I’m not sure why this is as it works for me, but if you are still having problems after following these steps, try changing the Header format to Blank.
The Header and Footer Tools Design ribbon has opened at the top of the page. You can see that the Link to Previous button is depressed, meaning the two sections will have the same header. (You can also see a Same to Previous tab on the bottom border of the header section.)

Click the Link to Previous button.

The Same as Previous tab is now gone from the header section.
Type “Section 2 Header” in the header area.
Double-click in the main text area of the page.
This will close the header section and remove the toolbar. The new header appears at the top of the page.

Now, if you scroll back up to the first page, you can see that the header is still blank, because the two headers are no longer linked. You could also enter text into the header area and it wouldn’t change the header on the next page.
![]()
Simply repeat these steps for each new section and you can have as many different headers as you want.
Instructions for Word 2003 and Earlier Versions
Note: The screenshots below show a document I used when I wrote the original post. I no longer have it and I no longer have Word 2003, so I can’t update the document. But the dialog boxes should look the same.
Put your cursor at the start of the text you want to start a new section.
From the Insert menu, select Break.
In the dialog box that comes up, select the “Next page” radio button from the “Section break types” area.

Now the text is at the top of the next page. You can tell it’s also the beginning of a new section by looking at the status line at the bottom left of the Word window.

From the View menu, click Header and Footer.
The header section of the page will display and the Header and Footer toolbar also appears.

You’ll notice, above the header box, it says “Same as previous.” This is the default option for when you create a header, and that’s what we need to change.
Click the Same as Previous button on the toolbar.
You can mouse over the buttons to see the names of them. You want to click it so it doesn’t look like it’s depressed.

The “Same as previous” text is now gone from the header box at the top of the page.

Type “Section 2 Header” in the header area.
Double-click in the main text area of the page.
This will close the header section and remove the toolbar.

Now, if you scroll back up to the first page, you can see the header is still blank, because the two headers are no longer linked.
![]()
Simply repeat these steps for each new section and you can have as many different headers as you want.
You may also be interested in:
Save Text Snippets to Easily Reuse in Microsoft Word
Four Formatting Tips for Excel
Microsoft Products: News, Views, & How-Tos
Filed Under: Formatting, How To, MS-Word, Popular, Top Ten, Updates
If you found this post helpful, maybe your friends will too (hint, hint)!
To receive future blog posts in your Inbox, please fill out the form below.
Topics Map > Services > Teaching, Learning and Classrooms > Services for Students & Staff
One of the key ways to make Microsoft Word documents accessible is to use Word’s built-in heading styles to format the document.
Why Use Headings
Accessible documents benefit everyone — not just those with disabilities! For example, accessible documents benefit cell phone and tablet users, as well as students with low bandwidth access. Accessible documents also make it easier for browsers to display them and are much easier to convert to various platforms or other formats.
Headings aren’t just a good idea — they’re required for accessibility. Microsoft Word provides pre-built heading styles to assist you.
Add Heading Styles in Word
Documents with a proper heading structure allow screen reader and other assistive technology users to:
- view a list of all of the headings on the page to navigate
- choose top-level headings or other heading levels and
- read or navigate a document by using headings.
Most of us scan a document or page quickly and look for big, bold text (headings) to get an idea of its structure and content. Screen readers and other assistive technologies also need to scan a document. They read and navigate through a document by using the heading structure.
To do this, documents should be structured in a hierarchical manner:
- Heading 1 is usually a page title or the main content heading. Generally, there is only one such header, and it is usually the most important.
- Heading 2 is usually a major section heading.
- Heading 3 is usually a sub-section of the Heading 2.
- Heading 4 is usually a sub-section of the Heading 3, and so on, ending with Heading 6.
Note:
- Lower-level headings should be contained within headings of the next highest heading.
- You should not skip heading levels, such as using Heading 4 directly below Heading 2.
- Headings should have descriptive text that give users a good idea of the content they will find within that section of the document.
Applying Heading Styles
- Select the text to be styled with a heading.
- Click the Home tab — see the heading styles listed in the Styles pane.

- Click on the heading style you want to apply to the selected text.
- To remove or change the heading style applied, highlight the text and select the Normal style, or a different heading style.

Verifying Your Headings
It is good practice to check that your headings create a logical outline for your content and verify that all of the headings are displayed in the headings list in the Navigation Pane.
Note: Instructions may vary when using Office versions older than Office 2019 or the Office 365 web versions, and/or Macintosh Office applications.
- Click the View tab
- Check the Navigation Pane option in the Show group (OR press Ctrl+F).
- The Navigation pane opens on the left. Click Headings to display the headings hierarchically. The headings should be nested in a logical manner.
- Click on a heading in the Navigation pane to move to specific parts of the document.

Modifying Pre-Defined Heading Styles
You can modify a pre-defined style to change the visual display:
- On the Home tab, right-click the style you wish to change in the Style pane and select Modify…
- In the Modify Style pop-up window, you can change the font type, font size, formatting, spacing, color, etc.
- Click the Format drop-down list in the bottom left corner to navigate through other style options.
- Check Automatically Update in the bottom left corner so that any text with that style applied in your document is automatically updated.
- Click OK — all text formatted with that heading style will change.

Note: Remember — there must be sufficient color contrast between the text and the background color to meet accessibility requirements.
Understand and Fix Color Contrast Issues
See Also:
- Blackboard Ally