
 When I first wrote this blog post, Word 2003 was still the predominant version of the program, more commonly used than Word 2007. (And Word 2010 was just a gleam in some Microsoft programmer’s eye…) So I basically wrote the post for users of 2003 and then just posted a brief explanation where to find the same functions in 2007, which was the first version to use ribbons instead of dropdown menus. Over the years, this has been one of the most popular T4L posts but now that 2007 and 2010 are more widely used, I’ve decided to spell out the steps for those versions in full. You can still find the instructions for Word 2003 and earlier versions later in the post.
NOTE: I’ve never had Office 2013, so I can’t say if there are any differences for that version, but I now have Office 2016 and the process is exactly the same, so it’s a good bet that it is for 2013 as well. (If you have Word 2013 and there is any difference, please post a comment below and I’ll add that info here.)
Both sets of instructions are for creating different sections in an MS-Word document so you can change the header for each section. For example, you might want to have different headers with each chapter name to help readers find the section they’re looking for more quickly.
Note: The same techniques work for creating separate footers, which you might want to do to start Page 1 after a Table of Contents, for example.
Section Break vs. Page Break
You may already know that you can force a page break by placing your cursor in front of the text you want to start on the next page and pressing Ctrl + Enter on your keyboard. (And if you don’t know that, consider this a bonus tip!) 🙂
However, that won’t work for our purpose. We don’t want to just move the text to the next page; we want to start a new section so we can create a new header.
Instructions for Word 2007, 2010, 2013, and 2016
Put your cursor at the start of the text you want to start a new section.
On the Page Layout ribbon, click the down arrow beside the Breaks button. (In Word 2016, the ribbon is just called Layout. I don’t know which one it is in 2013.)

Select Section Breaks > Next Page.
Now the text is at the top of the next page.
Move your cursor near the top of the page and double-click to display the Header area.

NOTE: Some readers have reported that if they create a Header section using the Insert > Header command and choose anything other than the Blank option, the instructions don’t work. I’m not sure why this is as it works for me, but if you are still having problems after following these steps, try changing the Header format to Blank.
The Header and Footer Tools Design ribbon has opened at the top of the page. You can see that the Link to Previous button is depressed, meaning the two sections will have the same header. (You can also see a Same to Previous tab on the bottom border of the header section.)

Click the Link to Previous button.

The Same as Previous tab is now gone from the header section.
Type “Section 2 Header” in the header area.
Double-click in the main text area of the page.
This will close the header section and remove the toolbar. The new header appears at the top of the page.

Now, if you scroll back up to the first page, you can see that the header is still blank, because the two headers are no longer linked. You could also enter text into the header area and it wouldn’t change the header on the next page.
![]()
Simply repeat these steps for each new section and you can have as many different headers as you want.
Instructions for Word 2003 and Earlier Versions
Note: The screenshots below show a document I used when I wrote the original post. I no longer have it and I no longer have Word 2003, so I can’t update the document. But the dialog boxes should look the same.
Put your cursor at the start of the text you want to start a new section.
From the Insert menu, select Break.
In the dialog box that comes up, select the “Next page” radio button from the “Section break types” area.

Now the text is at the top of the next page. You can tell it’s also the beginning of a new section by looking at the status line at the bottom left of the Word window.

From the View menu, click Header and Footer.
The header section of the page will display and the Header and Footer toolbar also appears.

You’ll notice, above the header box, it says “Same as previous.” This is the default option for when you create a header, and that’s what we need to change.
Click the Same as Previous button on the toolbar.
You can mouse over the buttons to see the names of them. You want to click it so it doesn’t look like it’s depressed.

The “Same as previous” text is now gone from the header box at the top of the page.

Type “Section 2 Header” in the header area.
Double-click in the main text area of the page.
This will close the header section and remove the toolbar.

Now, if you scroll back up to the first page, you can see the header is still blank, because the two headers are no longer linked.
![]()
Simply repeat these steps for each new section and you can have as many different headers as you want.
You may also be interested in:
Save Text Snippets to Easily Reuse in Microsoft Word
Four Formatting Tips for Excel
Microsoft Products: News, Views, & How-Tos
Filed Under: Formatting, How To, MS-Word, Popular, Top Ten, Updates
If you found this post helpful, maybe your friends will too (hint, hint)!
To receive future blog posts in your Inbox, please fill out the form below.

on
March 11, 2022, 1:32 PM PST
How to make different headers and footers in Word
Adding headers and footers to a Microsoft Word document is easy, even if you have a mix of header needs. Susan Harkins will show you how.

When it comes to headers and footers, Microsoft Word is flexible and powerful. Most headers and footers are as easy as a few clicks: Open the header or footer section, enter content, click a page-numbering option and that’s it. The process takes seconds.
However, not all documents have such simple requirements. But don’t worry because Word’s up to the task. In this article, I’ll show you how to create different headers and footers for the same document. Specifically, we’ll turn off the header for the first page and we’ll use different headers for odd and even pages. I’ll work specifically with headers, but you can do the same with footers.
SEE: 83 Excel tips every user should master (TechRepublic)
I’m using Microsoft 365 on a Windows 10 64-bit system, but you can use an earlier version. I recommend that you wait to upgrade to Windows 11 until all the kinks are worked out. For your convenience, you can download the demonstration .docx and .doc files. Word Online doesn’t display headers or footers, but you won’t lose them. If you open a document with headers in the online version, you won’t see the headers or footers, but they’re still there.
How to make a different header on the first page in Word
It’s common to have a header on that first page that’s different from the header for the remaining pages. You might print the document’s path and name or include the company logo or even more common, if the first page is a title page, you might want no header at all.
The simple document in Figure A comprises several instances of the RAND() function to create text—four pages of it. Let’s suppose you want to display a page number in the header for all but the first page. To accomplish this, do the following:
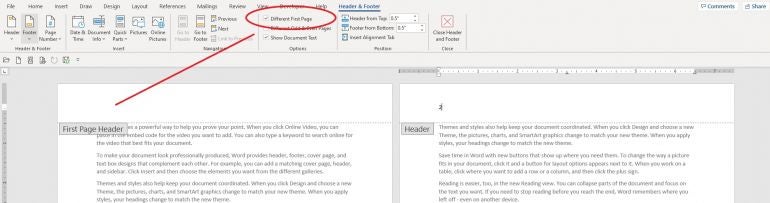
- On the first page, double-click the header area (the white space above the top margin) to open that section. Doing so dims the document a bit.
- Check the Different First Page option in the Options group on the contextual Header & Footer tab. There’s no header text yet, but if there were, clicking this option would delete it. Also notice that the header tab text now reads “First Page Header.”
- With the header section still open, move to page two, click the Page Number option and choose one of the built-in page numbering formats. I chose the first one, which displays the page number at the left margin.
Figure A
The Different First Page option leaves the header blank on the first page and allows you to use a header in the remaining pages of the document. Now, that doesn’t seem like a “multiple header” problem, but it is—an empty header is a header of sorts. In fact, you could enter a different header for page one if you like! I just left it blank because it’s a common task.
You could also add the page-numbering scheme to all pages and then click the Different First Page option. Word is versatile; the order in which you apply the options doesn’t matter at this point. Now let’s move on to different headers for odd and even pages.
How to make different headers for odd and even pages in Word
In long documents, especially when you’re viewing a two-page spread, it’s common to have a different header on odd and even pages. We’ll tackle this requirement by displaying the page number at the left margin for even pages and the right for odd pages—similar to a book’s two-page spread.
Right now, the pages numbers for pages 2, 3, and 4 are all left aligned. To change this, do the following:
- Click inside page 3’s header.
- On the contextual Header & Footer tab, click Different Odd & Even Pages in the Options group. Doing so will delete the even numbered pages. Don’t be alarmed; that’s supposed to happen.
- Typically, even numbers are left-aligned and odd numbers are right-aligned. The blank header on page 1 complicates this a bit for us—I did that on purpose so you can see how flexible the feature is.
- Still in page 3’s header, select the number 3 and click Align Right on the Home tab in the Paragraph group.
- Return to page 2 and click the Header & Footer contextual tab.
- In the Header & Footer group, click Page Number and choose one of the left-aligned built-in options.
As you can see in Figure B, the odd-numbered pages display the page number at the right margin and the even numbered pages display the page number at the left margin. This spread looks a little odd because the odd numbered page 3 is on the right, but don’t let what you’re seeing onscreen confuse you. That’s just a display behavior. If you add enough text to generate a fifth page, you will see that the page number is right aligned. Going forward all even page numbers will be left-aligned and all odd page numbers with be right-aligned. In addition, page 1 still has no header.
Figure B

It took very little effort to create different headers in this short document. You might not think of page numbering schemes as different, but the alignment is a difference. Over the next few months, we’ll tackle some more complex heading requirements.
Also See
-
Windows 11 cheat sheet: Everything you need to know
(TechRepublic) -
Zoom vs. Microsoft Teams, Google Meet, Cisco WebEx and Skype: Choosing the right video-conferencing apps for you (free PDF)
(TechRepublic) -
Checklist: Securing Windows 10 systems
(TechRepublic Premium) -
More must-read Microsoft coverage
(TechRepublic on Flipboard)
-
Microsoft
-
Software
- Column
- TECHNOLOGY Q&A
By J. Carlton Collins, CPA
Q. I’ve created a Word document with multiple chapters, and I want to insert different headers and footers for each chapter. However, each time I create a new header, it changes my previous headers. What’s the solution to creating different headers?
A. As a default in Word, all subsequent headers and footers link to the previous page’s header and footer. To insert a new header or footer without altering the one you’ve already inserted, navigate to the bottom of the last page before your new header or footer, and from the Layout tab (or the Page Layout tab) select Breaks, Next Page as pictured below. This action will create a section break enabling you to apply different attributes (such as headers and footers, margin settings, page sizes, orientations, etc.) to one section of the document without affecting other sections.

On the next page after the break, navigate to the header or footer area and double—click that area to make it editable (referred to as Design mode); this action also displays the header and footer toolbars. Next, select the existing header or footer and click the Link to Previous option (as circled below) to break the header or footer connection.

Once the link is broken, you can edit or change the new section’s header or footer without affecting your previous headers or footers. Continue to insert Next Page breaks and then break the link connections for each subsequent chapter where you want different headers or footers to appear.
About the author
J. Carlton Collins (carlton@asaresearch.com) is a technology consultant, a CPE instructor, and a JofA contributing editor.
Note: Instructions for Microsoft Office in “Technology Q&A” refer to the 2007 through 2016 versions, unless otherwise specified.
Submit a question
Do you have technology questions for this column? Or, after reading an answer, do you have a better solution? Send them to jofatech@aicpa.org. We regret being unable to individually answer all submitted questions.