
Home / Excel Basics / How to Open Dialog Box in Excel
In Excel, to get to more options of any option category you can open the dialog box and use those options directly from the dialog box. Apart from this, there are a few options that need to be used directly from a dialog box.

In this tutorial, we will look at how to open and use a dialog box use an option.
Open a Dialog Boxes from the Ribbon
- Go to the Tab from where you want to open the option.
- Move to the options group.
- Hover your cursor on the small arrow at the bottom right.
- Click on it to open the options dialog box.

The moment you click on it, Excel will open the dialog box for that option. And, when you click on the arrow from the font group, it opens the format dialog box and opens the font tab from there.

On the ribbon, you have multiple tabs, but not all the tabs have that down arrows in the options groups to open the dialog box.
Dialog Box Options
As I said, there are a few options that you need to use directly from a dialog box. For example, the find and replace option. When press the keyboard shortcut (Ctrl + F) it gives you a dialog box where you need to enter the value that you want to find.

Excel Options Dialog Box
Excel Options also have a dialog box. When you open the options, File ⇢ More ⇢ Options. You will get a large dialog box with all the options that you can make a change to in your Excel environment.

Содержание
- VBA – Dialog Box
- Message Box
- Syntax
- Simple Message Box
- YesNo Message Box
- Adding a Title
- Input Box
- VBA Coding Made Easy
- VBA Code Examples Add-in
- Dialog Boxes in Excel
- What is the use of dialog boxes?
- Types of Dialog boxes
- The Dialog Box and Dialog Box Launcher in Excel
- Find the Dialog Box Launcher
- Access Function Dialog Boxes
- Work With Non-Dialog Box Options
- Overview of forms, Form controls, and ActiveX controls on a worksheet
- What is a form?
- Types of Excel forms
- Data form
- Worksheet with Form and ActiveX controls
- Form controls
- MessageBox in Excel VBA
- Message Box
- Creating a Basic Message Box in VBA
- Buttons in MessageBox
- Different Icons in Excel VBA
- Values returned by Buttons
- Editing Title in a Msg Box
VBA – Dialog Box
In this Article
This article will demonstrate how to use Dialog Boxes in VBA.
Dialog Boxes are used to return information to the user. The most common dialog box that is used is the Message Box, but we can also use the Input Box.
Message Box
Syntax
The syntax of the Message Box is as follows:

Argument
Explanation Prompt
Message returned to the user – required
Visual Basic buttons – defaults to OK if omitted
Title of Message box – optional
Simple Message Box
A simple message box just requires the prompt – the message you are returning to your user. The OK button will automatically be displayed.

YesNo Message Box
Adding in buttons can make you message box more flexible.
We can select the type of box from a drop down list of VB constants.
As well as the Yes/No button, we can icons to display in our message box to indicate to the user what type of message is being displayed.
NOTE: if you do not select a button constant, but do select an information constant, you need to omit the brackets from around the message box arguments.
Adding a Title
We can also fill in the title argument.

For a more detailed article about Message Boxes, click here.
Input Box
An input box is a Dialog Box that asks the user a question, and returns a result.
For a more detailed article about Input Boxes, click here.
VBA Coding Made Easy
Stop searching for VBA code online. Learn more about AutoMacro — A VBA Code Builder that allows beginners to code procedures from scratch with minimal coding knowledge and with many time-saving features for all users! 

VBA Code Examples Add-in
Easily access all of the code examples found on our site.
Simply navigate to the menu, click, and the code will be inserted directly into your module. .xlam add-in.
Источник
Dialog Boxes in Excel
In this post, you will learn more about Dialog Boxes in Excel and how to use them with-in your Excel spread she
What is the use of dialog boxes?
A dialog box is a temporary window, where an application creates to retrieve user input. An application typically uses dialog boxes to prompt the user for additional information for menu items.
The following are the ways to use the dialog boxes.
- First, prepare an excel sheet with the required details in it.

Types of Dialog boxes
- When a Typical dialog box displays on the screen, it will remain until the user dismisses it. By clicking on the ok button, the task selected from the dialog box will be performed, and by clicking on the Cancel button, the dialog box will close without taking any action.
- The image below is an example for Typical dialog box.
- Navigating dialog boxes is very easy, click the command that you want to use. Although dialog boxes were designed for mouse users, you can also use the keyboard. Every dialog box button has also a text name on the button.
- The image below is an example for Navigating Dialog Boxes.
- Several Excel dialog boxes are tabbed dialog boxes. When you select a tab, a panel with relevant commands is visible. Tabbed dialog boxes are highly convenient because you can make several changes in a single dialog box. After you have made all your setting changes, click OK.

We will hope that this article was useful and understandable.
Источник
The Dialog Box and Dialog Box Launcher in Excel
Input information and make choices about Excel worksheet features
:max_bytes(150000):strip_icc()/laptop-with-alarm-clock-and-mug-103891309-5bdf473cc9e77c00511bae8e.jpg)
A dialog box in Excel is a screen where you input information and make choices about different aspects of the current worksheet or its content, such as data, charts, and graphic images.
The information in this article applies to Excel versions 2019, 2016, 2013, 2010, and Excel for Mac.
Find the Dialog Box Launcher
One way to open dialog boxes is to use the dialog box launcher. The launcher is a small downward-pointing arrow located in the bottom right corner of individual groups or boxes on the ribbon.
Examples of groups with a dialog box launcher include:
- The Font and Number groups on the Home tab
- The Charts group on the Insert tab
- The Page Setup and Sheet Options groups on the Page Layout tab
Access Function Dialog Boxes
Not all dialog box launchers in Excel are found in the corner of ribbon groups. Some, such as those found under the Formulas tab, are associated with individual icons on the ribbon.
The dialog box makes it easy to enter information related to the function’s arguments, such as the location of data and other input options.
The Formulas tab in Excel contains groups of functions that have similar purposes in the Function Library. Each group name has a dialog box launcher associated with it. When you select these down arrows, a drop-down menu opens and displays individual function names. Selecting a function’s name in the list opens its dialog box.
Work With Non-Dialog Box Options
It is not always necessary to access features and options in Excel through a dialog box. For example, many of the formatting features found on the Home tab of the ribbon, such as the bold feature, are found on single choice icons. Select these icons once to activate the feature and select a second time to turn the feature off.
Источник
Overview of forms, Form controls, and ActiveX controls on a worksheet
Important: This feature isn’t available in Office on a Windows RT PC. Want to see what version of Office you’re using?
 By using forms and the many controls and objects that you can add to them, you can make data entry on your worksheets easier and improve the way your worksheets look. You can also do this yourself with little or no need for Microsoft Visual Basic for Applications (VBA) code.
A worksheet form is not the same thing as an Excel template. A template is a pre-formatted file that can get you started creating a workbook that looks the way you want. A form contains controls, such as boxes or dropdown lists, that can make it easier for people who use your worksheet to enter or edit data. To find out more about templates you can download, see Excel templates.
What is a form?
A form, whether printed or online, is a document designed with a standard structure and format that makes it easier to capture, organize, and edit information.
Printed forms contain instructions, formatting, labels, and blank spaces for writing or typing data. You can use Excel and Excel templates to create printed forms.
Online forms contain the same features as printed forms. In addition, online forms contain controls. Controls are objects that display data or make it easier for users to enter or edit data, perform an action, or make a selection. In general, controls make the form easier to use. Examples of common controls include list boxes, option buttons, and command buttons. Controls can also run assigned macros and respond to events, such as mouse clicks, by running Visual Basic for Applications (VBA) code.
You can use Excel in several ways to create printed and online forms.
Types of Excel forms
There are several types of forms that you can create in Excel: data forms, worksheets that contain Form and ActiveX controls, and VBA UserForms. You can use each type of form by itself, or you can combine them in different ways to create a solution that’s right for you.
Data form
A data form provides a convenient way to enter or display one complete row of information in a range or table without scrolling horizontally. You may find that using a data form can make data entry easier than moving from column to column when you have more columns of data than can be viewed on the screen. Use a data form when a simple form of text boxes that list the column headings as labels is sufficient and you don’t need sophisticated or custom form features, such as a list box or spin button.
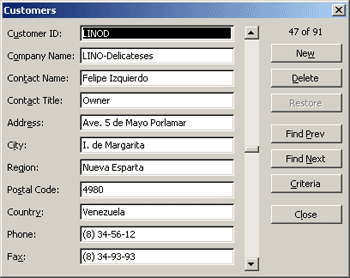 Excel can automatically generate a built-in data form for your range or table. The data form displays all column headers as labels in a single dialog box. Each label has an adjacent blank text box in which you can enter data for each column, up to a maximum of 32 columns. In a data form, you can enter new rows, find rows by navigating, or (based on cell contents) update rows and delete rows . If a cell contains a formula, the formula result is displayed in the data form, but you cannot change the formula by using the data form.
Worksheet with Form and ActiveX controls
A worksheet is a type of form that enables you to enter and view data on the grid, and there are several control-like features already built-in to Excel worksheets, such as comments and data validation. Cells resemble text boxes in that you can enter and format them in a variety of ways. Cells are often used as labels, and by adjusting cell height and width and merging cells, you can make a worksheet behave like a simple data entry form. Other control-like features, such as cell comments, hyperlinks, background images, data validation, conditional formatting, embedded charts, and AutoFilter can make a worksheet behave like an advanced form.
For added flexibility, you can add controls and other drawing objects to the drawing canvas of a worksheet, and combine and coordinate them with worksheet cells. For example, you can use a list box control to make it easier for a user to select from a list of items. Or, you can use a spin button control to make it easier for a user to enter a number.
Because controls and objects are stored on the drawing canvas, you can display or view controls and objects alongside associated text that is independent of row and column boundaries without changing the layout of a grid or table of data on your worksheet. Most of the time, many of these controls can also be linked to cells on the worksheet and do not require VBA code to make them work. You can set properties that determine whether a control floats freely or moves and resizes together with a cell. For example, you might have a check box that you want to move together with its underlying cell when the range is sorted. However, if you have a list box that you want to keep in a specific location at all times, you probably do not want it to move together with its underlying cell.
Excel has two types of controls: Form controls and ActiveX Controls. In addition to these sets of controls, you can also add objects from the Drawing tools, such as a AutoShapes, WordArt, SmartArt graphic, or text boxes.
The following sections describe these controls and drawing objects, and also explain how to work with these controls and objects in more detail.
Form controls
Form controls are the original controls that are compatible with earlier versions of Excel, starting with Excel version 5.0. Form controls are also designed for use on XLM macro sheets.
You use Form controls when you want to easily reference and interact with cell data without using VBA code, and when you want to add controls to chart sheets. For example, after you add a list box control to a worksheet and linking it to a cell, you can return a numeric value for the current position of the selected item in the control. You can then use that numeric value in conjunction with the INDEX function to select different items from the list.
You can also run macros by using Form controls. You can attach an existing macro to a control, or write or record a new macro. When a user of the form clicks the control, the control runs the macro.
However, these controls cannot be added to UserForms, used to control events, or modified to run Web scripts on Web pages.
Источник
MessageBox in Excel VBA
Message Box is one of the most frequently used functions in VBA Macro. The message box is a dialogue box that appears on the screen as an extra window. The dialogue box that appeared asks input from the user and returns a constant/code/number accordingly or it can use to display messages. In this article, we will learn how to create different types of message boxes in VBA Macro.
Message Box
A message box is a dialogue box that displays information that can be text, date, number, etc. like as shown in the below image. In Excel, we can easily create a message box using VBA.

Parts of a message box:
1. Title: The title of a message box specifies what properties or functions will this dialogue box performs. While writing a message box in VBA macro it is not mandatory to write a title. A title does not have multiple lines. If a title is not mentioned then by default the title becomes Microsoft Excel.

2. Prompt: The prompt is the heart of the message box. It specifies the work to be done or the information provided in a detailed manner. While writing a message box function it is mandatory to write a prompt statement. You can also display tables, dates, and numbers in the prompt. You can also add multiple lines in the prompt area.

3. Buttons: While working with basic Excel, you might have configured the different buttons that appear in a dialogue box. For example, Yes/No, Retry, Help, Abort/Retry/Ignore, etc. You can create and use any of the buttons, according to your requirement. While writing a message box function it is not mandatory to specify the buttons. By default, Ok appears.

Creating a Basic Message Box in VBA
In Excel, we can easily create a message box with the help of the MsgBox function.
Syntax:
Msgbox “prompt(mandatory)”, buttons(temporary), “title(temporary)”, “helpfile(temporary)”, “context(temporary)”
- Prompt: Prompt is the detailed information of the MsgBox. It is mandatory to add a prompt while writing the MsgBox function. You can also add multiple lines to the prompt.
- Buttons: It is the temporary argument that you wish to add. By default, it shows only the Ok button. To add custom buttons, you have the code for each button. For example, vbRetryCancel, vbOkOnly.
- Title: It is the temporary argument of the MsgBox function. You cannot add multiple titles to a message box.
- HelpFile: This is a very rare argument that is passed on while creating a MsgBox. This argument is only provided when you are using a help button. When you are passing the help file, you have to use context arguments also.
- Context: It is only used with the help file and help button. You need to have a numeric help context number to the appropriate help topic.
Follow the below steps:
Step 1: The MsgBox keyword is used to create a message box is MsgBox. So write MsgBox. Start with a double quote and write the prompt you want to display. Press Enter.

Step 2: Click on the Run button.

Step 3: The Message Box appears. Here, the VBA code has stopped running and will not get executed until we select any of the buttons in the message box. Click Ok.

Step 4: The VBA code resumes.

Buttons in MessageBox
When you have typed a prompt in the MsgBox function. The next argument is separated with a comma(,). Now, the VBA editor gives us a list of buttons that can be added to the MsgBox function. You can select and add the button according to your requirements.

The types of buttons in the MsgBox.
1. vbOkOnly(Default): This is the default button that appears. To create this button follow the following steps:
Step 1: Write the code. vbOkOnly is the code that helps create only the Ok button.

Step 2: The MsgBox contains only the Ok button.

2. vbOkCancel: vbOkCancel code tells the VBA compiler to show Ok and cancel buttons while displaying the MsgBox. To create this button follow the following steps:
Step 1: Write the code. vbOkCancel is the code that helps create the Ok and Cancel buttons.

Step 2: The MsgBox contains both Ok and Cancel.

3. vbAbortRetryIgnore: This code displays Abort, Retry and Ignore buttons in the message box. To create this button follow the following steps:
Step 1: Write the code. vbAbortRetryIgnore is the code that helps create the Abort, Retry, and Ignore buttons.

Step 2: The MsgBox contains all three Abort, Retry and Ignore.

4. vbYesNoCancel: vbYesNoCancel code displays Yes, No, and Cancel buttons in the message box. To create this button follow the following steps:
Step 1: Write the code. vbYesNoCancel is the code that helps create the Yes, No, and Cancel.

Step 2: The MsgBox contains all three Yes, No, and Cancel.

5. vbYesNo: vbYesNo code displays Yes and No buttons in the message box. To create this button follow the following steps:
Step 1: Write the code. vbYesNo is the code that helps create the Yes and No.

Step 2: The MsgBox contains both Yes and No.

6. vbRetryCancel: vbRetryCancel code displays Retry and Cancel buttons in the message box. To create this button follow the following steps:
Step 1: Write the code. vbRetryCancel is the code that helps create the Retry and Cancel.

Step 2: The MsgBox contains both Retry and Cancel.

7. vbDefaultButton2: You can use any of the default buttons. There are four types of default buttons. vbDefaultButton1, vbDefaultButton2, vbDefaultButton3, vbDefaultButton4. Here, vbDefaultButton2 is the button that is selected by default when a Msgbox appears. If you press Enter, then it automatically gets selected. To create this button follow the following steps:
Step 1: Write the code. Using vbAbortRetryIgnore creates three-button Abort, Retry and Ignore. vbDefaultButton2 is the code that helps us select the second default button i.e. Retry.

Step 2: The MsgBox appears and the default is Retry.

Different Icons in Excel VBA
While working with basic excel. You have come across different warnings and information. These all are represented with symbols. For example, a yellow exclamation for warning, a blue color question marks for information, etc. Here, we have discussed some of the icons that can appear in a message box.
1. vbCritical: This icon is a red cross. This red cross is used to display a critical message. To create this icon follow the following steps:
Step 1: Write the code. vbCritical creates a red cross.

Step 2: The message box with a critical icon appears.

2. vbQuestion: This icon is a blue question mark. This blue question mark is used to display when you forgot something to choose in a procedure. To create this icon follow the following steps:
Step 1: Write the code. vbQuestion creates a blue Question Mark.

Step 2: The message box with a Question icon appears.

3. vbExclamation: This icon is a yellow exclamation mark. It is used to represent an error when the entered data doesn’t match with the already present data. To create this icon follow the following steps:
Step 1: Write the code. vbExclamation creates a yellow exclamation mark.

Step 2: The message box with a ! (exclamation) icon appears.

4. vbInformation: This icon is a blue I mark that represents information. To create this icon follow the following steps:
Step 1: Write the code. vbInformation creates a blue I information mark.

Step 2: The message box with an i(information) icon appears.

Values returned by Buttons
Till now, you have studied how to create a message box and the different buttons associated with it. Now, we will learn how you can create nested message boxes and also with some conditions that are more practical in the real designing of a dialogue box. A message box returns a code or a constant according to the buttons applied. Some of the most commonly used constants and their return value are given in the table below.
| Constant | Value |
|---|---|
| vbOKOnly | 0 |
| vbOKCancel | 1 |
| vbAbortRetryIgnore | 2 |
| vbYesNoCancel | 3 |
| vbYesNo | 4 |
| vbRetryCancel | 5 |
Note: You can use values as well as constant interchangeably while comparing the boolean expressions.
For example, given Yes, No, and Cancel buttons. Display a message box accordingly. So to do this task follow the following steps:
Step 1: Write the code. The initial MsgBox will return a value and it will get stored in a variable name ans. If you click yes, then it will go inside the if condition else it will output the other one. Click on the Run button.

Step 2: A dialogue box appears. Click on Yes.

Step 3: A dialogue box appears. Click Ok.

Editing Title in a Msg Box
You can edit the title in a message box. By default, it shows Microsoft Excel as the title. In the MsgBox, function the third argument is for writing your custom title. It is a temporary argument. Follow are the following steps:
Step 1: Write the code. The third argument is your custom title.

Step 2: A dialogue box with the title “Be a geek” appears.
Источник
In this post, you will learn more about Dialog Boxes in Excel and how to use them with-in your Excel spread she
What is the use of dialog boxes?
A dialog box is a temporary window, where an application creates to retrieve user input. An application typically uses dialog boxes to prompt the user for additional information for menu items.
The following are the ways to use the dialog boxes.
- First, prepare an excel sheet with the required details in it.
Types of Dialog boxes
- When a Typical dialog box displays on the screen, it will remain until the user dismisses it. By clicking on the ok button, the task selected from the dialog box will be performed, and by clicking on the Cancel button, the dialog box will close without taking any action.
- The image below is an example for Typical dialog box.
- Navigating dialog boxes is very easy, click the command that you want to use. Although dialog boxes were designed for mouse users, you can also use the keyboard. Every dialog box button has also a text name on the button.
- The image below is an example for Navigating Dialog Boxes.
- Several Excel dialog boxes are tabbed dialog boxes. When you select a tab, a panel with relevant commands is visible. Tabbed dialog boxes are highly convenient because you can make several changes in a single dialog box. After you have made all your setting changes, click OK.
We will hope that this article was useful and understandable.
Input information and make choices about Excel worksheet features
Updated on October 14, 2019
A dialog box in Excel is a screen where you input information and make choices about different aspects of the current worksheet or its content, such as data, charts, and graphic images.
The information in this article applies to Excel versions 2019, 2016, 2013, 2010, and Excel for Mac.
Find the Dialog Box Launcher
One way to open dialog boxes is to use the dialog box launcher. The launcher is a small downward-pointing arrow located in the bottom right corner of individual groups or boxes on the ribbon.
Examples of groups with a dialog box launcher include:
- The Font and Number groups on the Home tab
- The Charts group on the Insert tab
- The Page Setup and Sheet Options groups on the Page Layout tab
Access Function Dialog Boxes
Not all dialog box launchers in Excel are found in the corner of ribbon groups. Some, such as those found under the Formulas tab, are associated with individual icons on the ribbon.
The dialog box makes it easy to enter information related to the function’s arguments, such as the location of data and other input options.
The Formulas tab in Excel contains groups of functions that have similar purposes in the Function Library. Each group name has a dialog box launcher associated with it. When you select these down arrows, a drop-down menu opens and displays individual function names. Selecting a function’s name in the list opens its dialog box.
Work With Non-Dialog Box Options
It is not always necessary to access features and options in Excel through a dialog box. For example, many of the formatting features found on the Home tab of the ribbon, such as the bold feature, are found on single choice icons. Select these icons once to activate the feature and select a second time to turn the feature off.
Thanks for letting us know!
Get the Latest Tech News Delivered Every Day
Subscribe
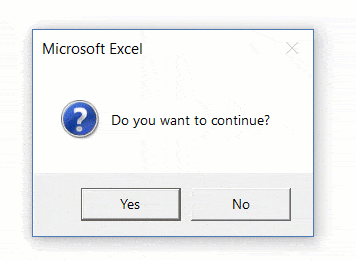
In Excel VBA, you can use the MsgBox function to display a message box (as shown below):
A MsgBox is nothing but a dialog box that you can use to inform your users by showing a custom message or get some basic inputs (such as Yes/No or OK/Cancel).
While the MsgBox dialog box is displayed, your VBA code is halted. You need to click any of the buttons in the MsgBox to run the remaining VBA code.
Note: In this tutorial, I will be using the words message box and MsgBox interchangeably. When working with Excel VBA, you always need to use MsgBox.
Anatomy of a VBA MsgBox in Excel
A message box has the following parts:
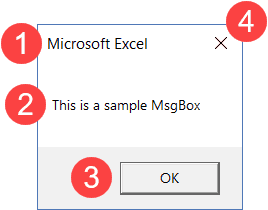
- Title: This is typically used to display what the message box is about. If you don’t specify anything, it displays the application name – which is Microsoft Excel in this case.
- Prompt: This is the message that you want to display. You can use this space to write a couple of lines or even display tables/data here.
- Button(s): While OK is the default button, you can customize it to show buttons such as Yes/No, Yes/No/Cancel, Retry/Ignore, etc.
- Close Icon: You can close the message box by clicking on the close icon.
Syntax of the VBA MsgBox Function
As I mentioned, MsgBox is a function and has a syntax similar to other VBA functions.
MsgBox( prompt [, buttons ] [, title ] [, helpfile, context ] )
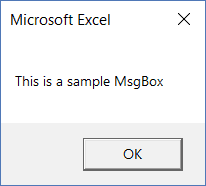
- prompt – This is a required argument. It displays the message that you see in the MsgBox. In our example, the text “This is a sample MsgBox” is the ‘prompt’. You can use up to 1024 characters in the prompt, and can also use it to display the values of variables. In case you want to show a prompt that has multiple lines, you can do that as well (more on this later in this tutorial).
- [buttons] – It determines what buttons and icons are displayed in the MsgBox. For example, if I use vbOkOnly, it will show only the OK button, and if I use vbOKCancel, it will show both the OK and Cancel buttons. I will cover different kinds of buttons later in this tutorial.
- [title] – Here you can specify what caption you want in the message dialog box. This is displayed in the title bar of the MsgBox. If you don’t specify anything, it will show the name of the application.
- [helpfile] – You can specify a help file that can be accessed when a user clicks on the Help button. The help button would appear only when you use the button code for it. If you’re using a help file, you also need to also specify the context argument.
- [context] – It is a numeric expression that is the Help context number assigned to the appropriate Help topic.
If you’re new to the concept of Msgbox, feel free to ignore the [helpfile] and [context] arguments. I have rarely seen these being used.
Note: All the arguments in square brackets are optional. Only the ‘prompt’ argument is mandatory.
Excel VBA MsgBox Button Constants (Examples)
In this section, I will cover the different types of buttons that you can use with a VBA MsgBox.
Before I show you the VBA code for it and how the MsgBox looks, here is a table that lists all the different button constants you can use.
| Button Constant | Description |
| vbOKOnly | Shows only the OK button |
| vbOKCancel | Shows the OK and Cancel buttons |
| vbAbortRetryIgnore | Shows the Abort, Retry, and Ignore buttons |
| vbYesNo | Shows the Yes and No buttons |
| vbYesNoCancel | Shows the Yes, No, and Cancel buttons |
| vbRetryCancel | Shows the Retry and Cancel buttons |
| vbMsgBoxHelpButton | Shows the Help button. For this to work, you need to use the help and context arguments in the MsgBox function |
| vbDefaultButton1 | Makes the first button default. You can change the number to change the default button. For example, vbDefaultButton2 makes the second button as the default |
Note: While going through the examples of creating different buttons, you may wonder what’s the point of having these buttons if it doesn’t have any impact on the code.
It does! Based on the selection, you can code what you want the code to do. For example, if you select OK, the code should continue, and if you click Cancel, the code should stop. This can be done by using variables and assigning the value of the Message Box to a variable. We will cover this in the later sections of this tutorial.
Now let’s have a look at some examples of how the different buttons can be displayed in a MsgBox and how it looks.
MsgBox Buttons – vbOKOnly (Default)
If you only use the prompt and don’t specify any of the arguments, you will get the default message box as shown below:
Below is the code that will give this message box:
Sub DefaultMsgBox()
MsgBox "This is a sample box"
End Sub
Note that the text string needs to be in double quotes.
You can also use the button constant vbOKOnly, but even if you don’t specify anything, it’s taken as default.
MsgBox Buttons – OK & Cancel
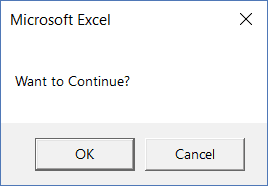
If you only want to show the OK and the Cancel button, you need to use the vbOKCancel constant.
Sub MsgBoxOKCancel()
MsgBox "Want to Continue?", vbOKCancel
End Sub
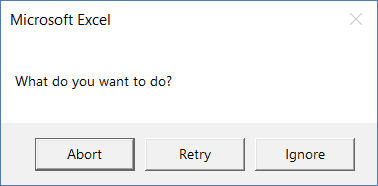
MsgBox Buttons – Abort, Retry, and Ignore
You can use the ‘vbAbortRetryIgnore’ constant to show the Abort, Retry, and the Ignore buttons.
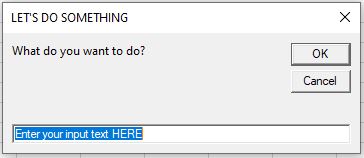
Sub MsgBoxAbortRetryIgnore()
MsgBox "What do you want to do?", vbAbortRetryIgnore
End Sub
MsgBox Buttons – Yes and No
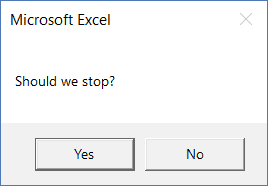
You can use the ‘vbYesNo’ constant to show the Yes and No buttons.
Sub MsgBoxYesNo()
MsgBox "Should we stop?", vbYesNo
End Sub
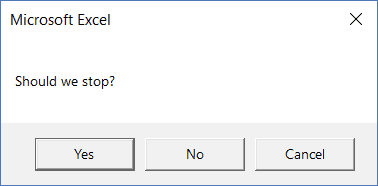
MsgBox Buttons – Yes, No and Cancel
You can use the ‘vbYesNoCancel’ constant to show the Yes, No, and Cancel buttons.
Sub MsgBoxYesNoCancel()
MsgBox "Should we stop?", vbYesNoCancel
End Sub
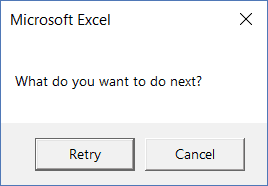
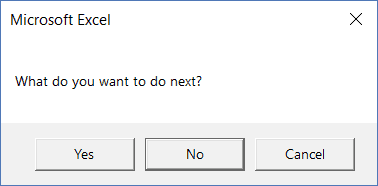
MsgBox Buttons – Retry and Cancel
You can use the ‘vbRetryCancel’ constant to show the Retry and Cancel buttons.
Sub MsgBoxRetryCancel()
MsgBox "What do you want to do next?", vbRetryCancel
End Sub
MsgBox Buttons – Help Button
You can use the ‘vbMsgBoxHelpButton’ constant to show the help button. You can use it with other button constants.
Sub MsgBoxRetryHelp()
MsgBox "What do you want to do next?", vbRetryCancel + vbMsgBoxHelpButton
End Sub
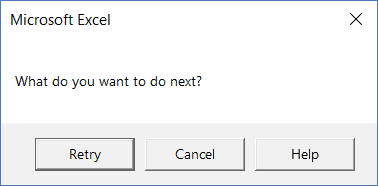
Note that in this code, we have combined two different button constants (vbRetryCancel + vbMsgBoxHelpButton). The first part shows the Retry and Cancel buttons and the second part shows the Help button.
MsgBox Buttons – Setting a Default Button
You can use the ‘vbDefaultButton1’ constant to set the first button as default. This means that the button is already selected and if you press enter, it executes that button.
Below is the code that will set the second button (the ‘No’ button) as the default.
Sub MsgBoxOKCancel()
MsgBox "What do you want to do next?", vbYesNoCancel + vbDefaultButton2
End Sub
In most cases, the left-most button is the default button. You can choose other buttons using vbDefaultButton2, vbDefaultButton3, and vbDefaultButton4.
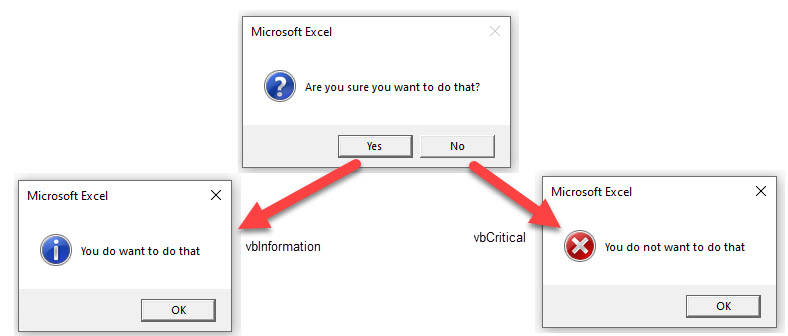
Excel VBA MsgBox Icon Constants (Examples)
Apart from the buttons, you can also customize the icons that are displayed in the MsgBox dialog box. For example, you can have a red critical icon or a blue information icon.
Below is a table that lists the code that will show the corresponding icon.
| Icon Constant | Description |
| vbCritical | Shows the critical message icon |
| vbQuestion | Shows the question icon |
| vbExclamation | Shows the warning message icon |
| vbInformation | Shows the information icon |
MsgBox Icons – Critical
If you want to show a critical icon in your MsgBox, use the vbCritical constant. You can use this along with other button constants (by putting a + sign in between the codes).
For example, below is a code that will show the default OK button with a critical icon.
Sub MsgBoxCriticalIcon()
MsgBox "This is a sample box", vbCritical
End Sub
![]()
If you want to show the critical icon with Yes and No buttons, use the following code:
Sub MsgBoxCriticalIcon()
MsgBox "This is a sample box", vbYesNo + vbCritical
End Sub
![]()
MsgBox Icons – Question
If you want to show a critical icon in your MsgBox, use the vbQuestion constant.
Sub MsgBoxQuestionIcon()
MsgBox "This is a sample box", vbYesNo + vbQuestion
End Sub
![]()
MsgBox Icons – Exclamation
If you want to show an exclamation icon in your MsgBox, use the vbExclamation constant.
Sub MsgBoxExclamationIcon()
MsgBox "This is a sample box", vbYesNo + vbExclamation
End Sub
![]()
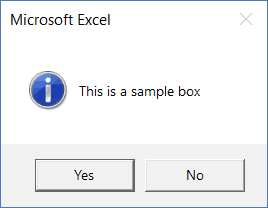
MsgBox Icons – Information
If you want to show an information icon in your MsgBox, use the vbInformation constant.
Sub MsgBoxInformationIcon()
MsgBox "This is a sample box", vbYesNo + vbInformation
End Sub
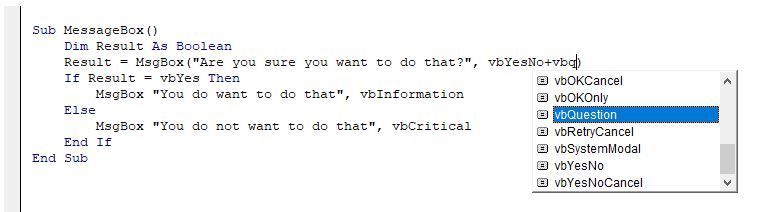
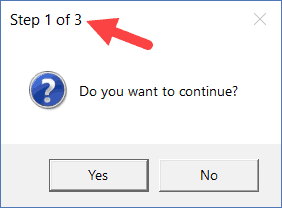
Customizing Title and Prompt in the MsgBox
When using MsgBox, you can customize the title and the prompt messages.
So far, the example we have seen have used Microsoft Excel as the title. In case you don’t specify the title argument, MsgBox automatically uses the title of the application (which has been Microsoft Excel in this case).
You can customize the title by specifying it in the code as shown below:
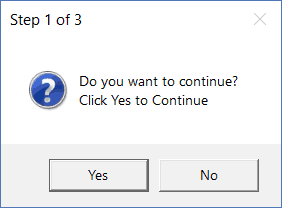
Sub MsgBoxInformationIcon()
MsgBox "Do you want to continue?", vbYesNo + vbQuestion, "Step 1 of 3"
End Sub
Similarly, you can also customize the prompt message.
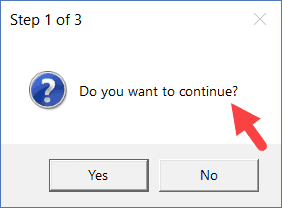
You can also add line breaks in the prompt message.
In the below code, I have added a line break using ‘vbNewLine’.
Sub MsgBoxInformationIcon()
MsgBox "Do you want to continue?" & vbNewLine & "Click Yes to Continue", vbYesNo + vbQuestion, "Step 1 of 3"
End Sub
You can also use the carriage return character – Chr(13) – or line feed – Chr(10) to insert a new line in the prompt message.
Note that you can add a new line to the prompt message only and not the title.
Assigning MsgBox Value to a Variable
So far, we have seen the examples where we have created message boxes and customized the buttons, icons, title, and prompt.
However, clicking a button has done nothing.
With MsgBox function in Excel, you can decide what you want to do when a user clicks a specific button. And this is possible as every button has a value associated to it.
So if I click on the Yes button, the MsgBox function returns a value (6 or the constant vbYes) which I can use in my code. Similarly, is the user selects the No button, it returns a different value ((7 or the constant vbNo)) that I can use in the code.
Below is a table that shows the exact values and the constant returned by the MsgBox function. You don’t need to memorize these, just be aware of it and you can use the constants which are easier to use.
| Button Clicked | Constant | Value |
| Ok | vbOk | 1 |
| Cancel | vbCancel | 2 |
| Abort | vbAbort | 3 |
| Retry | vbRetry | 4 |
| Ignore | vbIgnore | 5 |
| Yes | vbYes | 6 |
| No | vbNo | 7 |
Now let’s see how we can control the VBA macro code based on what button a user clicks.
In the below code, if the user clicks Yes, it displays the message “You Clicked Yes”, and if the user clicks No, it displays, “You clicked No”.
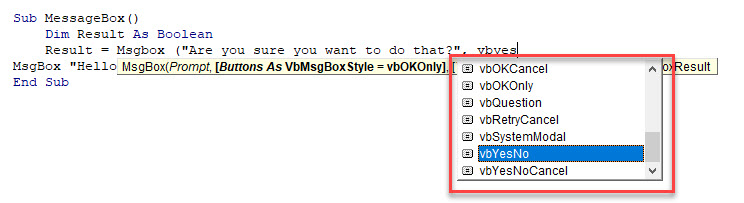
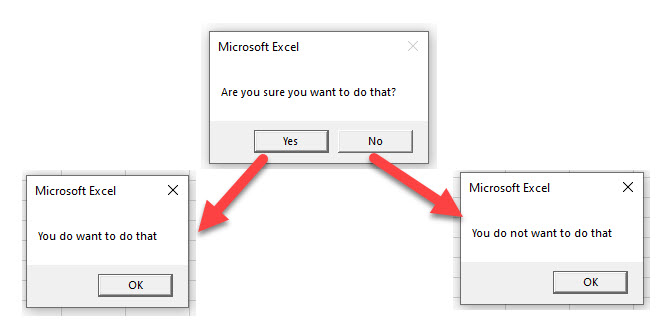
Sub MsgBoxInformationIcon()
Result = MsgBox("Do you want to continue?", vbYesNo + vbQuestion)
If Result = vbYes Then
MsgBox "You clicked Yes"
Else: MsgBox "You clicked No"
End If
End Sub
In the above code, I have assigned the value of the MsgBox function to the Result variable. When you click Yes button, the Result variable gets the vbYes constant (or the number 6) and when you click No, the Result variable gets the vbNo constant (or the number 7).
Then I used an If Then Else construct to check if the Result variable holds the value vbYes. If it does, it shows the prompt “You Clicked Yes”, else it shows “You clicked No”.
You can use the same concept to run a code if a user clicks Yes and exit the sub when he/she clicks No.
Note: When you assign the MsgBox output to a variable, you need to put the arguments of MsgBox function in parenthesis. For example, in the line Result = MsgBox(“Do you want to continue?”, vbYesNo + vbQuestion), you can see that the arguments are within parenthesis.
If you want to further dig into the Message Box function, here is the official document on it.
You May Also Like the Following Excel VBA Tutorials:
- Excel VBA Split Function.
- Excel VBA InStr Function.
- Working with Cells and Ranges in Excel VBA.
- Working with Worksheets in VBA.
- Working with Workbooks in VBA.
- Using Loops in Excel VBA.
- Understanding Excel VBA Data Types (Variables and Constants)
- How to Create and Use Personal Macro Workbook in Excel.
- Useful Excel Macro Code Examples.
- Using For Next Loop in Excel VBA.
- Excel VBA Events – An Easy (and Complete) Guide.
- How to Run a Macro in Excel – A Complete Step-by-Step Guide.
- How to Create and Use an Excel Add-in.
- Using Active Cell in VBA in Excel (Examples)
Worksheets and Workbooks
View
Row and Column Selection
Ribbon Control
Pivot Tables
Operating within a Cell
Navigating and Selecting Cells
Help and Menus
Group Selection
General Excel
General Cell Control
Formulas and Functions
Formatting Text and Numbers
Dialog Boxes
In Excel, a dialog box is a form that can help you add information and make decisions about different aspects of your current worksheet and its content such as data, charts, or graphic images. Shortcuts in this section will help you both open and work within these dialog boxes like a pro.
Borders
Advanced Selection
Adding Content to Cells
Get more Reference tips and tricks
Subscribe to our email updates and get Reference tips direct to your inbox.
Make code writing easier by using existing Excel dialog boxes. Excel 2013 has 258 dialog boxes built in, and you can use any of them in your code development, depending on the context of use.
Most of the BuiltIn dialogs are based on Excel 2003 menu items, such as , or . A complete list is provided in the figure 4 Excel Web App #1 Dialogs worksheet below.
Code 1:
Dim Tmp As Boolean

Application.Dialogs(xlDialogPrint).Show

Tmp = Application.Dialogs(xlDialogPrint).Show
This will show the Print dialog box — figure 1.
Code 2:
Application.Dialogs(xlDialogSaveAs).Show

Application.Dialogs(XlBuiltInDialog.xlDialogSaveAs).Show

Application.Dialogs(5).Show
Code 2, lines 1, 3, and 5 all show the Save As dialog box — figure 2. The Dialogs collection is returned by the Application object Dialogs property. Collection members are indexed by the XlBuiltInDialog constant and are identified by prefix xlDialog & dialog box name (caption) — lines 3 or index Value — line 5.
You can use all the functions in the box. When the user presses OK or cancel, they are returned to the program. Using BuiltIn dialog boxes can save a significant amount of programming effort.
The list in the Dialogs worksheet was returned by the procedure in code 3, where the Value and Name are stored in a 258 rows x 2 column array. A For…Next statement in lines 530 to 534 writes the list with the ActiveCell.Offset statement
Code 3: Sub procedure xlDialogList. Scroll down to view the 538 lines of code.
Sub xlDialogList()
Dim i As Integer
Dim xlDialog(1 To 258, 1 To 2) As String
'' Excel 2013 xlBuiltInDialog list

    xlDialog(1, 1) = 103
    xlDialog(2, 1) = 476
    xlDialog(3, 1) = 390
    xlDialog(4, 1) = 321
    xlDialog(5, 1) = 43
    xlDialog(6, 1) = 133
    xlDialog(7, 1) = 212
    xlDialog(8, 1) = 170
    xlDialog(9, 1) = 171
    xlDialog(10, 1) = 12
    xlDialog(11, 1) = 213
    xlDialog(12, 1) = 293
    xlDialog(13, 1) = 80
    xlDialog(14, 1) = 323
    xlDialog(15, 1) = 485
    xlDialog(16, 1) = 78
    xlDialog(17, 1) = 45
    xlDialog(18, 1) = 32
    xlDialog(19, 1) = 46
    xlDialog(20, 1) = 166
    xlDialog(21, 1) = 392
    xlDialog(22, 1) = 527
    xlDialog(23, 1) = 724
    xlDialog(24, 1) = 505
    xlDialog(25, 1) = 506
    xlDialog(26, 1) = 540
    xlDialog(27, 1) = 350
    xlDialog(28, 1) = 526
    xlDialog(29, 1) = 288
    xlDialog(30, 1) = 435
    xlDialog(31, 1) = 52
    xlDialog(32, 1) = 161
    xlDialog(33, 1) = 47
    xlDialog(34, 1) = 73
    xlDialog(35, 1) = 583
    xlDialog(36, 1) = 191
    xlDialog(37, 1) = 147
    xlDialog(38, 1) = 108
    xlDialog(39, 1) = 796
    xlDialog(40, 1) = 62
    xlDialog(41, 1) = 217
    xlDialog(42, 1) = 1272
    xlDialog(43, 1) = 276
    xlDialog(44, 1) = 493
    xlDialog(45, 1) = 36
    xlDialog(46, 1) = 379
    xlDialog(47, 1) = 723
    xlDialog(48, 1) = 40
    xlDialog(49, 1) = 525
    xlDialog(50, 1) = 61
    xlDialog(51, 1) = 229
    xlDialog(52, 1) = 111
    xlDialog(53, 1) = 110
    xlDialog(54, 1) = 203
    xlDialog(55, 1) = 27
    xlDialog(56, 1) = 862
    xlDialog(57, 1) = 438
    xlDialog(58, 1) = 223
    xlDialog(59, 1) = 54
    xlDialog(60, 1) = 251
    xlDialog(61, 1) = 228
    xlDialog(62, 1) = 463
    xlDialog(63, 1) = 464
    xlDialog(64, 1) = 732
    xlDialog(65, 1) = 709
    xlDialog(66, 1) = 530
    xlDialog(67, 1) = 35
    xlDialog(68, 1) = 6
    xlDialog(69, 1) = 481
    xlDialog(70, 1) = 200
    xlDialog(71, 1) = 301
    xlDialog(72, 1) = 447
    xlDialog(73, 1) = 370
    xlDialog(74, 1) = 475
    xlDialog(75, 1) = 26
    xlDialog(76, 1) = 381
    xlDialog(77, 1) = 269
    xlDialog(78, 1) = 465
    xlDialog(79, 1) = 423
    xlDialog(80, 1) = 150
    xlDialog(81, 1) = 88
    xlDialog(82, 1) = 225
    xlDialog(83, 1) = 128
    xlDialog(84, 1) = 42
    xlDialog(85, 1) = 226
    xlDialog(86, 1) = 129
    xlDialog(87, 1) = 89
    xlDialog(88, 1) = 64
    xlDialog(89, 1) = 63
    xlDialog(90, 1) = 130
    xlDialog(91, 1) = 450
    xlDialog(92, 1) = 193
    xlDialog(93, 1) = 272
    xlDialog(94, 1) = 194
    xlDialog(95, 1) = 195
    xlDialog(96, 1) = 196
    xlDialog(97, 1) = 273
    xlDialog(98, 1) = 67
    xlDialog(99, 1) = 68
    xlDialog(100, 1) = 69
    xlDialog(101, 1) = 388
    xlDialog(102, 1) = 344
    xlDialog(103, 1) = 70
    xlDialog(104, 1) = 71
    xlDialog(105, 1) = 249
    xlDialog(106, 1) = 72
    xlDialog(107, 1) = 198
    xlDialog(108, 1) = 76
    xlDialog(109, 1) = 666
    xlDialog(110, 1) = 55
    xlDialog(111, 1) = 596
    xlDialog(112, 1) = 259
    xlDialog(113, 1) = 342
    xlDialog(114, 1) = 380
    xlDialog(115, 1) = 436
    xlDialog(116, 1) = 437
    xlDialog(117, 1) = 382
    xlDialog(118, 1) = 470
    xlDialog(119, 1) = 339
    xlDialog(120, 1) = 378
    xlDialog(121, 1) = 85
    xlDialog(122, 1) = 185
    xlDialog(123, 1) = 1271
    xlDialog(124, 1) = 322
    xlDialog(125, 1) = 262
    xlDialog(126, 1) = 834
    xlDialog(127, 1) = 977
    xlDialog(128, 1) = 119
    xlDialog(129, 1) = 978
    xlDialog(130, 1) = 667
    xlDialog(131, 1) = 154
    xlDialog(132, 1) = 207
    xlDialog(133, 1) = 214
    xlDialog(134, 1) = 1
    xlDialog(135, 1) = 2
    xlDialog(136, 1) = 188
    xlDialog(137, 1) = 441
    xlDialog(138, 1) = 318
    xlDialog(139, 1) = 325
    xlDialog(140, 1) = 319
    xlDialog(141, 1) = 356
    xlDialog(142, 1) = 458
    xlDialog(143, 1) = 647
    xlDialog(144, 1) = 355
    xlDialog(145, 1) = 320
    xlDialog(146, 1) = 142
    xlDialog(147, 1) = 86
    xlDialog(148, 1) = 186
    xlDialog(149, 1) = 7
    xlDialog(150, 1) = 91
    xlDialog(151, 1) = 58
    xlDialog(152, 1) = 53
    xlDialog(153, 1) = 84
    xlDialog(154, 1) = 832
    xlDialog(155, 1) = 656
    xlDialog(156, 1) = 570
    xlDialog(157, 1) = 572
    xlDialog(158, 1) = 689
    xlDialog(159, 1) = 433
    xlDialog(160, 1) = 313
    xlDialog(161, 1) = 434
    xlDialog(162, 1) = 421
    xlDialog(163, 1) = 568
    xlDialog(164, 1) = 567
    xlDialog(165, 1) = 1183
    xlDialog(166, 1) = 1153
    xlDialog(167, 1) = 312
    xlDialog(168, 1) = 300
    xlDialog(169, 1) = 8
    xlDialog(170, 1) = 9
    xlDialog(171, 1) = 222
    xlDialog(172, 1) = 202
    xlDialog(173, 1) = 474
    xlDialog(174, 1) = 754
    xlDialog(175, 1) = 28
    xlDialog(176, 1) = 620
    xlDialog(177, 1) = 653
    xlDialog(178, 1) = 445
    xlDialog(179, 1) = 1258
    xlDialog(180, 1) = 134
    xlDialog(181, 1) = 127
    xlDialog(182, 1) = 17
    xlDialog(183, 1) = 5
    xlDialog(184, 1) = 456
    xlDialog(185, 1) = 208
    xlDialog(186, 1) = 145
    xlDialog(187, 1) = 285
    xlDialog(188, 1) = 87
    xlDialog(189, 1) = 307
    xlDialog(190, 1) = 305
    xlDialog(191, 1) = 308
    xlDialog(192, 1) = 473
    xlDialog(193, 1) = 311
    xlDialog(194, 1) = 420
    xlDialog(195, 1) = 731
    xlDialog(196, 1) = 132
    xlDialog(197, 1) = 189
    xlDialog(198, 1) = 460
    xlDialog(199, 1) = 557
    xlDialog(200, 1) = 466
    xlDialog(201, 1) = 504
    xlDialog(202, 1) = 461
    xlDialog(203, 1) = 462
    xlDialog(204, 1) = 509
    xlDialog(205, 1) = 1109
    xlDialog(206, 1) = 1208
    xlDialog(207, 1) = 23
    xlDialog(208, 1) = 1108
    xlDialog(209, 1) = 1107
    xlDialog(210, 1) = 159
    xlDialog(211, 1) = 204
    xlDialog(212, 1) = 220
    xlDialog(213, 1) = 261
    xlDialog(214, 1) = 1182
    xlDialog(215, 1) = 1184
    xlDialog(216, 1) = 1179
    xlDialog(217, 1) = 39
    xlDialog(218, 1) = 192
    xlDialog(219, 1) = 1134
    xlDialog(220, 1) = 1133
    xlDialog(221, 1) = 1135
    xlDialog(222, 1) = 137
    xlDialog(223, 1) = 190
    xlDialog(224, 1) = 472
    xlDialog(225, 1) = 44
    xlDialog(226, 1) = 218
    xlDialog(227, 1) = 398
    xlDialog(228, 1) = 474
    xlDialog(229, 1) = 41
    xlDialog(230, 1) = 394
    xlDialog(231, 1) = 422
    xlDialog(232, 1) = 94
    xlDialog(233, 1) = 201
    xlDialog(234, 1) = 328
    xlDialog(235, 1) = 478
    xlDialog(236, 1) = 330
    xlDialog(237, 1) = 197
    xlDialog(238, 1) = 773
    xlDialog(239, 1) = 686
    xlDialog(240, 1) = 684
    xlDialog(241, 1) = 687
    xlDialog(242, 1) = 683
    xlDialog(243, 1) = 685
    xlDialog(244, 1) = 14
    xlDialog(245, 1) = 13
    xlDialog(246, 1) = 281
    xlDialog(247, 1) = 283
    xlDialog(248, 1) = 354
    xlDialog(249, 1) = 282
    xlDialog(250, 1) = 386
    xlDialog(251, 1) = 302
    xlDialog(252, 1) = 284
    xlDialog(253, 1) = 417
    xlDialog(254, 1) = 415
    xlDialog(255, 1) = 384
    xlDialog(256, 1) = 199
    xlDialog(257, 1) = 95
    xlDialog(258, 1) = 256

    xlDialog(1, 2) = "xlDialogActivate"
    xlDialog(2, 2) = "xlDialogActiveCellFont"
    xlDialog(3, 2) = "xlDialogAddChartAutoformat"
    xlDialog(4, 2) = "xlDialogAddinManager"
    xlDialog(5, 2) = "xlDialogAlignment"
    xlDialog(6, 2) = "xlDialogApplyNames"
    xlDialog(7, 2) = "xlDialogApplyStyle"
    xlDialog(8, 2) = "xlDialogAppMove"
    xlDialog(9, 2) = "xlDialogAppSize"
    xlDialog(10, 2) = "xlDialogArrangeAll"
    xlDialog(11, 2) = "xlDialogAssignToObject"
    xlDialog(12, 2) = "xlDialogAssignToTool"
    xlDialog(13, 2) = "xlDialogAttachText"
    xlDialog(14, 2) = "xlDialogAttachToolbars"
    xlDialog(15, 2) = "xlDialogAutoCorrect"
    xlDialog(16, 2) = "xlDialogAxes"
    xlDialog(17, 2) = "xlDialogBorder"
    xlDialog(18, 2) = "xlDialogCalculation"
    xlDialog(19, 2) = "xlDialogCellProtection"
    xlDialog(20, 2) = "xlDialogChangeLink"
    xlDialog(21, 2) = "xlDialogChartAddData"
    xlDialog(22, 2) = "xlDialogChartLocation"
    xlDialog(23, 2) = "xlDialogChartOptionsDataLabelMultiple"
    xlDialog(24, 2) = "xlDialogChartOptionsDataLabels"
    xlDialog(25, 2) = "xlDialogChartOptionsDataTable"
    xlDialog(26, 2) = "xlDialogChartSourceData"
    xlDialog(27, 2) = "xlDialogChartTrend"
    xlDialog(28, 2) = "xlDialogChartType"
    xlDialog(29, 2) = "xlDialogChartWizard"
    xlDialog(30, 2) = "xlDialogCheckboxProperties"
    xlDialog(31, 2) = "xlDialogClear"
    xlDialog(32, 2) = "xlDialogColorPalette"
    xlDialog(33, 2) = "xlDialogColumnWidth"
    xlDialog(34, 2) = "xlDialogCombination"
    xlDialog(35, 2) = "xlDialogConditionalFormatting"
    xlDialog(36, 2) = "xlDialogConsolidate"
    xlDialog(37, 2) = "xlDialogCopyChart"
    xlDialog(38, 2) = "xlDialogCopyPicture"
    xlDialog(39, 2) = "xlDialogCreateList"
    xlDialog(40, 2) = "xlDialogCreateNames"
    xlDialog(41, 2) = "xlDialogCreatePublisher"
    xlDialog(42, 2) = "xlDialogCreateRelationship"
    xlDialog(43, 2) = "xlDialogCustomizeToolbar"
    xlDialog(44, 2) = "xlDialogCustomViews"
    xlDialog(45, 2) = "xlDialogDataDelete"
    xlDialog(46, 2) = "xlDialogDataLabel"
    xlDialog(47, 2) = "xlDialogDataLabelMultiple"
    xlDialog(48, 2) = "xlDialogDataSeries"
    xlDialog(49, 2) = "xlDialogDataValidation"
    xlDialog(50, 2) = "xlDialogDefineName"
    xlDialog(51, 2) = "xlDialogDefineStyle"
    xlDialog(52, 2) = "xlDialogDeleteFormat"
    xlDialog(53, 2) = "xlDialogDeleteName"
    xlDialog(54, 2) = "xlDialogDemote"
    xlDialog(55, 2) = "xlDialogDisplay"
    xlDialog(56, 2) = "xlDialogDocumentInspector"
    xlDialog(57, 2) = "xlDialogEditboxProperties"
    xlDialog(58, 2) = "xlDialogEditColor"
    xlDialog(59, 2) = "xlDialogEditDelete"
    xlDialog(60, 2) = "xlDialogEditionOptions"
    xlDialog(61, 2) = "xlDialogEditSeries"
    xlDialog(62, 2) = "xlDialogErrorbarX"
    xlDialog(63, 2) = "xlDialogErrorbarY"
    xlDialog(64, 2) = "xlDialogErrorChecking"
    xlDialog(65, 2) = "xlDialogEvaluateFormula"
    xlDialog(66, 2) = "xlDialogExternalDataProperties"
    xlDialog(67, 2) = "xlDialogExtract"
    xlDialog(68, 2) = "xlDialogFileDelete"
    xlDialog(69, 2) = "xlDialogFileSharing"
    xlDialog(70, 2) = "xlDialogFillGroup"
    xlDialog(71, 2) = "xlDialogFillWorkgroup"
    xlDialog(72, 2) = "xlDialogFilter"
    xlDialog(73, 2) = "xlDialogFilterAdvanced"
    xlDialog(74, 2) = "xlDialogFindFile"
    xlDialog(75, 2) = "xlDialogFont"
    xlDialog(76, 2) = "xlDialogFontProperties"
    xlDialog(77, 2) = "xlDialogFormatAuto"
    xlDialog(78, 2) = "xlDialogFormatChart"
    xlDialog(79, 2) = "xlDialogFormatCharttype"
    xlDialog(80, 2) = "xlDialogFormatFont"
    xlDialog(81, 2) = "xlDialogFormatLegend"
    xlDialog(82, 2) = "xlDialogFormatMain"
    xlDialog(83, 2) = "xlDialogFormatMove"
    xlDialog(84, 2) = "xlDialogFormatNumber"
    xlDialog(85, 2) = "xlDialogFormatOverlay"
    xlDialog(86, 2) = "xlDialogFormatSize"
    xlDialog(87, 2) = "xlDialogFormatText"
    xlDialog(88, 2) = "xlDialogFormulaFind"
    xlDialog(89, 2) = "xlDialogFormulaGoto"
    xlDialog(90, 2) = "xlDialogFormulaReplace"
    xlDialog(91, 2) = "xlDialogFunctionWizard"
    xlDialog(92, 2) = "xlDialogGallery3dArea"
    xlDialog(93, 2) = "xlDialogGallery3dBar"
    xlDialog(94, 2) = "xlDialogGallery3dColumn"
    xlDialog(95, 2) = "xlDialogGallery3dLine"
    xlDialog(96, 2) = "xlDialogGallery3dPie"
    xlDialog(97, 2) = "xlDialogGallery3dSurface"
    xlDialog(98, 2) = "xlDialogGalleryArea"
    xlDialog(99, 2) = "xlDialogGalleryBar"
    xlDialog(100, 2) = "xlDialogGalleryColumn"
    xlDialog(101, 2) = "xlDialogGalleryCustom"
    xlDialog(102, 2) = "xlDialogGalleryDoughnut"
    xlDialog(103, 2) = "xlDialogGalleryLine"
    xlDialog(104, 2) = "xlDialogGalleryPie"
    xlDialog(105, 2) = "xlDialogGalleryRadar"
    xlDialog(106, 2) = "xlDialogGalleryScatter"
    xlDialog(107, 2) = "xlDialogGoalSeek"
    xlDialog(108, 2) = "xlDialogGridlines"
    xlDialog(109, 2) = "xlDialogImportTextFile"
    xlDialog(110, 2) = "xlDialogInsert"
    xlDialog(111, 2) = "xlDialogInsertHyperlink"
    xlDialog(112, 2) = "xlDialogInsertObject"
    xlDialog(113, 2) = "xlDialogInsertPicture"
    xlDialog(114, 2) = "xlDialogInsertTitle"
    xlDialog(115, 2) = "xlDialogLabelProperties"
    xlDialog(116, 2) = "xlDialogListboxProperties"
    xlDialog(117, 2) = "xlDialogMacroOptions"
    xlDialog(118, 2) = "xlDialogMailEditMailer"
    xlDialog(119, 2) = "xlDialogMailLogon"
    xlDialog(120, 2) = "xlDialogMailNextLetter"
    xlDialog(121, 2) = "xlDialogMainChart"
    xlDialog(122, 2) = "xlDialogMainChartType"
    xlDialog(123, 2) = "xlDialogManageRelationships"
    xlDialog(124, 2) = "xlDialogMenuEditor"
    xlDialog(125, 2) = "xlDialogMove"
    xlDialog(126, 2) = "xlDialogMyPermission"
    xlDialog(127, 2) = "xlDialogNameManager"
    xlDialog(128, 2) = "xlDialogNew"
    xlDialog(129, 2) = "xlDialogNewName"
    xlDialog(130, 2) = "xlDialogNewWebQuery"
    xlDialog(131, 2) = "xlDialogNote"
    xlDialog(132, 2) = "xlDialogObjectProperties"
    xlDialog(133, 2) = "xlDialogObjectProtection"
    xlDialog(134, 2) = "xlDialogOpen"
    xlDialog(135, 2) = "xlDialogOpenLinks"
    xlDialog(136, 2) = "xlDialogOpenMail"
    xlDialog(137, 2) = "xlDialogOpenText"
    xlDialog(138, 2) = "xlDialogOptionsCalculation"
    xlDialog(139, 2) = "xlDialogOptionsChart"
    xlDialog(140, 2) = "xlDialogOptionsEdit"
    xlDialog(141, 2) = "xlDialogOptionsGeneral"
    xlDialog(142, 2) = "xlDialogOptionsListsAdd"
    xlDialog(143, 2) = "xlDialogOptionsME"
    xlDialog(144, 2) = "xlDialogOptionsTransition"
    xlDialog(145, 2) = "xlDialogOptionsView"
    xlDialog(146, 2) = "xlDialogOutline"
    xlDialog(147, 2) = "xlDialogOverlay"
    xlDialog(148, 2) = "xlDialogOverlayChartType"
    xlDialog(149, 2) = "xlDialogPageSetup"
    xlDialog(150, 2) = "xlDialogParse"
    xlDialog(151, 2) = "xlDialogPasteNames"
    xlDialog(152, 2) = "xlDialogPasteSpecial"
    xlDialog(153, 2) = "xlDialogPatterns"
    xlDialog(154, 2) = "xlDialogPermission"
    xlDialog(155, 2) = "xlDialogPhonetic"
    xlDialog(156, 2) = "xlDialogPivotCalculatedField"
    xlDialog(157, 2) = "xlDialogPivotCalculatedItem"
    xlDialog(158, 2) = "xlDialogPivotClientServerSet"
    xlDialog(159, 2) = "xlDialogPivotFieldGroup"
    xlDialog(160, 2) = "xlDialogPivotFieldProperties"
    xlDialog(161, 2) = "xlDialogPivotFieldUngroup"
    xlDialog(162, 2) = "xlDialogPivotShowPages"
    xlDialog(163, 2) = "xlDialogPivotSolveOrder"
    xlDialog(164, 2) = "xlDialogPivotTableOptions"
    xlDialog(165, 2) = "xlDialogPivotTableSlicerConnections"
    xlDialog(166, 2) = "xlDialogPivotTableWhatIfAnalysisSettings"
    xlDialog(167, 2) = "xlDialogPivotTableWizard"
    xlDialog(168, 2) = "xlDialogPlacement"
    xlDialog(169, 2) = "xlDialogPrint"
    xlDialog(170, 2) = "xlDialogPrinterSetup"
    xlDialog(171, 2) = "xlDialogPrintPreview"
    xlDialog(172, 2) = "xlDialogPromote"
    xlDialog(173, 2) = "xlDialogProperties"
    xlDialog(174, 2) = "xlDialogPropertyFields"
    xlDialog(175, 2) = "xlDialogProtectDocument"
    xlDialog(176, 2) = "xlDialogProtectSharing"
    xlDialog(177, 2) = "xlDialogPublishAsWebPage"
    xlDialog(178, 2) = "xlDialogPushbuttonProperties"
    xlDialog(179, 2) = "xlDialogRecommendedPivotTables"
    xlDialog(180, 2) = "xlDialogReplaceFont"
    xlDialog(181, 2) = "xlDialogRowHeight"
    xlDialog(182, 2) = "xlDialogRun"
    xlDialog(183, 2) = "xlDialogSaveAs"
    xlDialog(184, 2) = "xlDialogSaveCopyAs"
    xlDialog(185, 2) = "xlDialogSaveNewObject"
    xlDialog(186, 2) = "xlDialogSaveWorkbook"
    xlDialog(187, 2) = "xlDialogSaveWorkspace"
    xlDialog(188, 2) = "xlDialogScale"
    xlDialog(189, 2) = "xlDialogScenarioAdd"
    xlDialog(190, 2) = "xlDialogScenarioCells"
    xlDialog(191, 2) = "xlDialogScenarioEdit"
    xlDialog(192, 2) = "xlDialogScenarioMerge"
    xlDialog(193, 2) = "xlDialogScenarioSummary"
    xlDialog(194, 2) = "xlDialogScrollbarProperties"
    xlDialog(195, 2) = "xlDialogSearch"
    xlDialog(196, 2) = "xlDialogSelectSpecial"
    xlDialog(197, 2) = "xlDialogSendMail"
    xlDialog(198, 2) = "xlDialogSeriesAxes"
    xlDialog(199, 2) = "xlDialogSeriesOptions"
    xlDialog(200, 2) = "xlDialogSeriesOrder"
    xlDialog(201, 2) = "xlDialogSeriesShape"
    xlDialog(202, 2) = "xlDialogSeriesX"
    xlDialog(203, 2) = "xlDialogSeriesY"
    xlDialog(204, 2) = "xlDialogSetBackgroundPicture"
    xlDialog(205, 2) = "xlDialogSetManager"
    xlDialog(206, 2) = "xlDialogSetMDXEditor"
    xlDialog(207, 2) = "xlDialogSetPrintTitles"
    xlDialog(208, 2) = "xlDialogSetTupleEditorOnColumns"
    xlDialog(209, 2) = "xlDialogSetTupleEditorOnRows"
    xlDialog(210, 2) = "xlDialogSetUpdateStatus"
    xlDialog(211, 2) = "xlDialogShowDetail"
    xlDialog(212, 2) = "xlDialogShowToolbar"
    xlDialog(213, 2) = "xlDialogSize"
    xlDialog(214, 2) = "xlDialogSlicerCreation"
    xlDialog(215, 2) = "xlDialogSlicerPivotTableConnections"
    xlDialog(216, 2) = "xlDialogSlicerSettings"
    xlDialog(217, 2) = "xlDialogSort"
    xlDialog(218, 2) = "xlDialogSortSpecial"
    xlDialog(219, 2) = "xlDialogSparklineInsertColumn"
    xlDialog(220, 2) = "xlDialogSparklineInsertLine"
    xlDialog(221, 2) = "xlDialogSparklineInsertWinLoss"
    xlDialog(222, 2) = "xlDialogSplit"
    xlDialog(223, 2) = "xlDialogStandardFont"
    xlDialog(224, 2) = "xlDialogStandardWidth"
    xlDialog(225, 2) = "xlDialogStyle"
    xlDialog(226, 2) = "xlDialogSubscribeTo"
    xlDialog(227, 2) = "xlDialogSubtotalCreate"
    xlDialog(228, 2) = "xlDialogSummaryInfo"
    xlDialog(229, 2) = "xlDialogTable"
    xlDialog(230, 2) = "xlDialogTabOrder"
    xlDialog(231, 2) = "xlDialogTextToColumns"
    xlDialog(232, 2) = "xlDialogUnhide"
    xlDialog(233, 2) = "xlDialogUpdateLink"
    xlDialog(234, 2) = "xlDialogVbaInsertFile"
    xlDialog(235, 2) = "xlDialogVbaMakeAddin"
    xlDialog(236, 2) = "xlDialogVbaProcedureDefinition"
    xlDialog(237, 2) = "xlDialogView3d"
    xlDialog(238, 2) = "xlDialogWebOptionsBrowsers"
    xlDialog(239, 2) = "xlDialogWebOptionsEncoding"
    xlDialog(240, 2) = "xlDialogWebOptionsFiles"
    xlDialog(241, 2) = "xlDialogWebOptionsFonts"
    xlDialog(242, 2) = "xlDialogWebOptionsGeneral"
    xlDialog(243, 2) = "xlDialogWebOptionsPictures"
    xlDialog(244, 2) = "xlDialogWindowMove"
    xlDialog(245, 2) = "xlDialogWindowSize"
    xlDialog(246, 2) = "xlDialogWorkbookAdd"
    xlDialog(247, 2) = "xlDialogWorkbookCopy"
    xlDialog(248, 2) = "xlDialogWorkbookInsert"
    xlDialog(249, 2) = "xlDialogWorkbookMove"
    xlDialog(250, 2) = "xlDialogWorkbookName"
    xlDialog(251, 2) = "xlDialogWorkbookNew"
    xlDialog(252, 2) = "xlDialogWorkbookOptions"
    xlDialog(253, 2) = "xlDialogWorkbookProtect"
    xlDialog(254, 2) = "xlDialogWorkbookTabSplit"
    xlDialog(255, 2) = "xlDialogWorkbookUnhide"
    xlDialog(256, 2) = "xlDialogWorkgroup"
    xlDialog(257, 2) = "xlDialogWorkspace"
    xlDialog(258, 2) = "xlDialogZoom"

With ActiveCell
    .Offset(0, 0) = "Value"
    .Offset(0, 0).HorizontalAlignment = xlRight
    .Offset(0, 1) = "Name"
    .Offset(i, 1).IndentLevel = 1

    For i = LBound(xlDialog) To UBound(xlDialog)
        .Offset(i, 0).Value = xlDialog(i, 1)
        .Offset(i, 1).Value = xlDialog(i, 2)
        .Offset(i, 1).IndentLevel = 1
    Next i

End With

End Sub
A list of Built-In Dialog Box Arguments is available at the Office Dev Center site: Built-In Dialog Box Argument Lists. The xlDialogWorkspace dialog box demonstrated here, has 16 listed arguments. Details are shown in the Code 2 window. In Line 7, arguments are passed by Name, and in Line 10 arguments are passed by Position. A comma marks each position.
Code 2: Sub xlDialogWspace shows the xlDialogWorkspace box — with arguments, by Name and Position
Sub xlDialogWspace()
'' Arg1: fixed; Arg2: decimals; Arg3: r1c1; Arg4: scroll; Arg5: status; Arg6: formula;
'' Arg7: menu_key; Arg8: remote; Arg9 :entermove; Arg10:underlines; Arg11: tools;
'' Arg12: notes; Arg13: nav_keys; Arg14: menu_key_action; Arg15: drag_drop; Arg16: show_info

'' Set Wspace - parameters by Name
    Application.Dialogs(xlDialogWorkspace).Show Arg3:=True, Arg4:=False, Arg5:=False, Arg6:=False

'' Reset Wspace - parameters by Position
    Application.Dialogs(xlDialogWorkspace).Show , , False, True, True, True
End Sub
and the line 7 code result is in figure 5 (left pane), and the line 10 code result in figure 5 (right pane).
In this tutorial you’ll quickly learn the correct syntax to create a VBA message box (also referred to as a pop-up dialogue box) in Excel. I first show you how to create a message box that displays a simple message, and then we expand on this to include “YES” & “NO” buttons and perform an action based on the selected button.
The message box function (its official name is MsgBox) is a very easy to use, built-in feature in VBA that allows you to communicate with the user. The message box does not have to be designed, merely called.
In addition to displaying informative messages to the user, the MsgBox function can also solicit input from the user by way of the buttons displayed in the message box. Selections such as “Yes”, “No”, “OK”, and “Cancel” can be captured and used in decision making structures in VBA.
Common uses of a message box are to inform the user that a macro has finished running, or to request confirmation of an action prior to execution of that action.

Task 1: Create a Welcome Message for the User
This macro will display a message box welcoming the user to the workbook.
Open the Visual Basic editor by selecting Developer (tab) -> Code (group) -> Visual Basic or by pressing the key combination ALT-F11 on your keyboard.

We will need to insert a module sheet into your workbook. This is performed by right-clicking on any reference on the workbook in the Project Explorer (upper left of the VBA Editor) and selecting Insert -> Module.

In the code window of the newly created module sheet type the following code.
Sub Simple_MsgBox()
End Sub
The syntax for the MsgBox function is as follows:
MsgBox(Prompt, [Buttons], [Title], [HelpFile], [Context]
The official Microsoft descriptions of these parameters are:
- Prompt – Required. String expression displayed as the message in the dialog box. The maximum length of prompt is approximately 1024 characters, depending on the width of the characters used. If prompt consists of more than one line, you can separate the lines by using a carriage return character (Chr(13)), a linefeed character (Chr(10)), or carriage return – linefeed character combination (Chr(13) & Chr(10)) between each line.
- Buttons – Optional. Numeric expression that is the sum of values specifying the number and type of buttons to display, the icon style to use, the identity of the default button, and the modality of the message box. If omitted, the default value for buttons is 0.
- Title – Optional. String expression displayed in the title bar of the dialog box. If you omit title, the application name is placed in the title bar.
- HelpFile – Optional. String expression that identifies the Help file to use to provide context-sensitive Help for the dialog box. If helpfile is provided, context must also be provided.
- Context – Optional. Numeric expression that is the Help context number assigned to the appropriate Help topic by the Help author. If context is provided, helpfile must also be provided.
The MsgBox function can be directly typed into the code window or accessed via Intellisense by typing “VBA.” and selecting “MsgBox” directly from the global library.

The MsgBox function is also accessible through the Interaction class. This is accessed by typing “VBA.Interaction.MsgBox”.

Regardless of how you type this, you get the same result.
Creating our Message Box
In the newly created procedure named “Simple_MsgBox”, enter the following code.
MsgBox “Hello”
This is an example of a message box in its simplest form.
When we run the procedure (with your cursor in the code, press F5), we see the following result.

Adding and Customizing Other Features
The first customization deals with the button style. The default button style is to display the “OK” button. There are several pre-configured button styles, each presenting their own buttons. Some examples are:
vbAbortRetryIgnore, vbYesNo, vbYesNoCancel, vbOk, vbOkCancel, and vbRetryCancel

We can also define which button is pre-selected by using the “vbDefaultButtonX” option. In a vbYesNoCancel configuration, vbDefaultButton1 would pre-select the “Yes” button, where vbDefaultButton2 would pre-select the “No” button.

Since are only displaying a message, the default “OK” button will suffice so we will skip this argument.
Because this MsgBox function mimics the same structure of a regular Excel function, if you skip an argument you need to supply the comma as a placeholder.
The second customization will be for the wording in the Title Bar of the dialog box. If no title is provided, the application’s title is displayed, such as “Microsoft Excel”. Because there is limited space in the Title Bar, try to keep this text brief.
Our updated macro appears as follows.
MsgBox “Hello”, ,”Welcome!”
Another way to write the statement is to use embedded titles for the arguments.
MsgBox prompt:=”Hello”, Title:=”Welcome!”
This allows us to list the arguments in any order we see fit and serves as a rudimentary form of inline documentation.
Lastly, let’s personalize the prompt by reading the user’s name form the applications User Name property. This is stored in the application’s Options section (File -> Options -> User name).
The updated code appears as follows
MsgBox “Hello ” & Excel.Application.UserName, , “Welcome!”
Press F5 to run the macro and observe the results.

Storing the Selected Button
When the user clicks a button in a message box, a code is stored in a permanent variable called vbMsgBoxResult.

This will come in handy in our next example when we must perform an action based on the selected button. For now, we ignore the user’s selection. Clicking the OK button will discard the message box without any further actions.
Creating a Launch Button
We need a way for the user to run the macro and using F5 is not an easy way for users to remember. We want to give them a button to press. To create a launch button, select Developer (tab) -> Controls (group) -> Insert -> Form Controls -> Button.

Draw a small rectangle on the screen and select the “Simple_MsgBox” macro form the list of macros in the Assign Macro dialog box.

Replace the default text on the button with “Welcome” and consider adding symbols to the buttons.

The symbol library (available by clicking Insert (tab) -> Illustrations (group) -> Icons) has a large collection of simple objects that are ideally suited for this use.

If you elect to use symbols with your buttons, make sure that the following actions are performed:
- Make sure the symbol is in front of the launch button. (right-click on the symbol and select “Bring to Front”)
- Assign the same macro to the symbol. (right-click on the symbol and select “Assign Macro…” and select the same macro assigned to the launch button)
- Position and group the button and symbol so they will move and resize as a single object. (right-click -> group)
When we click the button, we see the updated message box.
Using Additional Features
We will enhance out message box with a second line of text. Because we cannot create a new line of text by hitting the Enter key in your text, we need to use a VBA command to initiate a new line. This is performed using the VBA constant called vbNewLine. Observe the updated code below.
MsgBox “Hello ” & Excel.Application.UserName &“.”& VBA.Constants.vbNewLine & _
	“Thanks for stopping by.”, , “Welcome!”
If you prefer the labeled version, the code would appear as follows.
MsgBox Prompt:=“Hello ” & Excel.Application.UserName &“.”& VBA.Constants.vbNewLine & _
	“Thanks for stopping by.”, Title:=“Welcome!”
Select the code and press F5 to view the results.

Task 2: Clear Values based on User’s Response
This macro will prompt the user to clear the contents of a range of cells. If the user selects “Yes”, we will clear the cell range. If the user selects “No”, we will exit the macro. The finished dialog box will appear as follows.
Because we must process a decision, we will examine the button pressed by the user do decide how to proceed. This will use information stored in the automatically created variable named vbMsgBoxResult.

We begin by creating a new procedure named “Yes_No_MsgBox”.

To use our user’s response in a decision structure, we will transfer the captured response from the vbMsgBoxResult variable and store it in a variable of our own named “Answer”. This variable will be defined as a vbMsgBoxResult data type.
Dim Answer As VbMsgBoxResult
Next, we will transfer the contents of the automatically captured response to our “Answer” variable created in the previous step. Notice that we must place all the MsgBox arguments inside parentheses. Because we are using the MsgBox more like an Excel function as opposed to an action, we must follow the conventions of formula structures.
Answer = MsgBox(“Are you sure about this?”, vbYesNo + vbQuestion + vbDefaultButton2, “Clear cells”)
Using the plus sign, we can combine dialog box features such as buttons, icons, and default selections.
Note: In the above example, we are not only customizing the buttons, but we are also customizing a displayed icon in the message box. The “vbQuestion” constant will display a blue circle with a white question mark.

Other options include “vbCritical”, “vbExclamation”, and “vbInformation”.

The next step is to examine the captured response in the variable “Answer” and decide what action to take. If the user presses the “Yes” button, we will clear the range of cells A7 through B9. If the user presses any other button (in this case, “No”), we will exit the procedure.
If Answer = vbYes Then
	Range(“A7:B9”).Clear
Else
	Exit Sub
End If
The completed code appears as follows.
Sub Yes_No_MsgBox()
Dim Answer As VbMsgBoxResult
	Answer = MsgBox("Are you sure about this?", vbYesNo + vbQuestion + vbDefaultButton2, "Clear cells")
	If Answer = vbYes Then
    		Range("A7:B9").Clear
	Else
    		Exit Sub
	End If
End Sub
Creating a Launch Button
We will need a way for the user to run the macro so we will create a new button in the same way we created the previous macro’s button. The only difference will be what is written on the button and the assignment of the “Yes_No_MsgBox” macro.
Running the Macro
Pressing the “Clear” button, we are presented with the following dialog box.

Observe that the default selected button is the “No” button.
If the user presses the “No” button, no action takes place. If we rerun the macro but select the “Yes” button, cells A7:B9 are cleared of their contents.

Practice Workbook
Feel free to Download the Workbook HERE.
![]()
Published on: February 11, 2019
Last modified: March 2, 2023


Leila Gharani
I’m a 5x Microsoft MVP with over 15 years of experience implementing and professionals on Management Information Systems of different sizes and nature.
My background is Masters in Economics, Economist, Consultant, Oracle HFM Accounting Systems Expert, SAP BW Project Manager. My passion is teaching, experimenting and sharing. I am also addicted to learning and enjoy taking online courses on a variety of topics.
Author: Oscar Cronquist Article last updated on February 08, 2023
A dialog box is an excellent alternative to a userform, they are built-in to VBA and can save you time because you don’t need to code and build a userform. Some of these dialog boxes also have built-in validation. This article shows you what you can and can’t do with dialog boxes.
Table of contents
- How to create a Message box (VBA)
- Message box arguments
- Message box buttons
- vbOKOnly
- vbOKCancel
- vbAbortRetryIgnore
- vbYesNoCancel
- vbYesNo
- vbRetryCancel
- How to display Message box icons
- vbCritical
- vbQuestion
- vbExclamation
- vbinformation
- Combine buttons and icons
- Default buttons
- Messagebox return value
- Helpfile
- Working with text in a message box
- Input box (vba)
- How to set the default value for an input box?
- Input box (Excel)
- Number
- Range
- Combine data types
- DataForm
- FileDialog
- msoFileDialogFilePicker
- msoFileDialogFolderPicker
- msoFileDialogOpen
- msoFileDialogSaveAs
- GetOpenFilename
- GetSaveAsFilename
1. How to create a Message box (VBA)
The most basic dialog box you probably have seen many times is the message box. In its most simple form, it gives the user a message you specify and an OK button.

Sub Macro1()

MsgBox "Hi, there!"

End Sub
It is a great tool for quickly troubleshooting a subroutine or a custom function. The message box has more options than displaying text or variables, these are the arguments:
Back to top
1.1 Message box arguments

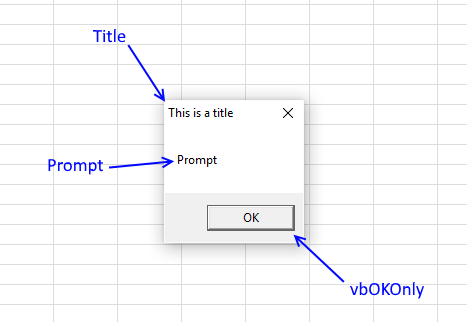
Sub Macro1()

MsgBox "Prompt", vbOKOnly, "This is a title"

End Sub
Prompt — Text shown in message box
Buttons — You can select of a variety of different buttons and icons. If you can’t find the buttons you need, a user form is required.
vbOKOnly — 0
vbOKCancel — 1
vbAbortRetryIgnore — 2
vbYesNoCancel — 3
vbYesNo — 4
vbRetryCancel — 5
vbCritical — 16
vbQuestion — 32
vbExclamation — 48
vbInformation — 64
vbDefaultButton1 — 0
vbDefaultButton2 — 256
vbDefaultButton3 — 512
vbDefaultButton4 — 768
Title — Text at the very top of the message box. (Optional)
Helpfile — Path to your helpfile. (Optional)
Context — A numerical expression. (Optional, required if you specify a helpfile)
Back to top
1.2 How to configure buttons on a message box
There are six different button setups. The most basic message box shows a text string or a variable and an OK button.
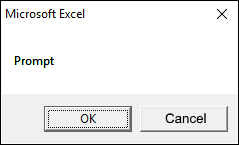
1.2.1 vbOKOnly
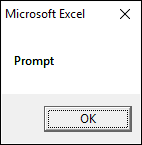
The dialog box demonstrated in the image above shows a single «OK» button, the VBA code below shows how to create the dialog box.
Sub Macro1()

MsgBox "Prompt", vbOKOnly

End Sub
You don’t even need to specify the vbOKOnly argument to show the above dialog box.
Back to top
1.2.2 vbOKCancel
The dialog box demonstrated in the image above shows an «OK» and «Cancel» button, the VBA code below shows how to create the dialog box.
vbOKCancel argument displays OK and Cancel buttons.
Sub Macro1()

MsgBox "Prompt", vbOKCancel

End Sub
Back to top
1.2.3 vbAbortRetryIgnore
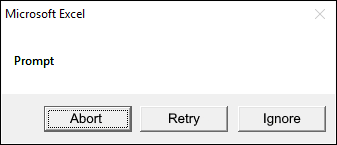
The dialog box demonstrated in the image above shows an «Abort», «Retry», and «Ignore» button, the VBA code below shows how to create the dialog box.
vbAbortRetryIgnore argument shows three buttons, abort, retry and ignore on the dialog box.
Sub Macro1()

MsgBox "Prompt", vbAbortRetryIgnore

End Sub
Back to top
1.2.4 vbYesNoCancel
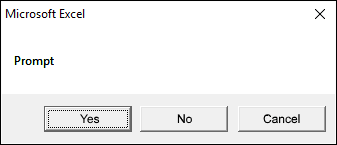
The dialog box demonstrated in the image above shows a «Yes», «No», and «Cancel» button, the VBA code below shows how to create the dialog box.
vbYesNoCancel argument also shows three buttons, however, they are named, Yes, No, and Cancel.
Sub Macro1()

MsgBox "Prompt", vbYesNoCancel

End Sub
Back to top
1.2.5 vbYesNo
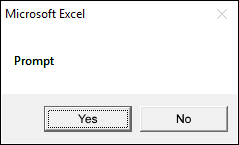
The dialog box demonstrated in the image above shows a «Yes» and «No» button, the VBA code below shows how to create the dialog box.
vbYesNo argument diplays Yes and No buttons.
Sub Macro1()

MsgBox "Prompt", vbYesNo

End Sub
Back to top
1.2.6 vbRetryCancel

vbRetryCancel argument shows Retry and Cancel buttons.
Sub Macro1()

MsgBox "Prompt", vbRetryCancel

End Sub
Back to top
1.3 Icons
1.3.1 vbCritical

vbCritical shows this icon on the message box, see the image above.
Sub Macro1()

MsgBox "Prompt", vbCritical

End Sub
Back to top
1.3.2 vbQuestion
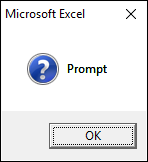
vbQuestion shows this query icon, see the image above.
Sub Macro1()

MsgBox "Prompt", vbQuestion
End Sub
Back to top
1.3.3 vbExclamation
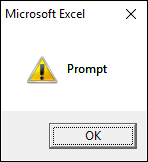
vbExclamation shows a warning icon, see the image above.
Sub Macro1()

MsgBox "Prompt", vbExclamation
End Sub
Back to top
1.3.4 vbinformation

vbinformation shows an information icon, see the image above.
Sub Macro1()

MsgBox "Prompt", vbInformation
End Sub
Back to top
1.3 Combine buttons and icons
If you look at the message box arguments at the beginning of this post, you will see a number next to each constant. Combining for example an OK and Cancel button with a query icon you simply add the numbers for those constants. OK and Cancel has value 1 and the query icon has value 32.
1 + 32 = 33
![]()
Sub Macro1()

MsgBox "Prompt", 33
End Sub
You can combine constants intead of values, if you prefer that. See macro below, it produces the same result as the macro above.
Sub Macro1()

MsgBox "Prompt", vbOKCancel + vbQuestion
End Sub
Back to top
1.4 Default buttons
You can change the default button for a message box, see the arguments in the beginning of this post. The following message box has the OK button as the default button, it has a dotted line around the text «OK».
![]()
You can change it to the second button by adding 256 to the second argument. 33 + 256 = 289
Sub Macro1()

MsgBox "Prompt", 289
End Sub
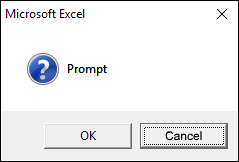
If you prefer you can add the constants to the second argument, as well. This macro shows the same message box as above.
Sub Macro1()

MsgBox "Prompt", vbOKCancel + vbQuestion + vbDefaultButton2
End Sub
Back to top
1.5 Messagebox return value
The message box returns one of these values depending on which button was press with left mouse button oned on by the user.
vbOK — 1
vbCancel — 2
vbAbort — 3
vbRetry — 4
vbIgnore — 5
vbYes — 6
vbNo — 7
This message box allows you to press with left mouse button on the OK button or the Close button. Both buttons result in the value 1 or vbOK.
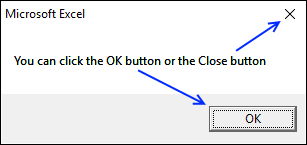
Sub Macro1()
Dim btt

btt = MsgBox("You can press with left mouse button on the OK button or the Close button", vbOKOnly)

MsgBox btt

End Sub
The following macro allows you to continue or stop a loop using a message box. If you press with left mouse button on No the macro ends.
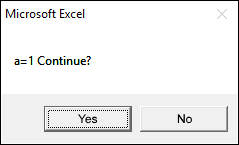
Sub Macro1()
Dim a As Integer
For a = 1 To 10
If MsgBox("a=" & a & " Continue?", vbYesNo) = vbNo Then Exit For
Next a
End Sub
Back to top
1.6 Help file
Here is an example of how to use a msgbox with a helpfile.
<href=»https://www.get-digital-help.com/wp-content/uploads/2016/09/dialog-boxes-help-file-1.png»>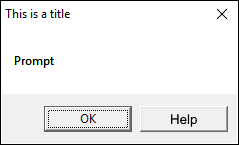
Sub Macro1()

MsgBox "Prompt", vbMsgBoxHelpButton, "This is a title", "c:temphelpfile.chm", 7

End Sub
How to build a chm file
Back to top
1.7 Working with text in a message box
The following macro shows you how to concatenate text and a variable.
Sub Macro1()
Dim nm As String
nm = "Jennifer"
MsgBox "My name is " & nm
End Sub
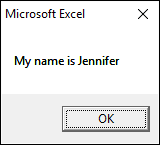
This macro shows you how to put text on two rows.
Sub Macro1()
MsgBox "First row" & vbNewLine & "Second row"
End Sub
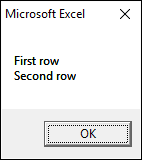
You can also show data with a delimiting tab.
Sub Macro1()
Dim a As Integer, result As String
For a = 1 To 8
result = result & a & vbTab
Next a
MsgBox result
End Sub
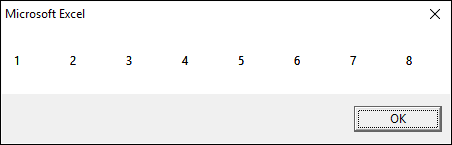
Back to top
2. Input box (VBA)
An input box asks the user for a value, you can specify the text and the title in the inputbox. You also have the option where to show the input box on screen and a default input value.
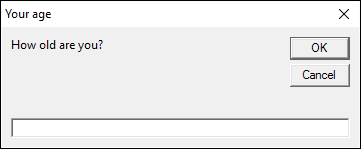

prompt — text in input box
title — Text at the very top of the input box
default — default value shown in the input box
xpo,ypos — specify where you want the input box on the screen from the upper-left corner.
helpfile — path to help file
context — A numerical value
Back to top
2.1 How to set the default value for an input box?
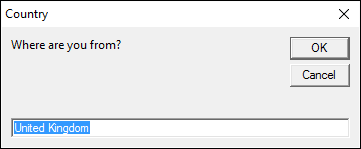
This macro asks where you are from. The default value is «United Kingdom».
Sub Macro1()
Dim Country

Country = InputBox("Where are you from?", "Country", "United Kingdom")

MsgBox Country

End Sub
Note, the Input box returns nothing if you press with left mouse button on the Cancel button.
Back to top
3. Input box (Excel)
Excel input box is more versatile, it will do basic validation for you and the user can select a cell range on a worksheet. You have also the option to select one or multiple data types returned by the input box.
![]()
prompt — text in input box
title — Text at the very top of the input box
default — default value shown in the input box
left, top — specify where you want the input box from the upper-left corner of the screen.
helpfile — path to help file
HelpContextID — A numerical value
Type — A number representing the data type returned
0 — Formula
1 — Number
2 — Text
4 — Logical value, True or False
8 — A cell reference
16 — Error value
64 — An array of values
Back to top
3.1 Number
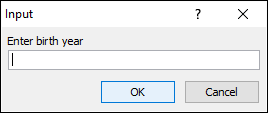
Sub Macro1()
Dim cd

cd = Application.InputBox("Enter birth year", , , , , , , 1)

MsgBox "Your birth year is " & cd

End Sub
Excel provides basic data validation, if you type a text string excel gives you this warning message.
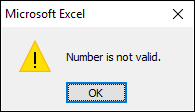
If you press with left mouse button on «Cancel» button excel returns «False».
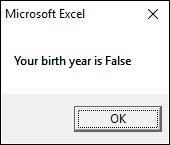
Back to top
3.2 Range
Data type 8 (Cell reference) lets the user select a cell range.
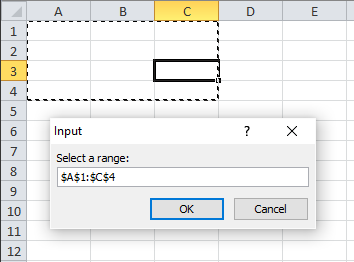
Sub Macro1()
Dim rngAs Range

Set rng = Application.InputBox("Select a range: ", , , , , , , 8)

MsgBox "You selected " & rng.Address

End Sub
If the user enters something else than a cell reference excel gives this message until a valid cell reference is entered:

Press with left mouse button oning on «Cancel» button makes excel error out:

Back to top
3.3 Combine data types
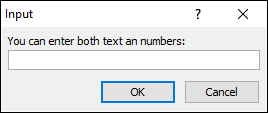
If you combine data types by adding their corresponding value, like this 1+2 = 3 the user is allowed to enter both numbers and text.
Sub Macro1()
Dim cd

cd = Application.InputBox("You can enter both text an numbers: ", , , , , , , 3)

MsgBox "You entered " & cd

End Sub
Back to top
4. Data Form
Data in this table is made up and random.
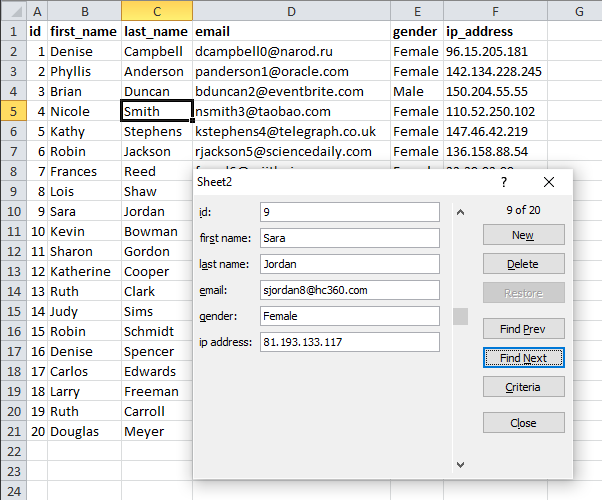
The data form is a smart dialog box, it analyzes your table and customizes the dialog box using table headers.
Make sure you have a cell selected in the table you want to work with before running this macro:
Sub Macro1()
ActiveSheet.ShowDataForm

End Sub
Back to top
5. FileDialog
FileDialog property lets you prompt the user for a directory or open/save/select a file
![]()
fileDialogType — Choose between 4 constants, see below.
msoFileDialogFilePicker — Select a file
msoFileDialogFolderPicker — Select a folder
msoFileDialogOpen — Open a file
msoFileDialogSaveAs — Save a file
5.1 msoFileDialogFilePicker
Allows the user to select a file. The following macro prompts the user for a file o multiple files and then a message box returns the path and file name for each file.
Sub Macro1()
Dim i As Integer
With Application.FileDialog(msoFileDialogFilePicker)
.Show
For i = 1 To .SelectedItems.Count
MsgBox .SelectedItems(i)
Next i
End With
End Sub
5.2 msoFileDialogFolderPicker
The following macro lets the user pick a folder. A message box displays the path and folder name.
Sub Macro1()
Dim i As Integer
With Application.FileDialog(msoFileDialogFolderPicker)
.Show
MsgBox .SelectedItems(1)
End With
End Sub
5.3 msoFileDialogOpen
The macro below asks the user for a file to open. A message box displays the path and file name. Note, it doesn’t open the file.
Sub Macro1()
Dim i As Integer
With Application.FileDialog(msoFileDialogOpen)
.Show
MsgBox .SelectedItems(1)
End With
End Sub
5.4 msoFileDialogSaveAs
This macro lets the user pick a folder and a save name. A message box displays the path and file name. It doesn’t save the file
Sub Macro1()
Dim i As Integer
With Application.FileDialog(msoFileDialogOpen)
.Show
MsgBox .SelectedItems(1)
End With
End Sub
Back to top
6. GetOpenFilename
![]()
Filefilter — Filter criteria (Optional)
FilterIndex — Index number of default filter (Optional)
Title — title of dialog box (Optional)
Multiselect — Enables the user to select multiple filenames (Optional)
The following macro asks for a file to open, filters used are *.xlsx and *.xlsm. The second filter is the default value. Keep in mind, the macro doesn’t open the file it just returns a file name and path.
Sub Macro1()
Dim txt
txt = Application.GetOpenFilename("Excel Files (*.xlsx), *.xlsx, Excel macro files (*.xlsm),*.xlsm", 2)

MsgBox txt

End Sub
If the user press with left mouse button ons «Cancel» a False is returned.
Back to top
7. GetSaveFilename
![]()
Filefilter — Filter criteria (Optional)
FilterIndex — Index number of default filter (Optional)
Title — title of dialog box (Optional)
Sub Macro1()
Dim txt
txt = Application.GetSaveAsFilename("Excel Files (*.xlsx), *.xlsx, Excel macro files (*.xlsm),*.xlsm", 2)
MsgBox txt
End Sub
This macro does not save the file, it only returns the selected path and name.
Back to top