
Design and edit in Word
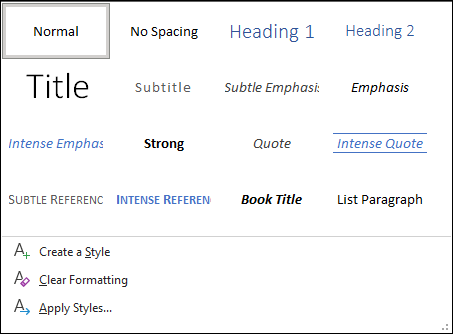
Use Styles
Styles templates apply a consistent font, font size, font color, and spacing to headings, paragraphs, and titling throughout your document.
-
Select the words, paragraph, list or table to edit.
-
On the Home tab, select a style.
If you don’t see the style you want, click the More button
 to expand the gallery.
 to expand the gallery.

Apply Themes
Themes add a professional look to your document.
-
Select Design > Themes.
-
Point to a theme to preview how it will look.
-
Select the theme you want.

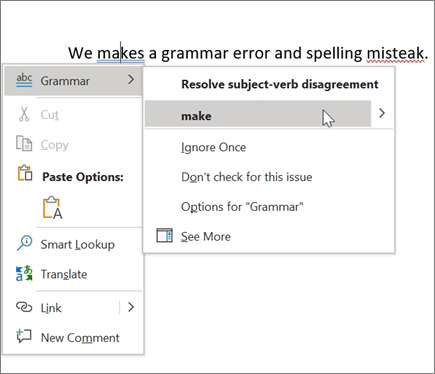
Check spelling and grammar
Word marks misspelled words with a red squiggly underline and grammar mistakes with a blue double underline.
-
Right-click the word.
-
Select a correction, or select Ignore.
Note: Spelling and grammar check work a little differently in newer versions of Word and Microsoft 365. For more, see Editor — your writing assistant.
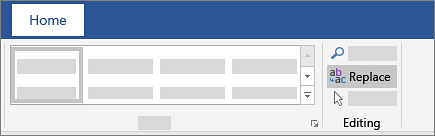
Find and replace text
-
Select Home > Replace.
-
For Find what, enter a word or phrase to search. For Replace with, enter the new text.
-
Select Find next, and then select:
-
Replace to replace the first instance, or
-
Replace all to replace all instances.
-
Next:
Collaborate in Word
Need more help?
Microsoft Word is packed with so many features that you can produce pretty much whatever you want with it. But these features don’t always result in the kind of beautiful, high-quality, and professional document designs that you may expect.
It’s one thing to know everything about Microsoft Word, all of its intricacies and quirks and functions—it’s something else entirely to know what makes a great document. Here, we’ll show you how to format a Word document to make it look professional.
1. Keep It Simple, Less Is More
Want to know how to make a Word document look good? Just keep it simple, and take advantage of the hidden features that Microsoft Word comes with. If you remember one thing from this article, let it be this, and you’ll be able to make the right design decisions in the future!
When writing a document, the content should be the main focus. Document formatting guidelines exist to make that content easier to read and digest.
Eliminate the temptation to introduce eye-catching elements that only serve to distract. Maximize whitespace. Keep your wording tight and revise any wordy sentences or paragraphs. Simple and minimal rules overall.
2. Choose a Context-Appropriate Typeface

Your first big design decision should be which typeface you’re going to use. Traditional knowledge says that serif fonts are easier to read in printed documents, whereas sans-serif fonts are better on the eyes when read on a digital screen.
Good examples of serif fonts include Garamond, Georgia, Hoefler Text, and Palatino, while good examples of sans-serif fonts include Arial, Gill Sans, Helvetica, and Lucida Sans.
Skip Comic Sans if you want to avoid one of the most common presentation design mistakes. And whatever you end up using, stick to the same typeface throughout to make your Word document professional. If desired, you can use a different typeface for headings.
3. Use Standard Font Size and Color
You can’t learn how to format a word document to look professional without paying attention to the look of the text. Business and academic papers generally use 12-point font sizes, which produce the most readable paragraphs when used in combination with the guidelines discussed below for page size, margins, and line spacing.
Some information-dense reports may sometimes go down to 10-point font size, but never less than that.
In general, it’s best to keep your hands off of anything related to colors, especially for printed documents. You’ll have to pay more for the color ink, and it won’t carry over if the document ever gets copied. For digital documents, reserve colored text for critical warnings and the like. Prefer to emphasize using bolded and italic text.
4. Use Standard Page Size and Margins
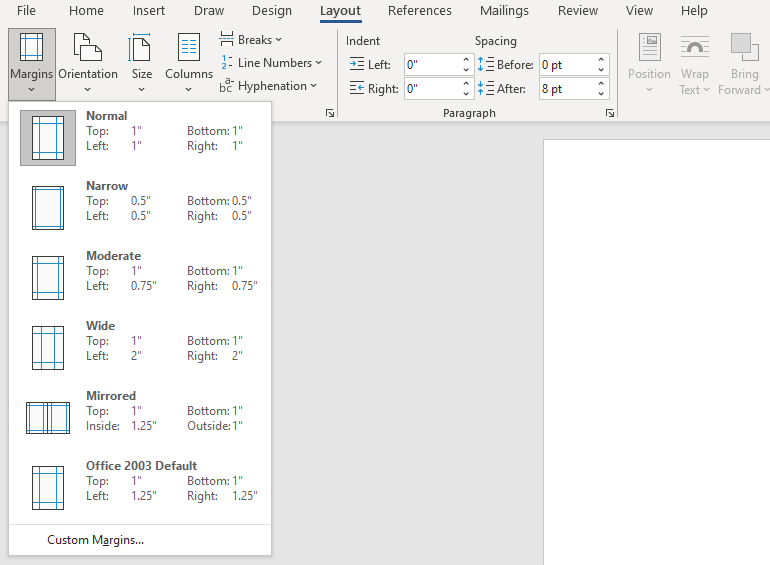
Nearly all office documents are formatted to the same page size as they are printed for standard 8½» x 11″ pages, known as US Letter size (also known as A4 elsewhere, which is 210mm x 297mm). This is the only size that’s guaranteed to be available regardless of which printer you use.
As for margins, most style manuals and style guides call for a 1″ margin on all sides of the page, which produces the best readability for line lengths and allows for written annotations if necessary. In Word, you can select Normal under Margins to do so. However, if the document is going to be bound in a binder, you may want to use Custom Margins to increase the side margins to 1½» to accommodate the rings.
5. Align Paragraphs to the Left
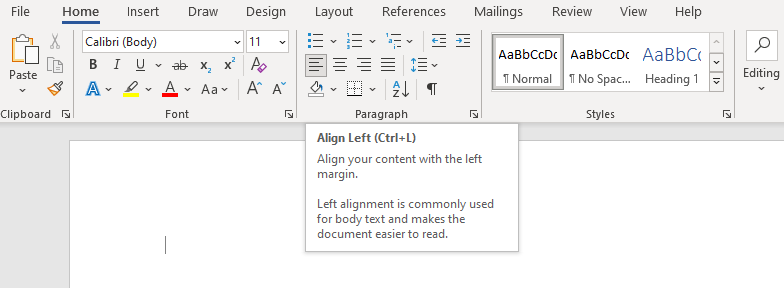
You may be tempted to use justified alignment because that’s what’s used in newspapers, novels, and some textbooks, but it’s the wrong choice for office and academic documents. Why is it important to make a document formal? Without formality, your document becomes unreadable.
What you want is left alignment for text. This produces jaggedness on the right side of paragraphs, but it keeps letter spacing as intended by whatever typeface you’re using, and that means optimal legibility.
Otherwise, you may end up with typographic rivers, which are extremely distracting and simply look ugly. This is something you certainly want to avoid when you want to make your Word document look professional.
6. Indent the First Lines of Paragraphs
Paragraphs should have no extra spacing between them, and the first lines of paragraphs should be indented to make each paragraph stand out. The only exception is for paragraphs that directly follow a section heading, which can be left unindented because the surrounding context makes it clear that it’s its own paragraph.
To make a document look professional, a general rule of thumb is to have the indent size the same as the font size. Make sure you use Word’s paragraph styling features to handle the indents rather than using the Tab key!
7. Place Images Between Paragraphs
Inserting images is a part of designing your Word document. It may be okay to place images inside a paragraph and allow the surrounding text to flow around it, and if your organization follows this document formatting guideline, then go ahead and do that.
But generally speaking, it can damage readability, especially in data-driven reports. The safest option, particularly for graphs, charts, and tables, is to put images in between paragraphs and keep them center aligned. That way, your images help to make your document attractive, but they are never vying for attention with the surrounding text. It also helps captions to stand out.
8. Choose Context-Appropriate Line Spacing
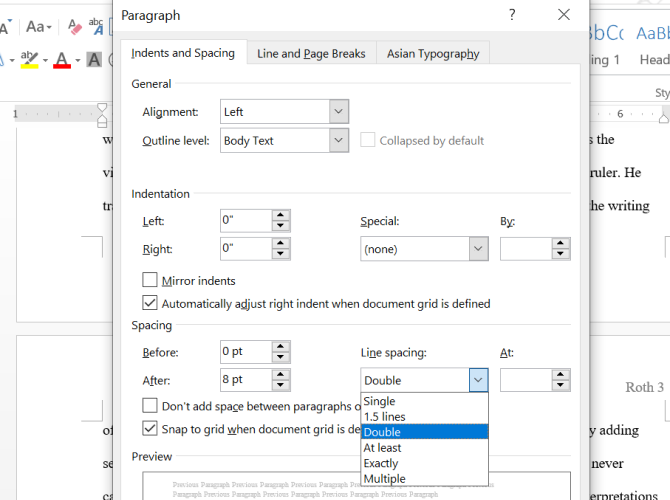
To format a document to look professional, the right choice for line spacing (the whitespace that separates a line of text from the next line of text) really depends on what kind of document you’re writing.
Academic papers should first follow any academic style guides in place, then prefer double-spacing if no style guide exists. Business and office documents tend to be single-spaced to minimize the number of pages needed when printing, but digital documents may be easier to read if spaced at somewhere between 120-150 percent.
9. Break Up Text With Headings and Lists
The longer the document, the more important headings become. Would you rather read a 20-page report that’s nothing but a wall of text from end to end? Or a 30-page report that’s organized into proper sections, subsections, and headings? It’s highly likely you’ll prefer the latter.
Lists are also good for breaking up walls of text and drawing eyes to important points. In Word, use Numbering to create numbered lists when counting a set of items (e.g., «the five attributes of a successful entrepreneur») or when providing step-by-step instructions. Otherwise, use Bullets to make bulleted lists.
Just be sure to avoid overusing lists, which detracts readability from your Word document design. This is especially important when it comes to using Word to format a screenplay.
10. Separate Sections With Breaks
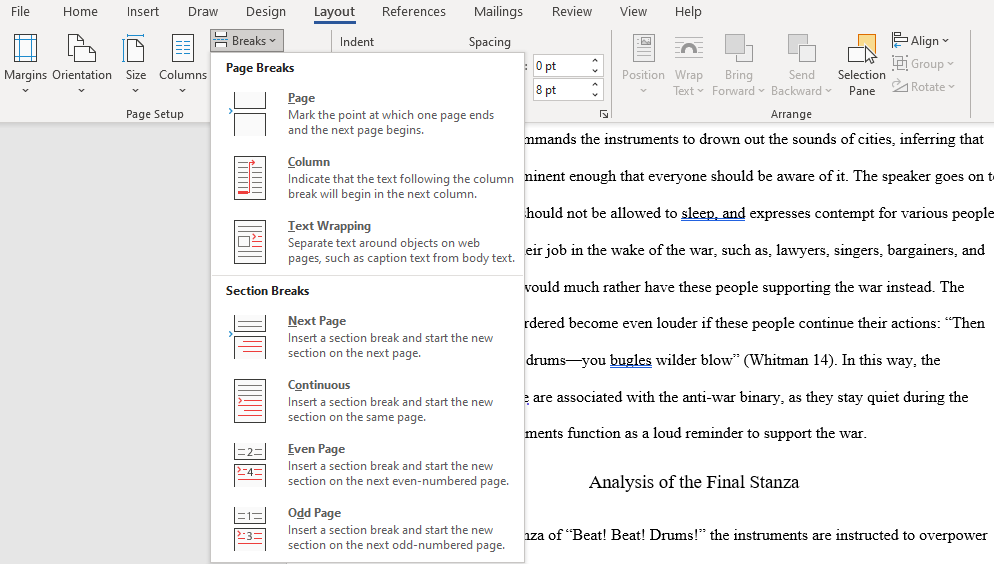
When you want to learn how to make your report look professional, you need to get acquainted with section breaks. In Microsoft Word, section breaks allow you to differentiate certain pages with changes in orientation, columns, headers, footers, page numbers, and more. Section breaks come in four forms:
- Next Page: Start the next section on the following page.
- Continuous: Start the next section on the current page.
- Even Page: Start the next section on the next even page.
- Odd Page: Start the next section on the next even page.
If your document is large enough to need chapters, this is the best way to format them in a clean way. Each chapter should be made with a Next Page section break, or the Even Page or Odd Page section breaks if you’re going to place it within a binder. We’ve shown how to remove page breaks if needed, too.
Learn How to Format a Word Document to Look Professional
Unless your organization or school requires a specific layout and format, you can skip the hard work of setting up your own template and just download one instead. This helps you quickly achieve a professional document design.
When you create a new document in Microsoft Word, it looks decent right off the bat. But sometimes you want to make your page look much better than the default.
Use Microsoft Word’s page layout design tools to make easy-to-read documents that reflect positively on you and your business—even if you’re new to Word.


You can make page layout designs in Microsoft Word from scratch. Or, skip the grunt work by using Microsoft Word templates.
Envato Elements and GraphicRiver are both great sources of print templates for Word. Each template is made by professional designers. Elements makes a compelling offer. Download unlimited templates, fonts, photos, and other creative assets for one fixed subscription price.
But, if you only need the occasional template for MS Word and prefer to pay for each single use, then look to GraphicRiver.
How to Make Awesome Page Layout Designs in Microsoft Word (Video)
If you create or modify documents in Word, you may want to change the standard Microsoft Word layout. There are a number of changes you can make.
Watch this quick screencast to find out what you need to know about Word page layout options:
To learn more about changing page layouts in Microsoft Word, study the complete written tutorial below:
Why Learn About Page Layouts In Word?
Page layout settings in Word determine how your document looks when you print it out. It includes the page orientation, margins, and columns, for example.
It’s important to pay attention to the page layout of your document for several reasons:
- It ensures consistency. This gives your readers a good experience while consuming your document.
- A good page layout makes your document more readable. When your document is aesthetically pleasing and has a consistent look, your audience is more likely to read, comprehend, and remember your content.
- A well-designed document reflects well on you. It reinforces your credibility and authority in your field.
Microsoft Word has robust page settings that allow you to control your page layout design. Everything is designed to be as simple and intuitive as possible. Yet, doing page layout in Word can be daunting if you’re new to the software.
This article breaks things down for you. So, you can follow along, step-by-step, and take control of how your document looks.
Types of Documents You Can Create in MS Word
You can create all kinds of printed documents in Microsoft Word.
Make business documents like:
- resumes
- cover letters
- business letters
- reports
- proposals
- invoices
- certificates
- forms
MS Word is also very handy for creating marketing documents. Create everything from:
- flyers
- brochures
- advertising inserts
- and more
For education or training use Word to prepare:
- handouts
- workbooks
- manuals
- certificates
You can also produce postcards, invitations, newsletters, and signs. If you can print it, then you can whip it up in Word.
In this tutorial, you’ll learn how to use Microsoft Word’s page layout tools to produce the print materials you need.
How to Work With Templates to Quickly Change Your Design
The quickest way to change or apply a page layout is by using a print template for Word. For the examples below, we’ll be using the SEO Proposal template from Envato Elements.


When looking for a print template for Word, it’s a good idea to choose one that uses paragraph and character styles. The styles feature will allow you to quickly format text even in a long document.
Below are some roundups of Microsoft Word templates you can choose from:
Now that you’ve chosen a template with a good page layout in Word, it’s time to learn how to use it.
1. Download the Template
Download the template of your choice to your computer’s hard drive. Unzip the file, then copy the template. This way, you’ve got the original template file intact, if you want to revert to it.


2. Customize the Template With Your Own Content
Replace the text with your own information.


If you want to change the text formatting, change the settings for fonts and paragraphs.
To add your own image, click on an image placeholder. The Format Picture dialog box opens. Under Fill, select Picture or texture fill. Under Picture source, click Insert….


Find and select the image you want to use. Click Insert.


Now, the image is inserted.


To replace an existing logo on the template, click on the logo, then click on the Picture Format tab.


Click the Change Picture button on the ribbon. Find and select the logo file, then click Insert.
![]()
![]()
![]()
If necessary, click-and-drag one of the handles of the logo to resize it.
Next, I’d like to change the color of the rectangle on the cover page. To do that, select the shape, then click the Shape Format tab.


The Shape Format ribbon is displayed. Click on the drop-down arrow beside the Shape Fill button. Select from the color options shown or click More Fill Colors… to specify the color you want to apply.


This is what the customized proposal cover looks like now:


Repeat these steps to customize the other pages of the template.
As you can see, when you start with a template for Word most of the design and page formatting decisions are already made for you by the template creator.
But, if you prefer to start your document from scratch, follow the steps below to change the default page format settings.
Type or paste your text into the document. Apply text and paragraph formatting to modify settings for fonts, spacing, alignment, and more. Then, you can move on to the page layout.
3. How to Set the Microsoft Word Page Orientation as Portrait or Landscape
To set the Microsoft Word page orientation of your document, go to File > Page Setup….


The Page Setup dialog opens. Click on the button for either Word portrait or landscape layout orientation.


4. How to Set the Print Size of the Paper
From the Microsoft Word Page Setup dialog, you can also change the paper size when you print the document. Click on the Paper Size field to show the different paper size choices available.


Select the size you wish to use. You can also click Manage Custom Sizes… to specify your own size.


5. How to Split Your Text into Multiple Columns
Sometimes you may want to divide your text into columns. This can make the document more readable and adds variety to an otherwise monotonous layout. Columns are popular in magazines, newsletters, and similar types of materials.
Arrange the Entire Document into Columns
To change the MS Word layout to columns, follow these steps:
1. Go to Layout > Columns.


The Columns dialog box opens.


2. Select one of the Presets or manually set the:
- number of columns
- width and spacing
- apply to the whole document or from that point forward
3. When you’re happy with the settings, click OK.
Apply Columns to a Part of the Document
You can also apply columns to only a specific part of the document.
1. Select the text you wish to display in columns.


2. Go to Layout > Columns.
3. In the Columns dialog box, choose the settings you want to apply.
Notice that you now have the option to apply the column settings to Selected text. Click OK.


Now, only the selected text has been broken into two columns. The rest remains in one column.


6. How to Add Page and Section Breaks
Sections in Microsoft Word enable you to apply different layouts to different parts of your document. This is useful for making creative layouts, especially to long documents.
Insert a Page Break in Word
A page break separates text, so that anything after the break is moved to a succeeding page. It’s useful for dividing up a document into chapters and sections.
To insert a page break, place the cursor at the point where you want the break to be, then go to Insert > Break > Page Break.


In our sample document, the title page is now on a separate page from the rest of the text.


Insert a Section Break in Word
If you wish to apply varying formatting on different parts of the document, then you’ll want to break it into sections. This includes varying the columns, headers and footers, pagination, borders, and other settings.
To create a section break, place the cursor where you would like the section break to be. Go to Insert > Break > Section Break.


Select the type of section break you want to insert:
- Section Break (Next Page) creates a section break and moves the next section into a new page.
- Section Break (Continuous) keeps the two sections on the same page while allowing you to apply different formatting settings for each.
- Section Break (Odd Page) starts a new section on the next odd-numbered page.
- Section Break (Even Page) starts a new section on the next even-numbered page.
Take Control of Your Page Layouts with Microsoft Word
Use Microsoft Word’s page layout tools to give your documents a consistent, readable, and professional look. You don’t have to be an expert in Word to take better control of your document’s page layouts. With Microsoft Word’s page layout tools, you can make any document look the way you want it to.
You don’t have to start from scratch, either. You can have professional designers make most of the design and layout decisions for you by using print templates for MS Word. If you want unlimited downloads of templates as well as photos, fonts, icons, and other creative assets—all for one small, fixed fee—then Envato Elements is the best source for you.
For one-off Word templates and other desktop publishing tools, look to GraphicRiver. Here, you can access everything you need to create impressive print materials on a pay-per-use basis.
And when you use a template, the skills you learned in this post will help you customize and adapt it to your needs.
Editorial Note: Video added by Alexis (Lexi) Rodrigo.
To apply a theme in Word to a document, click the “Design” tab in the Ribbon. Then click the “Themes” drop-down button in the “Document Formatting” button group to open a drop-down menu of theme choices. To preview a theme in your document, hold your mouse over a theme in this drop-down menu.
Contents
- 1 How do you insert a Design in Word?
- 2 How do I use Design templates in Word?
- 3 How do you Design a document?
- 4 How do I find the Design in Word?
- 5 How do you design a template?
- 6 How do I use a template in Word 365?
- 7 How do you create a fillable template in Word?
- 8 What is meant by designing a document?
- 9 How do you design a paragraph?
- 10 How do you design a project?
- 11 What’s a design template?
- 12 How do I use design templates?
- 13 Where do I find my templates in Word?
- 14 How does a template help in creating a document?
- 15 Can you make a fillable form in Word?
- 16 Can you make a Word document fillable?
- 17 How do you design a research document?
- 18 What is the purpose of a design document?
- 19 How do you write a design specification document?
- 20 How do you write a beginner paragraph?
How do you insert a Design in Word?
Select the words, paragraph, list or table to edit. On the Home tab, select a style. to expand the gallery.
Themes add a professional look to your document.
- Select Design > Themes.
- Point to a theme to preview how it will look.
- Select the theme you want.
How do I use Design templates in Word?
To find and apply a template in Word, do the following:
- On the File tab, click New.
- Under Available Templates, do one of the following: To use one of the built-in templates, click Sample Templates, click the template that you want, and then click Create.
How do you Design a document?
Document Design
- Use at least 12 point.
- Use a clear, easy to read font.
- Make important points stand out.
- Use bold or bigger sized font to emphasise text.
- Text should be set horizontally.
- Avoid splitting a word between two lines.
- Templates with accessible formatting.
- Use accessible formatting.
How do I find the Design in Word?
It’s the fourth tab from the left, between the Insert and the Layout tabs. If you do not see it, go to File>Options>Customize Ribbon and check the box to the left of Design.
How do you design a template?
Edit your template
- Click File > Open.
- Double-click Computer or This PC.
- Browse to the Custom Office Templates folder that’s under My Documents.
- Click your template, and click Open.
- Make the changes you want, then save and close the template.
How do I use a template in Word 365?
Method 1: Start a new document based on your template (Word 365 way)
- Open Word 365.
- Go to File > New.
- Click Personal (or Custom).
- Click the template you want to use.
How do you create a fillable template in Word?
Creating Fillable Forms Using Microsoft Word
- Enable Developer Tab. Open Microsoft Word, then go to the File Tab > Options > Customize Ribbon > check the Developer Tab in the right column > Click OK.
- Insert a Control.
- Edit Filler Text.
- Design Mode button again to exit the mode.
- Customize Content Controls.
What is meant by designing a document?
Document design is the process of choosing how to present all of the basic document elements so your document’s message is clear and effective. When a document is well designed, readers understand the information more quickly and easily. Readers feel more positive about the topic and more accepting of its message.
How do you design a paragraph?
5 Tips for Structuring and Writing Better Paragraphs
- Make the first sentence of your topic sentence.
- Provide support via the middle sentences.
- Make your last sentence a conclusion or transition.
- Know when to start a new paragraph.
- Use transition words.
How do you design a project?
7 Steps to Effective Project Design
- Define Project Goal.
- Determine Outcomes, Objectives, and/or Deliverables.
- Identify Risks, Constraints, and Assumptions.
- Prepare a Visual Aid.
- Ballpark Your Budget.
- Determine Approval and Monitoring Processes.
- Use Proper Project Design Documents.
What’s a design template?
Design templates are pre-made designs and documents that can be customized. Templates are often designed to meet specific standards or specs so they’re consistent between users and mediums. You can use pre-designed templates from template libraries and websites or create custom templates for future use.
How do I use design templates?
In the task pane under New, click From Design Template.
- A list of templates appears.
- Move your mouse pointer through the different designs or use the scroll bar.
- Click the down-pointing arrow in the gray box next to the template you like.
- Choose Apply to All Slides.
Where do I find my templates in Word?
In Word 2010 – 2021 it is under the File Tab. New > My Templates. See File New Variations in the Versions of Microsoft Word for more on this.) Any text that is in the template will be the start of your new document.
How does a template help in creating a document?
A template is a document type that creates a copy of itself when you open it. For example, a business plan is a common document that is written in Word. Instead of creating the structure of the business plan from scratch, you can use a template with predefined page layout, fonts, margins, and styles.
Can you make a fillable form in Word?
You can create the form with the desktop version of Word with the instructions in Create a fillable form. When you save the document and reopen it in Word for the web, you’ll see the changes you made.
Can you make a Word document fillable?
To do this, click on “File” tab > “Options” > “Customize Ribbon“. Then under the “Customize Ribbon”, select the “Developer” checkbox and click “OK”. Step 2: Open a Word document and you will be able to make the Word document fillable.
How do you design a research document?
Here are 9 things you need to be documented in doing design research.
- Background. State the reason why this project or feature needs to be realized in the first place.
- Challenges. During the research.
- Hypothesis.
- Objectives & Key Results (Focus & Metrics)
- Supporting Data.
- Design Concept.
- Validation.
- Design Conclusion.
What is the purpose of a design document?
Design documents are created to coordinate efforts of a large team, give them a stable reference point, and describe all parts of the software and how they will operate. It assures that the product is built to meet the needs and is on par with what was agreed upon prior to the inception of the product/software.
How do you write a design specification document?
Usually, the design requirements (specifications) document includes the following things:
- Full project overview.
- Main needs and goals.
- Target audience.
- Functional requirements and desired set of features.
- Aesthetic aspects.
- Non-functional details.
- Recommendation and prohibitions.
- Questions.
How do you write a beginner paragraph?
Five easy steps to paragraph writing
- Step 1: Write the topic sentence. This is the best starting point.
- Step 2: Brainstorm your information.
- Step 3: Organise your information.
- Step 4: Write & revise your draft paragraph.
- Step 5: Proofread your paragraph.
Microsoft Word can do more than bang out simple letters and plain text. Delve into its Design and Layout tools, and you’d be surprised at how much it can help even novices produce attractive layouts for brochures, flyers, and newsletters.
The more complex your layout and contents, the more you will need a design professional’s help—and maybe a high-end desktop publishing package, too. But before you do that, give Word’s built-in design talents a try.
Work with a template…
The easiest way to create more elaborate documents in Word is to use a template. Word has hundreds of them, from newsletters and flyers to business cards and faxes. To get started, go to File > New in the left navigation bar, which brings up a selection of popular templates (including the default blank page) topped by the search window.
Word has hundreds of templates to jumpstart your layout.
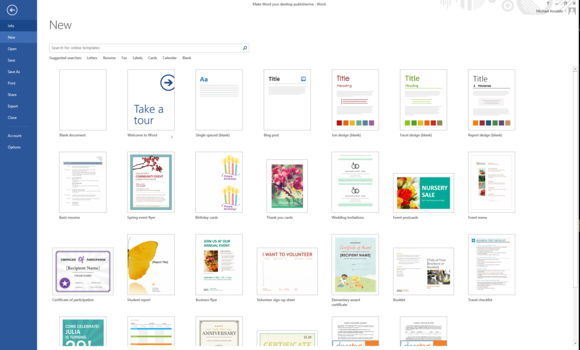
Templates come pre-populated with images and dummy text, both of which are easily replaceable with your own (you can either click on a block of text and start typing, or paste in text or images you’ve previously copied to the clipboard). But even if you want to change design elements (such as fonts, for example), you might start with a template just to pick up preset margins and other basic layout parameters that would be annoying to create from scratch.
…or work with themes
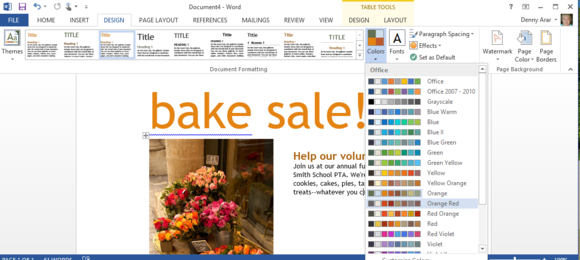
If you prefer to start from scratch on a blank sheet, you can set up page dimensions, margins, columns, and other basic defaults in the Page Layout ribbon. You might also want to click the Design tab and choose a theme—a collection of fonts for popular layout options such as titles, subheads, and plain text. You could, of course, specify these individually as you work, but the fonts in a theme are chosen and sized according to generally accepted design precepts so they’ll look good together.
The Design tab also provides collections of color palettes and effects you can apply to add character to your layout. You might choose one color from a palette for a border and another for subheads, for example. (Once you select a theme, the colors in the palette will show up when you click the Font Color icon on the Home ribbon.) You can experiment with different looks by hovering over a theme (or, for that matter, any other design element in the ribbon), which is then applied to the appropriate area in your document. To make the change permanent, you click on the desired element.
The Design tab offers collections of color palettes.
Another option in the Design tab lets you apply a background color, pattern, or even an image to your document. Click on Page Color to see these options—they’re a pleasant alternative to the usual plain white.
Play with typography
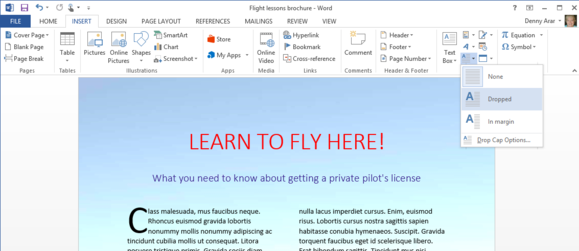
Nothing is more boring than a page full of plain text, but sometimes you don’t have a lot of images to relieve the monotony. Tools to make your layouts more interesting include drop caps, subheads, and pullquotes—and it’s relatively easy to apply them in Word.
Adding drop caps—large initial capital letters—to a paragraph is child’s play: In the Insert ribbon, simply click on the Add a Drop Cap icon in the Text tools. You can choose between having the enlarged initial capital letter embedded in the text or in the left margin. Drop Cap options let you change the font, the height (in number of lines of normal text) of the character, and its distance from the text.
Drop caps can liven up a page of plain text.
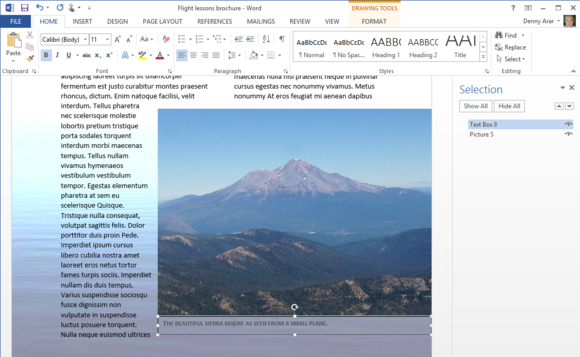
A pullquote is a quotation from the text that you copy into a box and use as a design element, much the way you’d use an image. It’s a way of highlighting an important nugget from the story, while at the same time adding visual interest to a page. In Word, put the cursor in the general area you’d like to place a text box, and click the Text Box icon in the Insert ribbon. This brings up a menu of several pre-formatted text box options. When you choose one, it will appear—with canned text—in your document. You can then replace the dummy text and adjust options such as font size and color.
Use a text box to create a pull quote in your document.
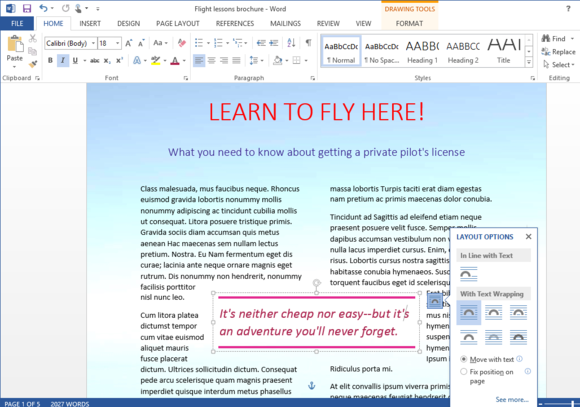
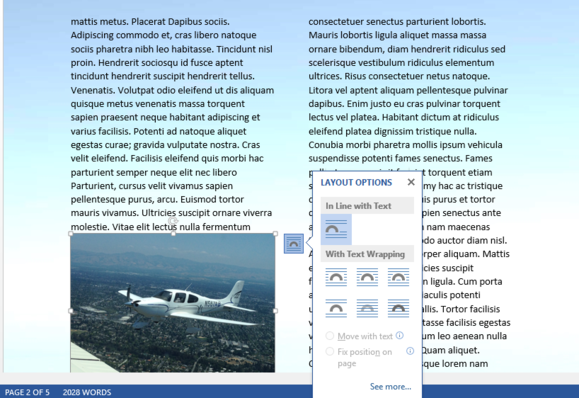
To the right of the box, a small icon lets you adjust how the box fits into the layout. You might, for example, opt to have text flow around the box, or you could choose to have it above and below (but not around) the box. You can also opt to fix the position of the box on the page or tie it to the copy around it, so that if the copy moves, so does the box.
Use colorful Word Art sparingly.
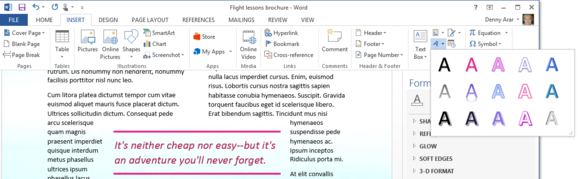
The Word Art icon on the Insert ribbon lets you use colorful display fonts with flourishes and effects you won’t find in standard fonts. You can use these characters to liven up a page, but avoid going overboard: A little of this sort of eye candy goes a long way.
Adding images, charts, and other content
By now you may have noticed that Text tools take up only a small area on the Insert ribbon, since there are so many other items you can add to spruce up the look and impact of a document.
Images are an obvious choice. Current versions of Word include tools that let you perform basic image editing from within the app. As with the text box, you start by placing the cursor in the area where you want the image to appear. Then click on Pictures (or Online Pictures if you want to look for images in Office’s huge collection of clip art), and click on the image you want to insert.
You can drag an image anywhere you want to use it in your document.
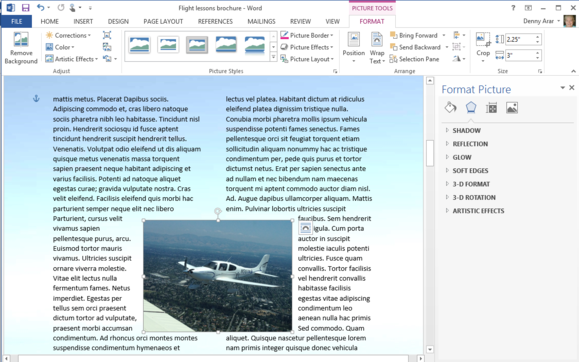
A couple of things will happen: The image will appear in your document—if not exactly where you intended, close enough so that you can easily drag it to where you want it. You can also make fine adjustments with arrow keys when the image is in moving mode.
At the same time, the Picture Tools ribbon will appear, filled with options for everything from cropping to artistic effects and frames. As with text boxes, you also get an icon next to the image that gives you choices for how it fits into the text.
SmartArt lets you insert complex diagrams.

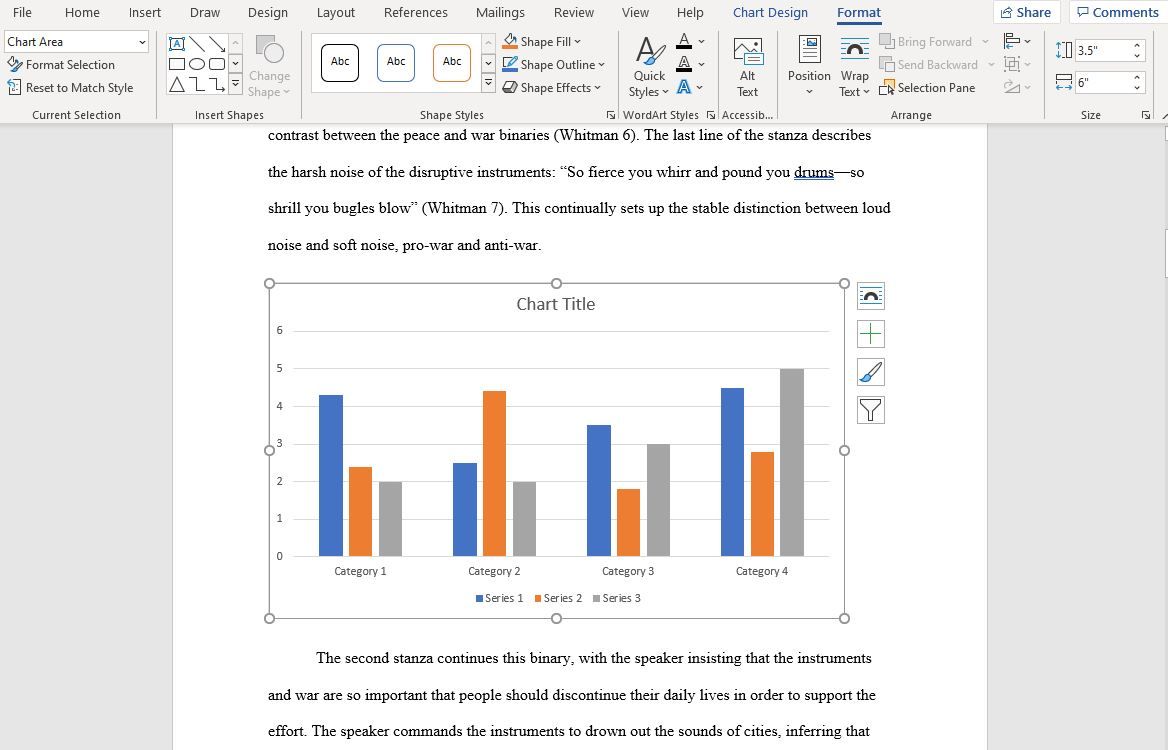
Word also has special tools for inserting shapes (for simple diagrams), SmartArt (for more complicated business diagrams), and even Excel-style charts that you create on the fly.
The newest graphic element in the Insert ribbon is the Screenshot icon: Click it and you’ll be able to insert any currently live screenshot on your Windows desktop—a useful tool for people who want to illustrate computer processes.
Use a text box to create unnumbered captions.
You can add captions to graphic elements using the Insert Caption feature in the References ribbon, but there’s a catch: Because the feature was intended for academic publications, it automatically assigns numbers to them (in sequence)—and it’s all but impossible to get rid of them in print unless you want to go into Word’s field codes. If you want your images to have captions that aren’t numbered, you have to either create a text box below (or beside) the image just for the caption or put them both in a box to tie them together, another complicated procedure.
Making adjustments
Many of Word’s tools can be applied on the fly, so if you don’t like the way something looks you can easily change it. For example, you can flow text into columns simply by selecting it all and clicking on the number of columns you want in the Page Layout tab.
You can realign objects in Word with layout options.
If you’ve added several elements to a document and they aren’t behaving the way you want, you might find help in the Arrange section of the Page Layout tab. Here you can find features for aligning objects and bringing them in front of or behind other objects.
Finishing steps
Most commercial printers who work with small businesses will accept documents in PDF format, and Word lets you save documents as PDFs. There are, however, different types of PDFs, so make sure to check with a printer beforehand—ask if they can work with the PDF format generated by the Word version you are using.
Word can’t do everything a high-end desktop publishing program can do. For example, if you need crop marks on pages, Microsoft advises you to export your Word document to Publisher, the Office desktop publishing app. Desktop publishing packages can usually export to all major PDF types. High-end packages also let you create multiple master pages to serve as templates for complicated documents. While Word makes it easy to create pages with headers and footers, it’s not so easy to mix them up with other page styles in the same project.
But for people who are simply looking to enhance the appearance of everyday documents—flyers, brochures, booklets and the like—Word has much to offer. The learning curve isn’t too steep, and if it’s already on your desktop, the price is right.