
Making a brochure like this while you’re online is quick and easy.
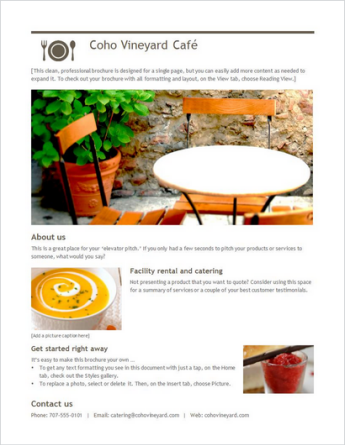
Choose one of our brochure templates, and open it in an Office for the web program to make it yours (some brochures are for editing in Word for the web; others work in PowerPoint for the web).
Tip: If you’re already in Word for the web, get to the brochure templates by going to File > New, and then below the template images click More on Office.com.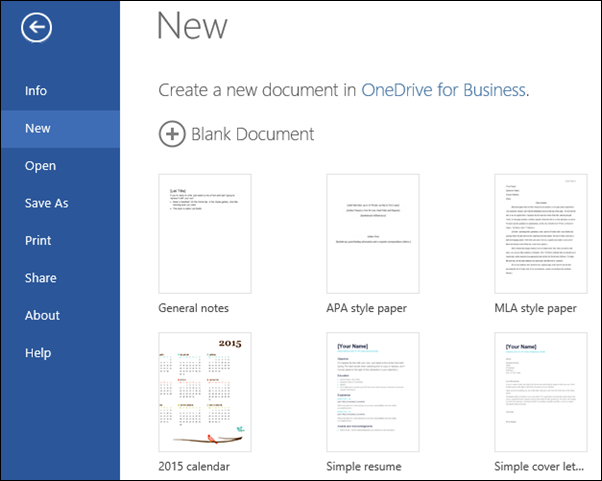
You’ll be on the Templates for Word page. In the list of categories, click Brochures.
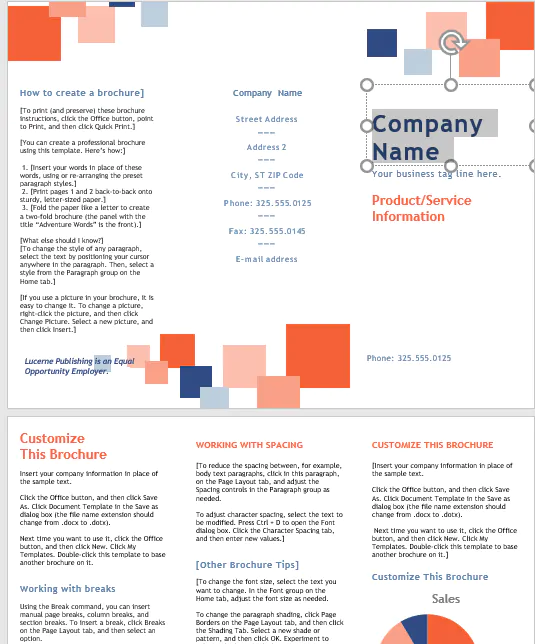
As you work on the brochure, you’ll probably want to Rename a file it and swap out the placeholder pictures with pictures that work for you. Delete the pictures you don’t want, and then insert pictures from your computer or Add clip art to your file.
Share your brochure
When you’re finished, print it out or share it online. You can do this with the brochure still open in Word for the web. No need to save it first (that’s already done for you).
Print it
To print it, press Ctrl+P, and wait for the Print dialog.
Note: If you don’t see a Print dialog box, click the link for opening a PDF version of your brochure. From there, use the PDF program’s Print command.
Share it
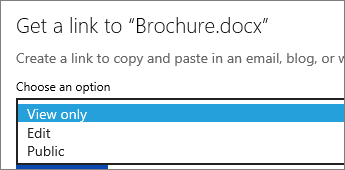
To share it online, send a link:
-
Near the top of the screen, click Share.
-
Under Share, click Get a Link.

-
Under Choose an option, click View only.
-
Click Create Link.
-
Click on the web address to select it, and then copy and paste it into an email, message, or post.

Need more help?
Want more options?
Explore subscription benefits, browse training courses, learn how to secure your device, and more.
Communities help you ask and answer questions, give feedback, and hear from experts with rich knowledge.
Brochures are a powerful tool for spreading awareness of your business or event, and educating potential customers about your product. Though relatively small, their format naturally allows for conveying multiple points of information for many occasions, whether advertising your business services or promoting a charity event or school play.
The key to an effective brochure is to capture and maintain the reader’s attention with a compelling design. This post will guide you through the key elements of brochure design, and how to make a brochure in Microsoft Word, step by step.
Learn more about Word
Download our print-ready shortcut cheatsheet for Word.
The five C’s of brochure design
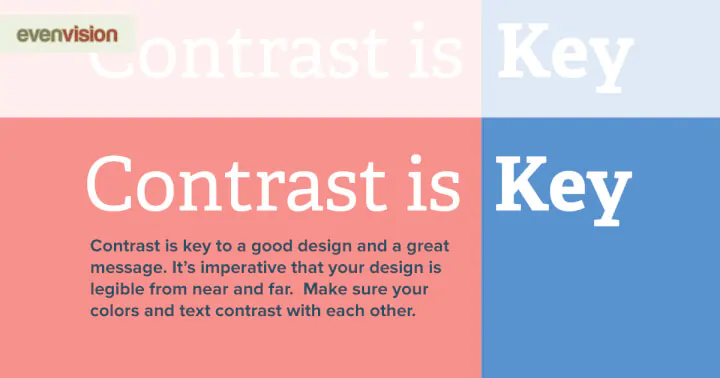
1. Contrast
Use contrast, such as combining light and dark colors, to call attention to the most important elements of the brochure. Changing the font is another way to add contrast. As a general rule, avoid using more than two typefaces. Instead, change the font in other ways, such as making it bold, larger or adding italics.
2. Clutter
Avoid clutter in your design. Every image, button, logo or group of text should have space around it. It will be easier to create this white space if you limit the number of elements you are attempting to include. Select one or two high quality images, rather than including all of the imagery you have. Stick to the most important talking points and leave out the rest.
Or you can simply turn a video into a gif so as to create motion in your design.

3. Copy
Keep your copy short and concise. Try to keep headers and subheads to brief phrases. Summarize longer pieces of text and make it scannable by incorporating bullet points, numbering or bolding main points.
Use a simple font that is easy to read. When adding copy to your design, pay attention to any widows or orphans. These occur when a single word or sentence falls on a separate column or page then the rest of the text.
4. Content placement
Create alignment by placing images and text in-line with each other. For example, you may choose to right align the front cover of the brochure and left-align the inside. Center alignment can work well for small sections, such as contact info, but should be used sparingly.
Additionally, consider the hierarchy of the page. Make sure the most important elements are placed in a prominent position without any distracting elements near it.

5. Color
There’s a lot to consider when selecting an appropriate color for your brochure. Start by thinking about the messaging you want to convey:
- More conservative businesses tend to opt for blues and greens.
- Red can indicate energy or danger.
- Yellow can be used to communicate cheerfulness, but can also easily be too bright, so use it with care.
- Purple is a color of royalty and is frequently used to communicate luxury.
For the most part, you will want to select two contrasting colors for your color theme, such as blue and orange or purple and yellow.
How to make a brochure in Microsoft Word
Create a new document
This can either be a blank document or start with one of the brochure templates. Microsoft Word offers single-page, bi-fold, and tri-fold brochure templates.

Adjust the layout
Orientation
If you’re starting with a blank page, create a tri-fold brochure layout by going to the Layout tab on the ribbon. Click on Orientation, and change the orientation from portrait to landscape.
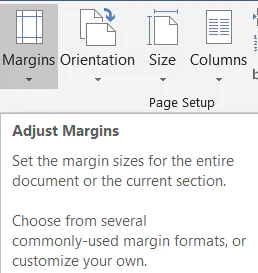
Margins
Then, click on Margins and adjust the margins to .5” or smaller. Remember, the margins will create a white space around the border of the brochure, so if you are using a colored background you will want to make the margins smaller by selecting Margins —> Custom Margins. I’d suggest .25” right and left, and .31” top and bottom.
You can skip this step if using a template, unless you want to adjust the preset margins.
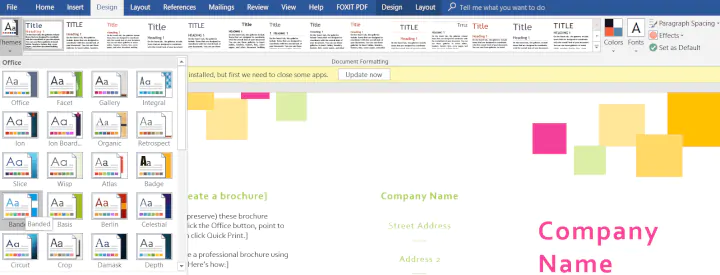
Choose a theme
Next, under the Design tab, go to Themes and select the desired theme for your brochure. This theme will then populate the Home tab with selected fonts and colors for Headings, Titles, Subtitles and Normal Text.

A template will come with a pre-selected theme. You can change the theme under the Design tab as shown above, or open up the style pane to make small adjustments, such as changing the default Header color.
Create the basic structure
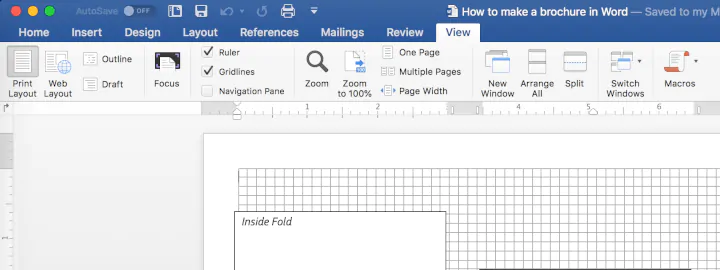
Ruler and gridlines
Under the View tab, select the checkbox to add the ruler and gridlines. Use the gridlines and ruler to create accurate spacing.
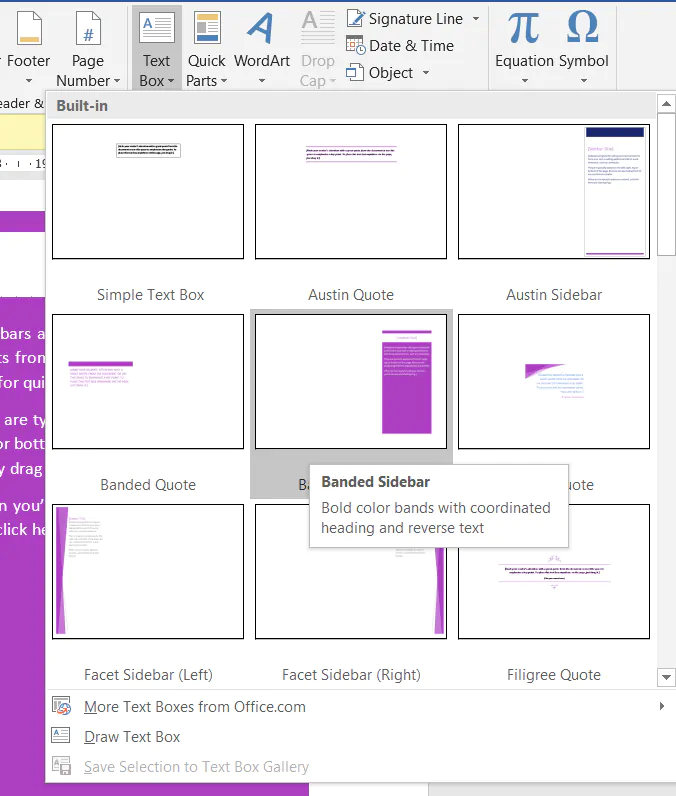
Text boxes
If using .5” margins, create text boxes that are 3” wide. These can be made shorter or longer depending on the copy you want to include. For example, use a short box to create a title and a long box to add several paragraphs of text.
To insert text boxes, go to the Insert tab —> Text Box. In addition to a blank text box, you will see a number of options based on the theme you have chosen.
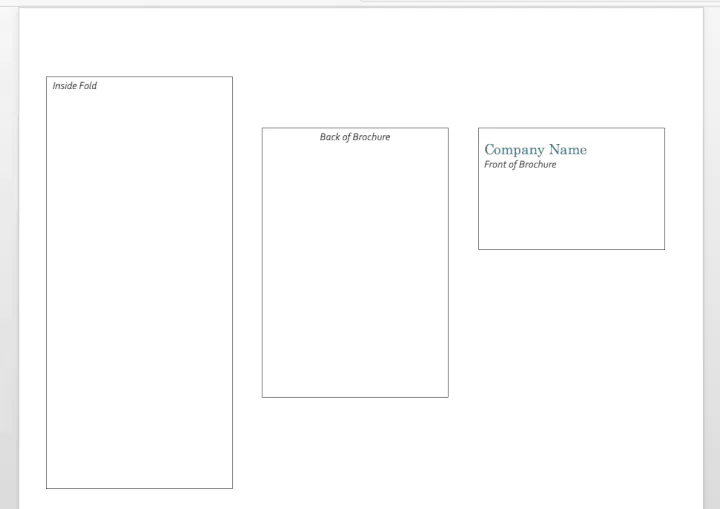
Columns
You will need two pages with three columns. The first page will be the front, back, and inner fold of the brochure. The second page will be the inside of the brochure. Use the ruler and gridlines to space the text boxes into three even columns per page.
If using a template, this is already done for you, so you can skip this step.
Add your content
Now that you have six columns, start adding your content to your brochure. In addition to copy, use the Insert menu to add images, shapes, and charts. Remember that images can bleed from one column to the next.
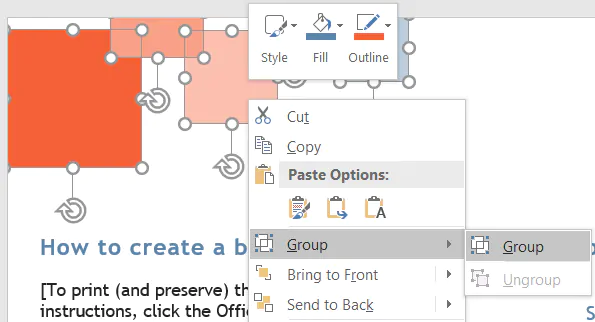
Create content groups
Your content will naturally fall into content groups, such as a header and subhead, or a group of shapes that form a design. Select each of these individual objects and convert them into a group. This will allow you to move each of those components together as you tweak the design.
Enjoy your finished design
You now know how to design a brochure in Microsoft Word! Whether you choose to start from scratch with a blank document, or use a template, you’re only limited by your imagination.
We hope this tutorial and the 5 C’s of effective brochure design will help you create stunning, compelling designs in Microsoft Word to showcase your product, business, or event.
Alternatives to creating brochures in Word
In addition to Word, there are other tools you can use to create brochures, flyers and pamphlets.
LucidPress is a popular web tool allowing you to create brochures right in your browser by choosing from a variety of templates, importing content from Google Docs or DropBox, and even collaborating online with a colleague or client.
Design software like Adobe’s InDesign and Illustrator as well as Microsoft Publisher are also viable options to help you get a professional result.
Want more tips and tricks?
If you’re looking to become a Microsoft Word whiz, check out our Basic and Advanced course for more practical tips on formatting and editing professional documents. You might also like our roundup of free Word resume templates if you’d like the hard work done for you!
For more design tips, the Illustrator — Basic and Microsoft Publisher courses can help you learn the essentials for unleashing your creativity when creating artwork, logos, flyers and more.
Ready to master Microsoft Office?
Start learning for free with GoSkills courses
Start free trial
![]()
Download Article
![]()
Download Article
This wikiHow teaches you how to create a brochure using Microsoft Word on both Windows and Mac computers. Brochures are informative documents that can be folded into a compact format. To make a brochure in Microsoft Word, you can either use a pre-made template or create one from scratch.
-
1
Open Microsoft Word. It’s a dark-blue app with a white «W» on it.
-
2
Type brochure into the top search bar, then press ↵ Enter. Doing so will search the database for brochure templates.
- On Mac, if you don’t see the Template page, click File in the top menu bar and select New from Template… in the drop-down menu.
Advertisement
-
3
Select a brochure template. Find a brochure template that you like and click on it. The brochure’s preview page will open.
- Most brochure templates will be formatted roughly the same, so you should choose a brochure based on appearance.
-
4
Click Create. It’s to the right of the brochure’s preview. Doing so will prompt Word to begin loading the brochure, which should only take a few seconds.
-
5
Enter your brochure’s information. Depending on the template that you chose, this step will vary; however, for most brochures, you can replace the placeholder text in each spot with your company’s information.
- Most brochures have several pages of information, including a testimonial section.
- You can replace the photos in the brochure by clicking a photo, clicking the Format tab, clicking Change Picture, clicking From a File, and selecting a file from your computer.
-
6
Save your brochure. To do so:
- Windows — Click File, click Save As, double-click This PC, click a save location on the left side of the window, type your brochure’s name into the «File name» text box, and click Save.
- Mac — Click File, click Save As…, enter your brochure’s name in the «Save As» field, click the «Where» box and select a save folder, and click Save.


Advertisement
-
1
Open Microsoft Word. Its app icon resembles a white «W» on a dark-blue background.
-
2
Click Blank document. It’s a white box in the upper-left side of the window. Doing so opens a blank Word document.
- Skip this step on Mac.
-
3
Click the Layout tab. You’ll find this at the top of the Word window. A new toolbar will appear below the row of tabs here.
-
4
Click Margins. This option is on the far-left side of the Layout toolbar. A drop-down menu will appear.
-
5
Click Custom Margins…. It’s at the bottom of the Margins drop-down menu. Doing so opens a new window.
-
6
Lower each margin. In the «Margins» section at the top of the window, you’ll see several different margin options (e.g., «Left»), each of which has 1 in a text box to the right of it. Change the value in this text box to 0.1 to ensure that your brochure’s margins are wide enough to accommodate your content.
-
7
Click Landscape. It’s in the middle of the window.
-
8
Click OK. This is at the bottom of the window. Doing so saves your changes and reformats your Word document.
-
9
Add columns to your document. To do so:
- Make sure that you’re still on the Layout tab.
- Click Columns
- Select a number of columns in the drop-down menu.
-
10
Add column breaks. This will ensure that each column (i.e. panel) of your brochure holds separate paragraphs of information. To do so:
- Make sure that you’re still on the Layout tab.
- Click Breaks
- Click Column in the drop-down menu.
-
11
Enter your brochure’s information. There are two main types of information that you can add to your document:
- Text — Type in your brochure’s information on a per-column basis. You can edit the text that you type by clicking the Home tab and then selecting options in the «Font» section while the text that you want to edit is highlighted.
- Images — Make sure that your cursor is at the point on the page in which you want to insert a photo, then click Insert, click Pictures, select a picture, and click Insert or Open.
-
12
Save your brochure. To do so:
- Windows — Click File, click Save As, double-click This PC, click a save location on the left side of the window, type your brochure’s name into the «File name» text box, and click Save.
- Mac — Click File, click Save As…, enter your brochure’s name in the «Save As» field, click the «Where» box and select a save folder, and click Save.


Advertisement
Add New Question
-
Question
How can I find a brochure format on word 2007?

Click the circle in the upper right corner, click «new» and search for «brochure».
-
Question
How do I open a blank page in MS Word?
Click File and select New. You will see a list of options, one of which will be a blank page.
-
Question
How do I print it in the correct orientation?
When you print your brochure, you should check the printing options and choose the option that best suits the look you want for your brochure.
See more answers
Ask a Question
200 characters left
Include your email address to get a message when this question is answered.
Submit
Advertisement
-
It helps to have a visual mock-up of your brochure on paper before creating it in Word.
-
Remember to print your brochure double-sided.
Thanks for submitting a tip for review!
Advertisement
-
Creating a brochure manually takes significantly more time and trial-and-error than does creating a brochure from a template.
Advertisement
About This Article
Article SummaryX
The easiest way to make a brochure with Microsoft Word is to use one of the brochure templates included with the program. Open MS Word, type «brochure» in the search bar located in the upper-left corner of the screen, then hit «enter.» Once the templates display on the screen, click through them until you find one you like and select it to get started. Type your brochure’s information into the provided spaces and add images, if desired. Save the completed brochure and it’s ready to print. If you need to learn how to make a brochure from scratch, keep reading the article!
Did this summary help you?
Thanks to all authors for creating a page that has been read 2,403,408 times.
Did this article help you?
Don’t be overwhelmed by the task of creating a brochure to promote your business. You can quickly and easily create a professional brochure in Microsoft Word using templates.


In this tutorial, I’m going to show you how to make a brochure in Microsoft Word, using a Microsoft Word brochure template. First, though, let’s look at why it makes sense to use brochure templates.
Why Printed Brochures Are Important
With so much information available online, are printed brochures still relevant for entrepreneurs, small businesses owners, and marketers?
Yes, they are, and here are just a few reasons why.
Ever been to one of those networking events designed to grow your business? I have, too, and it can be kind of a zoo. By the time you’ve visited the first dozen booths, you can barely remember your own name, let alone what each booth presented.
If you’re exhibiting at a trade show or networking event, handing out a brochure will help people remember your business later. It’s one of the best ways to make sure that when you’re out of sight of your prospective customer, you don’t have to be out of mind.


That’s also why it’s a good idea to have brochures available at conferences, workshops, seminars, and training sessions. At these events, people pick up brochures so they can retain business and contact information. Sure, you could hand out a business card, but a brochure offers much more. They’re a great way to deliver a focused, targeted message about your business.
Even if you’ve got a website, there’s no guarantee that visitors will experience it the way you want them to. So it makes sense to have a brochure, too.
And there’s one more thing: brochures last. Even if the person who picks it up doesn’t act, that person may pass it on to someone else, or leave it where a third person can find it. That means long after a particular event, that content is out there marketing your business.
The bottom line: brochures can help reinforce your brand so that people recognize and remember your business.
But there’s one problem you might face as a small business owner: knowing how to make a brochure. In the past, creating brochures required design and layout skills, so most were created by graphic designers.
The good news is: that has changed. You can now create brochures and pamphlets easily using the software you’ve already got on your computer: Microsoft Word. According to statistics from Datanyze, Word is one of the most-used document software programs.
Benefits of Using Microsoft Word Brochure Templates
There are several benefits to using brochure templates in Word.
One of the main ones is that you don’t need design skills to create a stunning brochure. Templates let everyone benefit from good design without having to come up with the concepts.
There’s no need to learn complicated page layout software or use complex apps, either. If you’ve never created a page layout before, using a program like InDesign can be challenging. Using brochure templates removes the hassle, by giving you a layout that’s easy to customize.
Then there’s speed. If you need to create a brochure in a hurry, a brochure or pamphlet template with placeholder text and images lets you create an attractive marketing tool in just a few minutes.
What You’ll Need to Customize Your Template
Brochures are basically text and images, so you’ll need plenty of both to customize brochure templates in Word. While you can do this as you go, it’ll work better if you prepare your text in advance, and choose some images, too. Don’t worry; you can always tweak as needed later.
Since brochure copy is marketing copy, you’ll need:
- a main title
- an explanatory subhead
- subheadings for the main content sections
- text
- a call to action
- contact details
- images for visual impact
For example, your copy might include
- your main unique selling point (USP)
- a brief history of your business
- an introduction to your services or products
Here’s some more advice on writing your own copy. Now let’s get started on making a brochure in Word.
How to Create Brochure Using a Template
Once you’ve got your content ready, it’s time to choose a brochure template for Word so you can create your brochure. Word has a built-in template library, but sometimes it’s hard to find a design that really appeals.
So, if you want an even wider range of templates to choose from to suit every business need, explore the brochure design templates at Envato Elements and GraphicRiver. These online marketplaces have thousands of Microsoft Word brochure templates and pamphlet templates to choose from. Here are some of the best ones available:
For example, here’s how you find a Microsoft Word brochure template on Envato Elements. Go to the website. Select Graphic Templates to the right of the search box so you’re only searching for templates. Type “brochure, microsoft word” in the actual search box. There will be thousands of templates to choose from.


Use the filter boxes on the left to refine your search by orientation, color, format, and more. There are several brochure types to choose from, including bifold, trifold, booklets, and flyers. Learn more about the different brochure types in the tutorial, How to Make a Brochure.
When choosing a brochure or pamphlet template, make sure it has a good balance of text and images, so it’ll be visually appealing. You also want to ensure it fits in with your company branding, so pay attention to color, too. Remember, it has to stand out against other brochures and encourage people to pick it up. Keep this in mind as you select your template.
I’ve chosen a tri-fold brochure for this tutorial, which is commonly used by small businesses, and works for most uses. Here’s the template we’re going to use:
1. Download and Unzip the Template
If you already have an Envato account, then add your chosen template and get ready to use it. You’ll find it in the Downloads section of your account. Download the zip file.
Click on the file to unzip it, then go to the unzipped folder. Navigate to the Microsoft Word sub folder.


There will be two versions of the template: Microsoft 97-2002 and one for the latest version of Word.


Click on one of the templates to open it in Word.
If you’re using a recent version of Word, it’ll open in Protected View. Click where indicated on the notification to enable you to edit the template.


Before you go any further, click on File — Save As in the Word menu, and give your brochure a suitable name. You’ll work on this version from now on, but the original template will be there should you wish to use it again.
Now it’s time to start customizing it. As you work through this tutorial, remember to save your work at regular intervals so you don’t lose your progress.
2. Explore the Brochure or Pamphlet Template
Before you start customizing, get familiar with your template, so you know exactly where you’ll be adding text and images. This template contains two pages, each divided into three to make a trifold brochure.
When printed, the second page will be on the rear of the first. The front cover is to the right of your screen, with the back cover in the middle. This ensures that when it’s folded the most important information is visible no matter how the brochure is placed.
Now you’re ready to customize the Microsoft Word brochure template.
3. Replace the Placeholder Text
One of the easiest places to start customizing is to replace your company name wherever it appears in the template. To do this, double click on the text you want to change to highlight everything within the text box.


Then replace it with the name of your company.


Repeat this process wherever the company name appears in the template.
Use the same process to edit the company address and contact details, and the company website.
Next, follow the same process to edit the brochure title. Here’s how the original title looks:


Choose something that’ll appeal to your target customer. For example, in this template, we’ve used the business strapline as a brochure headline.


You can also resize the text box to ensure that your text fits within the right space. Double click on the text to see the text box handles, then drag till it fits in the right space.


Depending on the text you want to use, you may need to adjust the font size. To do this, select the text you’ve just typed, and go to the font size selector near the top left of the screen. Choose a font size that works better for your template.


Now it’s time to edit the main brochure text. Follow the process we used earlier to add new text to the back of the brochure.


Feel free to edit the headlines to suit your purpose. For example, we’re going to replace the “Case Study Trifold” headline with one that says “My Customers Say,» then add some testimonials to the brochure. Here’s how it looks in the original Microsoft Word trifold template:


And here’s the edited version:


4. Replace the Image Placeholders
To complete the front of the brochure, you’ll need to upload some suitable images to accompany the text. Since images tend to draw the eye, and give a first impression of your business, it’s essential to make these as appealing, clear, and relevant as possible.
To change a picture, double click on one of the grey photo boxes to bring up the drawing tools menu.


Navigate to shape fill and select Picture.


You’ll get the option to choose a picture that’s already on your computer.


Select the picture and it’ll fill the shape.
If you need to find suitable pictures, type your search terms into Envato Elements.
Use the filters at the side of the screen to refine your search by picture orientation, color, and more. For example, we’ve chosen portrait orientation to match the shape of our image placeholder boxes.


In this case we’ve chosen a typewriter image. Here’s how the template looks with a couple of pictures added:
.jpg)
.jpg)
.jpg)
5. Customize the Inside Pages
Now that the outside is done, repeat the process for the internal pages, replacing text and images as shown earlier.
If there are elements you don’t need on the template, you can delete them, as we’ve done with the numbers on this image.


First, highlight the text and press Delete. Then click on the text box, right click, and press Cut.
Here’s how the cleaned-up image looks.


6. Proofread
Before you print your trifold Word brochure, proofread it and check for any mistakes. Spelling and grammar errors make your business look unprofessional, so you definitely want to avoid those.
And look over the finished brochure to make sure all images are clear and in the right place. Remember, brochures can be around for a long time, so make sure yours is giving the right impression of your brand.
Create Your Own Trifold Brochure From a Word Template
Now that you know how to create a brochure in Microsoft Word from a template, you’re ready to create your own professional brochure. Why not get started by downloading a Microsoft Word brochure template from Envato Elements or GraphicRiver today?
270
270 people found this article helpful
Templates make creating one easy
Updated on September 25, 2022
What to Know
- Use a template: Go to File > New and search for Brochure. Choose a style and select Create. Then replace the sample text and images.
- Or, open and customize a new Word document. When finished, select File > Save As and choose Word Template (*.dotx).
This article explains how to create a brochure in Microsoft Word by using an existing template or personalizing your own template design. Instructions cover Word for Microsoft 365, Word 2019, Word 2016, Word 2013, and Word 2010.
How to Create a Brochure From a Template
The easiest way to create a brochure in any version of Microsoft Word is to start with a template, which has the columns and placeholders configured. Change the document and add your text and images.
How to Create and Use Microsoft Word Templates
-
Select File > New.
-
In the Search for Online Templates text box, type brochure, then press Enter.
-
Choose the style you want and select Create to download the template. The template automatically opens in a new Word document.
-
Select sample text in any section and enter your custom text. Replace the sample text throughout the template.
-
Replace the sample images, if desired. Select an image, right-click, and select Change Image. Choose the location of the picture you want to use, navigate to the image, then select Insert.
-
To change the default color theme of the template, go to the Design tab.
-
Select the Colors drop-down arrow and choose a theme.
Point to a theme in the Colors drop-down list to preview before applying it.
-
Save the changes to the brochure when you are finished customizing it. Refer to the printer documentation or manufacturer website to find instructions on how to print double-sided documents.
How to Make a Brochure in Word From Scratch
To create a brochure from scratch, start with a blank document.
-
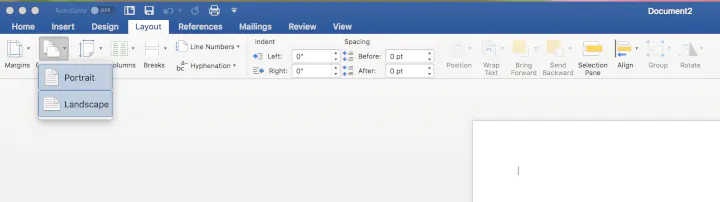
Change the document’s orientation. Go to the Layout tab and select Orientation > Landscape.
Orientation is set to Portrait by default.
-
Add a second page for a double-sided brochure. Go to the Insert tab and, in the Pages group, choose Blank Page.
-
Choose the number of columns. Go to the Layout tab and select Columns. Then, choose Two to create a bi-fold brochure, or choose Three to create a tri-fold brochure.
-
Add and format the text. To format the text, select the text, go to the Home tab, then choose a font, font size, and font color, or add a bulleted list or numbered list.
Another way to place text in a brochure is to insert a text box and add text to the text box.
-
Add photos or graphics. Select the location in the document where you want to place the picture, go to the Insert tab, and select Pictures.
-
Save the changes to the brochure when you are finished customizing it. Refer to the printer documentation or manufacturer website to find instructions on how to print double-sided documents.
To save the brochure as a template, go to File > Save As and choose Word Template (*.dotx) from the list of file types.
FAQ
-
How do I insert a signature in Microsoft Word?
To insert a signature in Microsoft Word, scan and insert a signature image into a new Word document and type your information beneath the signature. Then, select the signature block and go to Insert > Quick Parts > Save Selection to Quick Part Gallery. Name the signature > AutoText > OK.
-
How can I delete a page in Microsoft Word?
To delete a page in Word, select View, then go to the Show section and select Navigation Pane. In the left pane, select Pages, choose the page you want to delete and select the delete/backspace key.
-
How do I check the word count in Microsoft Word?
To check the word count in Microsoft Word, look at the status bar. If you don’t see the number of words, right-click the status bar and choose Word Count.
Thanks for letting us know!
Get the Latest Tech News Delivered Every Day
Subscribe