
Access for Microsoft 365 Access 2021 Access 2019 Access 2016 Access 2013 Access 2010 Access 2007 More…Less
Layout view and Design view are the two views in which you can make design changes to forms. You can use either view to perform many of the same design and layout tasks, but certain tasks are easier to perform in one view than they are in the other. This article describes the similarities and differences between Layout view and Design view, and shows you how to perform some common form design tasks in each view.
Note: Although this article is written with forms in mind, many of the concepts also apply to modifying reports.
What do you want to do?
-
Understand Layout view and Design view
-
Modify a form in Layout view
-
Modify a form in Design view
Understand Layout view and Design view
Layout view Layout view is a more visually-oriented view than Design view. While viewing a form in Layout view, each control displays real data. As a result, this is a very useful view for setting the size of controls, or performing many other tasks that affect the visual appearance and usability of the form.
Certain tasks cannot be performed in Layout view and require switching to Design view. In certain situations, Access displays a message telling you that you must switch to Design view to make a particular change.
Design view Design view gives you a more detailed view of the structure of the form. You can see the Header, Detail, and Footer sections for the form. You cannot see the underlying data while you are making design changes; however, there are certain tasks you can perform more easily in Design view than in Layout view. You can:
-
Add a wider variety of controls to the form, such as labels, images, lines, and rectangles.
-
Edit text box control sources in the text boxes themselves, without using the property sheet.
-
Resize form sections, such as the Form Header or the Detail section.
-
Change certain form properties that cannot be changed in Layout view (such as Default View or Allow Form View).
Top of Page
Modify a form in Layout view
After you create a form, you can easily fine-tune its design by working in Layout view. Using the actual form data as your guide, you can rearrange the controls and adjust their sizes. You can add new controls to the form and set the properties for the form and its controls.
To switch to Layout view, right-click the form name in the Navigation Pane and then click Layout View  .
.
Access shows the form in Layout view.
You can use the property sheet to modify the properties for the form and its controls and sections. To display the property sheet, press F4.
You can use the Field List pane to add fields from the underlying table or query to the form design. To display the Field List pane, use one of the following methods:
-
On the Format tab, in the Controls group, click Add Existing Fields
 .
. -
Press ALT+F8.
 .
.You can then drag fields directly from the Field List pane onto the form.
-
To add a single field, double-click it or drag it from the Field List pane to the section on the form where you want it displayed.
-
To add several fields at the same time, hold down CTRL and then click the fields that you want to add. Then, drag the selected fields onto the form.
Top of Page
Modify a form in Design view
You can also fine-tune your form’s design by working in Design view. You can add new controls and fields to the form by adding them to the design grid. The property sheet gives you access to many properties that you can set to customize the form.
To switch to Design view, right-click the form name in the Navigation Pane and then click Design View  .
.
Access shows the form in Design view.
You can use the property sheet to modify the properties for the form and its controls and sections. To display the property sheet, press F4.
You can use the Field List pane to add fields from the underlying table or query to the form design. To display the Field List pane, use one of the following methods:
-
On the Design tab, in the Tools group, click Add Existing Field.
-
Press ALT+F8.
You can then drag fields directly from the Field List pane onto the form.
-
To add a single field, double-click it or drag it from the Field List pane to the section on the form where you want it displayed.
-
To add several fields at the same time, hold down CTRL and then click the fields that you want to add. Then, drag the selected fields onto the form.
Top of Page
Need more help?
How do I get Design view in Word?
Just click the Design View button in the classic style toolbar, the Access interface will be shown in Design View. Just click the Design View item under the View drop down menu in main menu, the interface will be transferred into Design View.
Where is Layout tab in Word?
To open the Page Setup dialog box:
Click the Page Layout tab. Click the small arrow in the bottom-right corner of the Page Setup group.
How do I open design view?
Related Question How do I open design view in Word?
How can you open the database in design view?
Answer: To open a table in design view, right-click on the table name in the left window and selecting Design View from the popup menu. The window on the right should now display the table information.
How do I view content control in Word?
What Is Design tab in MS Word?
Design tab. The Design tab includes table formatting, cell and table borders, arranging the table on the page, and the size of the table.
How do I turn on the Developer tab in Word 2007?
How do I open designer in Visual Basic?
How do I get design view in Visual Studio?
How do I open a Windows Form in Visual Studio?
How do I lock the Design view in Access 2019?
How do you enter design mode in caseware?
From the current mode, on the Document tab, click Lock and then Design Mode. Enter the password to access the Design Mode.
How do I password protect a design view in access?
1 Answer. NOw Click the «File» menu from under the Office 2013 ribbon. There is a very large button that says «Encrypt with Password». Click that and enter your secret database password.
How do I open an Access database without access?
How do I open a table in Layout view?
How do I open a Microsoft Access database?
In Windows Explorer, navigate to the drive or folder containing the Access database file you want to open and double-click the database. Access starts and the database is opened.
Where is the Design tab in Word Mac?
On a Mac version of Word 2016: From the Menu Bar at the top of the screen choose Word > Preferences > Ribbon & Toolbar and look in the list box on right of the dialog for the Design tab to mark. These are instructions for a Desktop version of the product.
How do you use Picture Control in Word?
How do I edit content control in Word?
How do you access the page Setup in Word 2016?
How do I open table tools in Word?
How do I open the design code in Visual Studio?
Look for the code file named FormName. designer. vb. Double-click on it to open.
What is Visual Studio designer?
Windows Forms Designer in Visual Studio provides a rapid development solution for creating Windows Forms-based applications. Windows Forms Designer lets you easily add controls to a form, arrange them, and write code for their events.
When you create a new document in Microsoft Word, it looks decent right off the bat. But sometimes you want to make your page look much better than the default.
Use Microsoft Word’s page layout design tools to make easy-to-read documents that reflect positively on you and your business—even if you’re new to Word.


You can make page layout designs in Microsoft Word from scratch. Or, skip the grunt work by using Microsoft Word templates.
Envato Elements and GraphicRiver are both great sources of print templates for Word. Each template is made by professional designers. Elements makes a compelling offer. Download unlimited templates, fonts, photos, and other creative assets for one fixed subscription price.
But, if you only need the occasional template for MS Word and prefer to pay for each single use, then look to GraphicRiver.
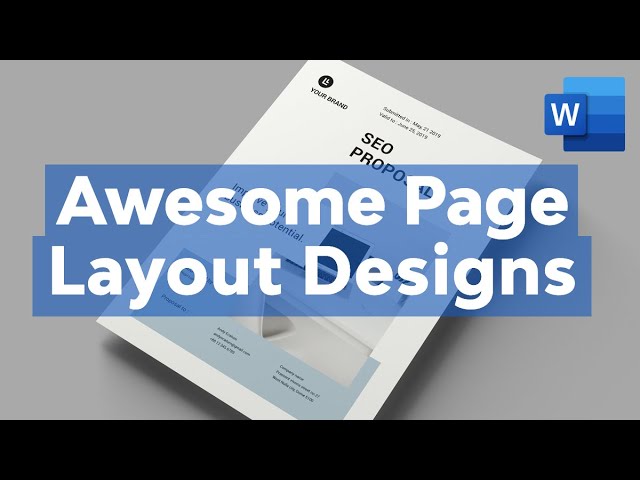
How to Make Awesome Page Layout Designs in Microsoft Word (Video)
If you create or modify documents in Word, you may want to change the standard Microsoft Word layout. There are a number of changes you can make.
Watch this quick screencast to find out what you need to know about Word page layout options:
To learn more about changing page layouts in Microsoft Word, study the complete written tutorial below:
Why Learn About Page Layouts In Word?
Page layout settings in Word determine how your document looks when you print it out. It includes the page orientation, margins, and columns, for example.
It’s important to pay attention to the page layout of your document for several reasons:
- It ensures consistency. This gives your readers a good experience while consuming your document.
- A good page layout makes your document more readable. When your document is aesthetically pleasing and has a consistent look, your audience is more likely to read, comprehend, and remember your content.
- A well-designed document reflects well on you. It reinforces your credibility and authority in your field.
Microsoft Word has robust page settings that allow you to control your page layout design. Everything is designed to be as simple and intuitive as possible. Yet, doing page layout in Word can be daunting if you’re new to the software.
This article breaks things down for you. So, you can follow along, step-by-step, and take control of how your document looks.
Types of Documents You Can Create in MS Word
You can create all kinds of printed documents in Microsoft Word.
Make business documents like:
- resumes
- cover letters
- business letters
- reports
- proposals
- invoices
- certificates
- forms
MS Word is also very handy for creating marketing documents. Create everything from:
- flyers
- brochures
- advertising inserts
- and more
For education or training use Word to prepare:
- handouts
- workbooks
- manuals
- certificates
You can also produce postcards, invitations, newsletters, and signs. If you can print it, then you can whip it up in Word.
In this tutorial, you’ll learn how to use Microsoft Word’s page layout tools to produce the print materials you need.
How to Work With Templates to Quickly Change Your Design
The quickest way to change or apply a page layout is by using a print template for Word. For the examples below, we’ll be using the SEO Proposal template from Envato Elements.


When looking for a print template for Word, it’s a good idea to choose one that uses paragraph and character styles. The styles feature will allow you to quickly format text even in a long document.
Below are some roundups of Microsoft Word templates you can choose from:
Now that you’ve chosen a template with a good page layout in Word, it’s time to learn how to use it.
1. Download the Template
Download the template of your choice to your computer’s hard drive. Unzip the file, then copy the template. This way, you’ve got the original template file intact, if you want to revert to it.


2. Customize the Template With Your Own Content
Replace the text with your own information.


If you want to change the text formatting, change the settings for fonts and paragraphs.
To add your own image, click on an image placeholder. The Format Picture dialog box opens. Under Fill, select Picture or texture fill. Under Picture source, click Insert….


Find and select the image you want to use. Click Insert.


Now, the image is inserted.


To replace an existing logo on the template, click on the logo, then click on the Picture Format tab.


Click the Change Picture button on the ribbon. Find and select the logo file, then click Insert.
![]()
![]()
![]()
If necessary, click-and-drag one of the handles of the logo to resize it.
Next, I’d like to change the color of the rectangle on the cover page. To do that, select the shape, then click the Shape Format tab.


The Shape Format ribbon is displayed. Click on the drop-down arrow beside the Shape Fill button. Select from the color options shown or click More Fill Colors… to specify the color you want to apply.


This is what the customized proposal cover looks like now:


Repeat these steps to customize the other pages of the template.
As you can see, when you start with a template for Word most of the design and page formatting decisions are already made for you by the template creator.
But, if you prefer to start your document from scratch, follow the steps below to change the default page format settings.
Type or paste your text into the document. Apply text and paragraph formatting to modify settings for fonts, spacing, alignment, and more. Then, you can move on to the page layout.
3. How to Set the Microsoft Word Page Orientation as Portrait or Landscape
To set the Microsoft Word page orientation of your document, go to File > Page Setup….


The Page Setup dialog opens. Click on the button for either Word portrait or landscape layout orientation.


4. How to Set the Print Size of the Paper
From the Microsoft Word Page Setup dialog, you can also change the paper size when you print the document. Click on the Paper Size field to show the different paper size choices available.


Select the size you wish to use. You can also click Manage Custom Sizes… to specify your own size.


5. How to Split Your Text into Multiple Columns
Sometimes you may want to divide your text into columns. This can make the document more readable and adds variety to an otherwise monotonous layout. Columns are popular in magazines, newsletters, and similar types of materials.
Arrange the Entire Document into Columns
To change the MS Word layout to columns, follow these steps:
1. Go to Layout > Columns.


The Columns dialog box opens.


2. Select one of the Presets or manually set the:
- number of columns
- width and spacing
- apply to the whole document or from that point forward
3. When you’re happy with the settings, click OK.
Apply Columns to a Part of the Document
You can also apply columns to only a specific part of the document.
1. Select the text you wish to display in columns.


2. Go to Layout > Columns.
3. In the Columns dialog box, choose the settings you want to apply.
Notice that you now have the option to apply the column settings to Selected text. Click OK.


Now, only the selected text has been broken into two columns. The rest remains in one column.


6. How to Add Page and Section Breaks
Sections in Microsoft Word enable you to apply different layouts to different parts of your document. This is useful for making creative layouts, especially to long documents.
Insert a Page Break in Word
A page break separates text, so that anything after the break is moved to a succeeding page. It’s useful for dividing up a document into chapters and sections.
To insert a page break, place the cursor at the point where you want the break to be, then go to Insert > Break > Page Break.


In our sample document, the title page is now on a separate page from the rest of the text.


Insert a Section Break in Word
If you wish to apply varying formatting on different parts of the document, then you’ll want to break it into sections. This includes varying the columns, headers and footers, pagination, borders, and other settings.
To create a section break, place the cursor where you would like the section break to be. Go to Insert > Break > Section Break.


Select the type of section break you want to insert:
- Section Break (Next Page) creates a section break and moves the next section into a new page.
- Section Break (Continuous) keeps the two sections on the same page while allowing you to apply different formatting settings for each.
- Section Break (Odd Page) starts a new section on the next odd-numbered page.
- Section Break (Even Page) starts a new section on the next even-numbered page.
Take Control of Your Page Layouts with Microsoft Word
Use Microsoft Word’s page layout tools to give your documents a consistent, readable, and professional look. You don’t have to be an expert in Word to take better control of your document’s page layouts. With Microsoft Word’s page layout tools, you can make any document look the way you want it to.
You don’t have to start from scratch, either. You can have professional designers make most of the design and layout decisions for you by using print templates for MS Word. If you want unlimited downloads of templates as well as photos, fonts, icons, and other creative assets—all for one small, fixed fee—then Envato Elements is the best source for you.
For one-off Word templates and other desktop publishing tools, look to GraphicRiver. Here, you can access everything you need to create impressive print materials on a pay-per-use basis.
And when you use a template, the skills you learned in this post will help you customize and adapt it to your needs.
Editorial Note: Video added by Alexis (Lexi) Rodrigo.
Change How Word Looks on Screen to Be More Productive
How do you change views in Word documents?
Updated on December 4, 2019
Microsoft Word provides several ways to view a document you’re working on. Each is suitable for different aspects of working with a document, and some are better suited for multi-page documents than single pages. If you’ve always worked in the default view, you may find other views that make you more productive.
Instructions in this article apply to Word for Microsoft 365, Word 2019, Word 2016, Word 2013, and Word 2010.
Change Layouts
Word documents open in the Print Layout by default. You can select an alternative layout at any time.
-
Go to the Ribbon and select the View tab.
-
In the Views group, select one of the other available layouts available to change the layout.
Change Layouts With the Icons Under the Document
Another way to change layouts on the fly is to use the buttons at the bottom of the Word document window. The current layout icon is highlighted. To switch to a different layout, select the corresponding icon.
Word Layout Options
Current versions of Word provide the following layout options:
- Print Layout is the default layout and the one you see most often.
- Web Layout is suitable if you are designing a web page in Word. Web Layout view shows how the document will look as a web page.
- Outline generates an outline version of the contents of the document. You can control the number of levels that are shown and whether the text is formatted. Use Outline view to organize and navigate through a lengthy document.
- Draft view displays only basic text without any formatting or graphics. It is Word’s equivalent of a plain text editor.
- Read Mode hides the writing tools and menus, leaving leave more room for the document pages.
- Focus Mode is a simplified view of the document without any distractions and is available in Microsoft 365. If you need the ribbon, move the mouse to the top of the screen and the ribbon will drop down.
Other Ways to Change How Word Displays
Also in the View tab are other ways to control how a Word document looks on screen.
- Zoom opens a dialog box you can use to specify the percentage of zoom you want. Choose from Word-supplied choices or enter any percentage you like.
- Zoom to 100% instantly returns the document to 100% size.
- One Page or Multiple Pages toggles the view so that either one page of the document displays on the screen or thumbnails of several pages display on the screen.
- Page Width expands the width of the working document to the screen size, usually displaying only the top part of the document.
- Ruler and Gridlines make it easier to measure distance and objects in a document and line up objects on the page.
- Navigation Pane adds a column to the left of the document that holds thumbnails for every page. It is useful for navigating through documents that have more than one page.
- Split displays parts of two pages at the same time, which is useful when you want to copy text or graphics from one page and paste to another.
Thanks for letting us know!
Get the Latest Tech News Delivered Every Day
Subscribe
In case you need to upload your texts to the Internet, it will be necessary that you all use Microsoft Word tools so that you can get a very good result.
In order not to try to write, then download the text and check how it was, you can save time in your work by using the function called «Web Design» .
With this tool, you will see, in a few quick steps, what your text will look like when you upload it to a website. If you want to know what this Word function is and how to use it properly , you should keep reading until the end of this article.
Word web design is a useful tool when you need to write texts that need to be uploaded to a web page . This feature will allow you to see what the design of your document will look like when you upload it to the website.
This way you will be en measure of correct formatting errors, spaces and any other related to images and paintings .
What Are the Benefits of Using Word to Design Websites?
There are many advantages to using this tool . Among the most important we can mention that you will be able to see your document as it would be seen in a web browser . This will allow you to correct distances in line spacing, as well as improve the font style, among other things.
Urban artist you will be able to see in more detail if the table or the image you have inserted is of a suitable size for the browser . This is important because when you are in Word’s print mode tables appear much larger than they actually appear on the Internet.
Although we have already mentioned something, with this document display mode you can choose more attractive colors in fonts, tables or images. This will give a beautiful appearance at texts when it comes to uploading it to the web and it will be fun to read .
You will be able to take advantage of all the advantages offered by Word . By this we mean that you will be able to work with all the advanced tools of this word processor, which are much more important than specialized writing programs for websites.
«UPDATE ✅ Want to learn more about Web Design View in Microsoft Word documents? ⭐ ENTER HERE ⭐ and learn all about SCRATCH! ”
You will only have to paste the document which you have analyzed via Word into the special software, then you can upload it to the web, thus obtaining a much richer text in its content .
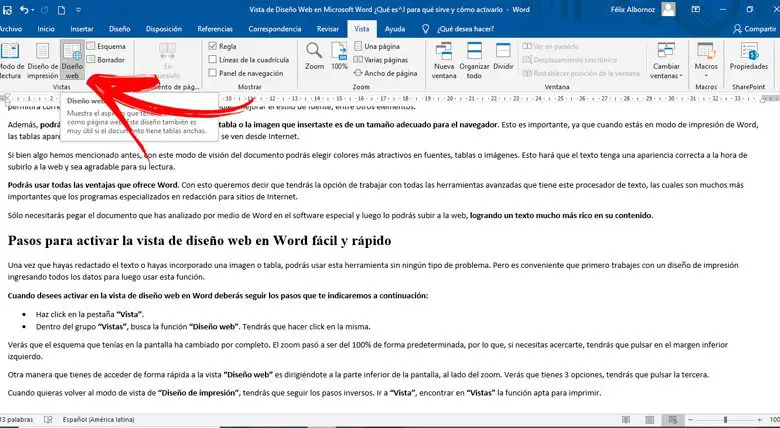
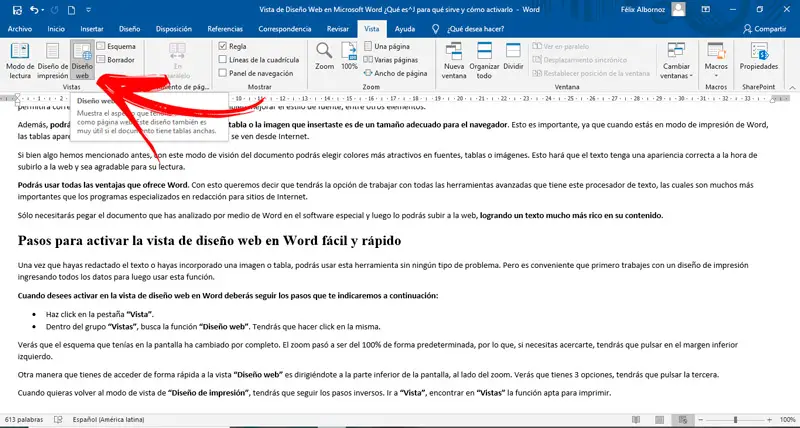
Steps to Activate Web Design View in Word Easily and Quickly
Once you have drafted the text or integrated an image or table, you can use this tool without any problem. But it is convenient that you work with a print design first by entering all the data and then using this function.
When you want to activate in web design view in Word, you need to follow the steps which we will show below:
- Click on the tab «Display» .
- In the group «Views» , search for the function «Web design» . You will have to click on it.
You will see that the diagram you had on the screen has completely changed. The zoom has become 100% by default, so if you need to zoom in, you will have to click on the lower left margin.
Another way to quickly access the view «Web Design» is to go to the bottom of the screen, next to the zoom. You will see that you have 3 options, you will have to press the third one.
When you want to return to display mode «Layout» , you will have to follow the reverse steps. Go to «Display» , find in «Views» the function suitable for printing.
If you have any questions, please leave them in the comments, we will get back to you as soon as possible, and it will be a great help for more community members as well. Thank you!
