
Images 96.20k
Collections 14
![]()

![]()
freepik
![]()
rawpixel.com
![]()
rawpixel.com

![]()
rawpixel.com
![]()
rawpixel.com
![]()
FpExpressVectors

![]()
freepik

![]()
freepik

![]()
ranastockbranding
![]()
freepik
![]()
rawpixel.com

![]()
rawpixel.com

![]()
rawpixel.com

![]()
freepik
![]()
rawpixel.com

![]()
rawpixel.com

![]()
AURA
![]()
rawpixel.com

![]()
rawpixel.com
![]()
freepik

![]()
verlen4418

![]()
rawpixel.com
![]()
rawpixel.com

![]()
freepik

![]()
ranastockbranding
![]()
freepik

![]()
tang90246

![]()
rawpixel.com

![]()
freepik

![]()
rawpixel.com

![]()
pikisuperstar

![]()
freepik

![]()
tang90246

![]()
freepik

![]()
rawpixel.com
![]()
rawpixel.com

![]()
freepik

![]()
rawpixel.com
![]()
veraholera

![]()
rawpixel.com

![]()
LuckyGraphic

![]()
rawpixel.com
![]()
rawpixel.com
![]()
rawpixel.com
![]()
keee

![]()
elisabeta
![]()
freepik
![]()
macrovector
![]()
rawpixel.com
We design-build custom homes and whole-home renovations for our clients in Coastal Georgia (US).
I’m open to ideas on the type of logo that’s best for my brand. The attached is my current logo. While it translates nicely to documents, my website (www.halfmoonhomes.com), and social media, it doesn’t translate well to hats, shirts, and other gift items.
Every design category has flexible pricing for all budgets. Logo design starts at $299.
Full copyright with production-ready files for digital and/or print.
It all began with a design brief.
A quick, interactive guide helped them understand their design style and captured exactly what they needed in their logo design.
Designers across the globe delivered design magic.
by Colorgraphicz
by Khalong
by Khalong
by Adven®
by kevinall
by Adven®
by kevinall
by kevinall
by Adven®
design entries
You’ll get loads of concepts from experienced designers around the globe.
designers
Work with talented, professional Logo design designers to turn your ideas into reality.
winner
Select your favorite custom Logo design (Or two! Or three!). And the design is all yours.
robbZ1 collaborated with designers to refine their ideas
by FDS™
Rate designs
When design entries come in, you can rate them so designers know what you’re looking for in your logo design.
Give feedback
99designs has great collaboration tools so you can pinpoint and capture your ideas
And then… they selected a winner!
Client review
Amazing experience! Our client loves their logo and your response time for updates was very quick. Thank you so much!
Amazing experience! Our client loves their logo and your response time for updates was very quick. Thank you so much!
Anonymous
We think contests are a super fun way to get design.
Recently completed contests:
Check out other construction design inspiration
We love talking design:
More design ideas:
- All effects
- Stylized Effects
- Photo Made of Words

Any photo can now become a piece of word art!
Create your own pictures made of words easily. Use this picture word art generator to turn your photos into text clouds in shades of brown complemented with artistic touch.
- Categories:
Art
Upload a photo:
from computerLoading: 0%by URLLoading…from FacebookLoading…
or select one of these:


Sample photos
What people say about this effect:
- VKontakte
×
Choose from Photos
Browse your albums until you find a picture you want to use
Select an album
Select a new photo
Back to albums
PreviousNext
Page 1 / 1
OKCancel
Generate for Free your own Word Clouds from your favorite words. Input your text and upload your own image to generate amazing color word cloud designs perfect for cut and print. Download the file and use it to create personalized products of your own choice. Print it on merchandise like t-shirts, bags or coffee mugs.
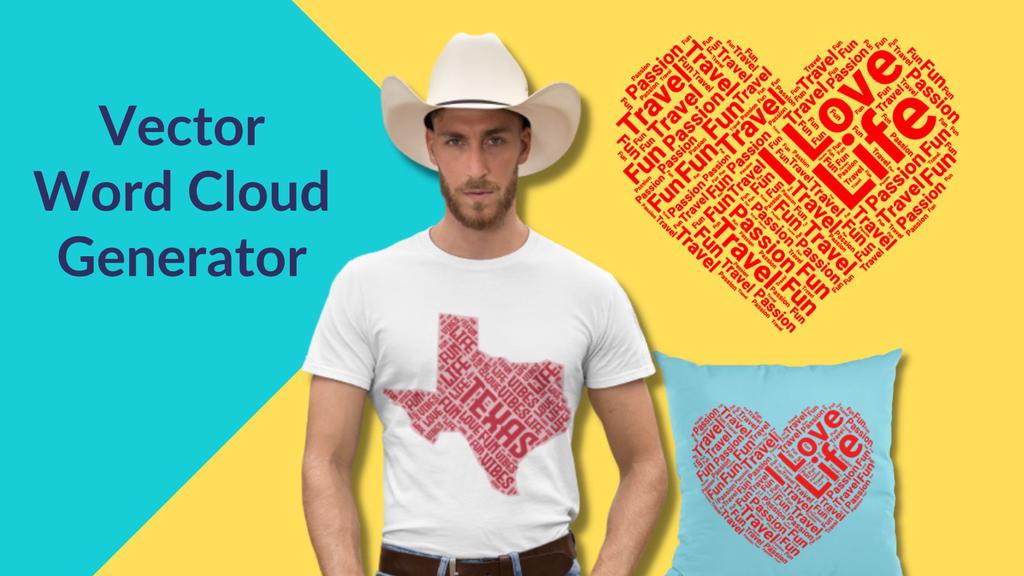
Steps to generate word cloud
Input your favorite words
Enter your words in the text input section.
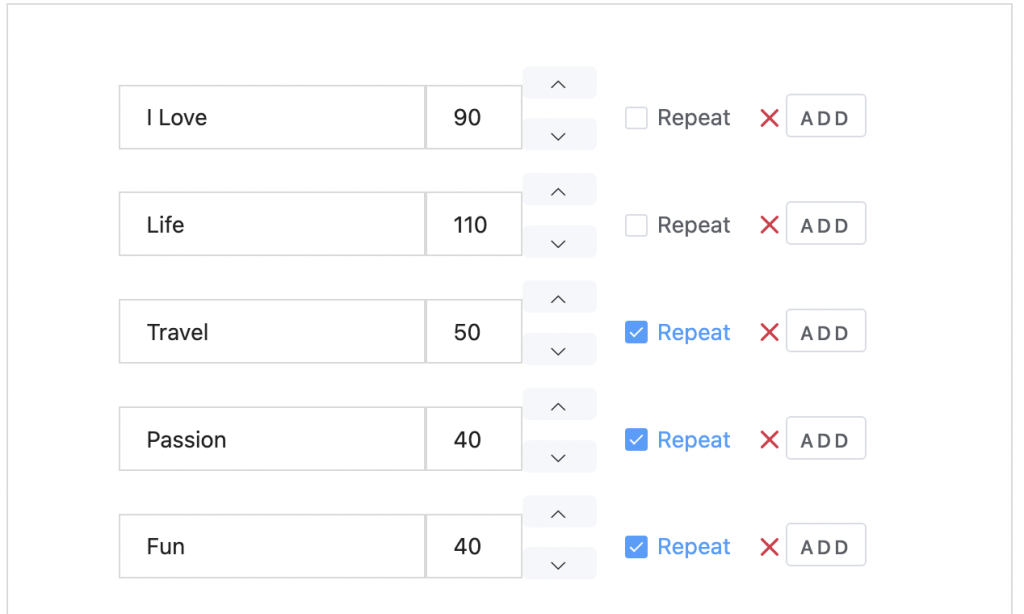
Check the word as repeatable by selecting the repeat checkbox.
Click on the generate button at the bottom to start generating the word cloud design.
Upload your own photo
Upload your own image to test the output design.
Choose from word setting options
Chose a font from the font dropdown or adjust the word gap and opacity of the uploaded photo.
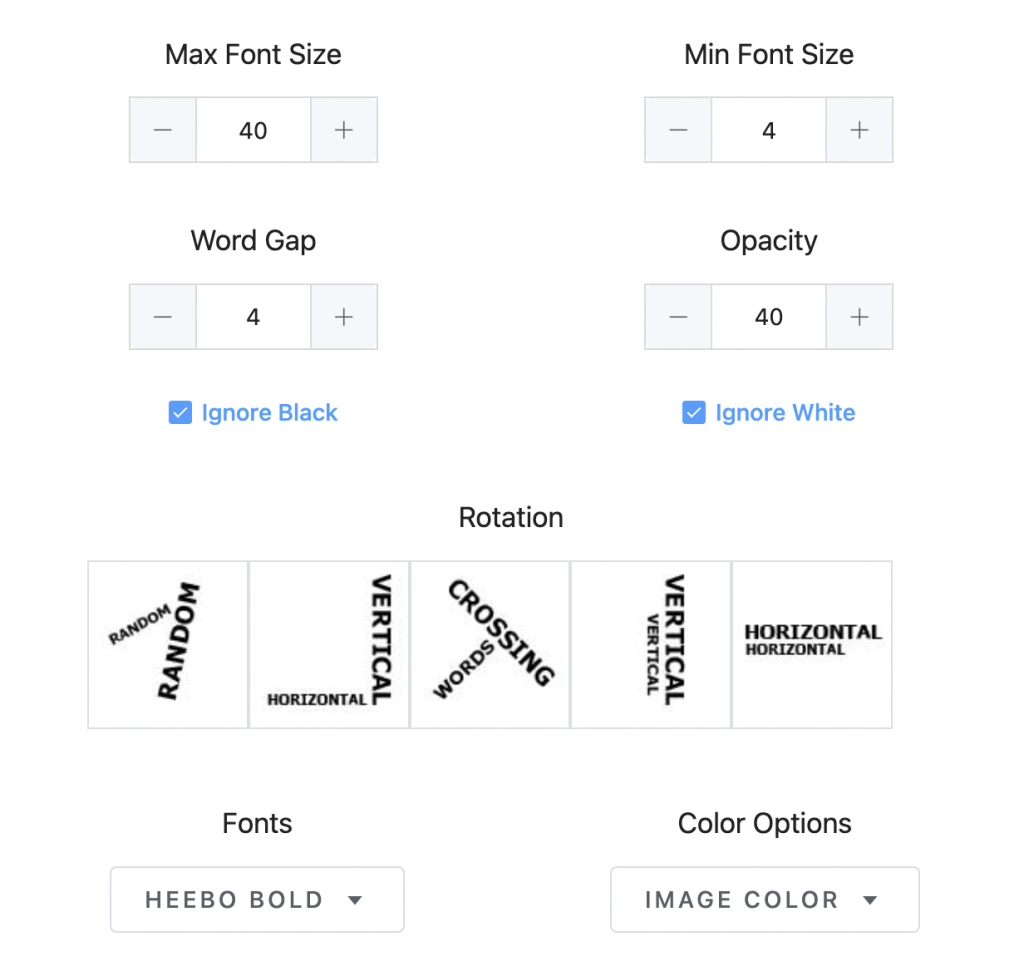
Choose word orientation
Select the rotation options to generate the word clouds with words in a different orientation.
Download the final output file
Download the file and use it to create personalized products of your own choice.
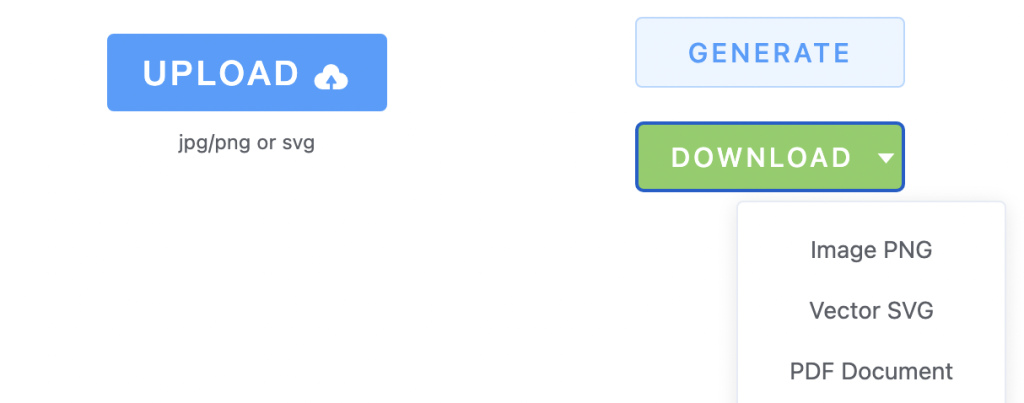
Print or cut the output file.
Print it on merchandise like t-shirts, bags, or coffee mugs.
FAQ
What is a Word Cloud Generator?
A Word Cloud generator is otherwise known as a Word Collage maker or Word Art shape generator which is a visual representation of text data. Also, it is a method to see the most often-used words in a given text. Each word in the word cloud is directly proportional to word frequency in the text.
Word clouds are commonly used to visualize the topics covered on a website or in a document. They can also be used as a tool for brainstorming and identifying keywords. It can be used for various purposes, such as helping to identify trends in data or to see what words are being used most often.
A word cloud generator can use different means, such as the Google Adwords Keyword Tool, a free word cloud generator, that allows you to create a word cloud by entering a few simple keywords.
A word bubble generator can highlight the most used words in a document. In a word bubble maker when analyzing text, it is essential to look for the most common words and phrases, as they will help you get a complete picture of what is written.
A word art creator chooses the words that are the most common and essential. They are usually frequently used in writing but may not be the most critical terms, as they may not carry an emotional impact.
Word Cloud Vs. Tag Cloud
A word cloud is a visual representation of the frequency of usage for a set of words. A tag cloud, on the other hand, is a visual representation of the tags associated with a document or set of documents. Tag clouds can be used to get a quick overview of the topics in a document, which can be helpful when searching for terms.
What are the benefits of using word clouds?
Word clouds help determine what your audience really thinks.
- To understand the feelings of your audience/employees about a topic/situation.
- The audience can summarize their view of a topic.
- Within an intervention/workshop, you can use it to monitor change.
- You have an understanding of the topic you are addressing.
- Allows you to help your audience determine what is most important to them.
- Brainstorm concepts or ideas.
- The audience members are able to offer their own feedback in their own choice of terms.
- Helps in identifying new topics or ideas to target.
- Facilitate peer to peer feedback
- Helps to gather and present.
Word Clouds are quick and informative
- The voting web page enables the presenter to get audience responses in real-time.
Word Cloud creation are exciting and emotional
- The audience feels part of the session.
- Give an opportunity for joint creation of content.
- This helps the audience to drive the discussion.
Word Clouds are engaging
- The audience feel involved by supplying answers to new questions.
- They’re eager to watch the evaluations of other people from the audience members.
- Word clouds can be effective icebreakers and can provide an entry point for discussion.
Word Clouds are visual
- One format our brains prefer is this one.
- Your audience is likely to be more engaged in this visual format than any with bullet points.
Why Are Unique Word Clouds Still Popular?
Word Clouds are a powerful way to visualise what your audience really thinks about a topic. That’s why Word Clouds are still popular.
What is this word cloud tool about?
Word Cloud Generator is an online application that can be used by anyone to create unique images of words. Excellent quality results can be obtained in a quick amount of time, even for users with no previous experience in the field.
What are the formats available for download?
You can download the file in different formats such as PNG, SVG and PDF.
How can I create my own custom word art generator or word graphic generator or free wordle generator or family word art generator or football word cloud generator or word mosaic generator?
You can easily create your own custom word art generator or word graphic generator or free wordle generator or family word art generator or football word cloud generator or word mosaic generator with the help of Word Cloud Generator application.
How do I make my word cloud art for free?
You can make your own word cloud art for free by using the Word Cloud Generator application from Vectordad.
Which Word Cloud builer is the best?
The Word Cloud Maker application from Vectordad is the best.It is so easy to use. Anyone even with no experience can generate clickable word clouds or word cloud letter shape.
Is there any Vector Word graphic generator or tag cloud creator application or online word cloud generator or word map generator available online for FREE?
Yes, the Word Graphic generator application from Vectordad is totally free for use.
Is there any word cloud generator for students available online for FREE?
Yes, the Word Cloud generator application from Vectordad is available online for free.
What is a Calligram Creator?
A Calligram creator is an application to create a calligram (a word or piece of text in which the design and layout of the letters create a visual image related to the meaning of the words themselves) from a picture.
Related designs

Word allows you to do much more than simply insert or place graphics. For our fourth lesson in this series, we will focus on the graphic design functions in Word such as pictures, SmartArt, screenshots, and other items that can be found on the “Insert” tab.
These functions really breathe life into your drab black and white text documents. With a simple picture or chart, you can turn your term paper from meh to yeah! Luckily, there’s a whole range of ways you can add images to better illustrate (no pun intended) your point.
We’ll wrap the lesson by changing gears a bit and discussing how to use more than one language in Word 2013.
Images and Multimedia
You don’t have to think of Word as simply a word processing program. It has requisite tools for doing some pretty nifty page layout. While it’s not a feature-complete or robust as a professional page layout program such as Adobe InDesign. You can still get very professional looking results if you know what’s in your toolbox and how to use it.

Pictures and Online Pictures
Both “Pictures” and “Online Pictures” accomplish the same goal. The only difference is that “Pictures” means you can insert pictures locally, while “Online Pictures” allows you to insert images from an internet-based source such as clip art from Office.com, Bing, or OneDrive (formerly SkyDrive).
You can also insert pictures from your Facebook profile or Flickr although you could always just save the pictures you want to insert to your computer and then insert them from there if you don’t want to connect Office to these profiles.
Picture Tools
As always, when you want to edit a picture or any element place in a Word document, you can click on it and the appropriate tab will appear on the Ribbon.
With pictures, that tab is “Picture Tools.” Here we see you can make all kinds of corrections to the picture on-the-fly. For example, you can correct brightness and contrast, the color, add a border.
Where you position and how you wrap text will also play a large role in formatting your documents.
Here we see those controls. In our documents, we don’t worry so much about word wrapping or positioning because Word isn’t the final step toward publishing online. However, if you’re going to produce something WYSIWYG (What You See is What You Get), such as for a PDF or print publication, then these things will definitely matter.
Also, there are a couple ways you make changes to your pictures inline, such as resizing, rotating, and moving them. In the following image, you see these controls, many of which you will likely be familiar with.
When you click on an image in your document, you get a box on each corner, which will let you resize a picture. At the top, in the middle, is a circular arrow, grab this to freely rotate your picture. To move the image, hover the mouse over the image until the pointer is the four arrows, you can then click and drag the image anywhere you like.
Finally, if you click on the little “Layout Options” button, you can change your text wrapping without going to the Ribbon.
Clicking on “See more…” at the bottom of the “Layout Options” opens the full-blown “Layout” dialog.
Note, the size tab both on the Ribbon the “Layout” dialog allows you to specifically resize, rotate, and scale your pictures, rather than relying wholly on winging it:
We’d like to spend the whole day talking about formatting images in Word, but as you can see, there’s a ton of options at your disposal. Let’s move on now to other objects you can insert into your documents, starting with “Shapes.”
Shapes
Microsoft Word 2013 comes with an array of built-in shapes, which you can use to create callouts, boxes, stars, and other shapes.
When you choose a shape, you simply draw it on a blank space on the page. It doesn’t matter if you get it perfect or just the way you want it because you can adjust it to your heart’s content once it is placed in your document.
Note in the screenshot, the previously mentioned little “handles” you can use to resize and rotate your shapes.
At the bottom of the “Shapes” menu, there’s an option to create a “new drawing canvas.” This will open, what is essentially a text box for shapes. With this drawing canvas, you can create drawings using these shapes allowing you to create things like diagrams and flowcharts.
SmartArt and WordArt
SmartArt and WordArt tend to have some overlap, particularly if you create something using WordArt and then customize any of the text within it. Of course, you can use one or the other and never the twain shall meet, but we’re going to talk about them in the same section because one often leads to the other.
Think of SmartArt as premade drawing canvases that you can insert into your document and then customize as you like. Simply pick an arrangement, such as a list, process, or cycle.
As you can see, we created a graphic based on a “Continuous Block Process.” When we click on the text boxes, we can edit what is inside. There are also the usual grab handles needed to resize the image, and the “Layout Options” allowing you to wrap text to your preference.
If you use SmartArt, note that the Ribbon changes to reflect this. The “SmartArt Tools” features two tabs: “Design” and “Format.” Let’s cover each one and its features.
The right half of the “Format” tab allows you to pick from a number of “SmartArt Styles” and you can also “Change Colors.”
If you look at our previous example, you can see we applied an embossed, shiny effect and changed the colors of our text boxes and arrow.
On the left half of the “Design” tab, you can “Create Graphic” so you can add shapes, bullets, text, and move things around.
The “Layouts” section lets you change how your graphic looks on the fly. Simply hover over any of the built-in options to see how it would look utilizing a different layout. Changes to the layout are not applied unless you first click on a style.
The right side of the “Format” tab is used for affecting changes to text. These include “WordArt Styles” and other effects suchs as fill and outline. Beyond that, you can arrange multiple layers by sending them forward and backward.
The “Layout” dialog pops out if you select the little arrow in the bottom-right corner of the “size” section or you can choose more options from any of the drop-down menus including “Position”, “Align”, and “Rotate.”
On the left side of the “Format” tab you can select any of your shapes and change them to another, and also make them larger or smaller.
If you click on “Shape Styles” you will be able to choose from a selection of pre-defined shapes and colors.
Shift right just slightly and you will find controls to alter the fill. Choose from various “Theme Colors” or select your own. You an also use pictures, gradients, and textures for even more fill options.
If you want to refine the outline around your shape(s), you can choose any color, weight, or dashes.
Finally, “Shape Effects” has quite a few options for enhancing your shapes, many of which will give them a cool 3D effect that you can adjust by clicking 3D Options at the bottom of the of the menu.
Format Text Effects
Let’s take a closer look at this because it contains a pretty sizable amount of features. We’ll cover the basics so that you’re more aware of them. The pane titled, “Format Text Effects,” slides out from the right edge.
As with any other panes in Word 2013, it can be detached, which you can then stick out of the way to save screen area, or keep it nearby so it is handy. Regardless, this dialog box will allow you to quickly work with text, so you don’t have to repeatedly keep going to the ribbon to change things. Note also that the dialog is split into functions, “Text Fill and Outline” and “Text Effects.” “Text Fill and Outline” is simple enough to figure out, and is used to enhance how text appears.
Say, for instance, we want to write How-To Geek School and enhance it so that it is size 48 pt., blue with a black 1 pt. outline. We simply select the text we want, increase to the size to 48, then in the “Format Text Effects” dialog, we can change the color (we can also do this in the “Font” section of the “Home” tab. Then under “Text Outline” we choose “Solid line” and choose block and 1 pt. for the outline width.
That looks pretty good, but we really want it to pop, let’s add some more text effects, such as a shadow, a reflection, and we’ll add a bit of a 3d bezel to round the lettering out.
The result is a bit more striking and while it’s not likely to make it into any final designs, it does give you an idea of what you can do with WordArt.
Chart
Who doesn’t like charts? Charts are a great way to visually display data sets and Word 2013 comes jam packed with a large assortment of Charts to choose from, including columns, pie, bar charts and much, much more. Check out the screenshot for an idea of just how many options there are:
When you choose a style, you’ll get a spreadsheet, which will allow you to enter the data points on your x and y axes. As you enter data, the chart will change.
Manipulating and formatting charts is easy. Whenever you click on a chart in your document, you’ll get the “Chart Tools,” which, as you might have guessed, is the Ribbon tab devoted solely to charts.
Using the “Design” tab, if you don’t like the colors or style of your chart, you can instantly apply changes to it without having to generate a new one.
If you decide you don’t think the layout works for this particular type of data, change it using “Quick Layout” or add another element such as another axis, chart title, gridlines, and more.
On the right side of the “Design” tab you will find essential tools for altering your data and you can also go back and completely change the type of chart you’re using.
So, if you think a pie chart would work better, you can change to that. Note however, some data points, such as “breakfast,” “lunch,” and “dinner” aren’t represented on this chart.
The “Chart Tools” also give you a “Format” tab so you can dress things up a bit by adding shapes and then being able to change the style, fill, and outline.
Turning to the right side of the “Format” tab, you are given options for adding and changing WordArt, arranging elements, and adjusting the size of your chart (which you can also do with the grab handles).
It’s easy also to affect changes inline too. When you click on a chart in your document, formatting controls appear along the upper-right corner. From top-to-bottom, you get “Layout options” so you can set your text wrapping. You can change chart elements with the plus (+) symbol, so if you want to change chart titles, add gridlines, and stuff like that.
The paintbrush icon is for setting a style and color them, and finally, the sieve icon is for “Chart Filters,” so you can edit data points and names on your chart.
Screenshot
The “Screenshot” feature will allow you to take a screen clip, which is automatically pasted in you document.
When you use the screenshot function, it will let you choose between any currently open windows, or you can select “Screen Clipping,” which will minimize Word allowing you to take a selection or full shot of your desktop. So for example, if you want to simply insert a shot of your desktop and its icons, you would first need to minimize everything you have open.
There’s a myriad of ways you can take and add screenshots, so we’re not going to dwell on it. Just note this feature, if you’re unfamiliar with adding screenshots, and you want an easy way to do it in Word.
Online Video
You can insert “Online Video” such as Bing, YouTube, or video embed code into your document.
When you embed a video, it will appear as if it is a regular picture, complete with grab handles and text wrap controls.
Further, you can adjust how the emedded video thumbnail appears (as a picture) using the “Picture Tools” so you can make adjustments to the color, add a border, correct the contrast and brightness, and more.
So you see, we simply applied a “picture style” and add a purple border. This is only a fraction of the stuff you can do, so if you to add some really nice looking effects and create a nice looking document that really pops, you should take your time to familiarize yourself with everything.
On the other hand, if you don’t like your changes and you want to go back to the default, simply click “Reset Picture” and it will revert to normal.
Other Text Features
Here are few more text features that you might want to be aware of though you will probably rarely use them.
Text Box
Text boxes are like their own little islands in Word. What we mean is, when you add a “Text Box” to your documents, it is immune to changes you make to the rest of the document. It is like a document within a document.
This is useful if you want to present something “as is” in your work, be able to make overarching changes to the document’s formatting, but have something you’ve pasted remain unchanged.
For the most part, text boxes are something of a bane to an editor’s existence because they don’t play nice with styles (Lesson 5). You may find them extremely convenient and that’s perfectly fine, but if you want something that conforms to your document’s style and formatting, but still place it in a box or have a border around it, then we recommend simply adding a border, which we covered in Lesson 2 – Shading and Borders.
Drop Cap
Drop caps are simply that one letter at the beginning of a chapter or book that is larger than the rest:
You can either make your drop cap “Dropped” (the text below it shifts underneath it) or “In Margin.” Check out the “Drop Cap” options for more power over how your drop caps behave.
Using More than One Language
If you want to produce content in a language other than the one that comes with Word by default, you will likely need to purchase it. Open the Word “Options” and click on “Language.”
Pick the language you want to add from the dropdown list and then click the “Add” button. When you add a language, you will need to enable it, which means that you will have to turn it on in the “Control Panel.”
From here, you can write in the language, but Word won’t display in it, in other words, menus and help systems will still appear in the default language. To get the full multilingual experience, you may need to purchase a language pack from Microsoft.
To see what languages are available for purchase, and how much, click on “Not installed” and you will be whisked to the Microsoft Office website.
If you want to add proofing tools, such as spellcheck, grammar check, and/or screen tooltips, then you may be able to simply download them for free.
While it’s doubtful you’ll be using Word in full multilingual mode, it’s nice to know how you can affect those changes. Moreover, most languages are freely available to use system-wide so actually creating a document in another language is well within your reach, for free.
Coming up Next…
So that concludes this section. We know it’s been a lot to absorb but you’ll see that after a while, this stuff is a cinch!
Once you get the hang of one skill, the rest is pretty similar and comes easier. By now you should have more than enough knowledge to create awesome documents with lists, tables, pictures, video, and anything you need to create a true multimedia publication!
Don’t forget though, if you’ve missed anything in this series you can always go back and read our introduction in Lesson 1, all that stuff on paragraphs and lists in Lesson 2, and all-important tables and other formatting options in Lesson 3.
In our final lesson, Lesson 5, we will cover styles, templates, and themes. It doesn’t sound like much, but they can be a fantastic way to not only save tons of time and create consistently formatted documents, but quickly apply themes that will instantly affect the entire appearance of your documents, as well as create templates that you can later use over and over again!
READ NEXT
- › How to Adjust and Change Discord Fonts
- › The New NVIDIA GeForce RTX 4070 Is Like an RTX 3080 for $599
- › This New Google TV Streaming Device Costs Just $20
- › Google Chrome Is Getting Faster
- › HoloLens Now Has Windows 11 and Incredible 3D Ink Features
- › BLUETTI Slashed Hundreds off Its Best Power Stations for Easter Sale