
Содержание
- View a demand forecast in Excel
- Prerequisites
- View a demand forecast
- Next step
- Related tasks
- Technical information for system administrators
- Adjust a demand forecast in Excel
- Prerequisites
- Make adjustments to specific forecast quantities
- Make percentage adjustments to an overall forecast
- Next step
- Related tasks
- Technical information for system administrators
- Create a forecast in Excel for Windows
- Create a forecast
- Customize your forecast
- Formulas used in forecasting data
- Download a sample workbook
- Need more help?
View a demand forecast in Excel
This content is archived and is not being updated. For the latest documentation, see Microsoft Dynamics 365 product documentation. For the latest release plans, see Dynamics 365 and Microsoft Power Platform release plans.
Applies To: Microsoft Dynamics AX 2012 R3
This topic describes how to view a demand forecast in an Excel file. You perform this task after you have created a baseline forecast, and it has been saved and stored in a Microsoft SQL Server Analysis Services cube.
Prerequisites
The following table shows the prerequisites that must be in place before you start.
Demand forecasting has been set up. For more information, see Set up demand forecasting.
A baseline forecast has been created. For more information, see Create a baseline forecast.
View a demand forecast
To view a demand forecast, follow these steps:
Open the demand forecast file. You can do this in the following ways:
After you generate a baseline forecast, and the Infolog informs you that the baseline forecast has been created, double-click the Infolog or click Open Excel file.
After a baseline forecast has been created, browse to the location that you specified in the Excel demand forecast file path field. This field is located in the Demand forecasting parameters form and the Create statistical baseline forecast form.
In the Excel file, click Enable Content. This enables the content in the PivotTable report, so that you can modify it. You only need to do this step the first time that you open the Excel file.
In the Forecast information sheet, view a summary of the parameters that were used to create the baseline forecast.
In the Forecast table sheet, view the forecasted quantities. The cells are color-coded according to the following rules:
Forecasted quantities are not highlighted.
Historical quantities are highlighted in gray.
Forecasted quantities that are frozen are highlighted in yellow.
In the Forecast table sheet, in the PivotTable Field List, specify how to filter and display the forecast data that is stored in the cube. For example, you can display only the forecasted quantities, or you can display both the forecasted quantities and the historical data. The historical data is displayed as actual demand.
Next step
After you view and analyze the demand forecast, you can adjust the forecasted quantities. For more information, see Adjust a demand forecast in Excel.
Technical information for system administrators
If you don’t have access to the pages that are used to complete this task, contact your system administrator and provide the information that is shown in the following table.
Configuration keys
Click System administration > Setup > Licensing > License configuration. Expand the Trade license key, expand the Inventory forecast configuration key, and then select the Demand forecasting (ReqDemandPlanning) configuration key.
Источник
Adjust a demand forecast in Excel
This content is archived and is not being updated. For the latest documentation, see Microsoft Dynamics 365 product documentation. For the latest release plans, see Dynamics 365 and Microsoft Power Platform release plans.
Applies To: Microsoft Dynamics AX 2012 R3
This topic describes how to adjust forecast quantities. After you have created a baseline forecast, you can adjust the forecasted quantities in response to business realities or plans. You can also use the demand forecast as it is, without adjusting the forecasted quantities.
You adjust forecast quantities manually by modifying the values in an Excel file, and then publishing the changes to the cube. There are two ways to adjust forecast quantities:
Make adjustments to specific forecast quantities. For example, if the forecast bucket is a month, increase the forecasted quantities for the months of June, July, and August.
In addition to making adjustments at the item level, you can also make adjustments at an aggregated level. A weighted allocation is then used to distribute the change proportionally to the item level. For example, if you increase the forecasted quantity of an item allocation key by 600, and there are 3 items assigned to the item allocation key, an additional quantity of 200 is then proportionally distributed to each item. Each item quantity is increased so that it still represents the same percentage of the new aggregated value.
Make percentage adjustments to an overall forecast. For example, to implement a business growth plan, increase the value of the demand forecast by 10 percent. This increase is then applied to all of the forecasted quantities in the demand forecast.
Prerequisites
The following table shows the prerequisites that must be in place before you start.
Demand forecasting has been set up. For more information, see Set up demand forecasting.
A baseline forecast has been created. For more information, see Create a baseline forecast.
Make adjustments to specific forecast quantities
To make adjustments to specific forecast quantities, follow these steps:
Open the Excel demand forecast file. You can do this in the following ways:
After you generate a baseline forecast, and the Infolog informs you that the baseline forecast has been created, double-click the Infolog or click Open Excel file.
After a baseline forecast has been created, browse to the location that you specified in the Excel demand forecast file path field. This field is located in the Demand forecasting parameters form and the Create statistical baseline forecast form.
In the Excel file, click Enable Content. This enables the content in the PivotTable report, so that you can modify it. You only need to do this step the first time that you open the Excel file.
If the PivotTable report is read-only, open PivotTable Tools, click the Options tab, and in the Tools field group, select What-If Analysis > Enable What-If Analysis.
In the Forecast table sheet, in the PivotTable Field List, filter for Demand forecast, and then select Forecasted quantity. These settings let you modify the values in the demand forecast.
In the PivotTable report, in the Comments column, enter a comment for future reference. For example, enter a comment that states you have adjusted the forecasted quantities for the months of June, July, and August.
In the PivotTable report, select one or multiple cells, and then modify the values. For example, for the months of June, July, and August, increase the quantities by 100.
When you modify values in the PivotTable report, a small red triangle appears in the lower-right corner of the cell. This indicates that these values have been modified but not yet published to the cube.
In the PivotTable Field List, select Adjusted quantity to display the Adjusted quantity column in the demand forecast. The adjusted quantity contains the difference between the original forecasted quantity and the modified quantity. The difference can be expressed by using both positive and negative values. For example, if you decrease the forecast quantity for the months of June, July, and August by 50, the adjusted quantity for these months is -50.
After you finish adjusting the forecast quantities, you must publish the changes to the cube to save them. Select any cell in the PivotTable report. Go to Pivot Table Tools. On the Options tab, click What-If-Analysis, and then click Publish Changes.
Save and close the Excel demand forecast file.
If you want to apply the manual adjustments to subsequent iterations of the demand forecast, you must select the Save the manual adjustments made to the baseline demand forecast check box in the Import adjusted demand forecast form when you import the demand forecast to Microsoft Dynamics AX 2012 R3. For more information, see Import a demand forecast to Microsoft Dynamics AX.
If you want to apply the manual adjustments to the next baseline forecast that you create, you must select the Transfer manual adjustments to the demand forecast check box. This check box is in the Create statistical baseline forecast form in the Manual adjustments field group. For more information, see Create a baseline forecast.
Make percentage adjustments to an overall forecast
To make percentage adjustments to an overall forecast, follow these steps:
Open the Excel demand forecast file. You can do this in the following ways:
After you generate a baseline forecast, and the Infolog informs you that the baseline forecast has been created, double-click the Infolog or click Open Excel file.
After a baseline forecast has been created, browse the location that you specified in the Excel demand forecast file path field. This field is located in the Demand forecasting parameters form and the Create statistical baseline forecast form.
In the Excel file, click Enable Content. This enables the content in the PivotTable report, so that you can modify it. You only need to do this step the first time that you open the Excel file.
If the PivotTable report is read-only, open PivotTable Tools, click the Options tab, and in the Tools field group, select What-If Analysis > Enable What-If Analysis.
In the Forecast table sheet, in the PivotTable Field List, filter for Demand forecast, and then select Forecasted quantity. These settings let you modify the values in the demand forecast.
In the PivotTable report, in the Comments column, enter a comment for future reference. For example, enter a comment that states you have adjusted the forecasted quantities for the months of June, July, and August.
In the PivotTable report, select the cell for the Grand Total row and the Grand Total column, and then modify the value. For example, to increase an overall forecast by 10 percent, increase the value in the Grand Total cell by 10 percent. If the original value is 600, increase it to 660.
When you modify values in the PivotTable report, a small red triangle appears in the lower-right corner of the cell. This indicates that these values have been modified but not yet published to the cube.
In the PivotTable Field List, select Adjusted quantity to display the Adjusted quantity column in the demand forecast. The adjusted quantity value contains the difference between the baseline forecast quantity and the modified quantity. The difference can be expressed by using both positive and negative values.
After you finish adjusting the forecast quantities, you must publish the changes to the cube to save them. Select any cell in the PivotTable report. Go to Pivot Table Tools. On the Options tab, click What-If-Analysis, and then click Publish Changes.
Save and close the Excel demand forecast file.
If you want to apply the manual adjustments to subsequent iterations of the demand forecast, you must select the Save the manual adjustments made to the baseline demand forecast check box in the Import adjusted demand forecast form when you import the demand forecast to Microsoft Dynamics AX 2012 R3. For more information, see Import a demand forecast to Microsoft Dynamics AX.
If you want to apply the manual adjustments to the next baseline forecast that you create, you must select the Transfer manual adjustments to the demand forecast check box. This check box is in the Create statistical baseline forecast form, in the Manual adjustments field group. For more information, see Create a baseline forecast.
Next step
After you have adjusted a demand forecast, you import it to Microsoft Dynamics AX. For more information, see Import a demand forecast to Microsoft Dynamics AX.
Technical information for system administrators
If you don’t have access to the pages that are used to complete this task, contact your system administrator and provide the information that is shown in the following table.
Configuration keys
Click System administration > Setup > Licensing > License configuration. Expand the Trade license key, expand the Inventory forecast configuration key, and then select the Demand forecasting (ReqDemandPlanning) configuration key.
Источник
Create a forecast in Excel for Windows
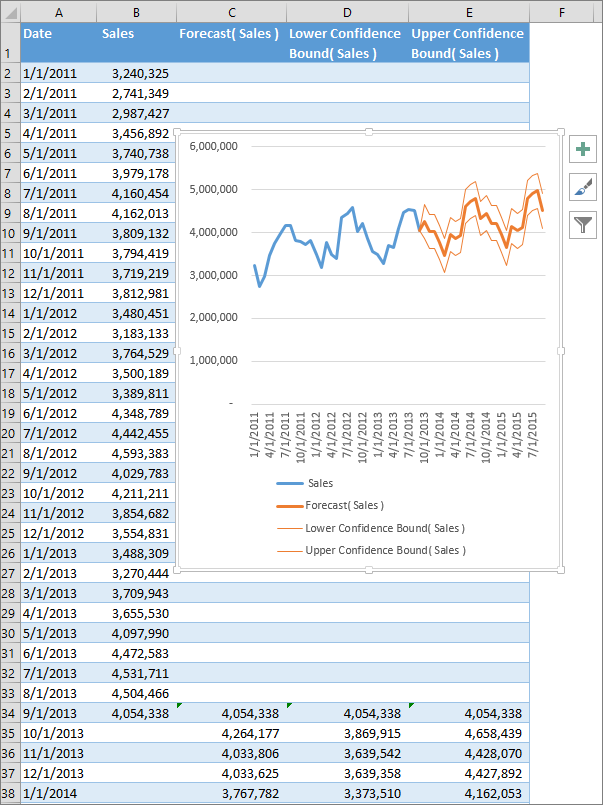
If you have historical time-based data, you can use it to create a forecast. When you create a forecast, Excel creates a new worksheet that contains both a table of the historical and predicted values and a chart that expresses this data. A forecast can help you predict things like future sales, inventory requirements, or consumer trends.
Information about how the forecast is calculated and options you can change can be found at the bottom of this article.
Create a forecast
In a worksheet, enter two data series that correspond to each other:
A series with date or time entries for the timeline
A series with corresponding values
These values will be predicted for future dates.
Note: The timeline requires consistent intervals between its data points. For example, monthly intervals with values on the 1st of every month, yearly intervals, or numerical intervals. It’s okay if your timeline series is missing up to 30% of the data points, or has several numbers with the same time stamp. The forecast will still be accurate. However, summarizing data before you create the forecast will produce more accurate forecast results.
Select both data series.
Tip: If you select a cell in one of your series, Excel automatically selects the rest of the data.
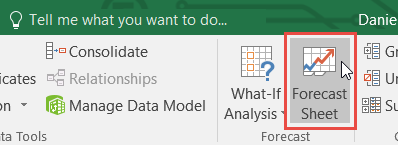
On the Data tab, in the Forecast group, click Forecast Sheet.
In the Create Forecast Worksheet box, pick either a line chart or a column chart for the visual representation of the forecast.

In the Forecast End box, pick an end date, and then click Create.
Excel creates a new worksheet that contains both a table of the historical and predicted values and a chart that expresses this data.
You’ll find the new worksheet just to the left («in front of») the sheet where you entered the data series.
Customize your forecast
If you want to change any advanced settings for your forecast, click Options.
You’ll find information about each of the options in the following table.
Pick the date for the forecast to begin. When you pick a date before the end of the historical data, only data prior to the start date are used in the prediction (this is sometimes referred to as «hindcasting»).
Starting your forecast before the last historical point gives you a sense of the prediction accuracy as you can compare the forecasted series to the actual data. However, if you start the forecast too early, the forecast generated won’t necessarily represent the forecast you’ll get using all the historical data. Using all of your historical data gives you a more accurate prediction.
If your data is seasonal, then starting a forecast before the last historical point is recommended.
Check or uncheck Confidence Interval to show or hide it. The confidence interval is the range surrounding each predicted value, in which 95% of future points are expected to fall, based on the forecast (with normal distribution). Confidence interval can help you figure out the accuracy of the prediction. A smaller interval implies more confidence in the prediction for the specific point. The default level of 95% confidence can be changed using the up or down arrows.
Seasonality is a number for the length (number of points) of the seasonal pattern and is automatically detected. For example, in a yearly sales cycle, with each point representing a month, the seasonality is 12. You can override the automatic detection by choosing Set Manually and then picking a number.
Note: When setting seasonality manually, avoid a value for less than 2 cycles of historical data. With less than 2 cycles, Excel cannot identify the seasonal components. And when the seasonality is not significant enough for the algorithm to detect, the prediction will revert to a linear trend.
Change the range used for your timeline here. This range needs to match the Values Range.
Change the range used for your value series here. This range needs to be identical to the Timeline Range.
Fill Missing Points Using
To handle missing points, Excel uses interpolation, meaning that a missing point will be completed as the weighted average of its neighboring points as long as fewer than 30% of the points are missing. To treat the missing points as zeros instead, click Zeros in the list.
Aggregate Duplicates Using
When your data contains multiple values with the same timestamp, Excel will average the values. To use another calculation method, such as Median or Count, pick the calculation you want from the list.
Include Forecast Statistics
Check this box if you want additional statistical information on the forecast included in a new worksheet. Doing this adds a table of statistics generated using the FORECAST.ETS.STAT function and includes measures, such as the smoothing coefficients (Alpha, Beta, Gamma), and error metrics (MASE, SMAPE, MAE, RMSE).
Formulas used in forecasting data
When you use a formula to create a forecast, it returns a table with the historical and predicted data, and a chart. The forecast predicts future values using your existing time-based data and the AAA version of the Exponential Smoothing (ETS) algorithm.
The table can contain the following columns, three of which are calculated columns:
Historical time column (your time-based data series)
Historical values column (your corresponding values data series)
Forecasted values column (calculated using FORECAST.ETS)
Two columns representing the confidence interval (calculated using FORECAST.ETS.CONFINT). These columns appear only when the Confidence Interval is checked in the Options section of the box..
Download a sample workbook
Need more help?
You can always ask an expert in the Excel Tech Community or get support in the Answers community.
Источник
Follow the steps below to use this feature.
- Select the data that contains timeline series and values.
- Go to Data > Forecast > Forecast Sheet.
- Choose a chart type (we recommend using a line or column chart).
- Pick an end date for forecasting.
- Click the Create.
Contents
- 1 How do you calculate a forecast?
- 2 Is Excel forecast accurate?
- 3 What is Forecasting in Excel?
- 4 How do you forecast growth rate in Excel?
- 5 How do you calculate accuracy in Excel?
- 6 How do you forecast using CAGR?
- 7 What is the formula for forecast accuracy?
- 8 What is the formula for precision?
- 9 How do you calculate mean forecast error in Excel?
- 10 Can’t see forecast sheet Excel?
- 11 What is CAGR formula in Excel?
- 12 How do I do CAGR in Excel?
- 13 What are the three types of forecasting?
- 14 How do you calculate demand forecasting?
- 15 Is Precision same as specificity?
- 16 Is F1 Score same as accuracy?
How do you calculate a forecast?
The formula is: sales forecast = estimated amount of customers x average value of customer purchases.
Is Excel forecast accurate?
The results are never a finite number, it’s always +/-7% or +/-30%, or whatever percent. If you don’t know the accuracy of your forecast, you can’t rely on it. The world is an uncertain place. There is no easy way to measure sales forecasting accuracy in Excel, at least no simple way that wouldn’t take years to draft.
What is Forecasting in Excel?
The Excel FORECAST function predicts a value based on existing values along a linear trend. FORECAST calculates future value predictions using linear regression, and can be used to predict numeric values like sales, inventory, expenses, measurements, etc.LINEAR function.
How do you forecast growth rate in Excel?
To calculate the Average Annual Growth Rate in excel, normally we have to calculate the annual growth rates of every year with the formula = (Ending Value – Beginning Value) / Beginning Value, and then average these annual growth rates.
How do you calculate accuracy in Excel?
Calculating accuracy within excel
- try: =IF(C1<0,»-«,»»)&(B1/A1)*100&»%»
- what value do you expect when you have a prediction of 24 and a result of 48, also 50%?
- @K_B In that case, yes, the accuracy should also be 50% but the Difference cell value would be 12 rather than -12.
How do you forecast using CAGR?
Forecasting future values based on the CAGR of a data series (you find future values by multiplying the last datum of the series by (1 + CAGR) as many times as years required). As with every forecasting method, this method has a calculation error associated.
What is the formula for forecast accuracy?
There are many standards and some not-so-standard, formulas companies use to determine the forecast accuracy and/or error.Mean Absolute Percent Error (MAPE) = 100 * (ABS (Actual – Forecast)/Actual) Bias (This will be discussed in a future post: Updated Links for bias: 1, 2)
What is the formula for precision?
Consider a model that predicts 150 examples for the positive class, 95 are correct (true positives), meaning five were missed (false negatives) and 55 are incorrect (false positives). We can calculate the precision as follows: Precision = TruePositives / (TruePositives + FalsePositives) Precision = 95 / (95 + 55)
How do you calculate mean forecast error in Excel?
How to Calculate MSE in Excel
- Step 1: Enter the actual values and forecasted values in two separate columns. What is this?
- Step 2: Calculate the squared error for each row. Recall that the squared error is calculated as: (actual – forecast)2.
- Step 3: Calculate the mean squared error.
Can’t see forecast sheet Excel?
Click the File tab. Click Options, and then click the Add-Ins category. Near the bottom of the Excel Options dialog box, make sure that Excel Add-ins is selected in the Manage box, and then click Go. In the Add-Ins dialog box, select the check boxes for Analysis ToolPak and Solver Add-in, and then click OK.
What is CAGR formula in Excel?
There’s no CAGR function in Excel. However, simply use the RRI function in Excel to calculate the compound annual growth rate (CAGR) of an investment over a period of years. Note: again, number of years or n = 5, start = 100, end = 147, CAGR = 8%.
read more the method for finding the CAGR value in your excel spreadsheet. The formula will be “=POWER (Ending Value/Beginning Value, 1/9)-1”. You can see that the POWER function replaces the ˆ, which was used in the traditional CAGR formula in excel.
What are the three types of forecasting?
Explanation : The three types of forecasts are Economic, employee market, company’s sales expansion.
How do you calculate demand forecasting?
Average demand is calculated as: forecast demand (prev. period) + Smoothing Factor for Demand Forecast (curr. period) * actual usage (prev. period) – forecast demand (prev.
To calculate demand forecast for each period
- Expected annual issue.
- Safety stock.
- Reorder point.
- Forecast demand.
Is Precision same as specificity?
Precision — Out of all the examples that predicted as positive, how many are really positive? Recall — Out of all the positive examples, how many are predicted as positive? Specificity — Out of all the people that do not have the disease, how many got negative results?
Is F1 Score same as accuracy?
Accuracy is used when the True Positives and True negatives are more important while F1-score is used when the False Negatives and False Positives are crucial.In most real-life classification problems, imbalanced class distribution exists and thus F1-score is a better metric to evaluate our model on.
Introduction
Every business wants to be able to see into the future. But while we haven’t perfected the crystal ball (even if we can sometimes forecast new products), we can use other tools to make educated decisions.
For example, Microsoft Excel can be used for forecasting—using algorithms and drawing on data from the past to forecast values and make the right choices in the future.
However, Excel is a basic forecasting tool. It’s good for businesses as a starting point, but it’s still very manual compared to inventory planning software, such as Inventory Planner.
We’re going to explore how forecasting data in Excel predicts demand by looking at the various tools Excel offers. We’ll also show you the upsides and downsides of using forecast worksheets in Excel.
Why use Excel in basic forecasting?
Before considering the advantages of Excel to forecast statistics, it may be worth considering the value of forecasting in the first place. In simple terms, forecasting predicts trends and opportunities that your business can exploit going forward. This is an activity undertaken by both old and new companies and shapes business decisions like budgeting, hiring, and broader business policies.
Excel is used in forecasting because it has a range of relevant tools at its disposal. Data can be easily stored and calculated in an Excel workbook. However, it still requires manual data sync and updates, so may not be the right solution for scale-up businesses.
Crucially, Excel can also visualize data in a variety of ways, which is essential to making forecasts more easily. There are a variety of formulas that can be used in an Excel workbook to help you calculate predicted values.
Once you have your data set entered into an Excel workbook, Excel can help you find a variety of things, including:
- Values range
- Aggregate values, like the sum and average of your values
- Duplicates
If you’re new to using Excel for forecasting purposes, search online for a tutorial that demonstrates features like how to:
- Fill missing points using a formula applied to the forecast sheet
- Calculate time series using the stat function
- Create a line chart for your forecast by completing steps like entering an end date in the forecast end box
If you have files or databases outside of Excel, it’s often easy enough to connect them to Excel and import the relevant data as well.
Up-to-date forecasting without manual data entry
Get a free demo of Inventory Planner
Get a Free Demo
Pros of Inventory Forecasting in Excel
Inventory forecasting in Excel (as opposed to other tools) has the following advantages:
1. Saves money
Since forecasting’s long-term goal is to make you more money, the fact that it helps you save it is similarly attractive. Excel can be used as part of varying business plan subscriptions, which can be priced in single digits. This means that despite the initial costs, purchasing Excel for forecasting might be one of the best buying choices you ever make, especially if you compare Excel’s pricing to other tools you might consider.
The idea of saving money with Excel can manifest in other, subtler ways. Cloud sync features mean that your employees can work together on a single file, even if they’re located in different places. This kind of time-saving allows your team to work more efficiently and complete tasks more quickly, allowing you to get more done in the process.
Inventory Planner’s own inventory planning software can also save you money by helping you use your purchasing budget more thoughtfully.
2. Customizable
Another advantage of Excel is that the software can be customized in a variety of ways. When you’re creating a visual forecast, for example, you can tweak various aspects of it.
Obvious areas of customization include where the timeline you’re using to forecast starts from and how wide the timeline range is. You can also see information on the forecast’s confidence interval, which tells you how likely you are to get the same result upon repeating the forecast.
If you need to, you can also fill in missing points during the forecast process. If you have a good understanding of statistics, you can even take advantage of other features like displaying smoothing coefficients and error metrics.
3. Different forecast functions
Excel supports several different functions, which allow you to actually put the software to practical use. Understanding these is the key to getting the most out of Excel.
The forecast.linear() function allows you to calculate a value by drawing upon ones that already exist, i.e., known_x values and known_y values. It’s a good choice if you can see a linear trend in the data in front of you.
Naturally, there are other functions you can draw upon in Excel. The forecast.ets function uses both existing values and the triple exponential smoothing method for more advanced forecasting techniques.
The forecasting.ets.seasonality() function, meanwhile, tells you how many seasonal patterns are in the relevant timeline.
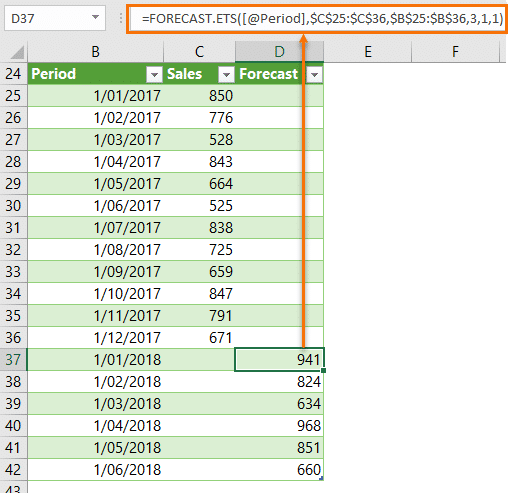
Image Source
There’s even a function to return a confidence interval for a specific part of your forecast. Whatever your requirements, Excel probably has what you’re looking for, provided you’re willing to invest the time to understand it.
Of course, we at Inventory Planner have our own forecasting methods. These help you replenish your stock at the right time and centralize all of your sales channels as well.
Cons of Inventory Forecasting in Excel
1. Time consuming
With Excel, you need to sync data and update data manually and you might need one dedicated headcount when forecasting at scale. So it might be cost-effective as the subscription fee may be lower, but the labor cost may be higher.
2. Prone to error
Using Excel for forecasting can result in errors if the data import is done incorrectly or the formula breaks. Unlike automated inventory planning tools, human error is a risk when inputting data into Excel. This could skew your results.
3. Learning curve could be long
When using Excel for forecasting, you need to learn how different formulas work and how to build the right forecasting model that fits the business needs.
4. Not scalable
Excel may be slow at processing data when data is large. While spreadsheets can be a good starting point, as business grows using spreadsheets is not scalable when it comes to inventory planning.
5. Not real-time
As data entry is done manually in Excel, the data that’s used for forecasting is not real-time data.
Forecasting methods in Excel
Forecasting in Excel can be approached from a variety of different angles. Understanding these will allow you to make more accurate predictions about your future course of action.
1. Moving average method
This forecast method lets you “smooth out” data, look at its underlying patterns, and estimate future values. You typically do this for three-month or five-month timespans, both of which can be explored in a single spreadsheet.
Start by creating three columns in Excel: one with your revenues from the last year and two more for three-month and five-month moving average predictions. To work out your three-month moving average, take the average revenue you’ve earned from your current month and the two preceding it. Then apply the formula =AVERAGE(Data Range) to it to get the information you need.
Calculating the five-month moving average works in a similar fashion. However, you take average revenue from five months rather than three and apply the same formula to it.
2. Straight line method
The straight line method is ideal for forecasting beginners and allows you to predict future revenue growth. To do this, however, you need to have a good idea of what your business’s sales growth rate (expressed as a percentage) will be. You can work this out by looking at your business’s historical performance.
When you’ve your growth rate to hand, set up several columns in Excel. Label each one with a year, labeling them consecutively as you do so. Then, starting from this year, take last year’s revenue figure and multiply it by your growth rate. By highlighting subsequent cells and using the Ctrl + R shortcut, you can apply this calculation to future years.
3. Simple linear regression method
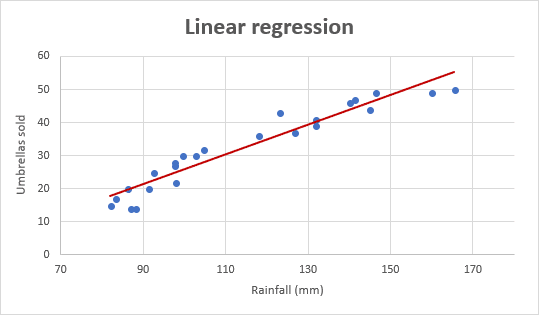
Image Source
Linear regression is a type of analysis called regression analysis, which examines the relationship between two different variables. For example, we might want to see the relationship between the money we spent on advertising and the revenue we earned within a given time period.
To better visualize the impact (good or bad) our spending had, we need to create three columns. Fill one with each of the 12 months, and then put (in this instance) the corresponding amount of adverts run and revenue earned.
Next, highlight the two columns containing data, and insert a scatter chart into the spreadsheet. Then, add a linear trendline to the data points; while you can play around with the chart’s visuals, this should give you a good idea of your actions’ impacts.
4. Multiple linear regression method
This forecasting method works in a similar fashion to simple linear regression. The difference is that you examine the relationship between several different variables. You might want to compare two different advertising methods to your revenues, for example. The advertising methods here are referred to as the explanatory variables, and the revenue is known as the response variable.
Set up your data in a similar manner to the simple linear regression method discussed earlier. Once this is in place, we can use the Regression command in the Data tab (click on Data Analysis to find it) and put data in the Input Y and Input X ranges. In this scenario, the data for the advertising methods goes in the Input X Range, and the revenues go in the Input Y Range.
Once the data is entered here and you’ve picked an output range (i.e., a cell where the output of your calculations is displayed), hit OK. You’ll see a group of output tables, which you can then interpret.
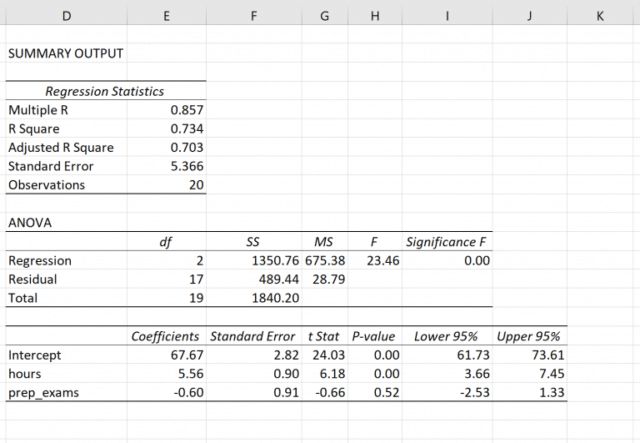
Image Source
In case it wasn’t already clear, linear regression requires some understanding of statistics in order to be used effectively. As such, they may not be the best option for beginners in this particular field.
Choosing the right forecasting models in Excel
As you can see, choosing the right forecast model in Microsoft Excel is shaped (at least partially) by your business demands. If you’re looking to better understand your recent business activity (and what it means for your business going forward), then the moving average method might be your best option. Similarly, if you’re keen to understand what revenue you can expect in the months ahead, the straight line method is a solid option.
Linear regression is ideal if you’re looking to make more sophisticated connections between different aspects of your business. That said, while assembling the data is relatively simple, you will need some specialist knowledge in order to interpret it.
How to build a forecasting model in Excel
The best way to build a useful, intuitive forecasting practice within your business may be to use some kind of template. Choosing a template automates some of the calculations you need to perform and can prove very intuitive.
A template can also help you clarify what you want to achieve with your sales forecast, like expected revenue in general or from a specific product. Once chosen, a good forecast template can assist you with tasks like introducing a new product or making radical changes to an existing product line.
Fortunately, there are several different templates available for you to draw upon when attempting to forecast your business success with Excel. Forecast templates work similarly to Excel balance sheets, but you’re using the data in them as a reference for your future financial status.
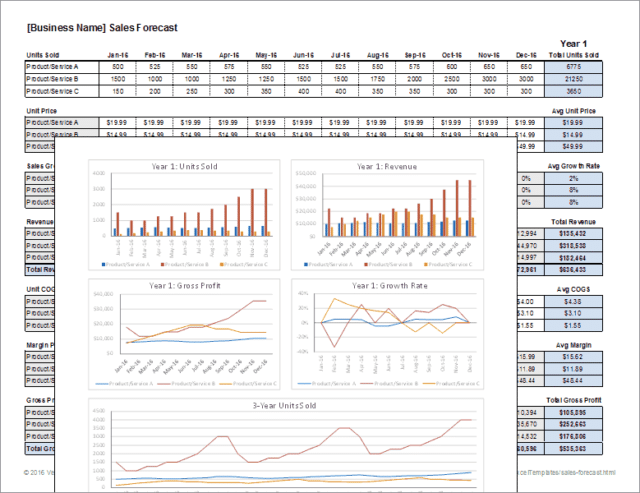
Image Source
Forecast templates require you to consider all your revenue sources in order for them to be useful (e.g., total sales, stock value, interest on deposits, etc.). You must also have a good idea of expected increases in revenue and a comprehensive list of your expenditures (like wages, debts, loans, taxes, advertising, etc.).
Templates for forecasting models in Excel
While there are many different forecast templates to choose from, we’ve picked out three kinds that we think are particularly useful. Excel forecast templates are used by a variety of businesses (and sizes of businesses). However, the accountants within them will probably be the ones who understand them best—and put them to the most practical use.
Automate your Excel forecasting with Inventory Planner
See how Inventory Planner can reduce errors and effectively plan inventory.
Get a Free Demo
To choose the best forecasting template in Excel, read on:
1. Monthly sales forecast models template
A monthly sales forecast models template breaks down your projected sales activity at a suitably granular level. However, this doesn’t mean that the amount of information is compromised. Several years of projections can be displayed within a single document, allowing you to take in a broad swathe of information very easily.
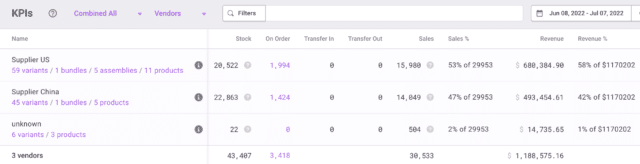
When choosing a template like this, look out for one that can accommodate a product name, unit numbers, selling price, total sales, and the percentage of the total. Some templates can also combine raw numbers with a more intuitive presentation, like bar charts. They’re a great way of visualizing a key part of your business’s operation.
2. Annual budget expense forecast template
This template allows you to plan your future business operations in a more complex manner. You can, for example, look more closely at expenditure on salaries, supplies, and equipment across multiple sites simultaneously. You can also look ahead a short distance to see how your expenditure will be affected.
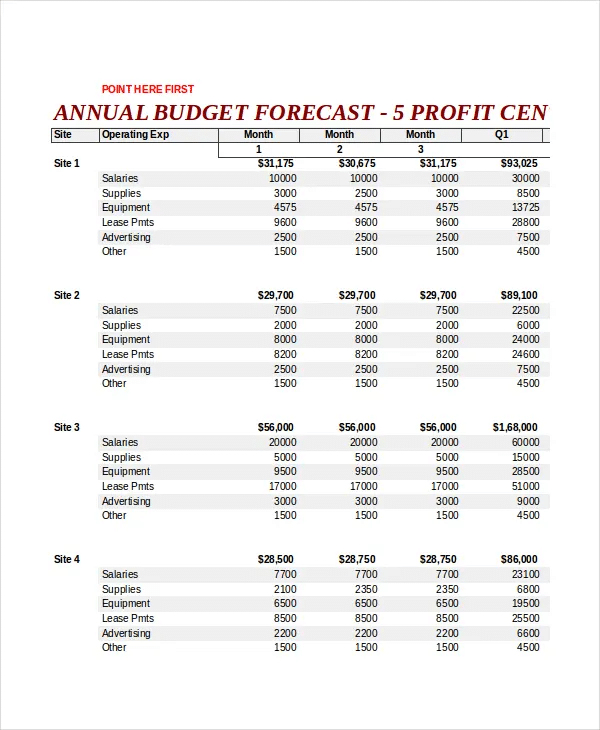
Image Source
Templates like these are ideal for larger businesses with several different premises and expenses to think about. As such, they may be of less use to smaller enterprises.
If you’re worried about your expenditure, you can assemble a cash flow forecast to put your mind at ease.
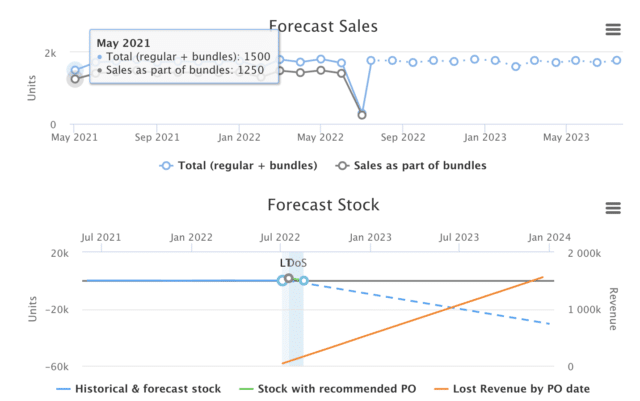
3. Demand planning forecasting template
This template allows you to predict your company’s financial status by analyzing various different factors and build demand forecasting models in Excel. You might want to better understand your gross revenue (on a recurring or non-recurring basis) and break down your revenues from individual products. If you sell a range of products you want to track, this template is probably what you need.
We at Inventory Planner have produced our own sales forecasting Excel template for Shopify merchants.
Is your Shopify, Amazon, or other store growing?
Do you want to have better control over your inventory?
Do you want to forecast how much inventory you’ll need?
All of the above? Let us help.
We’ve created a free demand forecasting Excel template for Shopify you can use to see:
- Forecasted sales and sales velocity
- How long your current stock will last
- How much you should order based on your lead time and days of stock
What to do:
- Follow the instructions on the “Overview” tab to copy over information from your e-commerce store file(s).
- Use the calculated replenishment recommendations to plan your inventory more effectively!
Inventory Planner Forecasting
2 Ways of forecasting sales in Excel
Another way of acquiring future sales data is by using Excel’s Exponential Smoothing feature. This works in a similar way to moving averages, but it smooths out data by looking for seasonality patterns and confidence intervals instead.
1. Using built-in exponential smoothing tool
In newer versions of Excel (i.e., Excel 2016 onwards), go to the Data menu and select Forecast Sheet. Then pick a suitable chart (line charts and column charts are best) and pick an end forecast date. Finally, click Create to generate a worksheet with your sales forecast.
2. Using the exponential smoothing formula manually
You can make some tweaks to the exponential smoothing process after you’ve created the aforementioned worksheet. Besides changing when the forecast starts, you can change the length of a season pattern, fill in missing points, or (if you’re familiar with statistics) view smoothing coefficients.
Why choose forecasting tools over Excel in this age?
While Excel has extensive forecasting capabilities, there may be other tools that are more suited to the task nowadays. This is for the following reasons:
1. Fewer errors
Excel’s complexity means that it’s very easy to make mistakes in it. If, for instance, you paste values into the wrong cells, you can quickly break any forecasting framework you’ve constructed. More troublingly, you may not discover the error until long after it’s been made. This can put your business on a course it shouldn’t be on, with disastrous consequences.
As such, it’s important that you thoroughly understand Excel’s inner workings before you come to use it. But doing so for the purposes of forecasting may be pointless, considering the suitability of other tools.
2. Better decision-making
Another problem is that Excel only uses historical data and past trends, and you need to give it up-to-date information in order to give you a forecast to shape future actions. The long, arduous method of inputting data to Excel (or collecting it from other people) means that data can literally become outdated as you’re entering it.
Moreover, Excel is unable to track and adapt to real-time changes that you may wish to deploy. This means you may struggle to make an accurate forecast.
3. Streamline structures and processes
The more data you add to an Excel spreadsheet, the more difficult it will be to use it. Piling more and more data into one place can lead to the spreadsheet becoming slow or buggy. This then makes it difficult to interpret its information or retrieve records contained in it. Using a more specialized tool makes these key tasks easier to carry out—like reporting, which Inventory Planner excels at.
Why should I sign up for Inventory Planner when Excel offers free templates?
Inventory Planner integrates directly with over 30 e-commerce stores and Inventory Management Systems as a tool for demand forecasting, replenishment analysis, KPI reporting, and the creation of new stock orders through Purchase Orders, Warehouse Transfers, and Assembly Orders (for production). This means no manual data entry that is prone to errors, more sophisticated forecasting and more streamlined purchasing.
With Inventory Planner, you can;
- Customize forecasts based on seasonality, recent trends, category trends, bundle and assembly relationships, and much more
- Customize replenishment recommendations and alerts by warehouse, by SKU to order what’s needed at the right time.
- Customize reports using over 200 metrics and attributes.
Start a 14-day free trial to see what we have to offer.
What is Demand Forecasting?
Demand Forecasting is the process of estimating future demand for products or services. Businesses use demand forecasting to make strategic decisions such as setting production levels, planning inventory, and managing staff.
There are various methods businesses can use to forecast demand, including qualitative techniques like market research and surveys and quantitative techniques like time-series analysis and regression analysis. The most accurate method will depend on factors such as the type of product or service being forecasted, the availability of data, and the time frame of the forecast.
Why is Demand Forecasting Important?
Demand forecasting is essential for businesses because it allows them to plan for future demand and ensure they have the resources to meet that demand. For example, if a company knows that demand for its product is going to increase in the coming months, it can plan to increase production or inventory levels accordingly.
Without accurate demand forecasting, businesses may find themselves either over-producing and wasting resources or under-producing and missing out on sales. In either case, this can have a negative impact on the bottom line.
How to Forecast Demand?
There are various methods businesses can use to forecast demand. The most appropriate method will depend on factors such as the type of product or service being forecasted, the availability of data, and the time frame of the forecast.
Qualitative Methods
Qualitative demand forecasting methods involve market research and surveys to estimate future demand. This type of forecasting is often used for new products or services where there is little historical data to work with.
Quantitative Methods
Quantitative methods of demand forecasting involve using mathematical models to estimate future demand based on past data. This type of forecasting is often used for established products or services where a large amount of historical data is available.
Time-Series Analysis
Time-series analysis is a quantitative demand forecasting method involving analyzing past data points to identify trends and patterns. This information can then be used to predict future demand.
Regression Analysis
Regression analysis is a quantitative demand forecasting method that involves identifying relationships between different variables. This information can then be used to predict how changes in one variable will impact demand for the product or service.
What Are Some Common Demand Forecasting Mistakes?
Some common mistakes made when forecasting demand include:
- Not considering all relevant factors: When forecasting demand, it is essential to consider all pertinent factors that could impact future demand. For example, if you are forecasting demand for a product, you should consider factors such as economic conditions, seasonality, and competitor activity.
- Using outdated data: When forecasting demand, it is crucial to use the most up-to-date data available. This will help ensure that your forecast is as accurate as possible.
- Failing to review and update forecasts: Demand forecasts should be reviewed on a regular basis and updated as needed. This will help ensure that they remain accurate over time.
How Can I Improve My Demand Forecasting?
There are various steps businesses can take to improve their demand forecasting, including:
- Identifying relevant factors: When forecasting demand, make sure to consider all relevant factors that could impact future demand. For example, if you are forecasting demand for a product, you should consider factors such as economic conditions, seasonality, and competitor activity.
- Using up-to-date data: When forecasting demand, use the most up-to-date data available. This will help ensure that your forecast is as accurate as possible.
- Reviewing and updating forecasts: Demand forecasts should be reviewed on a regular basis and updated as needed. This will help ensure that they remain accurate over time.
What Are Demand Forecasting Applications?
Some common applications of demand forecasting include:
- Planning production levels: Businesses can use demand forecasts to plan production levels for products or services. By accurately estimating future demand, businesses can avoid over-producing or under-producing, which can save time and money.
- Setting prices: Businesses can use demand forecasting to help set prices for products or services. By understanding how demand will respond to different price points, businesses can optimize pricing to maximize revenue.
- Developing marketing campaigns: Businesses can use demand forecasts to develop marketing campaigns targeted at specific customer segments. This can help ensure that marketing efforts focus on areas where they are most likely to succeed.
An e-commerce forecasting template is a tool that businesses can use to estimate future demand for products or services sold online. Various types of templates are available, which can be used to forecast demand using qualitative or quantitative methods.
The most appropriate template will depend on factors such as the type of product or service being forecasted, the data availability, and the forecast’s time frame.
What Are The Benefits of Using a Demand Forecasting Template?
Some benefits of using a demand forecasting template include:
- Improved accuracy: Using a template can help improve the accuracy of your demand forecast by ensuring that all relevant factors are considered.
- Save time: Developing a forecasting model from scratch can be time-consuming. Using a template can help save time by providing a starting point for your forecast.
- Flexibility: There are various types of templates available that can be used to forecast demand using qualitative or quantitative methods. This allows businesses to choose the template that best meets their needs.
What to Consider When Choosing a Demand Forecasting Template?
Some things to consider when choosing a demand forecasting template include:
- The type of product or service being forecasted: The most appropriate template will depend on factors such as the type of product or service being forecasted, the availability of data, and the time frame of the forecast.
- The availability of data: When forecasting demand, it is vital to use the most up-to-date data available. This will help ensure that your forecast is as accurate as possible.
- The time frame of the forecast: The time frame of the forecast will impact the level of detail required in the template. For example, a short-term forecast may only require basic information, while a long-term forecast may require more detailed data.
- The forecasting method: The type of template you choose should be based on the forecasting method you plan to use. For example, if you are using a qualitative method, you may want to choose a template that includes space for customer surveys. If you are using a quantitative method, you may select a template with space for data analysis.
How to Automate Your FP&A on Top of Google Sheets?
Layer is an add-on that equips finance teams with the tools to increase efficiency and data quality in their FP&A processes on top of Google Sheets. Share parts of your Google Sheets, monitor, review and approve changes, and sync data from different sources – all within seconds. See how it works.
Using Layer, you can:
- Share & Collaborate: Automate your data collection and validation through user controls.
- Automate & Schedule: Schedule recurring data collection and distribution tasks.
- Integrate & Sync: Connect to your tech stack and sync all your data in one place.
- Visualize & Report: Generate and share reports with real-time data and actionable decisions.
Limited Time Offer: Install the Layer Google Sheets Add-On today and Get Free Access to all the paid features, so you can start managing, automating, and scaling your FP&A processes on top of Google Sheets!
To progress in Supply Chain, mastering Excel is essential. Forecasting with Excel will allow you to automate and simplify your work.
In this article, I will tell you how to make forecasts in Excel automatically and simply. I advise you to download the Excel template to follow this tutorial step by step.
Forecasting in Excel: Visualizing a Trend
For our first example, we’re looking at COVID-19 cases around the world. You will find the data needed to follow this example in this Excel forecast template.

The purpose of the exercise is to use Excel to forecast and estimate future COVID cases using a trend, which we will add to the graph. To create a trend line on a graph (here in red), right-click directly on the graph and select add a trend line.

The forecast menu will appear, allowing you to select the desired trend line.

What is interesting about this forecast menu is that you can easily make new forecasts by adding future calculation periods of COVID cases. Just add forecast periods (in days) in the lower part of the menu.

This will generate a new graph, with a new curve, which will show future predictions.
Forecasting: How to make an Automatic Forecast?
For this exercise, we will select new data in our table. Here, we want the world data (World cases) and the number of days (Day).

When the columns are selected, click on Data, then Forecast Sheet in the top menu. You will get the following forecast sheet:
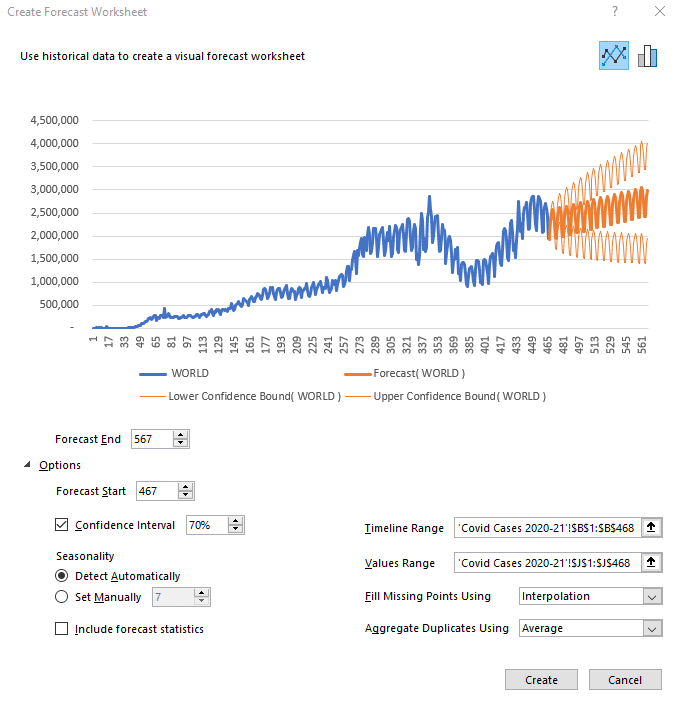
It is possible to change the number of days of predictions by clicking on Options below the graph. Simply add or remove the desired number of days in the Start and End boxes of the forecast.
The other interesting option you can play with is the confidence interval. What is the confidence interval? It is simply the probability of the forecast. The orange part of the graph shows a high forecast hypothesis and a low forecast hypothesis. If your confidence interval is 70, then there is a 70% chance that the prediction is between the high and low assumptions.
The last option to look at is Seasonality, which means the seasonality of your forecast. Excel detects patterns of change in the data and includes them in its forecast. For example, in our COVID cases, there is a drop in test results on Sundays and Mondays because the number of tests performed drops at the weekend. This change is taken into account when Excel makes its future forecast.
Once you have selected the desired parameters, click Create to see the forecast data calculated by Excel in a table format. The Day column shows the days, the World column shows the COVID cases in the world up to day 467, where our data ends. The Forecast column is the beginning of your future forecast, the Lower Confidence Bound column represents the low hypothesis, and finally, the Upper Confidence Bound column indicates the high hypothesis.
Forecast sheet: the Case of India
For the rest of our tutorial, let’s look at the case of India. By selecting the specific case column for India in our original data table, as well as the number of days, we obtain this forecast:

However, the forecast looks strange compared to historical data. Why is that?
The selected period is too long and Excel can’t detect a seasonal pattern. We can therefore define it manually (7 days). Also, we must ask ourselves: does the past period reflect what will happen in the future? Here, unfortunately, it will not, so we will focus on the second peak instead of the first.
To select the period of interest, click on Cancel. Click on the COVID CASES 2021 tab at the bottom of the spreadsheet, then select the Day and India columns again.

Then, click on Data and generate a new Forecast Sheet.

Manually redefine the end of the forecast and the seasonality and you will get something that looks much more like reality. It is always important to visualize the low and high hypotheses (companies don’t do this enough) as they correspond to the Best-Case and Worst-Case scenarios, which can be critical information for your performance.
Here’s how to make a forecast in Excel in just a few clicks. In the next part of our tutorial, we will try to forecast car sales in the USA for the next few months.
Sales Forecasts (U.S. Car Since 1976)

This is the database to work with on this forecast. It’s interesting to see this curve, which shows a slight increase right now and helps us visualize the different crises that have hit the US since 1976 (the oil crisis, the 2008 crisis, and finally the COVID crisis).
Once again, to see the forecast, select the sales per month and the total sales (the last 2 columns).

To have a more coherent forecast, let’s revise the end of the prediction downwards and put a confidence interval of 50%. We can see that Excel has detected a seasonality in this graph. Thanks to the data, we can see that there is a crisis about every 181 months. You can change this as you wish. Here I have changed the seasonality to show a change every 12 months.

And so here is the new forecast. Of course, these predictions are not perfect. You can always add new trends, new mathematical models, market research, competitive research into your analysis. All of which will impact your forecast.
But the important thing in this exercise is to understand how to do make your own automatic forecasts in Excel, to see how simple it is to master this tool. Indeed, mastering the art of forecasting is the best way to develop the profitability of a company, to improve performance and customer satisfaction.
Would you like to go further?
If you want to boost your career and develop your Excel skills in the long term, registration is open for our SCM Excel Expert training.

This program is for you if you want to …
- Gain efficiency in Excel to focus on the essentials
- Automate your Excel tasks, reporting and improve the performance of your company
- Generate files automatically in 1 click thanks to macros and Power Query / Pivot (without knowing how to code)
- –Improve your performance and boost your career in Supply Chain & Logistics

Founder of AbcSupplyChain | Supply Chain Expert | 15 years experience in 6 different countries –> Follow me on LinkedIn