

A7rexcel это компонент формирования отчетов в Excel для Delphi 7 — Delphi XE2 (Embarcadero RAD Studio XE2). Компонент полностью бесплатен и свободен для использования где угодно и как угодно, единственная просьба — ссылка на этот сайт при упоминании этого компонента на просторах интернета.
Зачастую отчетные системы предназначены для выдачи результата сразу на печать с предпросмотром, и возможность сохранения в Excel это лишь опция, иногда работающая так, что сохраненный файл выходит не очень похожим на оригинал, и представляет собой нагромождение объединенных ячеек, а иногда еще и с неправильным форматом данных. Для того чтобы избежать этих неприятностей, можно использовать отчетную систему, которая будет выводить информацию напрямую в Excel.
 A7rexcel позволяет выводить информацию в Excel используя в качестве шаблона xls-файл, благодаря чему становится просто настроить внешний вид получаемого документа, ориентацию листа, поля, нумерацию, и все остальное что можно настраивать в экселевском документе.
Предлагаемый компонент настолько прост, что в его внутренностях сможет разобраться даже начинающий программист, если потребуется расширение функционала. Так же он прекрасно подходит для тех, кто просто хочет разобраться как работать из Delphi-приложения с Microsoft Excel.
Исходные коды компонента на hithub — github.com/a7in/a7rexcel
Скачать компонент и демо-проект — a7rexcel.zip
Пример простейшего отчета:
Компонент работает со всеми версиями офиса — 2003,2007,2010,2013.
Read, Write excel 2002/2003 XML (SpreadsheetML / XML Spreadsheet) library.
// Creating new workbook
var workBook: TZWorkBook;
...
workBook := TZWorkBook.Create();
try
  workBook.Sheets.Add('My sheet');
  workBook.Sheets[0].ColCount := 10;
  workBook.Sheets[0].RowCount := 10;
  workBook.Sheets[0].CellRef['A', 0].AsString := 'Hello';
  workBook.Sheets[0].RangeRef['A', 0, 'B', 2].Merge();
  workBook.SaveToFile('file.xlsx');
finally
  workBook.Free();
end
// Editing exists workbook
var workBook: TZWorkBook;
...
workBook := TZWorkBook.Create();
try
  workBook.LoadFromFile('file.xlsx');
  workBook.Sheets[0].CellRef['A', 0].AsString := 'Hello';
  workBook.Sheets[0].CellRef['A', 0].FontStyle := [fsBold];
  workBook.SaveToFile('file.xlsx');
finally
  workBook.Free();
end
уважаемые посетители блога, если Вам понравилась, то, пожалуйста, помогите автору с лечением. Подробности тут.
Видимо любители экономить килобайты оперативной памяти могут меня закидать помидорами или ещё чем по-хуже, но все-таки я скажу, что интеграция приложений (мегабайты оперативы) — это большой плюс нынешней разработки приложений.
Как ни крути, а время DOS и килобайтов оперативной памяти прошло. Вряд ли кто-то всерьез сейчас задумывается над тем куда это с винчестера пропал мегабайт? Да и использование в своих приложениях функциональности программ, которых ты не писал, но которые выполняют что-то лучше — это всё-таки больший прогресс, нежели корпеть год-два над программой, а потом узнать, что время-то прошло.
Введение
Итак, цель сегодняшней статьи — поделиться с Вами опытом работы с Microsoft Excel в приложениях, написанных на Delphi.
Вспомнился сейчас один случай. Когда я только начинал работать по своей специальности, пригласили меня написать программу-расчётник для экологов нашего нефтезавода. В принципе ничего серьёзного — программа считает выброс от нагревательной печи и выдает табличку результатов, которую необходимо распечатать и уложить в толстую папку с отчётами. Естественно, что в области разработки подобных приложения я далеко не пионер, поэтому дали взглянуть на аналог будущей программы, который работал ещё под DOS и печатались отчёты на дико скрипящем матричном принтере с 12-ю иголками. Ну посмотрел, элементарная таблица, расчёт немного запутан, но жить можно — начал по-тихоньку писать. И попалась мне тогда на глаза статейка про работу с Excel в Delphi. Вот я и решил попробовать выдавать отчёт не только на форму приложения, а ещё и скидывать весь ход расчёта с формулами и прочим делом в Excel…Надо сказать более сильно детской радости начальника отдела я не видел до сих пор :). Люди, всю жизнь проработавшие в DOS увидели как тот же самый расчёт может выглядеть в современных условиях. Вот теперь при определении технических заданий на каждую новую программу, обязательно присутствует пункт, гласящий, что программа должна передавать данные либо в MS Word либо в MS Excel.Соответственно и цена на разработку возрастает, иногда значительно.
Отсюда можно сделать простой и однозначный вывод — заказчики готовы пожертвовать лишними деньгами только для того, чтобы всё в программе было красиво. Excel может дать вашему приложению ту самую красоту и удобство.
Ну, а для того, чтобы каждый раз не утруждать себя выполнением однотипных операций, я разработал небольшой модуль для работы с Excel. Этот же модуль я в настоящее время дорабатываю под ещё одну задачу, но об этом после. Сегодня основы основ работы с Excel в Delphi.
Создаем новый модуль (unit) и подключаем в uses следующие модули:
uses ComObj, ActiveX, Variants, Windows, Messages, SysUtils, Classes;
теперь объявляем глобальную переменную:
Одну константу (для удобства):
const ExcelApp = 'Excel.Application';
И пишем простенькую функцию:
function CheckExcelInstall:boolean;
var
  ClassID: TCLSID;
  Rez : HRESULT;
begin
// Ищем CLSID OLE-объекта
  Rez := CLSIDFromProgID(PWideChar(WideString(ExcelApp)), ClassID);
  if Rez = S_OK then  // Объект найден
    Result := true
  else
    Result := false;
end;
Или ещё короче:
function CheckExcelInstall: boolean;
var
  ClassID: TCLSID;
begin
  Result:=CLSIDFromProgID(PWideChar(WideString(ExcelApp)), ClassID) = S_OK;
end;
Если функция CLSIDFromProgID находит CLSID OLE-объекта, то, соответственно — Excel установлен.
Но проверка на наличие установленного Excel — это только часть необходимых операций перед началом работы. Другой немаловажной проверкой является проверка на наличие уже запущенного экземпляра Excel. Если этого не делать, то может случиться такая нехорошая ситуация, когда в системе будет зарегистрировано …дцать процессов Excel и все оперативная память волшебным образом утекает «в трубу» — за такое могут и по ушам надавать. Но мы-то свои уши бережем. Пишем вторую функцию проверки.
2. Определяем запущен ли Excel
function CheckExcelRun: boolean;
begin
  try
    MyExcel:=GetActiveOleObject(ExcelApp);
    Result:=True;
  except
    Result:=false;
  end;
end;
Думаю тут лишних объяснений не потребуется? Всё предельно просто — если есть активный процесс Excel, то мы просто получаем на него ссылку и можем использовать Excel для своих корыстных целей. Главное — не забыть проверить — может кто-то этот самый Excel забыл закрыть, но это другой момент. Будем считать, что Excel в нашем полном распоряжении.
3. Как запустить Excel?
Одно дело, когда мы получаем в распоряжение уже запущенный Excel, другое — когда Excel требуется запустить из Delphi. Напишем функцию запуска Excel:
function RunExcel(DisableAlerts:boolean=true; Visible: boolean=false): boolean;
begin
  try
{проверяем установлен ли Excel}
    if CheckExcelInstall then
      begin
        MyExcel:=CreateOleObject(ExcelApp);
//показывать/не показывать системные сообщения Excel (лучше не показывать)
        MyExcel.Application.EnableEvents:=DisableAlerts;
        MyExcel.Visible:=Visible;
        Result:=true;
      end
    else
      begin
        MessageBox(0,'Приложение MS Excel не установлено на этом компьютере','Ошибка',MB_OK+MB_ICONERROR);
        Result:=false;
      end;
  except
    Result:=false;
  end;
end;
Здесь мы в начале проверяем, установлен ли Excel в принципе и, если он все же установлен, запускам. При этом мы можем сразу показать окно Excel пользователю — для этого необходимо выставить параметр Visible в значение True.
Также рекомендую всегда отключать системные сообщения Excel, иначе, когда программа начнет говорить голосом Excel — пользователь может занервничать.
Переходим к следующему этапу работы — созданию рабочей книги.
4. Создаем пустую рабочую книгу Excel
Для создания пустой рабочей книги я обычно использую вот такую функцию:
function AddWorkBook(AutoRun:boolean=true):boolean;
begin
  if CheckExcelRun then
    begin
      MyExcel.WorkBooks.Add;
      Result:=true;
    end
  else
   if AutoRun then
     begin
       RunExcel;
       MyExcel.WorkBooks.Add;
       Result:=true;
     end
   else
     Result:=false;
end;
Второй вариант (более лаконичный):
function AddWorkBook(AutoRun: boolean = true): boolean;
begin
  Result := CheckExcelRun;
  if (not Result) and (AutoRun) then
  begin
    RunExcel;
    Result := CheckExcelRun;
  end;
  if Result then
    MyExcel.WorkBooks.Add;
end;
То есть сразу проверяю запущен ли Excel и, если он не запущен, то либо запускаю и добавляю книгу, либо просто выхожу — всё зависит от ситуации.
Здесь, думаю, следует напомнить, что, если вы выполните эту функцию, например пять раз, то получите пять открытых рабочих книг и работать с ними как Вам захочется. Главное при этом правильно обратиться к необходимой книге, а для этого можно использовать вот такую функцию:
function GetAllWorkBooks:TStringList;
var i:integer;
begin
  try
    Result:=TStringList.Create;
    for i:=1 to MyExcel.WorkBooks.Count do
      Result.Add(MyExcel.WorkBooks.Item[i].FullName)
  except
    MessageBox(0,'Ошибка перечисления открытых книг','Ошибка',MB_OK+MB_ICONERROR);
  end;
end;
Функция возвращает список TStringList всех рабочих книг Excel открытых в данный момент. Обратите внимание, что в отличие от Delphi Excel присваивает первой книге индекс 1, а не 0 как это обычно делается в Delphi при работе, например, с теми же индексами в ComboBox’ах.
Ну, и наконец, после того, как поработали с книгами — их требуется закрыть. Точнее сохранить, а потом уж закрыть.
5. Сохраняем рабочую книгу и закрываем Excel
Для того, чтобы сохранить рабочую книгу, я использовал такую функцию:
function SaveWorkBook(FileName:TFileName; WBIndex:integer):boolean;
begin
  try
    MyExcel.WorkBooks.Item[WBIndex].SaveAs(FileName);
    if MyExcel.WorkBooks.Item[WBIndex].Saved then
      Result:=true
    else
      Result:=false;
  except
    Result:=false;
  end;
end;
Если у Вас открыто 10 книг — просто вызываете функцию 10 раз, меняя значение параметра WBIndex и имени файла и дело в шляпе.
А закрывается Excel вот так:
function StopExcel:boolean;
begin
  try
    if MyExcel.Visible then MyExcel.Visible:=false;
    MyExcel.Quit;
    MyExcel:=Unassigned;
    Result:=True;
  except
    Result:=false;
  end;
end;
Вот набор тех основных функций с которых начинается вся интеграция Excel в приложения написанные на Delphi. В следующий раз займемся работой с конкретной книгой — научимся записывать и читать данные из книг.
Книжная полка
 |
Название:Разработка приложений Microsoft Office 2007 в Delphi Описание Описаны общие подходы к программированию приложений MS Office. Даны программные методы реализации функций MS Excel, MS Word, MS Access и MS Outlook в среде Delphi. |
 |
5
3
голоса
Рейтинг статьи
уважаемые посетители блога, если Вам понравилась, то, пожалуйста, помогите автору с лечением. Подробности тут.
Здравствуйте, в этой статье я расскажу Вам, как использовать в своем приложении (программе) на Delphi БД в виде MS Excel. Да да именно MS Excel. Тут ничего сложного нету. Для начала давайте заполним наш лист в MS Excel. Первая строка в каждом столбце всегда будет брать наше приложение как название столбцов, то есть оно не берет название столбцов такое — A, B, C и так далее. Так что в первсой строке столбца А и столбца B я написал ФИО и Оценка соответственно для каждого столбца. Это и будут наши заголовки, затем ниже я заполнил данные, которые будут в моей БД, ну это фамилии и оценки сами напиши. Так БД у нас готова. Теперь создадим к ней подключение. создается подключение похоже как и в MS Access, так что тут ничего сложного нету. На форме у нас старые компоненты это
- TDBGrid
- TADOQuery
- TADOConnection
- TDataSource
Как связывать эти компоненты я расскажу быстро, так как это уже было сказано мною.
- TADOQuery c TADOConnection в свойстве — Connection
- TDataSource с TADOQuery в свойстве DataSet
- TDBGrid c TDataSource в свойстве DataSource
В TADOConnection установим свойство LongPromt в False. Вроде бы небольшую настройку сделали. Теперь приходим к непосредственному подключени. В свойстве TADOConnection — ConnectionString нажимаем на кнопку «…«, далее у нас появляется окно вида

Нажимаем на кнопку «Build…» и появляется следующее окно

В данном окне выбираем следующего провайдера: Microsoft OLE DB Provider for ODBC Drivers и нажимаем кнопку «Далее>>» и видем следующее окно

В этом окне сразу ставим указатель на «Использовать строку подключения» и нажимаем на кнопку «Сборка«, после чего появляется окно

В этом окне переходим на вкладку Источник данных компьютера, в появившемся списке выбираем — Файлы Excel, а точнее жмем левой кнопкой мыши по этой сроке двойным щелчком и в появившемся окне указываем путь к нашей Excel-книги, которую мы создавали. После этого нажимаем на пноку «Ok«. Все подключение у нас готово. Хочу добавить еще, если у Вас файл Excel, где ваша таблица находится лежит в одном каталоге с программой, то в свойстве компонента TADOConnection — ConnectionString будет прописан путь к Вашему Excel-файлу, стерите путь, а оставьте просто имя Вашего Excel файла с расширением, а в свойстве DefaultDataBase этого же компонента, напишите имя вашего Excel-файла с расширением. Тогда при запуске вашего приложения, не будет возникать ошибок с неправильно заданым путем к вашей БД. Далее в TDBGrid нажмем по нему двойным щелчком и в появившемся окне создаим 2 строки, это наши столбцы будут. А создаются они путем нжатия в данном окне на кнопку «Add New (Ins)«. Далее выделив кажду строку в свойстве FieldName для первой строки напишем — ФИО, так как в Excel-файле я именно так написал в первую строку название столбца (для ячейки A1 я так написал), а выделив вторую строку, что создали в TDBGrid, в свойстве FieldName напишем — Оценка, так как именно я такое название столбца написал (в ячейке А2 я так написал). Все теперь нам можно активировать наши данные. Для этого на событие главной формы — OnCreate напишем следующее
procedure TForm1.FormCreate(Sender: TObject);
begin
try
ADOQuery1.SQL.Clear;
ADOQuery1.SQL.Add('SELECT * FROM [Лист1$]');
ADOQuery1.Active:=True;
except
on e:Exception do
end;
end;
Как видите все тот же запрос, только вместо имя таблица, как у нас было в MS Access мы указываем имя листа нашего в Excel, заключив его в квадратные скобки и поставив в конце знак $. Как видите ничего сложного нету. В следующей статье про БД MS Excel я расскажу как вставлять данные, редактировать и так далее.
Now write codes using above variables on a Button click or other appropriate event.
1. Create and connect with an Excel Application…
myxlApp := TExcelApplication.Create(Nil);
myxlApp.Connect;
myxlApp.Visible[LCID] := True; // will show newly connected Excel application // most of case not required //
2. Close and Free the Excel application….
myxlApp.Disconnect;
myxlApp.Quit;
FreeAndNil(myxlApp);
3. Add a Workbook
myxlApp.Workbooks.Add(EmptyParam, LCID); //it will also add a default sheet to workbok//
myxlBook := TExcelWorkbook.Create(myxlApp);
myxlBook.ConnectTo(myxlApp.ActiveWorkbook);
4. Disconnect Workbook before close
myxlBook.Close(True,’C:jitendraExcelTest1.xlsx’); //Saves the changes to mentioned file//
myxlBook.Disconnect;
FreeAndNil(myxlBook);
5. Add new Worksheet
myxlSheet11 := TExcelWorksheet.Create(myxlBook);
myxlSheet11.ConnectTo(myxlBook.ActiveSheet as _worksheet); //connecting with the default worksheet//
myxlSheet11.Name := ‘Class 11’;
6. Disconnect worksheet before close
myxlSheet11.Disconnect;
FreeAndNil(myxlSheet11);
7. Adding a new Worksheet to the Workbook
myxlBook.Worksheets.Add(EmptyParam, EmptyParam, EmptyParam, EmptyParam, LCID);
myxlSheet12 := TExcelWorksheet.Create(myxlBook);
myxlSheet12.ConnectTo(myxlBook.ActiveSheet as _worksheet);
myxlSheet12.Name := ‘Class 12’;
8. Access Sheets by Index or Name
(myxlApp.Worksheets[0] as _Worksheet).Activate(LCID);
Or
(myxlApp.Worksheets[‘Sheet1’] as _Worksheet).Activate(LCID);
9. Assign values to Cell by using Cell or Range property
myxlApp.Cells.Item[1,1] := ‘Value 1’; //with row, col number//
myxlApp.Range[‘A3′,’A3’].Value := ‘value 2’; //with cell from, to names//
myxlSheet11.Cells.Item[1,5] := ‘JITENDRA’; //with row, col number//
myxlSheet11.Range[‘E3′,’E3’].Value := ‘7834911261’; //with cell from, to names//
10. Change font format of an Excel Range
with myxlSheet11.Range[‘A1’, ‘B3’] do
begin
Font.Name := ‘Verdana’;
Font.Size := 15;
Font.Bold := True;
Font.Strikethrough := True;
Font.Color := clRed;
end;
11. Change Background Color of cells
with myxlSheet11.Range[‘A1’, ‘A1’].Interior.Color := clYellow;
myxlSheet11.Range[‘A5’, ‘D7’].Merge(False);// merge cells and fill color in merged cells//
myxlSheet11.Range[‘A5’, ‘D7’].Interior.Color := clRed;
12. Merge Cells in a range
myxlSheet11.Range[‘A5’, ‘D7’].Merge(False); //False by default if True it would merge cells row by row//
myxlSheet11.Range[‘A5’, ‘D7’].Value := ‘Merged data’;
13. Change Column width and Row height
myxlSheet11.Range[‘B5’, ‘B5’].ColumnWidth := 5; //single column B//
myxlSheet11.Range[‘J5’, ‘L8’].ColumnWidth := 15; //multiple column J,K,L//
myxlSheet11.Range[‘B5’, ‘B5’].RowHeight := 50; //single row 5//
myxlSheet11.Range[‘J10’, ‘J15’].RowHeight := 50; //multiple row 10-15//
14. Open the workbook that already exists:
myxlApp.Workbooks.Open ( ‘C:jitendraExcelTest1.xlsx’
EmptyParam , EmptyParam , EmptyParam , EmptyParam ,
EmptyParam , EmptyParam , EmptyParam , EmptyParam ,
EmptyParam , EmptyParam , EmptyParam , EmptyParam , 0 );
15. Copy and Paste Data from one cell to another in same sheet…
a.
myxlSheet11.UsedRange[LCID].Copy(myxlSheet11.Range[‘J10’, ‘J10’]);
myxlSheet11.Range[‘A5’, ‘D7’].Copy(myxlSheet11.Range[‘J10’, ‘J10’]);
b.
myxlSheet11.UsedRange[LCID].Copy(EmptyParam);
myxlSheet11.Range[‘J10’, ‘J10’].PasteSpecial(xlPasteAll, xlPasteSpecialOperationNone, EmptyParam, EmptyParam);
myxlSheet11.Range[‘A5’, ‘D7’].Copy(EmptyParam);
myxlSheet11.Range[‘J10’, ‘J10’].PasteSpecial(xlPasteAll, xlPasteSpecialOperationNone, EmptyParam, EmptyParam);
16. Copy and Paste Data from one Sheet to another sheet.
a.
myxlSheet11.UsedRange[LCID].Copy(myxlSheet12.Range[‘J10’, ‘J10’]);
myxlSheet11.Range[‘A5’, ‘D7’].Copy(myxlSheet12.Range[‘J10’, ‘J10’]);
b.
myxlSheet11.UsedRange[LCID].Copy(EmptyParam);
myxlSheet12.Range[‘J10’, ‘J10’].PasteSpecial(xlPasteAll, xlPasteSpecialOperationNone,EmptyParam, EmptyParam);
myxlSheet11.Range[‘A5’, ‘D7’].Copy(EmptyParam);
myxlSheet12.Range[‘J10’, ‘J10’].PasteSpecial(xlPasteAll, xlPasteSpecialOperationNone,EmptyParam, EmptyParam);
17. Insert new columns before b1
myxlSheet11.Range[‘b1’, ‘b1’].Columns.Insert(xlShiftToRight); // we can use xlShiftToLeft//
18. Insert new rows above b2
myxlSheet11.Range[‘b2’, ‘b2’].Rows.Insert(xlShiftDown); // we can use xlShiftUp//
19. Clear a Selected Range Content or Format
myxlSheet11.Range[‘b3’, ‘b10’].ClearContents;
myxlSheet11.Range[‘b3’, ‘b10’].ClearFormats;
20.Save, Save as a Sheet / Workbook
myxlSheet11.SaveAs(‘Filename’);
myxlBook.Save;
21. Print Preview / Print of a Sheet / Workbook
myxlSheet11.PrintPreview;
myxlSheet11.PrintOut;
myxlBook.PrintPreview;
myxlBook.PrintOut;
22. Set Sheet PageSetup
myxlSheet11.PageSetup.
A. header:
myxlSheet11.PageSetup.CenterHeader := » The report shows » ;
B. footer:
myxlSheet11.PageSetup.CenterFooter := » The & P » ;
The C. header into the top margin 2cm:
myxlSheet11.PageSetup.HeaderMargin := 2 / 0.035 ;
D. footer bottom margin 3cm:
myxlSheet11.PageSetup.HeaderMargin := 3 / 0.035 ;
E. top margin 2cm:
myxlSheet11.PageSetup.TopMargin := 2 / 0.035 ;
The bottom edge of the f. from the 2cm:
myxlSheet11.PageSetup.BottomMargin := 2 / 0.035 ;
G. left 2cm:
myxlSheet11.PageSetup.LeftMargin := 2 / 0.035 ;
On the right side of the H. from the 2cm:
myxlSheet11.PageSetup.RightMargin := 2 / 0.035 ;
I. pages horizontally:
myxlSheet11.PageSetup.CenterHorizontally := 2 / 0.035 ;
The J. page vertically:
myxlSheet11.PageSetup.CenterVertically := 2 / 0.035 ;
K. print cell line:
myxlSheet11.PageSetup.PrintGridLines := True ;
23. Auto Fill of Range. Fills value 1-10 in p1:p10
myxlSheet11.Range[‘p1’, ‘p1’].Value := 1;
myxlSheet11.Range[‘p2’, ‘p2’].Value := 2;
myxlSheet11.Range[‘p1’, ‘p1’].AutoFill(myxlSheet11.Range[‘p1’, ‘p10’], xlFillSeries);
Other fill options
xlFillCopy
xlFillDays
xlFillDefault
xlFillFormats
xlFillMonths
xlFillSeries
xlFillValues
xlFillWeekdays
xlFillYears
xlGrowthTrend
xlLinearTrend
24. Change Border style of cells in a range
myxlSheet11.Range[‘p3’, ‘p4’].Borders.Color := clRed;
myxlSheet11.Range[‘p3’, ‘p4’].Borders.LineStyle := xlDouble;
myxlSheet11.Range[‘p3’, ‘p4’].Borders.Item[xlEdgeLeft].Color := clBlue;
myxlSheet11.Range[‘p3’, ‘p4’].Borders.Item[xlEdgeRight].Color := clBlue;
Other line styles.
xlContinuous
xlDash
xlDashDot
xlDashDotDot
xlDot
xlDouble
xlSlantDashDot
xlLineStyleNone
25. Fill pattern style of cells in a range
myxlSheet11.Range[‘p3’, ‘p4’].Interior.Pattern := xlPatternCrissCross;
myxlSheet11.Range[‘p3’, ‘p4’].Interior.PatternColor := clBlue;
Other pattern styles
xlPatternAutomatic
xlPatternChecker
xlPatternCrissCross
xlPatternDown
xlPatternGray16
xlPatternGray25
xlPatternGray50
xlPatternGray75
xlPatternGray8
xlPatternGrid
xlPatternHorizontal
xlPatternLightDown
xlPatternLightHorizontal
xlPatternLightUp
xlPatternLightVertical
xlPatternNone
xlPatternSemiGray75
xlPatternSolid
xlPatternUp
xlPatternVertical
26. Add calculation function SUM/AVG/MAX/COUNT etc..
myxlSheet11.Range[‘k1’, ‘k1’].Formula := ‘=Sum(p3:p8)’;
myxlSheet11.Range[‘k3’, ‘k3’].Formula := ‘=Avg(p3:p8)’;
myxlSheet11.Range[‘k5’, ‘k5’].Formula := ‘=Max(p3:p8)’;
myxlSheet11.Range[‘k7’, ‘k7’].Formula := ‘=Count(p3:p8)’;
Автор: ООО «РИЛИО»
Прилагается исходный код компонента ExcelView и процедуры экспорта и печати по шаблону в Excel для Delphi 2010/XE/XE2. Доступна полная версия с примерами использования.
Зачем это нужно?
Excel в современном офисе фактически стал стандартом для ввода и анализа данных, создания итоговых отчетов и презентаций. В первую очередь, благодаря наглядности подхода и простоте освоения. Создать «табличку» с нужными автоматическими расчетами, добавить промежуточные итоги по нескольким критериям и построить по этим итогам круговую диаграмму — все это можно сделать без специальной подготовки, легко и непринужденно.
Поэтому вполне закономерно, что Excel широко используется и для разработки различных печатных форм. Хотя по своим возможностям он уступает специализированным генераторам отчетов, уже практически для всех типовых документов можно найти готовые Excel-шаблоны, от коммерческого предложения до товарно-транспортной накладной по форме 1-Т (http://blanker.ru/doc/38)
Что и как экспортировать?
Предполагается, что нам нужно заполнять предварительно созданные шаблоны Excel. Под шаблонами подразумеваются обычные Excel-файлы, в которых отдельные ячейки и области обозначаются именами переменных. Туда и будут вставляться наши данные.
В шаблоне могут использоваться в качестве переменных:
- все published свойства формы-владельца
- все компоненты, принадлежащие форме-владельцу, и их published свойства
- все наборы данных (наследники TDataSet) обрабатываются специальным образом, в шаблон подставляются значения их полей
Готовые решения на основе шаблонов
Компоненты для вывода в Excel довольно легко найти в интернете, например:
- TMS Flexcel Studio (http://www.tmssoftware.com/site/flexcel.asp) — $125
- ARExcelReport (http://www.vector-ski.com/reports/arexcelreport_index.htm) — бесплатный для некоммечерского использования, стоимость исходников — $125
- Don Excel Report (http://www.don-soft.com.ar/DonExcelReport/products.php) — $75
- AfalinaSoft XL Report (http://www.afalinasoft.com/download-xl-report.html) — «будет open source через месяц-два», — написано в 2003 году. Увы…
- FlexCelReport (http://www.freewebs.com/flexcel/) — бесплатный, в исходниках. Для Delphi 5/6/7. Сайт в настоящее время недоступен. При пересборке пакетов под Delphi 2010-XE2 необходимо вносить серьезные изменения.
Do It Yourself
Библиотеки компонентов всем хороши (кроме стоимости, конечно), но даже наличие исходных текстов не всегда спасает от возможных неприятностей. Проблема в том, что кода становится слишком много. Например, один из лучших (на мой взгляд) — FlexCelReport — это 916 Кб в 174 исходных файлах. Переносить этот проект на современные версии Delphi становится проблематично.
В таких случаях остается вариант написания процедуры или компонента самостоятельно. В качестве стартовой точки для ознакомления можно рекомендовать http://www.webdelphi.ru/2009/08/rabota-s-excel-v-delphi-osnovy-osnov/, http://www.codenet.ru/progr/delphi/stat/export-to-excel.php и т.д.
Таблицы и поля в шаблонах
У всех компонентостроителей — свои правила записи переменных в шаблонах. В FlexCelReport — это именованные диапазоны с двумя подчеркиваниями «__MAIN__» и переменные в ячейках вида ##DataSetName##FieldName, в ARExcelReport — <#table:DataSetName> … <#table> и т.д.
Мы хотим еще проще. Только FieldName и ничего лишнего.
А где задается DataSet?
В первой колонке. Отведем всю колонку под служебную информацию, благо в Экселе их (колонок) и так более чем достаточно. При выводе будем эту колонку скрывать.
Еще одно допущение — если мы хотим вывести все записи из DataSet-а в виде таблицы, ставим перед его именем звездочку (*tblOrders). Без звездочки будут выводиться только значения полей текущей записи.
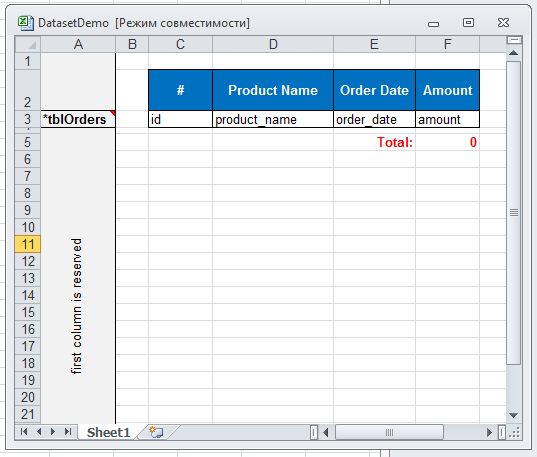
Свойства и компоненты в шаблонах
Для вывода в шаблоне published свойства текущей формы запишем в ячейке имя этого свойства в квадратных скобках: [Caption], [Tag]. Свойства компонентов формы записываются с именем компонента через точку: [Memo1.Lines]. Поддерживаются (пока) свойства следующих типов: Integer, Int64, String, Double, Boolean, TStrings.
Реализация
Весь код находится в файле ExcelView.pas (7 Кб). Компонент TExcelView имеет единственное published свойство TemplateFileName — это имя файла шаблона. Метод Show открывает Excel и запускает процесс экспорта.
Можно и не устанавливать компонент в палитру, а сразу выполнить процедуру
Код:
procedure ShowExcelView(Owner: TComponent; FileName: TFileName);
Обратите внимание на параметр Owner! Это тот компонент (форма, датамодуль), чьи свойства, компоненты, датасеты и будут экспортироваться в Excel.
Взаимодействие с Excel происходит через OLE:
Код:
Excel := CreateOleObject(‘Excel.Application’);
Для вывода набора данных сначала формируется вариантный массив:
Код:
ArrayData := VarArrayCreate([1, DataSet.RecordCount, 1, FieldList.Count], varVariant);
y := 1;
while not DataSet.Eof do
begin
z := 1;
for i := 0 to FieldList.Count—1 do begin
if FieldList[i]=» then ArrayData[y, z] :=»
else begin
if DataSet.FieldByName(FieldList[i]).DataType=ftFloat then
ArrayData[y, z] := DataSet.FieldByName(FieldList[i]).AsFloat
else ArrayData[y, z] := DataSet.FieldByName(FieldList[i]).Value;
end;
inc(z);
end;
DataSet.Next;
inc(y);
end;
А потом уже вставляется в нужное место:
Код:
Range.Value := ArrayData;
Для вывода свойств используется модуль Rtti:
Код:
c := TRttiContext.Create;
t:=c.GetType(cmp.ClassInfo);
p:=t.GetProperty(PropName);
if p <> nil then begin
IsNumeric:=false;
if p.PropertyType.ToString = ‘TStrings’ then PropValue:=p.GetValue(cmp).AsType.Text
else if p.PropertyType.ToString = ‘Boolean’ then PropValue:=BoolToStr(p.GetValue(cmp).AsBoolean,true)
else
case p.PropertyType.TypeKind of
tkInteger,
tkInt64 : begin
PropValue := IntToStr(p.GetValue(cmp).AsInteger);
IsNumeric:=true;
end;
tkString,
tkUString,
tkLString : PropValue := p.GetValue(cmp).AsString;
tkFloat : begin
PropValue := FloatToStr(p.GetValue(cmp).AsExtended);
IsNumeric:=true;
end;
else PropValue := »;
end;
if IsNumeric and (Trim(Copy(st,1,i1—1))=») and (Trim(Copy(st,i2+1,length(st)))=») then
Sheet.Cells[Row, Col]:=StrToFloat(PropValue)
else Sheet.Cells[Row, Col]:=Copy(st,1,i1—1)+PropValue+Copy(st,i2+1,length(st));
end;
c.Free;
Из за использования модулей Rtti и TypInfo компонент не работает в Delphi младше 2010. Можно либо удалить эти ссылки и весь метод ProcessProperty, либо переписать его для младших версий Delphi (см. http://delphi7.org/lit/faq/1618.php)
Исходный код
Код:
//////////////////////////////////////////////////////////////
// ExcelView v 0.1 //
// Freeware component for Delphi 2010/XE/XE2 //
// //
// Copyright (c) 2012 RILIO (http://rilio.net) //
// //
// Software distributed on an «AS IS» basis, //
// WITHOUT WARRANTY OF ANY KIND, either express or implied. //
// //
//////////////////////////////////////////////////////////////
unit ExcelView;
interface
uses
SysUtils, Classes, DB;
type
TExcelView = class(TComponent)
private
FTemplateFileName: TFileName;
procedure SetTemplateFileName(const Value: TFileName);
procedure ProcessSheet(Sheet: Variant);
procedure ProcessDataSet(Sheet: Variant; Row: integer);
procedure ProcessMultipleRecords(Sheet: Variant; Row: integer; DataSet: TDataSet);
procedure ProcessProperty(Sheet: Variant; Row: integer; Col: integer);
protected
public
procedure Show;
published
property TemplateFileName: TFileName read FTemplateFileName write SetTemplateFileName;
end;
procedure ShowExcelView(Owner: TComponent; FileName: TFileName);
procedure Register;
implementation
uses Variants, ActiveX, ComObj, Rtti, TypInfo;
procedure ShowExcelView(Owner: TComponent; FileName: TFileName);
begin
with TExcelView.Create(Owner) do begin
TemplateFileName:=FileName;
Show;
Free;
end;
end;
function IsExcelInstalled: boolean;
var
ClassID: TCLSID;
begin
Result := CLSIDFromProgID(PWideChar(WideString(‘Excel.Application’)), ClassID) = S_OK;
end;
procedure Register;
begin
RegisterComponents(‘RILIO’, [TExcelView]);
end;
{ TExcelView }
procedure TExcelView.ProcessDataSet(Sheet: Variant; Row: integer);
var DataSetName: string;
MultipleRecords: boolean;
DataSet: TDataSet;
i: integer;
FieldName: string;
begin
DataSetName:=Sheet.Cells[Row,1];
MultipleRecords:=DataSetName[1]=‘*’;
if MultipleRecords then
DataSetName:=Copy(DataSetName,2,length(DataSetName));
DataSet:=TDataSet(Owner.FindComponent(DataSetName));
if DataSet <> nil then
if MultipleRecords and (DataSet.RecordCount > 1) then ProcessMultipleRecords(Sheet,Row,DataSet) else
for i := 2 to Sheet.UsedRange.Columns.Count do begin
FieldName:=string(Sheet.Cells[Row,i]);
if DataSet.FindField(FieldName) <> nil then begin
if DataSet.FieldByName(FieldName).DataType=ftFloat then
Sheet.Cells[Row,i]:=DataSet.FieldByName(FieldName).AsFloat
else Sheet.Cells[Row,i]:=DataSet.FieldByName(FieldName).AsString;
end;
end;
end;
procedure TExcelView.ProcessMultipleRecords(Sheet: Variant; Row: integer; DataSet: TDataSet);
var i,z,y: integer;
ArrayData : Variant;
FieldName: string;
FieldList: TStringList;
StartCol: integer;
Cell1,Cell2,Cell3,Range,RowRange: OleVariant;
begin
StartCol:=0;
FieldList:=TStringList.Create;
for i:=2 to Sheet.UsedRange.Columns.Count do begin
FieldName:=string(Sheet.Cells[Row,i]);
if DataSet.FindField(FieldName) <> nil then begin
FieldList.Add(FieldName);
if StartCol=0 then StartCol:=i;
end else if StartCol <> 0 then FieldList.Add(»);
end;
FieldList.Text:=Trim(FieldList.Text);
DataSet.Last;
DataSet.First;
ArrayData := VarArrayCreate([1, DataSet.RecordCount, 1, FieldList.Count], varVariant);
y := 1;
while not DataSet.Eof do
begin
z := 1;
for i := 0 to FieldList.Count—1 do begin
if FieldList[i]=» then ArrayData[y, z] :=»
else begin
if DataSet.FieldByName(FieldList[i]).DataType=ftFloat then
ArrayData[y, z] := DataSet.FieldByName(FieldList[i]).AsFloat
else ArrayData[y, z] := DataSet.FieldByName(FieldList[i]).Value;
end;
inc(z);
end;
DataSet.Next;
inc(y);
end;
for i := 1 to DataSet.RecordCount—1 do
Sheet.Rows[Row+1].Insert;
Cell1 := Sheet.Cells[Row, StartCol];
Cell2 := Sheet.Cells[Row, StartCol + FieldList.Count—1];
Cell3 := Sheet.Cells[Row + DataSet.RecordCount—1, StartCol + FieldList.Count—1];
RowRange := Sheet.Range[Cell1, Cell2];
Range := Sheet.Range[Cell1, Cell3];
if DataSet.RecordCount=0 then RowRange.Value:=» else begin
RowRange.AutoFill(Range, 3);
Range.WrapText:= True;
Range.VerticalAlignment := 1;
Range.Value := ArrayData;
end;
FieldList.Free;
end;
procedure TExcelView.ProcessProperty(Sheet: Variant; Row, Col: integer);
var st, PropName, PropValue: string;
i1, i2, dotpos: integer;
cmp: TComponent;
c : TRttiContext;
t : TRttiType;
p : TRttiProperty;
IsNumeric: boolean;
begin
st:=string(Sheet.Cells[Row, Col]);
i1:=Pos(‘[‘,st);
i2:=Pos(‘]’,st);
PropName:=Copy(st,i1+1,i2—i1—1);
dotpos:=Pos(‘.’,PropName);
if dotpos <> 0 then begin
cmp:=Owner.FindComponent(Copy(PropName,1,dotpos—1));
PropName:=Copy(PropName,dotpos+1,length(PropName));
end else cmp:=Owner;
if cmp <> nil then begin
c := TRttiContext.Create;
t:=c.GetType(cmp.ClassInfo);
p:=t.GetProperty(PropName);
if p <> nil then begin
IsNumeric:=false;
if p.PropertyType.ToString = ‘TStrings’ then PropValue:=p.GetValue(cmp).AsType<TStrings>.Text
else if p.PropertyType.ToString = ‘Boolean’ then PropValue:=BoolToStr(p.GetValue(cmp).AsBoolean,true)
else
case p.PropertyType.TypeKind of
tkInteger,
tkInt64 : begin
PropValue := IntToStr(p.GetValue(cmp).AsInteger);
IsNumeric:=true;
end;
tkString,
tkUString,
tkLString : PropValue := p.GetValue(cmp).AsString;
tkFloat : begin
PropValue := FloatToStr(p.GetValue(cmp).AsExtended);
IsNumeric:=true;
end;
else PropValue := »;
end;
if IsNumeric and (Trim(Copy(st,1,i1—1))=») and (Trim(Copy(st,i2+1,length(st)))=») then
Sheet.Cells[Row, Col]:=StrToFloat(PropValue)
else Sheet.Cells[Row, Col]:=Copy(st,1,i1—1)+PropValue+Copy(st,i2+1,length(st));
end;
c.Free;
end;
end;
procedure TExcelView.ProcessSheet(Sheet: Variant);
var
i,j,Cols,Rows: integer;
begin
Sheet.Activate;
Rows:=Sheet.UsedRange.Rows.Count;
Cols:=Sheet.UsedRange.Columns.Count;
for i := 1 to Rows+1 do begin
for j := 1 to Cols+1 do
if Pos(‘[‘,string(Sheet.Cells[i,j])) <> 0 then
ProcessProperty(Sheet,i,j);
end;
for i := 1 to Rows+1 do begin
if string(Sheet.Cells[i,1]) <> » then
ProcessDataSet(Sheet,i);
end;
Sheet.Columns[1].Hidden:=true;
end;
procedure TExcelView.SetTemplateFileName(const Value: TFileName);
begin
FTemplateFileName := Value;
end;
procedure TExcelView.Show;
var
Excel, Book, Sheet, ArrayData : Variant;
i: integer;
ClassID: TCLSID;
begin
if not FileExists(TemplateFileName) then raise Exception.Create(‘Template file «‘+TemplateFileName+‘» not found’);
if CLSIDFromProgID(PWideChar(WideString(‘Excel.Application’)), ClassID) <> S_OK then raise Exception.Create(‘MS Excel application not found’);
try
Excel := CreateOleObject(‘Excel.Application’);
Excel.EnableEvents := False;
Excel.Visible:=false;
Book := Excel.Workbooks.Add(TemplateFileName);
for i := 1 to Book.Sheets.Count do
ProcessSheet(Book.Sheets.Item[i]);
Book.Sheets.Item[1].Activate;
finally
Excel.EnableEvents := true;
Excel.Visible:=true;
Excel.Visible:=false;
Excel.Visible:=true;
end;
end;
end.
This step-by-step guide describes how to connect to Microsoft Excel, retrieve sheet data, and enable editing of the data using the DBGrid. You’ll also find a list of the most common errors that might appear in the process, plus how to deal with them.
What’s Covered Below:
- Methods for transferring data between Excel and Delphi. How to connect to Excel with ADO (ActiveX Data Objects) and Delphi.
- Creating an Excel spreadsheet editor using Delphi and ADO
- Retrieving the data from Excel. How to reference a table (or range) in an Excel workbook.
- A discussion on Excel field (column) types
- How to modify Excel sheets: edit, add and delete rows.
- Transferring data from a Delphi application to Excel. How to create a worksheet and fill it with custom data from an MS Access database.
How to Connect to Microsoft Excel
Microsoft Excel is a powerful spreadsheet calculator and data analysis tool. Since rows and columns of an Excel worksheet closely relate to the rows and columns of a database table, many developers find it appropriate to transport their data into an Excel workbook for analysis purposes; and retrieve data back to the application afterwards.
The most commonly used approach to data exchange between your application and Excel is Automation. Automation provides a way to read Excel data using the Excel Object Model to dive into the worksheet, extract its data, and display it inside a grid-like component, namely DBGrid or StringGrid.
Automation gives you the greatest flexibility for locating the data in the workbook as well as the ability to format the worksheet and make various settings at run time.
To transfer your data to and from Excel without Automation, you can use other methods such as:
- Write data into a comma-delimited text file, and let Excel parse the file into cells
- Transfer data using DDE (Dynamic Data Exchange)
- Transfer your data to and from a worksheet using ADO
Data Transfer Using ADO
Since Excel is JET OLE DB compliant, you can connect to it with Delphi using ADO (dbGO or AdoExpress) and then retrieve the worksheet’s data into an ADO dataset by issuing an SQL query (just like you would open a dataset against any database table).
In this way, all the methods and features of the ADODataset object are available to process the Excel data. In other words, using the ADO components let you build an application that can use an Excel workbook as the database. Another important fact is that Excel is an out-of-process ActiveX server. ADO runs in-process and saves the overhead of costly out-of-process calls.
When you connect to Excel using ADO, you can only exchange raw data to and from a workbook. An ADO connection cannot be used for sheet formatting or implementing formulas to cells. However, if you transfer your data to a worksheet that is pre-formatted, the format is maintained. After the data is inserted from your application to Excel, you can carry out any conditional formatting using a (pre-recorded) macro in the worksheet.
You can connect to Excel using ADO with the two OLE DB Providers that are a part of MDAC: Microsoft Jet OLE DB Provider or Microsoft OLE DB Provider for ODBC Drivers. We’ll focus on Jet OLE DB Provider, which can be used to access data in Excel workbooks through installable Indexed Sequential Access Method (ISAM) drivers.
Tip: See the Beginners Course to Delphi ADO Database Programming if you’re new to ADO.
The ConnectionString Magic
The ConnectionString property tells ADO how to connect to the datasource. The value used for ConnectionString consists of one or more arguments ADO uses to establish the connection.
In Delphi, the TADOConnection component encapsulates the ADO connection object; it can be shared by multiple ADO dataset (TADOTable, TADOQuery, etc.) components through their Connection properties.
In order to connect to Excel, a valid connection string involves only two additional pieces of information — the full path to the workbook and the Excel file version.
A legitimate connection string could look like this:
ConnectionString := 'Provider=Microsoft.Jet.OLEDB.4.0;Data Source=C:MyWorkBooksmyDataBook.xls;Extended Properties=Excel 8.0;';
When connecting to an external database format supported by the Jet, the extended properties for the connection needs to be set. In our case, when connecting to an Excel «database,» extended properties are used to set the Excel file version.
For an Excel95 workbook, this value is «Excel 5.0» (without the quotes); use «Excel 8.0» for Excel 97, Excel 2000, Excel 2002, and ExcelXP.
Important: You must use the Jet 4.0 Provider since Jet 3.5 does not support the ISAM drivers. If you set the Jet Provider to version 3.5, you’ll receive the «Couldn’t find installable ISAM» error.
Another Jet extended property is «HDR=». «HDR=Yes» means that there is a header row in the range, so the Jet will not include the first row of the selection into the dataset. If «HDR=No» is specified, then the provider will include the first row of the range (or named range) into the dataset.
The first row in a range is considered to be the header row by default («HDR=Yes»). Therefore, if you have column heading, you do not need to specify this value. If you do not have column headings, you need to specify «HDR=No».
Now that you’re all set, this is the part where things become interesting since we’re now ready for some code. Let’s see how to create a simple Excel Spreadsheet editor using Delphi and ADO.
Note: You should proceed even if you lack knowledge on ADO and Jet programming. As you’ll see, editing an Excel workbook is as simple as editing data from any standard database.
- DB-Aware Components
- Direct DB Access
- MS Excel
RAD Studio & TMS Software v Městské knihovně v Praze
Dovolujeme si Vás srdečně pozvat na živá vystoupení Stephena Balla, Antonia Zapatera a Bruno Fierense, které se bude konat v sále Městské knihovny v Praze. Naším cílem je podělit se s Vámi o novinky a náměty, jak si usnadnit a urychlit každodenní práci a s čím vším Vám mohou pomoci komponenty od společnosti TMS Software.
Termín: 20.4.2023 od 9:00
Seminář je zdarma, v anglické jazyce a českém simultánním překladu. Klikněte na tlačítko pro další info a registraci!

CyExcel v.0.1
By AllyData.
Freeware + source 27 Jan 2003
Description
CyExcel is Multi-Page Excel component.
Informations
- Status: Fully functional
- Source: Included
- Size: 308kB
Platforms: D6
DataSet to Excel v.1.4
By Rafa.
Shareware 08 Apr 2002
Description
This component allows send data from Dataset to Excel sheet and formatting it.
Allows to create formula references data in Excel sheet. Allows to create charts references data in Excel sheet.
And more…
Informations
- Status: With Nag-Screen
- Source: N/A
- Size: 698kB
Platforms: D5
NativeExcel Suite v.3.1.0
Description
NativeExcel is a high-performance solution for Delphi Developers that allows writing of new Excel spreadsheets and reading of existing ones. NativeExcel does not require installed Microsoft Office, it writes and reads excel files directly. NativeExcel can be used as the replacement of standard Excel components, it has the same object model, properties and methods.
With NativeExcel you can open and modify an existing spreadsheet.
Advantages:
- High performance (30000-40000 values per second)
- Convenient object model
- Support for all Excel formatting options
- Microsoft Office is not required
- Compatibility with standard Delphi’s Excel components
- TDataset2Excel component. Populates a spreadsheet from TDataset descendants
- TDBGrid2Excel component. Populates a spreadsheet from TDBGrid descendants
Features:
- Open an existing excel file
- Access any cell values (number, string, date, formula)
- Calculation engine to perform computation on the cells
- Cell attributes (alignment, orientation, comments, borders, background attributes, and so on)
- Font attributes (font name, font size, color, decoration, and so on)
- Merged cells
- Images
- It preserves existing charts
- Unicode characters support
- Copy/Move/Delete/Insert range of cells
- Group/Ungroup rows and columns
- Worksheet attributes (name, protection, selection, and so on)
- Printing attributes (page size, orientation, margins, footer, header, page breaks, and so on)
- Exporting workbooks and worksheets to HTML, RTF, CSV, TSV files.
Informations
- Status: Trial (work while IDE is running)
- Source: On purchase/registration
- price: $80
- Size: 11 247kB
Platforms: D2005, D2006, D2007, D2009, D2010, D4, D5, D6, D7, DXE, DXE2, DXE3, DXE4
TAdvExcel v.3.0
By Econos.
Freeware + source 25 Sep 1998
Description
T(Adv)Excel is the Excel 4/5/7/8 DDE driver + data transfer component. Orders of magnitude faster than OLE automation or any other known mechanism.
Online help and code for extremely high data transfer rates (1000+ items in less than 25 milli seconds on a PII) are available.
Informations
- Status: Fully functional
- Source: Included
- Size: 303kB
Platforms: CB1, CB3, D1, D2, D3, D4
TExcel v.3.3
Description
TExcel is a component to produce output tables directly into MS Excel, including formatting, commands, macro calls, etc. Demo project is attached to show how easy to drive it.
Informations
- Status: Fully functional
- Source: Included
- Size: 21kB
Platforms: D1, D2, D3
TExcelDSNCreator v.1.10
Description
This Delphi component can be used to add/ remove/ configure Microsoft Excel Datasource Names (DSNs) on the fly, using just one line of code.
Informations
- Status: With Nag-Screen
- Source: On purchase/registration
- price: $29.99
- Source price: $49.99
- Size: 120kB
Platforms: D4, D5, D6
TGWGExporterXL
By wegi.
Freeware + source 09 Aug 2006
Description
This is a very fast component to «live» send export data from TDataSource or TDBGrid or TDataSet to MsExcel. 39000 rows x 43 fields abot 10sec. Possible export selected fields, constans, renamed fields, save to file. MsExcel required. Very fast and usefull. Full source code.
Simple checker (demo) of component added.
Informations
- Status: Fully functional
- Source: Included
- Size: 33kB
Platforms: D6, D7
TmxNativeExcel v.1.25
Description
You can create Excel BIFF files ( v2.1, v3, v4, v5 ). Its code 100% Native, so you do not need to have installed Office, OCX or other tools.
This component supports:
- Fonts
- Headers and Footers
- Label, Integer, Double, Boolean, BoolErr fields
- Alignment settings
- Borders
- Shading
- Sheet and cell protection.
Informations
- Status: Fully functional
- Source: Included
- Size: 289kB
Platforms: D2005, D2006, D2007, D2009, D5, D6, D7
TXlsFile v.1.01
Description
TXlsFile component produces a very old Excel file format (2.0) so any Excel version can open it.
Demo exe shows most of its features (put data into cells with alignment, set colums width, create XLS file, open Excel).
Informations
- Status: Fully functional
- Source: Included
- Size: 351kB
Platforms: D2005, D2006, D6, D7
TXLSFile v.4.00
Description
TXLSFile is a Delphi library for reading and writing of Microsoft Excel XLS files.
It is based on direct reading and writing of files, and works without OLE Automation with Microsoft Excel.
- Reading and writing speed is about 75 000 cells per second.
- TXLSFile supports MS Excel 97, 2000, XP, 2003 format (BIFF8).
- XLS files produced by TXLSFile may be opened in OpenOffice.
- TXLSFile is distributed as Borland Delphi source code which is compatible with Borland Delphi 3-2007.
- Contains functions for export of Excel data to HTML, TXT.
- Contains XLSExport components for quick export of TDBGrid, TDataSource, TStringGrid components to Excel file.
Informations
- Status: Trial (work while IDE is running)
- Source: On purchase/registration
- price: $85
- Size: 633kB
Platforms: D2009, D2010, DXE, DXE2, DXE3, DXE5, D2005, D2006, D2007, D3, D4, D5, D6, D7
XLSFile v.1.0
Description
Write directly to simple XLS file format (BIFF5). It fast because it doesn’t need OLE, DDE, or event MS-Excel. XLSfile can be used for write raw data, and OLE/DDE to format it.
Informations
- Status: Fully functional
- Source: Included
- Exe demo: included
- Size: 127kB
Platforms: D3
XLSMini v.1.00.08
Description
XLSMini is a mini version of XLSReadWriteII. With XLSMini you can read and write cell values, including formulas. The basic concept is the same as in XLSReadWriteII, but access is limited to cell values. When you edit an Excel file with XLSMini, all other data remains unchanged, except changed cells.
Informations
- Status: With Nag-Screen
- Source: On purchase/registration
- price: $99
- Size: 1 039kB
Platforms: C2k6, D2006, CB5, CB6, C2k7, D2007, D2005, D5, D6, D7
XLSReadWriteII v.6
Description
High performance component for easy access to Excel XLS and XLSX files.<
- Native access to Excel files. The user does not need to have Excel, or any other software installed.
- XLSReadWriteII uses it’s own memory manager that is optimized for storing cell values. This means that you can work with larger files. If your files still not will fit in memory, there is a Direct Read and Direct Write modes that let you process files on disc.
- Stability. One of the major goals with XLSReadWriteII was to create a product that won’t corrupt the Excel files and won’t alter any data in the file. The engine that handles XLSX files is automatically built directly from the file format specifications with our special developed tool. This will ensure maximum compatibility.
- No runtime fees for the component.
- Full source code included.
Key features:
- Read and write any cell value…
Numeric, string, boolean and error cells.
Cells are accessed in the same way as the TStringGrid that comes with Delphi, or by giving the cell as a string, like: ‘D7’.
Read cell values as a string formatted according to the rules of the cell.
- Performance:
XLSReadWriteII is designed with optimal performance in mind. As Excel 2007+ files permits up to 16,000 x 1,000,000 cells, performance is important.
Read and write speed of Excel 2007+ files at least twice as fast as Excel. As these files are compressed XML files both decompressor and XML parser must be fast.
XLSReadWriteII uses it’s own memory manager. Memory usage shall not be more than half of what Excel uses, and most times it’s much less than that.
Due to the fact that pre Excel 2007 files are binary file, these files are read and written much faster.
- Calculation:
Fast calculation engine with support for all standard Excel formulas.
The calculation engine will calculate dependent cells, if there are any.
- You can also work with:
Charts, Pivot tables, Encrypt, Import, Export and much more.
Informations
- Status: With Nag-Screen
- Source: Included
- price: $315
- Size: 7 488kB
Platforms: C2k6, D2006, C2k7, D2007, C2k9, D2009, C2k10, D2010, D6, D7, C10, D10, C10.1, D10.1, C10.2, D10.2, CBXE, DXE, CBXE2, DXE64, CBXE3, DXE3, CBXE4, DXE4, CBXE5, DXE5, CBXE6, DXE6, CBXE7, DXE7, CBXE8, DXE8
XLSReadWriteII v.5.20.00
Description
XLSReadWriteII is a component for reading and writing Excel files. XLSReadWriteII is a native Delphi component; you don’t need any other files or software in order to use it. Not even Excel. XLSReadWriteII works as an invisible grid component. All cells are always accessible, and can also be moved, deleted or copied.
One of the major goals was to create a product that don’t corrupts the Excel files and don’t alter any data in the file. With XLSReadWriteII, you can always be sure that your Excel files can be read by Excel after you have edited them, and no data has been unexpected removed.
Here are some of the advantages that you will have with XLSReadWriteII:
- Read, write and modify any Excel file.
- Read and write any cell values. Cells with multiple fonts formatting (Rich text) can be read and written directly to/from RTF files.
- Full support for formulas. You can use the same functions as in Excel. Formulas with references to external workbooks are supported as well. You can even read the result from an external reference.
- Cells and whole worksheets can be calculated and the calculation engine will calculate dependent cells, if there are any.
- Easy cell formatting, where the format properties are accessible trough the cell object. Whole ranges of cells can also be formatted, so it is easy to put a border around an area of cells.
- XLSReadWriteII has full support for Unicode. As all strings are WideString, you will not have any problems with non-English characters.
- Cell notes and text boxes are supported.
- All printing options are accessible.
- Control objects, such as list boxes, combo boxes, buttons etc. can used.
- Support for all kinds of drawing objects.
- Charts can be created with the same options as in Excel.
- Named cells and areas can be used. When a named cell is created, it can easily be accessed trough it’s name.
- All types of hyperlinks are supported.
- Password protected (encrypted) files can be read and written.
- Read and write VBA macros. Macros can also be assigned to controls, pictures etc.
- Autofilters.
- You can also use: Cell validations, Conditional formats, Merged cells and more…
Several sample projects are included.
XLSReadWriteII is fast. Write 1,000,000 cells in less than a second.
The XLSReadWriteII package also include import methods for:
- Any TDataset database.
- Open Office Calc documents.
- CSV and other text files. Characters for field separator, decimal separator and text quote character are detected automatic.
- HTML tables (TABLE tag).
Data can be exported to:
- CSV text files.
- HTML files.
Informations
- Status: With Nag-Screen
- Source: On purchase/registration
- price: $433
- Exe demo: included
- Size: 6 913kB
Platforms: C2k6, D2006, C2k7, D2007, C2k9, D2009, C2k10, D2010, D5, D6, D7, CBXE, DXE, CBXE2, DXE2, CBXE3, DXE3, CBXE4, DXE4, CBXE5, DXE5, CBXE6, DXE6, CBXE7, DXE7, CBXE8, DXE8
XLSSpreadSheet v.2.00.00
Description
XLSSpreadSheet is a native Delphi component for viewing Microsoft Excel files. With XLSSpreadSheet, you can see Excel files just as they looks in Excel itself. The component don’t need any other software or libraries to be installed.
XLSSpreadSheet works togheter with XLSReadWriteII, wich also is included. XLSSpreadSheet is easy to use. If you are familiar with XLSReadWriteII, you allready have the knowledge that’s needed, as all control of the Excel data is trough the XLSReadWriteII object of XLSSpreadSheet.
The latest version of XLSReadWriteII is included when you purchase XLSSpreadSheet.
XLSSpreadSheet also comes with components for printing and print preview.
You should have XLSReadWriteII installed to try this component.
Informations
- Status: Trial (work while IDE is running)
- Source: On purchase/registration
- price: $640
- Size: 5 176kB
Platforms: C2k6, D2006, C2k7, D2007, C2k9, D2009, C2k10, D2010, D7, CBXE, DXE, CBXE2, DXE2, CBXE3, DXE3, CBXE4, DXE4, CBXE5, DXE5, CBXE6, DXE6, CBXE7, DXE7, CBXE8, DXE8